You can choose to work through EITHER the React topic OR the Vue topic for this module. You do NOT need to cover both topics, although you can choose to learn both frameworks if you wish. The mōhio (formative assessment) is the same in both topics, and you should only complete it once. The framework you select will impact group work for the summative assessment.
In this topic, we will cover:
- Getting started
- Vue CLI
- Main concepts
- Building a CRUD interface
- App router.
What is Vue?
‘Vue (pronounced /vjuː/, like view) is a JavaScript framework for building user interfaces. It builds on top of standard HTML, CSS and JavaScript, and provides a declarative and component-based programming model that helps you efficiently develop user interfaces, be it simple or complex.’ 56
‘The two core features of Vue are:
- Declarative Rendering: Vue extends standard HTML with a template syntax that allows us to declaratively describe HTML output based on JavaScript state.
- Reactivity: Vue automatically tracks JavaScript state changes and efficiently updates the DOM when changes happen.’56
Here is a simple example demonstrating declarative rendering and reactivity.
What can you use Vue for?
Vue is flexible and can be adopted incrementally. From simply enhancing static HTML without a build step, through to more complex frontend development.
How you choose to use Vue will vary depending on stack complexity, your experience, and desired end performance. Here are some ways you can use Vue.
- Standalone script – think of Vue as a declarative replacement of jQuery in this instance.
- Embedded web components – build standard web components with Vue which can then be embedded into any HTML page.
- Single-page applications (SPA) – build rich interactivity and non-trivial stateful logic on the frontend. Vue controls the entire page and handles data updates and navigation.
- Fullstack/Server-side-rendering (SSR) – Vue provides APIs to “render” a Vue app into HTML strings on the server. End users can see content immediately without waiting for JavaScript to be downloaded.
- JAMStack /Static-site-generation (SSG) – If the required data is static, server-side rendering can be done ahead of time. The entire application is pre-rendered into HTML and served as static files, improving site performance and simplifying deployment.
- Desktop and mobile apps – While Vue is primarily used for developing web applications, you can also build desktop and mobile apps.106
First, we will get comfortable using Vue in a standalone script before creating single-page applications using Vue CLI. Once you are confident using Vue to create single-page applications, you may choose to explore Fullstack/SSR and JAMStack/SSG independently.
Standalone script
Vue.js is small and practical, yet you can create complex things fast and easily. In fact, you can use it as you would a general-purpose library, like you would jQuery.
You can use Vue for specific components in a page such as:
- Advanced user interaction
- To keep track of a complex set of data input by the user (application state)
- To update data frequently from a web service
- To perform complex animations and to maintain state easily.
One approach is to use vanilla JavaScript to build simple things such as image carousels, and Vue.js for building sophisticated components with a lot of animation and data/state.
| Vanilla JavaScript | Vue.js |
|---|---|
|
|
By using Vue instead of vanilla JavaScript, you can have an isolated component. Like a web component, all the programming and logic is in the same *.vue file instead of across three separate HTML, CSS, and JavaScript files. This makes development easier and the code more reusable.
Component scaffolding is already in place with prebuilt hooks for major states in the component lifecycle. Properties and methods are in a separate namespace and isolated from the global context, and rendering speed is similar to a reactive library.
You can integrate Vue into an HTML page by either:
- Creating and adding individual components, or
- Activating Vue on a whole page (or all pages on site).86
Using Vue as you would jQuery
You can incorporate Vue into a project the same way you could incorporate jQuery. Take the following page structure:
All you need to do is change the script tag and refactor a few small bits of code. There is no need to rewrite the HTML in JavaScript, nor use webpack, and you do not have to do a build setup.
You can leave the markup as is and replace the tags.
Consider the common use case for capturing user input from a form as the user types. In jQuery, you would do this:
With Vue, the code simplifies to the following:
Test out the form. Write your name in the name field. This example shows that Vue is reactive. There is no delay. Content is updated as the user types.
‘You can also see that in the jQuery version, the DOM is in control – we’re fetching things out of the DOM, listening to it, and responding to it. This ties us to the way that the DOM is currently set up, and forces us to think about how to traverse it. If the structure of the HTML elements were to change, we’d have to adapt our code to correspond to those changes.
In the Vue version, we’re storing the state – we keep track of one property we want to update and change, and track the element we want to change using a directive. This means it’s attached directly to the HTML element we need to target. The structure of the DOM can change, the HTML can move around, and none of this would impact our performance or capturing these events. In our case, we’re using that v-model attribute on the input to connect to the data we’re storing in the JavaScript.’100
Create a converter
In the following example, we use Vue to create a temperature converter. Have a play with the converter. Can you edit the code to create a weight converter from ounces to grams?
Creating a Vue app
In our converter example, the script started with creating a new application instance. This application instance will not render anything until it is mounted onto an element. So, what does mounting an application instance mean?
Most Vue 3 apps start by using the .createApp() function to create a new application instance:
The object we are passing into createApp is a component. A "root component" is required. This root component can contain other components as its children.
In Vue, you can author in a single file encompassing HTML, CSS, and JavaScript. If you do this, the root component is typically imported from another file:
Sometimes an app may be organised in a nested tree of reusable components, such as a Todo application. But for now, we are going to focus on situations with only a single component.
To render an application instance, call its .mount() method. A “container” argument is expected, and this can either be a DOM element or selector string:
HTML:
JS:
‘The content of the app's root component will be rendered inside the container element. The container element itself is not considered part of the app.
The .mount() method should always be called after all app configurations and asset registrations are done.’
If you are using Vue without a build step, you can write the root component’s template directly inside the mount container:
HTML:
JS:
This is an example of an in-DOM root component template. The container's innerHTML will automatically be used as the template if the root component does not already have a template option.113
Options or composition API?
Vue components are either authored in Options API or Composition API style. Both styles are valid. So how do you know which style to adopt?
The styles are different interfaces, but they are powered by the same underlying system. The fundamental concepts and knowledge of Vue are shared across both styles.
Options API suits smaller implementations where Vue serves as an enhancement to a site, while Components API is better suited when Vue is fully adopted and controls the entire frontend of an application.
Compare the two styles.
Options API
The component’s logic is defined using an object of options. For example; data, methods, and mounted. ‘Properties defined by options are exposed on this inside functions, which points to the component instance.’ 56
Vue:
Composition API
The component’s logic is defined using imported API functions.
In *.vue files, composition API is used with <script setup>. ‘The setup attribute is a hint that makes Vue perform compile-time transforms that allow us to use Composition API with less boilerplate. For example, imports and top-level variables / functions declared in <script setup> are directly usable in the template.
Here is the same component, with the exact same template, but using Composition API and <script setup> instead.’ 56
Vue:
Quick start without a build step
Start by simply using Vue in an HTML file, without a build setup. Copy the script into an HTML file and open it in your browser.
HTML:
The global Vue variable exposes all APIs. You could also make use of the ref API.
JavaScript:
If you want to use Vue over native ES modules, you would use the following HTML.
HTML:
You can see in this example that the block <script type=”importmap”> allows you to directly import into your code from ‘vue’. Note that you should only use import-maps-based setup while learning, and not for using Vue without build tools in production.114
Quick start with build tools
Vue can be set up using just JavaScript and HTML, without tooling, and with components as simple objects. However, when more components are added, and projects get more complex, it is helpful to leverage the Vue community and use build tools. Vite and Vue CLI are examples of build tools.
- Vue CLI is built on webpack. Therefore, the development (dev) server, build functionality, and performance are dependent on webpack.
- Vite is not based on webpack. Instead, it has its own dev server utilising native ES modules in the browser. This means Vite’s dev server performs faster than Vue CLI’s. The build is faster in Vite too. Vite is framework agnostic – you can use it with any JavaScript framework or even vanilla JavaScript.115
Vue CLI has been the standard Vue build tool for many years, and has an active community. A lot of existing projects use Vue CLI, so it is worthwhile knowing. However, Vue CLI is now in maintenance mode and Vite has become the recommended tool.116
Vite means quick in French, and that is what it aims to be. It gives a faster and leaner development experience for modern web projects. There are 2 parts to Vite:
- A dev server providing rich feature enhancements over native ES modules, such as extremely fast Hot Module Replacement (HMR).
- A build command that bundles your code with Rollup, pre-configured to output highly optimised static assets for production.
Vite is opinionated and comes with practical defaults, but is also highly extensible via its Plugin API and JavaScript API.114
A build setup allows you to use single-file components, also known as SFC (*.vue files).
What are Single-File Components?
‘In most build-tool-enabled Vue projects, we author Vue components using an HTML-like file format called Single-File Component (also known as *.vue files, abbreviated as SFC).’ 56
Vue SFC is a single file, encompassing the component’s template (HTML), styles (CSS), and logic (JavaScript). It is the recommended way of authoring Vue components if you need a build setup.
Our earlier count-button example would be written in SFC format as follows. 56
Vue:
To break it down simply, HTML looks like this:
Whereas SFC (or *.vue file) looks like this:
Create a build-tool-enabled Vue project
The official Vue build setup is based on Vite. Download and install Vite on your machine, or alternatively, you can try Vue with SFCs online on StackBlitz. StackBlitz runs the Vite-based build setup directly in the browser. It is almost identical to the local setup, but you do not need to install anything.
You will also need to install Node.js and be comfortable with using the command line.
Follow these steps to create a build-tool-enabled Vue project on your machine.
Step 1: Run the following command in your command line:
npm init vue@latest
Step 2: This command will install and execute create-vue, the official Vue project scaffolding tool. There will be prompts for optional features such as TypeScript and testing support:
✔ Project name: … <your-project-name>
✔ Add TypeScript? … No / Yes
✔ Add JSX Support? … No / Yes
✔ Add Vue Router for Single Page Application development? … No / Yes
✔ Add Pinia for state management? … No / Yes
✔ Add Vitest for Unit testing? … No / Yes
✔ Add Cypress for both Unit and End-to-End testing? … No / Yes
✔ Add ESLint for code quality? … No / Yes
✔ Add Prettier for code formatting? … No / Yes
Scaffolding project in ./<your-project-name>...
Done.
Step 3: Choose No if you are unsure about an option for now.
Step 4: Once the project is created, follow the instructions to install dependencies and start the dev server:
cd <your-project-name>
npm install
npm run dev
Step 5: Well done! You should now have your first Vue project running!
Step 6: When you are ready to ship your app to production, run the following:
npm run build
This will create a production-ready build of your app in the project's ./dist directory.114
What is Vue CLI?
‘Vue CLI is a full system for rapid Vue.js development, providing:
- Interactive project scaffolding via @vue/cli.
- A runtime dependency (@vue/cli-service) that is:
- Upgradeable;
- Built on top of webpack, with sensible defaults;
- Configurable via in-project config file;
- Extensible via plugins
- A rich collection of official plugins integrating the best tools in the frontend ecosystem.
- A full graphical user interface to create and manage Vue.js projects.’117
Vue CLI is made up of several components – CLI, CLI service, and CLI plugins.
The CLI (@vue/cli) is a globally installed npm package, providing the vue command in your terminal. You can use CLI to quickly scaffold a new project via vue create, and manage your projects using a graphical interface via vue ui.
The CLI service (@vue/cli-service) is a development dependency. It is an npm package installed locally into every project created by @vue/cli. It is built on top of webpack and webpack-dev-server, and contains:
- The core service that loads other CLI plugins
- An internal webpack config that is optimised for most apps
- The vue-cli-service binary inside the project, which comes with the basic serve, build, and inspect commands.
CLI plugins are npm packages that provide optional features to your Vue CLI projects, such as Babel/TypeScript transpilation, ESLint integration, unit testing, and end-to-end testing.’ You can identify a Vue CLI plugin because the name will start with either @vue/cli-plugin- (for built-in plugins) or vue-cli-plugin- (for community plugins).
All CLI plugins listed in your project’s package.json are automatically resolved when you run the vue-cli-service binary.117
Install
You need administrator privileges to execute install unless npm was installed on your system through a Node.js version manager such as n or nvm.
To install @vue/cli, use one of the following commands:
npm install -g @vue/cli
# OR
yarn global add @vue/cli
This may take a minute or two. After installation, you can access the vue binary in your command line. Verify that @vue-cli is correctly installed by running vue, which should present you with a help message listing all available commands.
Check you have the right version with this command:
vue –version
For information on upgrading the global Vue CLI package and project dependencies, visit the Vue CLI installation guide.118
Create a project
To create a project using vue create, follow these steps.
Step 1: Run
vue create hello-world
Step 2: Choose a preset. The default preset comes with basic Babel + ESLint setup. Alternatively, pick “Manually select features” for manual setup.
Step 3: Explore a number of vue create command options by running:
vue create –help
You will see:
Usage: create [options] <app-name>
create a new project powered by vue-cli-service
Options:
-p, --preset <presetName> Skip prompts and use saved or remote preset
-d, --default Skip prompts and use default preset
-i, --inlinePreset <json> Skip prompts and use inline JSON string as preset
-m, --packageManager <command> Use specified npm client when installing dependencies
-r, --registry <url> Use specified npm registry when installing dependencies
-g, --git [message|false] Force / skip git initialization, optionally specify initial commit message
-n, --no-git Skip git initialization
-f, --force Overwrite target directory if it exists
--merge Merge target directory if it exists
-c, --clone Use git clone when fetching remote preset
-x, --proxy Use specified proxy when creating project
-b, --bare Scaffold project without beginner instructions
--skipGetStarted Skip displaying "Get started" instructions
-h, --help Output usage information
Alternatively, you can create and manage projects using a graphical interface with vue ui command:
vue ui
The above command will open a browser window with a GUI that guides you through the project creation process.112
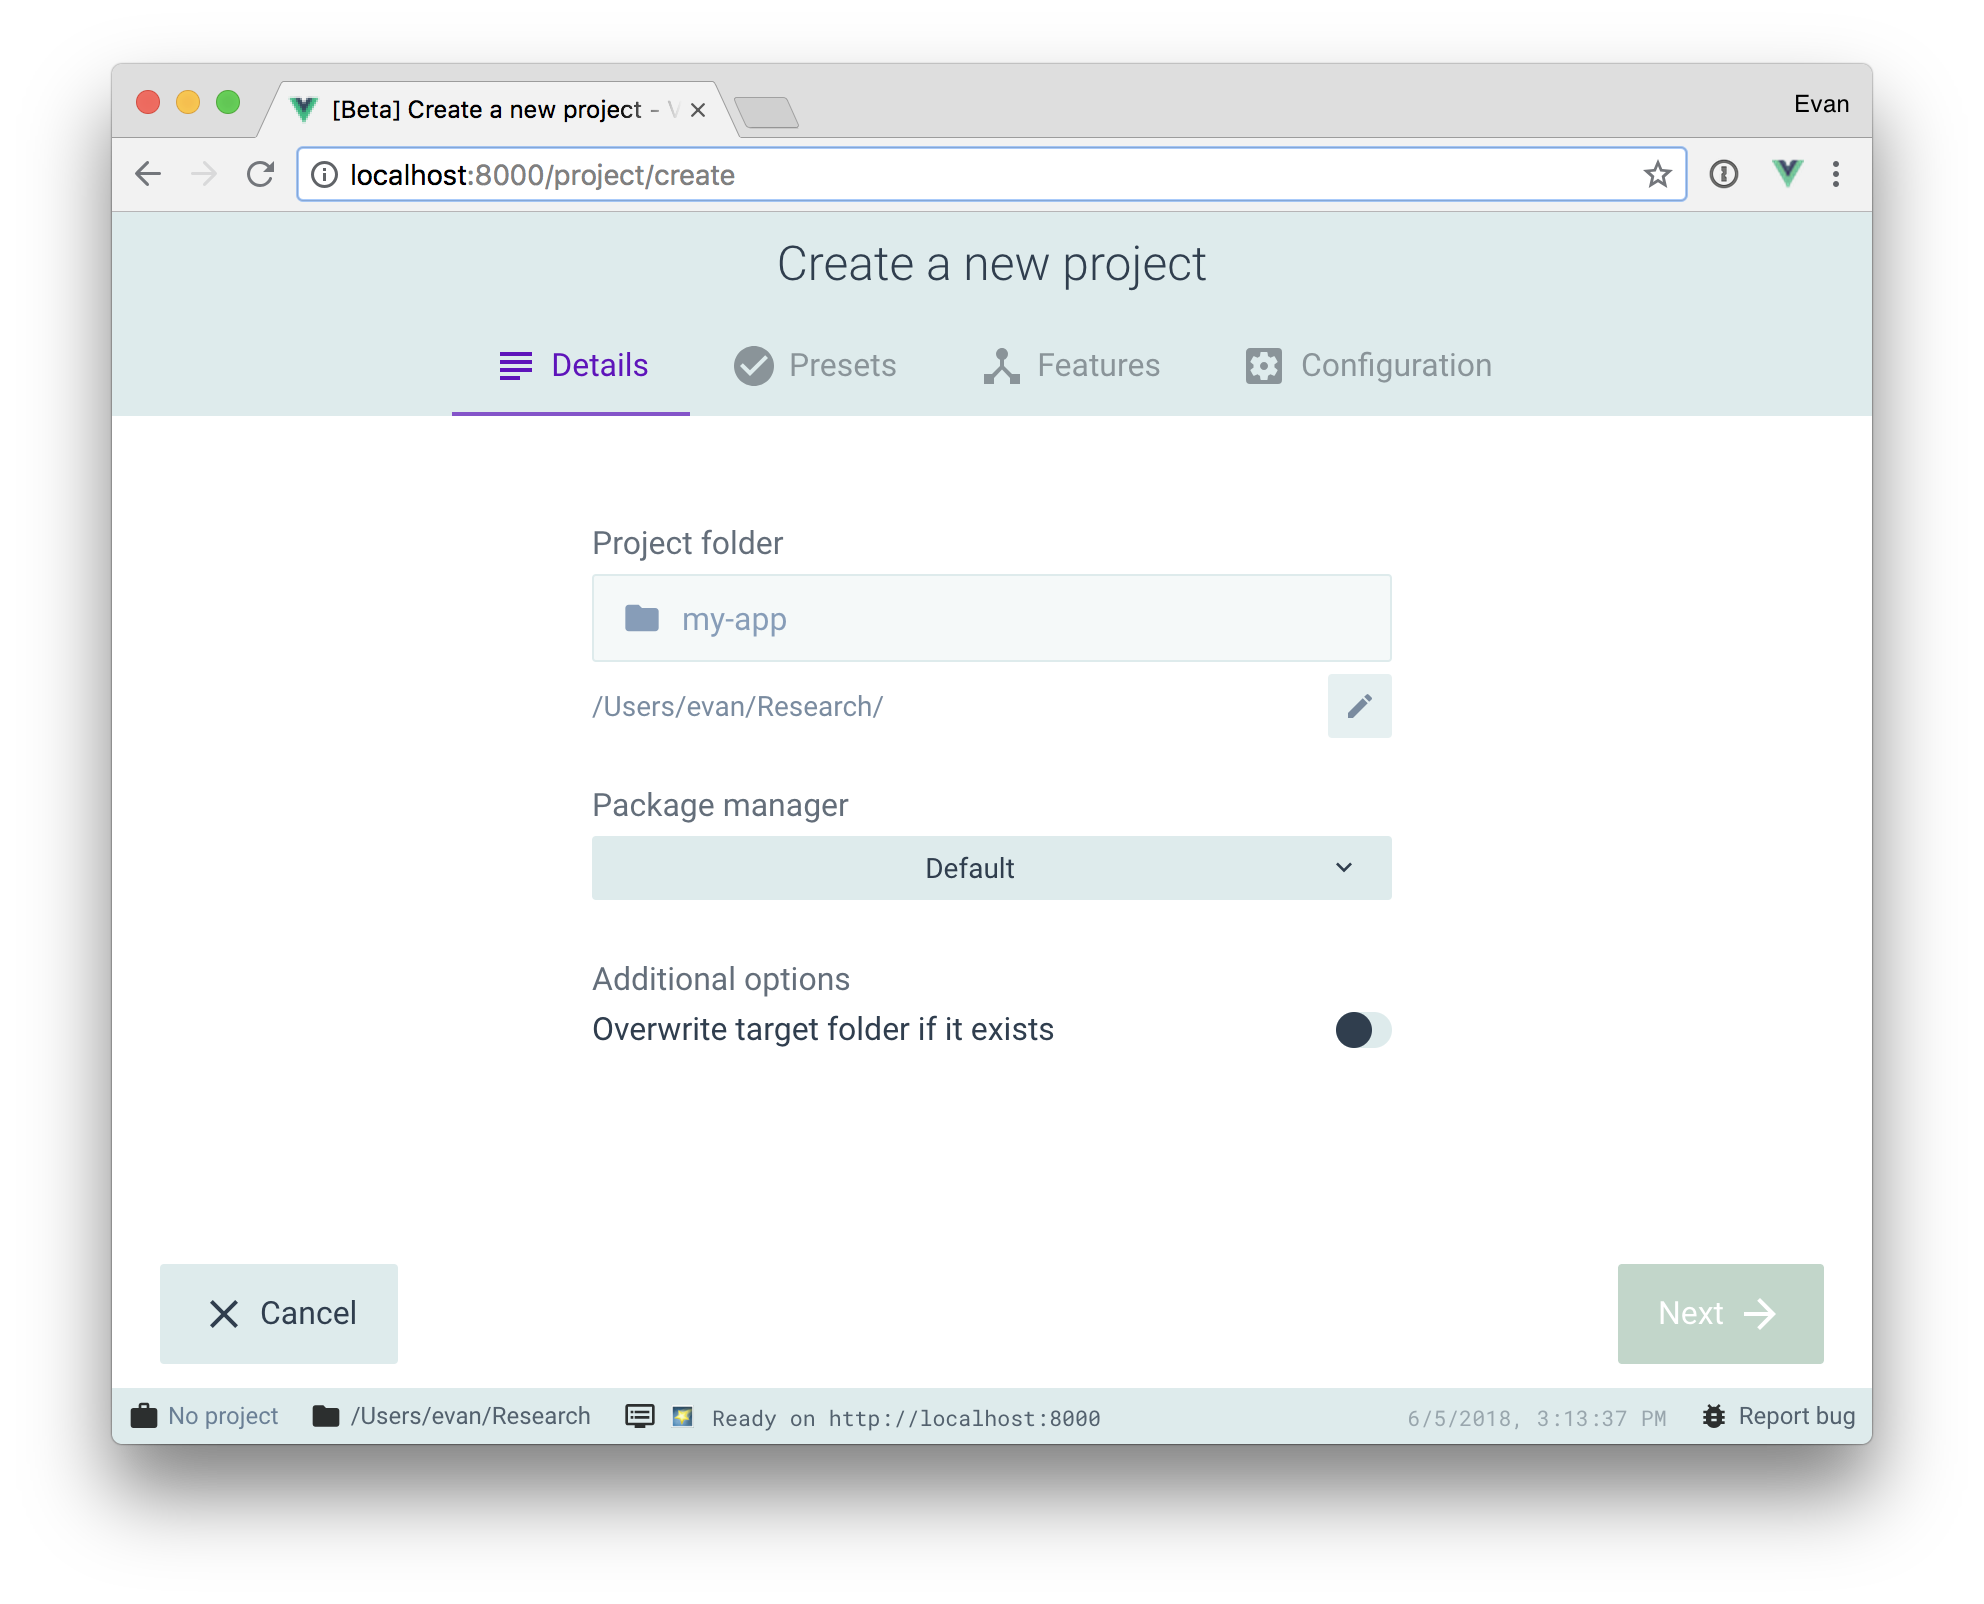
Create a new project with vue ui, © Vue
Create a single-page application
Vue CLI gives you with a pre-generated template, based on your specifications. The template is already configured so you can start developing your website or application immediately. In the command line prompt, Vue CLI will ask you a few questions about your project, download the required files, and pre-configure it for you.85
Get ready to build! Open the command prompt and follow along to build a single-page application.
Generate SPA
Step 1: Navigate to the directory where you store your Vue.js project files. In this example, we are going to use vue-starter-project. Run:
vue create vue-starter-project
Step 2: You should see the following prompt:
Vue CLI v5.0.4
? Please pick a preset:
Default ([Vue 2] babel, eslint)
Default ([Vue 3] babel, eslint)
❯ Manually select features
We are going to manually select features. This will allow you to see how each option you selected is installed by the CLI.
Select Manually select features. This will bring up several options. Usually, you can select as few or as many as you would like. Today, select the following by pressing <space> on the entry:
...
◉ Babel
◉ TypeScript
◯ Progressive Web App (PWA) Support
◉ Router
◉ Vuex
◉ CSS Pre-processors
◉ Linter / Formatter
❯◯ Unit Testing
◯ E2E Testing
Press the ENTER key to confirm.
Step 3: You will be prompted to choose a version of Vue.js. Select 3.x
...
? Choose a version of Vue.js that you want to start the project with (Use arrow keys)
> 3.x
2.x
Step 4: The next question is about TypeScript integration. Do not worry if you are not familiar with TypeScript. This option illustrates how Vue CLI 3 downloads what you defined as required for your unique project. We will not use the class-style syntax, but will use Babel alongside TypeScript.
When encountering the following, enter N:
...
Use class-style component syntax? (y/N) N
In the following prompt, enter Y:
...
? Use Babel alongside TypeScript (required for modern mode, auto-detected polyfills, transpiling JSX)? (Y/n) Y
Step 5: Next, you will be asked about history mode. History mode will make each route its own URL. This means you will not have the /#/ (hash) in your application’s URL.
If you use history mode, you will need a Node server to run your project. Vue CLI 3 provides you with a Node server, so this is fine.
Type Y to answer yes to history mode:
...
? Use history mode for router? (Requires proper server setup for index fallback in production) (Y/n) Y
Step 6: A CSS pre-processor is CSS with added features like nesting and variables. The browser cannot read this, so when the project is built, Node will compile all of your SCSS or LESS code to traditional CSS.
Since you are using Node to build your project, it is recommended to select Sass/SCSS (with node-sass) as your pre-processor.
...
? Pick a CSS pre-processor (PostCSS, Autoprefixer and CSS Modules are supported by default):
Sass/SCSS (with dart-sass)
❯ Sass/SCSS (with node-sass)
Less
Stylus
Step 7: Select linter style. For this walk-through, choose ESLint + Standard config:
...
? Pick a linter / formatter config:
ESLint with error prevention only
ESLint + Airbnb config
❯ ESLint + Standard config
ESLint + Prettier
The configured rules for ESLint include options such as the use of trailing commas, semi-colons at the end of a line, or using const over var in JavaScript.
Step 8: When do you want ESLint to format your code? This can be either on save or when you commit your code to a service like GitHub.
To allow you to review any changes before committing to version control, select Lint on save.
...
? Pick additional lint features: (Press <space> to select, <a> to toggle all, <i> to invert selection)
❯◉ Lint on save
◯ Lint and fix on commit
Step 9: Vue CLI will ask how you want to store the selected configurations. Standard practice is to store configurations in their own files. This makes it easier to share configurations between projects and the package.json will be kept as legible as possible by only defining the essential information about your app:
...
? Where do you prefer placing config for Babel, ESLint, etc.? (Use arrow keys)
❯ In dedicated config files
In package.json
Step 10: Nice one! You have finished setting features. You will be asked if you want to save this selection as a preset for future projects. This is useful if you want to ensure future projects are consistent.
Give your preset a name and save the configuration
...
? Save this as a preset for future projects? Yes
? Save preset as: WUX Vue CLI Walkthrough
Step 11: Your terminal will summarise all your options:
? Please pick a preset: Manually select features
? Check the features needed for your project: Choose Vue version, Babel, TS, Router, Vuex, CSS Pre-processors, Linter
? Choose a version of Vue.js that you want to start the project with 3.x (Preview)
? Use class-style component syntax? No
? Use Babel alongside TypeScript (required for modern mode, auto-detected polyfills, transpiling JSX)? Yes
? Use history mode for router? (Requires proper server setup for index fallback in production) Yes
? Pick a CSS pre-processor (PostCSS, Autoprefixer and CSS Modules are supported by default): Sass/SCSS (with node-sass)
? Pick a linter / formatter config: Standard
? Pick additional lint features: Lint on save
? Where do you prefer placing config for Babel, ESLint, etc.? In dedicated config files
? Save this as a preset for future projects? (y/N)
Press ENTER, and Vue CLI will start creating your app.
Step 12: Once Vue CLI has created your app, cd (change directory) in your project name (vue-starter-project):
cd vue-starter-project
Step 13: Run npm run serve to start your app. This will run your project at a port on your localhost, usually :8080.
npm run serve
The CLI has already downloaded dependencies. Open your browser of choice and visit localhost:8080 in the URL bar to view your project. You will find a welcome screen with the Vue logo and the technologies you have selected.
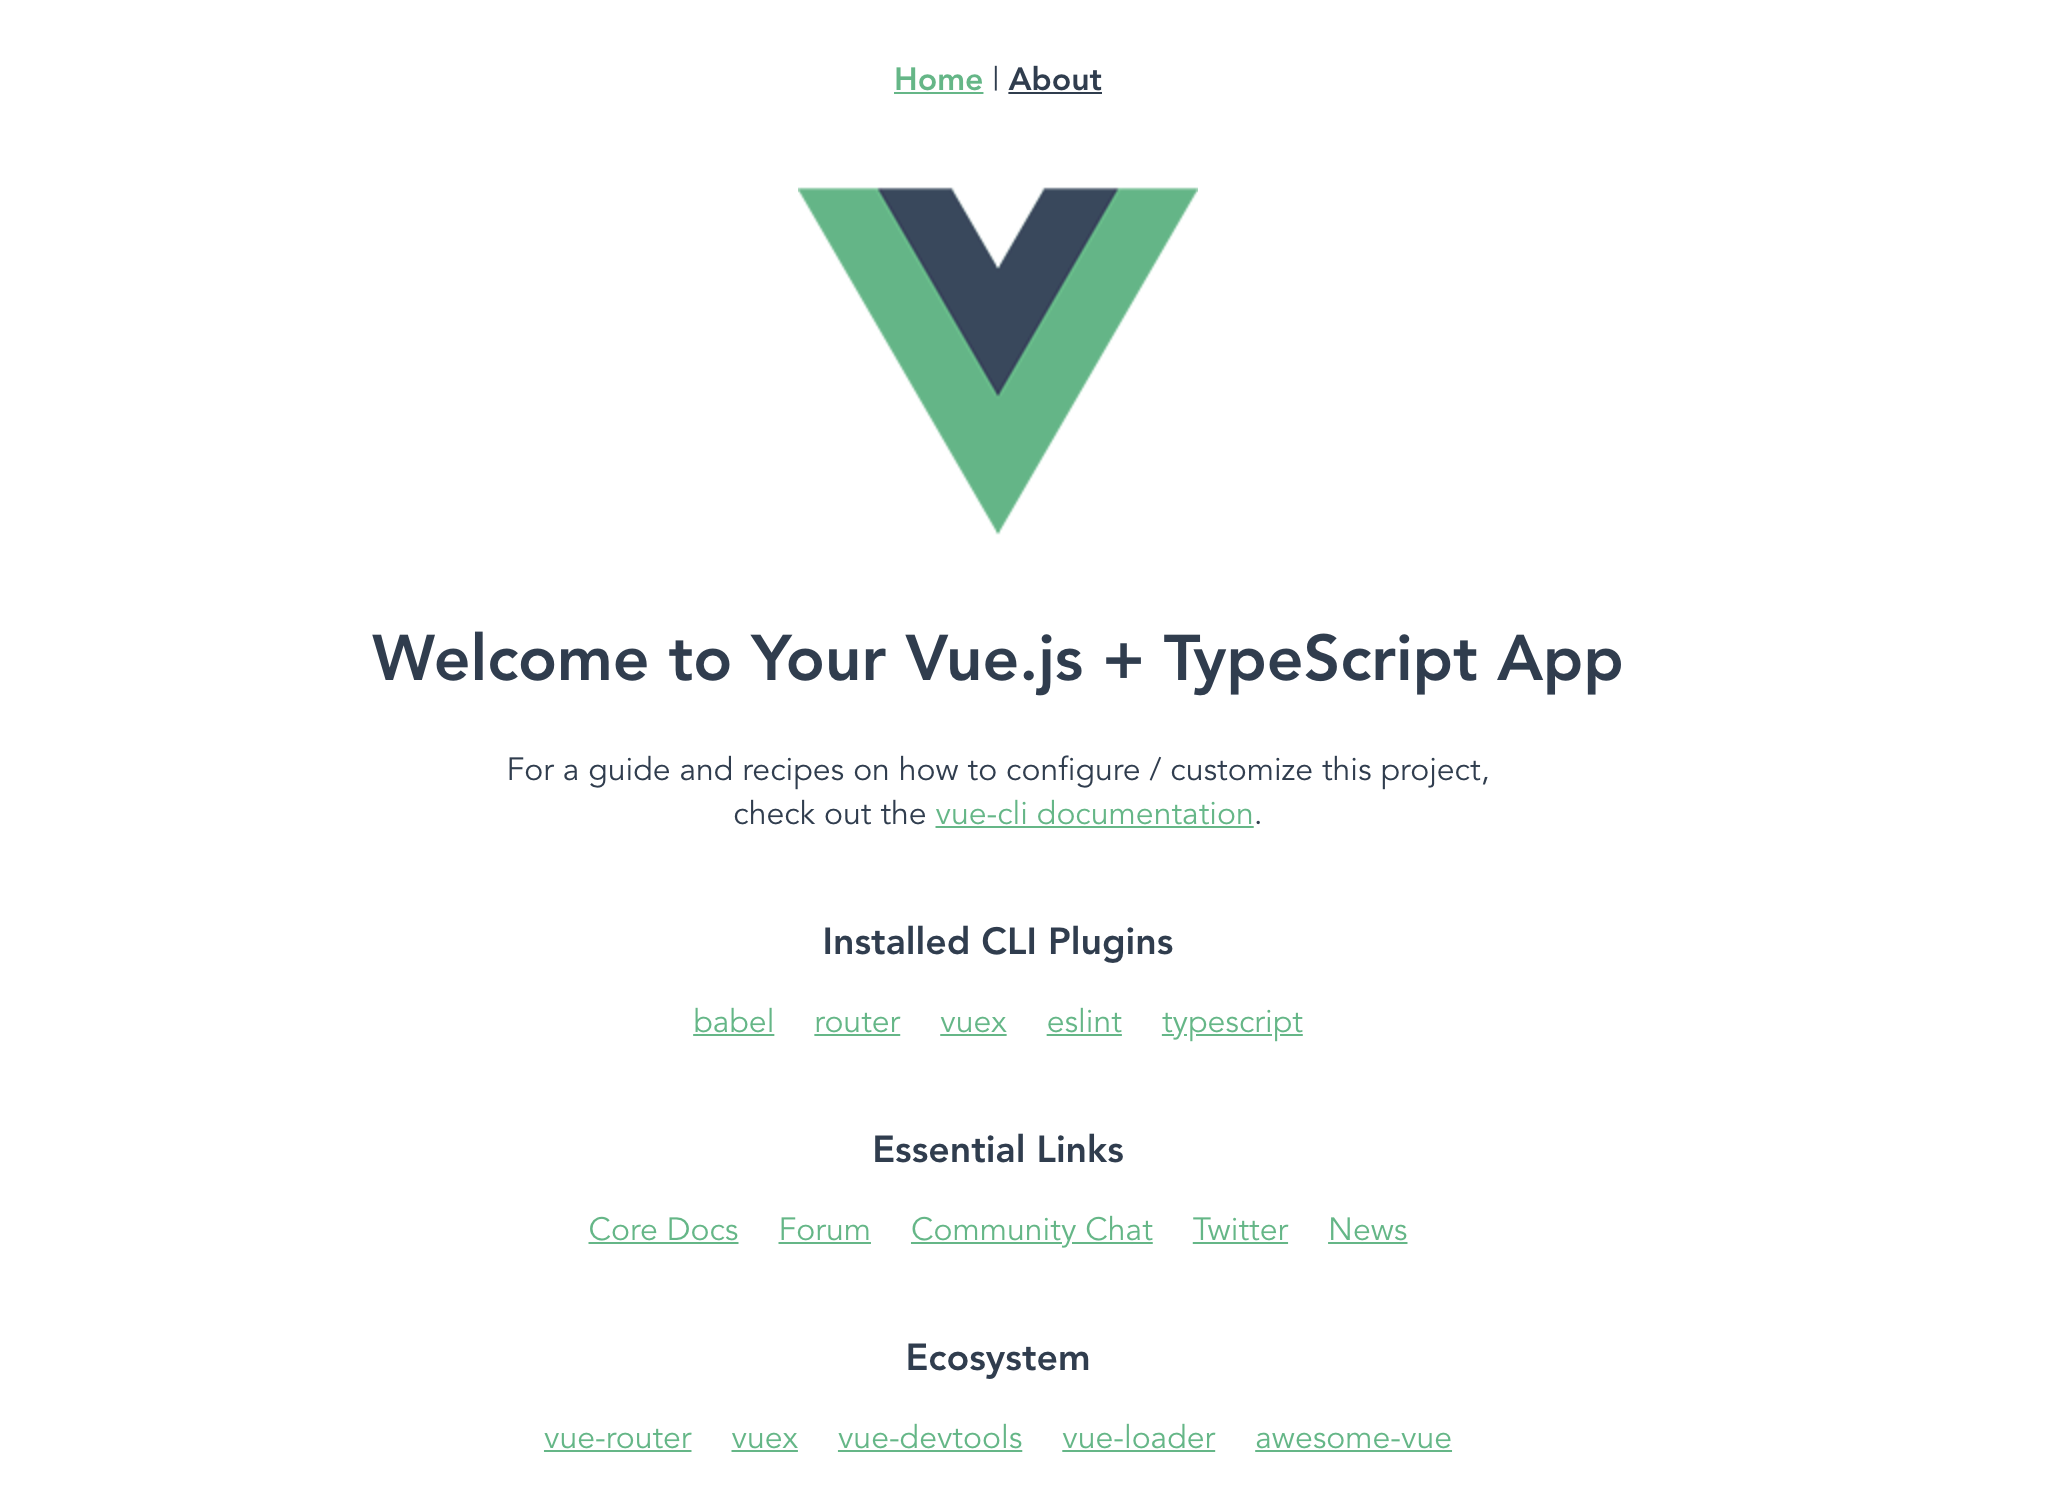
Welcome to vue.js project screen, © Vue
Leave this server running throughout this walkthrough to monitor your changes.
Step 14: The next stage is to start working in the generated code base, including creating your own single-file .vue components.85
Header and footer components
We are going to make some simple changes to the SPA by editing the header and footer. The AppHeader.vue and AppFooter.vue components are present on each route.
In a new terminal window, navigate into the root of your vue-starter-project folder. Use ls command to list out the files:
ls
This will output to:
Output
README.md babel.config.js node_modules package-lock.json package.json public src tsconfig.json
Alternatively, you can view the contents of your project by opening your project in your editor of choice, such as Visual Studio Code.
Now it is time to edit the header.
Step 1: Create a .vue file in the components directory and name it AppHeader.vue. Either right-click in the components directory and create a new file in IDEs like VS Code, or do this in your computer’s terminal with the bash command touch:
touch src/components/AppHeader.vue
You are creating a single-file component that contains all the HTML, JavaScript, and SCSS that this chunk of code needs.
Every .vue component contains three sections: <template>, <script>, and <style>. In this case, template is the component’s HTML.
Step 2: Open the new file in your text editor and create a header by using the <header> tag inside of <template>.
Inside of this <header>, add a logo image of your choice and a <p> element with some content. In this example we are going to use the Vue logo, but feel free to have fun with it:
vue-starter-project/src/components/AppHeader.vue
<template>
<header>
<img alt="Vue logo" src="../assets/logo.png" height="50">
<p>My Vue.js Application</p>
</header>
</template>
Step 3: Remember to keep your development server running throughout development. If you close or cancel the server process, you will not be able to view your application in the browser.
Save the file.
When you open your browser, you will not see the HTML rendered. To see it rendered you need to import the newly created AppHeader.vue component into a component that is already mounted. Because App.vue is your main entry point, import it there so the header appears on every route.
Step 4: Open the App.vue file in your text editor and delete the div with the ID of nav. Add the highlighted code:
vue-starter-project/src/App.vue
<template>
<app-header />
<router-view/>
</template>
<script>
import AppHeader from '@/components/AppHeader.vue'
export default {
components: {
AppHeader
}
}
</script>
When you import using ES6, you are essentially creating a variable to later reference in your code. So here, you are storing the code from AppHeader.vue into a variable called AppHeader. You need to register it via the components property before you can use it.
The changes you have made render the component in the HTML.
Step 5: Save any unsaved file and open your browser back to localhost:8080. You should be able to view your newly created header at the top of the page:
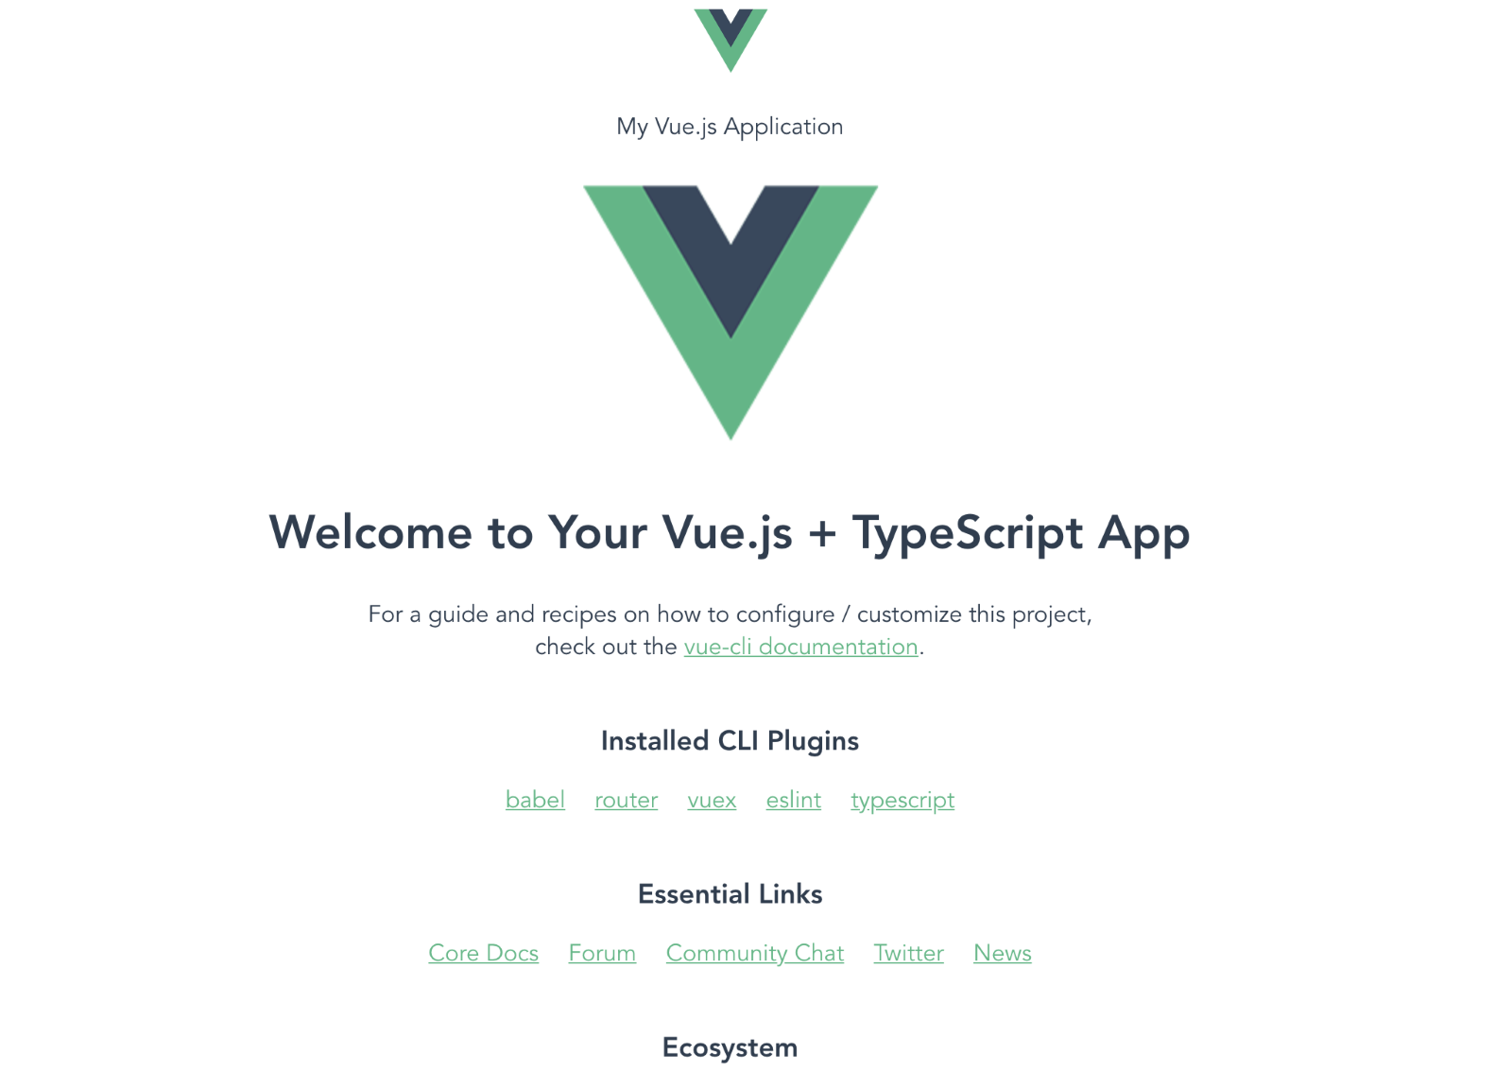
Vue template with new header, © Vue
Well done! You created a SFC, used import to bring it into a mounted component, and monitored the change with hot module reloading (HMR).
Step 6: Return to AppHeader.vue in your text editor. Add navigation underneath your <p> tags by adding the following highlighted code:
vue-starter-project/src/components/AppHeader.vue
<template>
<header>
<img alt="Vue logo" src="../assets/logo.png" height="50">
<p>My Vue.js Application</p>
<nav>
<ul>
<li><router-link to="/">Home</router-link></li>
<li><router-link to="/about">About</router-link></li>
</ul>
</nav>
</header>
</template>
Step 7: Style the navigation to make it look like a traditional navigation bar. Add a <style> tag at the end of the file.
vue-starter-project/src/components/AppHeader.vue
<template>
<header>
<img alt="Vue logo" src="../assets/logo.png" height="50">
<p>My Vue.js Application</p>
<nav>
<ul>
<li><router-link to="/">Home</router-link></li>
<li><router-link to="/about">About</router-link></li>
</ul>
</nav>
</header>
</template>
<style lang="scss">
</style>
This lang attribute will give you the ability to write SCSS in your SFC. Add the highlighted contents in the style element:
vue-starter-project/src/components/AppHeader.vue
...
<style lang="scss">
header {
display: flex;
border-bottom: 1px solid #ccc;
padding: .5rem 1rem;
p {
margin-left: 1rem;
}
}
nav {
margin-left: auto;
ul {
list-style: none;
}
ul li {
display: inline-flex;
margin-left: 1rem;
}
}
</style>
This SCSS creates a horizontal navigation bar with declarations such as display: inline-flex (using Flexbox) and spaces each item out with margin-left auto. Padding is applied to separate the header from the rest of the content.
Notice how the p styles are inside of the header SCSS block? While not allowed in traditional CSS, it is allowed in SCSS, and is known as nesting.
Step 8: Save your file and navigate to localhost:8080 in your browser to find the new style:
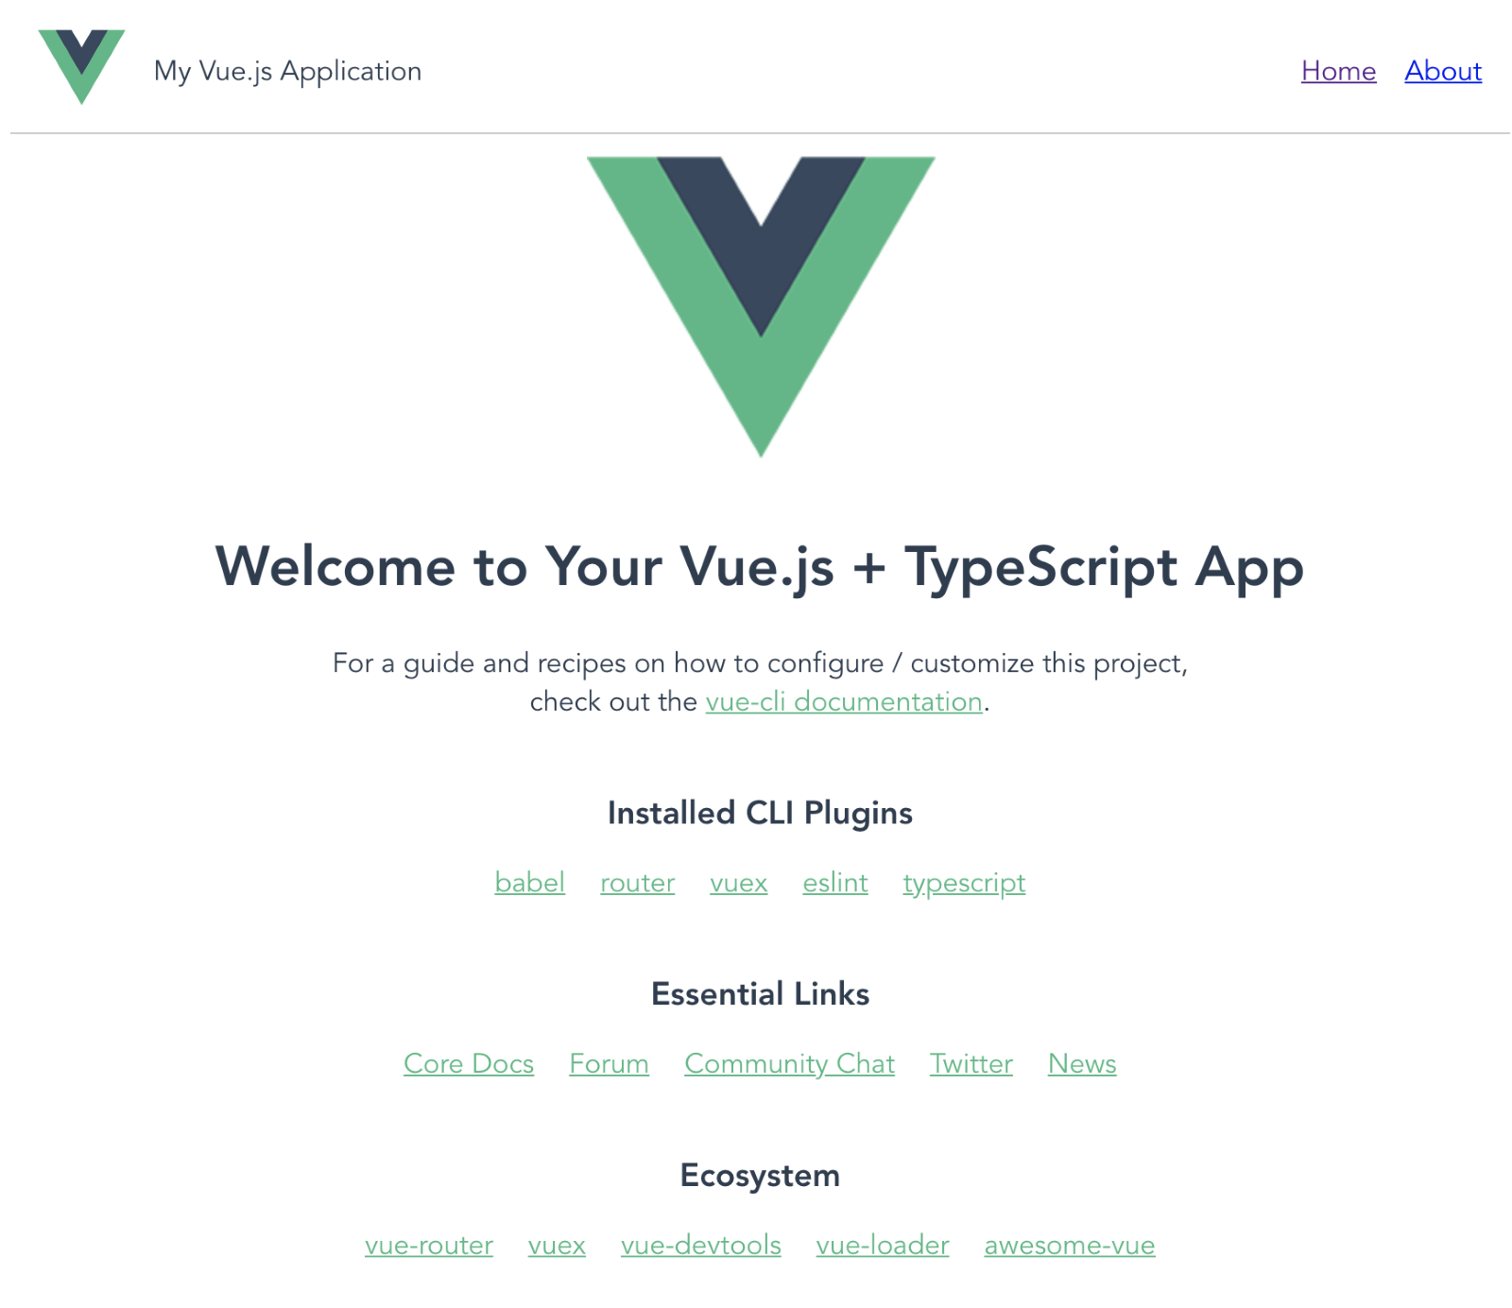
New style for header in Vue template, © Vue
Now you are ready to create the footer component.
Step 9: In the same components directory, create a file with the name AppFooter.vue. Do this as you did the header, either in your editor or using the touch base command.
touch src/components/AppFooter.vue
Step 10: Open App.vue and add the highlighted code to import into your App.vue file:
vue-starter-project/src/App.vue
<template>
<app-header />
<router-view/>
<app-footer />
</template>
<script>
import AppHeader from '@/components/AppHeader.vue'
import AppFooter from '@/components/AppFooter.vue'
export default {
components: {
AppHeader,
AppFooter
}
}
</script>
...
Notice that this time you are importing the component after the router-view tag.
Step 11: Save the file and open AppFooter.vue. In your AppFooter.vue file, use the <footer> HTML tag with a paragraph:
vue-starter-project/src/components/AppFooter.vue
<template>
<footer>
<p>Copyright © "current year" </p>
</footer>
</template>
You now have a basic footer.
Step 12: You can expand on this to include the current year programmatically, creating dynamic content that changes depending on what year it is. You can do this by creating a computed property which is a reactive value calculated with JavaScript.
Wrap your properties in the setup() function and return these values. First deconstruct the computed function from the vue library. Store this computed function and its value into a const. Pass an anonymous function that returns a value:
const year = computed(() => new Date().getFullYear())
Step 13: Add the following code to the end of AppFooter.vue to add the setup function to your file:
vue-starter-project/src/components/AppFooter.vue
...
<script>
import { computed } from 'vue'
export default {
setup () {
const year = computed(() => new Date().getFullYear())
}
}
</script>
Step 14: Give access to the computed property you created for the <template> to consume and render. Return an object with the year property and value in your setup() function:
/vue-starter-project/src/components/AppFooter.vue
...
setup () {
const year = computed(() => new Date().getFullYear())
return { year }
}
...
To use this value in the <template>, use interpolation with double curly braces (moustache syntax):
/vue-starter-project/src/components/AppFooter.vue
<template>
<footer>
<p>Copyright © {{ year }}</p>
</footer>
</template>
Step 15: Save the file and check on your localhost: 8080. You now have the current year in your footer.85
Nice work, you have created a single-page application using Vue CLI. Have a play around and see what else you can change in your SPA.
Vue.js is a frontend framework that is progressively adoptable. As a result, integrating it with other libraries or projects is simple. Vue.js, is perfectly capable of powering complex Single-Page Applications when used in conjunction with the right tooling and supporting libraries.
Template syntax
Vue's template syntax is based on HTML and allows you to declaratively connect the rendered DOM to the data of the underlying component instance. All Vue templates are syntactically valid HTML that can be processed by browsers and HTML parsers that follow the spec.
Text interpolation
We can use double curly brackets, which is also known as "moustache" syntax, to bind a variable from the relative component instance.
Vue.js supports two-way binding, which means that the element will be rendered again if the value of a variable changes. We can, however, use the v-once directive to prevent it from being modified.
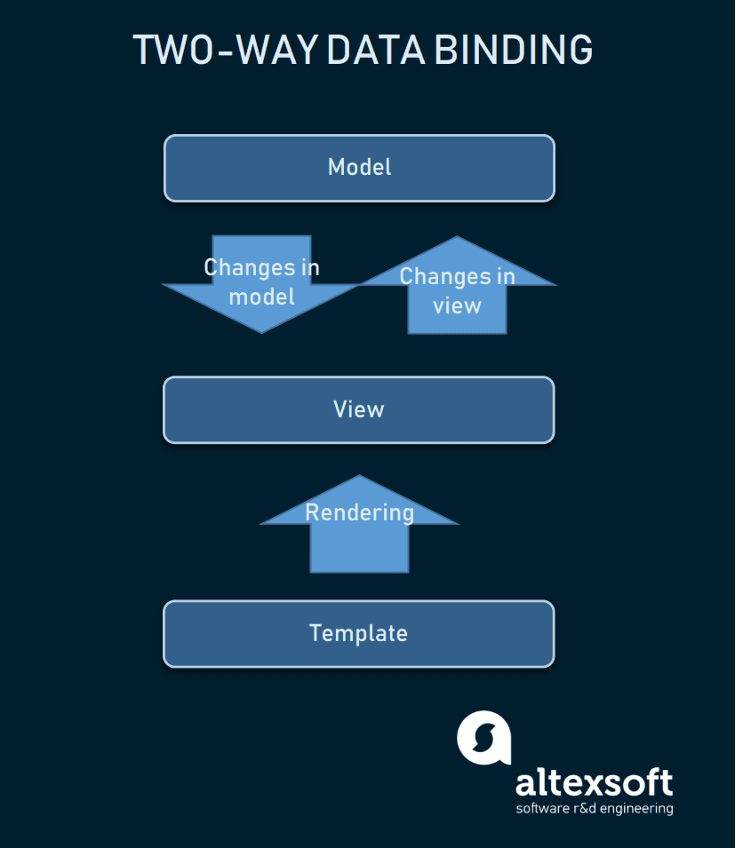
We use the v-model directive on an input form field for two-way/reactive binding. Internally, it will generate an event and modify the value, to which we can bind using double curly brackets or "Mustache" syntax anywhere else in the template.
<p>You are typing: {{ yoobeeText }}</p></td>
Check out the following video for a step-by-step explanation on binding.
Raw HTML interpolation
Plain text cannot be data bound in Vue.js, but we can use the v-html directive to bind raw HTML text. In the example following, we have a variable called rawHTML in a component that contains raw HTML content.
return {
msg: "Hello Vue",
rawHTML: "<p> Yoobee is <b>Great</b> </p>"
}
}
We can bind the rawHTML variable using v-html directive as follows.
<h1>{{ msg }}</h1>
<div v-html="rawHTML"></div>
</template>
A p tag will be inside the div tag.
Expressions
Vue.js offers more than just the ability to bind variables. Within double curly brackets, Vue.js may be utilised to write a variety of expressions.
{{ check ? "true" : "False" }}
{{ arr.sort().reverse() }}
Reactivity fundamentals
Declaring Reactive State
The data option in the Options API is used to declare a component's reactive state. A function that returns an object should be used as the option value. When Vue creates a new component instance, it will call the method and wrap the returning object in its reactivity system. Any of this object's top-level attributes are proxied on the component instance (this is true in methods and lifecycle hooks):
data() {
return {
count: 1
}
},
// `mounted` is a lifecycle hook which we will explain later
mounted() {
// `this` refers to the component instance.
console.log(this.count) // => 1
// data can be mutated as well
this.count = 2
}
}
Declaring methods
The methods option is used to add methods to a component instance. This should be an object with the following methods:
data() {
return {
count: 0
}
},
methods: {
increment() {
this.count++
}
},
mounted() {
// methods can be called in lifecycle hooks, or other methods!
this.increment()
}
}
For methods, Vue automatically binds the this variable so that it always refers to the component instance. If a method is used as an event listener or callback, this guarantees that it preserves the right this value. When designing methods, avoid using arrow functions because this prohibits Vue from binding the appropriate this value:
methods: {
increment: () => {
// BAD: no `this` access here!
}
}
}
The methods are accessible from within the component's template, just like all other properties of the component instance. They are most typically used as event listeners within a template:
DOM update timing
When you change the reactive state, the DOM is automatically updated. It should be noted, however, that the DOM modifications are not applied in a synchronous manner. Instead, Vue caches them until the "next tick" in the update cycle, ensuring that no matter how many state changes you make, each component only needs to update once.
To wait for the DOM update to complete after a state change, you can use the nextTick() global API:
export default {
methods: {
increment() {
this.count++
nextTick(() => {
// access updated DOM
})
}
}
}
Deep reactivity
In Vue, state is deeply reactive by default. This means you can expect changes to be detected even when you mutate nested objects or arrays:
data() {
return {
obj: {
nested: { count: 0 },
arr: ['foo', 'bar']
}
}
},
methods: {
mutateDeeply() {
// these will work as expected.
this.obj.nested.count++
this.obj.arr.push('baz')
}
}
}
It is also possible to deliberately define shallow reactive objects, which only track reactivity at the root level, but these are often only required in complex use cases.
Stateful methods
In some cases, we may need to dynamically create a method function, for example creating a debounced event handler:
export default {
methods: {
// Debouncing with Lodash
click: debounce(function () {
// ... respond to click ...
}, 500)
}
}
However, this approach is problematic for components that are reused because a debounced function is stateful: it maintains some internal state on the elapsed time. If multiple component instances share the same debounced function, they will interfere with one another.
To keep each component instance's debounced function independent of the others, we can create the debounced version in the created lifecycle hook:58
created() {
// each instance now has its own copy of debounced handler
this.debouncedClick = _.debounce(this.click, 500)
},
unmounted() {
// also a good idea to cancel the timer
// when the component is removed
this.debouncedClick.cancel()
},
methods: {
click() {
// ... respond to click ...
}
}
}
Computed properties
Computed properties in Vue.js allow you to create a property that can be used to modify, manipulate, and display data in a readable and efficient manner within your components.
You can calculate and display values based on a value or group of values in the data model using computed properties. It can also contain some custom logic that is cached based on its dependencies, which means it does not reload but does have a reliance that changes, allowing it to respond to changes.
<div class="hello">
<h1>{{ count }}</h1>
</div>
</template>
<script>
export default {
name: "HelloWorld",
data() {
return {
shopNumber: 2
}
},
computed: {
count: function() {
return 'The shop number is ' + this.shopNumber
}
}
};
</script>
This is passed to the count attribute. shopNumber is a data function dependency that returns a sentence containing the this. shopNumber is made available to the template directly.
Computed caching vs method
You may have noticed we can achieve the same result by invoking a method in the expression:
// in component
methods: {
calculateBooksMessage() {
return this.author.books.length > 0 ? 'Yes' : 'No'
}
}
We can define the same function as a method instead of a calculated property. In terms of the end product, the two approaches are identical. Computed properties, on the other hand, are cached depending on their reactive dependencies.
Only when any of a calculated property's reactive dependencies have changed will it be re-evaluated. This means that multiple access to publishedBooksMessage will return the previously computed result without having to perform the getter function again as long as author.books has not changed.
Because Date.now() is not a reactive dependency, the following calculated property will never update:
now() {
return Date.now()
}
}
In comparison, a method invocation will always run the function whenever a re-render happens.57
Writable computed
By default, computed properties are getter-only. A runtime warning will appear if you attempt to apply a new value to a calculated property. You can build a "writable" computed property by providing both a getter and a setter in the few circumstances where you need one:
data() {
return {
firstName: 'John',
lastName: 'Doe'
}
},
computed: {
fullName: {
// getter
get() {
return this.firstName + ' ' + this.lastName
},
// setter
set(newValue) {
// Note: we are using destructuring assignment syntax here.
[this.firstName, this.lastName] = newValue.split(' ')
}
}
}
}
Now when you run this.fullName = 'John Doe', the setter will be invoked and this.firstName and this.lastName will be updated accordingly.
Class and style binding
Data-binding is required when working with an element's class list and inline styles. Because these are both attributes, we can manage them with the v-bind directive: our expressions only calculate the final strings here. String concatenation, on the other hand, is error-prone and inconvenient. When v-bind is used with the class and style, Vue gives additional benefits. Not only do expressions evaluate to strings, but they also evaluate to objects and arrays.
Binding HTML classes
Object Syntax
We can dynamically toggle classes, by passing an object to the v-bind:class:
The presence of the active class is determined by the truthiness of the isActive data property.
Multiple classes can be toggled by having more fields in the object, the v-bind:class can co-exist with plain class attribute:
v-bind:class="{active: isActive, 'text-danger': hasError}">
</div>
With the following data:
isActive: true,
hasError: false
}
This will render:
The class list is updated once the data properties change. For instance, when hasError is false, the class list changes to static active text-danger. The bound object must not be inline:
data: {
classObject: {
active: true,'text-danger': false
}
}
Additionally, we can bind a computed property that returns an object:
data: {
isActive: true,
error: null
},
computed: {
classObject: function () {
return {
active: this.isActive && !this.error,
'text-danger': this.error && this.error.type === 'fatal'
}
}
}
Array Syntax
To apply a list of classes, we can pass an array to v-bind:class59
data: {
activeClass: 'active',
errorClass: 'text-danger'
}
This renders:
A ternary expression can be used to toggle a class conditionally:
The proceeding code will apply activeClass once isActive is truthy, but errorClass is always applied.
The code can be simplified using object syntax:
With components
When we use the class attribute on a custom component, the classes will be added to the component's role element. This will not overwrite the classes in the element.
Take for instance, when we declare this component:
template: '>p class="foo bar">Hi</p>'
})
And we also add some classes when using the component:
This results in the HTML:
This is also the case for class binding:
The HTML that will be rendered when isActive is truthy will be:
Binding inline styles
Object Syntax
v-bind has a pretty straightforward object syntax - it is almost like CSS, but it is a JavaScript object. For the CSS property name, we can use either kebab-case or camelCase:
data: {
activeColor: 'red',
fontSize: 30
}
Most often, to achieve a cleaner template, it is a good idea to bind to the style object directly:
data:{
styleObject: {
color:'red',
fontSize:'13px'
}
}
Array Syntax
The array syntax for v-bind:style will allow us to apply multiple style objects to an element:
Conditional rendering
The ability to render different user interface (UI) markup depending on whether a condition is true is referred to as conditional rendering. This is commonly used in situations like toggling components on and off, altering programme functionality, handling login and authorisation, and more.
v-if
The v-if directive is used to conditionally render a block, meaning it will only be rendered if the directive's expression returns a true value. The element is erased from the DOM if the expression returns an invalid result (for example, null, 0, empty string, false).
Check out the following example:
<p>This user has been logged in!... Welcome.</p>
</div>
<script>
export default {
data() {
return {
login: true,
};
}
};
</script>
Since login is set to true, the <div> block containing v-if directive will be produced, thus displayed.62
v-show
The v-show directive is another option for conditionally displaying an element. The following is an example of how it is used:
v-if versus v-show
v-if is “real” conditional rendering because it ensures that event listeners and child components inside the conditional block are properly destroyed and re-created during toggles.
The animation following demonstrates how v-if deletes and reproduces code blocks:

v-if is also lazy: if the condition is false on initial render, it will not do anything - the conditional block will not be rendered until the condition becomes true for the first time.
In comparison, v-show is much simpler - the element is always rendered regardless of initial condition, with CSS-based toggling.

Generally speaking, v-if has higher toggle costs while v-show has higher initial render costs. So, prefer v-show if you need to toggle something very often, and prefer v-if if the condition is unlikely to change at runtime.
v-else
You can use the v-else directive to indicate an “else block” for v-if:
Now you see me
</div>
<div v-else>
Now you don't
</div>
A v-else element must immediately follow a v-if or a v-else-if element - otherwise it will not be recognised.60
List rendering
The v-for directive can be used to render an array-based list of things. item in items is the syntax for the v-for directive, where item denotes the source data and items is the synonym for the array element to be iterated:
<ul id="example-1">
<li v-for="item in items">
{{ item.message }}
</li>
</ul>
var example1 = new Vue({
el: '#example-1',
data: {
items: [
{ message: 'Foo' },
{ message: 'Bar' }
]
}
})
v-for with an object
v-for can be used to iterate through the properties of an object.
<li v-for="value in object">
{{ value }}
</li>
</ul>
new Vue({
el: '#v-for-object',
data: {
object: {
title: 'How to do lists in Vue',
author: 'Jane Doe',
publishedAt: '2016-04-10'
}
}
})
<div v-for="(value, name) in object">
{{ name }}: {{ value }}
</div>
Another one can be added for index:
{{ index }}. {{ name }}: {{ value }}
</div>
Maintaining state
Vue utilises an "in-place patch" technique by default whenever it updates a list displayed using v-for. Rather than changing the DOM elements to match the order of the data items, Vue patches the element in-place and ensures it reflects what should be presented at that index.
You must give a unique key attribute for each item if you want Vue to track each node's identification and hence reuse and reorganise existing elements:59
<!-- content -->
</div>
Mutation methods
Vue wraps an observed array’s mutation methods so they will also trigger view updates. The wrapped methods are:
- push()
- pop()
- shift()
- unshift()
- splice()
- sort()
- reverse()
You can open the console and play with the previous examples’ items array by calling their mutation methods. For example:
example1.items.push({ message: 'Baz' }).
Replacing an array
Vue also provides non-mutating methods, filter(), concat() and slice(), which do not mutate the original array but always return a new array:
return item.message.match(/Foo/)
})
Caveats
Vue cannot detect the following changes in an array due to the limitation in JavaScript:
- When an item is directly set with the index, for example, vm.items[indexOfItem] = newValue
- When the length of an array is modified, for example, vm.item.length = newLength
data: {
items: ['a', 'b', 'c']
}
})
vm.items[1] = 'x' // is NOT reactive
vm.items.length = 2 // is NOT reactive
To overcome the first caveat, the following will give the same result as vm.items[indexOfItem] = newValue, and also triggers state update in the reactivity system:
Vue.set(vm.items, indexOfItem, newValue)
// Array.prototype.splice
vm.items.splice(indexOfItem, 1, newValue)
Displaying filtered/sorted results
There are times when we want to display filtered or sorted versions of an array without mutating the original data:
data: {
numbers: [ 1, 2, 3, 4, 5 ]
},
computed: {
evenNumbers: function () {
return this.numbers.filter(function (number) {
return number % 2 === 0
})
}
}
When calculated properties are not possible (for example, inside nested v-for loops), you can use the following method:
data: {
numbers: [ 1, 2, 3, 4, 5 ]
},
methods: {
even: function (numbers) {
return numbers.filter(function (number) {
return number % 2 === 0
})
}
}
v-for with a range
The v-for can also take an integer as a loop parameter:
<span v-for="n in 10">{{ n }} </span>
</div>
v-for on a <template>>
We can render a block of multiple elements in v-for using the <template>:>
<template v-for="item in items">
<li>{{ item.msg }}</li>
<li class="divider" role="presentation"></li>
</template>
</ul>
v-for with v-if

A ToDo List app using VueJS by VueJS © Vue.js Examples
Whenever v-for and v-if are used in the same node, v-for has a higher priority than v-if.
Look at the following code example for a simple To-do App:59
<form v-on:submit.prevent="addNewTodo">
<label for="new-todo">Add a todo</label>
<input
v-model="newTodoText"
id="new-todo"
placeholder="E.g. Feed the cat"
>
<button>Add</button>
</form>
<ul>
<li
is="todo-item"
v-for="(todo, index) in todos"
v-bind:key="todo.id"
v-bind:title="todo.title"
v-on:remove="todos.splice(index, 1)"
></li>
</ul>
</div>
Vue.component('todo-item', {
template: '\
<li>\
{{ title }}\
<button v-on:click="$emit(\'remove\')">Remove</button>\
</li>\
',
props: ['title']
})
new Vue({
el: '#todo-list-example',
data: {
newTodoText: '',
todos: [
{
id: 1,
title: 'Do the dishes',
},
{
id: 2,
title: 'Take out the trash',
},
{
id: 3,
title: 'Mow the lawn'
}
],
nextTodoId: 4
},
methods: {
addNewTodo: function () {
this.todos.push({
id: this.nextTodoId++,
title: this.newTodoText
})
this.newTodoText = ''
}
}
})
Event handling
Listening to events
We can use the v-on directive to listen to DOM events and run some JavaScript when they are triggered.
For example:
<button v-on:click="counter += 1">Add 1</button>
<p>The button above has been clicked {{ counter }} times.</p>
</div>
var example1 = new Vue({
el: '#example-1',
data: {
counter: 0
}
})
Method event handlers
The logic for many event handlers will be more complex though, so keeping your JavaScript in the value of the v-on attribute is not feasible. That is why v-on can also accept the name of a method you would like to call.
For example:
<!-- `greet` is the name of a method defined below -->
<button v-on:click="greet">Greet</button>
</div>
var example2 = new Vue({
el: '#example-2',
data: {
name: 'Vue.js'
},
// define methods under the `methods` object
methods: {
greet: function (event) {
// `this` inside methods points to the Vue instance
alert('Hello ' + this.name + '!')
// `event` is the native DOM event
if (event) {
alert(event.target.tagName)
}
}
}
})
// you can invoke methods in JavaScript too
example2.greet() // => 'Hello Vue.js!'
Event object
An event object is supplied to your event handler, giving you more options for responding to an event. This object includes a reference to the element from which the event originated (event.target), the time the event happened (event.timeStamp), and more.
console.log(`The button was clicked at ${event.timeStamp}.`);
}
Vue offers several different event modifiers that are useful in common event handling scenarios:
- stop
- .prevent
- .capture
- .self
- .once
- .passive63
<a v-on:click.stop="doThis"></a>
<!-- the submit event will no longer reload the page -->
<form v-on:submit.prevent="onSubmit"></form>
<!-- modifiers can be chained -->
<a v-on:click.stop.prevent="doThat"></a>
<!-- just the modifier -->
<form v-on:submit.prevent></form>
<!-- use capture mode when adding the event listener -->
<!-- i.e. an event targeting an inner element is handled here before being handled by that element -->
<div v-on:click.capture="doThis">...</div>
<!-- only trigger handler if event.target is the element itself -->
<!-- i.e. not from a child element -->
<div v-on:click.self="doThat">...</div>
Custom events
So far, we have spoken about how to deal with native events. But, because Vue is a component-based framework, is it possible to have a component emit its own event?
Let us imagine you want to communicate data from a child component to a parent component. Prop info only passes from parent to child, not the other way around, therefore we cannot utilise it here.
|
| (data travels down via props, never up)
v
ChildComponent
The solution is to have the child component emit an event, and have the parent listen to it.
To do this, call this.$emit("my-event") from the child component when you want the event to be emitted. For example, say we have a component DialogComponent that needs to inform its parent MainPage that it has been closed:
methods: {
onClose() {
this.$emit("dialog-closed");
}
}
};
The parent component can then handle the custom event exactly the same as it would a native event.
<dialog-component @dialog-closed="eventHandler" />
</div>
You can also send data in your custom event which can be received in the handling method:63
this.$emit("dialog-closed", { time: Date.now() });
}
eventHandler (event, { time }) {
console.log(`Dialog was closed at ${time}`);
}
Key modifiers
We frequently need to check for specific keys when listening for keyboard events. When listening for key events with Vue, you can apply key modifiers for v-on or @:
<input @keyup.enter="submit" />
You can directly use any valid key names exposed via KeyboardEvent.key as modifiers by converting them to kebab-case.
Vue provides aliases for the most commonly used key codes when necessary for legacy browser support:
- .enter
- .tab
- .delete (captures both “Delete” and “Backspace” keys)
- .esc
- .space
- .up
- .down
- .left
- .right
System modifier keys
You can use the following modifiers to trigger mouse or keyboard event listeners only when the corresponding modifier key is pressed:
- .ctrl
- .alt
- .shift
- .meta
Form input binding
The v-model directive is provided by Vue and is used to build two-way data bindings on form inputs, textareas, and select fields. Based on the input type, this directive automatically selects the correct method of updating the element. V-model is a syntax sugar for updating data on user input events, and it also takes particular care of some edge circumstances, which is a little bit magical.
v-model uses different properties internally and emits different events for different types of input elements:
- text and textarea uses the value property and input event
- checkboxes and radiobuttons uses the checked property and change event
- select fields use the value as a prop and the change as an event.
Text
<p>Message is: {{ information }}</p>
Multiline text
<p style="white-space: pre-line;">{{ message }}</p>
<br>
<textarea v-model="message" placeholder="add multiple lines"></textarea>
Checkbox
A single checkbox, boolean value:
<div for="checkbox">{{ checked }}</div>
Multiple checkboxes that are bound to the same array:
<input type="checkbox" id="jack" value="Jack" v-model="checkedNames">
<label for="jack">Jack</label>
<input type="checkbox" id="john" value="John" v-model="checkedNames">
<label for="john">John</label>
<input type="checkbox" id="mike" value="Mike" v-model="checkedNames">
<label for="mike">Mike</label>
<br>
<span>Checked names: {{ checkedNames }}</span>
</div>
new Vue({
el: '#example-3',
data: {
checkedNames: []
}
})
Radio
<label for="one">One</label>
<br>
<input type="radio" id="two" value="Two" v-model="picked">
<label for="two">Two</label>
<br>
<span>Picked: {{ picked }}</span>
Select
Single select:
<select v-model="selected">
<option disabled value="">Please select one</option>
<option>A</option>
<option>B</option>
<option>C</option>
</select>
Multiple select (bound to array):
<select v-model="selected" multiple>
<option>A</option>
<option>B</option>
<option>C</option>
</select>
Select options can be dynamically rendered with v-for:
data() {
return {
selected: 'A',
options: [
{ text: 'One', value: 'A' },
{ text: 'Two', value: 'B' },
{ text: 'Three', value: 'C' }
]
}
}
}
<select v-model="selected">
<option v-for="option in options" :value="option.value">
{{ option.text }}
</option>
</select>
<div>Selected: {{ selected }}</div>
Value bindings
For radio, checkbox and select options, the v-model binding values are usually static strings (or booleans for checkbox):
<input type="radio" v-model="picked" value="a" />
<!-- `toggle` is either true or false -->
<input type="checkbox" v-model="toggle" />
<!-- `selected` is a string "abc" when the first option is selected -->
<select v-model="selected">
<option value="abc">ABC</option>
</select>
Checkbox
type="checkbox"
v-model="toggle"
true-value="yes"
false-value="no" />
true-value and false-value are Vue-specific attributes that only work with v-model. Here the toggle property's value will be set to 'yes' when the box is checked, and set to 'no' when unchecked. You can also bind them to dynamic values using v-bind:
type="checkbox"
v-model="toggle"
:true-value="dynamicTrueValue"
:false-value="dynamicFalseValue" />
Radio
<input type="radio" v-model="pick" :value="second" />
pick will be set to the value of first when the first radio input is checked, and set to the value of second when the second one is checked.
Select Options
<!-- inline object literal -->
<option :value="{ number: 123 }">123</option>
</select>
v-model supports value bindings of non-string values as well! In the preceding example, when the option is selected, selected will be set to the object literal value of { number: 123 }.
Modifiers
.lazy
By default, v-model syncs the input with the data after each input event (with the exception of IME composition as stated previous). You can add the lazy modifier to instead sync after change events:
<input v-model.lazy="msg" />
.number
If you want user input to be automatically typecast as a number, you can add the number modifier to your v-model managed inputs:
If the value cannot be parsed with parseFloat(), then the original value is used instead. The number modifier is applied automatically if the input has type="number".
.trim
If you want whitespace from user input to be trimmed automatically, you can add the trim modifier to your v-model-managed inputs:
Lifecycle hooks
Lifecycle Hooks are special methods or peepholes that provide insight into how a library or framework works behind the scenes. These methods let you know when a component in the Vue instance is created, added to the DOM, updated, or destroyed.
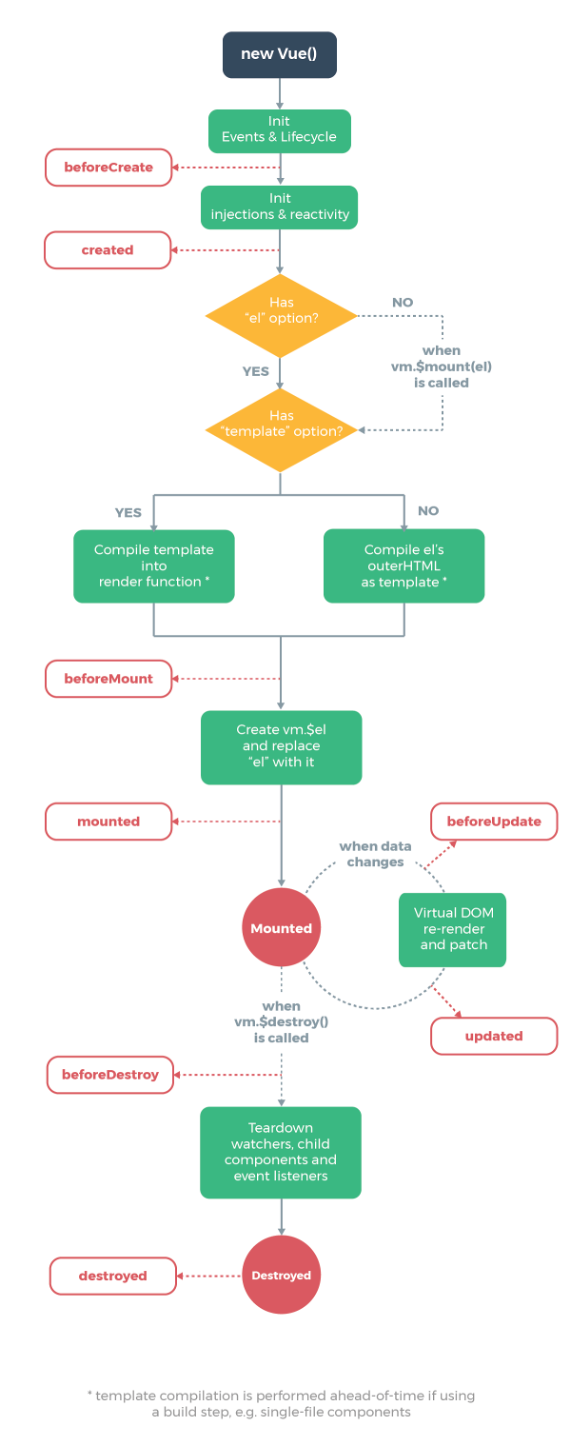
Lifecycle Diagram, © Evan You
There are eight lifecycle methods:
- Before create
- Created
- Before mount
- Mounted
- Before update
- Updated
- Before destroy
- Destroyed
We will be using the test component, which can be found in the components folder under the src folder. This is what it should look like:
<template>
<div>
</div>
</template>
<script>
export default {
name: ‘Test’,
props: {
msg: String
}
}
</script>
<! — Add “scoped” attribute to limit CSS to this component only →
<style scoped>
h3 {
margin: 40px 0 0;
}
ul {
list-style-type: none;
padding: 0;
}
li {
display: inline-block;
margin: 0 10px;
}
a {
color: #42b983;
}
</style>
beforeCreate()
This is the first lifecycle hook that is called in Vue JS, and it is called just after the Vue instance is initialised.
export default {
name: 'Test',
beforeCreate() {
alert('beforCreate hook has been called');
console.log('beforCreate hook has been called');
}
}
</script>
created()
The Vue instance has been initialised at this point, which has enabled the start of things like calculated properties, watchers, events, data properties, and operations.
export default {
name: 'Test',
data() {
return {
books: 0
}
},
created() {
alert('Created hook has been called');
console.log(`books is of type ${typeof this.books}`);
}
}
</script>
When you run the application, you will see that the type of data that can be presented has changed. It was not feasible in the beforeCreated stage since the activation that occurs here had not yet occurred.
beforeMount()
The beforeMount hook runs before the initial render of the components and after the template or render functions have been compiled.
export default {
beforeMount() {
console.log(`vm.$el has not been created yet`)
}
}
</script>
mounted()
We have access to the reactive components and rendered DOM (through this.$el) in the mounted hook.
export default {
mounted() {
console.log(`At this point, vm.$el has been created and el has been replaced.`);
}
}
</script>
beforeUpdate()
This is the lifecycle hook that is invoked after the mounted hook whenever the data needs to be changed and the DOM needs to be updated. This stage is ideal for any logic that must be performed prior to data changes, such as the removal of an event listener.
<div> {{hello}}
</div>
</template>
<script>
export default {
name: 'Test',
data() {
return {
books: 0,
hello: 'welcome to Vue JS'
}
},
beforeUpdate(){
alert('beforeUpdate hook has been called');
},
mounted(){
this.$data.hello= 'lalalalallalalalalaalal';
}
}
</script>
updated()
This lifecycle hook is called just after a DOM update, which implies it is called right after the beforeUpdate hook. Although it is possible to conduct DOM-related operations here, it is not recommended to update state within this hook because Vue already provides platforms for such.
<div> {{hello}}
</div>
</template>
<script>
export default {
name: 'Test',
data() {
return {
books: 0,
hello: 'welcome to Vue JS'
}
},
beforeUpdate(){
alert('beforeUpdate hook has been called');
},
updated(){
alert('Updated hook has been called');
},
mounted(){
this.$data.hello= 'lalalalallalalalalaalal';
}
}
</script>
beforeDestroy()
This Vue lifecycle hook is invoked immediately before a Vue instance is destroyed, but the instance and all of its features are still operational. At this point, you can manage resources, delete variables, and clean up the component.
export default {
name: 'Test',
data() {
return {
books: 0
}
},
beforeDestroy() {
this.books = null
delete this.books
}
}
</script>
destroyed()
At this point in the Vue lifecycle, all child Vue instances have been destroyed, and event listeners and directives have been unbound. It is called after the object has been destroyed.
export default {
destroyed() {
this.$destroy()
console.log(this)
}
}
</script>
Component basics
Vue Components are a key feature of VueJS that allows you to design custom elements that can be reused in HTML. Let us start with a simple example and develop a component to better understand how components work in VueJS.
<head>
<title>VueJs Instance</title>
<script type = "text/javascript" src = "js/vue.js"></script>
</head>
<body>
<div id = "component_test">
<testcomponent></testcomponent>
</div>
<div id = "component_test1">
<testcomponent></testcomponent>
</div>
<script type = "text/javascript" src = "js/vue_component.js"></script>
</body>
</html>
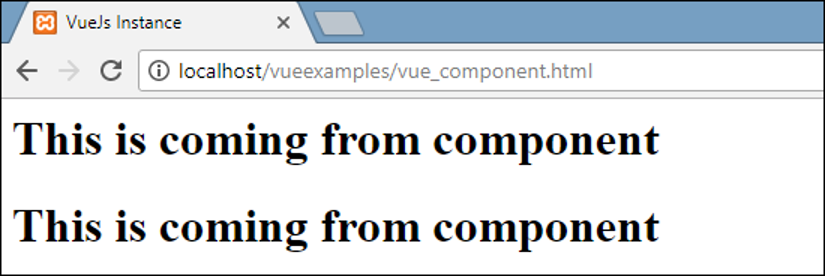
vue_component.js
template : '<div><h1>This is coming from component</h1></div>'
});
var vm = new Vue({
el: '#component_test'
});
var vm1 = new Vue({
el: '#component_test1'
});
We added two divs with the id component test and component test1 in the.html file. Two Vue instances are generated with the div ids in the.js files given previous. We have made a universal component that can be used with both view instances.
To create a component, use the following syntax.
The name of the component becomes the custom element once it is generated, and it may be used in the Vue instance element created, that is inside the div with the ids component test and component test1.
A test component is the name of the component in the.js file, and the same name is used as the custom element inside the divs.
<testcomponent></testcomponent>
</div>
<div id = "component_test1">
<testcomponent></testcomponent>
</div>
We added a template to the component established in the.js file, to which we supplied an HTML code. As shown in the following script, this is a technique of registering a global component that can be made a part of any Vue instance.
template : '<div><h1>This is coming from component</h1></div>'
});
The same will be reflected in the browser after execution.
VueJS – Components by Tutorialspoint, © Tutorials Point India Private Limited.
Organizing components
Components Basics, © Evan You
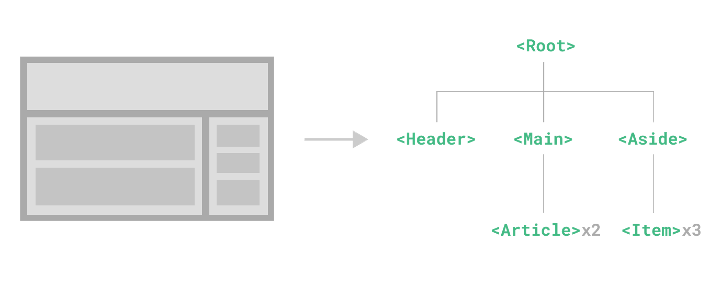
Apps are frequently organised in a nested component tree.
For example, you can have header, content area, and sidebar components, each of which typically contains other components for blog articles, navigation links, and so on. You must register these components to utilise them. This registration could take place on a global or local level. The syntax for global registration is:
// ... options ...
})
Passing data to child components with props
If we cannot transmit data to components, they are useless. Props are used to pass data. Custom properties that you can register on a component are known as props. When we provide a prop attribute a value, it becomes a property on that component's instance:
props: ['title'],
template: '<h3>{{ title }}</h3>'
})
A component can have more than one prop and any can be passed on to any prop.
When we register a prop, we can pass the data to it as a custom attribute:
<blog-post title="Blogging with Vue"></blog-post>
<blog-post title="Why Vue is so fun"></blog-post>
In a typical app, though, there will almost certainly be an array of posts in a data:
el: '#blog-post-demo',
data: {
posts: [
{ id: 1, title: 'My journey with Vue' },
{ id: 2, title: 'Blogging with Vue' },
{ id: 3, title: 'Why Vue is so fun' }
]
}
})
Then, for each post, render a component:
<blog-post
v-for="post in posts"
v-bind:key="post.id"
v-bind:title="post.title"
>>/blog-post>
Prop validation and defaults
In some cases, such as when you are simply experimenting and have not decided on a component design, declaring props as an array of strings is fine. However, to create more reliable components, it is necessary to be able to enforce the type and content of a component's props as well as give default values. These skills are especially crucial in circumstances when you have produced components that are used by other developers.
Set your component's props property to an object with the prop name as the key and the type as the value to apply some simple type checking to your props:
myString: String,
myNumber: Number,
myBoolean: Boolean,
myArray: Array,
myObject: Object
}
If you try to pass a value of the wrong type, you will get a warning in the browser’s console.
With our props object, we now have the flexibility to do more in terms of prop validation. If we want, instead of using the prop type as the value, we can set it to an object:61
isAdminUser: {
type: Boolean,
required: true
}
}
Listening to child component events
Previously, we looked at how to bind handler methods to DOM events (such as mouse clicks) on HTML elements in the template. It is actually quite simple to have components emit their own custom events and listen for them in the same manner.
$emit()
Vue components have access to a $emit() function for emitting custom events. This can be called from either the template (as in the example following) or the component's methods (as in this).
$emit()). Its first argument is an event name, which is the name of the event that the parent component will listen for. If you desire, you can give additional arguments that will be supplied as parameters to any listening callback function.
Here is an example of a SearchBox.vue component in action:
<div class="searchbox">
<label>
Terms
<input v-model="terms" />
</label>
<button @click="$emit('search', terms)">Search</button>
</div>
</template>
<script>
export default {
name: 'SearchBox',
data() {
return {
terms: ''
}
}
}
</script>
In the code preceding, we have a simple SearchBox component that renders a text input with a label, and a button. When the button is clicked, the component emits a search event that the parent component can listen for. This is a parent component:
...
<SearchBox @search="onSearch" />
...
</template>
<script>
import SearchBox from 'src/components/SearchBox.vue';
export default {
components: {
SearchBox
},
methods: {
onSearch(terms) {
// make API call with search terms
}
}
}
</script>
We are rendering the SearchBox component and attaching a handler to the search event in our hypothetical parent component. The onSearch() function is executed when the event fires, and it receives the keywords as an argument, which it can use to make an API call.
Slots
We need to be able to nest components inside one another, just like we can with HTML elements, to create components that can be put together in useful ways.
If you try to use a component with a closing tag and put some content inside, Vue will devour it whole. Anything between the component's opening and closing tags is replaced with the component's displayed output:
<div class="todo-list">
<h2>To-do List</h2>
<ul>
<slot><li>All done!</li></slot>
</ul
</div>
</template>
<script>
export default {
name: 'TodoList'
}
</script>
Here is a parent template:
<TodoList>
<li>Buy some milk</li>
<li>Feed the cats</li>
<li>Have some pie</li>
</TodoList>
In the example preceding, the TodoList component will render any child elements inside a <ul> with a heading.61
Named slots
Your components’ slots can be named, meaning you can have multiple slots rendered in different locations in the template. This allows you to design very flexible components that are highly configurable. As an example, let us say we wanted to create a reusable Bootstrap card component for our application, with slots to provide header, footer, and body content.
Here is the HeaderFooterCard.vue component:
<div class="card text-center">
<div class="card-header">
<slot name="header"></slot>
</div>
<div class="card-body">
<slot name="body"></slot>
</div>
<div class="card-footer text-muted">
<slot name="footer"></slot>
</div>
</div>
</template>
This is how we would use it:
<template v-slot:header>Featured</template>
<template v-slot:body>
<h5 class="card-title">Special title treatment</h5>
<p class="card-text">With supporting text below as a natural lead-in to additional content.</p>
<a href="#" class="btn btn-primary">Go somewhere</a>
</template>
<template v-slot:footer>Two days ago</template>
</HeaderFooterCard>
Slots, © Evan You
'Vue CRUD is a Vue.js, project template. It may be used to develop CRUD-based systems like CRMs and CMSs. The Vue CRUD-powered application is an SPA (Single Page Application) that communicates with the server using an API.
The CRUD cycle's concepts are CREATE, READ/RETRIEVE, UPDATE, and DELETE:
- Create statements are used in insert procedures to create new records.
- Read methods read data based on parameters provided. Retrieve processes, likewise, capture records based on input criteria.
- Update methods are used to make changes to records without overwriting them.
- Delete methods remove data from the specified location.
Build a basic CRUD app with Vue.js, Express.js, Node and MongoDB
Install the backend dependencies
For our simple CRUD app we will be using a MEVN stack (MongoDB, Express.js, Vue.js and Node.js). Axios is a promise-based HTTP client for the browser and Node.js that is used for making HTTP requests:
- Vue.js is a JavaScript framework for building user interfaces. The advantage of Vue over other frontend frameworks is its easiness to learn.
- Express.js is a web application framework for Node.js.
- Node.js is an open source, cross-platform, JavaScript runtime environment that executes JavaScript code outside of a browser.
- MongoDB is an open source, cross-platform NoSQL database used by most modern apps. MongoDB Compass will provide a GUI for MongoDB.
Let us get them installed.
Building the app
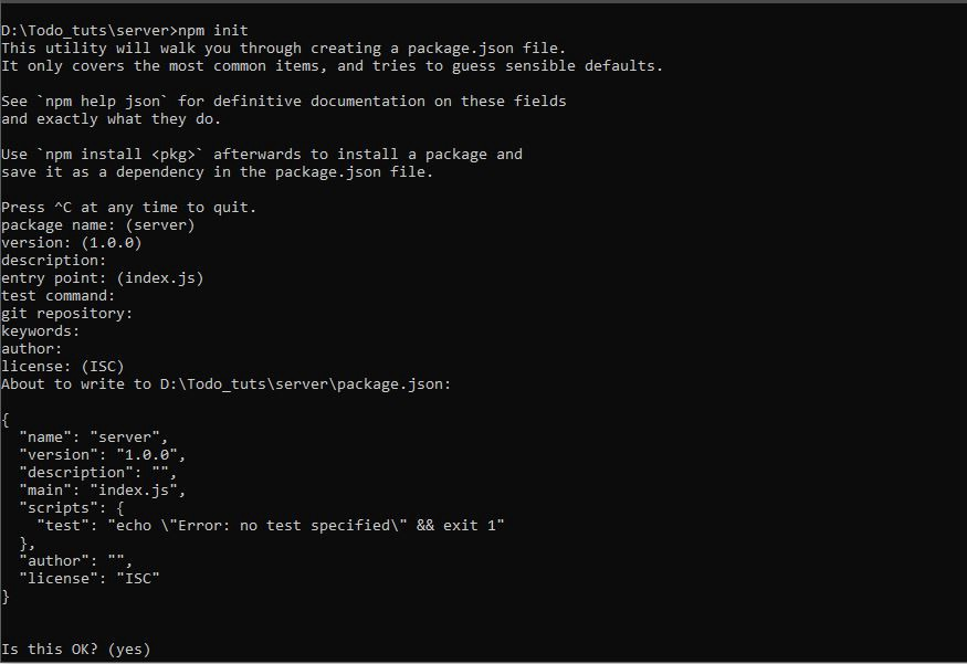
Create a directory named ‘Todo_tuts’ and navigate to the directory
cd Todo_tuts
Creating the backend
- Create a directory named ‘server’ inside ‘Todo_tuts’.
- Navigate to the ‘server’ directory and run the following command.
Select default options by pressing the enter key.
Create a CRUD app using Vue.js and Node.js (MEVN stack) by Albin Jose, © Albin Jose.
Install the 'Express.js', 'BodyParser', and 'Mongoose' dependencies. While trying to communicate from frontend to backend, we utilise:
- BodyParser to parse client requests
- Mongoose for object modelling
- cors to prevent Cross-Origin Request Block errors.
To install dependencies, use the following command.
A package.json file will be created in Todo_tuts/server which looks like this:
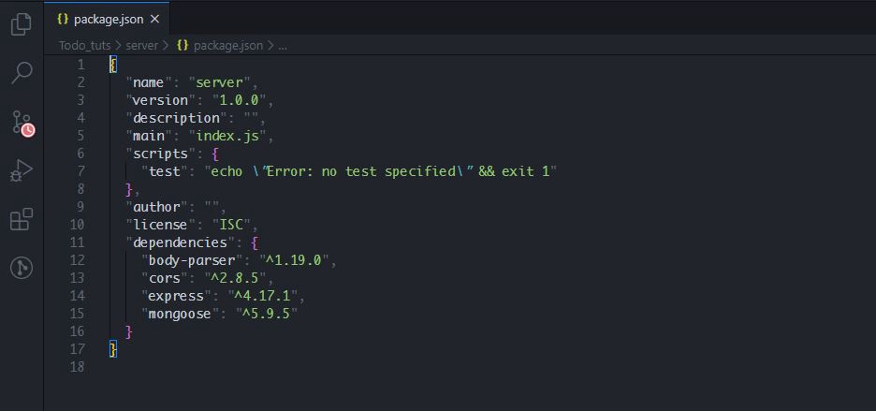
Create a CRUD app using Vue.js and Node.js (MEVN stack) by Albin Jose, © Albin Jose.
Create backend server
In the server directory, create a file called index.js. Paste the following code into the index.js file.
const cors = require('cors')
const app = express();
app.use(cors())
app.listen(3000, () => {
Console.log("Server started on port 3000")
})
First, express and cors are imported. After that, we will set up an Express app. app.use(cors()) that enables cross-origin resource sharing so that cors policy does not reject incoming requests. On http://localhost:3000, app.listen establishes a backend server.
Run the following command in the terminal to start the server.
If the server is started, you will see the following output in the terminal.
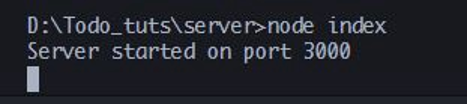
Create a CRUD app using Vue.js and Node.js (MEVN stack) by Albin Jose, © Albin Jose.
Database connection
Let us link our app to MongoDB before we start developing routes. To do so, we must first import Mongoose.
In index.js, paste the following code to connect to MongoDB.
useNewUrlParser: true,
useUnifiedTopology: true
});
var db = mongoose.connection;
db.on('open', () => {
console.log('Connected to mongoDB');
});
db.on('error', (error) => {
console.log(error)
})
Connecting to MongoDB is done via mongoose.connect. MongoDB's default port is 27017, and our database name is todoapp.
The following message will appear in the console after a successful connection to MongoDB.
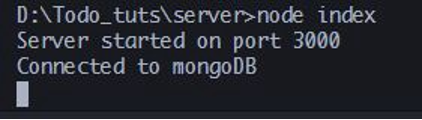
Create a CRUD app using Vue.js and Node.js (MEVN stack) by Albin Jose © Albin Jose.
Schema creation
Our database's schema must now be created. The structure of the data saved in the database is defined by schema. Inside the server directory, create a file called todo schema.js.
Our To-do schema has following fields:
- Title
- Completed.
We should start by importing mongoose. Then use mongoose.schema to create a schema. Add the following code to the todo schema.js file.
const todoSchema = mongoose.Schema({
title: {
type: String,
required: true
},
completed: {
type: Boolean,
required: true
}
});
const todo = (module.exports = mongoose.model("todo", todoSchema));
At last, we export the schema as a schema model using mongoose.model().
Defining routes
The client request is handled by Routes. We need to construct routes for adding to-dos, updating finished to-dos, fetching created to-dos, and deleting to-dos.
When a post request comes in, we need to import body-parser to parse the body of the request and get to-do details. For this, add the following code to index.js.
app.use(bodyParser.urlencoded({ extended: false }));
app.use(bodyParser.json());
To begin, we must import the to-do schema model. Add the following code to index.js.
Creating a to-do
Copy the following code to index.js to make a to-do list.
let newTodo = new todoModel;
newTodo.title = req.body.todo;
newTodo.completed = false;
newTodo.save((err) => {
if(err){
res.send("Error while adding Todo");
}else{
res.send("Todo added");
}
})
The preceding code produces a new to-do model called 'newTodo,' parses the request, and stores the to-do contents to the database.
Fetching a to-do list
The to-dos are retrieved and sent to the client in two steps. In other words, we need to get both completed and uncompleted to-dos. We will design two alternative routes to make this easier to grasp: one route for completed to-dos, and another for unfinished to-dos.
To-dos that have been completed are routed in this way.
todoModel.find({ completed: true }, (err, todos) => {
if (err) {
res.send("Error while fetching Todos");
} else {
res.json(todos)
}
})
})
Route for uncompleted to-dos
app.get('/todo/uncompleted', (req, res) => {
todoModel.find({completed:false},(err, todos) => {
if(err){
res.send("Error while fetching Todos");
}else{
res.json(todos)
}
})
})
Updating to-do
We set the completed field of a to-do to true to mark it as completed. MongoDB will generate an object id for every document it stores. We will send this object id to the backend API and set the completed to-do's field to true.
todoModel.findByIdAndUpdate(req.params.id, {completed: true}, (err, todo) =>{
if(!err){
res.send("Good Work");
}
})
})
Delete to-do
We will receive the object id of the to-do that has to be deleted from the frontend and delete the to-do with that object id.
let query = { _id: req.params.id }
todoModel.deleteOne(query, (err) => {
if(err){
res.send("Error while deleting todo")
}else{
res.send("Todo deleted")
}
})
})
Our backend server is up and running. Now let us move on to the frontend.
Creating the frontend
In the terminal, run the following command inside the 'Todo tuts' directory.
It will prompt you for a preset. Simply choose the default configuration. Vue will then create the 'client' folder for our frontend code.
npm run serve
Frontend dependencies
We use Axios and Vuetify for the frontend. Axios is a backend HTTP request framework, while Vuetify is a CSS framework. Run the following commands in a terminal from within the client folder.
We will start by installing Vuetify with the following command.
Then install Axios using the following command.
We will send all our requests to http://localhost:3000 with different endpoints to communicate with the backend. http://localhost:3000 will be the address of our backend server. For this reason, whenever a request is made, our backend server should be functioning.
Create to-do
Paste the following code in Todo_tuts/client/src/App.vue
<v-app>
<div class="d-flex justify-center">
<h1 id="addTodo">Add ToDo</h1>
</div>
<div class="d-flex justify-center">
<v-col cols="6" style="margin: 0px auto;">
<v-text-field v-model="newTodo" label="Add Todo" solo></v-text-field>
</v-col>
</div>
<div class="d-flex justify-center">
<v-btn @click="addToDo()" color="primary">Add ToDo</v-btn>
</div>
</v-app>
</template>
<script>
import axios from "axios";
export default {
data: () => ({
newToDo: "",
}),
methods: {
addToDo() {
axios.post("http://localhost:3000/todo/add", {
todo: this.newTodo
}).then(response => {
this.message = response.data;
});
}
};
</script>
The addTodo method will be invoked when you click the Add ToDo button. Using Axios, we make a post request to http://localhost:3000/todo/add within the method.
Fetch to-do
Add the following code to App.vue inside v-app tag below your previously added code.
<div class="d-flex justify-center">
<h1>Unompleted ToDo</h1>
</div>
<div v-for="todo in uncompletedTodos" :key="todo._id">
<v-card class="mx-auto" color="white" dark max-width="800">
<v-card-text class="font-weight-bold title blue--text">
{{ todo.title }}
<v-list-item id="todo-list-item" class="grow">
<v-btn @click="completeTodo(todo._id)" class="mx-2" small
color="green"> Done </v-btn>
<v-btn @click="deleteTodo(todo._id)" class="mx-2" small color="red"> Delete </v-btn>
</v-list-item>
</v-card-text>
</v-card>
</div>
<!-- completed todos -->
<div class="d-flex justify-center">
<h1>Completed ToDo</h1>
</div>
<div v-for="todo in completedTodos" :key="todo._id">
<v-card class="mx-auto" color="blue" dark max-width="800">
<v-card-text class="font-weight-bold title white--text">
{{ todo.title }}
<v-list-item id="todo-list-item" class="grow">
<v-btn @click="deleteTodo(todo._id)" class="mx-2" small
color="red"> Delete </v-btn>
</v-list-item>
</v-card-text>
</v-card>
</div>
By keeping finished and unfinished to-dos in two independent arrays, we can render completed and uncompleted to-dos separately.
Add this inside data in the script tag:
completedTodos: []
Our completed and uncompleted to-dos will be stored in these two arrays. The v-for directive will be used to render.
In the script tag, include the following methods.
// fetch uncompleted task
axios.get("http://localhost:3000/todo/uncompleted")
.then(response => (this.uncompletedTodos = response.data))
.catch(error => console.log(error));
// fetch completed task
axios.get("http://localhost:3000/todo/completed")
.then(response => (this.completedTodos = response.data))
.catch(error => console.log(error));
}
This is one of the lifestyle hooks created in Vue. The Axios get request will hit the backend API and get finished and unfinished tasks when our app is created. These to-dos will be added to two arrays; one for completed tasks and the other for uncompleted tasks, and we will render both using the v-for directive.
Delete to-do
Add the following code below methods in script tag in App.vue:
axios
.delete("http://localhost:3000/todo/" + todoID).then(response => {
console.log(response.data);
});
}
We are deleting something at http://localhost:3000/todo/'+todoID. When the delete button is clicked, the deleteTodo function is called. Each to-todoID is the MongoDB object id. This will be sent to the function that will delete the associated to-do.
Update to-do
Add this code inside method in script tag in App.vue
axios.post("http://localhost:3000/todo/complete/" + todoID)
.then(response => {
console.log(response.data);
});
}
We are making a post request to http://localhost:3000/todo/complete/+todoID to mark the to-do as done. In the backend, the todo with the corresponding todoID will be updated.
After each change, refresh the page. The modification be reflected on the website.
By using the MEVN stack, we have built a simple CRUD app.'65
Routing is one of the most powerful aspects of current single-page web applications (SPAs). On the client side, modern single-page apps like Vue can transition from page to page without requesting the server. The official library for page navigation in Vue applications is Vue Router, an easy-to-use yet powerful router.
Vue router fundamentals
We will create a new project with vue-cli. You can install it with npm instal -g @vue/cli if you do not already have it.
vue create myapp
cd myapp
# start your app by running the following command
npm run serve
Next we can add the Vue Router to our project by running the following command.
Select yes when cli asks if you want to use history mode.
Let us have a look at the folder structure that was automatically generated for us.
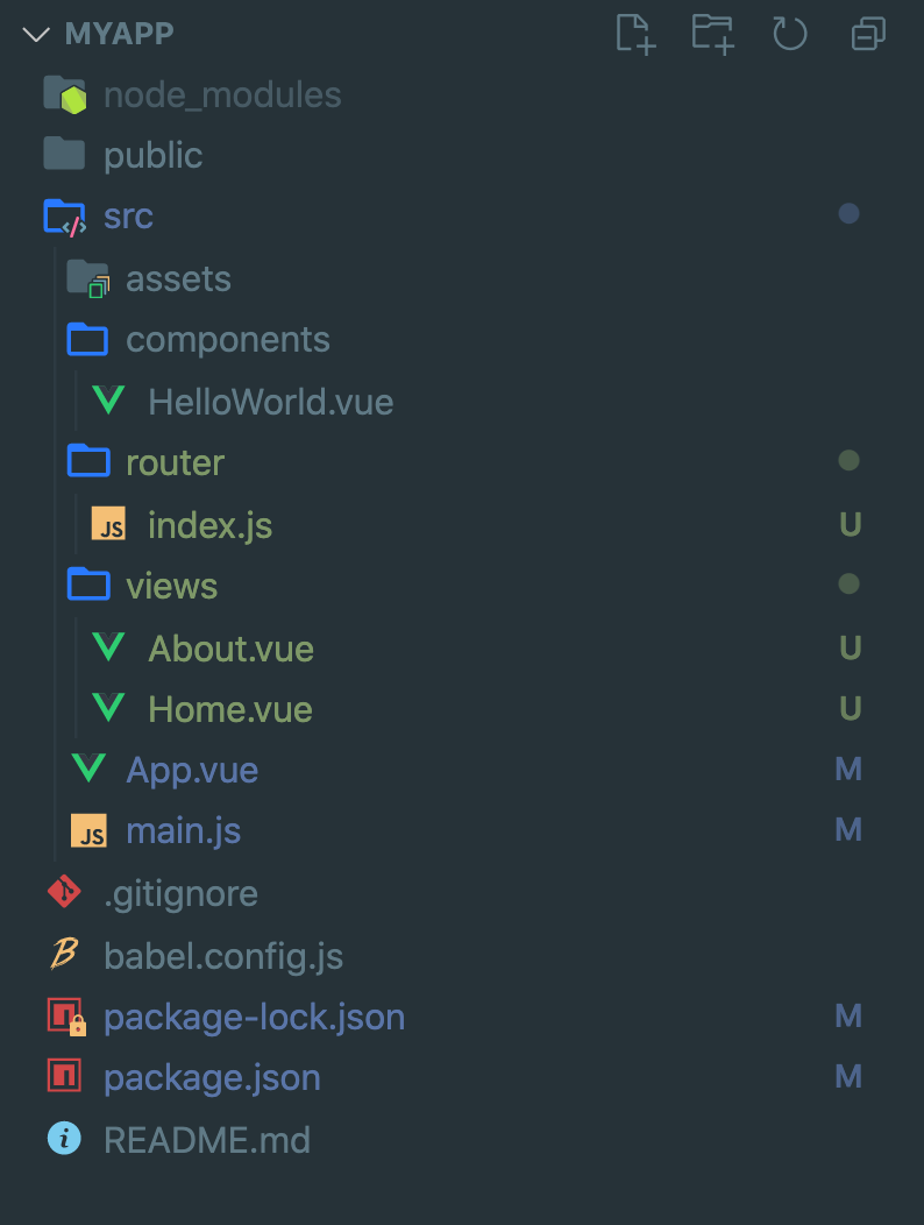
How to Use Vue Router: A Complete Tutorial by Shadid Haque, © VueSchool.io
We get a folder called views, along with two files labelled About.vue and Home.vue. Our pages are represented by these files. In addition, a router/index.js file is created. All the router configurations are contained in this file. Let us have a look at router/index.js.
import Home from '../views/Home.vue'
const routes = [
{
path: '/',
name: 'Home',
component: Home
},
{
path: '/about',
name: 'About',
// route level code-splitting
// this generates a separate chunk (about.[hash].js) for this route
// which is lazy-loaded when the route is visited.
component: () => import(/* webpackChunkName: "about" */ '../views/About.vue')
}
]
const router = createRouter({
history: createWebHistory(process.env.BASE_URL),
routes
})
export default router
The vue-router library's createRouter and createWebHistory functions are imported. The Home component is then imported from views/Home.vue. We declare an array of objects named routes on line 3. This array represents the application's routes. Route objects are the things in the array. The path / in the first route object denotes that this will be our base URL.
When the visitor hits this path, the component property determines which component will be presented. This path will be used to render the Home page. Finally, the route's name is represented by the name property. For the /about path, we are pretty much following the same rationale. Instead of explicitly importing the component, we are using webpack's code splitting capability to do so.
Now let us jump into the App.vue file.
<div id="nav">
<router-link to="/">Home</router-link> |
<router-link to="/about">About</router-link>
</div>
<router-view/>
</template>
<style>
</style>
Keep an eye on the router-link tags. These tags are nothing more than decorative anchor links. The router-link>, unlike an anchor link (a href=""> tag), does not reload the entire page. Keep in mind Vue is a single-page application. The app's data has already been downloaded from the server. The program just conceals some information and exposes what is needed when we route to another view. The to property of router-link tags specifies which page to visit. When navigation links are triggered, the router-view/> tag renders the appropriate component.
Now let us create our own route for this app.
<template>
<div id="nav">
<router-link to="/">Home</router-link> |
<router-link to="/about">About</router-link>
<router-link to="/profile">Profile</router-link>
</div>
<router-view/>
</template>
A new router-link needs to be added to App.vue. Then, in the views directory, we create a new component.
<template>
<div class="home">
Profile Info
</div>
</template>
Finally, we must import the following and define the route path in our routes array.81
import Home from '../views/Home.vue'
import Profile from '../views/Profile.vue'
const routes = [
{
path: '/',
name: 'Home',
component: Home
},
{
path: '/profile',
name: 'profile',
component: Profile,
},
{
path: '/about',
name: 'About',
// route level code-splitting
// this generates a separate chunk (about.[hash].js) for this route
// which is lazy-loaded when the route is visited.
component: () => import(/* webpackChunkName: "about" */ '../views/About.vue')
}
]
const router = createRouter({
history: createWebHistory(process.env.BASE_URL),
routes
})
export default router
Watch the following video for more information on Vue Router, with more advanced settings like:
- Lazy loaded routes
- Dynamic segments
- Navigation guard
- 404 Error page.
Knowledge check
Frontend client app
This formative assessment is the same in the React topic. You only need to work through one topic and complete the activity once.
Objectives
For this project, you should be able to:
- Use an external API to produce a web interface
- Utilise a JavaScript framework or user interface library to produce an industry standard single-page application
- Optimise a client-side application for production
Overview
Utilise a JavaScript framework or user interface library to create a single-page application that allows the user to browse items retrieved from an external API.
The app will be a news app that allows users to view news stories from around the world. It will use the News API (newsapi.org).
The basic use cases for the application are:
- View Article List
- View About Page (about the developer, you, and this project)
The application can be extended with the following use cases:
- Search Articles by Search Term
- Filter Articles by Country, Category, or Source
The application should take advantage of built-in features of the JavaScript framework. Where features do not exist, you can use third-party libraries. Use the framework and any number of libraries to:
- Implement navigation to different screens
- Handle XMLHttpRequests (requests to the News API server)
- Create components that communicate with each other. For example, the component that allows the user to filter articles could communicate with the list component
- Implement styles
If you get stuck, post in the forum to ask for help from your tutor and peers. Check in and see if any of your peers need help.
Once you have completed your single-page application, share it in the forum.