In this topic, we will cover:
- App proposal
- Evaluate requirements and technical options
- UX and UX process – including user journeys and stories
- UML diagrams – use case and class
- Wireframes, mockups, and prototyping
- Testing – user acceptance testing and web-based usability testing.
The importance of writing a great proposal

Writing a great proposal is an important stage in your process. You should cover the scope, cost, and timeline within your proposal so that the client can consider the logistics of the app design and development.82 The more information included in the proposal, the better the design of the app. Having a good feel for, and documenting, what your client wants and needs, can lead to a better user experience (UX), and allow you to link the app design to the business goals. This means you will be more likely to win the work!
An app proposal can help you to build trust and transparency with both your client and your developers; ensuring you are all on the same page. This in turn leads to a more efficient and effective build.
How to write an app proposal
You must consider your target audience when you are writing an app proposal. Your design should be inclusive of anyone the app is aimed at, so remember to use appropriate language and consider accessibility.
A proposal is comprised of two documents: An external document and an internal document.
External document
This is a professionally designed client-facing document that is easy for the client to follow. It includes:
- The name of the project, project commencement and projected completion date, and both the client and author’s contact details on the cover page
- A contents page
- An introduction of the client, the context, and the problem that needs to be solved
- Communication of how the website or application will meet the client’s needs in terms of overall user experience, which includes visual design, information architecture, and functionality
- A simple timeline that corresponds to deliverables
- An agreement and contract with any terms and conditions.
Internal document
This is for the development team to use internally. It may include:
- Research results and analysis
- Strategic planning
- Conceptual and visual designs
- Reflection
- Technical UML diagrams such as use case and class diagrams
- A detailed timetable or burndown chart (breakdown of hours, deadlines, deliverables for each stage)
- Technical requirements (languages/code libraries/third party APIs/devices)
- Development notes.
You may also wish to include the following, depending on the project:
- Client overview
- Problem statement/intention of site/identified requirements
- Research (personas/target market, competitor analysis, user testing results and analysis)
- Website analysis (for the existing site)
- Concept development with reasons for design choices that adhere to requirements identified in the planning stage (mood board/style tiles, typography, colour palette)
- Information architecture (site map, wireframes, content, calls to action)
- High fidelity mockups to give a close representation of what the site will look like (mobile version, link to online prototype)
- Functionality (identified as a result of modelling the application’s behaviour using UML diagrams)
- SEO plan/strategy
- Deliverables
- Timeline/number of hours (corresponds to deliverables)
- Budget/costs (corresponds to deliverables and number of hours).
Best practices
Both internal and external proposal documents should adhere to best practices.
- Ensure documents are free of spelling and grammar mistakes
- Give documents a clear information hierarchy that can be skimmed easily
- Describe functionality and structure clearly through diagrams
- Be explicit when showing concept development
- Favour visualisation tools (diagrams, charts, mockups, and so on) over text, and avoid walls of text
- Include all necessary components.
Additionally, client (external) documentation should:
- Be delivered in PDF format on A4 letterhead
- Be presented professionally to a standard that could be shown to a client
- Use language to a technical level suitable for the client
- Show that planning is complete, and the proposal is signed off by the client prior to development.
The language used in the internal documentation should be kept to a technical level suitable for your team members.
Your proposal should outline a clear vision of where you are going, why, and how to get there.
As part of the proposal and design process, you will need to identify requirements. Set aside some time to research these requirements and technical options to ensure stakeholder needs are met.

Identifying requirements
Choosing great tools that you can rely on to develop and deliver your app is a vital part of app proposal and design. This requires you to identify the requirements, research the technical options, and propose a solution.
Clearly defined requirements are essential signs on the road to a successful project.
Requirements need to be:
- Clear and understandable
- Specific, accurate, and complete
- Testable
- Feasible and sensible.
Requirements establish a formal agreement between a client and developer – with both working together to reach a common goal. High-quality, detailed requirements help mitigate financial risks and keep the project on a schedule.
Creating requirements is a complex task as it includes a set of processes such as elicitation, analysis, specification, validation, and management.83
Since needs and solutions can only be defined in terms of a stakeholder and a context, requirements and designs must behave the same way; they are just usable representations of needs and solutions.84Julian Sammy
Requirements can be grouped into four categories – Business, user (stakeholder), solution, and transition.
Business requirements
These include high-level statements of goals, objectives, and needs. Business requirements do not include any details or specific features. They just state the problem and the business objective to be achieved such as:
- Increased revenue/customer reach
- Reduced expenses/errors
- Improved customer service.
User (stakeholder) requirements
The needs of discrete stakeholder groups are specified to define what they expect from a particular solution. This group serves as a bridge between the generalised business requirements and specific solution requirements. They are outlined in a User Requirements Specification and can include, for example, the ability to create various reports, view order history and status, and manage customer databases.
Solution requirements
Solution requirements describe specific characteristics that a product must have to meet stakeholder and business needs. Solution requirements are either functional or non-functional.
- Functional requirements define what a product must do; what its features and functions are. Generally, functional requirements describe system behaviour under specific conditions.
- Non-functional requirements describe the general properties of a system. They are also known as quality attributes. Rather than relating to system functionality, they define how the system should perform.
The following table summarises the two aspects of solution requirements.
| Functional requirements | Non-functional requirements | |
|---|---|---|
| What is the aim? | To describe what the product does. | To describe how the product works. |
| What is the result? | To define product features. | To define product properties. |
| What is the focus? | User requirements. | User expectations. |
| How is it documented? | Captured in use case. | Captured as a quality attribute. |
| Is it essential? | Yes. | No, but desirable. |
| Who defines the requirement? | Usually defined by user. | Usually defined by developers or other tech experts. |
| What type of testing happens and when? | Component, API, UI testing, and so on. Test before non-functional testing. | Performance, usability, security testing, and so on. Test after functional testing. |
| Types | External interface, authentication, authorisation levels, business rules, and so on. | Usability, reliability, scalability, performance, and so on. |
Transition requirements
An additional group of requirements defines what is needed from an organisation to successfully move from its current state to its desired state with the new product. They are only necessary for a short period of time while the transition takes place. Examples can be “users must be trained to operate the system” or “previous data must be migrated to the cloud storage.”
Functional requirements and their specifications
Functional requirements may be written up as text in documentation, or they could be presented as visuals. The most common formats are:
- Software requirements specification document
- Use cases
- User stories
- Work Breakdown Structure (WBS), or functional decomposition
- Prototypes
- Models and diagrams.
Software requirements specification (SRS) document
This document provides descriptions of the functions and capabilities that the product must provide. It also details any constraints and assumptions.
The SRS can be a single document communicating functional requirements, or it may accompany other documentation such as use case documents.

A typical SRS contains the following sections:
- Purpose - Definitions, system overview, and background.
- Overall description - Assumptions, constraints, business rules, and product vision.
- Specific requirements - System attributes, functional requirements, and database requirements.83
Fundamentally a software requirement specification is an outline of what the software is and how it works.
You can ensure that an SRS document is easy to read by using images and charts, being mindful of terminology, and defining references.
- Images and charts: Graphics are a convenient way to engage with your stakeholders and team. Images can bring clarity to the purpose and scope of the software.
- Terminology: Use familiar and general terms to make it easy for readers to understand the intent. For example, if are putting a user login into the software, simply use the term ‘login’ - now is not the time to stretch your creative prowess.
- References: Define references throughout the document to lessen the risk of assumptions and misunderstandings.
How to write an effective SRS
The key steps to writing an effective SRS are:
- Communicate with the client
- Discover the requirements
- Build the structure including an introduction, business goals, intended use, and scope
- Make a general, descriptive document centred on the user and user experience
- Define functional and non-functional requirements
- Confirm with the client.
Use cases
Use cases describe the interaction between the system and external users to achieve goals. They can be presented as use case specifications in text format, or as a use case diagram. We will take a closer look at these later.
User stories
A user story is a documented description of a software feature seen from the end-user perspective. The user story describes what exactly the user wants the system to do.
User stories are always accompanied by acceptance criteria – Conditions that the product must satisfy to be accepted by a user, stakeholder, or product owner. We will take a more in-depth look at user stories later.
Functional decomposition or Work Breakdown Structures (WBS)
A functional decomposition or work breakdown structure (WBS) is a visual document that illustrates how complex processes break down into simpler components.
Prototypes
Prototypes allow you to showcase how requirements will be implemented. They range in fidelity from lo-fi paper prototypes to mockups and hi-fi digital prototypes. We will come back to prototyping later.
Models and diagrams
The previous documents could be presented with text, or visually with models and diagrams such as UML diagrams, user and task flows, and wireframes. Read more on UML diagrams shortly.
Non-functional requirements
Non-functional requirements detail how a system behaves. These requirements are sometimes referred to as the system’s quality attributes. The most common non-functional requirements include usability, security, reliability, performance, availability, and scalability. Usability can be assessed from various points of view including the efficiency of use, intuitiveness, and low perceived workload.
Can you identify which of the examples corresponds to which type of requirement? 83

What does the UX process look like?

Discover
- Focus groups
- interviews/surveys
- usability audit
- gap assessment
- usability goals
- requirements gathering
Define
- Brainstorming
- user profiling
- storyboarding
- creative direction
- requirements definition
- user experience definition
Design
- Wireframing
- prototyping
- functional design
- design concepts
- visual design
Develop
- UI application coding
- style guides
- UI specifications
Deploy
- UI assessment
- standards
- compliance check
- accessibility testing
- user training
- expert evaluation
Drive
- Usability check
- maintain and support
- new needs
The design process will differ depending on what product you are designing.
You are familiar with the 6D UX design process moving from discover, through to define, design, develop, deploy, and drive.
Design Thinking is another methodology for designing in an iterative process.

Design thinking also has six steps, like 6D; which can be categorised into three stages: Understand, explore and materialise.103
6D and design thinking provide two methods for the design process. It might seem like there are endless UX design processes out there, but when you look past the headings, the core concepts at each stage are the same.
Check out this video from InVision, describing the UX design process in more detail.
To recap the video.
- As a UX designer, you need to understand two things; your user and your brand.
- When researching, you can use methods such as one-on-one interviews, surveys, and focus groups. But remember that there is no need to have a huge sample of users. 3 – 5 will do.
- Create a user journey map to help identify any pain points.
- Start the design; create site maps, visual mock ups and finally wireframe for the experience.
- Launch the product, maintaining collaboration with the team and keeping an eye on feedback.
- Analyse by asking questions to find out what went well and what needs to be changed.
User stories
What is a user story?
A user story is an informal, general explanation of a software feature written from the perspective of the end user. Its purpose is to articulate how a software feature will provide value to the customer.87
User stories allow you to design efficiently and effectively for your audience.
Let us look at an example.

"As a student (USER), I want to buy a parking pass (PERFORM ACTION), so that I can drive to school (BENEFIT)."
Using the three C’s you can create a user story. Use a card or post-it so that you have something tangible.
Card: Create the story on the front of the card.
“As a student, I want to buy a parking pass so that I can drive to school.”
Conversations: Keep up communication with stakeholders (verbally is fine but a paper trail is always useful). This is to elaborate on background knowledge, and share thoughts, plans, and updates.
Confirmations: This is the acceptance criteria to confirm that the story is being implemented correctly. These are boundaries that must be defined before story development starts, and it is useful for the user to have some input into these.88
Take a look at the following card:

User stories are more than software system requirements.
User stories put end-users needs front and centre. They use non-technical language to provide the development team with context for their build.
Stories are used in agile settings such as Kanban. They can be ‘burnt down’ during a sprint, and are often the building blocks of larger constructs such as epics and initiatives (projects and larger organisational goals).
What are some benefits of user stories?
- Stories keep the focus on the user
- Stories enable team collaboration; it is easier to work together with a defined end goal
- Stories encourage creative solutions; allowing the team to think critically
- Stories create momentum; providing a small challenge and a small win to celebrate as each story is completed.87
Time to get creative!
Find a post-it note now and create your own story using the three C’s.
- On the front of the Card, put your user story
- On the back of the card, write your Confirmations (acceptance criteria)
- And think about what you would say to stakeholders in Conversations about this story.
User journey
Users take a path called a user journey when they use a particular website. This can be illustrated in its simplest form as a flow diagram. The user journey must be designed in the process of creating the UX to show how the user can achieve their various goals. Break down each step that the user must take to reach the page they need in the shortest time possible.89
A user journey map is made up of website pages and the decision points that navigate between them. This mapping process allows you as the designer to redesign this experience for better efficiency or clarity.89
Different user journey map models
Journey maps are a simplified version of reality. They enable us to make user-focused design decisions.
No two will be the same, depending on the product and designer.
Here is an example of a detailed journey map:

And an example of a much simpler journey map.

Other types of user journey maps
Various user journey maps assist in improving specific goals and are dependent on how a user interacts with a product.104 Here is a quick breakdown of the user journey maps that can be used.
Experience maps
The experience map is not tied to any one company or product. It is utilised to figure out how people behave in general.

Empathy maps
Empathy maps are organised into four sections to track what a user thinks, says, does, and feels when using a product.

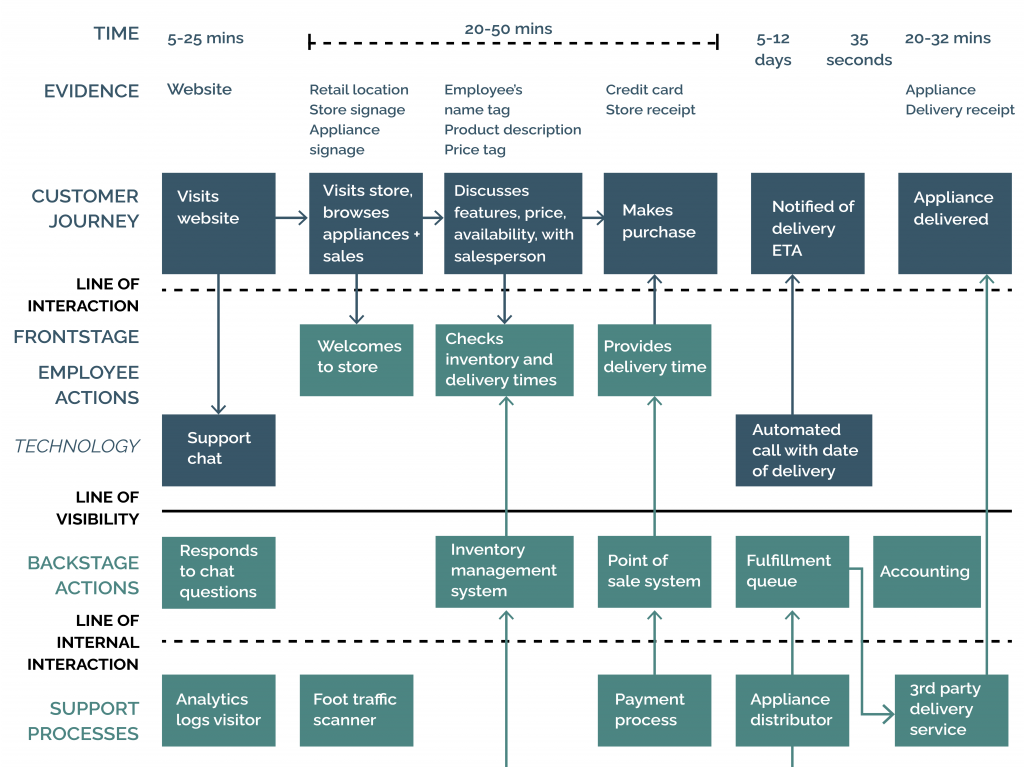
Service blueprints
Imagine service blueprints to be the follow-up to customer journey maps. They are similar to journey maps, but instead of focusing on the user, they are more focused on the business.
How to create a user journey map for your onboarding UX
We have covered what a user journey map is, why you would want to make one, and what aspects to include. Let us walk through the fundamentals of creating your own user journey map.
Clearly indicate your business goals
A user journey map is constructed to support known business goals. Maps that are not aligned with business goals will not result in useful information.
Define the scope
The scope of a user journey map describes the content of your map. The map's scope can range from a high-level view of the entire experience to a more detailed perspective of a specific encounter.
Build user personas
The experience of a person who represents your target audience—a user persona—is always the focus of a user journey map. Having good information about your users might prevent you from making incorrect assumptions about their behaviour.
Define user goals
Make sure your map reflects the realities of users, as well as the context in which they engage with a product. Spend some time thinking about what your target user wants after you have a better idea of who they are.
List touchpoints and channels
A user's interaction with a product or service is referred to as a "touchpoint." Websites, social media platforms, apps, ads, and face-to-face meetings are all examples of business channels where these interactions can happen. Make a list of all the channels and touchpoints that are involved.
Map the journey
Your map could be as simple as a timeline or as detailed as a storyboard that represents each phase visually. You might use sticky notes on a whiteboard for a low-tech approach, or go digital with an Excel spreadsheet or software program.
Validate and refine the user journey
It is critical to check the map, even if the user journey is based on excellent user research. To verify that your route resembles a real-world scenario, use the insights collected from usability testing sessions and product analytic tools.90
Discover, learn, use, decide, goal(s)
It can help to frame the user journey map with different stages, moving from how a user discovers the product or service, to achieving their goal(s).

For each map, identify who the map relates to. In the first instance, this will be the primary persona. But you may wish to create 2 or 3 maps that consider secondary personas. What is the user’s context? Where are they, and what devices, operating systems, and browsers are they using? Also, define the state the map relates to – current or future state.
With your framework in place, you are ready to start mapping. Write down the different ways the user will discover the product or service, and what their goals are. Once you have identified the start and endpoints, you can define the steps to reach the goal(s).
- How will the user learn about the product or service? This could take the form of a landing or about page.
- What are the steps for the user using the product or service to achieve their goal? This stage may be quite detailed and capture data fields.
- At some point, the user must make a decision that allows them to achieve their goal. For example, if the goal is to make a purchase, the user must confirm the purchase with payment. At which point in the journey map is the user making those decisions? How is this decision captured?
Check out the following video on how to create a map for a more complex product or service, and how to elaborate your complex map into detailed steps.

Unified Modelling Language (UML) is the name of the toolkit you can use to create system diagrams.
There are two types of UML diagrams; behavioural diagrams and structural diagrams. We are going explore one type of each specifically; use case diagrams, and class diagrams.

Use case diagrams
Use case diagrams are behavioural diagrams that represent the interactions within a system and its users. You can create one using a series of specialised symbols and connectors.
But why might you create one in the first place?
Use case diagrams:
- Represent the goals of a system
- Define the interactions between the system and user
- Specify the requirements of the system from the user’s perspective
- Identify major classes and their relationships
- Serve as the foundation for developing system test cases
You may find it useful to model the way a system works (on paper or using software) and discuss with your team to make project decisions.

What is a use case diagram made of?
| Use case | Flattened ovals that represent a use that a user might have, or a goal |
|---|---|
| Actor | Stick figures representing the person or organisation that produces or consumes data (for example, the user) |
| Associations | Lines between actors and use cases |
| System boundary box | A box surrounding the system scope. Some parts of the diagram may be outside the system (for example, a user) |
Take a look at these examples of use case diagrams:


Chainsaw use case diagram example: A man with a chainsaw interacts with his environment.
Depending on the situational context, he might fall into one of many different use cases. Could he be on his way to work? Is there anything ominous about the way he is wielding his chainsaw? For example, if he is using the chainsaw in a non-work setting, it may be that he falls within the scope of "scary."91
What are use case relationships?
Let us look at this simple video store use case:

There might exist a relationship between two use cases. There are two types of relationship:
- Uses: one use case always involves the steps of another
- Extends: under certain conditions, a use case follows a variant.
Look at this uses relationship now:

And now look at the extends relationship between two use cases:

Here are some useful guidelines you can use when creating use case diagrams:
- Focus on interactions that provide value to actors
- Do not include details such as how the use case may be achieved in code or user-interface
- Include a user-appropriate level of detail and volume to ensure focus on the basic ideas.
Time to get creative!
Head over to Lucidchart.com, sign up for a free account, and create your own use case diagram.
Make yourself the actor and think of a goal that you have had as a student or customer, and create a simple use case diagram. Try to include:
- A system
- A use case relationship
- A goal.
Share your use case diagram in your forum for this class.
Class diagrams
Now we know what use case diagrams are – they represent the “requirements” of the system.
Class diagrams are slightly different – they show the building blocks (classes) that are needed to build the software/system. They represent the software used to build the system and their relationships.92

A class diagram is a type of structural UML diagram that describes the structure of a system by showing the system's classes, attributes, operations, and the relationships among objects.

Take a look at this video about class diagrams. Make notes if you need to as you will have a go at making one yourself.
Why do we use class diagrams?
- They show the structure of classifiers in a system
- Diagrams provides basic notation for other UML structure diagrams
- They are helpful for developers and other team members.
A UML class diagram is made up of:
- Classes
- Relationships between classes.93
Let us look at this example of a banking class diagram:

What is a Class?
A class is a description of a group of objects all with similar roles in the system, which consists of:
Structural features (attributes) define what objects of the class "know." They:
- Represent the state of an object of the class
- Are descriptions of the structural or static features of a class.
Behavioural features (operations) define what objects of the class "can do."
- They define the way in which objects may interact
- Operations are descriptions of behavioural or dynamic features of a class.
Class Notation
A class notation consists of three parts:

Class Name
- The name of the class appears in the first partition.
Class Attributes
- Attributes are shown in the second partition
- The attribute type is shown after the colon
- Attributes map onto member variables (data members) in code.
Class Operations (Methods)
- Operations are shown in the third partition. They are services the class provides
- The return type of a method is shown after the colon at the end of the method signature
- The return type of method parameters is shown after the colon following the parameter name
- Operations map onto class methods in code.
Time to practise!
If you have not yet already, take a moment to sign up to Lucidchart.com for free.
Play around with creating a class diagram. Get a good handle on learning where the class name, class attributes and class operations go within a box.
Overview
Wireframing, mockups, and prototyping allow you to play with design decisions and test UX and functionality before progressing to app development. These may be included in an app proposal.

Adapted from The Difference Between Wireframe Mockup and Prototype and Their Roles in the Design Process by Eleken, © Eleken
Different design deliverables have different, and sometimes overlapping affordances – they serve different purposes.
- Mockups and high-fidelity (hi-fi) digital prototypes convey graphic design and layout.
- Both low-fidelity (lo-fi) paper prototypes and hi-fi digital prototypes illustrate functionality.
- Wireframes show layout and can communicate proposed functionality if annotated. A wireframe can be made clickable using prototyping software, in which case it would sit between a hi-fi wireframe and a low-to-medium-fidelity functional prototype.
You may not produce all these design deliverables in every project. It will depend on several factors including the scope/size of the project, budget, resources, testing, and how many iterations are needed to achieve sign-off and launch a successful product.
Affordances
An affordance is ‘the quality or property of an object that defines its possible uses or makes clear how it can or should be used.’ 94
A chair affords the ability to be sat on. A button affords the ability to be pushed. Affordances can help us do something or prevent us from doing something (an anti-affordance). Objects (either a physical object or a user interface) that can easily convey an affordance, without the need of a sign or signifier, are examples of good design.
Don Norman evolved the traditional definition of affordance to focus on the relation between the user and the object. This means you should consider not just the properties of an object, but who the user is. A door only affords opening if you can reach the handle.95
Don Norman came up with the concept of Noman Doors – a door that you do not know if you are supposed to push or pull. The affordance is not clear, and it is an example of poor design. Watch the video that follows and consider how making affordances obvious is related to user experience.96
So, what are the affordances of the various design deliverables? And can knowing these affordances help you select which ones to use?
Wireframes
Wireframes act as a blueprint for your app. They provide a clear, simple overview of the structure and layout using basic shapes and lines to indicate imagery, text, buttons, and other features. Wireframes can be sketched by hand or created using online tools such as Adobe XD, Figma, Lucidchart, and Whimsical.

Wireframes afford many benefits for app design including:
- Provide a visual representation of your app so stakeholders can review and provide feedback before progressing the design.
- Quick, easy, and inexpensive to create, review, and revise based on stakeholder feedback – they can even be modified during a stakeholder presentation.
- Wireframes can be sketched on paper or on a whiteboard, leading them to be a great collaborative exercise.97
Wireframes are useful for both product development and communication – plus they are inexpensive to create.
There are three components to a wireframe:
- Information architecture – Organise content and visual components to create a logical and enjoyable user experience.
- Navigation and structure – Illustrate the global and secondary navigation elements which will allow users to move freely around the app with ease. This may include breadcrumbs, buttons, and menus.
- Layout design – How will content elements be positioned? Content may include titles, text boxes, images, videos, and embedded social media. Remember to consider borders, spacing (and white spaces), and positioning.
Wireframes are often simple, fast, black and white sketches – created by hand or using online tools. However, there can be varying degrees of fidelity.
Start with a lo-fi wireframe to define the basics and build on that. This ensures you give due diligence to information architecture, navigation, and layout before moving on to the creative design elements. In doing so, you consider the user journey and how users will meet their goals in the most efficient way.
Lost in translation
Wireframes are incredibly useful for internal communication within the design and development teams. However, they should not be used in isolation when communicating with a client, as the client may not be able to see past the black and white shapes, lines, and placeholders.
Instead of relying solely on wireframes, present your wireframes alongside hi-fi prototypes or mockups. This will allow the client to clearly see the vision for the app.98
Mockups
In the timeline of the design process, a mockup is often created in between a wireframe and a prototype. Mockups illustrate what the finished app will look like – including colour palette, typography, imagery, layout, button styles, and so on. Mockups afford stakeholders the ability to see what the final product will look like, enabling rich feedback. You can use this feedback to validate your design and user experience before investing further time and money into development.109
Mockups are high-fidelity illustrations of how your app will look. Like a wireframe, they may show the structure and logic of an app, but they also feature high-fidelity graphics and user interface elements. Mockups are static and do not include the transitions and functionality characteristic of prototypes and the final product.
Mockups help you to deliver a near-final design of an app without having to actually build the app or write code. Their hi-fi visual design makes them an excellent resource to share with your client to validate the design decisions.
It is possible to use mockups in early user testing. Users will not be able to interact with a mockup, but they can give initial feedback on the design.

Mockups can be used to:
- Get client buy-in early on
- Improve collaboration and communication with the development team
- Boost user experience early in development
- Do initial user testing.
There are five core design elements to consider when creating a mockup; branding and logo, colours, shape and design of elements, typography, and images.
- Branding and logo – these make the user experience of the app harmonious and determine what is possible with other design elements.
- Colours – Users will often notice colours first. Be mindful of accessibility and choose a simple, clean palette.
- Shape and design of elements and components – While buttons, menus, and other navigational elements will not do anything functional in a mockup, you should still consider what they will look like (including in different states!)
- Typography – The fonts and font sizes in your mockup should clearly reflect those you are intending to use in the final app. Aim for optimal readability in titles, headings, navigation, and content.
- Images – Ditch the placeholders as soon as possible so testing and review are more realistic and valid.99
Prototypes
Prototypes are a close replica of what an app will look like when complete, usually without code but not always. Native prototyping involves writing code and building prototypes to test on real devices. Depending on the fidelity, prototypes incorporate most of the final user interface design and interaction. They are one of the most powerful tools in a UX designer/developer's inventory.
Prototypes afford us the ability to experiment and test out assumptions before full and expensive dev work happens. They are an ideal way to communicate functionality, interaction and design to all stakeholders and test users. Prototypes evolve from lo-fi to hi-fi in an iterative cycle.
Paper prototypes
Paper prototyping is a lo-fi way of prototyping. It is fast, easy, and low-cost. All you need is a pen and paper, although scissors, glue, sticky notes, and tape can also come in handy.

Sketch out the main screen layout, along with basic elements and shapes, including any pop-ups like the onscreen keyboard. You can create several sheets of paper that represent the different screens.
When testing paper prototypes, you need to include a facilitator to talk to the test user, and another team member to “play” the computer – switching out the screens to manually mimic functionality.
Lo-fi digital prototypes
A low-fidelity prototype consists of a bare-bones version of the final product. It typically contains the following:
- Screen layouts
- Simple element outlines
- Sizing, spacing, and positioning of elements
- Basic clickability and navigation between screens.
The focus at this stage of prototyping is on fundamental screen layouts, information architecture, and navigation. A clickable wireframe could be considered a lo-fi digital prototype.
Lo-fi digital prototypes help test users, stakeholders, and dev teams to conceptualize the app’s basic functionality without extraneous distractions.
Hi-fi digital prototypes
With a high fidelity digital prototype, you should be close to having designed all but the finished product. These prototypes contain all the layouts, spacing, element positioning, and navigation of the lo-fi prototype, but with a lot of extra design and content details.
You can usually identify hi-fi prototypes because they have:
- Sophisticated interaction
- Advanced user interface design
- Real content and high-definition images
- Data visualisation.
Hi-fi prototypes may include page scrolling, mouse over micro-interactions, or icons that change colour when tapped. Other interactions could include onscreen navigation between dynamic tabs and in accordion menus – even parallax scrolling.
Case studies: Wireframe to hi-fi prototype
The following case studies are good examples of how the design process progresses, and how the deliverables move from wireframe to mockups to hi-fi prototypes for the creation of an app. These case studies were created by a variety of UX professionals to showcase their work in their online portfolios.
Take a moment to read through these case studies. Consider how they moved through the UX process, and how that can be mapped to the 6D method – Discover, Define, Design, Develop, Deploy, and Drive.
What were the design deliverables in each case study? When and how were they used?
- User journeys and user stories
- User and task flows
- Information architecture and site maps
- Sketches and wireframes
- Mockups and moodboards
- Low- and high-fidelity prototypes.
Parking Finder App designed by Soumitro Sobuj – An app that helps users find parking slots.
Recipe App designed by Dorothea Niederee – An app that offers inspirational recipes for people seeking to eat healthier.
Bee Better designed by Anastasiia Mysliuk – A habit tracking app to help users develop new helpful habits.
Sit My Pet designed by Aiman Fakia – An app for pet owners to connect with pet sitters.

User acceptance testing (UAT) versus usability testing
Testing is a crucial part of app design. In an agile methodology, testing happens throughout the iterative design process. Consider two fundamental types of user testing – user acceptance testing (UAT) and usability testing.
Sometimes UAT and usability testing are conflated, but they are distinct types of testing. Read the following case study to learn how a mobile game developer used the two types of testing.

Developing a mobile game app for Android
‘Last year I was developing a mobile game for Android—think Whack-A-Mole meets mutant veggies. Eight months into the project we decided to do some user acceptance testing to find some bugs before launch. We got several reports of the game crashing from testers, but we looked in the code and couldn’t find out why.
This is when we decided to do some usability testing. After conducting usability testing with a facilitator, note taker, recording equipment, and eight participants, we determined that the crash wasn’t the issue. The spot where players had to drop veggies was dangerously close to the back button. Users kept hitting the back button by accident, causing the program to quit and make it seem as if the game had crashed.
User acceptance testing dealt with functionality and showed us that there was a critical error with the game.
Usability testing dealt with user behaviour, and showed us what the true error was.’101
UAT finds bugs. Generally, it happens towards the end of the design process, as a gate to pass so the project can be signed off by stakeholders and released to production.
Usability testing assesses how easy, usable, and learnable the app is for target users. It is done throughout the design process with prototypes of varying fidelity.

Usability testing
Web-based usability testing
Web-based usability testing, commonly referred to as User Experience (UX) testing, is a method of determining how simple and user-friendly a software product is.
What is usability testing?
The usability of an object refers to how simple it is to use. A machine, tool, method, book, software application, or website can all be used as the object – anything that may be used by a person is suitable.
Web-based usability testing involves having real people engage with a website, app, or other product you have created, and analysing their behaviours and reactions.
Why is usability testing important?
‘Usability testing is carried out by real-life users, who are more likely to uncover difficulties that people who are already familiar with a website are unaware of.
Bringing in new users to test your site, and/or observing how real people are already using it, are effective ways to determine whether your visitors:
- Understand how your site works and don't get 'lost' or confused
- Can complete the main actions they need to
- Don't encounter usability issues or bugs
- Have a functional and efficient experience
- Notice any other usability problems.’105
This type of user research is exceptionally important with new products or new design updates. Without it, you may be stuck with a UX design process that your team members understand, but your target audience will not.
The goal of usability testing
‘The goal of this testing is to satisfy users, and it mainly concentrates on the following parameters of a system:
Effectiveness
- Is the system easy to learn?
- Is the system useful and does it add value to the target audience?
- Are content, colours, icons, and images used aesthetically pleasing?
Efficiency
- Little navigation should be required to reach the desired screen or webpage, and scrollbars should be used infrequently.
- The format of the screen/pages in your application or website should be uniform.
- Include an option to search within your software application or website.
Accuracy
- No outdated or incorrect data should be present
- No broken links should be present.
User-friendliness
- The controls used should be self-explanatory and must not require training to operate.
- Users should be provided help to understand the application/website.
- Alignment with the above goals helps in effective usability testing.’102
Methods of usability testing
There are a few usability testing methods to choose from, but the two most common methods available are:
- Laboratory Usability testing - This testing takes place in a dedicated lab area with observers present. Testers are assigned tasks to complete, while the observer watches and reports on the results of the tests.
- Remote Usability testing - Testers use remote access to the System Under Test to complete tasks. An automatic software records the tester's voice, screen activity, and facial expressions. Observers analyse this data and report the findings of the test.
6 steps to conduct website usability testing
‘Now that you are aware of the many usability test methods available, you can take the following 6 steps to guarantee that the tests are relevant to your website's improvement.
-
Determine what to measure
Clearly define what you hope to accomplish with usability testing and what data you want to collect. -
Identify the best method
Choose the most appropriate usability testing method. Consider the resources you have available to conduct a website usability test. -
Create a task scenario and set your success rate
Next, develop a task scenario, which is the goal that participants must achieve. -
Find participants
Each usability testing session should ideally have five to seven people. -
Conduct the test
Even with unmoderated remote users, you must be consistent in terms of the task and order while conducting a website usability test. -
Analyse your findings
You must summarise the findings and structure the reports depending on the type of testing and your objectives.’108
Usability testing, like any other type of website testing, is a continuous process, so run tests again after you make modifications. This will not only check the adjustments you made were appropriate but also assist in identifying new usability issues.
User acceptance testing
Acceptance testing is carried out to determine if the app has met the requirement specifications. The main purpose of this test is to evaluate the app’s compliance with the business requirements and verify if it has met the required criteria for delivery to users.
User acceptance testing (UAT) is performed by the end-user or the client before deploying the application to market. UAT is done in the final phase of testing after functional, integration, and system testing is complete. The main purpose is to validate end to end business flow.
How to do UAT?
You are ready for UAT when:
- The app is fully developed
- The business requirements are available
- There are no showstopping bugs
- Use cases are documented for testing
Once the entry criteria for UAT are satisfied, you can proceed with the UAT process.

- Analyse business requirements
Use the business requirements to identify and develop test scenarios. Look at UML diagrams and system requirements specifications. - Create a UAT plan
The UAT plan outlines the strategy that will be used to verify and ensure the app meets stakeholders’ needs. It documents entry and exit criteria for UAT, test scenarios, test cases, and timelines of testing.Identify test scenarios - Identify test scenarios and create test cases with clear test steps
Test cases should cover most of the UAT scenarios. - Test data preparation
If possible, use live data for UAT. Data should be scrambled for privacy and security reasons. - Run and record results
Execute test cases and report bugs if any. Re-test bugs once fixed. - Confirm business objectives met
Business analysts or UAT testers need to confirm (sign off) after UAT. After this, the app is good to be deployed to production. Deliverables include the test plan, UAT scenarios and test cases, test results, and bug log.
Exiting UAT
Before exiting UAT and moving to production, the following needs to be met:
- No critical defects open
- The business process works satisfactorily
- UAT sign off meeting with all stakeholders.102
Knowledge check
Designing an app
Time to design and prototype a web app. A company called Cycle Innovation has approached you. They create smart bikes that record your cycling distances, speeds, and routes. Now they would like you to design a web app that their customers can use to track these metrics. The app should be named ‘Track my tracks’.
Your task is to:
- Draw up internal and external proposal documents.
- Work through either 6D or Design Thinking models in your design process.
- Create a user journey map, using any of the models that you think will suit your design, and then create your user stories. Select one user story to explore in more detail.
For your selected user story:
- Create a use case diagram.
- Create a class diagram to represent the classes within the system to achieve this user story.
- Create a wireframe for your app. This can be done by hand, or with online tools. You may wish to extend this and create a clickable wireframe for your selected user story.
Share your design process and artefacts with your peers in the forum. Review and comment on a peer’s post. Did you approach the challenge in the same way?