You may already have some experience with different file formats for video. If you’ve downloaded movies online or copied videos you’ve captured on your phone or camera, you may have noticed more than a few different file extensions.
File types
The file type is commonly differentiated by its file extension and is often described as the 'container' or 'wrapper' for the video. It describes how the elements of the videos are stored and read by our computers and devices.
Browse Adobe's great list of common video formats to see if you recognise any extensions.
MP4
MP4 (MPEG-4 Part 14) is the most common type of video file format. Apple’s preferred format, MP4, can play on most other devices as well. It uses the MPEG-4 encoding algorithm to store video and audio files and text, but it offers lower definition than some others. MP4 works well for videos posted on YouTube, Facebook, Twitter and Instagram.
MOV
MOV (QuickTime Film) stores high-quality video, audio and effects, but these files tend to be quite large. Developed for QuickTime Player by Apple, MOV files use MPEG-4 encoding to play in QuickTime for Windows. MOV is supported by Facebook and YouTube and it works well for television viewing.
AVI
AVI (Audio Video Interleave) works with nearly every web browser on Windows, Mac and Linux machines. Developed by Microsoft, AVI offers the highest quality, but also large file sizes. It is supported by YouTube and works well for television viewing.
MPEG-2
If you want to burn your video to a DVD, MPEG-2 with an H.262 codec is the way to go.
Codecs
'Codec' stands for compression-decompression--which is exactly what it does. A codec can be a software or hardware solution that compresses a video for storage and decompresses it for playback. Each codec has its own advantages and disadvantages. Some codecs offer small files sizes but low image quality, while others might have high image quality but larger files sizes. Having both small file size and high image quality may mean less compatibility.
Two popular codecs are:
- H.264 (AVC): This is currently the most popular format. It’s used in a lot of devices like cameras and phones for recording, and also in streaming platforms like Netflix. H.264 hardware is often part of devices such as televisions, iPhones and computers.
- H.265 (HEVC): This is the next generation of H.26x codec. It stands for High-Efficiency Video Coding, and as the name suggests, it offers better compression while maintaining high image quality. By default, modern iPhones and iPads use this codec as capturing 4k footage can create very large files, especially at high frame rates.
Frame rate, or FPS (frames per second), is the number of individual frames used every second to capture and display motion.
In the Film History module, we looked at early 1900s films like 'Arrival of a Train at La Ciotat' (The Lumière Brothers, 1895) and 'A Trip to the Moon' (Georges Méliès, 1902). These early examples were often shot at very low frame rates: 12-18fps. This is why the motion often appears choppy.
24fps is considered the standard recording frame rate for film and television. It allows for smooth movement and a cinematic look to the motion. The number 24 came about in the 1920s in response to the need for the film industry to have a standard that could be used to synchronise both the movie and the recorded audio.
25fps in NZ, or 30fps in the US, is common for live television like a news broadcast or sporting event. It’s also popular for soap operas. 30fps is the default recording frame rate for many phones and apps.

Slow-motion
60, 120, and 240fps are very high frame rates and these are often used to create slow-motion effects. By playing back footage shot at 60fps at 30fps, you effectively double the time the motion takes to happen without making it appear choppy.
Some filmmakers have chosen to use high frame rates in their movies. Peter Jackson chose to use 48fps for the 'Hobbit' movies in an effort to render a sharper, more 'realistic' image. It’s worth looking at some of the criticism of this decision.
Ang Lee’s 'Gemini Man' was shot at 120fps--that’s very fast!

Time-lapse
Capturing frames at much longer intervals (seconds, minutes, hours) and playing them back at a regular frame rate can enable us to see movement that would otherwise be imperceptible (like plants growing and clouds moving). Time-lapse can be a useful way to show the passing of time.

When we’re discussing resolution for film and video we’re usually talking about the output resolution or the resolution we’re capturing at. In both cases, it’s about the number of pixels.
Other than the price, the two main considerations when purchasing a television are its size and its resolution (or the number of pixels it can display).
A few years ago, most large-screen televisions were advertised with a resolution of 1080p (also known as full HD). This meant that there were 1080 pixels going vertically down the screen. Because televisions come in a standard shape of 16:9, it also meant that there were 1920 pixels going horizontally across the screen.
1080p also became a popular recording size for both professional and consumer equipment with video cameras, digital SLR cameras and smartphones all supporting the size for recording.
Recently, 4K (Ultra HD or UHD) has become the new standard for large televisions, especially for screens 50” and above. A 4K screen has the equivalent number of pixels as 4 1080p screens.
As the pixel density increases, more detail can be captured by a camera or displayed by a screen. A lot of modern cameras and phones now have the ability to record in 4K, with some now supporting 8K.

- Click New Project…in the Home window. Give your project a name and set the Capture Format to HDV.


Premiere includes some default Workspaces for:
- Assembly
- Editing – This is the default Workspace and includes the following panels:

- Project: Where we import and organise the file we’ll use in our project. This includes videos and still images, music and audio, and the sequences we create.
- Timeline: Where we put our media to assemble, create and edit a sequence.
- Program: Where our timeline will be displayed.
- Source: Where we can view clips before they go in the timeline.
- Color
- Effects
- Audio
- Graphics

- Double-click in the centre of the Project panel to select and import your media. Your project panel will now include the file you just imported.
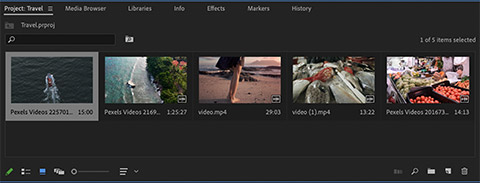
- Double-click a file in the Project panel to display it in the Source panel.
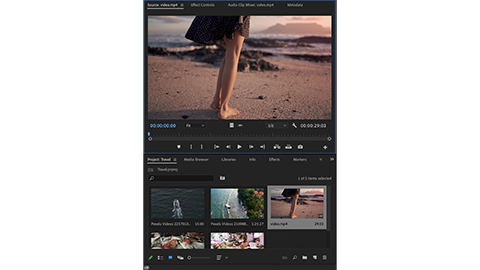
- Use the player controls to preview the clip.


As a filmmaker, it’s important to make decisions about which parts of the clip to include in your timeline.
- Move the play head to a point in the clip where you would like it to begin, and click the Mark In button.
- Move the play head to a point in the clip where you would like it to end (around 10 seconds) and click the Mark Out button.
- Now click and drag from the middle of the source panel and drop onto the timeline.
This will create a new sequence and add the clip to it. The sequence will be created using the setting from the clip you dragged.
The new sequence will be added to the project panel and named after the first clip is added.
You can drag media from the source panel or the project panel into the timeline.
Dragging a clip into the program window will allow you to choose how the clip is placed in the timeline.

- Insert will split the clip at the play head in the timeline and place the dragged clip between the split clips.
- Overwrite will place the dragged clip at the play head and overwrite any clips after it in the timeline.
- Replace will override only the clip where the play head is.
- Overlay will place the clip at the play head on a video layer above the clip already in the timeline.
- Insert Before or After will place the clip either before or after the clip the play head is over.
Repeat the process to add additional clips to your timeline and play your timeline using the player controls in the Program panel.