Transitions are how we move from one clip to another. Watch the following video for a few insights before we begin.
Standard cut
This is the most basic transition, and it requires no extra effort in Premiere. It’s just the end of one clip meeting beginning of the next.
Jumpcut
Jump cutting can be used to speed up a scene or show time passing more quickly. We use the razor tool to make cuts in the clip and remove pieces that make the scene drag on. You often see just cuts in Youtube videos.


- Start by dragging a clip into the timeline.
- Use the Program panel player controls or drag the play head to a point where an action has just finished.
- Select the Razor tool from the central Tool panel and click on the video track where the play head is. This will make a cut in the clip.
- Move the play head to the beginning of a new action point and make another cut.
- Right-click the clip between the two cuts and select Ripple Delete. Ripple delete removes the clip and shifts the clips that follow down.
- Repeat until the clip is finished.
Jump cuts can also be used to edit out dialogue mistake. Watch the video below for more tips.
Transition effects
Transition effects can be applied between clips and cuts to change how the transition will happen. There are many different types of 'Wipe and Dissolve' that can be applied.
You can find a list of transition effects by clicking the Effects tab in the Project panel and expanding the Video Transitions folder.
To add a transition effect:

- Drag a transition effect from the project panel between two video clips in the timeline.
- Open the Effect Controls tab in the Source panel to control the duration.

We can add text and titles to our movie using the text tool in the central Toolbar.
- With the text tool selected, click on your movie in the Program panel. A Graphic element will be added to the timeline at the play head. By default, the element will be 5 seconds long.
- Type what you would like the title to say.
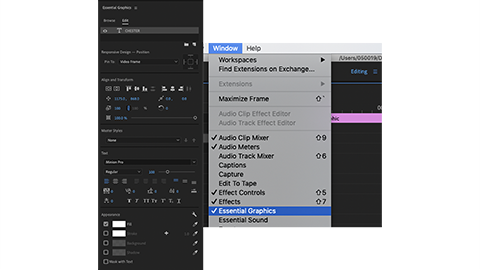
- Open the Essential Graphics panel from Window in the menu bar.

We can use the Essential Graphics panel to adjust the typeface, size, alignment and colour of our title. We can also use the selection tool to position it.
The duration of the title can be adjusted by dragging the ends of the clip in the timeline.
The Essential Graphics panel has a range of pre-made titles with animation that can be dragged onto your timeline and edited.
Premiere Pro can accept most audio formats: MP3, M4a and WAV will all work well.
Audio files can be added to the Project panel using the same process used for video files in Software Lab 1. Once in the Project Panel, audio clips can be added to the timeline by dragging and dropping them into Audio Track 1 or 2.
Audio tracks can be cut and edited in the same way, using the same tools as video tracks.
We can access more audio settings by opening the Essential Sound panel from Window in the menu bar.

Tag the type of audio selected to adjust its properties.

Use the Clip Volume slider to make the audio louder or quieter. This can also be used for audio that is part of your video clips.
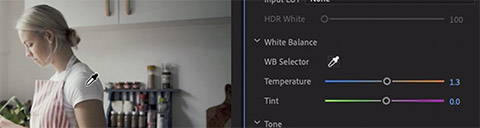
Colour grading is the process of correcting, enhancing or changing the colouring of your captured video. Most footage you capture will need to be graded to correct its white balance, improve its contrast and make it consistent with the rest of your footage and the look of the movie.
Colour grading is actually a 2-step process. Before we can start playing with the tone and colour of our movie, we need to work on the basics to correct white balance, exposure and contrast so they are consistent between clips.
Colour correcting
-
Start by selecting the Color Workspace by clicking Color in the top bar. In the Color Workspace, the Lumetri Color panel will appear on the right-hand side of the screen and clips will be selected if the play head is over them. Many of the settings in the Basic Correction section will be familiar across other software.
- With the White Balance Eyedropper selected, click on an area of the image in the Program panel that you know should be white.
- Move the play head the to next clip.
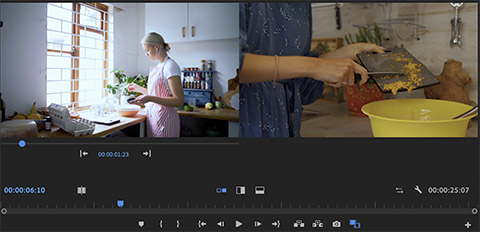
- Turn on Comparison View by clicking the
 icon in the Program Panel player controls. This will show two frames from 2 different points in the movie side-by-side. We can use this view to correct the second clip to match the first.
 - Another way to get consistency is to use the colour matching features.
- Set the Reference viewer to a frame in the first clip, and the Current view to the second clip.
- Select Color Wheels & Match from the Lumetri Color panel.
- Click Apply Match. Premiere will analyse the Reference frame and use the colour wheels to match the clips.
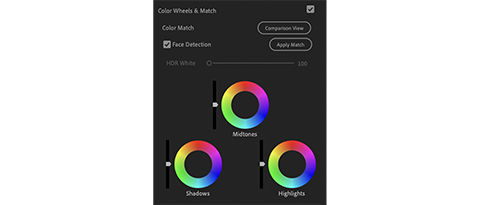
- Repeat across the rest of the clips. You may find that Color Match doesn’t give you the result you expected or wanted. In those cases, undo the colour match and use the basic corrections or play with the colour wheels to make improvements.


Creative colour
Once your footage looks consistent, you can get creative with the look of your movie.
The Creative section of the Lumetri Color panel has a lot of interesting colour effects that can be applied.

Or you can use the sliders and colour wheels in the Creative section to create your own.

'Effects' are a great way to enhance your movie. Premiere has lots of interesting built-in effects.
- Open the Effects Workspace by clicking Effects in the top bar. The Effects panel will appear on the right. Find effects by searching for them in the Search Bar or by expanding the folders.
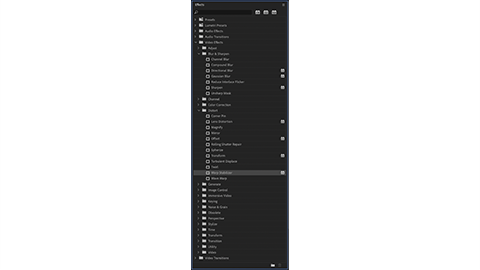
- Locate the Gaussian Blur effect, then drag it onto a clip in your timeline.
- With the clip selected, open the Effects Controls panel in the Source panel. The Effects Controls panel will now include a Gaussian Blur at the bottom of the Video section.
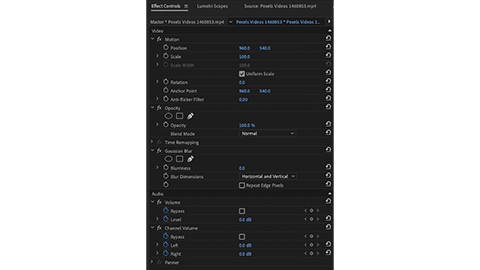
- Click and drag the Blurriness value to the right to increase the effect. This same process can be used to apply other effects. Each clip can have multiple effects applied to it.


Removing green screen
One common effect that you want to apply is to remove the background from footage shot on a green screen.
-
Create a timeline with a background video on Video Track one and your green screen footage on Video Track two.
-
Drag the Ultra Key effect from Keying in the Effects panel onto the green screen footage.
-
In the Effect Controls panel, use the eyedropper to select green in the Program panel.

-
Adjust the Tolerance and Pedestal values to refine the mask.


WARNING
This material has been reproduced and communicated to you by or on behalf of UP Education in accordance with section 113P of the Copyright Act 1968 ( the Act ).
The material in this communication may be subject to copyright under the Act. Any further reproduction or communication of this material by you may be the subject of copyright protection under the Act.
Do not remove this notice.