Character Creation – Adobe Illustrator
Animating a character can be a little more complicated than animating a box or a ball; however, the same principles apply.
We can use Adobe Illustrator to create our character. The important step is to use a layer for each element you’ll want to animate.

In this example, we’ve created a very simple rabbit and each element has its own layer.

Save your character as an illustrator file, open Animate and create a new Full HD Stage with 24fps.
Importing Illustrator files into Animate
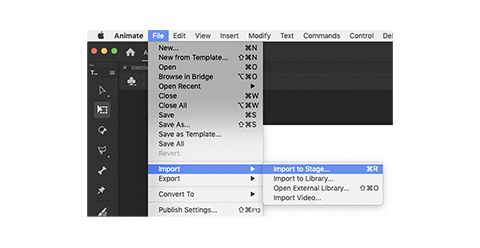
- Select Import to Stage… from File in the menu bar.
- Navigate to your saved character and click Open.
- Confirm Convert layer to is set to Animate layers and click Import.
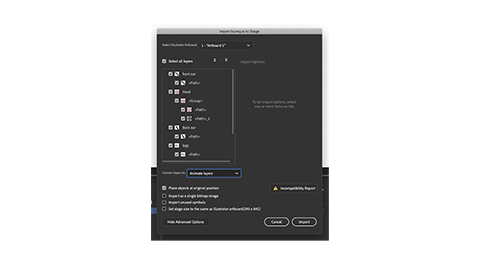
- Your character will appear on the Stage and each of the Illustrator layers will be a layer in Animate layer.
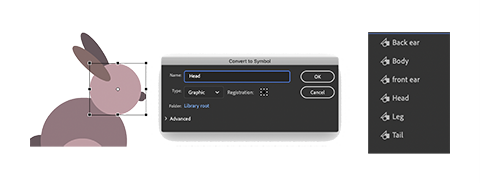
- We’ll want to use tweening so our first step is to make each element a symbol by selecting it and clicking the Convert to Symbol button in the Properties panel.
- Convert each element into a named symbol.
- Currently, each element/layer is completely independent. If we wanted to animate our rabbit doing a hop, we’d need to move every element. It would be better if one of the elements was the main one and everything else followed. We can do this using layer parenting. Watch the videos below for more tips.

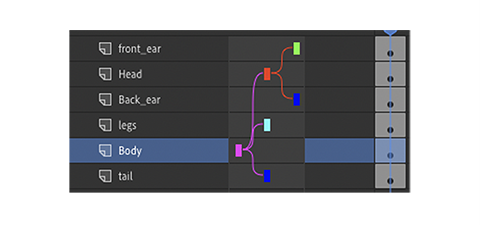
- We can show layer parenting by clicking the
 icon above the timeline. In this example, the body is going to be the main element we move, so the other elements will be 'children' of the body.
 - Click and drag a line from the legs layer to the body layer in the timeline.
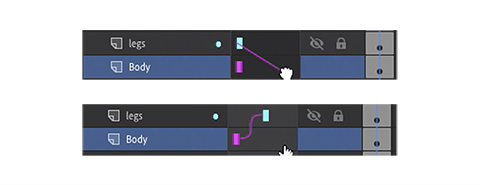
- Repeat for the tail and head.
- Each of the ears will be a 'child' of the head. Now if we move the body, the whole rabbit will move. If we move the head, the ears will move, too.
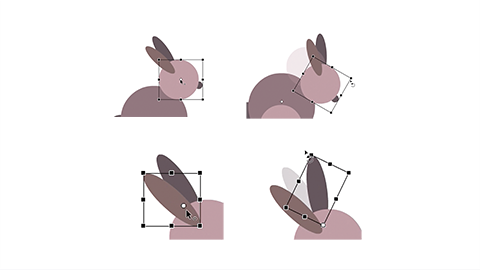
- Change the centre point for each element to a point where want the rotation to happen. With the rabbit, the ears will rotate from where they meet the head, at the base of the ear. The head will rotate from the centre of the body, as will the tail. And the leg will rotate from the centre of the back part of the leg.
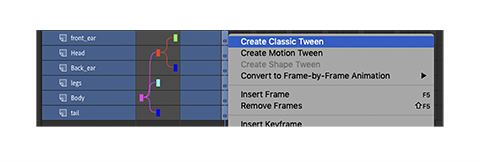
- To start animating, select all the first frames in the layer panel, right-clicking and selecting Create Classic Tween.
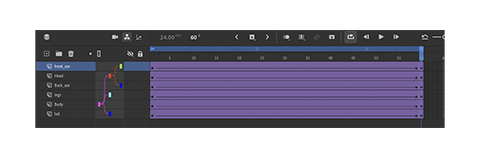
- With the ends of all the tweens selected, drag the last frame to frame 60. (We’ll leave the first 18 frames to build some anticipation.)
- Add a keyframe to the body layer at frames 19, 36 and 52.
- Select the keyframe at 36, then move the body of the rabbit up on the Stage. If you preview the animation now, the motion will be very linear.
- Apply Ease In and Ease Out to the tweens before and after the jump keyframe. If the jump takes too long, try a different Ease Curve, or moving the keyframes closer together. Let’s add a bit of anticipation by lowering the rabbits head before the jump.
- Add a keyframe to frames 16 and 20 on the head layer.
- On frame 16, rotate the head down.
- Apply Ease In Out to the tween before the head lowers. Experiment with the rest of the layers to finish the animation. Try to make the legs point and the ears flop during the jump.


Once your animation is finished, you’ll probably want to share it with your friends and family.
Animate has several great formats to export under File/Export in the menu bar.

Export Image… will let you export the frame you’re currently viewing in an image format. You can choose GIF, JPEG or PNG.

Export Video/Media… enables you to export your entire animation as a video file.

You can choose the format and there are many presets for different outputs like YouTube and Vimeo.
Choose an output destination and click Export.
Export Animated GIF… lets you export a GIF you could use in an email or on social media. It’s just like the sticker you see in Facebook Messenger.
If you’re exporting a GIF, it’s a good idea to think about the size of your animation. You may want to change the size to something a bit smaller.
WARNING
This material has been reproduced and communicated to you by or on behalf of UP Education in accordance with section 113P of the Copyright Act 1968 ( the Act ).
The material in this communication may be subject to copyright under the Act. Any further reproduction or communication of this material by you may be the subject of copyright protection under the Act.
Do not remove this notice.