Good hygiene is incredibly important in the prevention and treatment of germ spreading. This topic covers the core aspects of hygiene requirements, including regulatory requirements, protective behaviours, nappy changing and toileting, and policies and procedures.
By the end of this topic, you will understand how to:
- Following health and hygiene regulatory requirements
- Supporting children to learn personal health and hygiene
- Nappy-changing policies and procedures
- Providing positive nappy-changing and toileting experiences
- Working with families and colleagues to support consistent toilet training.
Infection and illness can spread very quickly in an early childhood service, particularly because of the nature of babies and toddlers and their impulse to taste and feel everything. Your role is to ensure that healthy and safe hygiene practices are followed.
In order to protect the health and wellness of all children, staff, families and the community, it is of utmost importance that the service has established clear and proven practices to ensure good health and hygiene and reduce the risk of spreading infection and illness.
Early childhood educators are required to be competent in their understanding of health, hygiene and wellness practices from the following sources:
- Their service’s policies and procedures relating to health, hygiene and wellness
- The Education and Care Services National Regulations
- The National Quality Framework and National Quality Standard (NQS) – Quality Area 2: Children’s health and safety
NQS 2.1, ‘Each child’s health and physical activity is supported and promoted’
| QA2 | Children's health and safety | |
|---|---|---|
| Standard 2.1 | Health | Each child's health and physical activity is supported and promoted. |
| Element 2.1.1 | Wellbeing and comfort | Each child’s wellbeing and comfort is provided for, including appropriate opportunities to meet each child’s need for sleep, rest and relaxation. |
| Element 2.1.2 | Health practices and procedures | Effective illness and injury management and hygiene practices are promoted and implemented. |
| Element 2.1.3 | Healthy lifestyle | Healthy eating and physical activity are promoted and appropriate for each child. |
| Standard 2.2 | Safety | Each child is protected. |
| Element 2.2.1 | Supervision | At all times, reasonable precautions and adequate supervision ensure children are protected from harm and hazard. |
| Element 2.2.2 | Incident and emergency management | Plans to effectively manage incidents and emergencies are developed in consultation with relevant authorities, practised and implemented. |
| Element 2.2.3 | Child protection | Management, educators and staff are aware of their roles and responsibilities to identify and respond to every child at risk of abuse or neglect. |
The early childhood service will need to ensure they have a process for collaborating with health specialists and families to support children’s needs, including:
- Reducing spread of infectious diseases
- Implementing safe practices for injuries and illness.
It is important for a childhood professional to:
- Be informed of all regulatory requirements related to good hygiene
- Know and follow the policies and procedures at their service.
Children are at a higher risk of infection at an early childhood service. The primary reasons are as follows:
| People and ventilation | Services usually have a large number of people in one room, which may have poor ventilation and little natural light. |
| Hygiene skills | Children are just starting to learn personal hygiene skills and very often do not have consistent skills. |
| Low immunity | Children have weaker immune systems and are not fully immunised yet while in services. |
Types of diseases

Diseases can be grouped by their nature:
-
Airborne diseases
Airborne diseases pass from one person to another, directly or indirectly, when microorganisms — such as bacteria, fungi, or viruses — travel through the air in aerosolized particles. These droplets are expelled when someone with the airborne disease sneezes, coughs, laughs, or otherwise exhales in some way. Droplets can easily spread to hands, furniture, equipment, toys, books and food.
Airborne transmission can occur over relatively long distances and spans of time and it happens when germs are spread by breathing contaminated air, such as via ventilation and air-conditioning systems. Airborne transmission has varying capabilities. Airborne diseases can travel distances greater than 2 meters and remain infectious in the air from minutes to hours. This largely depends on the type of ventilation and preventative measures inside the building.
For example, measles, tuberculosis or TB, Coronavirus, influenza, common cold, and whooping cough.
Although it’s impossible to completely avoid airborne pathogens, there are some things you can do to lower your chances of getting sick:
- Avoid close contact with people who have active symptoms of the disease.
- Stay home when you’re sick. Don’t let vulnerable people come in close contact with you.
- If you must be around others, wear a face mask to prevent spreading or breathing in germs.
- Cover your mouth when you cough or sneeze. Use a tissue or your elbow to cut down on the possibility of transmitting germs on your hands.
- Wash your hands thoroughly (at least 20 seconds) and often, especially after sneezing or coughing.
- Avoid touching your face or other people with unwashed hands.
Vaccines can reduce your chances of getting some airborne diseases. Vaccines also lower the risk for others in the community.
You can read more about airborne diseases on Healthline’s website.
-
Food-borne diseases
Foodborne diseases or food poisoning are caused by contamination of food and occur at any stage of the food production, delivery and consumption chain. There are many different agents that can contaminate food and cause illness. These include bacteria (e.g. Salmonella or Campylobacter), viruses (e.g. norovirus or hepatitis A), and toxins in food (e.g. Staphylococcus aureus or Bacillus cereus). Foodborne diseases encompass a wide range of illnesses, from diarrhoea to cancers. Usually, people are infected after eating inadequately cooked food or by cross-contamination. Agents that cause foodborne diseases can also be spread directly from animals to humans or from person-to-person.
Hand washing is a very effective way of preventing cross-contamination and person-to-person spread of foodborne disease agents.
Hands should be washed with soap and running water for between 10 and 15 seconds:
- before preparing food
- before handling raw and ready-to-eat food
- before eating
- after going to the toilet or changing nappies
- after handling pets
- after working in the garden.
Adopting safe food handling and storage techniques can effectively prevent the spread of foodborne illness. Remember to follow these food safety rules:
- Keep food preparation areas and utensils clean.
- Use separate cutting boards and utensils when preparing raw foods and ready-to-eat foods.
- Thoroughly cook all raw food.
- Avoid using cracked or dirty eggs.
- In the fridge, keep raw foods on a lower shelf than ready-to-eat foods to avoid cross-contamination.
- Keep food below 5ºC or above 60ºC.
- Reheat food until it is steaming (internal temperature at least 75ºC).
- Wash raw fruit and vegetables before eating them.
- Only defrost food in a fridge or by using a microwave.
- Dry dishes with a different dish-cloth than what was used for wiping hands or kitchen surfaces, and wash dish-cloths regularly.
You can read more about foodborne diseases on the Health Department’s website.
-
Infectious diseases
Infectious diseases are caused by infectious agents (bacteria, viruses, parasites and fungi and their toxic products). Many infectious diseases are also communicable diseases, meaning they can be passed from one person or animal to another.
Transmission can occur:
- directly (through contact with blood and bodily fluids) or
- indirectly (through contaminated food, water or surfaces)
- or by means of vectors (such as mosquitoes).
Examples of these communicable diseases include measles (direct or indirect transmission), malaria (transmitted by mosquitoes), and chlamydia (direct transmission through sexual contact).
Immunisation and vaccination is a key preventive measure against infectious and communicable diseases and has been highly successful at reducing infections from significant diseases. Other common examples of infectious diseases are colds and flu, conjunctivitis, and bronchitis.
The chain of infection
Despite the variety of viruses and bacteria, germs spread from person to person through a common series of events. Therefore, to prevent germs from infecting more people, we must break the chain of infection.


WATCH
The following 1-minute video demonstrates how easily germs can spread:
The way to stop germs from spreading is by interrupting this chain at any link.
How do you do this? Hand washing, immunisation and isolation.
The spread of germs
In order to break the chain of infection in care services, it is important to be aware of how germs spread.
Three ways germs spread:
- Contact: Some germs can be spread only through direct contact. It can be hard to know when someone has been exposed because contagious periods can start before symptoms show and last after symptoms have stopped.
- Airborne: Some germs, such as those that cause measles, can remain in the air hours after the infected person has left the room. Airborne germs do not require direct contact to spread.
- Droplets: These germs are passed through coughs and sneezes via tiny droplets that remain in the air, on land and on surfaces, which are then touched by another person.
WATCH
Watch this 2-and-a-half-minute video about a school experiment to see how easily germs can be passed around:
Controlling the spread of germs
According to the National Health and Medical Research Council’s ‘Staying Healthy’ guidelines, there are three (3) key ways to prevent germs from spreading:
- Proper hand washing and environmental cleaning
- The exclusion of unwell children
- Immunisation
Handwashing
Imagine the trail of germs spread through hand contact: a child sneezes and rubs their nose and goes to play with toys. A baby then joins them, putting the toy in their mouth. Next, the child goes to eat a snack and touches plates and cups that are then taken to the kitchen by an adult.
Proper hand hygiene is critical in breaking this chain of spreading germs.
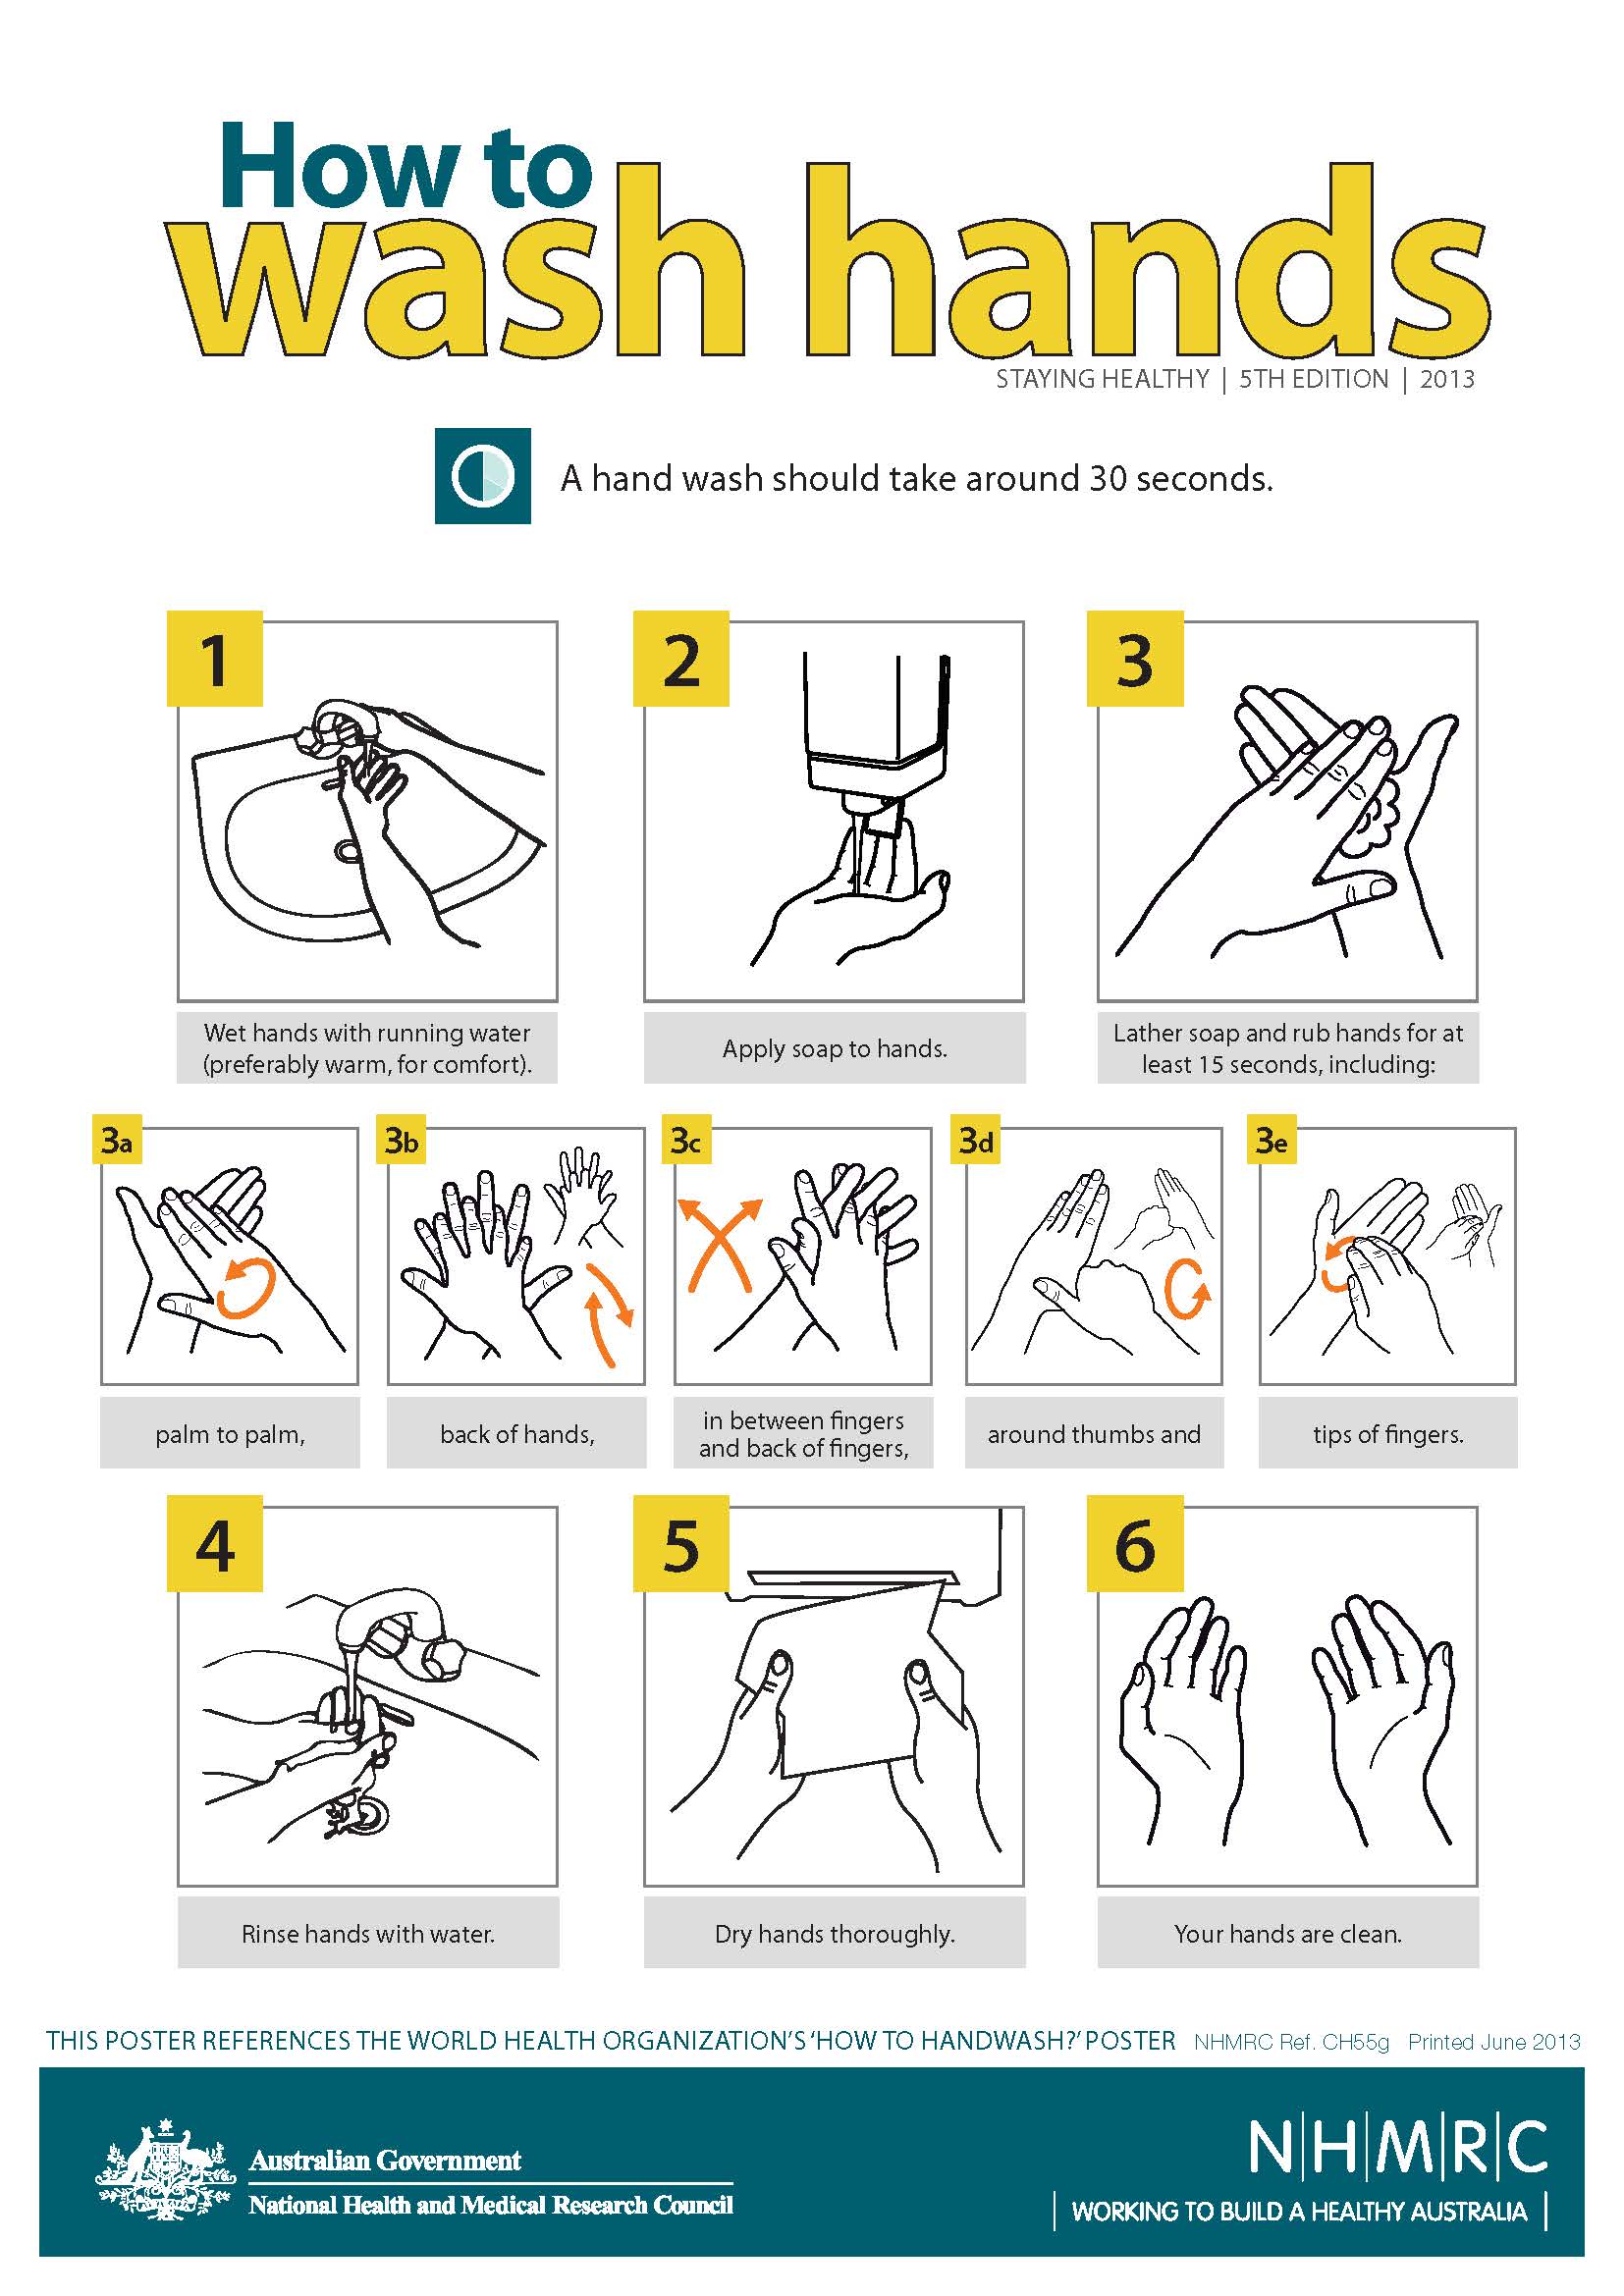
Children's bathrooms should have a poster with images to illustrate how children should wash their hands. Help children to learn to follow the steps while they are in the bathroom.
How to wash your hands properly?
According to the National Health and Medical Research Council’s (NHMRC) hand-washing poster:
- Wet hands with running water (preferably warm, for comfort).
- Apply soap to hands.
- Lather soap and rub hands for at least 15 seconds, including palm to palm, back of hands, in between fingers and back of fingers, around thumbs and tip of fingers.
- Rinse hands with water.
- Dry hands thoroughly.
Did you know?
When washing hands, scrubbing hands should last for at least 20 seconds – which is about signing “Twinkle, twinkle, little star” twice.
This article can provide a few interesting and useful information about effective handwashing in early childhood settings, including why the following are the most effective against germs:
- liquid soap and warm running water
- disposable single-use towels
- hand sanitisers to be used only when soap is not available
- washing infants’ and toddlers’ hands too.
Excluding unwell children
When you notice a child showing signs of illness, it is important to respectfully isolate them from other children and then assess them. Isolating a child can be done by providing them a comfortable place to lie or rest or engage in restful play. This will reduce the spread of the illness to other children and staff.
Once you have assessed the child’s symptoms, you may decide that the child needs to be excluded from the service.
The child will need to be collected by an authorised person and will need to adhere to the public health recommended exclusion periods.
Refer to the National Health and Medical Research Council’s manual for preventing diseases, entitled ‘Staying healthy: preventing infectious diseases in early childhood education and care services’ (5th edition). Information on the recommended exclusion periods for different conditions can be found on page 17’.
Here are some examples for common conditions:
| Condition | Exclusion of case | Exclusion of contacts |
|---|---|---|
| Conjunctivitis | Exclude until discharge from the eyes has stopped unless a doctor has diagnosed non-infectious conjunctivitis. | Not excluded |
| Diarrhoea (no organism identified) | Exclude until there has not been a loose bowel motion for 24 hours | Not excluded |
| Glandular fever (mononucleosis, Epstein–Barr virus [EBV] infection) | Not excluded | Not excluded |
| Hand, foot and mouth disease | Exclude until all blisters have dried | Not excluded |
| Head lice (pediculosis) | Not excluded if effective treatment begins before the next day at the education and care service. The child does not need to be sent home immediately if head lice are detected. | Not excluded |
| Herpes simplex (cold sores, fever blisters) |
Not excluded if the person can maintain hygiene practices to minimise the risk of transmission. If the person cannot comply with these practices (e.g. because they are too young), they should be excluded until the sores are dry. Sores should be covered with a dressing, where possible. |
Not excluded |
| Measles | Exclude for 4 days after the onset of the rash. |
Immunised and immune contacts are not excluded. For non-immunised contacts, contact a public health unit for specialist advice. All immunocompromised children should be excluded until 14 days after the appearance of the rash in the last case. |
| Rubella (German measles) | Exclude until the person has fully recovered or for at least 4 days after the onset of the rash. | Not excluded |
| Varicella (chickenpox) | Exclude until all blisters have dried—this is usually at least 5 days after the rash first appeared in unimmunised children and less in immunised children. | Any child with an immune deficiency (for example, leukaemia) or receiving chemotherapy should be excluded for their own protection as they are at high risk of developing severe disease. Otherwise, not excluded. |
These exclusion recommendations are relevant to all children, families, staff and visitors of early childhood services.
In addition to excluding children, it is also important that staff exclude themselves if they are unwell. Seek medical advice from a doctor to ensure you are returning to work healthy and not risking spreading the infection to others.
In most cases, services will also require a doctor’s clearance to ensure the child is fit to return to the service without spreading disease or illness further.
Note
Families will most likely support early childhood services in their work to isolate children who are infectious.
However, proactive discussions are key to this understanding. For more information on isolating children, see Topic 8.
Immunisation
Immunisation is an important strategy for preventing many dangerous and highly contagious infections. It protects the child and also protects those around them who cannot be immunised due to age or special conditions.
Parents are required to complete immunisation records at enrolment, and it is crucial to make sure children continue to receive the required vaccinations for their age. Services are required to ensure all immunisation records are kept up to date, and they often recheck this every six months.
The immunisation status of the children will be provided through either a health record booklet that the service will photocopy as evidence. Or the Parent will receive digital evidence of immunisation via the MyGov website or App and will be emailed through to the service by the parent.
Where a family has decided not to vaccinate their child, they will need to supply an exception from a medical professional. This can be approved for medical reasons and may be permanent of have a time restriction.
Three (3) strategies to encourage parents:
- Reminders to parents as new immunisation dates approach
- A monthly check and update discussion with parents
- Provide information abound benefits of immunisations
Note
It is critical that services are aware of children in their care who have not been medically immunised— this includes children who have received partial immunisations. When an outbreak of a disease occurs, it is important to exclude any non-vaccinated or partially vaccinated children to protect their health and safety.
For more on immunisation, see sections 5.1 and 8.2.
Additional strategies
Additional strategies to prevent infection include:
| Cough and sneeze etiquette | Consistent practices for cough and sneeze etiquette help to ensure droplet germs are not spread. See 5.2 to learn how to practise this and teach children to as well. |
| Blowing noses | Capable children should be taught to blow their own noses, discard the tissue straight away into the waste basket and wash their hands. Educators who need to help hold or discard the tissue should wear gloves and wash their own hands thoroughly. |
| Appropriate use of personal protective equipment (PPE) | Use PPE, such as gloves and an apron, if you are likely to come in contact with bodily fluids that could infect you, including faeces, urine, saliva, vomit or blood. See Topic 8 for more details on the use of gloves. |
Environment cleaning
Cleaning regularly is required to reduce the number of germs that can be accessed by people in the environment and reduce the risk of spreading an illness or infection. Educators are responsible for maintaining a clean environment inside, outdoors and in bathroom facilities.
Educators should follow the guidance of the service’s cleaning policies and procedures to ensure they are cleaning the correct items at the correct times in the correct way. Items that require regular cleaning include:
- All toys and resources touched by children – Toys need to be washed at the end of each day, especially those in rooms with younger children. Wash toys in warm water and detergent, and rinse them well—many toys can be cleaned in a dishwasher (but not at the same time as dishes). All toys, including cloth toys and books, can be dried by sunlight.
- Couches and cushions – Make sure that all cushions, including large floor cushions, have removable cushion covers that can be changed and washed daily, as well as when they are visibly dirty.
- Floors - Hard floors like tiles and vinyl need to be vacuumed or swept every day. Wet mopping has to be observed at least once a week or as needed. For best results, wet mop with warm water and detergent. Hard floors need to be mopped daily in dining areas, infant, and toddler’s areas.5
- Bathrooms and sinks - Bathrooms and toilets should be cleaned at least once a day, and more often if they are visibly dirty. Ensure that the education and care service has bathrooms and toilets that are appropriate for staff and visitors as well as children; these should include appropriate disposal bins for sanitary products.
- Nappy changing facilities - After each nappy change, clean the nappy change area thoroughly with detergent and water, rinsing and drying with single-use paper towel. If faeces or urine spill onto the change table or mat, clean it with detergent and water, then rinse and dry with single-use paper towel. If possible, it is useful to have at least two nappy change surfaces for each day. At the end of the morning and at the end of the day, remove the nappy change surface (waterproof sheet or change mat), wash it with warm water and detergent and dry it, preferably in the sun.
- Bedding, sleeping mats, cots and linen - Use detergent and warm water. Follow the manufacturer's instructions on how much detergent to use. Vigorously rub the surface to physically remove germs. Rinse the surface with clean water. Dry the surface. 6
- Furniture, including tables, chairs and highchairs - It is advisable to use warm water when cleaning because this makes it easier to remove dirt from a surface. Use a soapy water solution to clean tables, chairs, highchairs using a clean disposable paper towel, then disinfect furniture with diluted bleach water solution. Always wash your hands after wiping tables and other surfaces.
- Mouthed items - Remove toys for washing during the day. Start a ‘Toys to wash’ box and place toys in it during the day if you see a child sneeze on a toy or put a toy in their mouth, or if the toy has been used by a child who is unwell. Toys can also be split into two lots and rotated between washing one day and in use the next. Wash toys in warm water and detergent, and rinse them well—many toys can be cleaned in a dishwasher (but not at the same time as dishes). All toys, including cloth toys and books, can be dried by sunlight.
- Doorknobs - Wash doorknobs daily and whenever they are visibly dirty. Use warm water, detergent and disposable clean paper towel, then disinfect with diluted bleach water solution.
- All routine resources, such as bottles, dummies, utensils, crockery and bowls - Never let children share dummies. When not in use, dummies should be stored in individual plastic containers labelled with the child’s name. Store dummies out of children’s reach, and do not let the dummies come in contact with another dummy or toy. It is best to put bottles, dummies, utensils, crockery and bowls in the dishwasher and/or sanitiser.
- Prams or strollers stored at the service - Clean prams regularly and whenever they are visibly dirty. Use warm water, detergent and disposable clean paper towel, then disinfect with diluted bleach water solution.
- Equipment storage areas - Clean storage areas regularly, tidy up equipment and dispose broken/faulty equipment. Depending on the storage area, whether it is indoors or outdoors, needs to be swept and mopped, shelves wiped down with warm water, detergent and disposable clean paper towel.
It is recommended to allow all equipment and resources to air dry after cleaning. A service’s policies should guide educators on how often these items need to be cleaned and the preferred method used. Frequency could range from multiple times a day to weekly, fortnightly or monthly.
Note
Disinfectants are only necessary if a surface is known to be contaminated with potentially infectious material. Remember, if the surface is not clean, the disinfectants cannot kill germs, so you should always clean first, then (if required) disinfect.
The following table published by Staying Healthy: Preventing Infectious Diseases in Early Childhood Education and Care Services, pages 52–55, explains what to clean, how regularly things should be cleaned and how things should be cleaned:
| Surface or area | Wash daily plus when visibly dirty | Wash weekly plus when visibly dirty |
|---|---|---|
| Bathrooms—wash tap handles, toilet seats, toilet handles and door knobs. Check the bathroom during the day and clean if visibly dirty | X | |
| Toys and objects put in the mouth | X | |
| Surfaces that children have frequent contact with (e.g. bench tops, taps, cots and tables) | X | |
| Beds, stretchers, linen and mattress covers (if children do not use the same mattress cover every day) | X | |
| Door knobs | X | |
| Floors | X | |
| Low shelves | X | |
| Other surfaces not often touched by children | X |
How to clean
Early childhood services will have their own system for cleaning. This may include popular systems such as colour-coded mops and sponges.
It is recommended to use the following products when cleaning:
- Detergent and water – This can be used for general cleaning and areas that have not come into contact with bodily fluids or infectious diseases.
- Disinfectant – This should be used when cleaning surfaces that have come into contact with bodily fluids or an infectious disease. By washing these areas with detergent and water first and then drying the area before you use disinfectant, the chain of infection can be broken.
Here are some important tips for cleaning the environment:
- Cleaning agents distributed using spray bottles do not generally help reduce germs. Mist plus a wipe is not enough to dislodge and kill germs.
- Cleaning with detergent and water should be followed by rinsing and drying the surface to be most effective.
- Disinfection should happen after cleaning with detergent and water to be effective.
Check your understanding

One aspect of development for children is the learning and implementation of their own personal hygiene practices. Children are often open and willing to learn and complete self-help tasks themselves. This encourages a sense of agency. However, while children are still developing physically and cognitively, they will need support and guidance in personal hygiene practices.
Emphasis on personal hygiene practices is important to ensure we are protecting the health and safety of everyone.
Specific practices educators can teach children include:
- Hand-washing practices
- Cough and sneeze etiquette
- Toileting practices
- Oral hygiene.
Key points
Remember, to help create consistency for children, be sure to discuss hygiene practices with families and learn what they teach their child at home. For children to learn personal hygiene and protective practices, they require a consistent approach, and you can help to frame that for them by working collaboratively with their family.
Teaching handwashing
Teaching children how to wash their hands correctly is one of the first steps to teaching personal hygiene.
Educators need to ensure they are teaching each child in an appropriate manner for their age.
Here are practices to implement when teaching hand washing to different age groups:
| Babies | Wash the baby’s hands with a face washer or a baby wipe. Engage and talk to the baby about what you are doing. Where possible, let the baby hold the face washer or wipe and explore it. |
| Toddlers | Use small basins to encourage toddlers to wash their hands. Use role modelling and demonstrating to show the toddler how to do it. During this time engage with the toddlers about why we wash our hands. |
| Three-year-olds and older | Three-year-olds should be independent in washing their hands and will need less assistance and guidance. Ensure you have a visual poster at eye level in the bathroom so children can reflect on the steps. Give the children the time to wash their hands properly—do not rush them. Remind them to use the soap provided and count to 10 when washing and rinsing their hands. |
Handwashing before and after
A good rule of thumb is to teach children to wash their hands before touching anything that should be clean (such as food) and after touching anything that may have germs (such as a rock from outside).
Children should wash their hands before:
- Starting the day at the service
- Eating or handling food.
Children should wash their hands after:
- Eating or handling food
- Blowing their nose
- Coming in contact with any bodily fluids
- Having their nappy changed or going to the toilet
- Coming in from outside
- Touching sand, water in a trough, or playdough
- Touching animals
- Any experience that poses a high risk of spreading infection.
Key points
Children will learn a lot about hand washing from watching you, so model appropriate handwashing practices. Also, help children by ensuring all required equipment is easily accessible and appropriate for use.
Check your understanding
Try to answer to the following questions regarding hand-washing practices. You can check your answers by clicking on the 'Answer' button.
-
Think of three (3) examples of activities before which you would wash your hands.
- Serving food
- Preparing a bottle
- Giving medication
-
Think of three (3) examples of activities you would wash your hands after doing.
- Eating
- Changing nappy
- Applying first aid
- Coming from outside
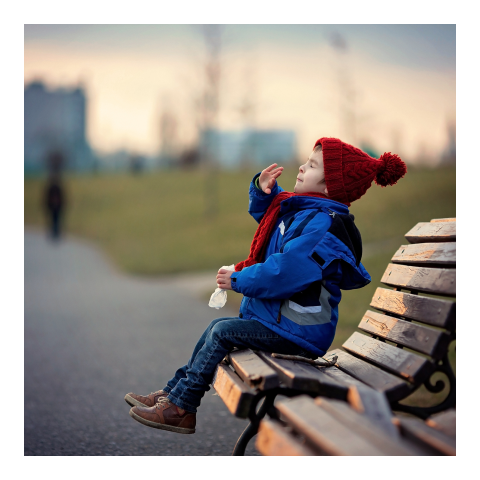
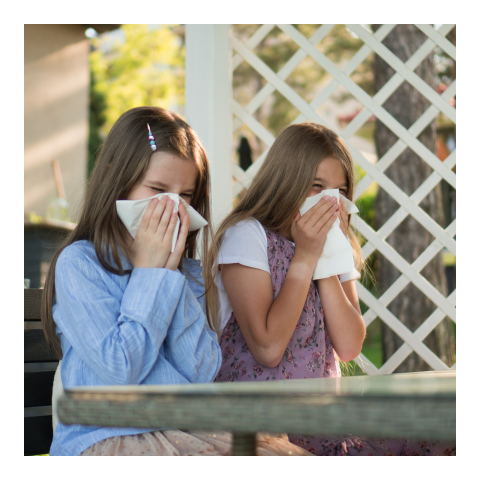
Cough and sneeze etiquette
Coughing and sneezing are common ways for germs to spread in services. Teaching children good hygiene habits is important at home and at the service. This requires patience and consistency.
 |
 |
| The WRONG Way | The RIGHT Way |
|
|
The quickest way to cough or sneeze safely is to sneeze into the bend of the elbow. Sneezing into the hand is not helpful, as germs will be spread as soon as an item or surface is touched. If there is time to get a tissue, sneezing with the nose and mouth covered by the tissue is also good hygiene. Remember that hand washing after sneezing and coughing is important too.
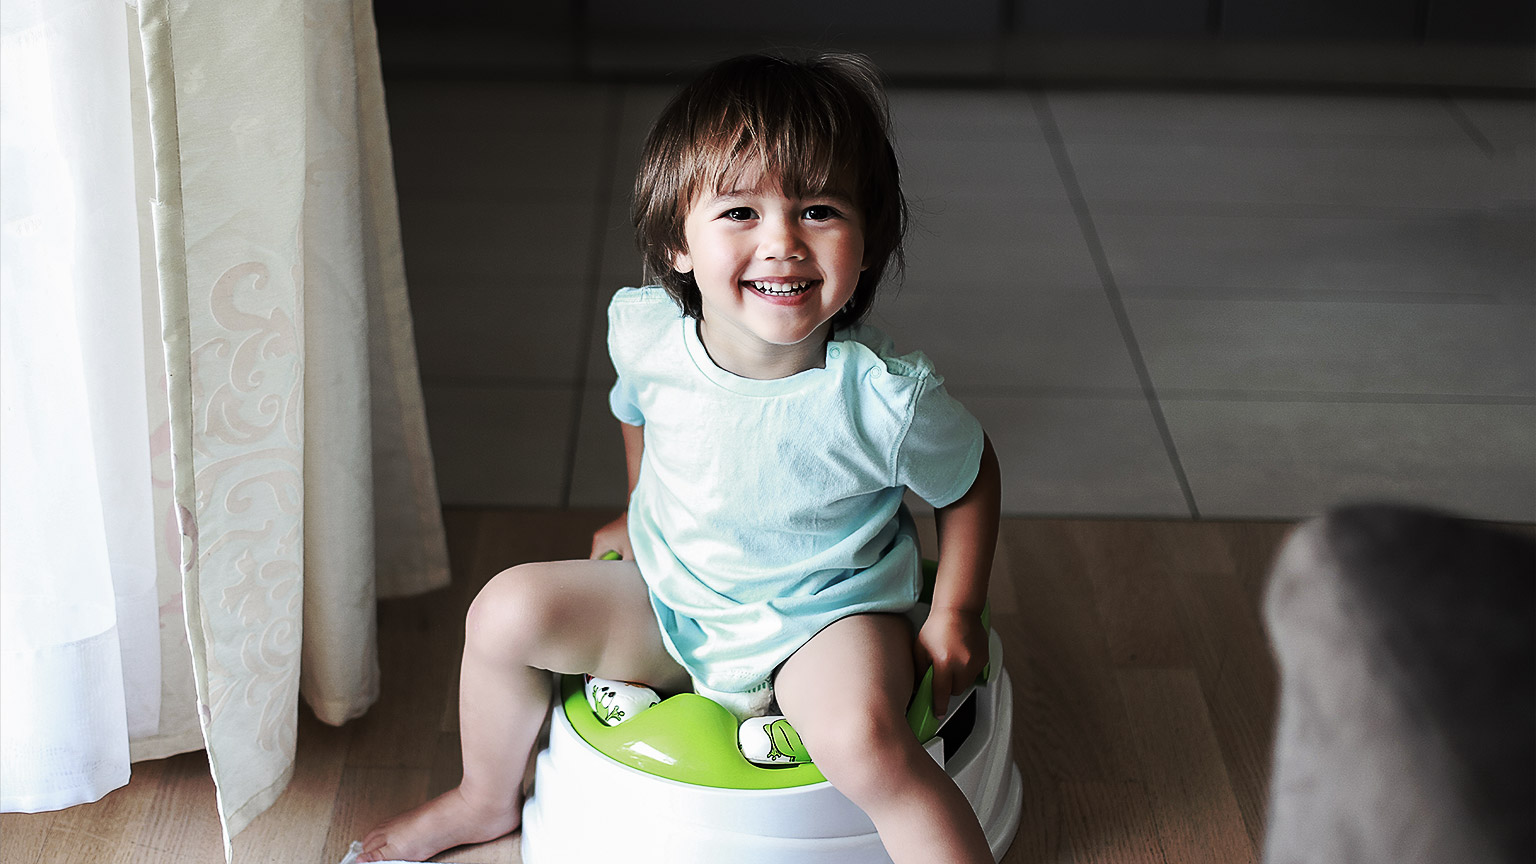
Toilet practices
Babies and toddlers will primarily be in nappies, and educators are responsible for ensuring the children are protected during nappy changes. However, as children start to transition from nappies to using the toilet, they will need support in learning how to complete this task in a hygienic way.
Toilet hygiene for children:
- Dressing and undressing
- Using toilet paper
- Flushing the toilet and closing the lid
- Washing hands with soap
- Drying hands
- Putting away towel or throwing paper into rubbish
Practices to support learning toileting hygiene:
- Allow the child to practise each step of the process themselves and assist only as needed.
- Display a visual poster guiding the children through the steps.
- Explain each step of toileting to the child and discuss the impacts it has on keeping well and healthy.
- Encourage the child to inform you if they have an accident and bodily fluid is on the child’s clothes or floor.
- Praise and encourage the child’s efforts.
- Supervise children when toileting and dressing/undressing, maintaining the child’s right to privacy as much as possible.
Oral hygiene

Oral hygiene is a form of dental care that is vital to personal hygiene for children. Children need support and guidance in understanding the value of oral hygiene and how to correctly care for their gums and teeth.
Babies’ teeth will start developing and showing at different stages but are often seen around the age of 6–10 months. These babies will continue to develop their teeth until around the age of three, where they will have around 20 teeth.
If babies and children are not supported to care for their oral health, they will start to develop gum disease and tooth decay. Both of these can have an impact on a child’s oral health.
Educators commonly support oral hygiene after mealtimes by providing children with apple slices after they have consumed their meal. This acts as a means to help clean the food in their teeth and reduce the accumulation of plaque. Alternatively, encouraging children to swish water in their mouth after mealtimes is also used as an oral hygiene strategy.7
Gum disease
This is usually an infection that has been caused by plaque building up on the teeth and in the mouth. This occurs when a child does not brush their teeth and gums. This bacteria then infects the gums, causing them to become red, swollen and sore.
In the short term this can prevent children from eating and sleeping, socialising and playing. In the long term it could impact the structure of their teeth and jaw.
Tooth decay
Tooth decay occurs when acid is produced by the bacteria in the mouth to breakdown sugary foods and drinks. This then turns into plaque. When a child does not clean their teeth, this plaque starts to dissolve the enamel and creates holes in the tooth. This can be identified by holes in the teeth, black spots, aching in the tooth or mouth, or being sensitive to certain foods and drinks.
- Not brushing teeth two times a day
- Eating sugary foods and drinks
- Eating foods and drinks right before sleep time
- Using the incorrect toothpaste for the child’s age.
Supporting families to encourage good oral hygiene
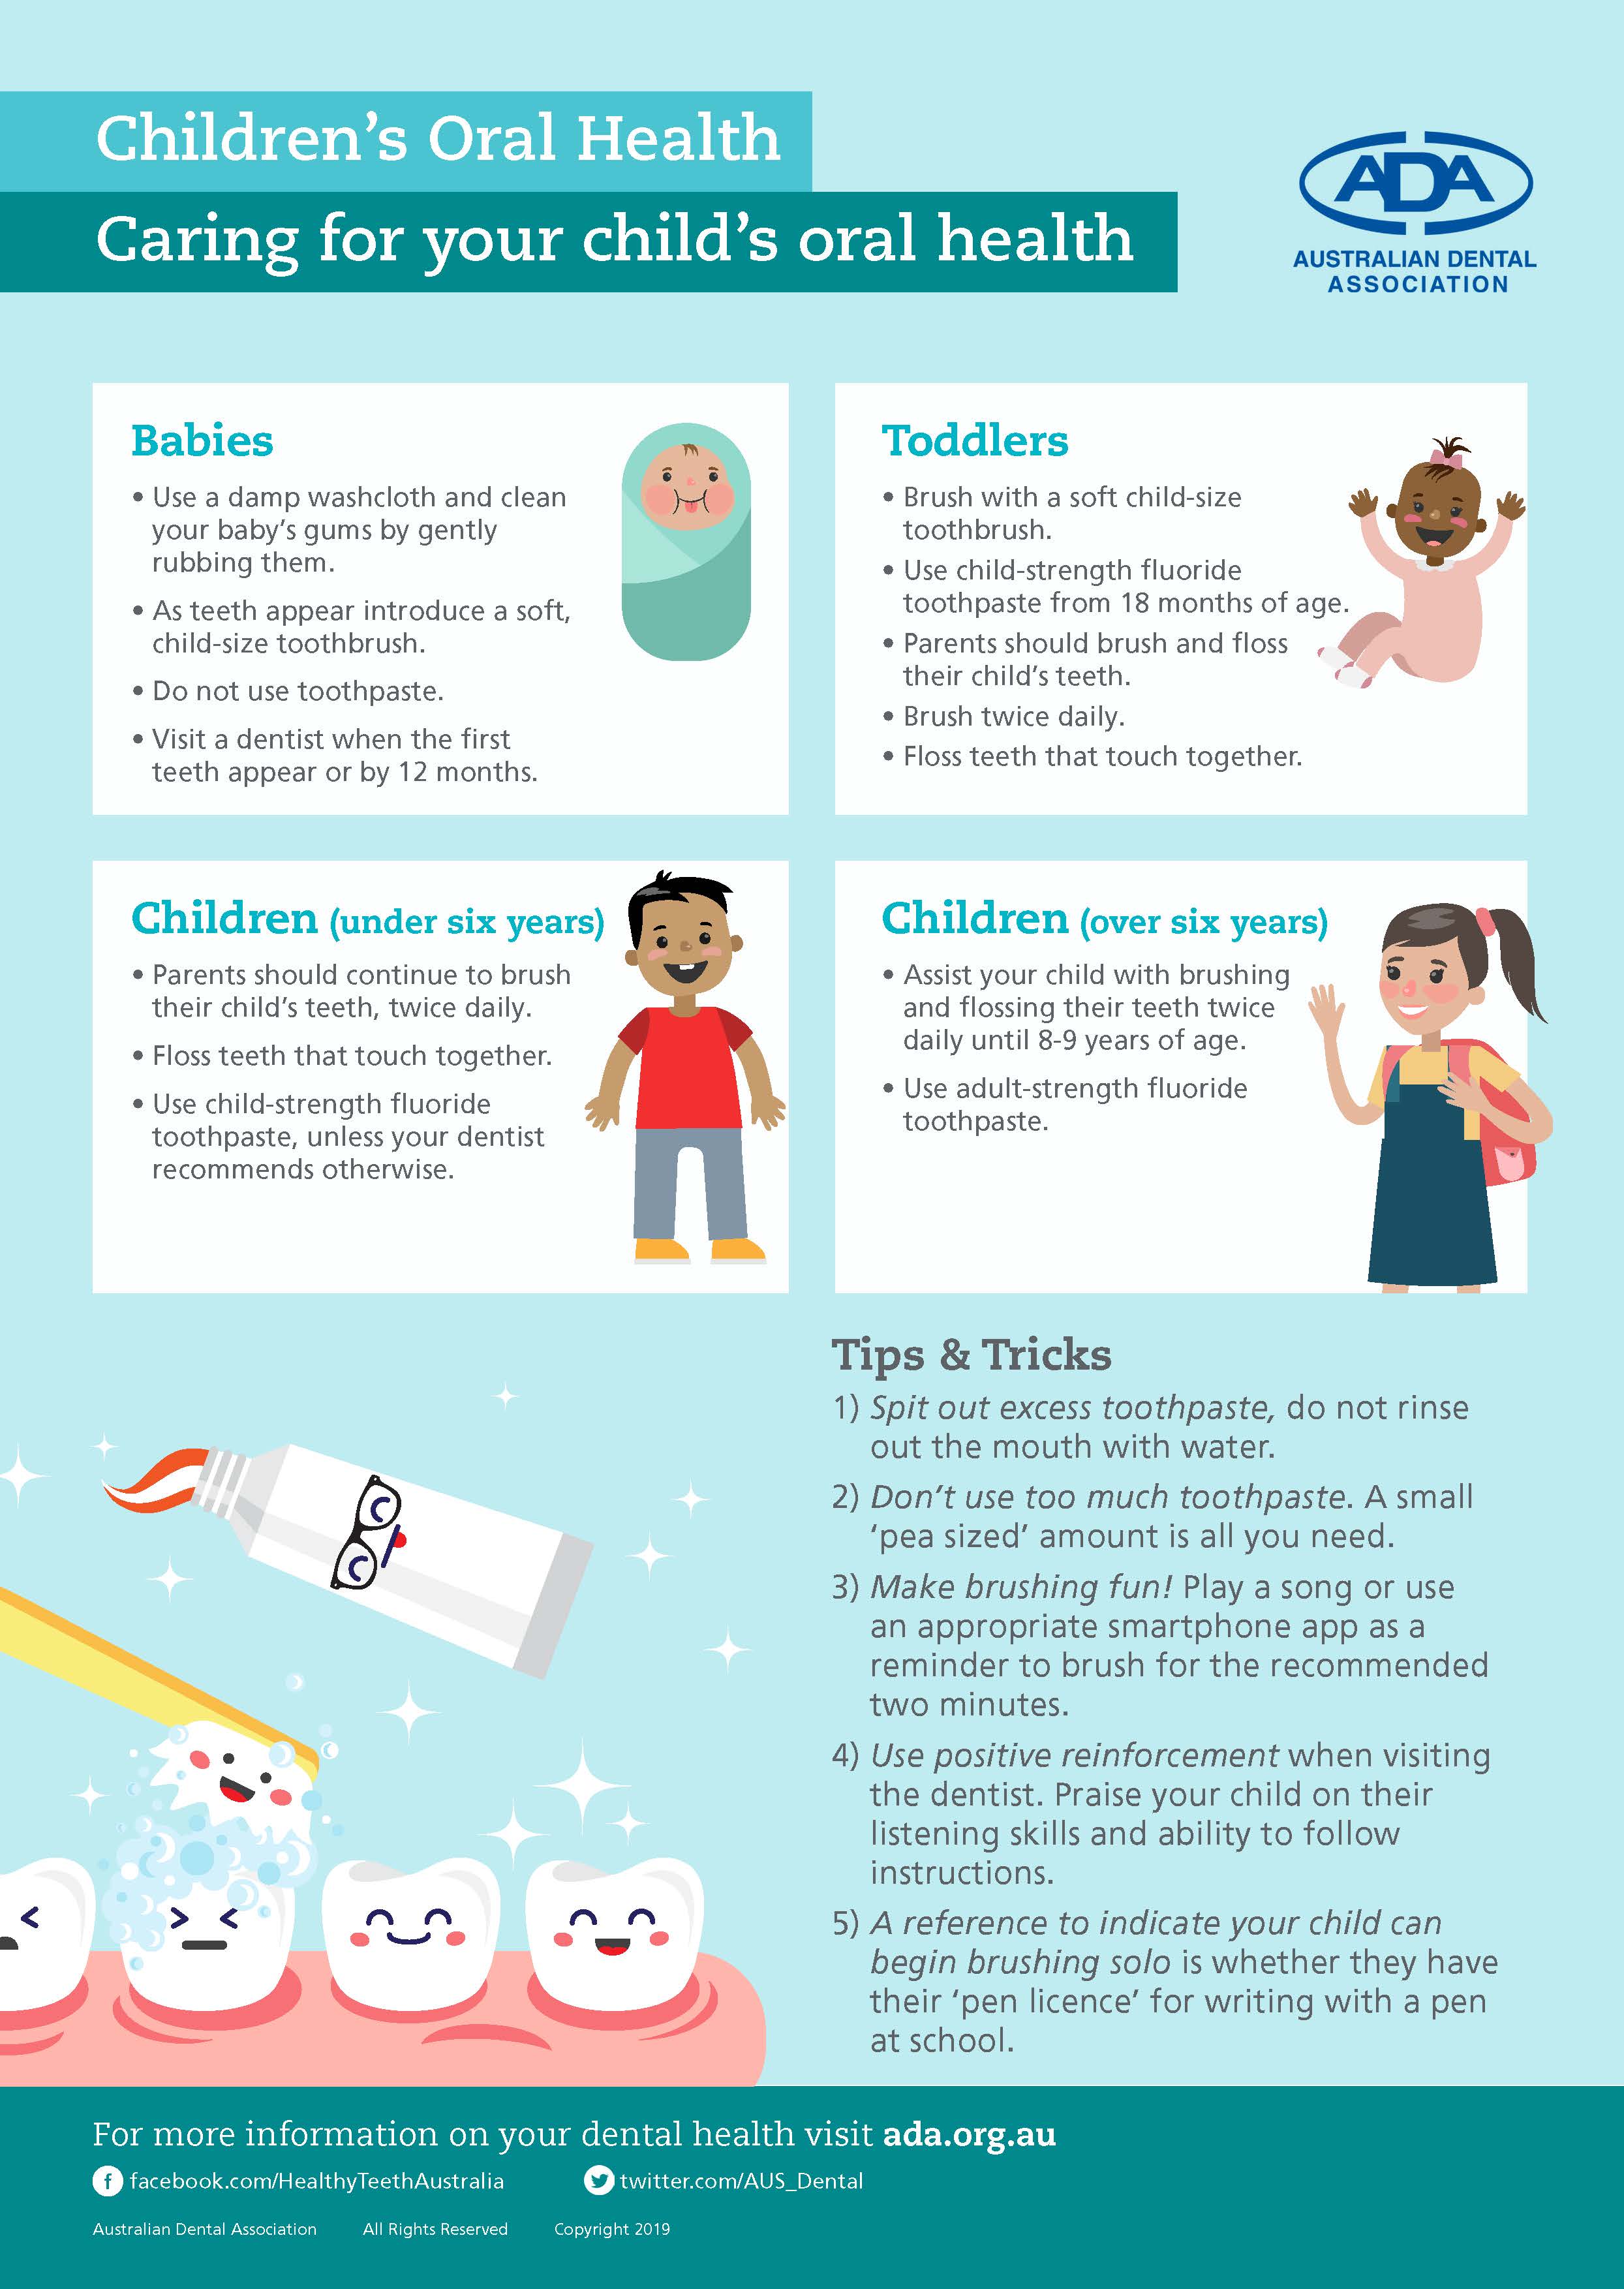
As oral health mainly occurs in the home environment, it is important to inform families of best practices from birth to school age. Review the following information for best practice for each age group:
| Age group | Oral health practices |
|---|---|
| Birth to one (0-1) year | Baby teeth develop while babies are still in the womb. Newborns have a full set of 20 baby teeth hidden in their gums.
For most babies, teeth begin to appear between 6 and 10 months. But in some children, teeth appear as early as 3 months. In others, they don’t arrive until around 12 months. A very small number of children are born with 1-2 teeth. Most children have their full set of baby teeth by 3 years of age. Dental care for baby teeth can start before the baby’s first tooth appears. Once the baby is about 3 months old, you can gently wipe the baby’s gums using a damp, clean face washer or gauze twice a day. This helps your baby get ready for brushing when the first tooth appears. As soon as the first tooth appears, clean teeth using a soft infant toothbrush designed for children under 2 years. If the baby doesn’t like the toothbrush in their mouth, you can keep using a clean, damp face washer or gauze to wipe the front and back of each tooth. Dental care usually happens at home and it’s done by parents. Always check your service’s relevant policies and procedures and communicate with families to support them the best. Source: Dental Care for Babies from the Raising Children Network |
| One to three (1-3) years | Toddler teeth need cleaning twice a day – in the morning and before bed.
Use a small, soft toothbrush designed for your child’s age. Use water on the toothbrush until the child is 18 months old, unless a dentist/service policies and procedures tell you otherwise. From 18 months to 3 years, you can start using a smear-sized amount of low-fluoride toothpaste, unless a dentist recommends otherwise. Many services introduce dental care at an early stage: the child can start helping to clean their teeth at around 2 years of age. Letting a child hold the toothbrush with you will help them feel they’re part of the action. But children need help and supervision with cleaning teeth until they’re about 8 years old. Always check your service’s relevant policies and procedures and communicate with families to support them the best. Source: Dental Care for Toddlers from the Raising Children Network |
| Three to five (3-5) years |
Brush the child’s teeth twice a day – morning and night. Use a pea-sized amount of low-fluoride toothpaste on a child-size toothbrush, unless a dentist/service’s policies and procedure recommend otherwise. Also encourage children to rinse their mouth with water after lunch and snacks. This helps to wash away any leftover food. Children need help and supervision with keeping teeth clean until they’re about 8 years old. Always check your service’s relevant policies and procedures and communicate with families to support them the best. Source: Dental Care for Preschoolers from the Raising Children Network |
Educators can refer parents and families to the Australian Dental Association, which has developed a quick and easy handout that can be given to parents: ‘Children’s Oral Health: Caring for Your Child’s Oral Health’:
Educators can research dental hygiene on the Australian Dental Association’s (ADA) website.
Teaching children oral hygiene
Educators should ensure they embed learning practices into the curriculum to teach children about oral health.
This can be done by:
- Inviting a dentist to the service as a guest speaker
- Having a dental van visit
- Teaching how to care for teeth and gums in planned lessons
- Playing or singing educational music or songs
- Reading educational storybooks
- Displaying oral health posters and visuals.
Health and hygiene practices are essential to keeping staff and children safe. Nappy changing and toileting represent particularly important hygiene opportunities.
Nappy changing is a routine commonly implemented throughout early childhood services. Some services might be changing up to 60 nappies a day. This process exposes children and educators to bodily fluids and therefore is an increased risk of spreading illness and infection.
All services will have clear policies and procedures around the steps required for an effective, hygienic nappy change.
Nappy changes or checks should occur in the following circumstances:
- On the child’s arrival to the service
- Whenever the child presents wet or faecal matter
- When a child wakes from sleep (allow the child 10–20 minutes after waking)
- At least every two hours—this may include a check or change depending on whether the child is dry (we would not expect a child to be dry after two hours)
Ensure your service provides the following:
- Hygienic resources for nappy changing, such as wipes, paper towel, detergent spray, nappy bags, a nappy bin, gloves, nappies, and spare clothes if needed
- Suitable facilities such as a private space that still allows supervision, access to a sink and washing facilities, and an appropriate nappy-change bench and mat
- Nappy-changing policies and procedures in view of the nappy-change area
- Recordkeeping practices that educators use
- Visual display of hand-washing procedures for the child
Nappy-changing procedure
Once you have ensured you have clean resources and a full nappy-change area, you can commence the nappy-changing procedure:
- Approach the child calmly and gently, and ask them if you can change their nappy. Encourage the child to have their nappy changed. However, if a child is immersed in play or is refusing a nappy change, you can give them 10 minutes and come back and ask again.
- Once the child has agreed to the nappy change, take them to the nappy-change area.
- Wash your hands.
- Place paper towel on the nappy-change mat.
- Put on your gloves.
- Move or remove the child’s clothes from their bottom half.
- Remove the nappy and dispose of it safely in a nappy bin.
- Clean the child’s bottom, and place dirty wipes and paper towel into the bin.
- Remove your gloves and place them into the bin.
- Place a clean nappy on the child.
- Put the child’s clothes back on.
- Take the child to the hand-washing facilities and clean the child’s hands and your own.
- Engage the child back into play.
- Return to the nappy-change area, and use detergent and warm water to clean the area.
- Wash your hands.
- Record the nappy change via your service’s procedures (e.g. online platform or hard copy).
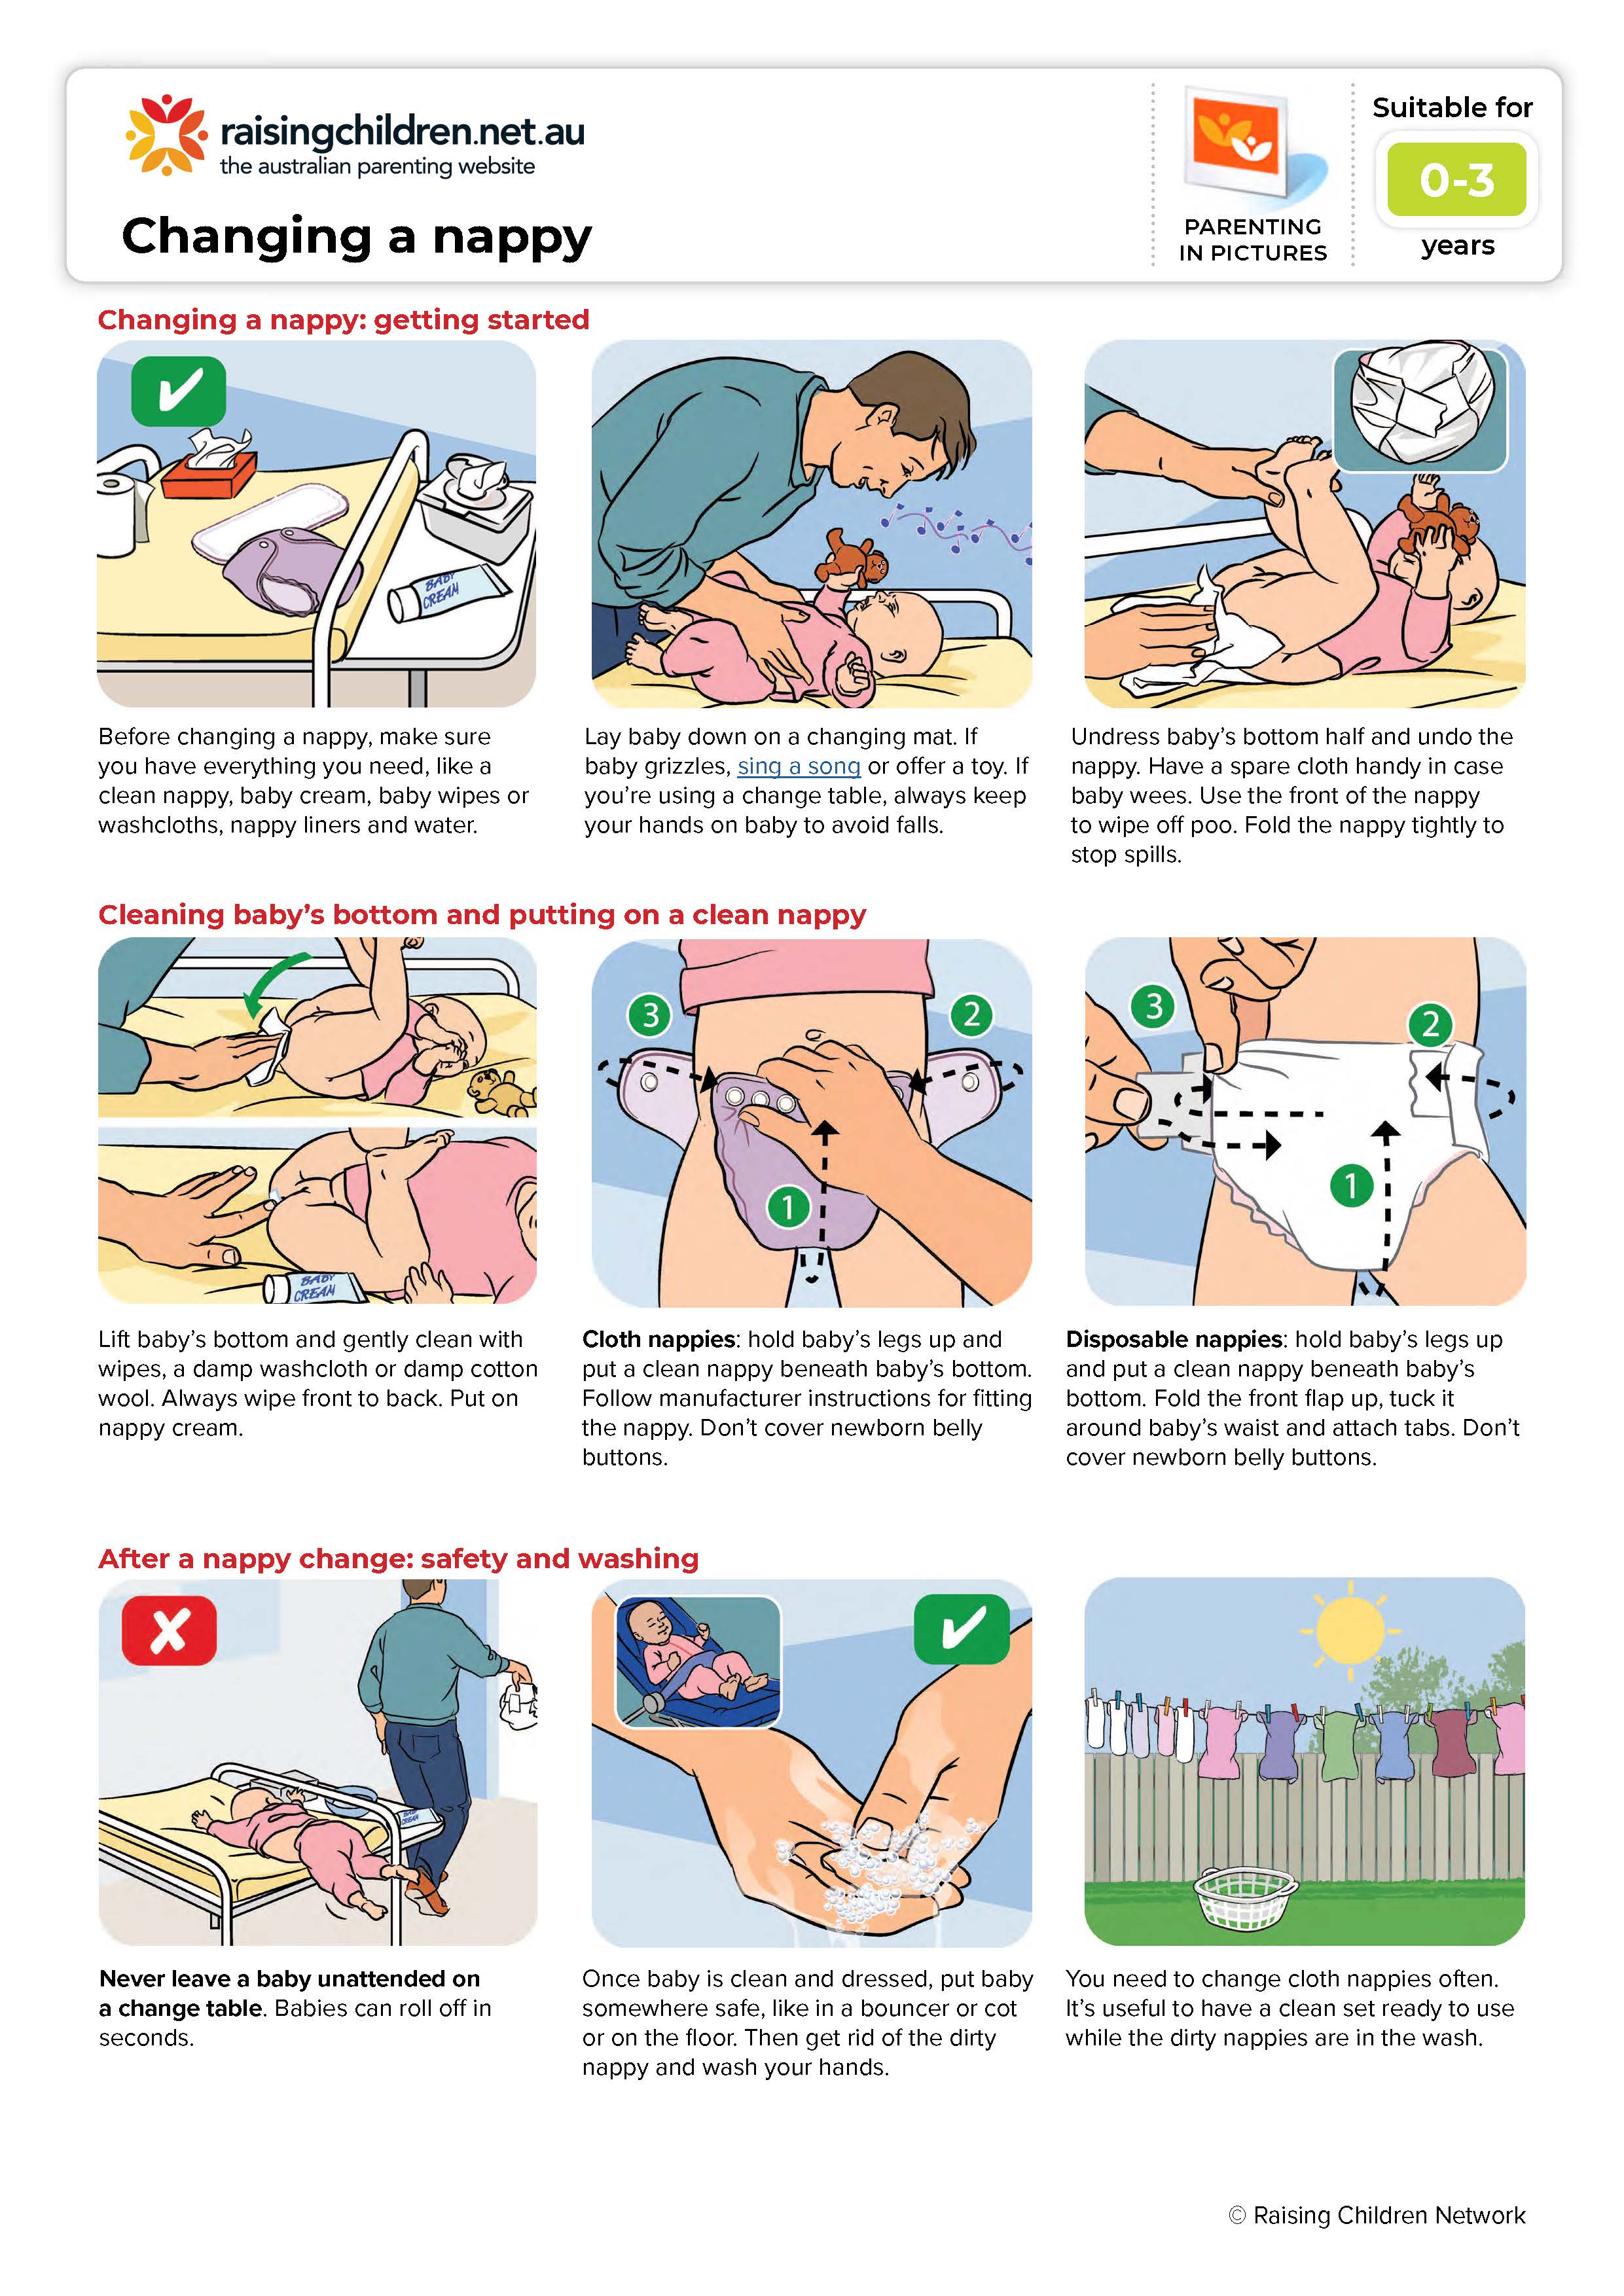
For a step-by-step visual depiction of nappy changing, refer to the following poster:
Safety practices for nappy changing
Always follow these practices during nappy changing:
- Never leave a child alone on a nappy-change mat or bench.
- Ensure the physical area is clean.
- Check that all the supplies you need are ready.
- If there are faeces on the child’s body or clothes, hold the child away from your body if you need to carry them.
- Keep direct contact and supervision with the child at all times.
- If the child is able to walk, encourage them to use the steps instead of lifting them onto the change mat or bench.
WATCH
Watch the following 6-minute video for more information about nappy-changing practices in the childcare setting:
Check your understanding
While ensuring nappy changing and toileting is safe and hygienic, it is also important that educators use this time to create caring, responsive and positive learning for children. Nappy-change times provide excellent opportunities for one-on-one engagement and learning.
What is positive nappy changing?
Ensuring a nappy changing experience for the child that is:
- Relaxed
- Enjoyable
- Engaging
- Unhurried
Refer to the following National Quality Standard Quality Areas:
- Quality Area 1, Element 1.1.3 ‘Program learning opportunities’, which states, ‘All aspects of the program, including routines, are organised in ways that maximise opportunities for each child’s learning.’
- Quality Area 5, Element 5.1.1 ‘Positive educator to child interactions’, which states, ‘Responsive and meaningful interactions build trusting relationships which engage and support each child to feel secure, confident and included.’
The benefits of positive nappy changing
- Personal engagement: Nappy changing provides an opportunity for one-on-one engagement with a child to develop a stronger bond.
- Learning self-help: Nappy changing allows the child the opportunity to learn self-help skills, such as hygiene and toileting practices.
- Respect and trust: Positive nappy-changing experiences build a sense of respect and trust between a child and those caring for them.
The following tips demonstrate how to create a positive nappy-changing and toileting experience for children:
- Talk it though: Talk with the child about what is going to happening and invite them into the bathroom.
- Explain the steps: Explain each step as they are happening and support the child’s capacity to predict what will happen next.
- Use games: Develop small games or use songs to help the child relax and connect.
- No pressure: No matter what has happened, do not put unnecessary attention or pressure on a child, particularly during toilet training.
- Celebrate successes: Acknowledge successes, no matter how small.
- Sing songs about the experience: Have a hand-washing song that lasts as long as hand washing should (e.g. sing ‘Happy Birthday’ twice).
Toilet training

For children who are toilet training, be mindful that this is often a long step-by-step process. Encourage the child to take steps such as simply making a trip to the toilet to see how it flushes or to practise pulling down their pants at the toilet. Keeping the process light-hearted and pressure free will go a long way.
To help facilitate positive toilet training, look for signs that a child is ready (these may start around 18–24 months):
- Showing interest in the toilet or using it
- Talking about going to the toilet either before or during urination or bowel movement in nappy
- Staying drier for increasing periods
- Trying to pull off a nappy when it is wet, or disliking wearing them
Signs that indicate a child is ready for toilet training include:
- Moving to pull-ups – When a child moves from nappies to pull-ups or straight to underwear
- Wanting to try the toilet – When a child is having a nappy change and wants to try the toilet
- Having an interest in the toilet – When a child shows interest in the toilet—this could be demonstrated by spending time in the bathrooms and flushing toilets, or watching peers go to the toilet
- Being able to dress – When a child is able to dress and undress themselves
- Having the ability to hold on – When a child is able to physically control when they need to go the toilet— when they are able to hold on or stay dry for long period of time
- Awareness of passing – When a child tells the educator that they have wet their nappy.
Toilet training is a milestone in a child's life, and consistency between home and the service helps with the journey and the child’s wellbeing along the way. Collaborative practices with families are a vital aspect of ensuring the child has consistent and supportive environments when toilet training.
NQS Quality Area 2, Element 2.1.1 ‘Wellbeing and comfort’ outlines practices for ensuring the wellbeing and comfort of children. These practices directly involve a collaborative relationship with the child’s family and relate specifically to consistency in hygiene and toileting that educators should uphold.
Educators should:
- Seek information from families about the child’s routines, and support the same approaches within the service
- Find out about a child’s routines at home and ensure other staff members are informed to ensure consistency
- Gather information from both the child and their families about the child’s wellbeing, physical comfort and personal needs, and support them sensitively within the service
- Ensure that families are informed of the service’s policies and procedures regarding toilet training and ensure collaborative discussions take place
- Be open and considerate of cultural or other family-specific practices regarding toilet training.
Communicating with families
Regular communication with families helps to ensure you are aware of any differences in routine and approach the child is experiencing. This enables you to work with the family to help bridge those differences in a way that supports the child.
The following practices will help you be effective in your communication with families and your work colleagues:
- Share the services practices – Ensure parents know the daily toileting practices you are using with their child so that they can help maintain consistency for the child. Also, make sure that you work with your colleagues to maintain the same practices with the child.
- Manage differences – Sometimes the type of toilet will differ for the child between home and the service (families may use smaller, plastic toilets to help a child start toilet training and services cannot always provide these). Talk with the child about the differences during their toileting experiences. The family may bring in a potty to begin with for the child to use.
- Identify inhibitions – For many children, learning to defecate on the toilet is more challenging than urination. Look for children who may be trying to wait until they are home and, as awkward as it may seem, share frequency and bowel movement information with parents.
- Support families through the journey – Help parents talk through any concerns or cases of regression. This is a natural part of toilet training. Prolonged regression with anxious emotions can indicate the child is struggling with other things they are having a hard time naming and expressing. Talk with your colleagues if you suspect this is happening.
- Share the children’s efforts and celebrate achievements - Providing communication around children’s efforts and achievements in their toilet training journeys makes it a positive experience for all involved. If these are communicated, it allows families to continue the conversations at home and allow the child to feel proud of their efforts and feel positively around toilet training.
To support parents and caregivers during toilet training, encourage them to:
- Stay committed - Advise parents and caregivers to choose a way of toilet training and stick to it. Changing plans can confuse the child. Once started, do not put a nappy back on, unless for naptime—this will also confuse the child and delay learning.
- Be aware of timing - Tell parents and caregivers to watch the clock. They should encourage the child to go to the toilet 20 minutes after they have a drink or when they wake up from a sleep or rest time.
- Read the signs - Suggest parents and caregivers watch carefully for signs that a child has to go to the toilet—such as hiding, wiggling, holding themselves—and help them relate the sign to the action: going to the toilet.
- Pack plenty of clothes - Always be sure the family has provided a change of clothes—including t-shirts, shoes and socks—so if the child has an accident, you can quickly clean them up. Ask the family to dress their child in loose and easy-to-remove clothes during toilet training.
- Encourage the child to enjoy using the toilet - You could use stories, songs or games while on the toilet to help the child associate the toilet with positive things.
WATCH
The following 2-minute short video from the Raising Children Network features parents sharing their strategies and techniques for toilet training:
For more tips on working with families to support consistent toileting, read the 'Toilet Training: A Practical Guide’ from the Raising Children Network.
Check your understanding
Use the following questions to check your knowledge. You can check the correct answer by clicking on the 'Answer' button:
-
List three (3) ways germs can spread.
- Airborne
- Droplets
- Contact
-
List the parts of your hands that needs to be individually scrubbed.
The backs of hands, wrists and between fingers must be scrubbed individually -
Name five (5) ways we can reduce the spread of infection. For each, detail how you might educate children in this area.
- cleaning
- handwashing
- immunisations
- exclusion
- coughing into your elbow
-
Outline the steps required to change a nappy.
- Before changing a nappy, make sure you have everything you need, like a clean nappy, baby cream, baby wipes or washcloths, nappy liners and water.
- Lay baby down on a changing mat. If baby grizzles, sing a song or offer a toy. If you’re using a change table, always keep your hands on baby to avoid falls.
- Undress baby’s bottom half and undo the nappy. Have a spare cloth handy in case baby wees. Use the front of the nappy to wipe off poo. Fold the nappy tightly to stop spills.
- Lift baby’s bottom and gently clean with wipes, a damp washcloth or damp cotton wool. Always wipe front to back. Put on nappy cream.
- Cloth nappies: Hold baby’s legs up and put a clean nappy beneath baby’s bottom. Follow manufacturer instructions for fitting the nappy. Don’t cover newborn belly buttons.
Disposable nappies: Hold baby’s legs up and put a clean nappy beneath baby’s bottom. Fold the front flap up, tuck it around baby’s waist and attach tabs. Don’t cover newborn belly buttons.
- Once baby is clean and dressed, put baby somewhere safe, like in a bouncer or cot or on the floor. Then get rid of the dirty nappy and wash your hands.
Never leave a baby unattended on a change table! Babies can roll off in seconds.
-
Who would you consult before engaging in toilet training a child?
Parents / caregivers / room educators -
Identify ten (10) moments during the day when you would wash your hands.
- Nappy change
- Serving food
- After eating food
- Administering medication
- After cleaning with chemicals
- After applying first aid
- Wiping a child’s nose
- Cleaning up blood
- Coming in from outside
- After going to the toilet