About this topic
In Texturing, you’ll learn about texturing and how it elevates the visual appeal and realism of your 3D models. Throughout this topic, we’ll cover key areas including an introduction to Photoshop, materials in Maya, and Maya Hypershade. We’ll also focus on texture mapping, texturing using Maya and Photoshop, and the rendering approach known as PBR. To put your texturing skills into practice, you will use Photoshop to modify the sword model you created back in Modelling.
In 3D modelling, texturing refers to the process of applying textures, colours, patterns, and other visual attributes to the flat and uniform surfaces of 3D geometry. It involves mapping 2D images or procedural patterns onto the 3D geometry to enhance its visual appearance, realism, and detail.
Texturing is widely used in various industries, including gaming, film and television, architecture, product design, and virtual reality, to create stunning and immersive 3D graphics. It brings life to 3D models by simulating the appearance of different materials (e.g. wood, metal, fabric, stone, or skin), surfaces, and patterns, making models visually appealing and engaging.
The process of texturing typically involves the following steps:

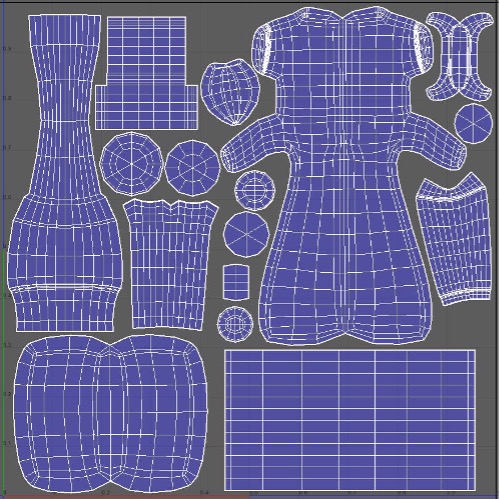
- UV Mapping: Before applying textures, the 3D model's surface needs to be UV unwrapped, resulting in a 2D representation of the model's surface called a UV map. The UV map provides a coordinate system that corresponds to the 3D geometry, allowing textures to be accurately applied to specific areas of the model (see example below).
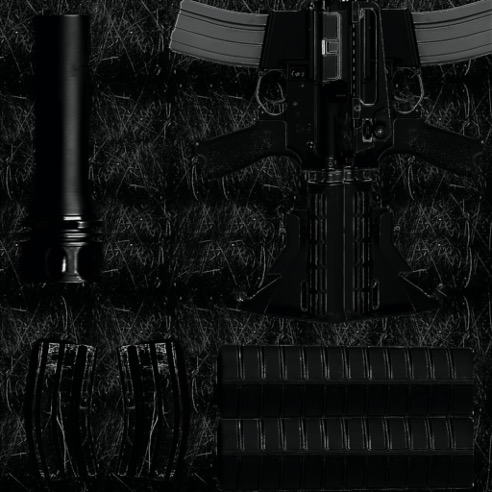
- UV Mapping: Textures can be created using various methods. They can be painted manually in 2D image editing software like Photoshop or created procedurally using dedicated texture generation software or shader networks. Textures can include colour maps, bump maps, specular maps, normal maps, displacement maps, and more, depending on the desired visual effects (see example below).
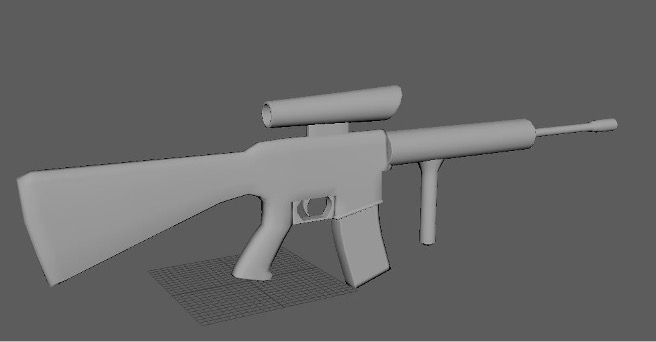
- Texture Application: Once the textures are created, they are applied to the 3D model using specialised software or within the 3D modelling software itself. The textures are mapped onto the UV coordinates of the model, ensuring that they align with the desired areas accurately (see example below).
- Texture Mapping Techniques: Different mapping techniques are used to control how textures are applied to the model's surface. These techniques include diffused mapping, planar mapping, cylindrical mapping, spherical mapping, box mapping, or more advanced techniques like projection mapping or decals (see example below).
- Texture Adjustments: Artists may need to adjust the scale, rotation, or placement of textures on the model to achieve the desired visual effect. This involves tweaking the mapping coordinates, repeating or tiling the textures, or applying blending or masking techniques to control how different textures interact (see example below).
The goal of texturing is to enhance the visual realism and detail of the 3D model, making it visually appealing and engaging. Texturing brings life to the model by simulating the appearance of different materials, surfaces, and patterns. It is widely used in various industries, including gaming, film and television, architecture, product design, and virtual reality, to create visually stunning and immersive 3D graphics.
While we have spent time working through Maya, there are a number of additional applications used in 3D Animation. One of these applications is Photoshop. Photoshop is primarily known for its image editing capabilities; it also plays a significant role in 3D modelling and computer graphics.
By leveraging Powershop’s powerful image editing and manipulation capabilities, 3D artists and designers can enhance the quality, realism, and overall visual impact of their 3D models and renderings. Photoshop is a valuable tool in the pipeline of 3D modelling and computer graphics, complementing the specialised functionalities of dedicated 3D software and contributing to creating immersive visual experiences.
Here are some ways in which Photoshop can be useful in 3D modelling:
Tutorial 3a: Navigate and use Photoshop
By the end of this tutorial, you’ll be able to navigate the Photoshop interface and perform basic image editing tasks. To work through the tutorial, follow these steps:
- Visit Photoshop tutorials and focus on the first playlist: 'Photoshop Get Started course'.
- Work your way through the playlist (made up of ten tutorials).
- You do not have to watch the playlist’s final tutorial, Apply filters.
- Interact with the playlist and Photoshop, taking time to have breaks between Photoshops tutorials.
- Have fun, and ask us if you need any help!
Layers
In the context of 3D modelling and computer graphics, layers in Photoshop serve as a valuable tool for managing and enhancing various elements related to the creation and post-processing of 3D content. Here's how layers can be used in this context:
- Texture Creation: Layers in Photoshop can be utilised to create and manipulate textures for 3D models. Different texture parts, such as colour, bump, specular, or displacement maps, can be organised on separate layers. This allows for easy editing, adjustment, and fine-tuning of each component individually, ensuring precise control over the final appearance of the 3D model.
- Texture Editing and Enhancement: Layers enable artists to apply non-destructive edits and enhancements to textures used in 3D models. By working with layers, it becomes possible to modify specific texture elements, such as adding weathering effects, adjusting colours, or refining details, without affecting the original texture data. This flexibility helps in creating visually appealing and realistic textures for 3D models.
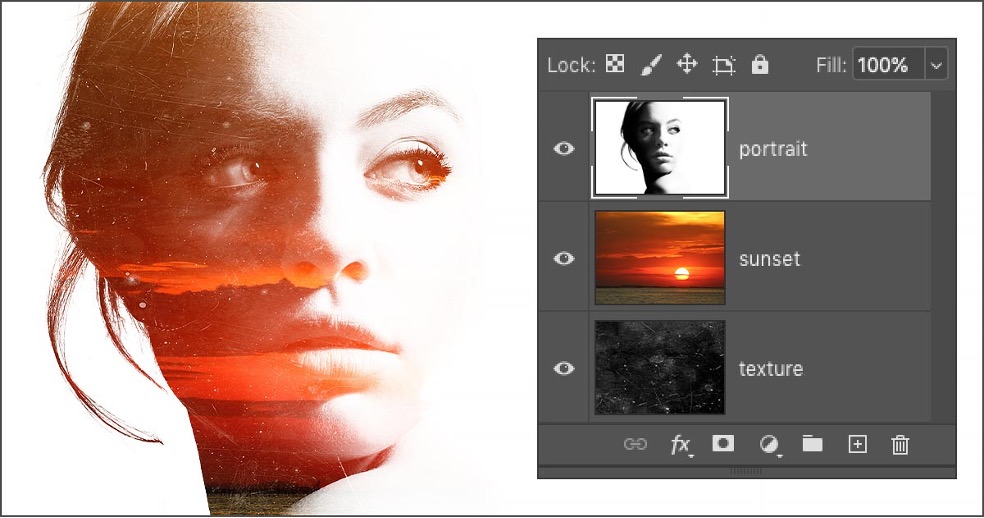
- Composite Images: Layers can be used to combine 3D renders with other visual elements, such as backgrounds, textures, or photographic elements, to create complex and seamless composite images. By utilising layers, artists can easily blend different elements, adjust their positioning, opacity, and blending modes, and add special effects or filters to achieve the desired final result.
- Post-Processing and Visual Effects: After rendering a 3D scene, layers in Photoshop allow for post-processing and applying various visual effects. Artists can utilise adjustment layers to fine-tune the overall look of the 3D render, such as adjusting brightness, contrast, and colour balance or adding additional effects like vignettes or gradients. Layers also facilitate the addition of text, logos, or graphic elements to the 3D composition.
- Non-Destructive Editing: One of the key advantages of using layers in Photoshop is non-destructive editing. Any edits or adjustments made to a layer can be modified or undone at any time without affecting the original 3D data. Non-destructive workflows allow for experimentation and flexibility, ensuring that changes can be made easily and efficiently throughout the creative process.
- Layer Management and Organisation: Layers provide a structured and organised way to manage different visual elements in the 3D modelling and computer graphics workflow. By naming and grouping layers, artists can maintain a clear and hierarchical structure, making it easier to navigate and modify specific components of the overall composition.
By leveraging the power of layers in Photoshop, 3D artists and designers can enhance their workflow, achieve greater control over texture creation, seamlessly combine elements in composite images, and add visual effects to their 3D renders. The versatility and flexibility of layers make them a valuable asset in the creation and post-processing of 3D content in the realm of computer graphics.
Image Editing
Image editing in Photoshop refers to the process of manipulating and enhancing digital images to improve their overall quality, appearance, or artistic expression. It involves various techniques and tools available in Photoshop to adjust colours, tones and sharpness, remove imperfections, retouch details, and apply creative effects.
In the context of 3D modelling and computer graphics, image editing in Photoshop can be used in several ways:
- Texture Refinement: Photoshop allows for precise and detailed editing of textures used in 3D models. Artists can use image editing techniques to enhance the textures' details, colours, and overall quality. This includes adjusting contrast, brightness, saturation and applying filters or effects to achieve the desired texture appearance.
- Post-Processing of Rendered Images: After rendering a 3D scene, the resulting images may require additional adjustments and enhancements to achieve the desired look. Photoshop provides a range of tools and features for post-processing, including colour correction, exposure adjustment, noise reduction, and sharpening. These adjustments help improve the visual quality of the rendered images, making them more vibrant, balanced, and realistic.
- Composite Images: Photoshop enables the integration of 3D rendered elements with other photographic or digital elements, allowing for the creation of complex composite images. Artists can combine 3D renders with backgrounds, stock images, textures, or other visual elements, seamlessly blending them using layering, masking, and blending techniques. This allows for the creation of visually striking scenes and compositions.
- Digital Matte Painting: Matte painting involves creating or enhancing digital environments or backdrops for 3D scenes. Photoshop provides powerful tools and capabilities for painting and manipulating images, making it an ideal choice for creating digital matte paintings. Artists can use brushes, adjustment layers, and blending modes to paint or enhance landscapes, skies, buildings, or other elements within a 3D environment.
- Graphic Design Elements: In computer graphics, Photoshop is often used to create graphic design elements that complement 3D models or scenes. This includes designing logos, typography, labels, or other visual elements that enhance the overall presentation of 3D assets or graphics.
- Retouching and Compositing 3D Renders: Photoshop offers advanced retouching capabilities that can be used to refine 3D renders by removing imperfections, blemishes, or artefacts. Additionally, Photoshop allows for compositing multiple 3D renders together, merging them seamlessly to create complex and polished final images.
Brushes

In Photoshop, brushes are digital tools that apply strokes or marks on an image or canvas. They mimic traditional painting brushes and can be customised to create various effects, textures, and styles. Brushes in Photoshop offer a wide range of creative possibilities and are valuable assets in the context of 3D modelling and computer graphics. Here's how brushes can be used:
- Texture Painting: Brushes in Photoshop can be used to paint textures directly onto 3D models or UV maps. Artists can create custom brushes replicating different materials, such as wood, metal, fabric, or skin. By painting textures using brushes, artists can add detail, depth, and realism to the surfaces of their 3D models.
- Digital Sculpting: Brushes can be used for digital sculpting techniques, such as adding or subtracting details from 3D models. By utilising brushes with different shapes, sizes, and hardness, artists can sculpt and refine the geometry of their models, adding fine details or creating intricate patterns.
- Concept Art and Sketching: Brushes are valuable tools for creating concept art and sketches in the early stages of 3D modelling. Artists can use various brush presets to quickly sketch ideas, create rough drafts, or explore different design possibilities. Brushes allow for expressive and organic strokes, facilitating the visualisation of concepts and forms.
- Digital Painting: Brushes in Photoshop can be used for digital painting, enabling artists to create illustrations, character designs, or environmental art. With many brush types and settings, artists can simulate different painting techniques, such as oil painting, watercolour, or airbrushing. Brushes allow for applying colours, shading, and blending to achieve visually stunning digital paintings.
- Texture and Material Creation: Brushes are instrumental in creating custom textures and materials for 3D models. Artists can use brushes to paint and blend different colours, patterns, or surface effects onto texture maps. This helps achieve realistic material properties like rust, dirt, grunge, or weathering, enhancing the overall visual quality of the 3D model.
- Special Effects: Brushes in Photoshop offer a wide array of special effects that can be applied to 3D models or rendered scenes. Artists can create brush presets for effects like smoke, fire, sparks, particles, or atmospheric elements. These brushes can add dynamic and visually striking elements to 3D renders or composite images.
- Post-Processing and Image Editing: Brushes are essential tools for post-processing and image editing in Photoshop. Artists can use brushes to selectively apply adjustments, such as dodging, burning, or smoothing, to specific areas of a 3D render. Brushes allow for precise control over localised editing, enabling fine-tuning and enhancing the image's final appearance.
In Maya, materials are attributes assigned to 3D objects to define their surface appearance and how they interact with light. They determine an object's colour, texture, reflectivity, transparency, and other visual properties.
Materials play a crucial role in creating realistic and visually compelling 3D renders, contributing significantly to the overall visual quality and realism of 3D scenes and enhancing the believability and aesthetic appeal of the rendered images or animations. By using materials in Maya, 3D artists can define and control the surface appearance of objects, apply textures, and simulate realistic reflections and refractions.
Here's how materials are used in Maya:
Maya Hypershade is a visual interface and workspace within Autodesk Maya that allows artists to create, edit, and manage materials, textures, shaders, and shading networks for 3D objects. It provides a node-based system that enables artists to construct complex and intricate material networks by connecting different nodes.
Hypershade is a powerful tool in Maya that empowers you to create and manipulate materials, textures, and shading networks. It offers you a user-friendly and intuitive interface, providing control over the visual appearance of 3D objects in Maya's rendering engine.
Here are some key features and functions of Maya Hypershade:
Texture mapping is a technique used in 3D computer graphics to apply textures or images onto the surfaces of 3D objects. It involves mapping 2D images, called texture maps, onto the 3D coordinates of an object's surface to add detail, colour, and surface characteristics. Texture mapping enhances the realism and visual quality of 3D models by simulating the appearance of different materials, patterns, or surface effects.

Here's an overview of the texture mapping process:
- Texture Coordinate Generation: Before applying a texture map, a set of texture coordinates needs to be generated for each vertex or point on the 3D object's surface. These texture coordinates define how the 2D texture map will be mapped onto the 3D geometry. They are typically generated based on the UV coordinates, representing a 2D coordinate system.
- Texture Map Creation: Texture maps are created in external software or painted using tools like Photoshop or Substance Painter. They can contain colour information, patterns, bumpiness, transparency, specular highlights, and other visual attributes. Common types of texture maps include colour maps, bump maps, normal maps, specular maps, and displacement maps.
- UV Unwrapping: UV unwrapping is the process of flattening the 3D object's surface onto a 2D plane to create a UV map. The UV map represents the relationship between the 3D geometry and the 2D texture space. Artists manipulate the UV coordinates to ensure that the object's surface is unwrapped in a way that minimises distortion and maximises the use of the texture map.
- Texture Projection: Once the UV map is created, the texture map is projected onto the 3D object's surface using the generated texture coordinates. This projection aligns the texture map's pixels with the corresponding UV coordinates on the object, accurately mapping the texture onto the surface.
- Texture Mapping Types: There are different types of texture mapping techniques used in 3D graphics, including planar mapping, cylindrical mapping, spherical mapping, and box mapping. Each technique is suited for specific objects or surfaces, and artists can choose the most appropriate mapping method based on the object's geometry and desired appearance.
- Texture Filtering and Wrapping: Texture filtering methods, such as bilinear or trilinear filtering, are applied to smooth out the textures' appearance when they are rendered at different scales or viewed from different distances. Texture wrapping determines how textures are repeated or clamped when they are mapped beyond the UV coordinate range.
Case study: Texture mapping - Assassin’s Creed Unity

One real-life example of a game where players noticed bad texture mapping is the release of 'Assassin's Creed Unity' in 2014. The game, developed by Ubisoft, received criticism for various technical issues, including poor texture mapping on character models and environmental objects.
In 'Assassin's Creed Unity', players noticed instances where textures appeared low-resolution, blurry, or incorrectly applied. The texture mapping problems were particularly evident on the faces of characters, resulting in characters' facial features looking smudged or lacking detail. The lack of sharp textures and the noticeable blurriness affected the game's overall visual quality and immersion, drawing attention away from the intended realism and impacting the player's experience.
These texture mapping issues in 'Assassin's Creed Unity' were widely discussed and criticised by players and the gaming community. The game's developers acknowledged the problems and released patches to address some of the technical issues, including texture improvements. The negative reception of the game's texture mapping further emphasised the importance of proper texture implementation for maintaining visual fidelity and enhancing player engagement.
This example serves as a reminder of how crucial texture mapping is in game development and how noticeable and impactful texture issues can be to the overall gaming experience. Proper texture mapping techniques and quality control play a significant role in creating visually appealing and immersive games.
Texturing using Maya and Photoshop is a common workflow in the field of 3D modelling and computer graphics. Maya is primarily used for creating and assigning materials to 3D models, while Photoshop is used for editing and creating texture maps applied to those materials.
By combining the strengths of Maya and Photoshop, you can achieve high-quality texturing results for your 3D models. Maya's material creation and UV unwrapping capabilities work hand in hand with Photoshop's powerful editing tools, allowing you to create detailed and visually appealing textures that enhance the realism and visual quality of your 3D assets.
Here's an overview of how Maya and Photoshop can be used together for texturing:
- Creating Materials in Maya: In Maya, you can use the Hypershade workspace to create and assign materials to your 3D models. Maya provides a variety of material types, such as Lambert, Phong, Blinn, and more, each with different properties and shading characteristics. You can adjust attributes like colour, transparency, specularity, and bumpiness to achieve the desired appearance.
- UV Unwrapping in Maya: Before texturing, you need to perform UV unwrapping in Maya to generate the UV coordinates for your 3D models. UV coordinates define how the 2D texture maps will be applied to the 3D surfaces. Maya offers various UV editing tools, allowing you to manipulate and optimise the UV layout to minimise distortion and maximise texture resolution.
- Exporting UV Layout: Once the UV unwrapping is done, you can export the UV layout from Maya as an image. This image serves as a guide for texturing in Photoshop, helping you understand how the 2D texture map should be painted to match the 3D model's surface.
- Texture Map Editing in Photoshop: With the UV layout image as a reference, you can open it in Photoshop and start creating or editing the texture maps. Texture maps include colour maps (diffuse), bump maps (normal), specular maps, roughness maps, and more. Photoshop provides powerful tools for painting, blending, and manipulating textures, enabling you to add intricate details, surface effects, and realistic materials to your models.
- Applying Texture Maps in Maya: Once the texture maps are edited or created in Photoshop, they can be imported into Maya. In the Hypershade workspace, you can assign the texture maps to the corresponding material attributes of your 3D models. Maya allows you to connect the texture maps to colour channels, bump channels, specular channels, and other material properties, providing precise control over the appearance of your models.
Tutorial 3b: Explore the Maya to Photoshop texturing workflow
By the end of this tutorial, you’ll become familiar with the texturing workflow between Maya and Photoshop. To work through the tutorial, follow these steps:
- Watch the tutorial’s video below (5min 9sec).
- Interact with the tutorial, Maya, and Photoshop.
- Have fun, and ask us if you need any help!
Photoshop
Below is a step-by-step process for creating texture maps using software like Photoshop:
- Gather Reference Images: Start by collecting reference images that depict the desired appearance of the object or material you are texturing. These references will help guide your texture creation process and ensure accuracy.
- Set up the Document: Open Photoshop and create a new document with the appropriate dimensions for your texture map. Common sizes include 1024x1024, 2048x2048, or 4096x4096 pixels, depending on the desired level of detail and the target platform.
- Define Base Colors and Patterns: Use painting tools in Photoshop to establish the base colours and patterns for your texture map. This includes filling the canvas with the base colour or applying simple patterns and shapes.
- Add Details: Use various brushes, filters, and layer blending modes in Photoshop to add details to your texture map. This can include surface imperfections, wear and tear, dirt, scratches, or any other desired visual elements that enhance the realism of the texture.
- Use Layer Masks: Utilize layer masks to control the visibility and blending of different elements within the texture map. Layer masks allow for non-destructive editing, enabling you to refine and adjust specific areas without permanently altering the texture.
- Incorporate Shading and Highlights: Create shading and highlights to give depth and dimension to your texture map. This can involve adding shadows, highlights, gradients, or subtle variations in colour and brightness to simulate the interaction of light with the surface.
- Export and Save: Once you're satisfied with the texture map, save it in a suitable file format such as JPEG, PNG, or TIFF. Consider preserving the transparency of the texture if necessary.
- Test and Iterate: Apply the texture map to your 3D model in the desired software (e.g., Maya). Test how it looks in different lighting conditions and perspectives. If needed, go back to Photoshop to make adjustments or create additional texture maps for different material properties like a bump, specular, or roughness.
- Optimize and Finalize: Depending on the target platform and performance requirements, optimise your texture maps by reducing file size, adjusting compression settings, or making adjustments to improve performance without sacrificing visual quality.
Tutorial 3c: Texture objects with Maya and Photoshop
By the end of this tutorial, you’ll find out how 3D artists texture a simple object – like a crate - in Maya and Photoshop. To work through the tutorial, follow these steps:
- Watch the tutorial’s video below (20min 5sec).
- Interact with the tutorial, Maya, and Photoshop.
- Try to texture the sword model that you created earlier in this course.
- Have fun, and ask us if you need any help!
Tutorial 3d: Texturing a barrel
By the end of this tutorial, you’ll find out how to texture a barrel – the tutorial also covers useful tools that help you create realistic textures.
- Visit this Texture a Barrel playlist on YouTube.
- Locate and watch these ‘Create a Barrel’ videos:
- Create a Barrel: UV Map in Maya 2020 (1/6)
- Create a Barrel: Texture Wood in Maya 2020 (2/6)
- Create a Barrel: Texture Metal in Maya 2020 (3/6)
- Create a Barrel: Decorations in Maya 2020 (4/6)
- Create a Barrel: Bump Map in Maya 2020 (5/6)
- Create a Barrel: Metalness and Spec in Maya 2020 (6/6)
- Interact with the tutorial, Maya, and Photoshop.
- Remember to take breaks, as this tutorial playlist is long.
- Have fun, and ask us if you need any help!
PBR (Physically Based Rendering) materials, also known as PBR materials or shaders, are a rendering approach used in computer graphics to achieve realistic and physically accurate material appearances. PBR materials simulate how light interacts with surfaces in the real world, resulting in more accurate and visually appealing renderings.
PBR materials have become the standard in modern game engines and 3D rendering software. They provide a more physically accurate representation of materials, resulting in realistic lighting, shading, and reflections in virtual environments. With PBR materials, artists can achieve more visually appealing and immersive experiences in computer graphics and game development.
Here are the key characteristics and components of PBR materials:
Examples of games that use PBR materials
Numerous games utilise PBR (Physically Based Rendering) materials to achieve realistic and visually stunning graphics. Here are five examples:
Now that you have explored Photoshop and started to gain texturing skills, you can practice applying these skills to the sword model you developed and UVed in Maya.
Follow the steps below to complete this activity. Focus on using Photoshop to create a minimum of two texture maps – such as a Colour Map, Specular Map, or Normal Map – and ensure that you share each of your texture maps in the designated Forum thread.:
- Access Photoshop: Open Photoshop on your computer and ensure you are comfortable with the features and functionality you explored in this topic.
- Retrieve the Sword Model: Access the sword model you developed and UVed in Maya for further modification in Photoshop.
- Create Texture Maps:
- Generate a minimum of two texture maps selected from the following list:
- Colour Map – to add colour and detail that complement the sword’s design.
- Specular Map – to control the reflective properties of the sword.
- Normal Map – to enhance the surface details of your sword.
- Consider creating all three texture maps to enhance your sword model’s appearance.
- Generate a minimum of two texture maps selected from the following list:
- Save Texture Maps: Save your texture maps as JPEG or PNG to your computer, using descriptive names for the files (e.g. ‘ColourMap_Sword').
- Share the Texture Maps:
- Post your texture maps to the forum thread Learning Activity 3: Texture your sword model with a brief comment about the aesthetic choices you made.
- Reflect on the creative process – what were the most enjoyable and challenging aspects of the texturing process?
Next steps
In this topic, you've discovered ways to elevate the visual appeal and realism of your 3D models. From understanding materials in Maya to texture mapping and texturing techniques using both Maya and Photoshop, you're mastering the art of adding depth and detail to your creations.
Explore texturing in your own projects. Take photographs of different surfaces and experiment with creating custom textures. Challenge yourself to achieve photorealistic results and share your textured models with others to showcase your skills and inspire your peers.
With your knowledge of texturing models, it's time to inject them with structure in the next topic, Rigging. Learn how to create digital skeletons, manipulate joints and handles, and establish realistic movements through weight painting and constraints.