In this topic, we will cover:
- Overview
- Modify an existing theme
- Adapt an existing theme
- Build a theme from scratch
- Theme development
- Migrating a CMS.
The purpose of this module is to build a custom theme with a set of useful plugins that fulfil use cases and developer needs. To support your learning, we will explore modifying and adapting child or starter themes. This can be a useful stepping stone. However, the expectation for assessment is to produce a fully custom theme, not a derivative.
In WordPress, there are 3 ways to create your own theme:
- Modify an existing theme
- Adapt an existing theme
- Build a theme from scratch.
To begin, there are 3 types of themes: parent, child, and premium.
A parent theme
A parent WordPress theme is a custom theme for WordPress that is specifically designed to be used as a starting point for creating your own custom theme. This is useful if you want to create a custom theme without having to modify an existing theme.43
A child theme
A child theme is a custom theme for WordPress that is specifically designed to make modifications to an existing theme without affecting the functionality of the main WordPress site. This is useful if you want to create a separate site specifically for your child's content, without having to modify the main WordPress site.43
Premium
High quality WordPress themes that are developed by small or large companies and in most cases you pay for them. Requires parent/child relationship.
- SEO Optimized
- Performance focused
- Follow web standards
- Highly customisable
- Support.
Code tweaks are only recommended in the premium themes because updates may break changes made in the child.43
Framework
Less opinionated than a premium theme and requires a parent/child relationship.
- Follow web standards
- Easily customisable
- Different layout options
- Built-in plugins
- Support.43
Starter
Starter themes are used as a solid starting point to create a complete theme or theme framework. They follow web standards and have community support.43
Follow the video below, where changing a WordPress theme is explained in a few simple steps.
- 0.00 How to Change Your WordPress Theme Safely
- 1.03 Set Up a Staging Copy of Your Website
- 2.26 Install Your New Theme and Preview It
- 3.23 Activate Your New Theme
- 3.46 Resolve Errors and Replace Missing Elements
- 5.01 Push Your Staging Website Live.

There are a few reasons you might want to modify an existing WordPress theme:
- You want to make customisations that are not possible with the current theme
- The current theme is not compatible with the plugins you want to use
- You want to create a child theme so you can update the parent theme without losing your customisations
- You want to create a completely new theme from scratch.43
There are many existing themes in WordPress. Some of the most popular themes include:
- Twenty Twenty
- Twenty Seventeen
- Twenty Sixteen
- Twenty Fifteen
How to modify
If you want to make some changes to an existing theme, or you just want to use a different theme altogether, you will need to create a child theme. A child theme is a copy of an existing theme, just with some modifications made to it.
Step 1: To create a child theme, first go to the Themes tab in the WordPress admin area and click on the “Create a new theme” link. This will take you to a page where you can enter a name for your theme and choose a location for it to be saved.
Step 2: Once you have created your child theme, you will need to copy the files from the parent theme into the child theme folder. The files you need to copy are the theme’s header file, theme files, and style.css file. Once you have copied these files into the child theme folder, you will need to make some modifications to them.
Step 3: The most important modification you will need to make is to the theme’s header file. This file contains the theme’s name, author, and version information. You will need to change the name, author, and version information in the child theme’s header file to match the name, author, and version information of the parent theme.
The other important modification you will need to make is to the theme files. The theme files contain all of the code that controls the look and feel of the site. You will need to modify the files to match the style of the parent theme.
Step 4: Finally, you will need to make a modification to the style.css file. This file contains the custom CSS code that you will need to add to the child theme. You will need to copy the style.css file from the parent theme and modify it to match the style of the child theme.
Step 5: Once you have made these modifications, you can click on the “Activate” button to activate your child theme. This will add the modified files to the theme’s template files and allow you to use the child theme on your site.43
Watch the video below, to follow step-by-step on how to modify a child theme.
The author of the video recommends using a child theme configurator plugin, which can be accessed via the WordPress plugins.
The WordPress website covers in detail how to create a Child Theme, including:
- Create a child theme folder
- Create a stylesheet: style.css
- Enqueue stylesheet
- Install child theme
- Activate child theme.
Follow the step-by-step instructions from WordPress Developer.
Create a child theme
Create a child theme from the latest theme in your project's wp-content/themes folder (i.e. Twenty Seventeen)
- In wp-content/themes, create a folder with the suffix "-child" (i.e. "twentyseventeen-child").
- Inside the folder, create a file called "style.css".
- Open "style.css and add a comments block with the following syntax "Key: value". The comment block must have "Template: twentyseventeen" in order to extend the twentyseventeen theme. Example keys can be:
- Theme Name
- Version
- Author
- Author URI
- Description
- Template
- Go to the WordPress Admin "Themes" interface and click the "Activate" button to apply the child theme.
- Go to the site and you will see no styles have been applied.
- Inside the folder, create a file called "functions.css".
- in this file, create a function called my_styles().
- Inside the function, call Wordpress's wp_enqueue_style method and pass in:
- as a first argument a unique handler (String), i.e. 'css-of-parent-theme'
- and the second argument is the path to the stylesheet, i.e. get_template_directory_uri() . '/style.css'
- Add an action to call the my_styles() function that you created, i.e. add_action('wp_enqueue_scripts', 'my_styles');
- Go back to the site and you will see the styles have been applied.
- Decide on some elements of the site that you'd like to re-style. Open your developer tools and inspect the elements. Make a note of the class names used to style these elements and override these styles in your child class's style.css.
- Copy a template from the parent theme and paste it into your theme folder. This file will now override the parent theme's file. Open it and make changes to the file, then check out the changes on the site.
- Try making changes to as many templates as you can (and view the changes on the website). To know how to view the templates on the site, you will need to understand what each template is responsible for and you may need to make configurations in the dashboard so that some templates are visible).
Watch the video tutorial on SitePoint: Create your first WordPress child theme fast.
Further reading about child themes:
- WordPress Developer: Child Themes
- Smashing Magazine: Create customize WordPress child theme
- WPBeginner: WordPress child themes pros and cons

By duplicating an existing theme, you can adapt it any way you want.
How to adapt a theme
Once you have duplicated the theme you are able to explore and change styles to suit your needs. This might involve deleting current styles so you can create your own.
When you are adapting an existing theme, you might want to change the HTML structure of the theme.
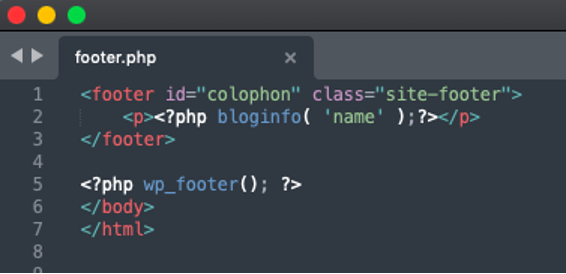
To do so, you will need to open various files such as header.php, index.php and footer.php and update the HTML parts with your own template elements.

To adapt an existing theme:
- Check the theme's source code to see how the theme is built. This will help you understand how to customize and adapt the theme to your specific needs.
- Research other WordPress themes that may be suitable for your website. This will help you find a theme that is compatible with the features and layout of your website, as well as the style and branding of your business.
- Download and install the theme's custom plugin and scripts. This will help you customize the theme to include specific features and functionality that are specific to your website.
- Test the theme on a small sample of pages to make sure it looks and works as intended. Once you are confident that the theme is working as intended, you can begin to adapt it to your website's specific needs.
When adapting an existing theme, there are a few tools you can use, depending on what it is you need to adapt.
The video below takes us through:
- Installing a Plugin
- Using the Customizer
- Using the Page Builders Features
- Customising Framework Themes
- Editing Your Themes Code.43
Functions
Theme functions file, also known as functions.php, is a template included in WordPress theme.
It behaves like a plugin that is automatically activated with your current theme. The functions.php file uses PHP code to add features or change default features on your WordPress site.41
Functions.php is important because it is a file that contains all of the functions that are used by the WordPress installation. These functions are called by the WordPress administration panel and by the WordPress theme and plugin developers.43
To access the functions.php file through your WordPress Admin interface, follow the steps below.
- Log in to the WordPress Admin interface

- In the left sidebar, hover over Appearances, then click Theme Editor
- In the right sidebar, click functions.php
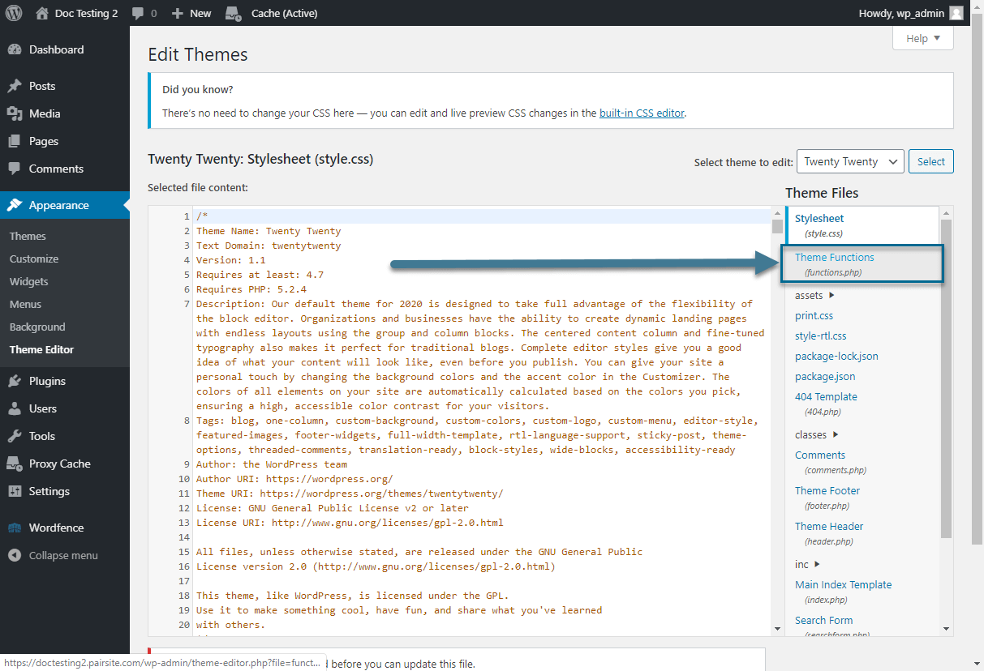
This will bring up the functions.php code editor. You can write code directly in this interface and save it.
Templates
In the functions.php file, sometimes it is useful to have simple functions that templates can use.
Word count
This function counts the words in a post:
And the function can be called in a template like so:
Adding contextual edit/delete links
An admin can manage post comments from the admin dashboard, but it is also handy for the admin/editor to have links available on the website. A function can be used to create these links (in this case to delete comments or mark them as spam):
And then used in a template like so:
Add feed links to header
Enable threaded comments
Add Google analytics to the footer

There are many reasons to create your own custom theme, including:
- To create a unique look.
- To take advantage of features such as templates, template tags, and the WordPress Loop.
- To provide alternative templates for specific site features, including category pages and search result pages.
- To quickly switch between 2 site layouts, or to allow site owners to change the look of your site using a theme or style switcher.42
Building a theme from scratch is a great opportunity to learn, and master, CSS, HTML, and PHP.
Theme development standards
WordPress Themes need to be coded using the specific standards:
- WordPress Coding Standards to ensure well-structured, error-free PHP and valid HTML.
- CSS Coding Standards to ensure clean, valid CSS.
- Site Design and Layout guidelines.42
Take a moment now to familiarise yourself with these standards.
Anatomy of a theme
'WordPress Themes live in subdirectories of the WordPress themes directory (wp-content/themes/ by default) which cannot be directly moved using the wp-config.php file. The Theme's subdirectory holds all of the Theme's stylesheet files, template files, and optional functions file (functions.php), JavaScript files, and images. For example, a Theme named "test" would reside in the directory wp-content/themes/test/. Avoid using numbers for the theme name, as this prevents it from being displayed in the available themes list.
WordPress includes a default theme in each new installation. Examine the files in the default theme carefully to get a better idea of how to build your own Theme files.
For a visual guide, see this infographic on WordPress Theme Anatomy. WordPress Themes typically consist of 3 main types of files, in addition to images and JavaScript files.
- The stylesheet called style.css, controls the presentation (visual design and layout) of the website pages.
- WordPress template files control the way the site pages generate the information from your WordPress database to be displayed on the site.
- The optional functions file (functions.php) as part of the WordPress Theme files.'42
Theme stylesheet
'In addition to CSS style information for your theme, style.css provides details about the Theme in the form of comments. The stylesheet must provide details about the Theme in the form of comments. No 2 themes are allowed to have the same details listed in their comment headers, as this will lead to problems in the Theme selection dialog. If you make your own Theme by copying an existing one, make sure you change this information first.'42
Stylesheet guidelines
- Follow CSS coding standards when authoring your CSS.
- Use valid CSS when possible. As an exception, use vendor-specific prefixes to take advantage of CSS3 features.
- Minimise CSS hacks. The obvious exception is browsers-specific support, usually versions of IE. If possible, separate CSS hacks into separate sections or separate files.
- All possible HTML elements should be styled by your theme (unless it is a child theme), both in post/page content and in comment content.
- Tables, captions, images, lists, block quotes, et cetera.
- Adding print-friendly styles is highly recommended.
- You can include a print stylesheet with media="print" or add in a print media block in your main stylesheet.'42
Custom theme development can be a big project to take on, but easier than you may expect if you know basic CSS, HTML, and JavaScript.44
Custom theme development requirements
Before we move on to the practical work, you need to have an understanding of a theme’s structure. You will already be familiar with some of these from what you have learned so far, but in its most basic form, a WordPress theme is a normal HTML page made up of the following files:
- header.php – contains the code for the header section of the theme.
- index.php – contains the code for the Main Area and will specify where the other files will be included. This is the main file of the theme.
- sidebar.php – contains the information about the sidebar.
- footer.php – handles the footer section.
- style.css – responsible for the styling of your theme.
- single.php – includes code for displaying the article on its own page;
- page.php – includes code for displaying a single page’s content;
- archive.php – displays a list of items in the archive, as well as the categories that the user has defined;
- functions.php – This file contains functions that enhance theme functionality, such as logos, menus, colour, thumbnails, scripts, and stylesheets.
- 404.php – an error code indicating that the requested file could not be found.
Now we are ready to start.44
Make a folder for your files
Outside of configuring WordPress, almost everything you do in WordPress will be in the wp-content folder. Everything else is core code, so you do not want to edit those.
A WordPress installation usually contains a WordPress directory as its root directory. Look at how the root directory appears.
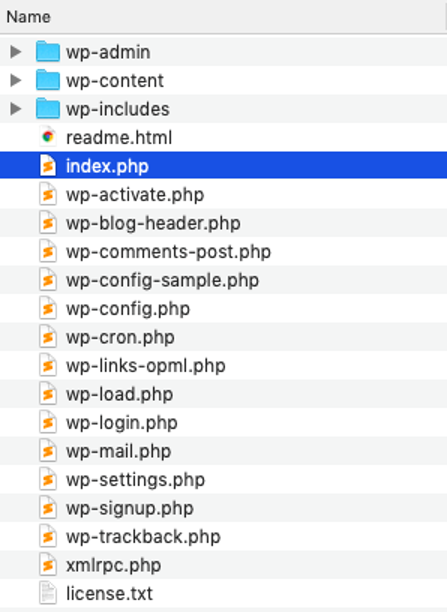
How to Develop a WordPress Theme from Scratch – Beginners Guide by Ardra Muralidharan, © wp-content.co
In Finder, follow the path of wp-content > themes to arrive at your themes folder. You will see the WordPress default themes and index.php. Create a new directory for your theme.
2. Create the custom theme
A WordPress theme only needs 2 files to exist – style.css and index.php. Therefore, you need to create new index.php and style.css files when you finish constructing your theme folder. Style.css contains a comment that alerts WordPress that a theme exists there. It is required in all themes and contains the information header for your theme. Change the name, author, description, and so on. Let us look at what each of them indicates.
- Theme Name – A theme name should always be provided, otherwise the folder name will be used.
- Theme URI – This should direct users to a website where they can learn more about the theme.
- Author – This is where you put your name.
- Author URI – Here you link to your own website.
- Description – This displays in both the wp-admin theme modal and the WordPress theme listing.
- Version – Version numbers help developers keep track of changes, and ensure customers use the most up-to-date version.
- License – You can choose how your theme is licensed, but if it is not GPL-compatible, you will not be able to distribute it on WordPress.
There are a few more non-essential fields to style.css, but they are strongly recommended if you want your theme to look good in wp-admin. The following example has assigned a Theme Name, Author, Author URI, Description, Version number, and Tested up to (The last main WordPress version the theme has been tested up to).
Coming to index.php WP loads the posts that would be shown on the screen using this file. It is the main template file and is required in all themes. In addition, if a WP base file is missing, it will use it. Your theme has now been created. Go to the WordPress dashboard and click on Appearance > Themes. You will see the theme in the collection with all the default themes.
3. Activate the theme
To check if the information entered in the style is correct, go to “Theme Details” in Appearance > Themes. Then, activate the theme and go back to your main URL. Now you have technically created a custom theme, but it does not do anything yet beyond what a static HTML site can do.
4. Change the settings in the index.php file
To test if your theme works, go back to the index.php and write a command-line for WP to retrieve the posts from the database and show them on the page. You need to restore the post’s title and content so all the files can be seen on the home page.
The “have posts” command instructs WP to look for blog posts in the database. The page will be updated if there are any new listings. If not, the message for the negative response condition that we set in the code will be shown (false).
There is a function named “the post” that needs to be added to the loop “have posts” for WP to show that file whenever the “have posts” condition is true. WordPress looks for new entries in this loop and shows them on the page as needed.
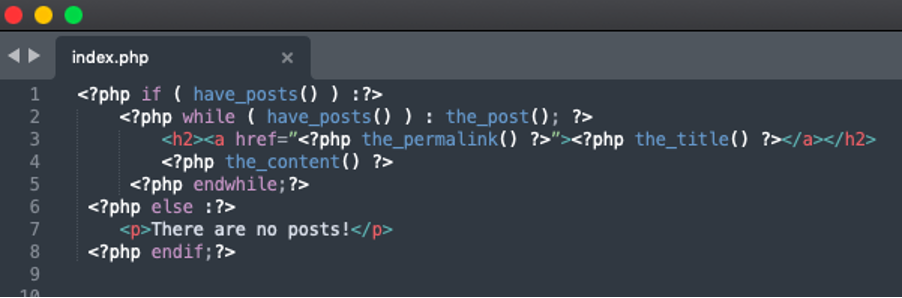
How to Develop a WordPress Theme from Scratch – Beginners Guide by Ardra Muralidharan, © wp-content.co
The “the post” method fetches the most recent post and makes the required adjustments to show it chronologically on the theme page. Because this is a loop, if the function returns true, every time a new post is made it will be instantly included.
The content is attached to the file title put on the page using the “the content” function. The “the permalink” function creates a link to each individual post, allowing users to view the information without having to scroll through the whole text on the main page. You can use “the excerpt” method instead of the “the content” method to add a quick summary under the file title with the first 200 characters of the content. Then when the user clicks on the link, they will get the whole text.
5. Divide your page into sections
As of now, everything is in index.php, but we want the header, footer, and sidebar on all the pages to be the same. Therefore, we need to divide index.php into 2 sections – header.php and footer.php.
It is good to have wp head in all of your themes because it is a particular function that wraps up the output in the header.php file’s head> section. It should be entered before the closing /head> tag to make adding plugins to the site easier, as this hook can be used to integrate styles, scripts, or meta components to the head> region. On the other hand, the footer.php file can close the tags used in the functions as defined in the following:
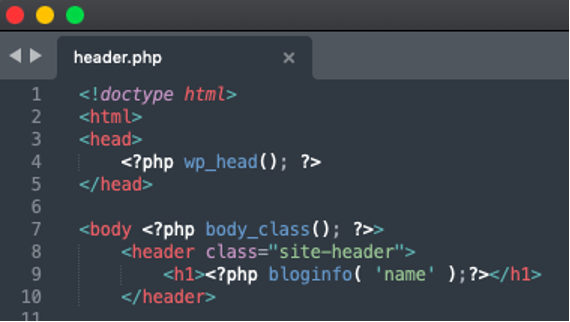
How to Develop a WordPress Theme from Scratch – Beginners Guide by Ardra Muralidharan, © wp-content.co
How to Develop a WordPress Theme from Scratch – Beginners Guide by Ardra Muralidharan, © wp-content.co
Most websites, particularly blogs, will also have a side area for including content such as archives, tags, categories, ads, and more. If you want to include them, you need to divide the index.php again into sidebar.php, content.php, and such. If the sidebar is where all the secondary information goes, the content is where all the articles and main content of the website go.
6. Create the functions.php file
Now, your custom theme contains index.php, style.css, header.php, and footer.php files. The next file you should have is functions.php, which gives WordPress personality by allowing the command-line to change the CMS’s default behaviour. It does not require a unique header text. It only applies only to the current theme and works when the theme is active.44

Migrating a WordPress site is useful for when you are ready to move your remote site onto a web server, or if you want to change hosting providers. It is important to know how to do it properly because poor execution can result in downtime or data loss.
There are several ways to migrate a WordPress site, but – no surprise – the easiest way is to use a plugin. Backups and migration go hand-in-hand. There are several plugins to choose from for this task, including UpdraftPlus which we used to demonstrate site backups, but for variety, we will be using a plugin called Duplicator.
Duplicator plugin
Duplicator by Snap Creek is one of the best WordPress plugins for site migration. It successfully gives WordPress users the ability to migrate, copy, move or clone a site from one location to another and also serves as a simple
The plugin enables you to:
- Move, migrate, or clone a WordPress site between domains or hosts with zero downtime
- Pull down a live site to localhost for development
- Transfer a WordPress site from one host to another
- Manually backup a WordPress site or parts of a site
- Duplicate a live site to a staging area or vice versa
- Bundle up an entire WordPress site for easy reuse or distribution
- Perform a full WordPress migration without struggling with messy import/export SQL scripts.
Duplicator creates a package that bundles all your plugins, themes, content, database, and WordPress files into a simple zip file. This “package” can then be used to migrate a WordPress site to any location you want easily – almost any location a WordPress site can be hosted. WordPress is not required for installation since the package contains all site files.45
Watch this video for a quick overview of the plugin.
How to migrate a WordPress site with the Duplicator plugin
It can be daunting to move your site after all the time and money you have invested into it. A plugin like Duplicator simplifies the process, but can still be confusing, so will require attentiveness and a little time to get comfortable using it.46
1. Download and install the plugin
The first step is to download and install Duplicator the same way you would other plugins.
2. Activate the plugin and create a site package
After activating the plugin, you will get a new navigation option in your main WordPress dashboard menu: “Duplicator”. Select this and you will enter the main setup screen with a warning message that you have not created any packages yet:
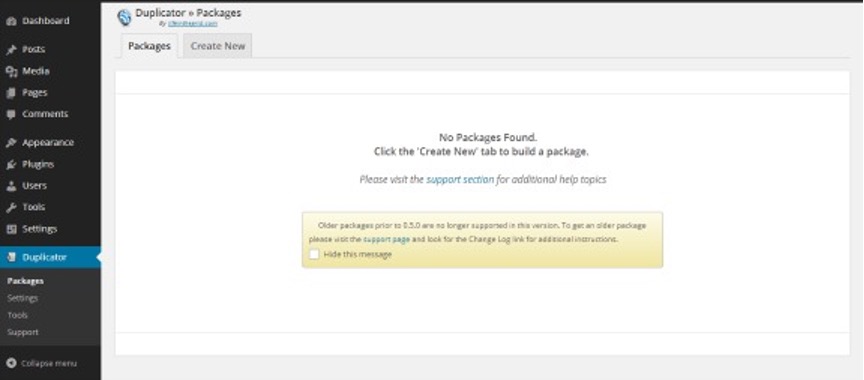
How To Move Or Backup Your Website With The WordPress Duplicator Plugin by Rachel Adnyana, © WPKube
Click the “Create New” tab. This will take you to the package creation wizard.
Before the package can be created, there are several requirements that need to be fulfilled. Hopefully, you will have a “pass” in this, but if not, you can expand the box to find out where the problem is:
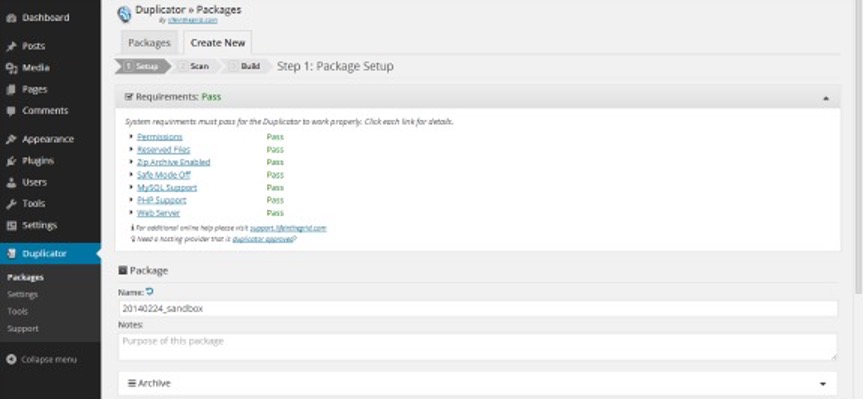
How To Move Or Backup Your Website With The WordPress Duplicator Plugin by Rachel Adnyana, © WPKube
If any of the requirements fail, you can click the link for further information about how to solve the issue. Some common problems you may be able to fix by yourself, but in other cases, you may have to contact your hosting provider to make changes for you.
The name will be pre-filled (you can change this if you wish), you have the option to create some notes about the package and there are further options under Archive and Installer.
Under the Archive section, there is a drop-down box to change the file format. You do not need to enable the file or database filters unless you want to exclude something from your site backup.
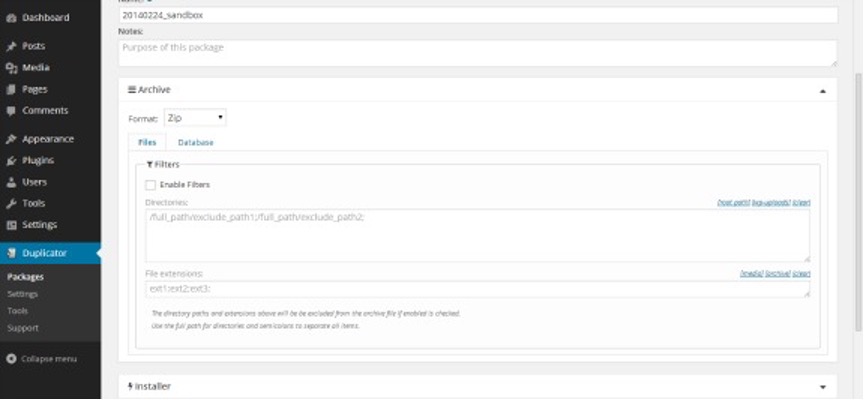
How To Move Or Backup Your Website With The WordPress Duplicator Plugin by Rachel Adnyana, © WPKube
You can use the installer section to enter details about the server where you will be moving your WordPress site. Fill these out now or leave them until the installation step.
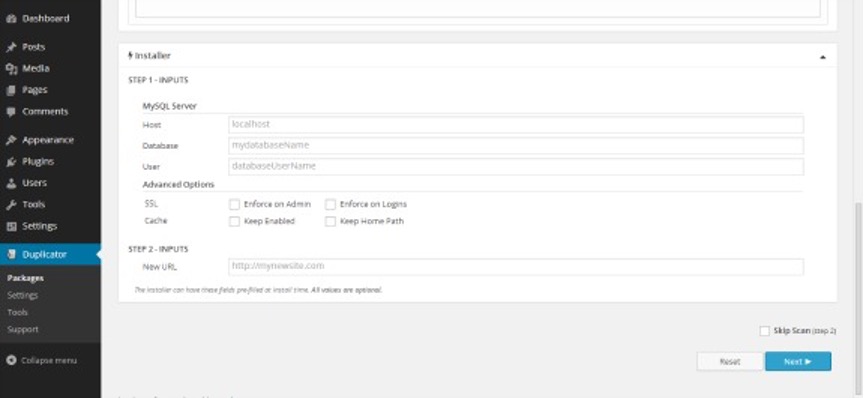
How To Move Or Backup Your Website With The WordPress Duplicator Plugin by Rachel Adnyana, © WPKube
Finally, you can choose to skip the system scan and go directly to the package build. However, it is recommended to uncheck this so you are aware of potential issues.
After clicking the Next button, the plugin will perform a scan of the server, files, and database to detect any possible problems. It is not required for all the checks to pass to build the package, but it is good to know about them because they can be troublesome in some cases.
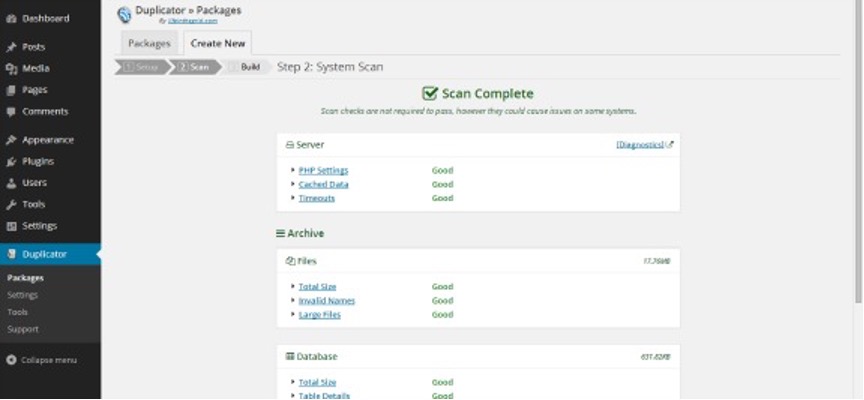
How To Move Or Backup Your Website With The WordPress Duplicator Plugin by Rachel Adnyana, © WPKube
If you get any warnings on this page, click the relevant link for more information. If you have a large site or files (like video files), this might throw up a warning as they can cause timeouts. In such cases, you might want to go back and use the filter option to exclude such files from the package. It is also a good idea to clean up the database of very large sites before you export the package.
After clicking build, the software will go ahead and back up your whole site including all plugins, themes, pages, posts, and media to a single file. Once the build has finished, you will be presented with download buttons for an installer (a PHP file) and the archive you just created as a zip file. Download these files.
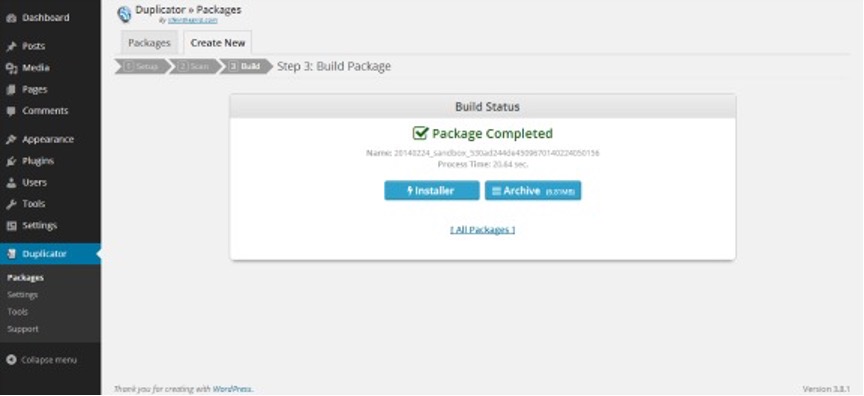
How To Move Or Backup Your Website With The WordPress Duplicator Plugin by Rachel Adnyana, © WPKube
The package will be listed back on the packages tab with date and size information, which is useful for backups. The package files are stored in a new wp-snapshots directory in your main website directory.
3. Prepare new server for installation
The next step is to connect to the new server via FTP, and upload the installer.php and your archive zip file to the directory you want to install the site in. You do not need to install WordPress on the new server.
Note: Duplicator does not handle setting up a new database for your site on the new server, so you will need to do this manually.
Remember to note down your database host (if on a different server to your website files – localhost works for many hosts), username, password, and database name, as you will need them in the next step.
4. Run the site installer
Access the installer script in your web browser from wherever you copied it to. For example, http://www.mysite.com/newsite/installer.php You should see a screen like the following. Fill out the fields with the information for the database you just set up:
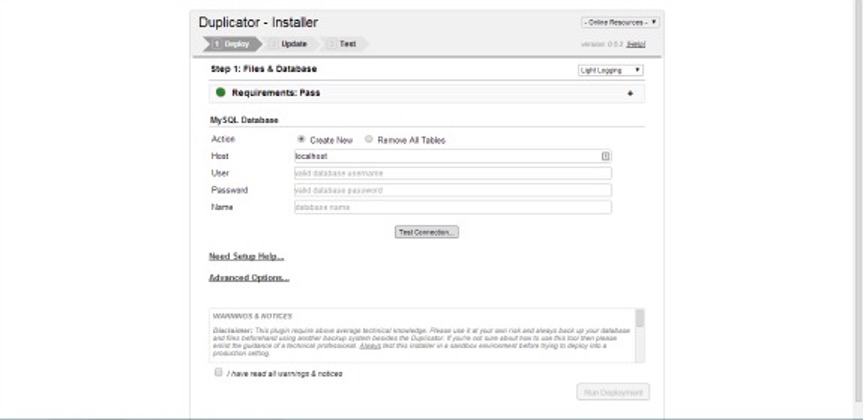
How To Move Or Backup Your Website With The WordPress Duplicator Plugin by Rachel Adnyana, © WPKube
Press the “Test Connection” button to check the script can connect to the database. If the connection is successful, you should get a pop-up telling you that the server is found and the script managed to connect to the database. If you get a fail for either of these, follow the advice under “common connection issues”, or contact your hosting provider for help.
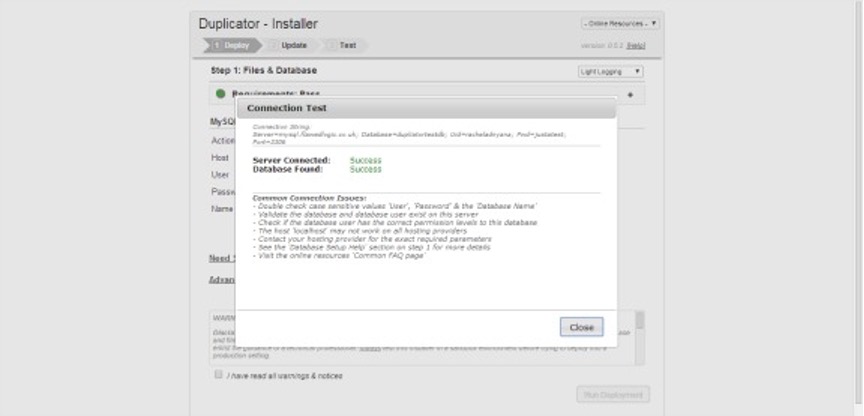
How To Move Or Backup Your Website With The WordPress Duplicator Plugin by Rachel Adnyana, © WPKube
Before proceeding, you need to tick the box to confirm you have read all the warnings and notices. Then click “Run Deployment”. You will get a warning reminder that any data existing in the database will be overwritten. Double-check that you have entered the name of your new database and not an existing one, then click OK.
You should then see the system starting to deploy the files. If you get an error, try re-uploading your archive file in case it was corrupted during the file transfer.
After installation, you will be presented with a page showing you the old and new Path and URL settings for your site. You can change your page title here and create a new admin user if you want.
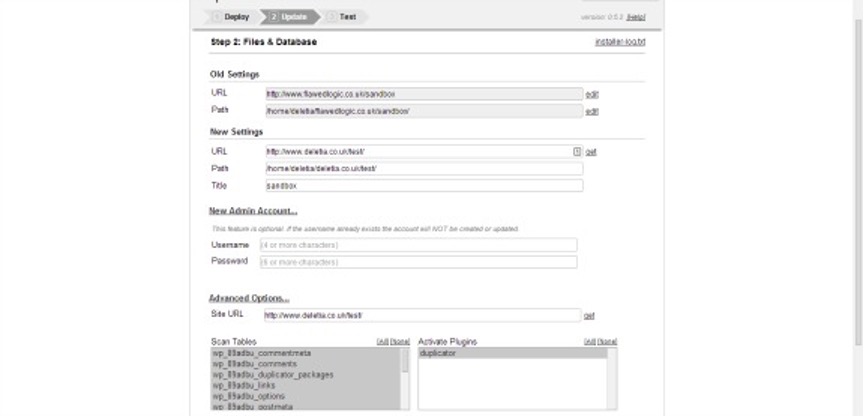
How To Move Or Backup Your Website With The WordPress Duplicator Plugin by Rachel Adnyana, © WPKube
If you have problems with certain plugins when you are copying your site across, you can disable them from the advanced options section. You can then hit the “Run Update” button to update the database and finish the site install.
The final screen displays a report of the installation, with any errors and warnings, and steps you should complete before using your new site.
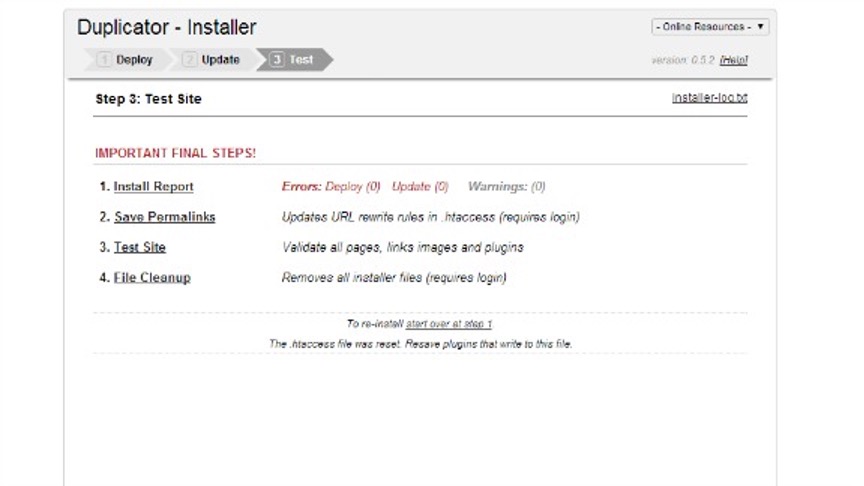
How To Move Or Backup Your Website With The WordPress Duplicator Plugin by Rachel Adnyana, © WPKube
Clicking on Save Permalinks will take you straight to the WordPress dashboard of your new site. You may have to log in (using your original admin username and password, or the new one you set up on the previous screen).
Select the permalinks structure you want to use and save the setting.
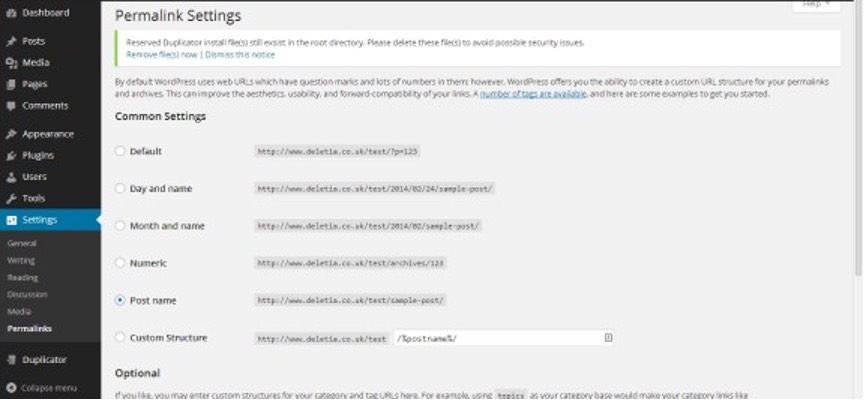
How To Move Or Backup Your Website With The WordPress Duplicator Plugin by Rachel Adnyana, © WPKube
You will also get a warning at the top of the screen that the install files are still located within the WordPress directory, and this could pose a security risk. You can delete the files directly using the link on this page.
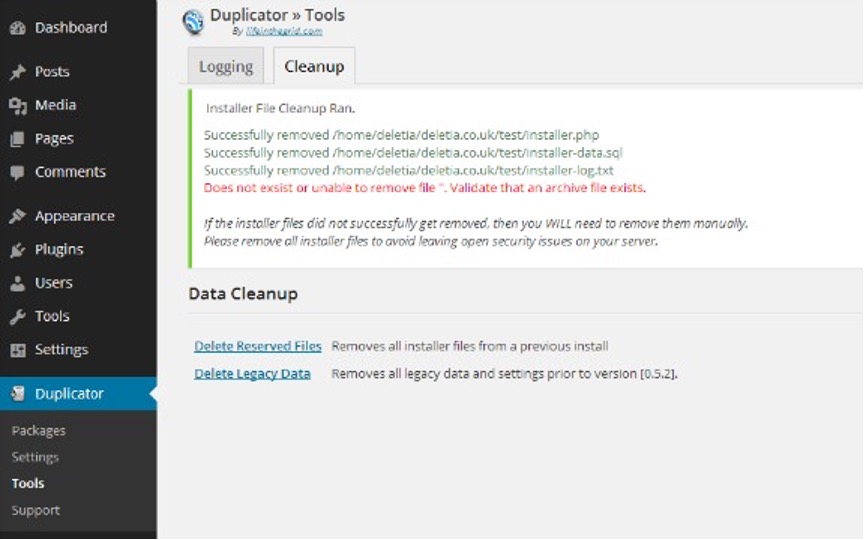
How To Move Or Backup Your Website With The WordPress Duplicator Plugin by Rachel Adnyana, © WPKube
If you get an error message that a file was not removed successfully, you can just delete it manually using your FTP program.
Finally, check your site from the front end to see if everything works properly. Sometimes a plugin or 2 may need reinstalling, but otherwise, you should have an exact copy of your original site.
Congratulations – you have successfully migrated your site to a new server!46
Knowledge check
Custom theme development
For this milestone, you should be able to:
- Create a custom theme
- Write server-side code
- Include reusable design and functionality
- Apply typographic principles.
Choose a small non-profit organisation that needs a website redesign. Research the cultural/sociological issues the non-profit organisation is facing, and use these insights in your design.
Create a custom theme that:
- Overrides template files
- Uses template parts
- Includes custom post types
- Includes custom taxonomies
- Uses and extends a plugin.