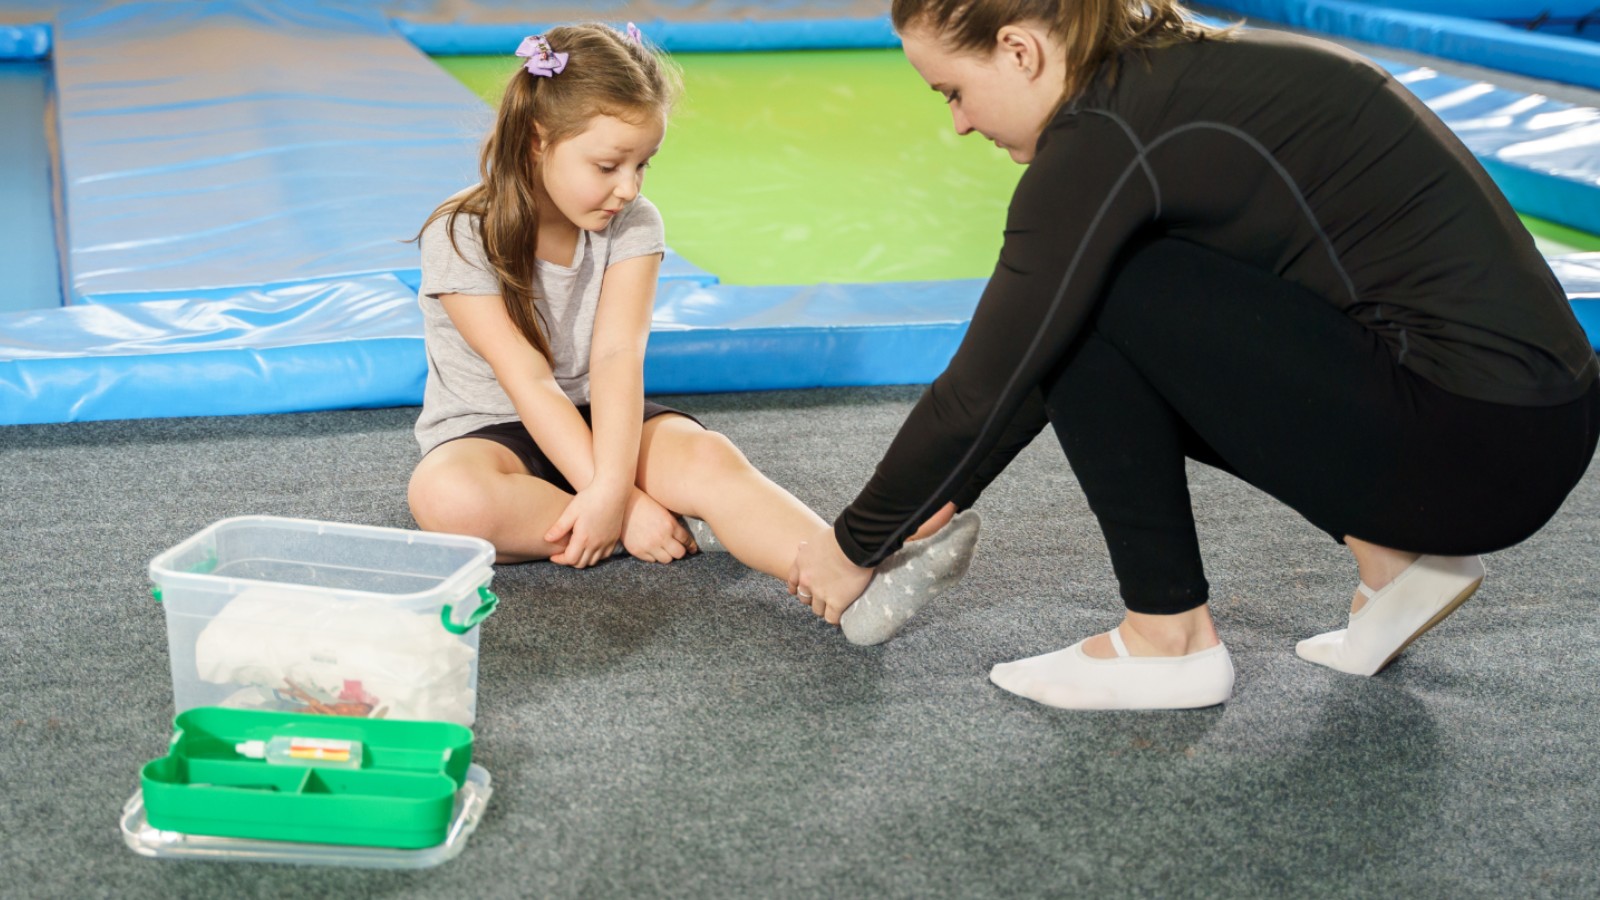
Determining when professional medical assistance is required is an essential aspect of responsible first aid management. Always be aware of your own skills and limitations and defer to professional medical staff if you are in any doubt about the seriousness of the situation. Calling an ambulance unnecessarily is a much better scenario than underestimating the situation and potentially causing more harm or having the patient die.
Call 000 (triple zero) and advise the operator of the situation and seek their advice on the best course of action.
The information in this topic is largely gathered and paraphrased from the St. John Ambulance first aid fact sheets site.
The abdominal cavity is not protected by any bones and thus trauma to this area can cause severe damage to organs such as the stomach, liver, spleen and intestines. Internal bleeding is a risk even if there is no obvious laceration to the skin.
First aid techniques for this type of injury include:
-
Place the patient into a position that affords the most comfort, this will probably be on their back.
-
Draw their knees upwards to help relieve pain and spasms.
-
Loosen any tight clothing, especially at the waist and neck.
-
If there is a laceration then attempt to control the bleeding by applying gentle pressure to the wound or for larger wounds attempting to hold the edges together.
-
DO NOT touch or attempt to replace any visible intestines.
-
For larger gaping wounds cover with a sterile dressing that has been soaked in warm water to avoid damage to organs.
-
DO NOT allow the patient to eat, drink or smoke.
The main objectives of treating burns is to:
-
Stop the burning process.
-
Cool the burn wound.
If the victim or their clothing is on fire then practice the STOP, DROP, and ROLL technique to extinguish the flames. If the burn has occurred in another manner and there is no immediate danger to the patient then commence to stage two.
-
As soon as possible hold the burnt area under cool running water and maintain this for at least 20 minutes.
-
Remove clothing and jewellery from the immediate area, unless it is stuck to the burnt skin. If this is the case then do not attempt to pull at the material.
-
Cover the burn with a light, loose nonstick dressing. This dressing should be clean, dry and non-fluffy.
-
Monitor the patient for shock and treat as necessary until professional help arrives or the patient can be taken to a doctor/hospital (if the wound is serious).
Burns have different severity levels:
-
First-degree burns - Red, non-blistered skin.
-
Second-degree burns - Blisters and some thickening of the skin.
-
Third-degree burns - Widespread thickness with a white, leathery appearance.
Medical assistance should be sought if the burn affects a large area of skin (ie. larger than a 20c piece) and/or it is on the face or a major joint.
The first and foremost action is to remove all crushing forces as soon as possible. Depending on the situation this may not be easy or even possible, in this situation seek professional advice on the best course of action.
Removing the crushing force helps to prevent Crush Syndrome which is a disruption of the body's chemistry and can result in damage to the kidneys, heart and other systems/organs.
First aid techniques for this type of injury include:
-
Call and ambulance.
-
Remove the crushing force (if physically possible).
-
Control any external bleeding.
-
Treat other injuries.
-
Maintain body temperature.
-
Offer reassurement to avoid panic.
-
If the patient is unconscious but breathing normally then place them in the recovery position.
A sprain is where a ligament has been twisted or torn. A strain is where a muscle has been overstretched. You may not immediately be able to tell if there is also a fracture, if you are in any doubt about whether this type of injury is a fracture always treat as a fracture.
First aid techniques for this type of injury include following the RICE acronym:
-
Rest - Rest the patient and the injured part.
-
Ice - Apply an ice pack or cold pack for 15 minutes every two hours for 24 hours, then for 15 minutes every four hours for 24 hours.
-
Comfortable support - Apply compression bandage firmly to extend well beyond the injury.
-
Elevation - Elevate the injured part.
A stroke is a medical emergency that occurs when the blood flow to the brain is interrupted. This is a very serious situation and prompt action is required.
First aid techniques for this recognising a potential stroke include following the FAST acronym:
-
Face - Has any part of the person's face drooped? Ask them to try and smile.
-
Arms - Can they lift both arms?
-
Speech - Do they have slurred speech? Do they understand you?
-
Time - Call an ambulance immediately, time is critical.
Hypothermia is caused by prolonged or sudden exposure to low temperatures and hyperthermia is caused by prolonged or sudden exposure to high temperatures.
First aid techniques for Hypothermia include:
-
Remove the patient from the source of cold and remove any wet clothing.
-
Place them between blankets or in a sleeping bag and then wrap them in an emergency blanket.
-
Cover their head to help maintain body heat.
-
Give the patient a warm drink (not alcohol) if they are conscious.
-
Place hot water bottles, heat packs and other sources of external heat directly on the patient's neck, armpits and groin. Be careful to avoid burns.
-
If necessary body-to-body contact can be used for rewarming if no other means are available.
-
If severe hypothermia has occurred call an ambulance.
First aid techniques for Hyperthermia include:
-
Remove the patient from the heat source and guide them to sit or lie down in a comfortable position.
-
Remove most of their clothing (allowing for basic modesty) and loosen any remaining tight items.
-
Apply cold packs to the neck, armpits and groin.
-
If possible, cover them with a wet sheet and fan to increase air circulation.
-
Give the patient cool water to sip if they are conscious.
Dehydration can occur if someone loses fluid from the body and is unable to replace it. Heat exhaution (where body temperature rises above 37° but stays below 40°), and heatstroke (where body temperature rises above 40°) can be caused by untreated dehydration.
Signs and symptoms of dehydration include:
-
Headache or light-headedness.
-
Dry mouth, eyes, and lips.
-
Small amounts of dark urine.
-
Muscle cramps.
Provide plenty of water to a person suspected of having dehydration and encourage them to rest. In some cases an oral rehydrating solution (available from chemists) can be provided, this is especially helpful for dehydration caused by vomiting and diarrhea. If severe or prolonged dehydration is evident then encourage them to see a doctor.
Wounds are an internal or external break in body tissue, usually the skin, which results in bleeding and other damage. Wounds can be caused by a variety of sharp objects or trauma. There are four classifications of wounds:
-
Abrasion - Caused by skin rubbing against a rough surface such as asphalt or gravel. Also known as a graze or a scrape. This type of wound is usually superficial and requires basic first aid to cleanse the area and stop minor bleeding.
-
Laceration - A deep cut or tearing to the skin. Commonly caused by accidents with knives, tools, and machinery. Bleeding can be rapid and extensive. Medical treatment and stitches are often required.
-
Puncture - A deep narrow wound caused by a sharp pointed object such as a nail.
-
Avulsion - A partial or complete tearing away of skin and tissue beneath. This type of wound usually occurs during violent accidents. They cause heavy bleeding and are very serious.
First aid techniques for this type of injury include:
-
For abrasions, wash the graze with warm water and gentle soap using a sterile gauze. Place a dressing such as a band-aid or small bandage over the wound to keep it clean and dry.
-
For lacerations, apply pressure to the cut to control bleeding. Wash area with warm water and gentle soap using a sterile gauze. Apply padding and a bandage to the wound. If the bleeding continues and soaks through the dressing then seek medical attention as stitches may be required.
-
For punctures, remove any clothing that is covering the wound. If the wound is not bleeding then clean around it. If it is bleeding then apply padding and a bandage to control bleeding. Do not attempt to remove any foreign materials that may be inside the wound. Seek medical assistance if bleeding is extensive or of infection is likely (ie. dirt, clothing, or other foreign object is inside the wound).
-
For needlestick injuries (which are a form of puncture), wash the area with soap and water as soon as possible and apply an antiseptic solution and clean dressing. Seek prompt medical assistance if the injury was sustained from a potentially contaminated or infectious needle.
Important Note: Do not attempt to remove an embedded object as it may be preventing significant blood loss. Removing the object may also cause structural and/or nerve damage. Always leave this task to a medical professional.
Wounds often result in bleeding, which can be severe. It is important to quickly get bleeding under control to avoid a potentially life threatening situation.
First aid techniques for controlling bleeding include:
-
Apply firm, direct and continuous pressure on the bleeding wound. Use your hands to do this in the first instance and, when available, switch to a form of padding or dressing.
-
If there is an embedded object apply pressure and any dressings around the object.
-
Once bleeding is under control apply a bandage. Ensure that the padding stays directly over the wound.
-
Monitor the patient for signs that bleeding may be continuing, checking vital signs such as their pulse and breathing can assist with this, as can visually observing the dressing for signs of blood soaking through.
-
If the bleeding is not controlled and the bleeding is on a limb, apply an arterial tourniquet (if available) approximately 5-10cm above the site of the bleeding and tighten until the bleeding stops. Advise the patient that this will cause pain. If necessary an arterial tourniquet can be improvised using any form of cloth strip which is approximately 5cm wide.
-
If the bleeding is not on a limb, remove existing dressings and apply a haemostatic dressing (if available) in or directly over the wound and apply firm, direct and continuous pressure until the bleeding stops. This type of dressing contains a chemical agent which promotes blood clotting.
-
If a tourniquet has been applied (and this should only be used as a last resort in the case of severe uncontrolled bleeding) ensure you DO NOT remove the tourniquet yourself, always wait for medical professionals. Removing a tourniquet should only be done in a hospital.
Shock is a life-threatening condition that is caused by the body not receiving adequate blood flow and thus cells and organs are not receiving adequate oxygen and nutrients. It is often associated with wounds as there can be a significant loss of blood. Note: This condition differs from 'non-medical shock' which is caused by the sudden release of adrenaline into the bloodstream as a result of anxiety or fear.
First aid techniques for treating shock include:
-
Help the patient to lay down and reassure them.
-
Treat any source of bleeding.
-
Attend to other injuries.
-
Call an ambulance, shock is caused by blood loss or inadequate blood flow which is very serious and requires professional medical treatment.
-
Keep the patient warm, although you should not use any form of direct heat.
-
Encourage the patient to sip small amounts of cool water on a frequent basis.
-
If the patient is having difficulty breathing, loses consciousness or is likely to vomit then place them in the recovery position.
Allergic reactions can be triggered by many different allergens, such as pollen, animal fur, dust mites, certain foods, insect stings and some medications.
Most allergic reactions are mild and temporary, resulting in rashes and/or itchiness or respiratory reactions such as runny nose, stinging eyes and/or sneezing.
First aid techniques for treating mild allergic reactions include:
-
Administer an antihistamine such as Benadryl or a nasal decongestant.
-
Use ice or a cool wet towel to relieve discomfort from itchy rashes. Discourage the patient from scratching.
-
Apply creams such as Calamine lotion to sooth itchy skin.
Some people are prone to more severe allergic reactions that causes a sudden and potentially life-threatening reaction, this is known as Anaphylaxis. Treatment for anaphylaxis is the prompt adminsitration of adrenaline which rapidly helps to reduce throat swelling, open the airways and control blood pressure.
First aid techniques for treating severe allergic reactions (anaphylaxis) include:
-
Lay the patient down flat or if breathing is difficult allow them to sit or put them in the recovery position.
-
The patient may have their own action plan for such a scenario and if they are able to self-administer the necessary medication (EpiPen® auto-injector) then allow them to do so.
-
If necessary, administer the Epi-Pen® auto-injector yourself.
-
Form a fist around the auto-injector device and pull the blue safety release off.
-
Hold the patient's leg still and place the organge end against the patient's outer mid-thigh (with or without clothing).
-
Push down hard until a click is heard or felt and hold in place for three seconds. Remove the EpiPen®.
-
Monitor the patient, if no improvement is made after five minutes then administer another EpiPen® injection (if available).
-
Call an ambulance if anaphylaxis is not immediately controlled, or if this is the patient's first occurance of severe allergic reaction.
Choking occurs when an object or food becomes lodged in the throat or windpipe (trachea) blocking airflow. Asthma is an inflammatory condition that affects the bronchial tubes causing them to narrow in response to environmental factors (allergens or air pollution) therefore making breathing difficult.
First aid techniques for treating choking in an adult or a child (above the age of one year) include:
-
Have someone call an ambulance.
-
Ask the patient to try and cough to remove the object.
-
If this is unsuccessful then administer up to five sharp blows to the back: Lean the patient forward and use the heel of your hand to deliver a blow between the shoulder blades.
-
Check to see if there is anything in their mouth.
-
If this is unsuccessful then administer up to five chest thrusts: Stand behind the patient, put your arms around their body, link your hands together between their belly button and the bottom of their chest. Clench your lower hand into a fist and clasp the fist with your other hand. Pull sharply inwards and upwards.
-
Check again to see if there is anything in their mouth.
-
If the patient is still choking then alternate these two processes until medical assitance arrives.
The following video demonstrates the above process, please note that this is an English video and thus the emergency call number is not applicable - Always call 000 in Australia.
-
If the patient is an infant (under one year of age) then place them with their head downwards on your forearm or thigh, supporting the head and shoulders on your hand.
-
Hold the infant's mouth open with your fingers.
-
Give up to five sharp blows to the backbetween the shoulders with the heel of one hand, checking if the blockage has been removed after each blow.
-
If the blockage has become losse or removed turn the infant into the receovery position and remove the object from the mouth with your little finger.
-
If unsuccessful and the blockage has not been removed, place the infant on their back on a firm surface still supporting their head and neck.
-
Place two fingers on the lower half of the sternum (in line with the armpit) and give up to five chest thrusts, checking if the blockage has been removed after each thrust.
-
Continue alternating between back blows and chest thrusts until medical assistance arrives.
The following video demonstrates the above process, please note that this is an English video and thus the emergency call number is not applicable - Always call 000 in Australia.
First aid techniques for treating an asthma attack include:
-
Help the patient to sit down in a comfortable position, preferably sitting up straight, and reassure them.
-
The patient may have their own action plan for such a scenario and if they are able to self-administer the necessary medication (administered via a device known as a reliever inhaler) then allow them to do so.
-
If necessary, administer the medication yourself. Shake the inhaler, give one puff, ask them to take four breaths, repeat until four puffs have been administered.
-
Wait four minutes, if there is no improvement then administer four more separate puffs. Call an ambulance.
-
Continue to provide four puffs every four minutes until medical assistance arrives.
Epilepsy is a neurological disorder that can cause recurrent seizures as a result of temporary disruption of the electrical activity in the brain.
First aid techniques for treating an epileptic seizure include:
-
Protect the patient from injury by removing surrounding objects and placing something soft under their head and shoulders.
-
Do not try to restrain the patient or stop the jerking.
-
Do not put anything in their mouth.
-
Do not move the patient unless they are in immediate danger.
-
Time the length of the seizure.
-
After the seizure place the patient in the recovery position.
-
Reassure the patient.
-
Treat any injuries that may have been sustained during the seizure.
-
Do not disturb the patient if they happen to fall asleep, however, continue to monitor their breathing.
-
Call an ambulance if the seizure lasted for more than five minutes, the patient remains unresponsive for more than five minutes after the seizure, they have been injured, the patient has diabetes or is pregnant, or you know that this is the patient's first seizure.
Febrile convulsions are a type of seizure that occurs in children when they have a high fever.
First aid techniques for treating a febrile convulsion include:
-
Place the child on their side.
-
Do not restrain the child or place anything in their mouth.
-
Do not cool the child by sponging or bathing. This will not stop the seizure and can actually increase their temperature by cooling the skin too much and causing shivering.
-
Remove any excess clothing.
-
Seek medical attention after the convulsion.
Cardiac conditions such as chest pain and heart attack often result in unconsciousness and the stopping of the heart. If loss of consciousness has not occurred but the patient is experiencing chest pain then ensure they sit and rest, assess their conscious state (alertness level), assist them to take any applicable medication they have been prescribed, and call an ambulance.
Near-drowning often results in the cessation of breathing and also the stopping of the heart and is last stage before fatal drowning.
If cardiac conditions or drowning have resulted in an unconscious or unresponsive patient the DRSABCD approach is required:
Ensure the area is safe for yourself, others, and the patient. Potential dangers include:
-
Electrical hazards after electrocution.
-
Traffic hazards after a car accident.
-
Fire or smoke hazards.
-
Wildlife hazards ie. snake, wasps etc...
-
Water hazards if rescuing a potential near-drowning victim.
-
Exposure to blood, vomit, and other bodily fluids.
It may not be possible to completely remove or eliminate a hazard, however, due caution should be taken and if absolutely necessary the casualty (patient) should be moved from the dangerous area.
Often a person experiencing a medical/first aid emergency will be unconscious or not fully responsive. To determine the level of response you must conduct a visual and verbal assessment of the patient. Squeeze their shoulder and ask them to open their eyes and/or say their name. If they are still unconscious or unresponsive then go to the next step "Send for help".
If they regain consciousness and/or become more responsive/alert then some of the following steps (notably the airway, breathing, CPR and defibrillation steps) are not applicable, however, they may still be experiencing chest pain or other symptoms.
In this situation you must:
-
Make the patient comfortable.
-
Assist them to take any medication that may be applicable for their condition.
-
Monitor them until further assistance arrives.
Most first aid emergencies will require some form of further medical treatment, in this situation you may need to call an ambulance (dial 000). If there are other people around then ask them to call the ambulance whilst you undertake the other steps in this process. If an ambulance has been called then ensure there is someone ready to meet them and guide them to where you and the patient are located, this is particularly important if you are located within a large building.
Airway management is required to provide an open airway when the person is unconscious, has an obstructed airway, or requires rescue breathing. Open the mouth, inspect for, and remove any foreign material, common items are:
-
Vomit.
-
False teeth.
-
Food.
-
Small objects that may have been swallowed.
The next step is to position the head for resuscitation. For adults and children above the age of one year, tilt the head back to fully open the airway. For infants (under one year of age) the head should be kept in a neutral position and maximum head tilt should NOT be used. If simple airway manoeuvres (chin lift) do not open the airway, then a slight backwards head tilt may be needed to open the airway.
The applicable Australian Resuscitation Council (ARC) guideline for Airway Management (Guideline 4) provides more specific information about this important aspect of the DRSABCD process.
Continue the visual and verbal assessment of the patient by checking for breathing using the Look, Listen and Feel method:
-
Look for movement of the upper abdomen or lower chest.
-
Listen for the escape of air from nose and mouth.
-
Feel for movement of air at the mouth and nose.
If the patient is breathing then place them in the recovery position, laying on their left side, and monitor their breathing until further assistance arrives. This position helps to maintain an open and clear airway and allows for the drainage of body fluids, such as vomit, which may cause an additional choking hazard if the patient is in any other position.
The applicable Australian Resuscitation Council (ARC) guideline for Breathing (Guideline 5) provides more specific information about this important aspect of the DRSABCD process.
.png)
If the patient is not breathing and/or they have no detectable heartbeat then Cardiopulmonary Resuscitation (CPR) should be attempted. The two processes of CPR are chest compressions and mouth-to-mouth. Chest compressions are used to circulate blood around the body if the heart is not beating and therefore unable to do this vital task. Mouth-to-mouth is the transference of oxygen from you to the patient if they are not breathing. Instructions for these processes as per the Healthdirect.gov.au website are:
To carry out chest compressions:
-
Place the patient on their back and kneel beside them.
-
Place the heel of your hand on the lower half of the breastbone, in the centre of the person's chest. Place your other hand on top of the first hand and interlock your fingers. Note: If performing compressions on an infant (less than one year of age) use the two-finger technique to perform the compressions to minimise transfer time from compression to ventilation.
-
Position yourself above the patient's chest.
-
Using your body weight (not just your arms) and keeping your arms straight, press straight down on their chest by one-third of the chest depth (more than 5cm in adults, approximately 5cm in children and 4cm in infants).
-
Release the pressure. Pressing down and releasing in one compression. Aim for 100-120 compressions per minute (if only undertaking chest compressions).
-
If a second rescuer is available then ensure you rotate regularly (recommended every two minutes) to avoid exhaustion. Try to keep the interruption to CPR that occurs during rotation to an absolute minimum by having the second rescuer ready to take over immediately after you move aside.
To carry out mouth-to-mouth:
-
Open the person’s airway by placing one hand on the forehead or top of the head and your other hand under the chin to tilt the head back (do not tilt the head back if the patient is an infant).
-
Pinch the soft part of the nose closed with your index finger and thumb.
-
Open the person’s mouth with your thumb and fingers.
-
Take a breath and place your lips over the patient's mouth, ensuring a good seal.
-
Blow steadily into their mouth for about 1 second, watching for the chest to rise.
-
Following the breath, look at the patient’s chest and watch for the chest to fall. Listen and feel for signs that air is being expelled. Maintain the head tilt and chin lift position.
-
If their chest does not rise, check the mouth again and remove any obstructions. Make sure the head is tilted and chin lifted to open the airway. Check that yours and the patient’s mouth are sealed together and the nose is closed so that air cannot easily escape. Take another breath and repeat.
If both processes are required then chest compression will take priority, perform 30 compressions followed by two breaths (known as the 30:2 rule), aim for five sets of the 30:2 rule in about two minutes.
If the patient is a pregnant woman then it is advisable to apply some padding under her right buttock/hip to tilt the abdomen to the left and alleviate pressure on major blood vessels, however, ensure her shoulders are still flat on the ground.
CPR should be continued until any of the following conditions have been met:
-
The person responds or begins breathing normally.
-
It is impossible to continue (eg. exhaustion).
-
A health care professional arrives and takes over CPR.
-
A health care professional directs that CPR be ceased.
The applicable Australian Resuscitation Council (ARC) guidelines for Compressions (Guideline 6) and Cardiopulmonary Resuscitation (Guideline 8) provides more specific information about this important aspect of the DRSABCD process.
An Automated External Defibrillator (AED) is designed to provide electricity to re-start the heart or shock it back into its correct rhythm. If one is available then follow the instructions (audio which is spoken out loud) to place the pads in the correct place and start the process.
The pads are placed in the anterior (front) lateral (side) position of the body. This means one pad is placed on the persons right chest and one pad on the person's left side below the arm pit as shown in the image below:
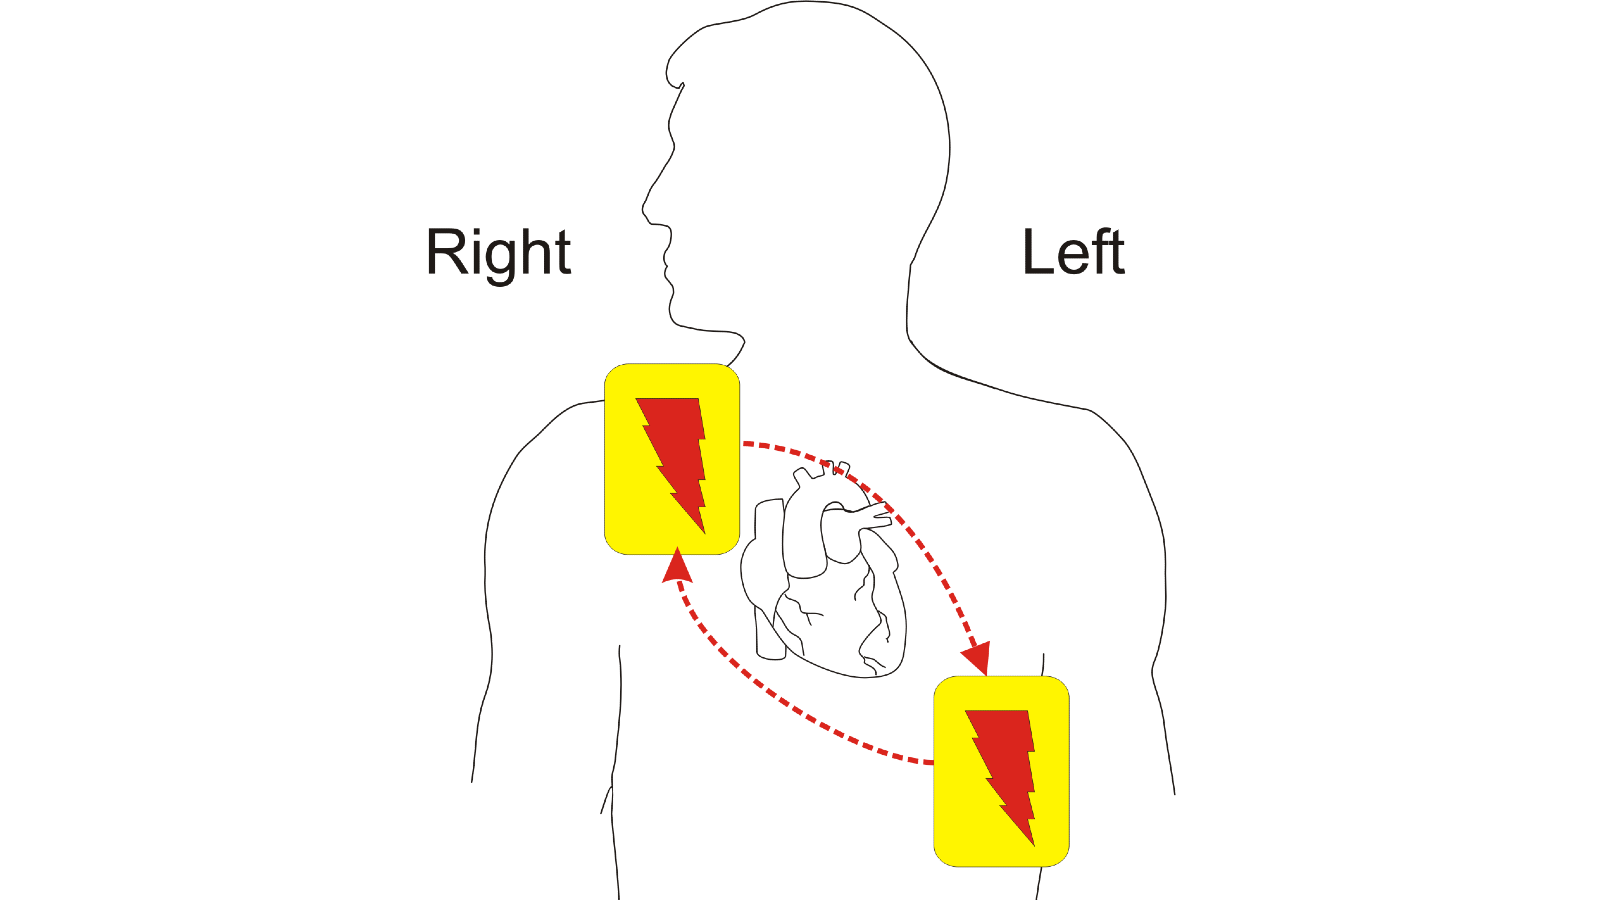
Be prepared to continue CPR if the defibrillation doesn't work.
The applicable Australian Resuscitation Council (ARC) guideline for Defibrillation (Guideline 7) provides more specific information about this important aspect of the DRSABCD process.
A fractured bone, which is the same as a broken bone, can range from a thin (hairline) crack to a complete break. A compound fracture is when the broken bone pierces the skin. A dislocation occurs when a bone slips out of a joint. Injuries, including fractures and other trauma, can affect the head, neck and spine causing severe damage to the brain and spinal cord.
First aid techniques for treating a fracture include:
-
Immobilise the broken bone by placing a padded splint along the injured limb.
-
Secure the splint using bandages. Extend the bandaging above and below the suspected area of the fracture.
-
For a leg fracture also immobilise the foot and ankle.
-
For an arm fracture use a sling to support the limb.
-
For a compound fracture ensure you stop any bleeding.
-
DO NOT try to realign the bone or push a bone that is sticking out (compound fracture) back in.
-
Call an ambulance, fractures will require professional medical treatment.
First aid techniques for treating a dislocation include:
-
Rest and support the limb using soft padding and bandages.
-
For a shoulder injury, support the arm as comfortably as possible. For a wrist injury, support the wrist in a sling.
-
Apply ice or a cold pack directly over the injured joint, if possible.
-
DO NOT attempt to 'pop' the dislocated joint back in. This can damage the joint and its surrounding muscles, ligaments, nerves, and blood vessels.
-
Call an abmulance, dislocations require professional medical treatment.
-
Check circulation of the limb. If circulation is absent, call triple zero (000) for an ambulance. Massage the limb gently to try to restore circulation.
For a suspected head, neck or spinal injury the most important thing to remember is to not move the patient unless they are in immediate danger. If moving them is absolutely necessary the take care to avoid twisting or bending the spine and support the head and neck with your hands during movement.
-
Call an ambulance, head and spinal injuries are very serious and definately require professional medical treatment.
-
Apply gentle support to the head.
-
Reassure the patient.
-
DO NOT apply a cervical collar.
-
If they loose consciousness then be prepared to put the DRSABCD process into action. Maintaining a clear airway and resuscitation must take precedence over any injury including a suspected spinal injury, however due care should be taken when shifting the patient's head and neck to avoid sudden twisting or bending movements.
The following video demonstrates the above process, please note that this is an English video and thus the emergency call number is not applicable - Always call 000 in Australia.
Poison is a toxic substance that enters the body via swallowing, inhaling or absorption through the skin. Venom is a toxin that is injected into the body and is most commonly associated with snake and spider bites.
First aid techniques for treating poisoning include:
-
Try to determine what type of poison is involved.
-
Call an ambulance or the Poisons Information Centre (13 11 26) for advice.
-
DO NOT induce vomiting unless you have been advised to by a medical professional (depends on the type of poison injested).
-
If the patient becomes drowsy place them in the recovery position and continue to check their airway and breathing.
-
Send any vomit, medicine containers and/or suicide notes along with them to the hospital.
First aid techniques for treating snakebite (envenomation) include:
-
Lie the patient down and ask them to keep very still. Reassure them.
-
Call an ambulance.
-
If the bite has occurred on a limb then apply an elasticised bandage over the bite site and extending upwards on the limb as far as possible (ie. if the injury is near the ankle then extend the bandaging up to the hip/groin area if enough bandaging is available).
-
If no actual bandages are available then use clothing or other material as a substitute.
-
The bandaging should be firm, but not cutting off circulation.
-
Immobilise the limb using splints.
-
Keep the patient laying down and very still. The venom is transported around the body via the lymphatic system and this is accelerated by muscle movement.
Diabetes is a medical condition that results in their being too much sugar in the blood. It is caused by the body be unable to produce or regulate a hormone called insulin which is supposed to control sugar levels. There are two types of diabetes:
-
Type One - Occurs when the body's immune system destroys the cells of the pancreas which is where insulin is produced.
-
Type Two - Occurs when the body does not effectively respond to insulin.
Diabetic first aid emergencies tend to relate to the patient either having high blood sugar (hyperglycaemia) or low blood sugar (hypoglycaemia).
First aid techniques for treating high blood sugar (hyperglycaemia) include:
-
The patient may have their own action plan for such a scenario and if they are able to self-administer the necessary medication (insulin) then allow them to do so.
-
Encourage the patient to drink water.
-
Seek medical attention if symptoms worsen.
First aid techniques for treating low blood sugar (hypoglycaemia) include:
-
Loosen any tight clothing.
-
Give the patient sugar, preferably fruit juice, however, a soft drink (not a diet variety), jellybeans, or glucose tablets can also be used.
-
Continue providing sugar every 15 minutes until they begin to recover.
-
Follow with carbohydrates eg. a sandwich, milk, fruit, biscuits or cheese.
-
If there are no improvements then seek medical assistance.
Eye injuries can range from minor situations such as sand or dust causing irritation and more serious situations such as an embedded foreign object or a chemical splash. Ear injuries can be caused by impact, foreign objects entering the ear, sudden changes in air or water pressure and also infection.
First aid techniques for treating eye injuries include:
-
Irrigate the eye with water or saline. If a chemical splash as occurred then do this for 30 minutes or more.
-
Cover the eye, gently.
-
Seek medical attention if there is any sustained pain or blurry vision after irrigating and monitoring for a short period.
-
For an embedded object it is important that you do not try to remove the item. Instead apply a donut bandage or cup over the injured eye, being careful not to touch or bump the object, and secure this with bandages.
-
Seek medical attention for any foreign object injuries.
First aid techniques for treating ear injuries include:
-
If fluid or blood is present and there was some form of head trauma sustained then seek immediate medical assistance.
-
DO NOT plug the ear if there is any sign of bleeding. Instead allow the blood to drain out into a lightly applied dressing.