There are three sides to every story: your side, my side, and the truth. And no one is lying. Memories shared serve each differentlyRobert Evans
As well as reflecting on your personal learning and growth over this course, you also need to identify accurate information from relevant sources to provide appropriate evidence and/or examples when required. To play or coach your best you need to be able to accurately research about the META and the mechanics of your game.
Now that you have an idea about what is expected from you during this course to meet the graduate outcomes, you can start thinking about where you might source information for your assessment milestones and Portfolio activities. In today’s world there are endless places to find information, gather ideas and stay up to date with the eSports industry.
But are they all reliable sources?

To refresh your memory, Module 1's Learning Outcome 2 is:
- Select and use authoritative sources of information to inform performance skill development.
Read: An eSports player’s review of information sources
An eSports player has created a website to share their view of information sources. Read through and consider if the information sources are official organisations or one person's opinions.
Do you agree with the star ratings? Why or why not?

Source 1 - Recognised international organisations
Sponsored top level domains such as WHO (World Health Organisation) or NATO (North Atlantic Treaty Organisation) have entire research teams working to both research and corroborate facts before they make any public disclosures.
Level of Credibility: Over 9000!
Source 2 - News Outlets
The Guardian, Forbes, NYT, CBS, CBC and all the main Western media outlets. Even when the information comes from a reliable source, it is important to understand that there may be a political agenda involved.
Level of Credibility: Pog champ
Source 3 - Independent Journalists and Verified Social Media Sources
YouTube, Twitter, Reddit may be our favourite spots to look for spicy news. But be careful, we are in the fake news and post truth era! Make sure to corroborate any information before sharing it with your friends.
Level of Credibility: I’m watching you!
Source 4 - Tabloids and random people on the internet
When it comes to reliable sources of information random YouTube videos or social media comments may not cut it.
Level of Credibility: I’m out of here
Online sources: What do domain names mean?
For online sources, check the url domain.

Do you think information from .co or .com sources is reliable? How about .org?
Commercial - .co, .com
https://www.microsoft.com
https://www.airnewzealand.co.nz
Non-profit - .org
https://www.greenpeace.org
Government - govt., gov
https://www.health.govt.nz
https://www.hhs.gov
Academic/educational - .ac, .edu
https://www.otago.ac.nz/
https://www.harvard.edu

How to research the internet effectively
It is important to search for information effectively for 2 reasons:
- To ensure that you do not waste too much time
- To ensure that you find the information you are looking for.
Keywords
To search effectively you need to select the best keywords. Nouns are the most effective keywords.
Before doing a search, define your topic as much as possible. Consider:
- What information are you looking for?
- Why are you looking for it?
- What are you not looking for?
Avoiding Plagiarism
It is important to always reference or cite the source of information to demonstrate your research skills and have integrity in your work.
The concept of plagiarism means to take someone's ideas, images or writing and passing it off as your own.
You can avoid this by always referencing/citing your source.
You can start sourcing information, images and ideas as below:
Source: Name of Source. Year. URL Link.
Portfolio Checkpoint 1E: Cross-Referencing your information sources
In your assessments you will be asked to "cross reference" information. This means finding at least two reliable sources that can confirm that information.
Practice using your keywords and search skills to find the answers to the following questions in this Portfolio Research Activity.
Remember, you need to find at least two sources for each answer to cross reference.
You may also not be able to source a black and white answer which is fine. Include the most recent answer sources and information that you can.
GLHF!
- What's the percentage of eSports players that make it to the professional scene?
- How many hours a day does a professional athlete and a professional gamer play?
- How many people in the world work for an eSports organisation?
- What's the lifespan of professional athletes?
- What's the average age of professional athletes?
- What are the key qualities and/or skills of successful eSports coaches?
- What are the key qualities and/or skills of successful individual eSports players?
- What are the key qualities and/or skills of successful eSports teams?
Writing and reading tools
If you are unsure about what a word means (definition) or how to say a word (pronunciation), look up the word on dictionary.com
You can use synonyms for words with a similar meaning so you can express yourself in different ways with various words. Remember to bookmark these authoritative word websites in your Bookmarks bar!
How do you evaluate ‘good’ sources for your assessment milestones and your own research for your eSports events? We all know the concept of good is ‘subjective’. A useful tool to have in your eSports toolbox is the CRAAP test:
Watch: How to evaluate sources (2:10 minutes)
Watch the following video and take notes.
Key questions to ask about sources
For online sources, check the url domain.
- What is the source? Is it sourced from university/ government department/professional body website, a commercial website, an opinion blog or social media?
- How current is it? In the last 5 years?
- Who is the author? An expert, a researcher, controversial or neutral journalist?
- What sort of writing is it? A research article, a blog, a media source?
- What is the purpose of the text? To inform people, to argue a point, to promote change…?

Writing clearly and with confidence is an important eSports skill as you will need to correspond with many different kinds of people to gain employment opportunities and set up events.

Now you know how to use the CRAAP test, let’s look at how to express our ideas and link them to a source using the TEEL method. The TEEL Method is one way to write a paragraph.

TEEL is an acronym for the following:
Topic sentence - what are you talking/writing about?
- Introduces the paragraph/idea
- States the main idea
- Uses key words from the topic
Explanation – what do you mean by that?
- Explains what you mean by the topic sentence
- Gives more detail about the idea
Example/Evidence – what makes you say that?
- Proof/evidence from the source (quotes) and/or facts, statistics
- Supports the point you have made
Link – Why is all that important?
- Explains how the example links to the main idea
- Closes the opinion
- May link to the next paragraph
Watch: T.E.E.L -The perfect guide for writing a body paragraph (3:59 minutes)
Watch the TEEL overview and take notes.
Portfolio Checkpoint 1F: Putting your research, words and sources together
You will need to use all your research, evaluation, referencing and writing skills together for these 2 Portfolio activities:
Challenge One
- Read the opinion article.
- Make a plan of your response then write your response as a TEEL paragraph in a Microsoft Word document.
- This means you will need to include your sources of supporting evidence: Source: Name of Source. Year. URL Link.
- Proofread and edit and add to your Portfolio.
Challenge TWO
- Consider the following statement: eSports is not a real sport and should not be included in the Olympic Games.
- Choose to agree or disagree, brainstorm your ideas and research your supporting evidence from at least two sources.
- Now write your response as a TEEL paragraph in a Microsoft Word document.
- You will need to include your sources of supporting evidence: Source: Name of Source. Year. URL Link.
- Proofread and edit and add to your Portfolio.
PowerPoint Basics
One of the most popular presentation aids is Microsoft PowerPoint (PPT). This elegant software can really make your presentation pop with the use of slides.
PowerPoint is a tool used to create a presentation and display information in the form of a slide show. Microsoft PowerPoint supports individuals and organisations to effectively present their ideas, information and data in a visually appealing manner.
PowerPoint houses many tools and functions that enables the user to add the following to their presentations:
- Text
- Images/ photography
- Music
- Videos
- Charts
- Graphs
- other multimedia elements.
These features can be added to the slides in order to create engaging and informative presentations. It is important to note however, that while these fun and exciting features are available, they do not all have to be used to create an exciting and meaningful presentation.
You will be using PowerPoint as the tool for collaborative group design.
PowerPoint Benefits
PowerPoint presentations help the audience in the following ways:
- Helps break down complex information into simpler concepts.
- Helps the audience understand key concepts.
- Helps the audience to visualise information.
- Keeps the audience listening and engaged with the content.
- Empowers people with different learning styles to absorb the information.
The Do’s and Don’ts of PowerPoint
While presenting information visually can be exciting, there are some practical do’s and don’ts when using PowerPoint that need to be considered.
Do’s
- Keep it simple
- Try to keep your design as simple as possible. While there are some very elaborate designs in PPT, the design you choose should suit the look and feel of the information you are presenting. For example, you would be unlikely to use a theme based solely on business and statistics when you are presenting an eSports campaign pitch.
- Left to right
- One of the rules to remember is that most languages in the world move from left to right. It is helpful, therefore, to have the text on the left and images on the right. This helps the audience to follow the information intuitively.
- Timing
- Keep presentations no longer than 20-30 minutes. After that, people can begin to lose interest.
- Duration is not only an important contributing factor. You must also consider the time of day in which you are presenting. Most people are alert in the mornings. Straight after lunch may result in a tired audience, and too late in the afternoon, you may not seek any engagement at all.
- Colour and font (typography)
- Use a colour scheme that is compatible with the subject of your presentation. For example, if you are presenting a new product, you can complement the presentation using similar colours.
- Consider the colour of the font and style you are using. Remember, most presentations will be delivered on a screen and in some cases, a projector. If the font is not the appropriate style or colour, the text will be difficult to read.
- Be wary of animation
- The animation feature of PPT is very nice to use, but it can be over-used as well. Use it very sparingly.
- Balance images and texts
- Balance the images and content with white space to enhance rather than overwhelm the content.
- Keep it brief
- Slides should have no more than seven key points. Less is even better. Otherwise, the slides become messy and cluttered.
Don’ts
In addition to the do’s of presentation, there are, of course, don’ts. When creating your slide show presentation, the following are some tips of what you should avoid.
- Overloading slides with too much text and information.
- Using a generic and boring template.
- Poor colour combinations and font choices.
- Lack of consistency in design and formatting.
- Use of inappropriate images, graphics or charts to support your message. The images should reflect and back up the information you are presenting.
- Creating a presentation overly complex in nature.
Watch: POwerPoint Do's and Don'ts (5:25 mins)
Download Transcript
Now that you have developed your understanding of what PowerPoint is used for, its features and some basic do’s and don’ts. Let us take a look at how to use it.
How to use Microsoft PowerPoint
When you first open PowerPoint, you will see the following options. Each tab holds unique options specific to it. The ‘Home’ tab as you can see in the image below, houses within it similar options you will see in a word document, including the fonts, formatting, copy and paste tools along with some others. As we progress through this How to guide, you will learn the different options pertaining to each tab.

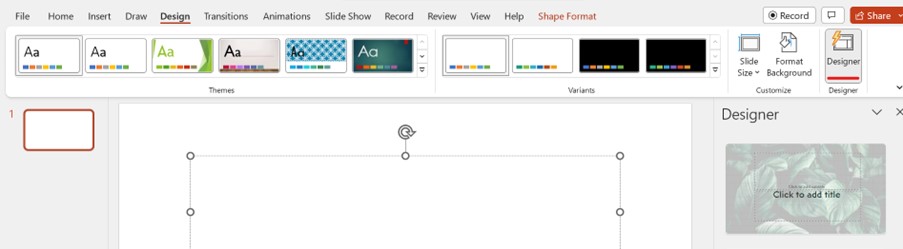
Step 1: Choose a design according to your presentation.
Click the ‘Design’ option from the navigation bar at the top and you will see the following templates. You may also wish to select one of the suggested designs down the right hand side of your screen.
*NOTE: Designs may vary according to what version of Microsoft PowerPoint you are using.
Give your presentation a title and include the name of the group/org/person this presentation is representing.
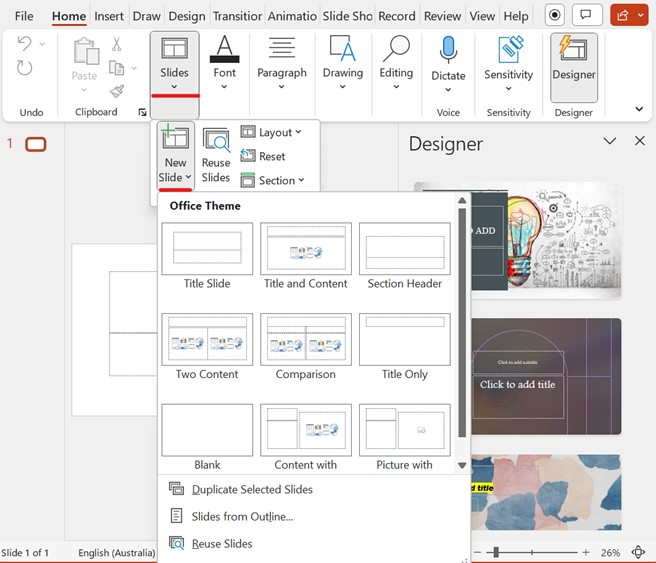
Step 2: Add your desired amount of slides.
- To add your slides, click the ‘Home’ tab in your navigation bar
- Select the ‘Slides’ option, and a drop down will appear with ‘New Slide’
- 3. Click ‘New Slide’. Choose the type of slides you wish to use to display your information. Continue this process until you have the desired amount of slides.
*Note: you may also wish to add the slides as you go to determine the design layout of the slide you feel would suit the information you are presenting.
Step 3: Introduction
Always start your presentation with a proper introduction. This can serve as a preview of what's coming and capture the audience's interests.
Remember, keep your information short and simple.

Step 4: Icebreakers
An icebreaker is an activity that is often used when presenting. It engages the audience and serves to eliminate early awkward silences at the start of a presentation. Icebreakers do not need to be long, some can be 2-3 minutes in total. A quick google search will provide you with several options to choose from. Ensure your icebreaker is achievable and will not take up too much time.
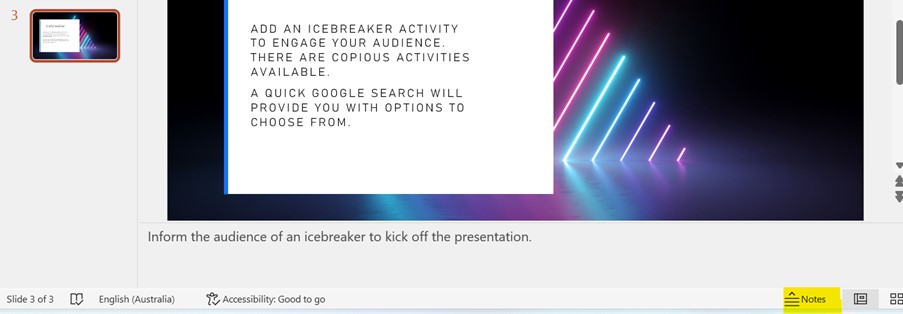
Step 5: Adding notes
Traditionally, palm cards are used for prompts when delivering an oral presentation. However, when you are using PowerPoint, you can in fact add notes for yourself to refer to in order to help jog your train of thought and keep you focused on your discussion point. And the best part, the audience will not be able to see your notes!
To add notes, click the ‘Notes’ tab as highlighted and type your notes in the space provided.
Step 6: Adding visuals
Don’t forget to use visual aids. Using graphics or pictures to expose your ideas is great for the audience's digestion of information.
To insert visual aids, click the ‘insert´ tab at the top of your navigation bar and select from the options listed below.
Remember: Ensure when using images and graphics, they are clear and in high resolution to support your message. Images and graphs should not have too much text attached and will display well when size has been maximised.

Step 7: Consistency and flow
Ensure your presentation is consistent and flows. Each piece of information should flow seamlessly and logically together.
Tip: Avoid jumping around with your information. Ensure you have covered all of your points and move on to the next. Jumping back and forth from points can create confusion and may lead to disengagement.
Step 8: Transitions and Animations
Transitions and animations are often what bring a PowerPoint presentation to life.
To add transitions to your slides, select the ‘Transitions’ or ‘Animations’ tabs in your navigation bar and select a transition and or animation from the options in the drop down.
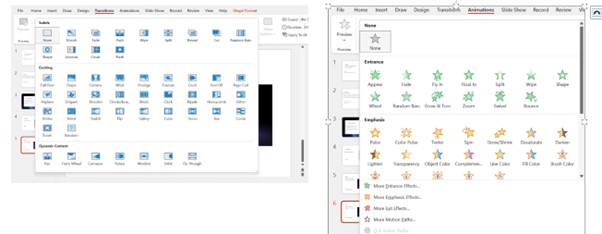
Fun Fact!
When you have added an animation, a number appears next to where the animation has been added! See the following example.

Step 9: Timings
You can add timings to your transitions. The option for timing can also be viewed in ‘Transitions’ and ‘Animations’ tabs. You may wish to start your transitions or animations using a click.

Step 10: Slide show views
Once you are happy with your presentation, you will be able to view the slideshow and how it will present to the audience. To view your presentation, select the ‘Slide Show’ option in the tab in the navigation bar.
You will see a list of options on how you wish to view your presentation. Click ‘From Beginning’. This will take you to the start of the slideshow and run it through from start to finish. You also have the option to view from the current slide you are working on and allow the presentation to run through until the end.

Step 11: Practice!
The best way to familiarise yourself with PowerPoint is to play with it! Practice using each of the functions with a basic presentation of your choosing.
Practising is not just limited to the actual use of PowerPoint, but the presentation itself. To deliver an effective presentation, you must ensure you have practised it and you know the content you are delivering well.
Remember, Nerves are natural! You may feel nervous when delivering to an audience, but confidence comes with time. The more you flex the presenting muscle, the stronger it gets, and the nerves will lessen.
PowerPoint Structure
Now that you have learnt the basics of how to use PowerPoint, it is time to look at the structure. It is essential when you are developing a presentation using any software that you take the time to plan it. Winging it and improvising on the fly may not always be successful when it comes to developing a presentation. You need to ensure you have a clear vision in mind of how you want it to look and practice your skills in research, evaluating and summarising.
If you do not take the time to plan and prepare, it is likely you will end up with a presentation that is rushed, and inaccurate i.e., important points are not covered or misinterpreted and you may find yourself posed with questions you are not prepared for.
When developing and delivering a presentation, you need to start strong to keep the momentum and build your confidence. Your audience will be able to tell if you are underprepared before you present.
Like any work you write, present, deliver or discuss, it needs to have structure. The structure should be considered in the planning process. Without structure, the important information you wish to convey is lost or misinterpreted. Let us take a look at what a typical structure would look like for a PowerPoint presentation.
Introduction
All presentations need to start with an introduction. Speakers, whether they are presenting by themselves or with a group, need introduce themselves and pair it with a strong opener. Something that will engage the audience’s attention. The introduction should also provide an overview of the topic/ context you are presenting.
Outline an Agenda
Your presentation should always include an agenda. The agenda outlines the structure of the presentation, highlighting the main sections, and their objectives.
Content
The content is essentially the body of the presentation. It is the section where you discuss and talks through the material you are presenting.
When developing and delivering the content, it is important to use clear and concise language; to ensure your audience will understand what it is you are discussing. The content should be supported by visual aids such as images, charts, and diagrams, to deliver the main message of each section.
The content should be developed with logic and flow. It is important you have considered how the content will sit and the order in which you want to deliver it. You want the audience to be able to follow along with you and make sense of what you are delivering.
Hot Tip!
Avoid jumping around with your information, going back and forth on topics will create confusion and may result in disengagement and impact your timing.
Transitions
We have discussed the use of transitions in our do’s and don’ts. It is important to use smooth transitions between slides to keep the presentation flowing and prevent it from feeling disjointed. When considering transitions, you may wish do use a pattern or select two to three transitions and use them consistently throughout the presentation.
Conclusions
Finally, all presentations should have a conclusion. The conclusion, essentially, should summarise the main points and provide a clear call to action or next steps.
Closing
Last but not least, a closing. The end of the presentation should include a memorable conclusion, thanking the audience for their attention and inviting questions. Some conclusions may end with a meaningful quote that is relevant to the information you have delivered.
Group presentations
PowerPoint presentations can be delivered as a group as well as individually. Teamwork and collaboration are essential when developing and delivering a group presentation and is important to consider when you are in the planning phases of your presentation.
If you are presenting in a group of three which is commonly how presentations take place, you should consider the following sequence during your planning.
Identify an objective
As a team, you must come up with a purpose for your presentation. When presenting as a part of an assessment, it is likely you will be given a subject brief or topic to present. You must follow the brief in order to achieve the best possible outcome.
Assign the roles
One of the most important aspects of group presentations is the delegation of roles and responsibilities. Each person within your group should know what is expected of them. Having clear roles of each presenter helps the presentation run smoothly.
If a group presentation is part of an assessment, the tutor may delegate the roles for you within your team. Therefore, it is important you know what is expected of each role.
The following are examples of the roles of group presenters.
- The presentation opener
- The presentation outliner
- The presentation closer.
Let us take a look at these in more detail.
Presentation opener
The presentation opener, as the name suggests, is the person responsible for opening a group presentation. The presentation opener plays an important role in setting the tone and direction for the rest of the presentation.
The opener’s responsibility is to introduce the presentation and fellow presenters who will be delivering. The opener is the person who sets the foundations of the presentation.
If you are allocated the role of presentation opener, you should consider the following to ensure you have considered the following:
- Make it engaging. You are capturing the audience’s attention to entice the audience to want to listen- grab their attention and make them feel invested in the presentation, encouraging them to listen and participate.
- Introduce the presentation. Introduce yourself and the other presenters. The introduction should also provide context for the presentation, including the topic, purpose, and key messages.
- Set the Tone. The opener should set the tone for the rest of the presentation, whether it be serious, humorous, or informative.
Hot Tip!
Be mindful if you are using humour to present. Ensure you are respectful of the audience and demographic. Not all people have the same sense of humour and what one person may think is funny, another might find offensive or not understand the concept of what it is you are trying to make humorous.
- Provide an overview. The opener can provide an overview of the key points that will be covered in the presentation. This will help the audience understand the flow and structure of the presentation.
Presentation outliner
The presentation outliner ensures that the presentation is well-structured, presents well, clearly communicates its message, and runs smoothly. The outliner is responsible for creating foundations for the presentation and ensuring that all elements are covered and come together to create a seamless and engaging experience for the audience.
If you are allocated the role of presentation outliner, you should consider the following.
- The organisation of the Content. The outliner needs to organise the content of the presentation into clear and concise sections, ensuring that each point is well-defined, and easy to follow.
- Create Flow. The outliner must ensure that the presentation flows logically. Logical flow consists of the following:
- a clear beginning
- a middle
- an end
- seamless transitions between sections.
- Identify the key messages. The outliner should identify the key messages that the presentation is aiming to communicate. If this is your role, you need to ensure they are clearly defined and well-presented throughout the presentation.
- Practice time management. The outliner should ensure that the presentation stays within the allocated time, ensure sections/ slides are timed carefully and allow for enough time to pose questions and engage in discussion.
- Collaboration. The outliner needs to work closely with the rest of the presentation team. Together you all need to come up with the content research, the images and visual aids you wish to use for the presentation. Each member of the team has a role to play and must ensure they have helped add the value to the presentation to emphasise the collaboration that has taken place truly.
The presentation closer
Last but not least, is the presentation closer. While this role is at the end of the presentation, it is not to be taken lightly. The closer needs to be aware of all aspects that have been covered between the opener and the outliner, because it will be the role of the closer, to summarise and recap what has been discussed.
If you are given the role of the closer, you should consider the following.
- The summarising of key points. The closer should summarise the key points of the presentation, highlighting the most important information and reinforcing the message.
- Providing a conclusion. The closer should provide a conclusion to the presentation, tying together the key messages and providing a sense of closure.
- Closing statements. The closer should include closing statements such as the following.
- thanking the audience for their time
- providing contact information for follow-up.
- Making a Final Impression. The closer holds the final opportunity for the presenter to make a lasting impression on the audience, so it should be memorable and impactful. You may wish to use humour (but remember our Hot tip.) or a memorable quote at the end.
- Handling of questions and answers. It is the responsibility of the closer to provide time for questions and answers from the audience. You should also encourage the audience to ask questions and voice their opinions. By allowing for questions and answer, you are giving the audience an opportunity to provide feedback and ask any remaining questions.
PowerPoint Template
Use this eSports PPT template to help you and your team members create your Group Presentation Assessment.