| Day One | Day Two | Day Three | Day Four | |
|---|---|---|---|---|
| Course Content | Accident Prevention: Tools & Equipment; PPE. Ex 20-23 |
Accident Prevention: Testing & Tagging; Circuit Protections Devise; Lock Out. Ex 24-26 |
Risk Management. Hazard Control. Ex 27-30 |
Carrying out a Practical Risk Assessment. Ex 31-32 |
| Self-directed Learning | Investigate electrical PPE. Post findings on Group Forum. | Decimal check. Assessment writing. |
Read WorkSafe information about site safety. | Assessment writing. |
NOTE: A two-day First Aid and CPR Course will occur as part of Module One. Your tutor will advise you when this occurs. The two days of the course will take the place of your usual online and face to face lessons.

What we are covering:
- tools and equipment
- Personal protective equipment
Preventing electrical accidents can be as simple as using the correct tools and wearing appropriate safety clothing and equipment.
Tools and equipment
When electrical tools are working properly a complete circuit is maintained between the tool and the energy source.

However, if the tool is damaged the person may come into direct contact with the electricity and become a path for the current, resulting in electric shock.
Before using any electrical tool or extension cord, it is a good idea to inspect it completely for damage such as cracks, damaged insulation, broken or removed ground pins, loose parts, frayed line cords etc. If there are any defects, the tool must be taken out of service until repaired by a Registered Electrician.
SiteSafe Te Kaitiaki o Haumaru makes the following recommendations.
Every day:
- ✔ Check that all electrical equipment is RCD-protected (RCD= residual current device).
- ✔ Test RCDs using the test button, including RCDs on PSOAs (PSOA= portable socket-outlet assembly)
- ✔ Look at the general condition of electrical equipment (including cords and leads) before use.
- ✔ Check for visible signs of damage or faults
- ✔ Makes sure the equipment operates the way it's supposed to (e.g. that the trigger switch on a drill responds to pressure).
- ✔ Check that suitable personal protective equipment (PPE) is being used, along with other controls.
- ✔ Check equipment is protected from weather and other environmental hazards.
- ✔ Make sure that leads and cords are arranged, used and stored safely.
Exercise 21
Create your own list of 10 safety tips when using tools and equipment and post on the Group Forum.
A double-insulated tool is a tool that is encased in plastic, which prevents the user from electrocution if the tool develops a short circuit.
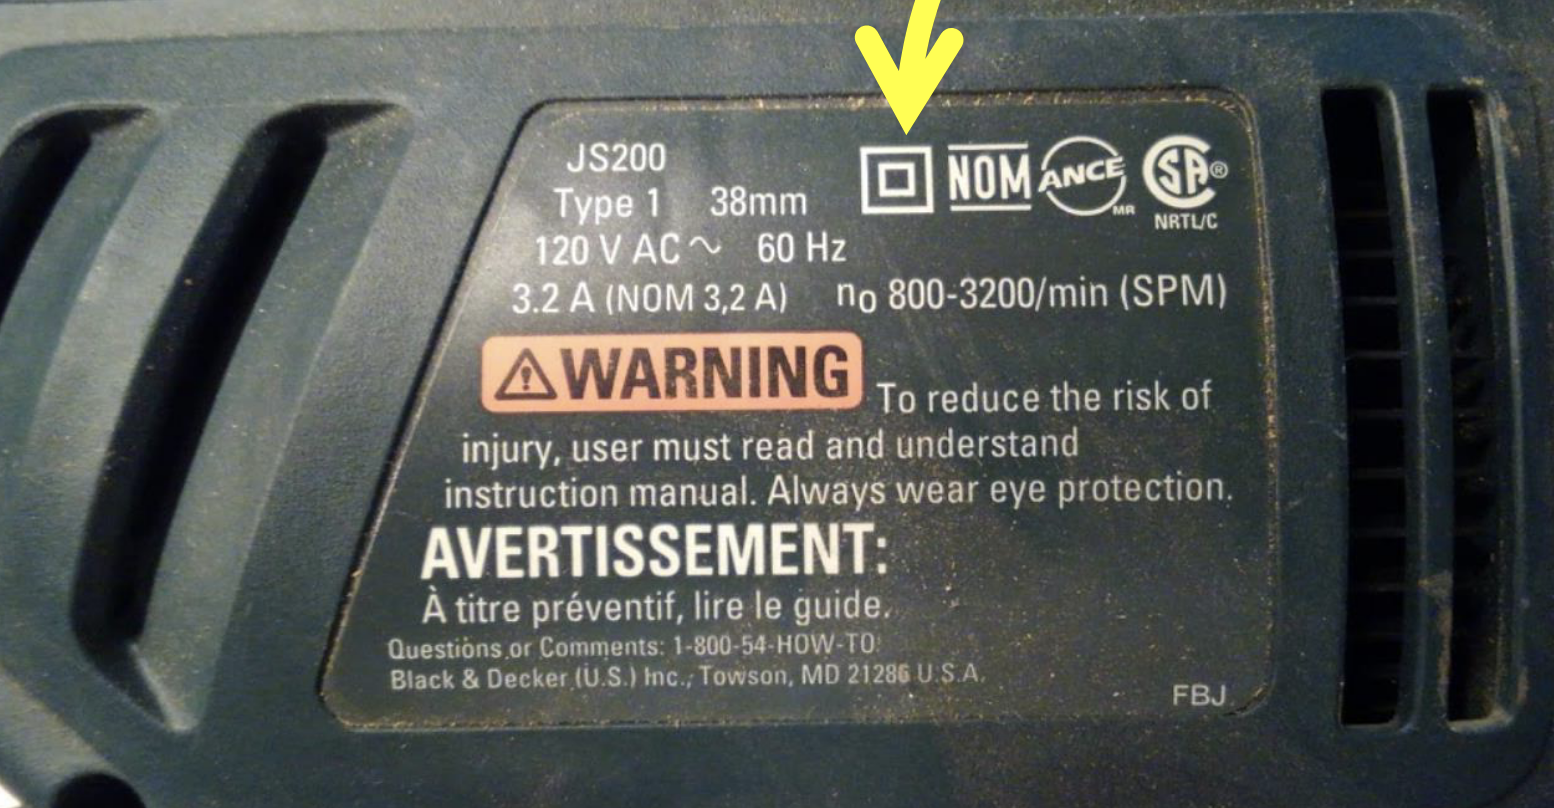
Double-insulated tools are identified with a square-within-a-square logo or the words “double-insulated” on the label. Double-insulated equipment does not require grounding.
Exercise 22
Personal protective equipment
Personal protective equipment (PPE) helps keep you safe on the job, but it should be the last line of defence once all other reasonable actions have been taken to eliminate or minimise risks to your health and safety.
Visit WorkSafe Mahi Haumaru Aotearoa to learn more about PPE. You can read on your phone by scanning the QR code.

The site has various guides. Familiarize yourself with these and then answer the following questions.
Exercise 23
Self-directed learning
A full risk assessment must be undertaken before it is decided which PPE should be worn by an electrician. Investigate the most important items of electrical PPE and their purpose. Choose 3. Post findings on group forum.

What we are covering:
- testing and tagging
- circuit protection devices
- lock out/tag out
Good workplace practices and procedures will go a long way towards avoiding accidents and injuries caused by exposure to electricity.
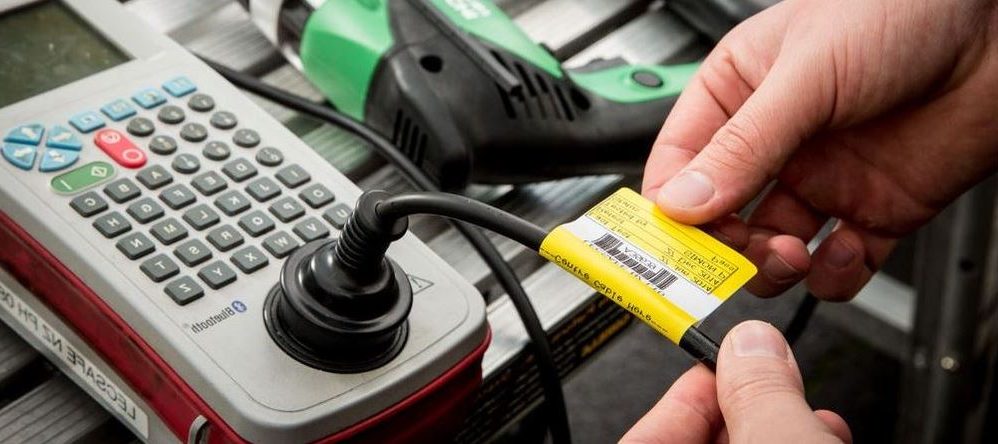
Testing and tagging
All electrical appliances, tools and leads should undergo regular testing to ensure the safety of those coming into contact with the appliance, as well as minimizing the risk of an electrical hazard.
‘Test and Tag’ involves two parts:
- Visually inspecting the appliance for any damage.
- Electrically testing it with a Portable Appliance Tester.
Once tested, the item is tagged to confirm it has been tested, along with information about who tested it, the test date and when the next test is due.
Testing and tagging is widely used but not mandatory. It is an indication of how safe the appliance is at the time of testing but does not guarantee future electrical safety.
The Electricity Act 1992 requires all electrical products to be of a high quality and standard, so that their construction and maintenance meets the safety requirements within the Electricity (Safety) Regulations 2010. The Act requires a person to take all reasonably practicable steps to prevent serious harm. Test and tagging to AS/NZS 3760 is a widely recognised way to meet those safety obligations.
Exercise 24
Circuit protection devices
Circuit protection devices are designed to automatically limit or shut off the flow of electricity in the event of a ground-fault, overload, or short-circuit in the wiring system. Fuses, circuit breakers, and residual current devices (RCDs), or ground-fault circuit interrupters (GFCIs) as they are known in the U.S., are all examples of such devices.
Fuses and circuit breakers are over-current devices. When there is too much current:
- Fuses heat up and melt if there is too much electricity passing through and into a power system. Unlike circuit breakers, fuses must be replaced after they have done their job of halting abnormal electricity flow.
- Circuit breakers trip open. They can be reset either automatically or manually.
- Surge Protectors work to prevent voltage spikes from damaging equipment (usually in the home) by diverting voltage to ground or straight up blocking extra voltage.
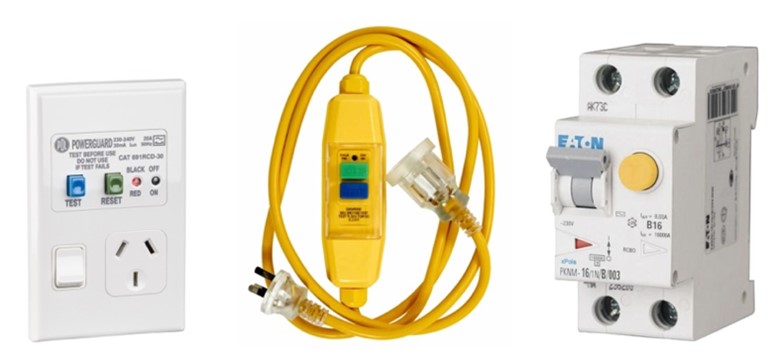
RCDs are fast-acting circuit breakers that continually match the amount of current coming and going to an electrical device. Mismatches as small as 5 milliamps will result in the circuit being tripped. While RCDs don’t do much to protect equipment from electricity overload or short-circuits, they are very effective in limiting the damage caused by electrical shocks.
The best place for an RCD is built into the main switchboard or the socket outlet, as this means that the supply cables are permanently protected. If this is not possible, a portable device for mobile operations such as a contractor on a site plug can provide additional safety.
Remember:
- An RCD is a valuable safety device, never bypass it.
- When an RCD trips, it signals a fault – check the system before using it again.
The RCD has a test button to check that its mechanism is free and functioning – use this regularly.
Exercise 25
Lock-out/Tag-out
Using a lock-out/tag-out program is another way to keep electrical workers safe. Never work live on switchboards, fittings, conductors or equipment. Lockout procedures ensure electrical machines are completely turned off and unable to restart until maintenance and repair work is completed.
- Locking the power switch in the off position prevents someone from inadvertently turning the equipment back on while maintenance is underway.
- Once the on/off switch is securely locked out, the switch must be tagged. Tags identify equipment or circuits being worked on.
- The lock and tag are warning signs, alerting others as to why the switch is off.
- If you see equipment that is locked and tagged do not touch it - it is locked and tagged for a reason.
- If you are required to work on electrical equipment you must be trained in lock-out/tag-out procedures specific for that site.
Exercise 26
This completes the section on accident prevention. Always keep in mind:
- Look after yourself and your mates. Don't take shortcuts around known safety rules just because you think you might be able to do the job easier or faster.
- Report all hazards, risks, incidents, accidents and injuries. Doing this will allow you, your workmates, the organisation you work for and the organisations you work with to identify ways to stop these things from causing harm to you and your mates.
Self-directed learning
Check your competency with decimals by ranking the sets of wire diameters from largest to smallest:
Continue with Assessment writing.

What we are covering:
- risk assessment
Identifying potential risks before they happen by performing a risk assessment helps keep electrical workers safe onsite.
Visit the following sites to learn more about Risk Management when carrying out electrical work.


Electrical workers face risks on the jobsite every day. All activities and workplaces have potential risks and hazards. You can’t avoid risks, but you can manage them. A risk assessment helps identify hazards, assess risks, and implement risk controls before beginning work at a site. It should answer the following questions:
- Is a hazard present?
- Is an injury likely to occur?
- What is the severity of the potential injury?
- How can the risk be managed according to the hierarchy of risk controls?
Carrying out a Risk Assessment

A hazard is anything that can cause harm to people, equipment, or property. It may be an activity, event, process, situation, equipment, substance, or behaviour.
Step 2 - Assess the Risk Level of Each Hazard
The risk is a measure of how likely a hazard is to harm someone and how serious the harm could be. To determine a risk rating, consider:
- The likelihood – chances or possibility of it occurring.
- The consequence – what will happen, the extent of the harm.
A risk matrix like the one below is commonly used to identify the level of risk for a particular hazard. Management can then make decisions and take actions based on the outcomes.
| Likelihood | ||||||
|---|---|---|---|---|---|---|
| Rare | Unlikely | Possible | Likely | Almost certain | ||
| Consequences | Major | Moderate | High | High | Critical | Critical |
| Significant | Moderate | Moderate | High | High | Critical | |
| Moderate | Low | Moderate | Moderate | High | High | |
| Minor | Very low | Low | Moderate | Moderate | Moderate | |
| Insignificant | Very low | Very low | Low | Moderate | Moderate | |
Exercise 27
Identify two common hazards on campus and assess using the risk using the matrix above. Post findings to group forum page.
Step 3 - Control the Risk to Reduce the Harm and Severity
After assessing the likelihood of occurrence and severity of a potential injury, it’s time to implement risk controls based on a hierarchy.

| Risk Level | Explanation |
|---|---|
| 1. Elimination | Temporarily eliminate the hazard to establish an electrically safe work condition. |
| 2. Substitution | Substitute less-hazardous equipment, such as using non-electrical or battery-operated tools instead of cord- and plug-connected. |
| 3. Engineering controls | Choose options that automatically reduce risk, including GFCI protection or factory-installed barriers |
| 4. Awareness | Alert people to the hazard by installing permanent or temporary signs, labels, barricades, etc. |
| 5. Administrative controls | Complete all initial work, such as establishing planning processes, attending training, obtaining permits, and clarifying work procedures. |
| 6. Personal Protective Equipment (PPE) | Ensure personal protective equipment (PPE), such as insulated tools, clothing, and gloves, are available when needed. |
Step 4 - Document a risk management plan detailing how the plan is to be communicated, implemented, monitored and reviewed. Include who is responsible for each step.
Exercise 28
Read the paragraph below about controlling hazards, then fill in the blanks with the corresponding letters of the words listed.
Exercise 29
Exercise 30
Self-directed Learning
Read the WorkSafe information about electrical safety on small construction sites.


What we are covering:
- how to conduct a risk assessment
Risk assessment is a careful examination of what could cause harm, injury or ill health to people in the workplace. Before starting any job, you must ensure an assessment has been made of any electrical hazards. The risk assessment should take into consideration the type of electrical equipment used, the way in which it is used and the environment that it is to be used in. By assessing the risks, you can decide whether enough precaution has been taken or whether more should be done to prevent harm.

Identify the hazards:
- walk around the workplace looking at what might cause harm
- check accident and incident forms to see what previously caused harm
- consider long-term hazards to health
- describe hazard and how it might harm people, equipment and property.
Assess risk level:
use a risk assessment matrix to identify the likelihood of it happening and the consequences or severity if it happened.
Control the hazard:
- can the hazard be eliminated altogether?
- if not, then how can it be minimised? (use hierarchy of controls)
Make a plan of action:
- record findings
- describe how you intend implementing the controls.
Review and update regularly:
- reviews are necessary since procedures change, equipment is updated, new staff come onboard etc.
A risk assessment might look like this. (Five separate hazards have been identified.)
| Hazard | Description | likelihood | Consequence | Risk level | Current control | Further risk mitigation measure | likelihood | Consequence | Residual risk level |
|---|---|---|---|---|---|---|---|---|---|
| Measure | |||||||||
| Fire & electrical shock | During welding process there is flammable substance (paper, thinner) or welding on a wet floor | B | 4 | H | No flammable substance, no paper near welding area & equipped with fire extinguisher. Welding warning sign, PPE & clean welding environment is a must. All welders have attended the welder training from approved agent. | Provide in-house fire safety, welding safety & general safety training for all welders | D | 2 | L |
| Skin burn injury | Welder or worker is affected | C | 3 | M | Welder must be equipped with PPE. All welders have attended welder training from approved agent. | Provide in-house fire safety, welding safety & general safety training for all welders | D | 3 | M |
| Inhalation | During welding process, welder inhales fumes | D | 2 | L | Open area or with electric fan. All welders have attended welder training from approved agent. | Provide in-house fire safety, welding safety & general safety training for all welders | E | 2 | L |
| Radiation | During welding process, welder's skin might be exposed to bright flash | D | 2 | L | Must wear long sleeves/arm covers/ coveralls to prevent skin exposure to bright flash | Provide in-house fire safety, welding safety & general safety training for all welders | E | 2 | L |
| Arc-eye or eye hurt by slag | During welding, bright flash will appear. After welding, slag needs to be removed. If welder doesn't have PPE, eyes can be damaged by bright light or slag | E | 1 | L | Welder has been equipped with PPE. All welders have attended welder training from approved agent. | Provide in-house fire safety, welding safety & general safety training for all welders | E | 1 | L |
To understand this table, first you need to grasp the 2 dimensions of risk:
| Likelihood of occurrence | Severity of consequence(s) |
|---|---|
| A. Almost certain (e.g. fire and electrical shock) | 1. Insignificant (e.g. eye hurt during slag removal) |
| B. Likely (e.g. skin burn injury) | 2. Minor (e.g. welding fumes with inhalation problem) |
| C. Moderate (e.g. radiation) | 3. Moderate (e.g. extremely bright flash) |
| D. Unlikely (e.g. inhalation) | 4. Major (e.g. contact with hot welded pieces) |
| E. Rare (e.g. arc-eye and eye hurt by slag) | 5. Catastrophic (e.g. electrocution) |
Exercise 31
Research other risk assessment forms online looking at the categories/headings they use. Note the requirements when completing a risk management task.
Exercise 32
Identify one common electrical hazard and complete a risk assessment similar to the example above.
Self-directed learning
Assessment writing.