Building friendships and connections online will make your learning goals easier to complete and more enjoyable to do so.
Learning online — remember, you are not alone. The power of connection is there for you to harness. It's a two-way road; you will both benefit from working together.
In addition to the connection features within the Online Campus, we encourage you to use Social apps like Discord and Facebook Groups to stay in touch with your peers.
Māori Proverb
Nāu te rourou, nāku te rourou, ka ora ai te iwi
With your food basket and my food basket, the people will thrive.
This whakatauki is about community, collaboration and a strengths-based approach. It acknowledges that everybody has something to offer, a piece of the puzzle, and we can all flourish by working together.

Consider this:
If by the end of the first week of your programme, you haven’t made a new student connection in your cohort, make a point of reaching out to someone, maybe once per week even. It might be challenging, but having a new friend, possibly a study buddy, and maybe a networking connection will be worth it.
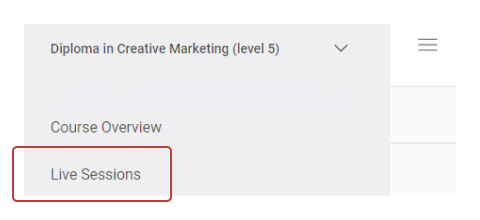
Live Sessions are a feature of the Online Campus that allows you to attend video meetings with your tutor and other students via Zoom. Your tutor will schedule Live Sessions regularly for your programme. These sessions might include information about assessments, Q and A sessions, a guest speaker, or specific topic information. The Live Sessions calendar is found in the content menu under Live Sessions.
To be an active learner, it is important to attend these sessions and make the most of the time with your tutor and peers. However, if you cannot attend, don’t worry each Live Session is recorded and when the recording is available it will be in the content menu under Live Session Recordings.
How to register for live sessions
(when your programme of learning begins — we don't have a Live Session for Ready, Set, Go!)
- Register for a session by clicking Live Session in the content menu.
- A calendar appears and shows the scheduled Live Sessions on their dates.
- Click on the session you would like to register for.
- Click I’ll Attend to register.
- The button will change to two options: Join (greyed out until about 10 minutes before the session starts), and I’m not attending, in case your plans change. (We appreciate you letting us know if you cannot attend after registering.)

Note: You are still just registering at this point – you cannot join a Live Session without first registering.
What to do on the day of the session
- Repeat the first three steps above.
- When the Join button is green (which happens once the tutor starts the session), you can click it to launch Zoom in a browser window.
- Tick the box to: always allow up-education.zoom to open links of this type in the associated app. and click Open Zoom Meetings.
- If you are asked to log in, choose SSO key button and enter up-education as the company.
- If you have not registered for a Live Session by the time it starts, follow the steps to register first to access the live Join button.
To view a live session recording
- Locate Live Sessions Recordings, in the content menu.
- Open the Live Session recording you want from the list then click on a recording.
GO TO: Module 6 (Digital Skills Hub) for more information on using Zoom.
We know that staying connected is part of keeping motivated while you learn, so we’ve made messaging an easy part of your online campus experience.
Watch this video for an overview.
Here is a step-by-step guide to using the online messaging feature.
Send a message to another student
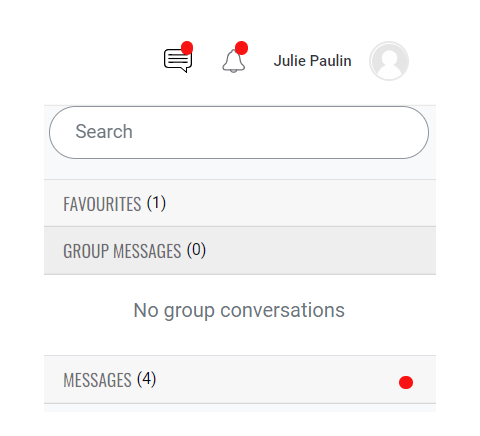
- While logged into the Online Campus, click the message icon in the top right-hand corner.
- This will open the messages menu.
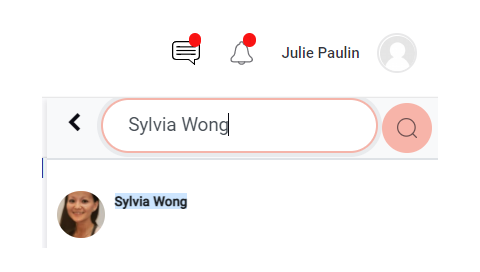
- Type in the name of a student you want to connect with and click the magnifying glass, and wait for their name to appear then select it.
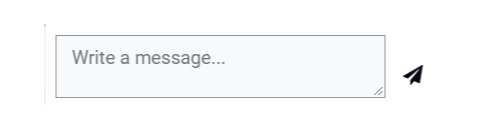
- To create a new message, scroll to the bottom of the chat box and click Write a message to begin typing. Click the paper plane icon to post your message.


View and respond to your messages
- If you have unread messages, a red dot will display on the message icon at the top of the page next to your account. (As shown above.)
- Click the message icon, then click the message title from the pop-up menu to view the message.
- To respond to a message, scroll to the bottom of the chat box and click on Write a message to begin typing. Click on the paper plane icon to post your message.

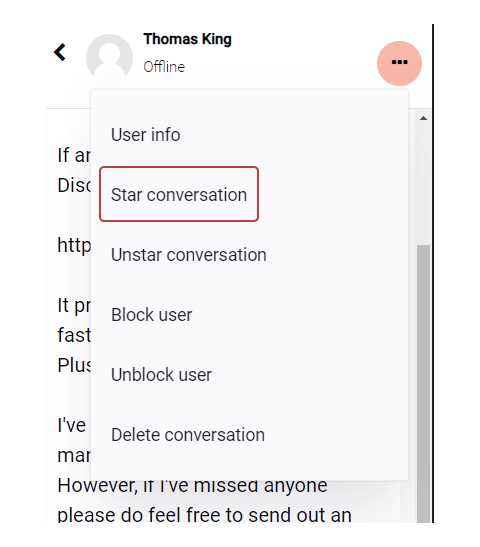
Mark some conversations as important with a star
- With the message selected, click the three dots next to the sender’s name.
- Select star conversation or unstar conversation to flag or unflag the message.

Send a group message
- Click the message icon in the top right-hand corner, then select Group Messages from the menu.
- Select the name of the group you want to message from the list of groups.
- To create a new message, scroll to the bottom of the chat box and click Write a message to begin typing. Click the paper plane icon to post your message.
Booking one-on-one video sessions with your tutor
Sometimes you might need an extra bit of information or support with your programme of study. When this happens, you can message your tutor directly through the Online Campus, and let them know you’d like to book a one-on-one session at a time that suits. Your online tutors will send you a booking system link, once you click on that link, you can then select a one-on-one time that suits your schedule.
We have forums, which are used by your tutor to discuss, share, show, tell, inquire, etc. Your tutor will create forum threads for you to engage with.
Watch this video to look at how forums work.
Here is step-by-step instruction for engaging with forums.
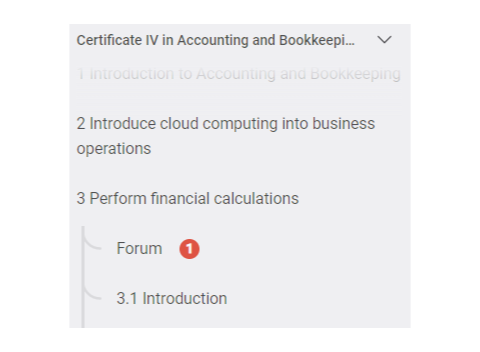
- If there is a forum attached to a module, it will appear at the start of the module in the content menu. If there is an unread message or comment in this forum, you will get a numbered notification beside it.
- Click Forum in the content menu to go into the forum section and view the list of threads.
- Only a tutor can start a new thread
- Forum with posts that you have not read will be highlighted as shown.
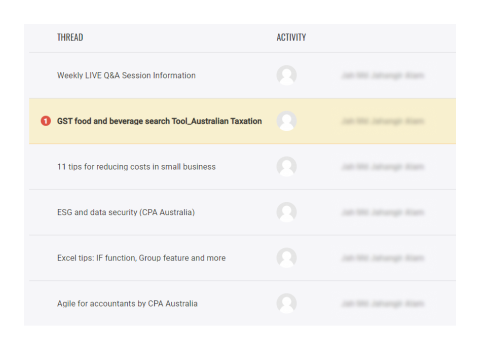
- Click the thread you are interested in.
- You can then Like or Reply to this thread.


Activity – Ready, set, Post!
Find the forum post created for this topic, and reply to it.
As part of your online learning journey, you may have access to a Journal for some topics in your programme of study.
If your programme includes Journals, you may be asked to reflect on a subject or your progress towards your goals by completing journal entries, view and share your journal posts and respond to others’ thoughts, insights, successes, etc
You can journal in different ways:

- Write journal entries and format text using the text editor icons in the toolbar.
- Click on the down arrow button to access more editing features such as:
- Underline
- Calculations
- Alignment
- HTML and more.

- Upload a document by using the drag and drop feature in the file upload tool.
- Upload an image by selecting the image icon on the toolbar and using the file picker tool.
- Upload or embed a video by using the video file icon on the toolbar, linking the URL of the video, or uploading a file.
- Record audio entries directly from the toolbar by selecting the microphone icon on the toolbar, then clicking on start recording.
- Record video entries directly from the toolbar by selecting the camera icon, then click on 'start recording'.
- Embed streaming videos into the Journal by clicking on the down arrow button and then choosing the parenthesis button.
- This will open the HTML code.
- Copy the embed code from the video streaming site such as YouTube and paste this into the HTML.
- Click on the parenthesis button again to return to the normal editor.
- At this point you will see the video appearing in the entry.


- Comment on other people's entries that have been shared with you by selecting 'comment' below their post.
- Insert a link to a website or URL address by choosing the chain icon on the toolbar and pasting the URL.

To journal, access the Journal located in the navigation bar under each subject, click on the 'Journal about this Course' located on the top right of the page. Please note when creating the entry there are two options to choose from in the drop-down menu under 'Publish to'.
- Yourself (draft) – only visible between the author and lecturer.
- All course users – visible to all students and staff members in the subject.
To publish click on the Save changes button located at the bottom of the page.
Activity – Ready, set, journal!
Create a journal post about why you have enrolled in your programme of study, share it. Comment on someone else's.
Qtime is an important part of learning at NZMA and stands for Quality Time.
This means Quality Time with your tutor, they will regularly offer opportunities for students to chat about goal setting, career aspirations, academic progress or aspects of the programme material. You will receive an email from your online tutor at the start of your programme, inviting you to book a one-on-one time with them to chat. This chat can be about anything related to online learning, any concerns you may have or you might just want to meet your tutor and get to know them better.
Qtime discussions could be during:
- One-on-one video chats
- Live Sessions.
- Forum posts
- Group Messages
- Email replies to students' queries
Success Story: Matt

Matt works at the Auckland University Rugby Football Club as their Rugby Development Officer. This opportunity allows him to remain challenged with management and practical tasks.
When asked what the best piece of advice Matt has for new students he said… “Say yes to every opportunity that comes your way. Being able to put myself out there and show willingness to help others and achieve has allowed me to grow as a person and push outside my comfort zone.”
Learn more about our Personal Training Course!
New Zealand Certificate in Exercise (Personal Training) (Level 4)