The purpose of a site assessment is to help you decide what types of plants will grow well at your chosen site.
A note about garden maintenance: If you plan on using a wheelbarrow or a mower in and around your garden beds, make sure you plan for this before you set up your garden. Ensure there is enough space to turn the wheelbarrow around and move from aisle (path) to aisle, especially if using in-ground raised beds, timber-sided raised beds, or tyre planters.
Before we look at how to do a site assessment, we'll review the types of garden beds that may be suitable for your site, and your options for watering.
In-ground raised beds

These are raised rows of soil in the ground which are formed once and then maintained.
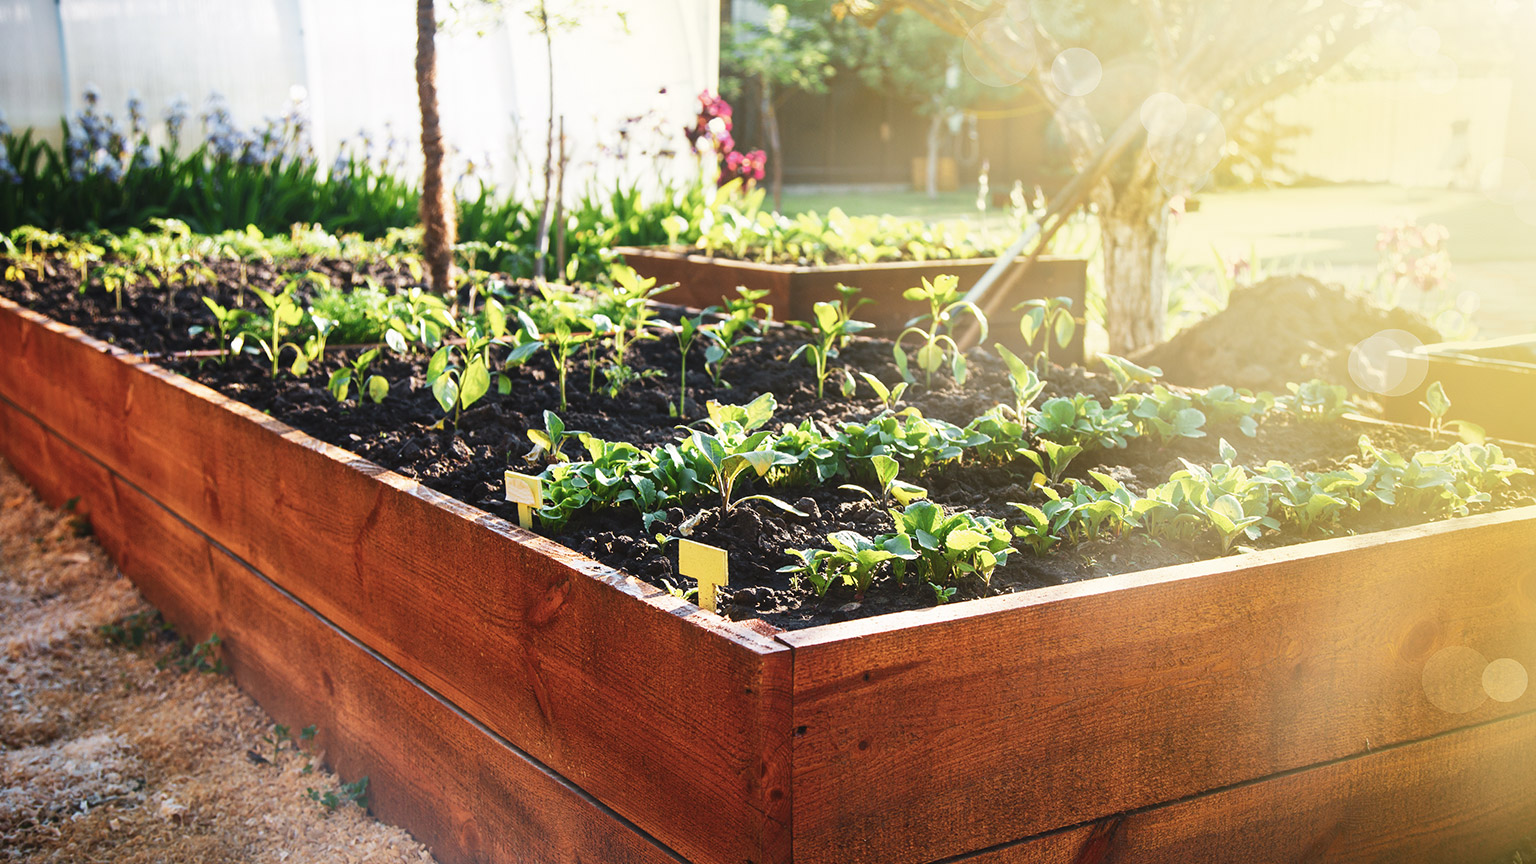
Timber-sided raised bed

These are usually made out of wood, and filled with soil, compost, or a mix of both. There is some concern timber-sided raised beds made from treated timber may leach chemicals into the soil. If you’re concerned, you can line them with a thick sheet of flexible plastic and fill the bottom 5-10cm with coarse gravel. This way, the soil is not in contact with the timber.
Tyres

Milk cartons, yoghurt pottles

Yoghurt pottles and milk cartons that have been cut in half and filled with potting mix are excellent for growing seeds. Most plants will need to be moved from these into larger containers, or into the ground (this is called transplanting) before they outgrow the carton or pottle. You may need to put drainage holes in the bottom so the soil doesn’t get waterlogged.
- Microgreens are one type of plant that could grow well in these containers, but if you plan to grow them, cut the carton or pottle so it is only about 2.5cm deep, as they prefer shallow soil.
Old pots and pans

Transplant seedlings into these or grow directly from seed inside your pan planter. If the plants you want to grow prefer well-draining soil, you might need to drill a few holes in the bottom or the sides, near the bottom to let water drain out.
Bags of potting mix
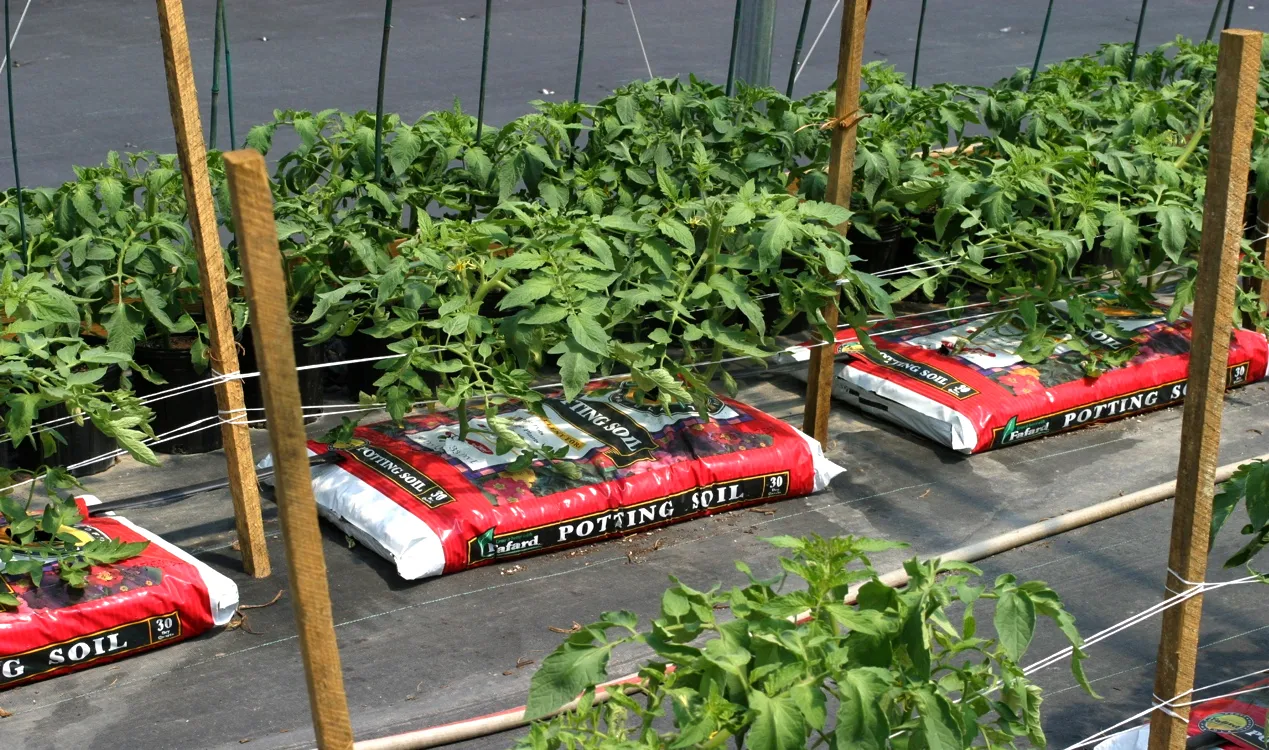
Source: https://www.democratandchronicle.com
One of the easiest ways to get growing is to plant seedlings directly into a bag of potting mix.
The Tui website provides this instruction:
- Lay the bag flat, and simply poke some holes in the bottom for drainage. Flip the bag over and place it in full sun.
- Cut some criss-cross holes in the bag, opening a space about finger length, just enough room to fit a small seedling into.
- Cut as many incisions as you like, an average bag of Tui Vegetable Mix can take 6-9 seedlings.
- For tomatoes, stand the bag of Tui Tomato Mix up and cut the top, fold back the plastic a little and then plant your tomato. For a sweet 100 cherry tomato you would only plant one into the bag. For dwarf varieties you could lay the bag flat on the ground, put holes in the bottom for drainage and plant three tomato plants. Stake tall tomatoes at the time of planting.
Sinks and baths

These are ideal for garden beds because they already have a drainage hole at the bottom. If the bathtub doesn't contain legs or feet like this one, and you are setting them up on a hard surface, like concrete, sit them on timber slats to lift the plug hole off the ground. Make sure they are stable before filling. Put 5-10cm of gravel in the bottom to help with drainage then fill with soil, aged compost or potting mix to the desired depth.
- These are great for containing plants that spread quickly (like mint).
▶ Market Gardener's Toolkit (optional)
Canadian market gardener Jean-Martin (JM) Fortier, explains the raised garden bed system he uses on his small organic farm in Quebec, Canada. Most of the design principles JM talks about can be scaled down to small garden plots here in Aotearoa.

| Heading | Chapter 02: The Permanent Bed System |
| Timestamp | 14:28 — 18:46 |

Another really important thing to consider is where you’re going to get water to irrigate (water) your plants.
The most common water sources are:
- Council-supplied – if you live in a city or town, this is probably how you get your drinking and irrigation water, accessed through faucets and hoses. If you plan on using this “tap water” to irrigate your plants, consider:
- Do you pay water rates? Can you afford to pay for the water you’ll use on your garden?
- Depending on the size of your garden, this could be one thousand litres (or one cubic metre - m3) of water per week or more.
- Can you rely on this for your garden? How likely is it that you’ll be put on water restrictions during summer? If you are, will these restrictions limit how much water you can use or only the days that you can water your garden?
- Do you pay water rates? Can you afford to pay for the water you’ll use on your garden?
- Collected water – if you live in the country, you’ll most likely get your drinking water from rainwater collected in water tanks on your property. (See image below.) In towns and cities, more people are installing small water tanks that are filled with rainwater from their roof. Once the tank is full, the rest overflows into the stormwater system.
- Will the rain supply enough water over summer?
- Groundwater – Tap, bore
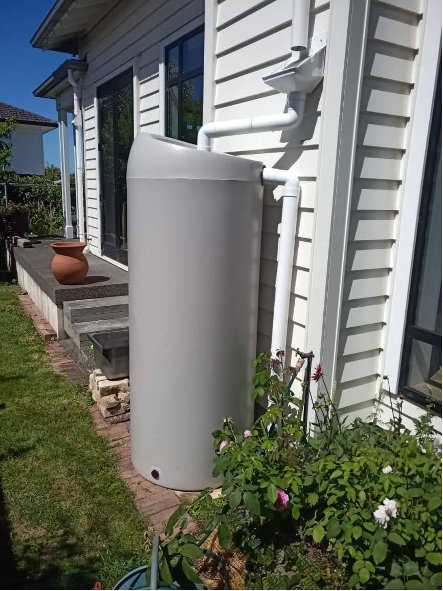
Source: https://www.theprogroup.co.nz
Collected Water: An 800 litre tank like this can be connected to a house downpipe off the roof, with a filter to trap debris, to give you extra water for your garden. Because it’s constructed from food-grade plastic, its also a great source for emergency drinking water.
How much water you can use over the hottest months of the year should help you decide how many new plants you can grow. New plants - such as trees and shrubs planted within the past two years and annuals or perennials - need watering during the dry months. After two years, trees and shrubs will usually have grown enough roots so they won’t need watering except during extremely dry summers.

Frost sits on this orange and yellow calendula flower in the early morning sun. Calendulas are able to tolerate mild frosts.
When choosing what to plant at a site, the main consideration is the usual first and last dates of frost. This gives us the growing period we have available to us.
Growing period: The last frost of winter or early spring, to the first frost of the next autumn/winter.
There are various resources to find out the climate and frost patterns in your area such as this one, from figure.nz. While it is outdated, the climate patterns haven't changed, or are changing slowly.

Take photos
Visit the site to dig a soil test pit (if you haven’t already), take photos, and create a site plan.
Take photos of:
- plants already growing, both healthy and unhealthy
- trees, hedges, fences, and buildings nearby that provide shelter from the wind, and/or cast shade onto your growing site
- your water source.
Creating a site plan
This activity requires you to draw a site plan. This can be done in any of these three ways:
- Entirely on paper and pen and you can submit a photo of your drawing as evidence
- Entirely digitally using a handheld device in the field and you can submit the file as evidence
- You can take notes on paper and then use those notes to create the site plan digitally and submit the file as evidence
You’ll need:
- Pencil, paper, clipboard and ruler
- An ipad or laptop/notebook if preferred
- Surveyor’s tape measure
- Builder’s tape measure
- Navigational compass to identify where north is, or a compass app on your phone
- A compass (drawing tool) to measure distances and draw circles
Recording key information
- Create a rough sketch of your site as if you're a bird looking down on it.
Include:- the site boundaries (edges)
- objects that block the wind, which are outside the site, such as a neighbour’s house
- buildings
- paths and hard surfaces, like driveways
- trees, shrubs and existing garden beds
- if you can identify the species of plants growing, write these on the plan
- the location of the water source
- if there are any conditions on using the water, e.g. a maximum of 200L per day, note this on your map.
- Use your navigational compass to mark the direction of north on the map.
- For tall trees and structures, estimate the height and write this on your map.
- If you know the direction of the strongest winds, mark this on the map. On some sites, you may see trees and shrubs permanently leaning in the same direction. The strong winds will come from the opposite direction to the lean of the trees.
Measuring the position of main objects
- Choose a hard object that you can measure the straight line distance of, e.g. the length of one side of a building, or the length of a boundary fence. Use your tape measure to measure this length and record it on your map. This will be your baseline.
- Use your tape measure to measure the distance from the two end points to a feature (an object), such as a washing line post. Record these dimensions on your map. Repeat this process to locate all main features.
- For smaller features, such as the location of shrubs or compost heaps, estimate the location and draw it on the map.

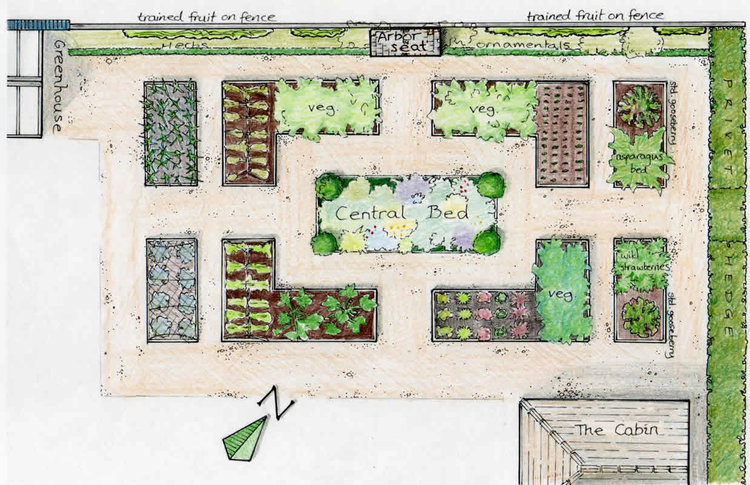
Example rough site plan
Drawing a tidy copy
At home, draw a tidy copy of the map — your Site Plan.
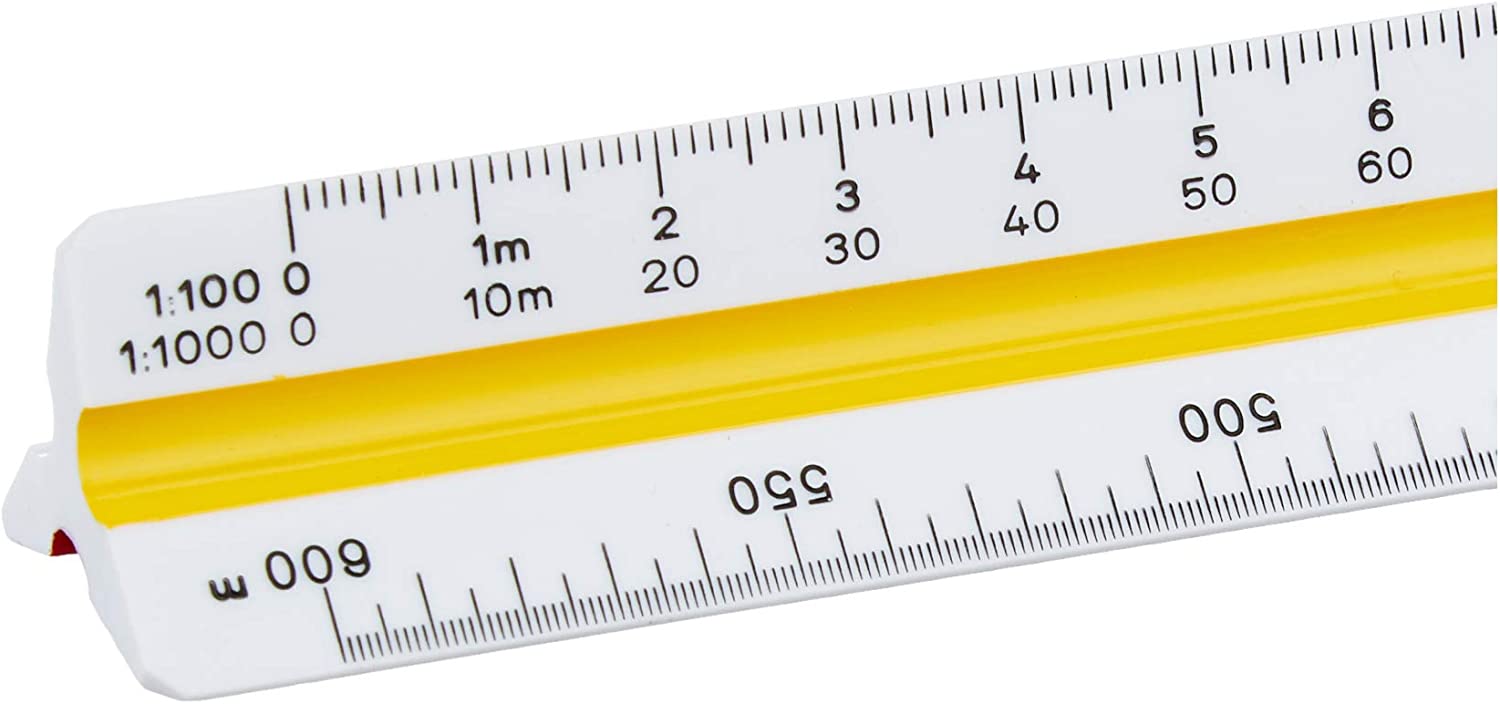
A scale ruler can be very useful. Scale rulers have a number of different scales on them which mean that once you’ve chosen you preferred scale you can just find your real world measurements on the ruler. These are available from most stationery shops or online.
- Work out the longest site boundary and then choose a scale that will fit it onto your piece of paper. A scale is ratio between the real world measurement and the size it is on your drawing. For example, if you have a boundary that is 40m long and you want to draw it on an A4 sheet of paper, you can work out the scale by:
- Measure the longest side of the paper: 29.7cm, or 0.297m
- Divide the real world measurement by the paper size using the same units of measure for both (metres): 40 / 0.297 = 134.
- This means that if we drew the long site boundary on the page at a scale of 1:134 it would be the exact same length as the piece of paper.
- But we want our drawing to be a bit smaller so we can add our notes around the edges. So we need to choose a scale that has a bigger number.
- We also want a scale that is easy to calculate. Let’s try 1:200 (pronounced “one to two hundred”).
- Find a suitable scale that is easy to calculate, if we use 1:200, our 40m boundary will be 0.2m (20cm or 200mm) on the page. We can work this out by calculating: 40m / 200 = 0.2m.
- Draw in your baseline using your ruler and a calculator to work out the correct scale, or by using your scale ruler.
- Set your compass (drawing tool) to the length of one of the measurements to another feature. Put the sharp point on the baseline location and then draw a light arc (curve) with the pencil end where you think the feature needs to go.
- Set your compass (drawing tool) to the second distance. Put the sharp point on the other end of your baseline and use the pencil end to draw a mark where it crosses the arc you just drew. This is the true location of that feature.
- Repeat the process for all key features.
- Draw in the other features.
- Draw in the location of your soil test pit.
- Add a north arrow to show which way is north, and include notes about direction of strong winds, and objects that block the wind, which are outside the site.
- Add the names of the features and any important information, such as tree height and health.
- Add your name, the site address, the date you completed the drawing, and the words “Site Plan”.
- Optionally, add colour to your drawing.
Activity – Test your understanding