Software installation is the action of making the program ready for execution.
There are programs that need to be installed on your computer to ensure that it will work efficiently.
Software installation and updates are important for the overall health of your device, security, user experience and more.
In this topic, we are going to cover the different components of software installation through these aspects:
- Computer basics
- Installation of software drivers
- Software diagnostics
- POST
- Testing and maintenance
- Troubleshooting
The following video deciphers 'software' and 'hardware', and how the 2 components interrelate.
'Software' can be categorised into 2 groups: system software and application software.

Technology has now become a vital part of our everyday lives--every transaction and every form of communication can be completed online. Without a second thought, we are completing complex tasks efficiently and with minimal effort.
There are many aspects that contribute to this convenience; however, an overlooked factor that can be attributed to this is software within a computer.
Compared to hardware (the physical elements that comprise a computer), software tells the computer what to do and how to do it. It is a set of programs with instructions that will direct the hardware to perform specific tasks.
Software can be classified as the 'brain' of the device and hardware as the 'shell'--they work together to support the effective functioning of a computer.
The following diagram illustrates the different components.

Operating system
System software makes the interaction between the user and computer possible, typically achieved through an 'operating system'.
A computer requires an operating system to function by providing an environment in which to run software applications and create computer networks.
One of the main functions of an operating system is to provide an interface between the user and the computer hardware and software. Windows has a number of interface components designed both for general use and for more technical configuration and troubleshooting, depending on its purpose.
An operating system is generally made up of a number of core files--called the kernel--with additional device drivers and programs to provide extended functionality.
The market for operating systems is divided into four main sections:
| Market Section | Description |
|---|---|
| Business client | OS designed to work as a client on business networks. |
| NOS | OS designed to run on servers on business networks. |
| Home client | OS designed to work on standalone or workgroup PCs in a home or small office environment. |
| Cell phone/Tablet | OS designed to work with a handheld portable device. For this section, the OSs must have a touch-operated interface. |
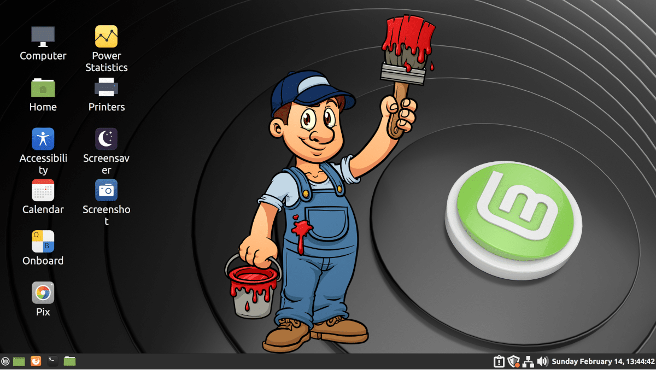
Popular operating software choices for desktop and laptops are Microsoft Windows, macOS and Linux.

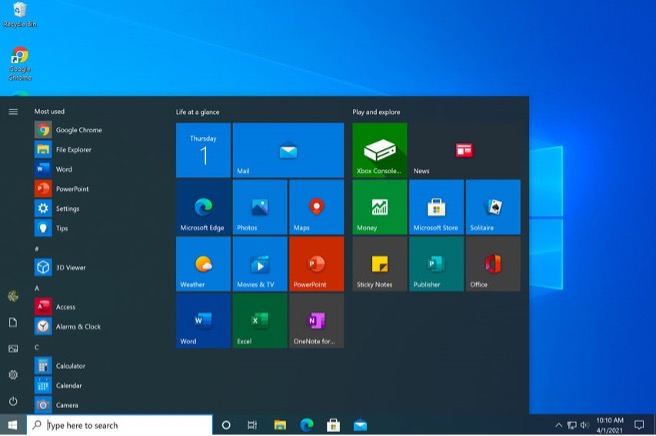
Windows
Windows 10 aims to provide a consistent user experience across different types of devices, including desktop PCs, laptops, tablets and smartphones.
When installed to a PC or laptop, Windows 10 retains the user desktop and taskbar familiar from legacy versions but uses a touch-optimised Start Screen interface to access apps and programs. This replaces the old Start Menu.
As well as shortcuts, the Start Screen can display app tiles, which can contain live or actively updated content. These app tiles are fully customisable.
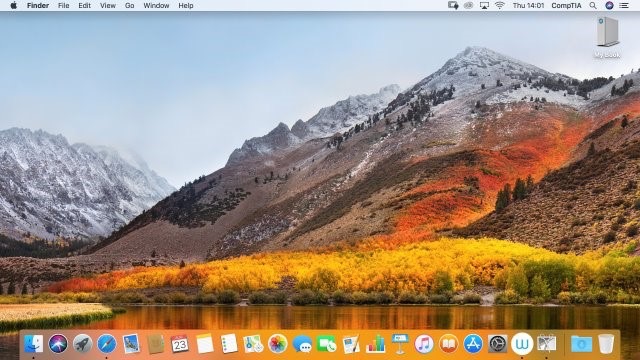
Mac OS
In 1984, when the IBM PC was the dominant desktop standard, Steve Jobs and Steve Wozniak created a new type of personal computer—the Apple® Macintosh® (or Mac® ). It was revolutionary because it came with a graphical user interface at a time when IBM's PC used the command-line/text menu DOS operating system.
The main difference between Mac OS and other operating systems is that the OS is only supplied with Apple-built computers. You cannot purchase Mac OS and install it on an ordinary PC. This helps to make Mac OS stable but means that there is far less choice in terms of buying extra hardware.
UNIX
UNIX is a trademark for a family of operating systems originally developed at Bell Laboratories beginning in the late 1960s. All UNIX® systems share a kernel/shell architecture, with the kernel providing the core functionality and the interchangeable shells providing the user interface.
Unlike Windows and Mac OS, UNIX is portable to different hardware platforms; versions of UNIX can run on everything from personal computers to mainframes and on many types of computer processors.
Operating system for mobile devices

iOS
iOS is the operating system for Apple's iPhone® smartphone and iPad® tablet. While also derived from UNIX, iOS is a closed source operating system. This means that the code used to design the software is kept confidential and can only be modified by Apple.
Mac OS and iOS have some similarities, but they are not compatible; an app developed for iOS will not run on Mac OS.
On an iOS device, apart from volume and power, the only external button is the Home key, which returns the user to the home screen 'desktop'. The interface is then entirely controlled via touch.

Touch can be operated either with your fingers or with a special soft-touch stylus.
There are many more gestures in addition to those listed above. For example, shaking the device is often used to activate undo. There are also external keyboards available and most Apple devices support Siri®, a voice recognition system and personal assistant.
Android
Android is a smartphone/tablet OS developed by the Open Handset Alliance, primarily driven by Google. Unlike iOS, it is an open-source OS, based on Linux. The software code is made publicly available (source.android.com), meaning there is more scope for hardware vendors, such as Acer® , Asus® , HTC® , Huawei® , LG, Motorola® , OnePlus, Oppo™, Samsung® , Sony® , and Xiamoi to produce vendor-specific versions.

Application software
Application software, on the other hand, focuses on applications and directs the computer to execute commands given by the user to process data.
This is an essential component of every computer system, providing various levels of functionality to perform different tasks (e.g. Word processes, emailing clients, accessing internet browsers, games and MS-office and media players).
The main differences between system software and application software are highlighted in the images below.

A 'software driver' is a software component that allows the operating system and a hardware device to communicate with each other. This is relevant to any computer, laptop, tablet or smartphone. When you have the hardware, in order for it to function you will need to have the drivers installed.

Internal components such as the processor, memory, hard drive and peripherals (e.g. printer, speakers, keyboard and mouse) all need to send and receive information to each other for them to operate on your computer.
While a physical connection exists for data to move from one device to another across a circuit board or wire, it is the software drivers that tell your computer what type of device is connected, what it can do, and how to communicate with it from other software on your computer, including the operating system.
For internal components such as the processor, data ports and screen that are supplied by the computer maker, you typically won't see the software drivers or need to be aware that they even exist.
For mobile devices and smartphones, software drivers are installed and updated through Wi-fi and Bluetooth; therefore, there is no need to install additional software drivers.
To install and maintain drivers, the phone manufacturers will provide users with apps to complete these tasks. In some cases, there will be instances where the installation of software will need to be obtained directly from a device's manufacturer. This may include visiting their website or being provided with a disk or download version to use to begin the driver installation.
This may include computer peripherals and other accessories.
Consider this scenario: You purchase a printer that you would like to use. The manufacturer will provide the software driver for that specific model. Once connected, the operating system will detect and install the device automatically. You can then use Device Manager, Control Panel, Windows Settings, or the vendor-supplied software to configure user settings.
Guidelines for installing peripheral devices
Below are some guidelines for you to apply when you are adding or removing peripheral devices.
- Always read the manufacturer's instructions and check that the device is compatible with the PC and operating system.
- Hold the connector, not the cable, when removing a lead.
- Inspect the connector and port for damage (notably broken or bent pins) before attaching a lead.
- Take care to align the connector carefully and do not use excessive force (in order to avoid damaging the pins).
- Check whether the device requires an external power source.
Installing any peripheral device involves:
- plugging in the cables between the device and the computer
- installing any drivers
- troubleshooting installation when necessary
- customising the device
- testing that the device satisfies required conditions.
Guidelines to install software drivers for Windows
Windows will have driver updates automatically installed into the operating system, but if manual updates and installations had to occur, the details below are a guideline on how this can be done.
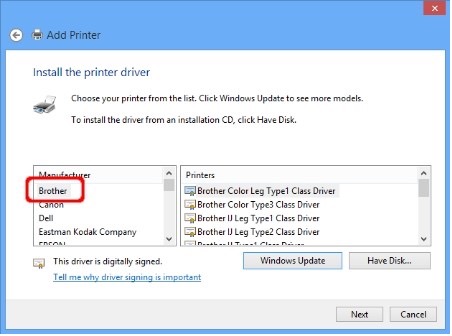
The Add Hardware/Add a Device Wizard (in Control Panel) supports the manual addition of devices while Device Manager (in Administrative Tools, the Computer Management snap-in, or Control Panel) is used to configure them.
The precise stages in the Add Hardware or Add a Device Wizard are different between the various versions of Windows but in all of them, by selecting the appropriate options, you can get to the point where you choose which hardware you want to install manually.
Choose the type of hardware from the list, then select from the list of manufacturers and models, and Windows will attempt to allocate its resources.
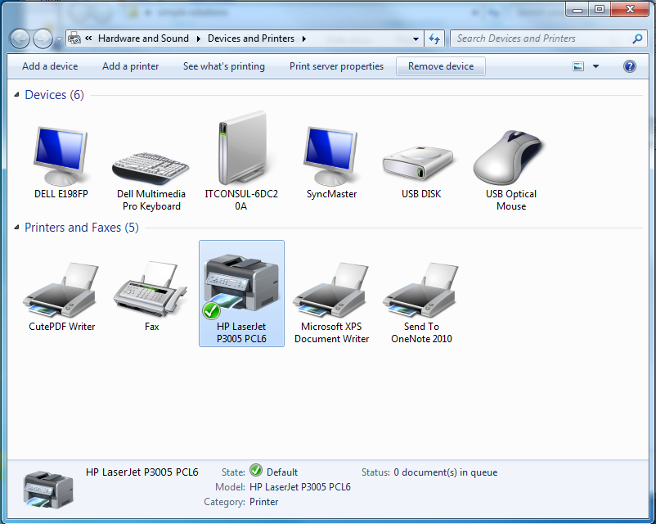
Devices and printers
In Windows 7 and Windows 8, Devices and Printers is the location for the basic user-configurable settings for peripheral devices attached to the computer. Double-clicking an icon brings up the device's status page and available configuration options (referred to as the Device Stage).
Note: The shortcut menu for each device also allows you to set configurable properties, start a troubleshooter (if devices with an icon are not working properly) or remove the device from the computer.
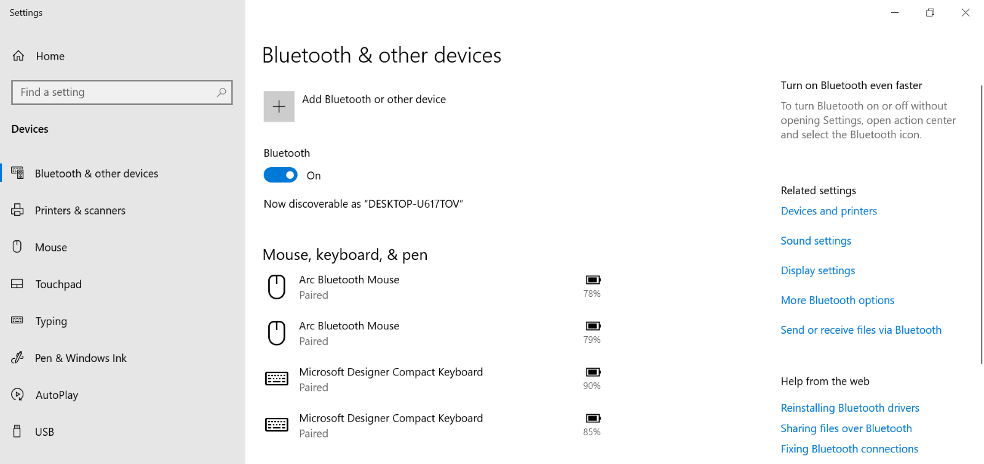
In Windows 10, the Devices page in Windows Settings provides options for adding and configuring peripherals.
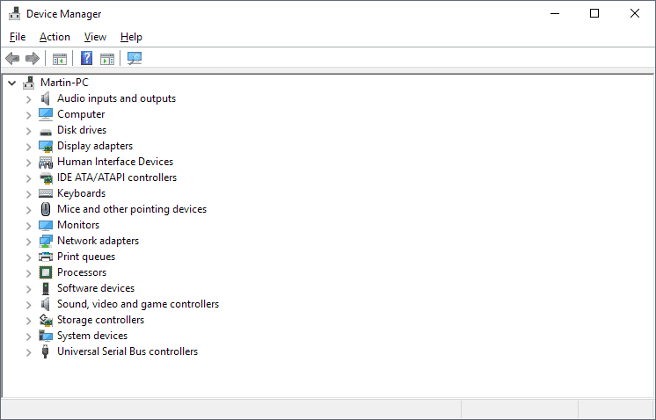
Device Manager
When you have installed a device, check that it works. It is a good sign if the device is recognised by Windows, but you should still perform a functionality test.
For example, print a test page when installing a printer, test file copy when installing removable media, or test audio and video playback when installing multimedia devices.
Device Manager (devmgmt.msc) allows you to view and edit the properties (change device settings, update drivers and resolve any known conflicts) of installed hardware.
Verifying device installation
Beyond installation of its driver, a device's configuration will include an interrupt address (IRQ) and various other properties (such as memory addresses and I/O ranges).
All hardware devices need a unique configuration so that they can communicate with the processor and other system components. Hopefully, if all your devices are fairly recent, Windows will be able to detect them and install them properly.
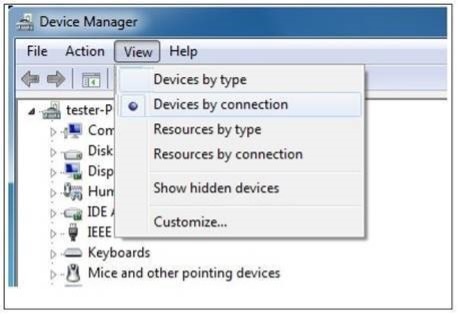
There may be circumstances where you need to check the system resources assigned to a device, however. You can use the View menu in Device Manager to see which resources are assigned to which device.
Updating and troubleshooting a device
Sometimes, Windows can determine a device's type and function but cannot locate a driver for the device (perhaps there is no driver included on the Windows setup media or in Windows Update). In this case, you may find an 'Unknown Device' or device of a 'generic' type listed in the Device Manager with a yellow exclamation mark indicating a problem.
If the device has never worked, check that it (or the driver installed) is compatible with the OS. Manufacturers often release updated drivers to fix known problems. The update can normally be obtained as a download from the support area of the manufacturer's website. Once downloaded, the driver may come with a setup program to install it or may need to be installed manually.
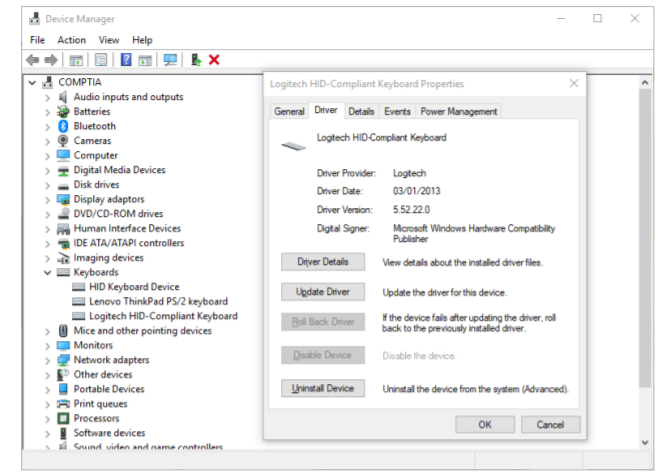
To update or troubleshoot a device manually, in the Device Manager hardware tree, locate the device, right-click it, and select Properties to display the device settings. The General tab displays status information for the device. Use the Update Driver button on the Drivers tab to install a new driver.
If a device supports 'plug and play' and is 'hot swappable', you can remove it from the computer without having to uninstall it.
Before removing a storage device, close any applications that might be using it, then select the Safely Remove Hardware icon in the notification area on the taskbar and choose the option to stop or eject the device.
Otherwise, you can uninstall a device prior to physically removing it by right-clicking in Device Manager and selecting Uninstall.

There is also an option in Device Manager to Disable a device, which you might use if it is not working with the current driver and you want to make it inaccessible to users while you find a replacement or to improve system security by disabling unused devices (such as modems).
Disabled devices are shown with a down arrow.
Hardware diagnostics
If you cannot diagnose a hardware driver or configuration problem via Device Manager, there are other tools you can use to get more information.
Troubleshooting application
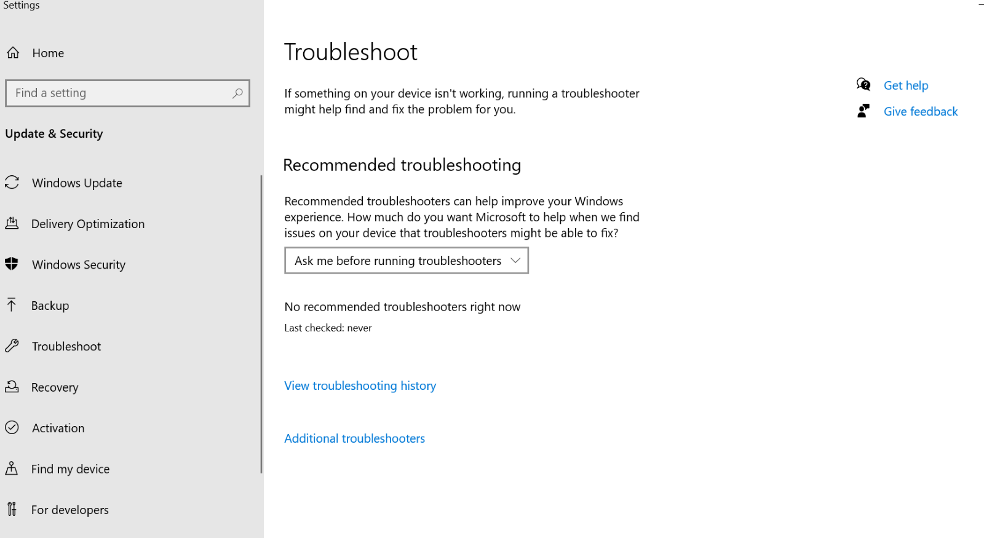
Windows is bundled with a number of automated troubleshooting utilities. These guide you through the process of installing and configuring a device correctly. The troubleshooters are available from Control Panel in Windows 7 or the Settings app in Windows 10.

'Software diagnostics' refers to programs that are used to identify the causes of problems in computers. Diagnostic tools are categorised into 2 groups: software and hardware.
These programs test the onboard systems for issues and help to alert users of potential problems and breakdowns.
- Hardware diagnostic tools: Physical devices that are designed to determine the conditions of various computer hardware components.
- Software diagnostic tools: Computer programs that are used, either in or outside of a system, to determine the causes of software and hardware malfunctions within a computer.
Software diagnostic tools can be used to test and regulate various components of a computer system. Some, for example, will monitor temperature; whilst others check Wi-fi speed, network and RAM as well as monitor any other devices connected to your computer.
Once these tools are able to identify the problems that may be causing a disruption to your computer, then the repair process can begin.
Windows performance monitor
An example of a software diagnostic tool is the Windows performance monitor (see below) which is a built-in program within the operating system. This software program monitors the CPU, fan speed, voltage, memory disk and ethernet information.
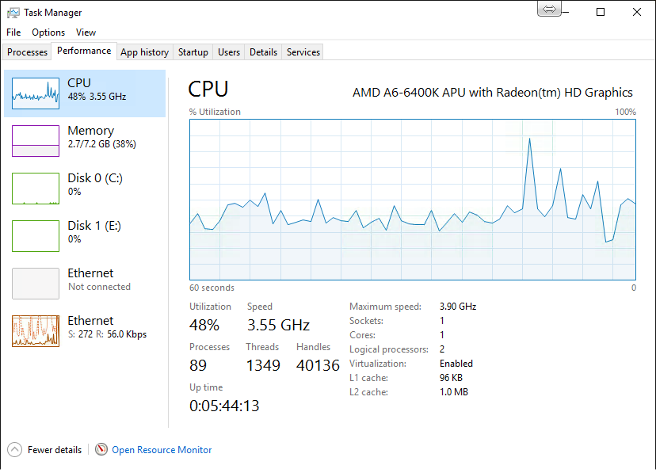
The following memory usage is displayed:
- Physical Memory—usage of system RAM (not including the pagefile)
- Kernel Memory—physical and paged memory used by Windows core files
- System summary—showing handles, threads and processes (software objects being managed by the CPU), system uptime and the commit charge (overall memory usage, including physical memory and pagefile).
High peak values are nothing to worry about, but consistently high utilisation means that you should consider adding more resources to the system (or run fewer processes!).
CPU and physical memory obviously require physical upgrades. Windows will normally change the pagefile dynamically if it is running out of space. If it has been set manually, you should increase it using the Performance Settings button on the Advanced page of System Properties.
Note: Monitoring the temperature is an important aspect as it can impact the overall performance of your computer. Heat damage can create many problems for your hardware components, including the motherboard and hard disks.
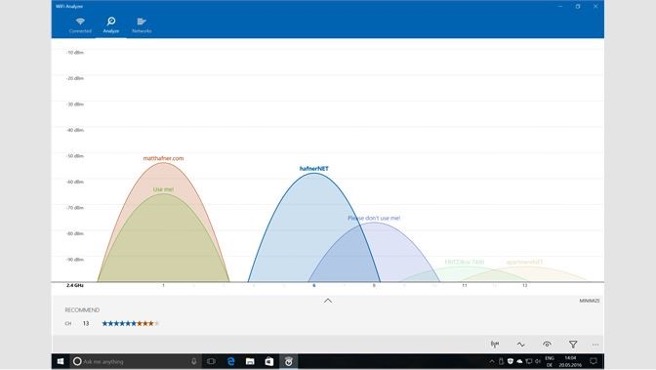
Software diagnostics for Wi-fi networks
Another example includes software diagnostics for Wi-fi networks. The majority of users will need Wi-fi or ethernet to conduct everyday personal and business activities, so there's a chance that every once in a while, you will run into a problem. A software tool will be crucial to support, identify and rectify any Wi-fi issues relating to your computer.
Wifi Analyzer is another good example of a software diagnostic tool that helps monitor your Wi-fi network setup and whether there are surrounding networks disrupting your connection. With this information, you are able to identify any issues and potentially boost your Wi-fi speed.
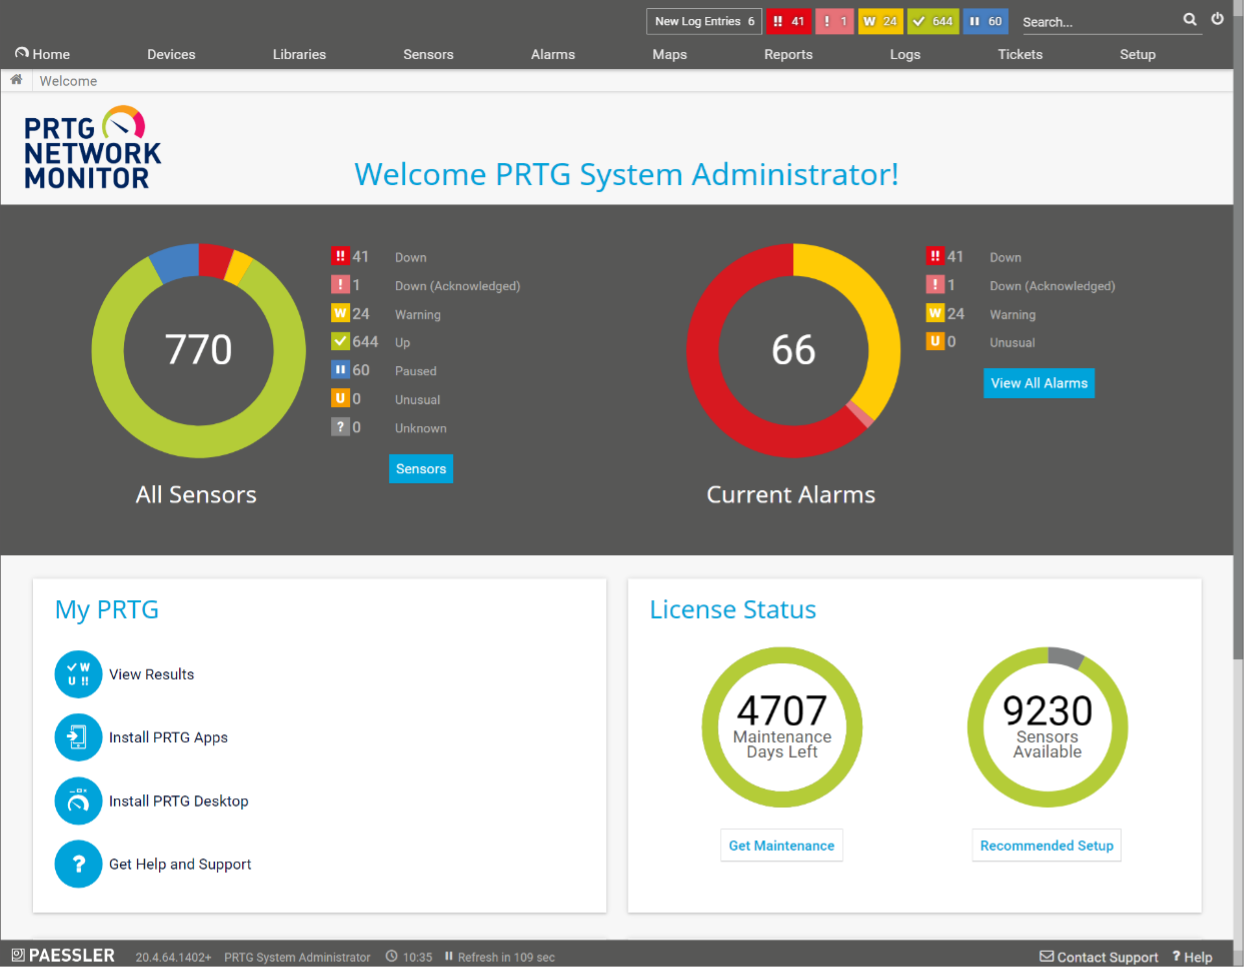
Software diagnostics for network monitoring
Routers, servers, CPU and switches also need to be monitored to ensure the computer is running efficiently.
Many software programs support this--one example is PRTG network monitoring. PRTG focuses on providing a complete overview of loads and parameters of CPU, RAM load, disk usage and network traffic. This will help prevent server overloads, increase productivity and decrease the risk of network failures.
Software diagnostics are crucial to the running of your computer as they help identify and pinpoint specific issues. It is normal for computers to malfunction, slow down and demonstrate other issues that may be hard to identify by physical checks.

POST (power-on self-test) is the testing diagnostic sequence performed to determine if the hardware is working as expected. Once it has determined that all hardware is working correctly, it will go on to the next stage which will load the operating system.
The main duties of POST are to:
- check and verify CPU registers
- validate basic input and output integrity
- check peripherals
- confirm main memory
- identify and organise devices available for booting.
Watch the video below to learn more about:
- what POST is
- what beep codes are
- how to identify errors in the boot process
- what a POST card is.
General process for POST:
- The POST starts by locating video card firmware at the address C000 in memory. If found, the video card is initialised from its own firmware. Information from the card manufacturer may also be displayed at this point.
- A start-up screen is displayed. More tests on the system, including counting through system RAM, are performed. If any errors are found, a text error message is displayed. Explanations of these messages are usually found in the system guide. Once numeric codes, these messages now tend to be descriptive, such as 'key stuck'.
- You should be able to access the system setup routine from this point. This allows you to reconfigure the settings stored in the system setup. The key used to invoke system setup varies according to the firmware, but is usually Delete, F2, Esc, F10 or F1.
- Some PCs indicate that system checks have been successfully completed at this point with a single short beep, but the trend for modern computers is to boot silently.
- A search is made for further interfaces that may have firmware chips on them. This could include storage adapters and network cards. Further information about these cards may be displayed at this point and their memory addresses reserved.
- The firmware may display a summary screen about the system configuration. This may scroll by quite quickly. Use the Pause key if you want to analyse it.
- The operating system load sequence starts. If everything is okay, booting starts! If there is a problem POST throws a beep sound, using specific beep codes to specify the problem.
You must decode the pattern of beeps and take the appropriate action. Use resources such as the manufacturer's website to determine the meaning of the beep code.
An example below details the codes for an original IBM PC.
| Code | Meaning |
|---|---|
| One short beep | Normal POST – system is OK. |
| Two short beebs | POST error – error code shown on screen. |
| No beep | Power supply or motherboard problem (use multimeter to check the onboard speaker is functioning). |
| Continuous beep | Power supply, motherboard,or system memory problem. |
| Repeating short beep | Power supply, motherboard, or keyboard problem. |
| One long, one short beep | Motherboard problem. |
| One long, two or three short beeps | Display adapter error. |
| Three long beeps | 3270 keyboard card. |
POST not running
If power is present but the computer does not start or the screen is blank and there are no beeps from the speaker, it is likely that the POST procedure is not executing.
If the screen is blank, check that the monitor cable is connected and undamaged and that the monitor is powered on. If the monitor has separate inputs (e.g. HDMI and DVI), make sure it is switched to the correct one. If possible, test with another monitor to confirm that there is no problem with the display. If you can rule out a problem with the display itself, other likely causes are faulty cabling or a damaged or mis-seated CPU or other motherboard component.
To troubleshoot, try the following tests and solutions.
- Ask what has changed—if the system firmware has been flashed and the PC has not booted since, the system firmware update may have failed. Use the reset procedure.
- Check cabling and connections, especially if maintenance work has just been performed on the PC. An incorrectly oriented storage adapter cable or a badly seated adapter card can stop the POST from running. Correct any errors, reset adapter cards, and then reboot the PC.
- Check for faulty interfaces and devices—it is possible that a faulty adapter card or device is halting the POST. Try removing one device at a time to see if this solves the problem (or remove all non-essential devices then add them back one-by-one).
- Check the PSU—even though the fans are receiving power, there may be a fault that is preventing the Power Good signal from being sent to the CPU, preventing POST.
- Check for a faulty CPU or system firmware. If possible, replace the CPU chip with a known good one or update the system firmware.
- Some motherboards have 'jumpers' to configure modes (such as firmware recovery) or processor settings. If the jumpers are set incorrectly, it could cause the computer not to boot. If a computer will not work after being serviced, check that the jumpers have not been changed.
Operating system search/boots to incorrect device
Once the POST tests are complete, the firmware searches the devices as specified in the boot sequence. If the first drive in the sequence is not found, it then moves on to the next.
For example:
- If there is no fixed disk > the boot sequence checks for a USB attached drive.
- If no disk-based boot device is found > the system might attempt to boot from the network.
- If no boot device is found > the system displays an error message and halts the boot process.
If the system attempts to boot to an incorrect device, check that the removable drives do not contain media that are interfering with the boot process and that the boot device order is correctly configured.
For more information on POST, check out the following video below.
Once you have installed the OS, you need to maintain it on an ongoing basis and set up some basic preventive maintenance procedures to keep the computer working well.
Maintaining an OS might not seem as exciting or interesting as performing a new installation or replacing a hard disk, but it is actually one of the most crucial tasks for a support technician.
System maintenance is important for 2 reasons:
- proper maintenance can prevent system problems from arising
- proper maintenance of the system, including the creation of appropriate backups, can make recovery or troubleshooting operations much easier.
Disk maintenance
Of all the computer's subsystems, disk drives and the file system probably require the most attention to keep them in optimum working order. They are subject to 3 main problems:
- Fragmentation: Ideally, each file would be saved in contiguous clusters on the disk. In practice, over time as files grow, they become fragmented (written to non-contiguous clusters), reducing read performance.
- Capacity: Typically, much more file creation occurs on a computer than file deletion. This means that capacity can reduce over time, often quite quickly. If the system disk has less than 20 per cent free space, performance can be impaired. When space drops below 200 MB, a Low Disk Space warning is generated.
- Damage: Hard disk operations are physically intensive and the platters of the disk are easy to damage, especially if there is a power cut. If the disk does not recognise that a sector is damaged, files can become corrupted.
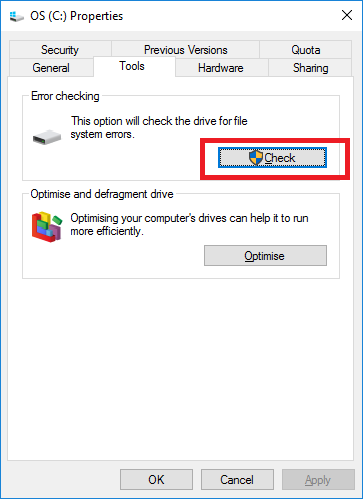
These problems can be addressed by the systematic use of disk performance tools. These tools should be run regularly—at least every month and before installing software applications. In Windows, you can access tools to maintain and optimise a drive through the drive's Properties dialog box.
Windows disk maintenance tools
There are several tools that you will find helpful when it comes to performing disk maintenance in Windows.
CHECK DISK (chkdsk)
The Check Disk Windows utility checks the integrity of disks and can repair any problems detected. Scheduling a check disk to run regularly will keep errors from accumulating on the hard disk. It is recommended that you run the Check Disk utility weekly.
There are 3 ways to run the tool.
- No option selected—runs in Read-Only mode.
- Automatically fix file system errors—file system errors are caused by crashes, power loss, and the like. At a command line, use chkdsk volume: /f, where volume is the drive letter.
- Scan for and attempt recovery of bad sectors—'bad sectors' are damage to the actual drive. If a drive has many bad sectors, it is probably nearing the end of its useful life. You are prompted to save any recoverable data, which is copied to the root directory as filennnn.chk files. At a command line, use chkdsk volume: /r, where volume is the drive letter.
Check Disk cannot fix open files, so you may be prompted to schedule the scan for the next system restart. A version of Check Disk (autochk) will also run automatically if the system detects file system errors.
The other main parameters and switches for the command-line version are detailed below.
| Switch | Use |
|---|---|
| path | Specify a path (and optionally file name) to check. |
| /x | Force the volume to dismount. This will cause file errors for users with files open on the volume. If the volume is in use and you use the /f or /r switches without /x, you are prompted to schedule chkdsk for the next system restart. |
| /i /c | On NTFS volumes only, skips parts of the checking process. |
Disk Defragmenter
In Windows, the Disk Defragmenter reorganises a drive to store information relating to each file in contiguous sectors of the disk. This improves performance by reducing the time required to load a file.
The Disk Defragmenter can also move data to the start of the disk, leaving a single free area of disk for use by new files.

Note: Although it is possible to run this utility in the background while you work, it will slow your machine and prevent defragmentation of open files. It is usually better to run defragmenter when your computer is not being used.
Linux and MacOS disk maintenance tools
The file systems used by Linux and MacOS (ext and HFS Plus/APFS) are less prone to fragmentation than NTFS. However, regular use of disk maintenance utilities is still considered best practice.
Linux disk management tools
Linux file systems do not ordinarily require defragmenting.
Linux leaves gaps between each file, allowing the files to grow or shrink within their own 'space', avoiding the worst effects of fragmentation.
Performance will suffer if the disk is more than 80 per cent full, however. You can use the following tools to check the health of the disk and file system:
- df and du—check free space and report usage by directories and files
- fsck—check a partition for errors. Note that the partition should be unmounted before running this tool.
macOS DISK UTILITY
In MacOS, the Disk Utility app can be used to verify or repair a disk or file system. It can also be used to erase a disk with security options in case you are selling or passing on a Mac.
Patch management
A patch, or update, is a file containing replacement system, or application, code. The replacement file fixes some sort of coding problem in the original file. The fix could be made to improve reliability, security or performance.
'Patch management' is the practice of monitoring, obtaining, evaluating, testing and deploying fixes and updates. As the number of computer systems in use has grown over recent years, so has the volume of vulnerabilities and corresponding patches and updates intended to address those vulnerabilities.
However, not every computer within an organisation will necessarily be compatible with a certain patch--whether because of outdated hardware, different software versions or application dependencies. Because of the inconsistencies that may be present within the various systems, the task of managing and applying patches can become very time-consuming and inefficient without an organised patch management system.
In typical patch management, software updates are evaluated for their applicability to an environment and then tested safely on non-production systems. If the patch is validated on all possible configurations without causing more problems, only the valid patch will be rolled out to all computers throughout the entire organisation.
A patch management program might include:
- an individual, responsible for subscribing to and reviewing vendor and security patches and updating newsletters
- a review and triage of the updates into 'urgent', 'important' and 'non-critical' categories
- an offline patch test environment where urgent and important patches can be installed and tested for functionality and impact
- immediate administrative push delivery of approved urgent patches
- weekly administrative push delivery of approved important patches
- a periodic evaluation phase and full rollout for non-critical patches.
Many organisations have taken to creating official patch management policies that define the who, what, where, when, why and how of patch management for that organisation.

Updating
While working within patch management procedures, you also need to know the processes involved in performing updates in different operating systems.
Windows update
Windows Update is a website (update.microsoft.com) hosting maintenance updates for different versions of Microsoft Windows. A control installed on the computer enables it to browse the site and select updates for download and installation, using the Background Intelligent Transfer Services (BITS) protocol.
Windows Update hosts critical updates and security patches (code to fix security vulnerabilities in Windows and its associated software) plus optional software and hardware updates to add or change features or drivers. There is also a complementary program, called Microsoft Update, which can be used to keep Microsoft Office software patched at the same time
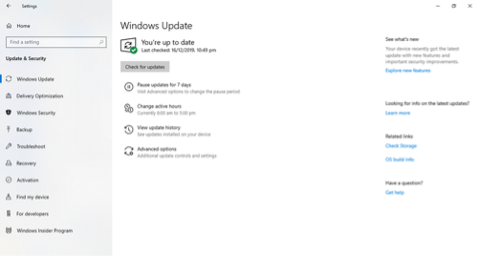
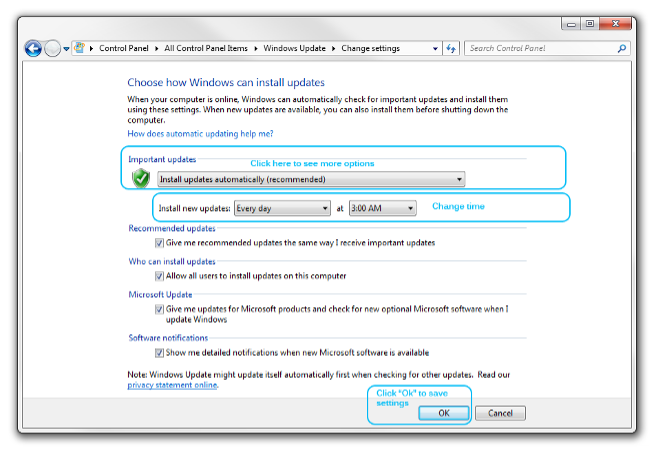
During setup, Windows can be configured to check for system updates (via the internet) and download them as needed.
Update settings can be reconfigured via the Windows Update applet in Control Panel.
Application updates
Software applications (especially those with browser plug-ins) may also need updating with the latest patches. Applications can contain security vulnerabilities in the same way as the OS; in fact, applications are targeted more aggressively than Windows itself as attackers recognise that they are less likely to be patched than the OS.
Microsoft software (such as MS Office) can be updated via the same update interface by selecting 'Give me updates for other Microsoft products when I update Windows'. Most third-party vendors install auto update software with their applications.
Linux updates management
To manage updates and software in Linux, the package manager (such as yum or aptget) needs to be configured with the web address of the software repository (or repositories) that you want to use. It can then be used to install, uninstall or update the software.
Most Linux software is configured by editing one or more text files with the required parameters, though some software may provide a GUI front-end. Updates to the Linux kernel and drivers and a distribution's software tools and applications can be obtained via the package manager.
For example, you can edit a configuration file in the unattended-packages package to allow apt to obtain different types of updates.
macOS Patch management
In MacOS, the App Store checks daily for automatic updates and releases of installed apps. If a new version is available, a notification will be shown against the App Store icon in the dock. Also when you open the App Store, it will highlight that updates are available against the Updates button in the App Store window menu bar. To update the app, run App Store and click the Updates button in the top bar of the window.
You will have a choice to either update the apps individually or update all from the button at the top. It is recommended to choose Update All so that the latest versions of your apps and updates to MacOS (not necessarily new versions) are on the Mac.
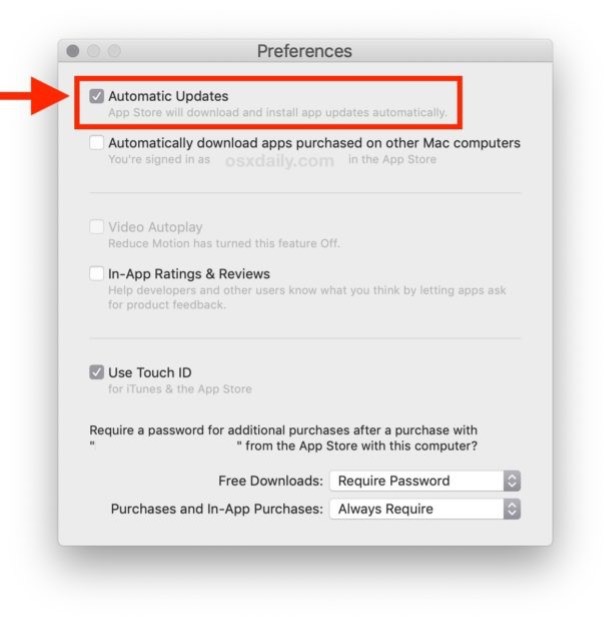
It is also possible to automatically update apps to the latest version. To do this, go to App Store→ Preferences and configure the appropriate settings.
Most apps that are downloaded and installed from a third-party developer will automatically check if updates are available each time they are run. A prompt will be displayed to update or to cancel. It's also possible to manually check for updates using the Check for Updates menu option in the app itself.
Driver and firmware updates
Windows ships with a number of core and third-party device drivers for system components and peripheral hardware.
Updates for these devices can be obtained via Windows Update, though they will be listed as optional updates and might not install automatically. You might need to use the device vendor's website to obtain a driver.
To update, you download the driver files and install them using the supplied setup program or extract them manually and save them to a local folder. You can then use the device's property dialog box in Device Manager to update the driver. You can either scan for the update automatically or point the tool to the updated version you saved locally.
Driver updates
Unlike Windows-based PCs, where desktops are made from various hardware components from different manufacturers, each requiring its own driver, Apple's integrated approach to system building means that drivers are easier to manage.
All drivers for display, network interfaces, drives, and so on, are integral to MacOS and will be updated (where necessary) either through software updates through the App Store or even new releases of MacOS itself.
Where third-party devices are installed, always make sure that the latest version of the driver is installed. Use the About button from the device's page in System Preferences to verify the current driver version.
Check the manufacturer's website to see if this is the latest version.
If installing a new driver, first remove the old driver from MacOS. You would use the Wacom Utility under Applications, then click Remove under Tablet Software to delete the driver and utilities. You may be prompted to enter an administrator password to do this.
Next, download the latest version from the manufacturer's website. This will almost certainly take the form of a .dmg disk image. Double-click the package and follow the instructions to install the driver.
Complete the process by verifying that the updated version number is shown via System Preferences.
Windows backup
The backup tool included with Windows 7 has the ability to backup selected locations. The home editions are restricted to backing up to local drives or removable media, whereas the business/Ultimate editions can backup to a network share.

MacOS backup
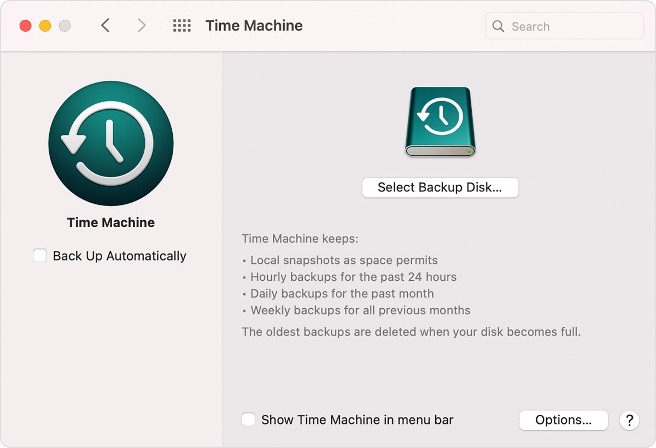
In MacOS, the Time Machine utility enables data to be backed up to an external, attached drive.
To enable Time Machine, go to System Preferences→Time Machine and slide the switch to On. Select the disk where the backups are to be stored. Under Options... it is possible to unselect certain files, folders, or even drives from a backup plan.
By default, Time Machine keeps hourly backups for the past 24 hours, daily backups for a month, and weekly backups for all previous months. When the drive used to store backups becomes full, Time Machine removes older backups to free up space.
To restore files from Time Machine, a timeline on the right-hand side of the screen will show the available backups. Using the Finder window in Time Machine, find the folder with the file (or files) that you want to restore. Then slide the timeline back to the date/time of the previous version.

Often, computer technicians spend a large percentage of their time troubleshooting the various software and hardware components used in computers, networks and printers.
Before you can even begin to troubleshoot a physical problem with a piece of hardware or diagnose an error thrown up by a software program, you need to understand the basics of troubleshooting and some best practices used.
The most elaborate toolkit and expensive diagnostic software can be useless if you do not have a consistent plan for solving problems.
Even experienced technicians can sometimes overlook obvious problems or solutions. Troubleshooting can be extremely challenging, but if you follow common best practices and basic troubleshooting procedures, you will often be able to determine the specific cause of a problem, as well as possible solutions to the problem.
Troubleshooting basics
To some extent, being an effective troubleshooter simply involves having a detailed knowledge of:
- how something is supposed to work
- the sort of things that typically go wrong.
However, the more complex a system is, the less likely it is that this sort of information will be at hand, so it is important to develop general troubleshooting skills to confidently approach new and unexpected situations.
As troubleshooting is a process of problem-solving, it is important to realise that problems have causes, symptoms and consequences.
- A computer system has a fault in the hard disk drive (cause).
- Because the disk drive is faulty, the computer is displaying a 'blue screen' (symptom).
- Because of the fault, the user cannot do any work (consequence).
From a business point of view, resolving the consequences of the problem is more important than solving the original cause and so the most effective solution might be to provide the user with another workstation and replace the drive.
It is also important to realise that the cause of a specific problem might be the symptom of a larger problem.
This is particularly true if the same problem recurs. For example, you might ask why the disk drive is faulty—is it a one-off error or are there problems in the environment, supply chain and so on?
Here are the steps in CompTIA's A+ troubleshooting model:
- Identify the problem
- Question user and identify user changes to computer
- Perform backups before making changes
- Inquire about environmental or infrastructure changes
- Review system and application logs
- Establish a theory of probable cause (question the obvious and if necessary conduct internal or external research based on symptoms)
- Test the theory to determine the cause
- Once the theory is confirmed, determine the next steps to resolve the problem
- If the theory is not confirmed, re-establish a new theory or escalate
- Establish a plan of action to resolve the problem and implement the solution
- Verify full system functionality, and if applicable, implement preventative measures
- Document findings, actions and outcomes
While applying this model, other key components of the troubleshooting process are your approach and attitude.
Troubleshooting process
The troubleshooting process has been broken down into 4 aspects. Each aspect and the explanation (included below) can be used to develop your own troubleshooting steps.
- Customer service and communication skills
- Open and closed questioning
- Developing a troubleshooting mindset
- Problem identification
Customer service and communication skills
Employers value 'soft skills', such as communicating effectively and using questioning, as highly as technical skills. Troubleshooting is one area where soft skills are vital, as a user may:
- be upset or angry—perhaps they have lost work or cannot get an expensive, new computer to work
- not be technically knowledgeable.
It is your job to calm the user and help them give you the information you need to diagnose and solve the problem. You need to ask questions that the user can answer simply, without having to know anything about the computer or its software and guide them through basic troubleshooting steps.
When speaking with a user:
- be calm and polite
- do not interrupt when the user is speaking
- do not use technical language (jargon) or abbreviations that are likely to confuse them.
Open and closed questioning
The basis of drawing troubleshooting information from users is asking good questions.
Questions are commonly divided into 2 types:
- Open questions invite someone to explain in their own words.
Examples:
'What is the problem?'
'What happens when you try to switch the computer on?'
'Were you able to complete this task before, and if so, when did you notice there was an issue?'
'What types of changes have you noticed since the last time you completed this task?' - Closed questions invite a Yes/No answer or a fixed response.
Example:
'Can you see any text on the screen?'
OR
'What does the error message say?'
Open questions are good to start with as they help avoid making assumptions about what is wrong and encourage the user to give you all the information they are able to.
However, you should not trust the user's judgement completely. The user may be inexperienced or have formed a false impression of what is going wrong.
Try to establish factual information rather than asking for the user's opinion. Closed questions can be used to 'drill down' into the nature of the problem and guide a user toward giving you useful information.
Developing a troubleshooting mindset
Troubleshooting is not just the application of technical knowledge and expertise--remember that all-important approach.
- Be calm: If you are calm, it instils confidence in the customer and prevents you from making rash decisions.
- Take breaks: Troubleshooting requires a great deal of concentration. After working on the same task, the mind can become fatigued and concentration is reduced. Consider taking breaks or leaving the problem for a while to refresh your mind.
- Challenge assumptions: A problem may be reported similar to one you have experienced before, but you should not assume that the problem is identical. Although the symptoms may be similar, the problem and its solution could be completely different. Always treat each problem as a new challenge. Be prepared to try something different. If you have decided what the problem is, but cannot seem to solve it, it may be that you are incorrect. Be prepared to start again from the beginning with an open mind.
- Assess costs and impacts: Remember, you must account for corporate policies and evaluate the impact of a problem. A particular problem might be a stimulating challenge, but if resolving it is not the highest priority in terms of business needs, you need to give up on finding The Answer and use a shortcut to get to a solution. When assessing whether to repair a part, consider the cost of the part and the cost of your time to perform the repair. In many circumstances, replacement is the most effective option.
- Know when to give up! You will not always be able to fix the problem yourself. Be prepared to pass the problem on rather than wasting the customer's time!
Problem identification
When troubleshooting, unless the problem is very simple, it is best to work methodically to ensure that you diagnose the correct problem and choose the best way to resolve it.
The traditional method for problem-solving is to find the cause of the problem and then seek to remove or resolve that cause.
Consider: If you switch your television on and the screen remains dark, you seek out the cause and remove it. Finding the actual cause may involve identifying several possible causes and then checking them out one by one to determine a probable cause.
If your television stops working, you could ask yourself:
- Is the problem with the television?
- Has the fuse blown?
- Is there a problem at the broadcasting station rather than with my television?
With all problems, we run through a list of possibilities before making a decision. The trick is to do this methodically (so that possible causes are not overlooked) and efficiently (so that the problem can be solved quickly).
Troubleshooting is not just a problem-solving process, though. It requires effective decision-making. Sometimes there is no simple solution to a problem:
- there may be several solutions and which is best might not be obvious
- an apparent solution might solve the symptoms of the problem but not the cause
- a solution might be impractical or too costly
- a solution might be the cause of further problems, which could be even worse than the original problem.

Expanding the 8 troubleshooting steps
- Perform backups
Consider the importance of data stored on the local computer when performing troubleshooting or maintenance. Check when a backup was last made. If a backup has not been made, perform one before changing the system configuration, if at all possible. The simplest way of making a backup before troubleshooting is to use drive imaging software. - Question the user
The first report of a problem will typically come from a user or another technician, and they will be one of the best sources of information if you can ask the right questions. Before you begin examining settings in Windows or taking the PC apart, spend some time gathering as much information as you can about the problem. Ensure you ask the user to describe all of the circumstances.
Good questions to ask include: 'What are the exact error messages appearing on the screen or coming from the speaker?' (Remember that the error could reveal a symptom, not a cause.)
'Has anyone else experienced the same problem?'
'How long has the problem been occurring?'
'What changes have been made recently to the system? Were these changes initiated by you, or via another support request?'
'Has anything been tried to solve the problem?' - Sources of information
Of course, you cannot always rely on the user to let you know everything that has happened. To diagnose a problem, you may also need to use the following techniques:- Make a physical inspection—look and listen. You may be able to see or hear a fault (scorched motherboard, 'sick-sounding' disk drive, no fan noise and so on).
Some problems are intermittent, though, which means that they cannot be repeated reliably. Issues that are transitory or difficult to reproduce are often the hardest to troubleshoot.- Check system and application logs or diagnostic software for information.
- Check the system documentation, such as installation or maintenance logs, for useful information.
- Consult any other technicians that might have worked on the system recently or might be working at the moment on some related issue.
- Researching the problem
One of the most useful troubleshooting skills is being able to do research; to find information quickly. Learn to use web and database search tools so that you can locate information that is relevant and useful.
Identify different knowledge sources available to you.
Consider both internally available documentation and problem logs and external support resources, such as vendor support or forums. - Re-establishing a new theory
If your theory is not proven by the tests you make or the research you undertake, you must establish a new theory. If one does not suggest itself from what you have discovered so far, there may be more lengthy procedures you can use to diagnose a cause—remember to assess business needs before embarking on very lengthy and possibly disruptive tests. Is there a simpler workaround that you are overlooking? If a problem is particularly intractable, you can do the reverse of the above process and take the system down to its base configuration (the minimum needed to run). When (if) this is working, you can add peripherals and devices or software subsystems one-by-one, testing after each, until the problem is eventually located.
This is time-consuming but may be necessary if nothing else is providing a solution. - Problem escalation
Be aware that you may not have all the answers all the time. Consider consulting your colleagues, internet discussion groups, or manufacturer help lines. This will not only help you to solve the problem more quickly or identify a better solution than you had considered yourself, but will also increase your knowledge and experience. If you cannot solve a problem yourself, it is better to escalate it than to waste a lot of time trying to come up with an answer.
Formal escalation routes depend on the type of support service you are operating and the terms of any warranties or service contracts that apply. Some obvious escalation routes include:- senior staff, knowledge experts, subject matter experts, technical staff, developers, programmers, administrators within your company
- suppliers and manufacturers—warranty and support contracts and helplines or web contact portals
- other support contractors/consultants, websites and social media.
You should be guided by policies and practices in the company you work for. When you escalate a problem, make sure that what you have found out or attempted so far is documented.
Failing that, describe the problem clearly to whoever is taking over or providing you with assistance.
If you are completing troubleshooting steps under instruction from another technician—the vendor's support service, for instance—make sure you properly understand the steps you are being asked to take, especially if it requires disassembly of a component or reconfiguration of software that you are not familiar with. - Solution implementation and testing
If you have established and tested a theory of cause, it should be apparent what steps are required to resolve the issue.
There are typically 3 solutions to an IT problem:- Repair—you need to determine whether the repair cost makes this the best option.
- Replace—often more expensive and maybe time-consuming if a part is not available. There may also be an opportunity to upgrade the part or software.
- Workaround—as any software developer will tell you, not all problems are critical.
You have to assess the cost and time required when you consider solutions. Another consideration involves the potential effects on the rest of the system that your plan of action may have and whether you have the authorisation to proceed. A typical example is applying a software patch, which might fix a given problem but cause other programs not to work. This is where an effective change and configuration management system comes into play. It should help you understand how different systems are interconnected and cause you to seek the proper authorisation for your plan. - Implement the solution
If you do not have authorisation to implement a solution, you will need to escalate the problem to more senior personnel. If applying the solution is disruptive to the wider network or business, you also need to consider the most appropriate time to schedule the reconfiguration work and plan how to notify other network users.
When you make a change to the system as part of implementing a solution, test after each change. If the change does not fix the problem, reverse it and then try something else.
If you make a series of changes without recording what you have done, you could find yourself in a tricky position.
View the following video for more troubleshooting tips.