In order to complete PC support tasks without damaging the equipment you are servicing or causing physical injury, there are several tools to use and operational procedures to follow to get the job done quickly, safely and correctly.
Local government regulations
When performing PC maintenance work, you may need to take account of compliance with government regulations.
Regulations that typically affect PC maintenance or the installation of new equipment are:
- Health and safety laws: Keeping the workplace free from hazards.
- Building codes: Ensuring that fire prevention and electrical systems are intact and safe.
- Environmental regulations: Disposing of waste correctly.
For example:
New Zealand's WorkSafe (Mahi Haumaru Aotearoa) provides laws and when installing computers and working with electrical components, you must follow the Electrical codes of practice standards.
While specific regulations may vary from country to country and state to state, employers are generally responsible for providing a safe and healthy working environment for their employees.
Employees have a responsibility to:
- use equipment in the workplace in accordance with the guidelines given to them
- report any hazards.
Employees should not:
- interfere with any safety systems, including signs, warnings or devices (such as firefighting equipment)
- introduce or install devices, equipment or materials to the workplace without authorisation or assessing the installation.
Safety procedures
A company's health and safety procedures should be set out in a handbook--possibly part of an employee's induction handbook.
Health and safety procedures should:
- identify what to do in the event of a fire or other emergency
- identify responsible persons (e.g. for overall health and safety, nominated first aiders, fire marshals and so on)
- identify hazardous areas in the workspace and precautions to take when entering them
- describe best practices for the use and care of the workspace and equipment within it
- establish an incident reporting procedure for detecting and eliminating workplace hazards and accidents.
General emergency procedures
Below is an example of a general procedure for emergencies.
- Raise the alarm and contact the emergency services, giving them a description of the emergency and your location.
- If possible, make the scene safe (e.g. if you are faced with a fire, establish that you have an escape route, or if faced with electrical shock, disconnect the power--if it is safe for you to do so).
- If you have the training and it is safe to do so, do what you can to tackle the emergency (e.g. give first aid or use firefighting equipment).
Of course, circumstances might dictate that you do something differently.
It is vital that you keep calm and do not act rashly.
Electrical hazards
The most prevalent physical hazards that computer technicians face are electrical hazards. Electricity is necessary to run a computer, but it can also damage sensitive computer equipment and, in some cases, pose a danger to humans.
Following established best practices for promoting electrical safety will protect the computer equipment you work on, your safety and the safety of others.
Electrical equipment can give an electric shock if it is broken, faulty or installed incorrectly. It is important to test electrical devices regularly. The frequency will depend on the environment in which the device is used. In some countries, Portable Appliance Testing (PAT) carried out by a qualified electrician or technician ensures that a device is safe to use.
Electrical currents can pass through metal and most liquids, so neither should be allowed to contact any electrical device installations. Damaged components or cables are also at risk and should be replaced or isolated immediately.
The human body is an electrical conductor and a resistor, so a current will pass through it and make it heat up, manifesting as a burn if the current is strong enough. A current can interfere with the body's nervous system, which also uses electrical signals.
This might manifest as spasms or paralysis or, in a severe case, cause a heart attack.
Collateral injuries occur when involuntary muscle contractions caused by the shock cause the body to fall or come in contact with sharp edges or electrically live parts.
Electricity can hurt you even if you are careful and avoid becoming part of an electrical ground circuit. The heat generated by an electric arc or electrical equipment can burn your skin or set your clothes on fire.
Note: High voltages (over about 30V) are more dangerous because they have the power to push more current through you (skin's resistance drops at higher voltages), but it is the current that causes the actual damage. This is why static electricity is not dangerous to you, despite the high voltages. More current will flow if a larger area of your body is exposed.
Fuses
An electrical device must be fitted with a fuse appropriate to its power output. A fuse 'blows' if there is a problem with the electrical supply, breaking the circuit to the power source.
Fuses come in different ratings, such as 3A, 5A, and 13A. A device's instructions will indicate the fuse rating to use, but most computer equipment is rated at 3A or 5A. If the fuse fitted is rated too low, it will blow too easily; if the rating is too high, it may not blow when it should (it will allow too much current to pass through the device).
If multiple devices need to be attached to a single power point, a power strip of sockets should be used. If too many devices are attached to a single point, there is a risk they will overheat and cause a fire. 'Daisy-chaining' one power strip to another is dangerous. The total amperage of devices connected to the strip must not exceed the strip's maximum load (typically 12 Amps).
Electrical grounding
Electrical equipment must also be grounded (or earthed). If a fault causes metal parts in the equipment to become 'live', a ground provides a path of least resistance for the electrical current to flow away harmlessly. Most computer products (PCs, printers and so on) are connected to the building ground via the power plug.
However, the large metal equipment racks often used to house servers and network equipment must also be grounded. Do not disconnect the ground wire. If it has to be removed, make sure a competent electrician replaces it.

High voltage device safety
Most of the internal circuitry in a computer is low voltage (12 V or less) and low current, so there is not much of a threat to your safety. However, there are exceptions to this, which can be very dangerous. Power supplies, CRT monitors, the inverter card in an LCD's fluorescent backlight and laser printers can carry dangerously high levels of voltage.
Charges held in capacitors can persist for hours after turning off the power supply. You should not open these units unless you have been specifically trained to do so. Adhere to all printed warnings and never remove or break open any safety devices that carry such a warning.
Electrical safety
Follow these guidelines to work safely with electrical systems:
- do not work on electrical systems unless you understand the risks and appropriate safety procedures
- do not attempt repair work when you are tired--you may make careless mistakes and your primary diagnostic tool, deductive reasoning, will not be operating at full capacity
- do not assume anything without checking it out for yourself (e.g. a ground wire might have been disconnected or never properly installed)
- disconnect the power to a circuit if you must handle it
- hold down the power button on the device to ensure the circuits are drained of residual power
- test live parts with a multimeter to ensure no voltage is present
- always use properly insulated tools and never grip a tool by its metal parts
- take care not to touch any part of a circuit with both hands to reduce the risk of a serious shock--this is called the 'hand in pocket' rule (it reduces the chance that the current will pass through your chest and cause a heart attack)
- make sure your hands and the surrounding area are dry--sweat can make your hands more conductive
- do not leave any spill hazards in the vicinity and ensure you are not standing on a wet floor
- do not wear jewellery, a wristwatch, or other items such as name badges that may dangle from your neck or wrist, as they can cause a short circuit or become trapped by moving parts.
Toxic waste handling
Computer equipment conditions can be an issue when many airborne particles are flowing in and around various devices.
Contaminants can be gaseous--such as ozone, particles, dust or organics, from industrial processing of fossil fuels or plastics. There is also a risk of poisonous or corrosive chemicals leaking from faulty equipment.
Special care must be taken in respect of the following device types.
CRT monitors
A cathode ray tube (CRT) is an older computer monitor. These are very heavy and bulky and contain substantial amounts of hazardous materials; notably, lead. They also contain a glass vacuum tube and high-voltage capacitors. While the tube is designed to be shatter-resistant, it is still potentially very hazardous if dropped. The capacitors represent a high risk of electric shock.
Batteries
Swollen or leaking batteries from laptops or cell phones and tablets must be handled very carefully and stored within appropriate containers. Use gloves and safety goggles to minimise any risk of burns from corrosive material.
Electronic devices (PCs, cell phones and tablets)
Many electronic devices contain toxins and heavy metals (such as lead, mercury, and arsenic).
These toxins may be present in batteries, circuit boards and plastics used in the case and are not only harmful to human health if ingested, but they also damage the environment. This means that you must not dispose of electronic devices as general waste in landfills or incinerators. If an electronic device cannot be donated for reuse, it must be disposed of through approved waste management and recycling facility.
Toner kits and cartridges
Photocopier and laser printer toner is an extremely fine powder. The products in toner powder are not classed as hazardous to health, but any dust in substantial concentration is a nuisance as it may cause respiratory tract irritation.
ESD
Static electricity is a high voltage (potential difference) stored in an insulated body. Electrostatic discharge (ESD) occurs when a path allows electrons to rush from a statically charged body to another with an unequal charge. The electricity is released with a spark. The charge follows the path of least resistance so that it can occur between an electrical ground (such as a doorknob or a computer chassis) and a charged body (such as a human hand).
Although the voltage is high, the amount of ESD current sustained is very low, so static electricity is not that harmful. It can, however, be slightly painful. You might have felt a small shock when reaching for a metal door handle, for instance.
- You can feel a discharge of over about 2500V.
- A discharge of 20,000V or more could produce a visible spark.
Walking over an untreated carpet in dry conditions could create a charge of around 35,000V.
The human body is mostly water and does not generate or store static electricity very well. Unfortunately, our clothes are often made of synthetic materials (such as nylon and polyester) which act as good static electricity generators and provide insulating layers that allow charges to accumulate.
Humidity and climate also affect the likelihood of ESD. The risk increases during dry, cool conditions when humidity is low.
In humid conditions, such as before or during a storm, the residual charge can bleed into the environment before it can increase sufficiently to be harmful to electrical components.
An electronic component, such as a memory or logic chip, is composed of fine, conductive metal oxides deposited on a small piece of silicon. Its dimensions are measured in fractions of a micron (one-millionth of a metre). Any static electricity discharged into this structure will flash over (spark) between the conductive tracks, damaging or vaporising them. A transistor designed to work with 1-3V can be damaged by a charge of under 100V, though most ESD protection circuits improve this tolerance.
A static discharge may make a chip completely unusable. If not, it is likely to fail at some later time. Damage occurring in this way can be hidden for many months and might only manifest in occasional failures.
Component handling
By eliminating unnecessary activities that create static charges and removing unnecessary materials known as charge generators, you can protect against ESD-related damage and injuries.
There are several other prevention techniques that you can use to protect yourself and equipment when you are working with computer components.
- Self-grounding, or manual dissipation of static build-up by touching a grounded object before touching any electronic equipment. You can accomplish this by touching an unpainted part of a metal computer chassis or another component.
- Using an anti-ESD wrist strap or leg strap can dissipate static charges more effectively than self-grounding. The band should fit snugly around your wrist or ankle to maximise contact with the skin. Do not wear it over the clothing--the strap ground is made using a grounding plug that plugs into a wall socket or a crocodile clip that attaches to a grounded point or an unpainted part of the computer's metal chassis.
- An anti-ESD service mat is also useful. Sensitive components can be placed on the mat safely. The mats contain a snap connected to the wrist or leg strap. If the technician's clothing can produce static charges, an ESD smock, which covers from the waist up, can be helpful.
Electronic components, assemblies and spare parts (known as field replaceable units (FRUs)) are often shipped in anti-static bags to protect them from ESD damage.
Anti-static bag types
Anti-static packaging includes either anti-ESD shielding or dissipative material.
- Anti-ESD Shielding: this packaging reduces the risk of ESD because it is coated with a conductive material (such as a nickel compound). This material prevents static electricity from discharging through the inside of the bag. These bags are usually a shiny grey metallic colour. To protect the contents of the bag fully, you should seal it, or at least fold the top over and seal that down.
- Dissipative Packaging: this light pink or blue packaging reduces the build-up of static in the general vicinity of the contents by being slightly more conductive than normal. A plastic bag or foam packaging may be sprayed with an anti-static coating or have anti-static materials added to the plastic compound. This is used for packaging non-static-sensitive components packed in proximity to static-sensitive components.
Answer the following question:
What should Alex use?
The scenario:
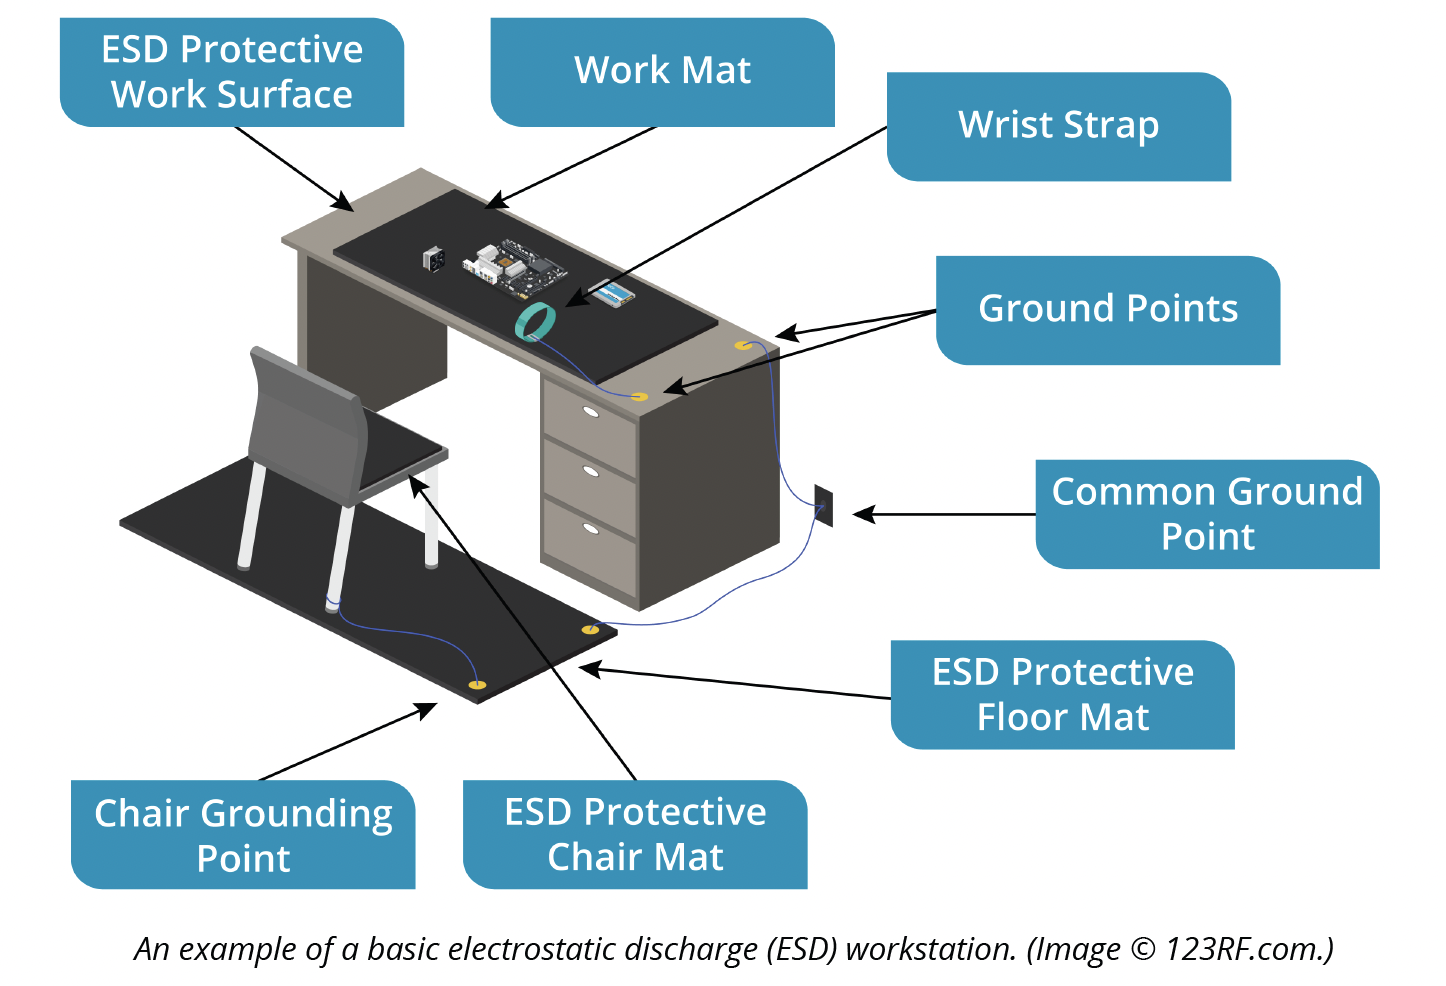
Alex and Ngaire are thinking of sharing the cost of setting up a safe workspace to practice computer assembly and disassembly.
While Alex is looking at the availability of used computers on the internet, Ngaire is looking at the cost and availability of setting up a workstation like the earlier image.
Can you assist Ngaire in putting together a quotation that lists an estimated price for a starter kit to set up a safe workspace?
Share, discuss, and compare your findings on the forum with your peers.
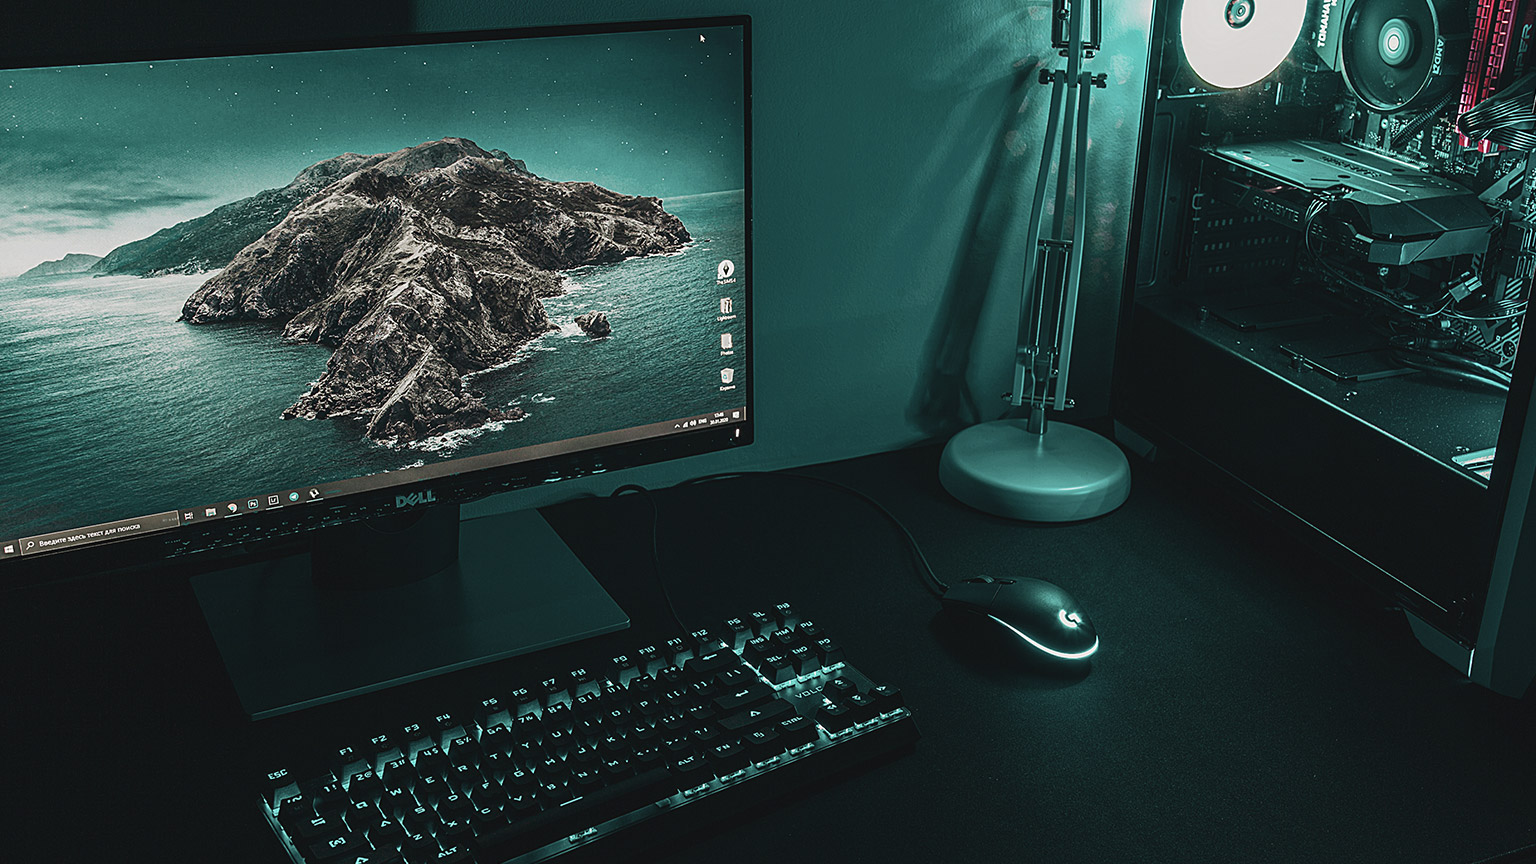
Much of the work you will perform as a PC technician will involve installing and configuring various hardware and software components. As an IT professional, you will often find yourself setting up end-user workstations or helping those users with the hardware they need to make their daily lives easier.
Installing and configuring peripheral components—like a keyboard and mouse, or even more specialised devices—are some of the more common tasks that you will perform.
Input devices
Input devices—or Human Interface Devices (HIDs)—are peripherals that enable the user to enter data and select commands.
Computers need user input such as directions or commands and user interaction with the programs that are included in order to produce something of use. Keyboards and pointing devices are the standard input devices for personal computers and there is an ever-growing number of input devices available for the user to interact within a variety of ways.
As well as command input, security systems often require different ways for users to input credentials to access an account or authorise a payment.
Keyboards
The keyboard is the longest-serving type of input device. Historically, keyboards were connected via the 6-pin mini-DIN PS/2 port. (This is coloured purple to differentiate it from the identical form factor mouse connector.) All keyboards are now USB or wireless (typically Bluetooth), though.
Extended PC keyboards feature several special command keys (Alt and Ctrl plus keys such as Print Screen, NumLock, Scroll Lock, Start, Shortcut and Function). A numeric keypad can allow faster entry of numeric data or as an additional set of arrow keys (the function is toggled by NumLock). Multimedia keyboards may also feature programmable keys and buttons that can be used for web browsing, playing CDs/DVDs and so on.

When selecting a keyboard for a user, in addition to considering its ergonomics, you should also consider whether the keyboard offers additional features (such as customisable hotkeys and scrolling) as well as wireless connectivity.
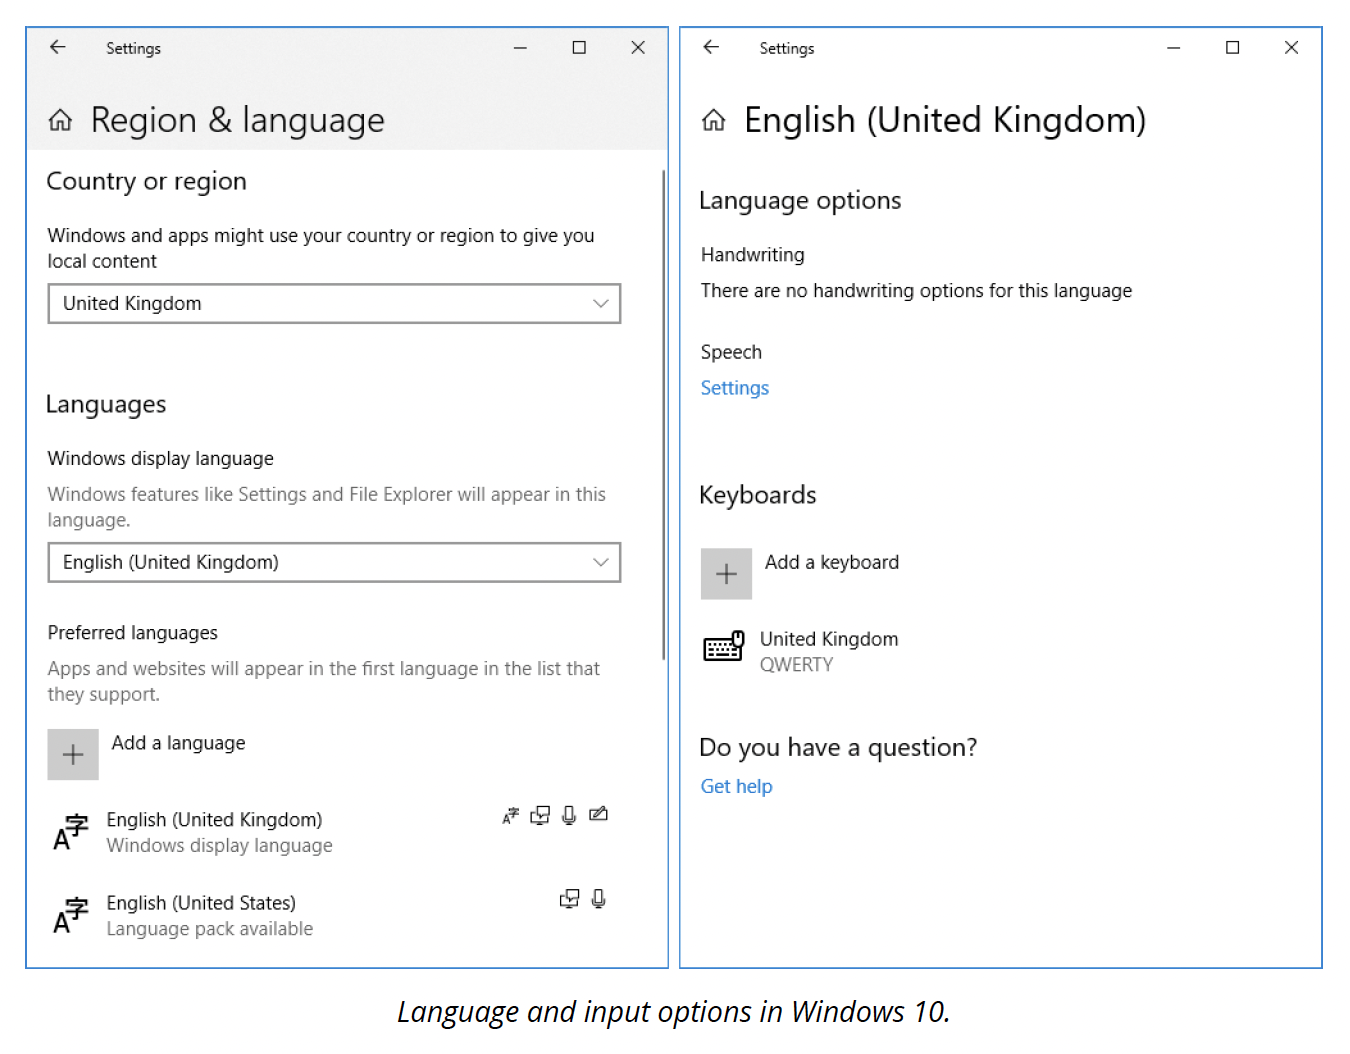
Most keyboards designed for use with Latin scripts use the QWERTY key layout. There are different layouts, though, such as the small differences between US and UK layouts, the Dvorak alternative layout for Latin script, and keyboards for different scripts, such as Cyrillic.
The keyboard type must be set correctly in the OS. In Windows, the type of keyboard layout is configured through the Language applet in Control Panel/Settings so that the computer knows which symbol to use when a particular key or key combination is pressed.
Pointing devices
While a keyboard can be used to navigate a window (using Tab and arrow keys, for instance), most operating systems are designed to be used with some pointing device. A pointing device is usually used to move a cursor to select and manipulate objects on the screen.
Mouse
The mouse is the main type of pointing device for graphical software, using the same interfaces as keyboards (the PS/2 port for a mouse is colour-coded green, though).
There are 3 main types:
- Mechanical mouse: this contains rollers to detect the movement of a ball housed within the mouse case. As the user moves the mouse on a mat or other firm surface, the ball is moved and the rollers and circuitry translate that motion to move a cursor on the screen. Mechanical mice are no longer in production.
- Optical mouse: this uses LEDs to detect movement over a surface.
- Laser mouse: this uses an infrared laser, which gives greater precision than an optical mouse. This can be customised to different functions, and the presence of a scroll wheel is used (obviously) for scrolling and as an extra clickable button.
A mouse can also be distinguished by size and shape (e.g. a smaller mouse is useful with portable systems; while some are marketed based on their ergonomic shape).

Touchpad
A 'touchpad' is a small, touch-sensitive pad. The user moves their fingertip across the surface, sending electronic signals to the computer to control the pointer on the screen.
They can also have buttons like a mouse or trackball, or can be configured to detect finger taps on its surface and process those signals like button clicks.
Touchpads are most closely associated with laptop computers, but it is possible to use them as peripheral devices with PCs, too. An external touchpad is connected using USB or Bluetooth.
Guidelines for installing internal components
Follow these guidelines for working with peripheral devices.
Installing Internal components
Here are some guidelines for you to consider when you are adding or removing peripheral devices.
- Always read the manufacturer's instructions and check that the device is compatible with the PC and operating system.
- Hold the connector, not the cable, when removing a lead.
- Inspect the connector and port for damage (notably broken or bent pins) before attaching a lead.
- Take care to align the connector carefully and not use excessive force (to avoid damaging the pins).
- Check whether the device requires an external power source.
PC and laptop build considerations
In this section of the course, we will be going through build considerations, including:
- Step 1: Plan and organise your work
- Step 2: PC case and examine the system
- Step 3: Remove expansion cards
- Step 4: Remove motherboard, PSU and drives
- Step 5: Put a computer back together
- Special considerations supporting laptops.
General tools:
- Tool kit containing various screwdrivers
- Pillbox or plastic bag or cup to hold system screws
- Screw grabber
- Assorted soft paintbrushes and wiping cloth
- Note pad and pen.
Anti-static precautions:
- Anti-static strap
- Anti-static mat
- Anti-static bags.

Step 1: Plan and organise your work
- Make notes for backtracking.
- Remove loose jewellery that might get caught.
- Stay organised by keeping small parts in one place.
- Do not stack boards on top of each other.
- Do not touch board chips:
- with hands, magnetised screwdriver
- fingerprints on edge connectors may later cause corrosion.
Step 2: PC case and examine the system
- Backup important data.
- Power down the system and unplug it.
- Unplug other peripherals as well.
- Press and hold the power button for 3 seconds (this will drain the power supply).
- Have a Pill Box, plastic bag or cup handy to hold screws.
- Open the case cover
- Many cases require you to remove the faceplate first
- Some older cases require you to remove a side panel.
- Place the computer on top of the anti-static mat.
- Clip your ESD strap to the side of the computer case
- If you do not have an ESD strap, then touch the case (do this every time you move from the computer).
- After opening, you will see the main components:
- Power supply
- Motherboard
- Drives.
- Follow cables from the motherboard to the component to know the purpose of each cable.
Step 3: Remove expansion cards
To remove expansion cards:
- Remove any wire or cable connected to the card
- Remove the screw holding the card to the case
- Grasp the card with both hands and remove it by lifting it straight up (can also rock the card from end to end)
- Don't put your fingers on edge connectors or touch a chip
- It is best to store cards in an anti-static bag or on an anti-static mat ensuring distance from other components cards etc.
Step 4: Remove Motherboard, PSU and Drives
You may have to remove the drives and/or power supply to get to the motherboard, depending on the system.
To remove motherboard:
- Unplug power supply lines
- Unplug SATA cables connected to the motherboard
- Disconnect wires leading from the front of the computer case to the motherboard (called front panel connectors)
- Make a diagram before disconnecting.
To remove the power supply from the case:
- Look for screws that attach the power supply to the computer case
- Do not remove screws that hold power supply housing together (do take the housing apart)
- Sometimes power supplies are also attached to the case on the underside by recessed slots
- Turn the case over and look for slots
- If present, determine in which direction you need to slide the power supply to free it from the case.
Tips to remove drives:
- Look for screws on each side of the drive attaching the drive to the drive bay
- There might be a catch underneath the drive
- You must lift as you slide the drive forward
- Some drive bays have a clipping mechanism to hold the drive in the bay
- Release the clip and then pull the drive forward
- You may have to remove the drive bay to remove the drives.
Step 5: Put a computer back together
Connect the power cords from the power supply to the motherboard.
- You will always need the main P1 power connector and may likely need the 4-pin auxiliary connector for the processor.
- A board might have a 6-pin or 8-pin PCIe power connector
- If the power supply does not have this connector, use an adapter to convert 2 Molex connectors to a PCIe connector
- If the case fan is present, connect the power cord from the fan to pins on the motherboard labelled 'Fan Header'.
- If a CPU and cooler are already installed on the motherboard, connect the power cord from the CPU to pins on the motherboard labelled 'Fan Header'.
- Connect wire leads from the front panel of the case to the front panel header on the motherboard.
- Look for a small triangle embedded on the connector that marks one of the outside wires as pin 1.
- Line up pin 1 on connector with pin 1 marked on the motherboard.
- If labels on the motherboard are not clear, consult the user guide for help.
- Connect wires to ports on the front panel of the case (audio ports or USB ports are examples).
- Install the video card and other expansion cards.
- Double-check each connection.
- Plug in keyboard, monitor and mouse.
- Turn on the power and check that the PC is working properly (if not, there is most likely a loose connection).
Special considerations supporting laptops
Laptops and their replacement parts cost more than desktop PCs.
Factors to consider that apply more to a laptop than desktop computers include:
- original equipment manufacturer's warranty
- service manuals and diagnostic software provided by the manufacturer
- customised installation of the OS unique to laptops
- advantage of ordering replacement parts directly from the laptop manufacturer or authorised source
- it may become necessary to open a laptop case to upgrade memory, exchange a hard drive or replace a failed component
- replacing a broken LCD panel or motherboard can be a complex process
- screws and nuts on a laptop are smaller than a desktop, requiring smaller tools.
Work methodically:
- Keep screws and components organised
- Place screws in a pillbox, bag or cup (label each compartment or each type of screw in a separate container)
- Keep notes to help with reassembly.
Disassembly tips:
- Find the hardware service manual
- Consider the warranty might still apply
- Opening the case might void the warranty
- Take the time necessary, do not force anything
- Protect against ESD
- Plastic screws may be used only once
- Disassemble components in order.
Reassembly tips:
- Reassemble laptop in reverse order
- Tighten, but do not over-tighten, all screws
- Before installing the battery or AC adapter, verify there are no loose parts inside the laptop.

'Multimedia' refers to devices used to play and record audio and video from different inputs and outputs. You will need to support a wide range of multimedia devices (including speakers, microphones, headsets and cameras).
Audio subsystems
A computer's audio subsystem is made up of a sound card (to process audio signals and provide interfaces for connecting equipment) and one or more input (microphone) and output (speaker) devices.
Sound cards
The basis of a sound (or audio) card is the Digital Signal Processor (DSP) chip, which contains one or more Digital-to-Analog Converters (DACs). DACs convert the digital signals generated by the CPU to an analog electrical signal that can drive the speakers.
The DSP also provides playing digital sound (synthesis) and driving MIDI-compatible devices. The audio playback quality is determined by the card's frequency response, which is the volume produced at different frequencies.
A basic sound chip may be provided as part of the motherboard chipset. Still, better quality audio functions can be provided as a PCI or PCIe expansion card or as an external adapter connected by USB.
Pro-level cards may also feature onboard memory, flash memory storing sound samples (wavetables) and multiple jacks for different input sources.
As with graphics cards, sound cards are designed to support sound APIs. Cards designed for use with Windows should support Microsoft's DirectSound3D (part of DirectX). Cards designed for use with games should also support Open AL and EAX, which provide extensions to DS3D for special sound effects.
Creative, Terratec, RealTek and Turtle Beach are the most notable vendors of consumer sound cards; while M-Audio, RME and Apogee are noted for their professional-level cards.
Audio connectors
Most audio connectors are 3.5 mm (⅛ inch) mono or stereo jacks (also referred to as 'phone plugs' or 'mini TRS [Tip, Ring, Sleeve] connectors'). A standard sound card will have several of these for different equipment.
| Jack | Use | Description |
|---|---|---|
| Audio in (light blue) | Audio in (or line-in) is a low-level (1V) stereo signal as supplied by most tape decks, video players, tuners, CD players and so on. | |
| Microphone input (pink) | This is generally a mono-only analog input. | |
| Audio out (lime) | Audio out (or line out) is a low-level (1V) analog stereo signal suitable for feeding into amplified speakers or headphones. | |
| Audio out (black) | Carries the signal for rear speakers in a surround sound system. | |
| Audio out (orange) | Carries the signal for the subwoofer in a surround sound system. | |
| Sony/Philips Digital Interface (S/PDIF) jack | Used for higher-end sound systems. S/PDIF can either use coax cabling with RCA (or phono) connectors or fibre optic cabling and connectors, which can either be in a square form factor (TOSLINK) or use 3.5mm jacks. S/PDIF is most often used to carry digital data for surround sound speaker systems. |
Audio output devices
Audio playback is achieved via speakers or headphones which are connected to the sound card via an analog or digital audio jack. Both analog and digital speakers are available (or speakers may support both analog and digital inputs).
Sound cards supporting multiple output channels with an appropriate speaker system can provide various playback levels, from mono (on legacy systems) or stereo to some type of surround sound.
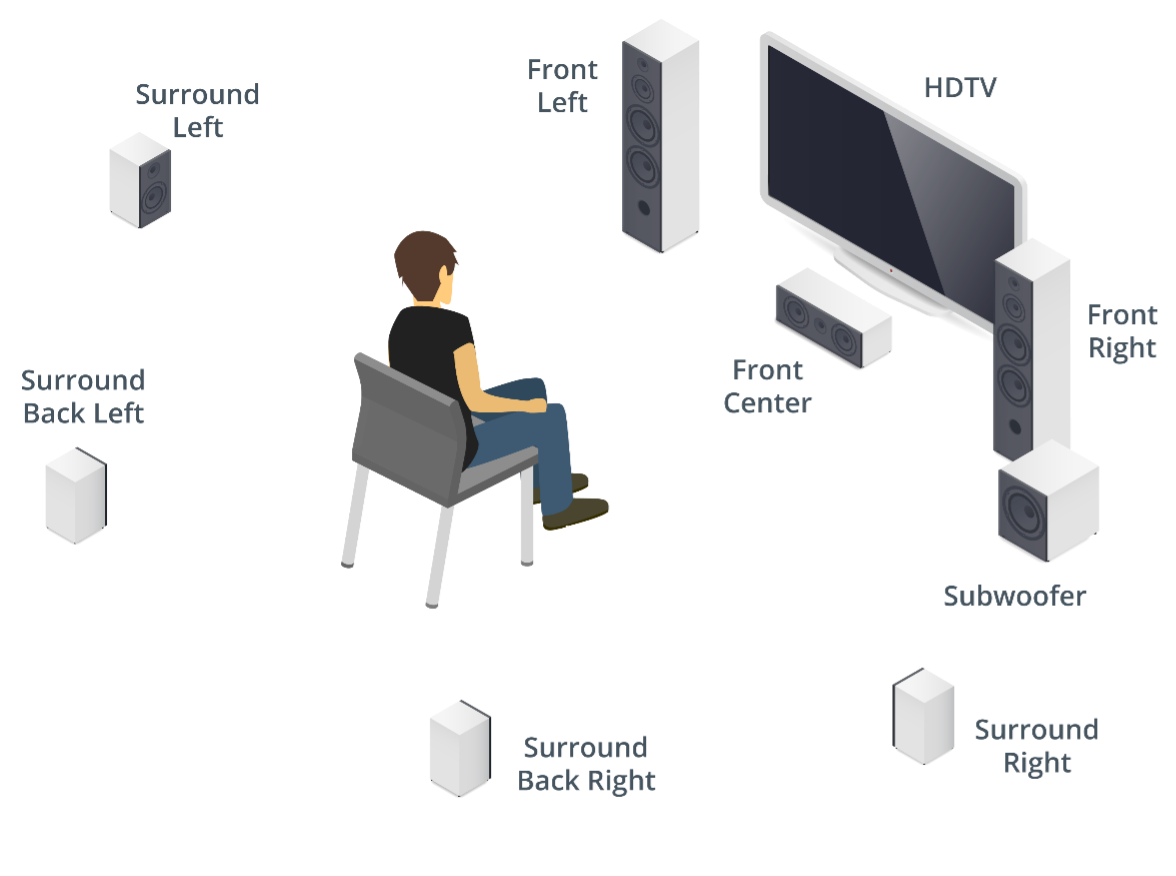
Surround sound uses multiple speakers positioned around the listener to provide a 'cinematic' audio experience.
- A 5.1 digital system (Dolby Digital or Digital Theater System [DTS]) has 3 front centre, left and right speakers; 2 left and right rear speakers; and a subwoofer for bass sounds.
- A 7.1 system (Dolby Digital Plus or DTS-HD) has 2 extra side speakers. A speaker the system will usually have controls for adjusting volume, bass and treble plus optionally EQ or preset sound effects.
Note: A sound card will also feature internal channels (or voices). These represent the number of sounds the card can play and mix at once (polyphony). This is important for music recording and working with sound effects used by some games.
Most graphics adapters support audio over HDMI (or Thunderbolt), allowing surround sound output without a separate connection to a sound card. An HDMI cable would be connected from the graphics adapter port to the television and then the television would be connected to the surround sound speaker system (see below).
Midi equipment
As well as playing sound via speakers, a card supporting Musical Instrument Digital Interface (MIDI) functions can be used to control MIDI equipment (such as a synthesiser or drum machine).
Instead of exchanging the sound wave, the devices exchange information about how to play a sound in terms of the sample (a sound pattern stored in a wavetable), volume, pitch, tempo and so on.
For example, you could use a keyboard to play with samples stored on the PC or use sequencing software to program a drum machine.
MIDI devices use 5-pin DIN connectors or USB connectors.
Sound recording equipment
The sound card must sample the wave to record an analog sound wave.
The sampler divides the wave up into several slices per second (sampling rate) and records information about each slice (resolution). The higher the sampling rate (measured in Kilohertz [KHz]) and resolution (measured in bits), the better the representation of the source is.
CD-quality audio is sampled at 16-bit/44.1 kHz, but professional cards may sample at 24-bit/192 KHz or better.
The card's circuitry and cabling introduce noise or distortion into the sampled audio. Noise levels are measured using Total Harmonic Distortion (THD) and Signal-to-Noise Ratio (SNR).
THD is measured as a percentage and SNR in decibels (dB). For both, smaller values represent better performance.
Headset
A 'headset' combines headphones and a microphone in a single device--and are mostly used with Voice over IP (VoIP) calling, meeting and conferencing applications.
Most headsets are connected to the computer via a USB port or a wireless interface (such as Bluetooth®).
Audio settings
Connect the microphone, headset or speakers to the appropriate ports on the card or motherboard to set up the audio subsystem.
Use the Sound applet in Control Panel or Windows Settings to test the hardware and configure settings.
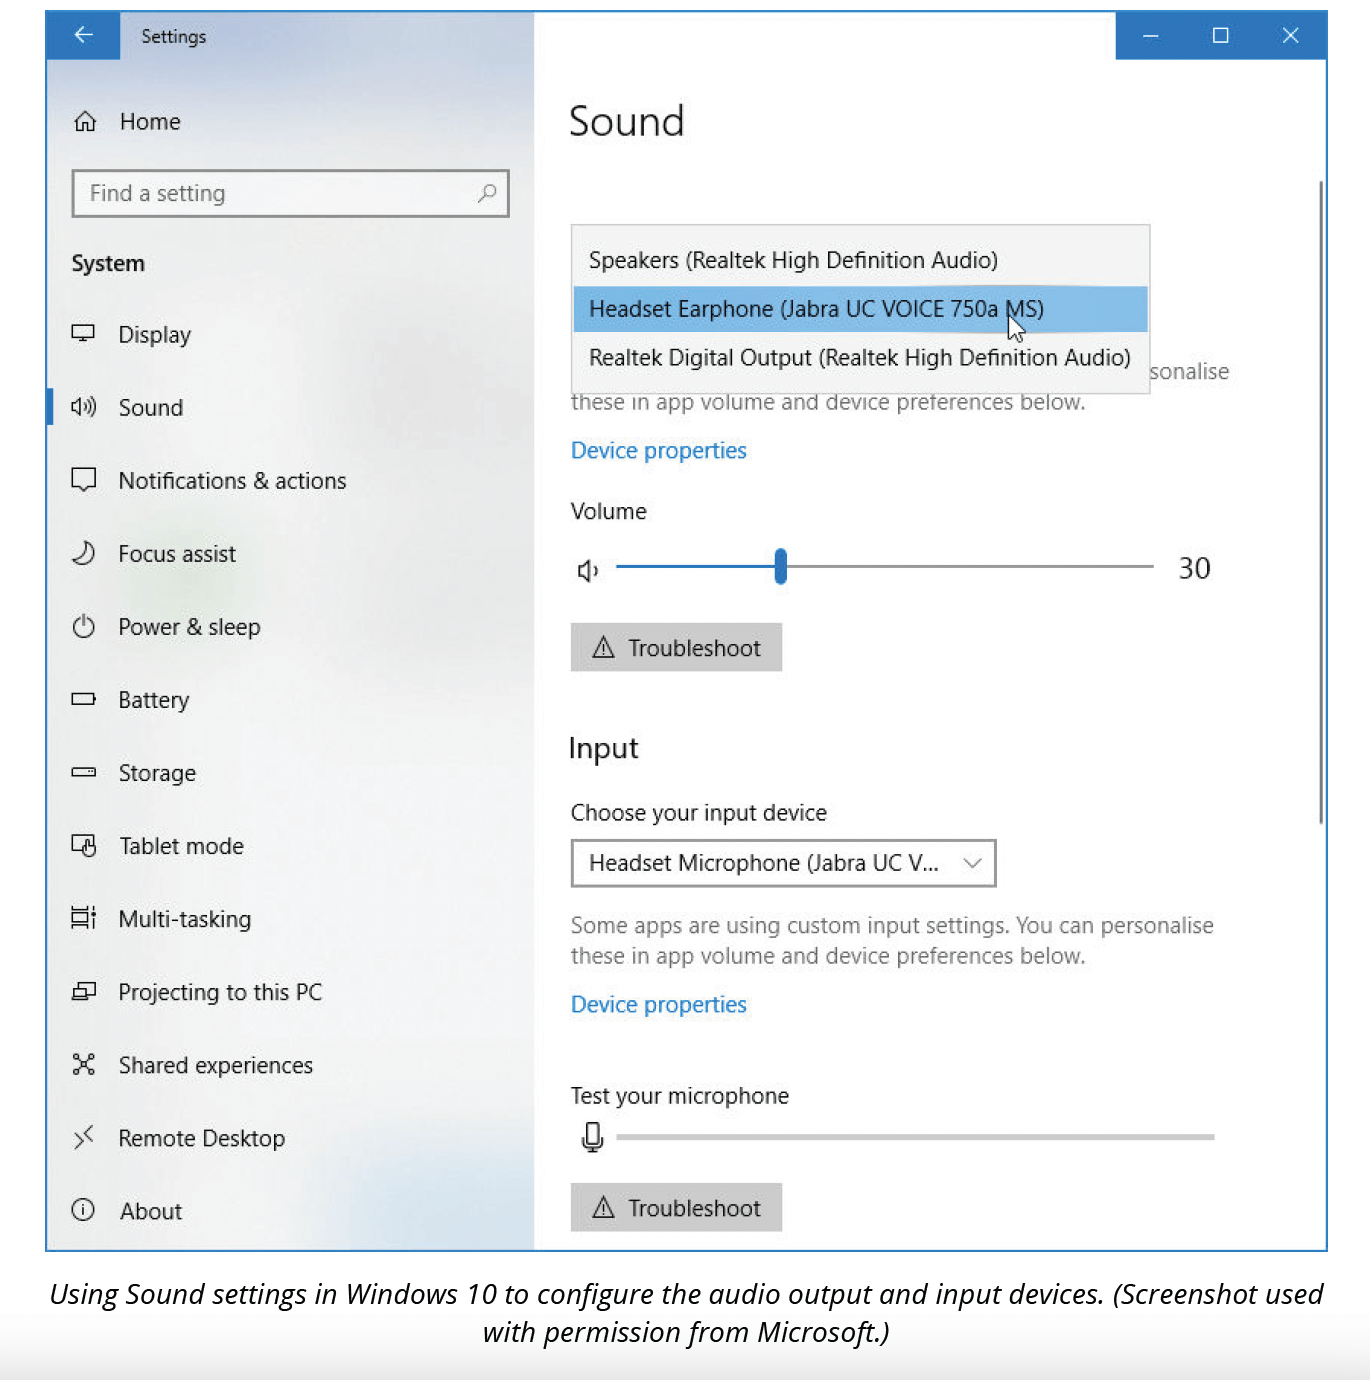
If you have multiple devices connected simultaneously, you can choose the defaults here and test levels for audio input and output.
However, if you have a multimedia keyboard, there are usually keys for adjusting the volume. Also, laptops have push buttons and special function (Fn) keys to adjust the volume.
In Windows, use the Speakers icon in the Notification Area to control the volume and switch between playback devices.
Troubleshooting flow charts provide a visual representation of the steps required to solve a problem. Troubleshooting must be conducted in a systematic way, and the flow chart breaks the process down into a sequence of decisions. At each step, the user is presented with a yes/no question. Answering yes or no leads them to another question, a resolution or a return to an earlier step. An example is shown below.