In this topic, we will look into:
- User and network management model
- Network resource sharing
- NTFS
- Mail servers.
Managing users and sharing resources might not be a priority when working independently or at home. You might be sharing the computers only with your partner, siblings, parents, or other family members.
However, once you start working for large organisations, you will have staff members working for various departments, each with their responsibilities. All the staff will benefit from being able to share workstations, files, and other resources.
Network printing and file sharing are key uses of almost every network. When configuring these resources, you must be aware of potential security issues and how to set permissions correctly to ensure that the data is only accessible to authorised recipients.
You will also need to manage user accounts on networks with permissions. Windows® networks can use local accounts within workgroups. In the following subtopics, you will learn some basic principles for managing users in both types of environments.
Managing user accounts and permissions is an important task on any network. You will learn how group accounts can allocate permissions more easily and use consoles to configure system policies to improve computer and network security.27
User accounts and group accounts
A user account is a principal means of controlling access to computer and network resources and rights or privileges.
The User Accounts applet in Control Panel is adequate for creating accounts on a family computer. If you are configuring computers for business use, you might want to use more advanced tools to create user and group accounts.
Security groups
A security group is a collection of user accounts that can be assigned permissions in the same way as a single user object.
Security groups are used when assigning permissions and rights, as it is more efficient to assign permissions to a group than to assign them individually. You can assign permissions to a user by simply adding the user to the appropriate group(s).

The five groups we will cover are:
- Built-in Local Groups
- Administrators
- Users
- Guests
- Power Users.
Built-in Local Groups
Built-in groups are given a standard set of rights to perform appropriate system tasks.
Starter and Home editions of Windows allow the use of two groups only:
- Limited/standard user
- Computer administrator.
For Windows Professional/Business, the principal built-in local groups include Administrators, Users, Guests, and Power users.
Administrators
An Administrator account can perform all management tasks and generally has very high access to all files and other objects in the system.
The initial user created at installation is automatically added to this group; however, you shouldn't use the administrator account to do your daily tasks such as web browsing and editing files. Use it for administrative tasks only.
The " Administrator " account is disabled by default when Windows is installed on a new computer. The setup procedure creates an account with administrative privileges in its place.
Note: If the computer is not part of a domain, the "Administrator" account is re-enabled in Safe Mode if all other administrative accounts have been deleted or disabled (as a disaster recovery mechanism). It should be left disabled to keep the computer more secure.
Users
New users are typically added to the standard Users group when created.
The group can perform the most common tasks, such as powering up and shutting down the computer, accessing a shared printer, and running some applications. Ordinary users can add a networked printer, provided a suitable driver is already installed.
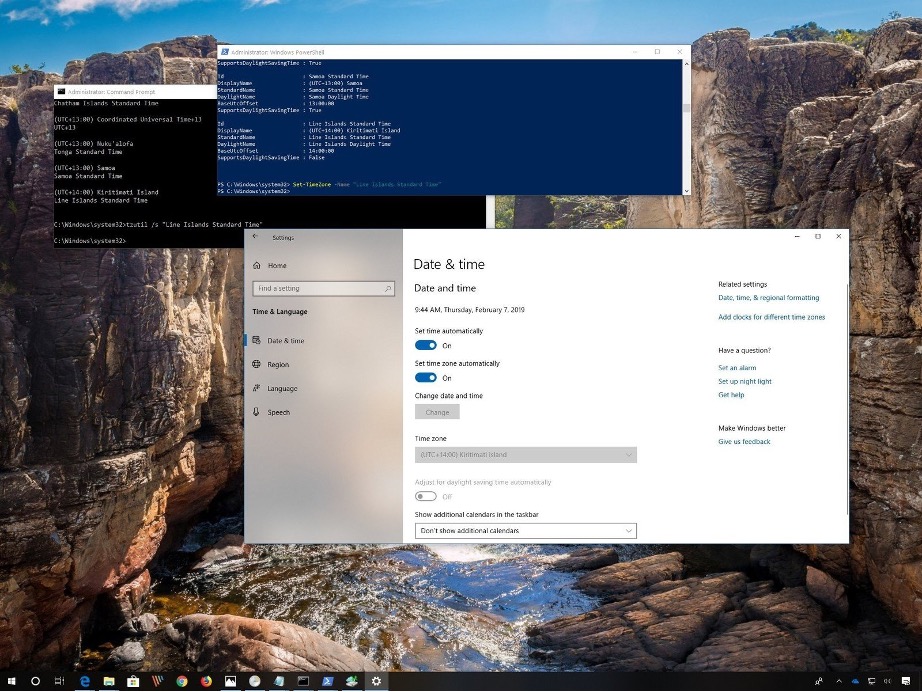
Date and time settings on Windows 10. Screenshot used with permission from Microsoft.
Guests
The Guests group has only limited rights; for example, members can browse the network and Internet and shut down the computer but cannot save changes made to the desktop environment.
Generally, you should disable the Guest account (its default condition) and establish a valid user account for each user accessing your system. If the account is enabled, any user attempting to access your computer which does not hold their user account will be connected using the Guest account credentials.
Power Users
The Power Users group still supports legacy applications, but its use is strongly deprecated. The rights allocated to this account type can be abused to allow the user to obtain more powerful Administrator or System privileges.
System Groups
Several other default groups provide a means to easily configure things like privileges to access, remote desktop, backup, event logs, etc. Windows also include built-in system groups. Their membership cannot be changed manually, as it is dependent on what users are doing at the time.
Everyone
All users who access the computer are members of the group Everyone. This includes users who have not been authenticated and access the computer as guests.
Authenticated Users
All users who access the computer have a valid user account.
Creator Owner
The Creator Owner group includes the account of the resource owner. Normally, the creator of a resource is the owner, but administrators (and other users who have been allowed to do so) can take ownership.
Interactive
This group contains the user account of the person currently working locally at the computer.
Network
This group contains the user account(s) of any users currently connected to the computer over a network.
System and service accounts
There are also some non-interactive accounts that you should be aware of. Users cannot sign into these accounts. They are "owned" by the OS (NT_AUTHORITY). They are used to run Windows processes and services:
Local System
An account with the same, or in some ways better, privileges as the default Administrator account. A process executed using the system account has unrestricted access to change the system configuration and file system.
Local Service
A limited account is used to run services that cannot make system-wide changes. Local Service can access the network anonymously.
Network Service
An account with the same privileges as Local Service but can access the network using the computer's account's credentials.
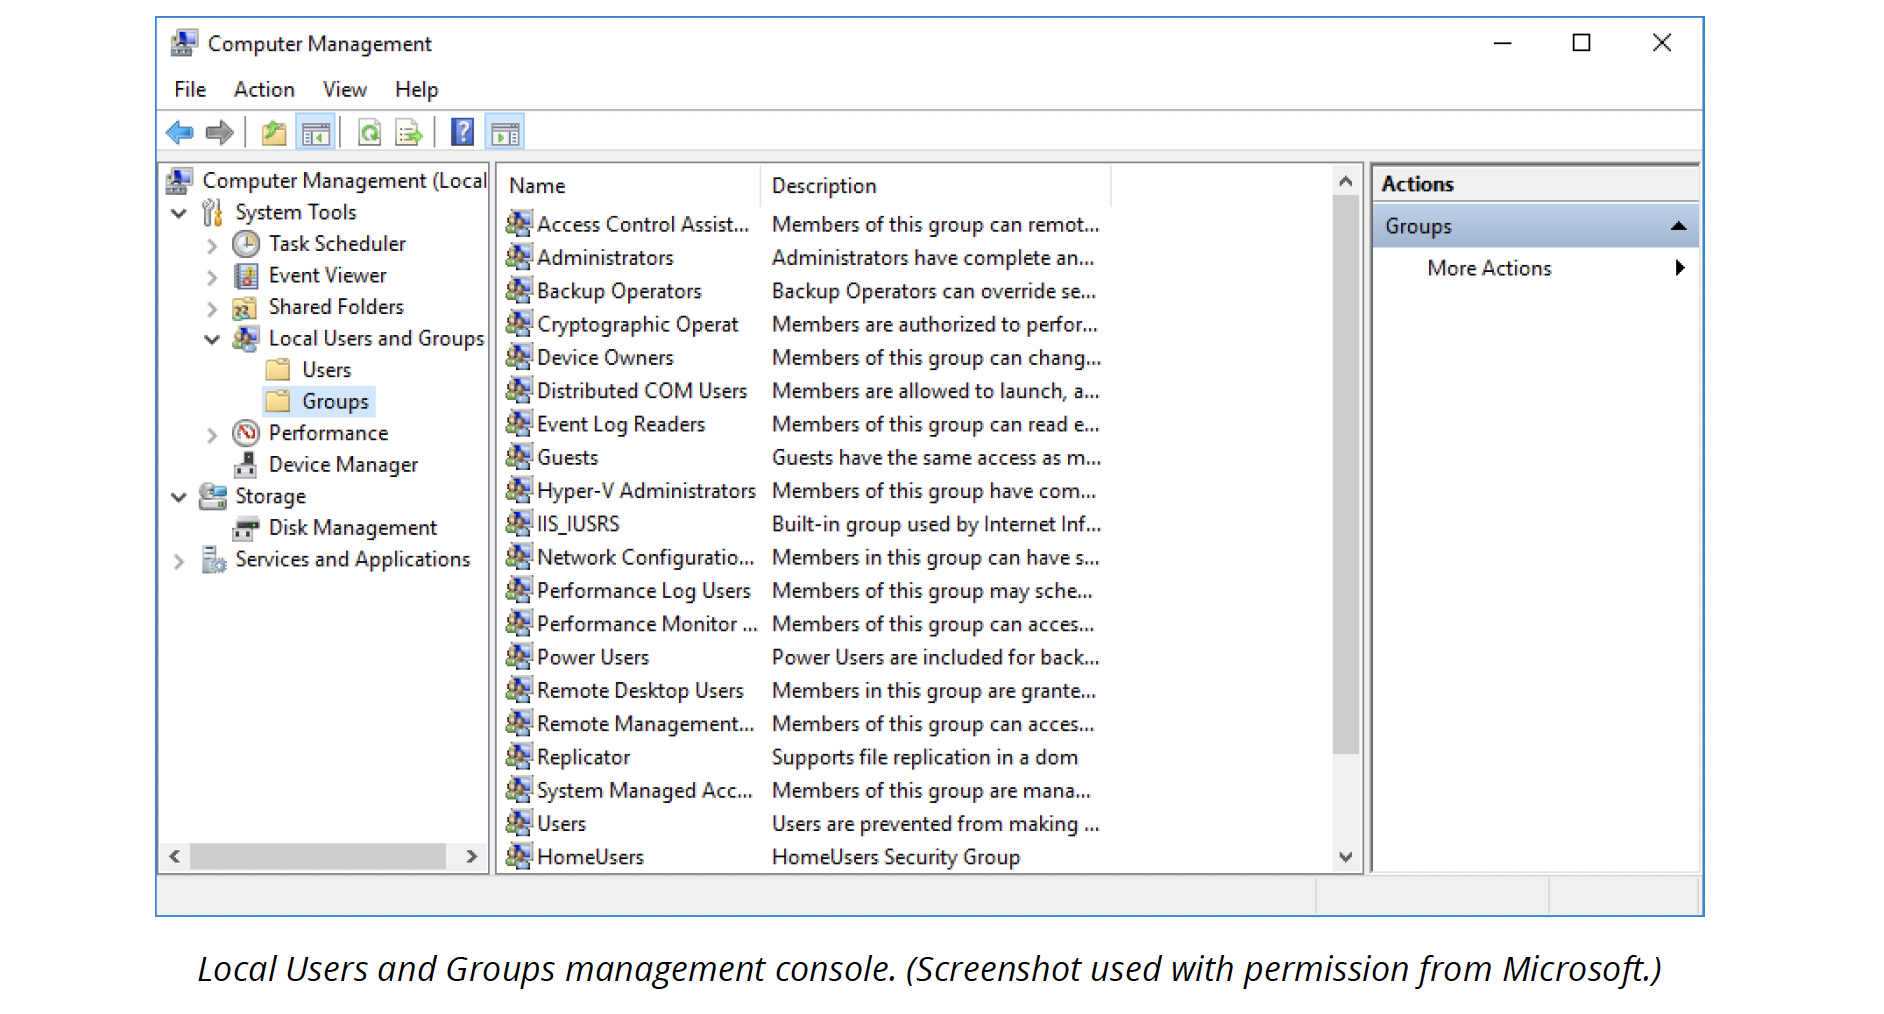
Local users and groups
In Pro, Professional, and Enterprise editions of Windows, the Local Users and Groups management console provides an interface for managing both user and group accounts. It is not available in Starter or Home editions.
Creating new user
Right-click on or in the Users folder to create a user and select New User. We will cover more detail about best practices when configuring password authentication later in the module.
The account can be configured with the following properties:
- Username (required)
- Full name (optional)
- Description (optional)
- Password (optional but recommended)
- The user must change the password at the next logon
- Users cannot change password
- Password never expires
- The account is disabled.
Username (required)
The username must be unique. Usernames are not case sensitive. The username may be up to 20 characters and cannot contain the characters "/\ [ ] : ; | = , + * ? < >
Full name (optional)
This should include the first and last name and any middle initials if required.
Description (optional)
It may be used to describe the user's job role.
Password (optional but recommended)
Passwords can be up to 128 characters (at least eight is recommended). Passwords are case sensitive. Avoid passwords that simply use words; include upper- and lower-case letters, punctuation, and numbers.
User must change password at next logon
A useful way to ensure that an administrator-assigned password is reset by the user when they first access the account.
Users cannot change password
Generally, users control their passwords, but the administrator should control password change requests for some user accounts. Some organisations require individuals to change passwords every six or 12 months.
Password never expires
A useful option that overrides the local security policy is to expire passwords after a fixed number of days. This option should be selected for system accounts, such as those used for replication and application services.
Account is disabled
Prevents the use of the account. Acts as an alternative to deleting an account.

Renaming and deleting user accounts
To rename a user account
Select the account name, then right-click and choose the Rename option. A renamed account retains all the properties of the original account and retains access to system resources.
To delete an account
Select the account name and press the Delete key or right-click and choose Delete from the context menu.
Security ID
Windows uses a Security ID (SID) to uniquely identify each user and group.
Every user account is associated with a unique ID, called Security ID (SID) when the account was created. A warning will remind you when you try to delete the user account. Normally when an employee leaves the company, instead of deleting their account (and leaving behind an unusable SID), the account will be disabled. When a new employee comes on board to replace the position, the user account can simply be renamed, and the new employee will have all privileges that the previous employee had. Disabling an account prevents it from being used but allows the account to be reactivated if required.
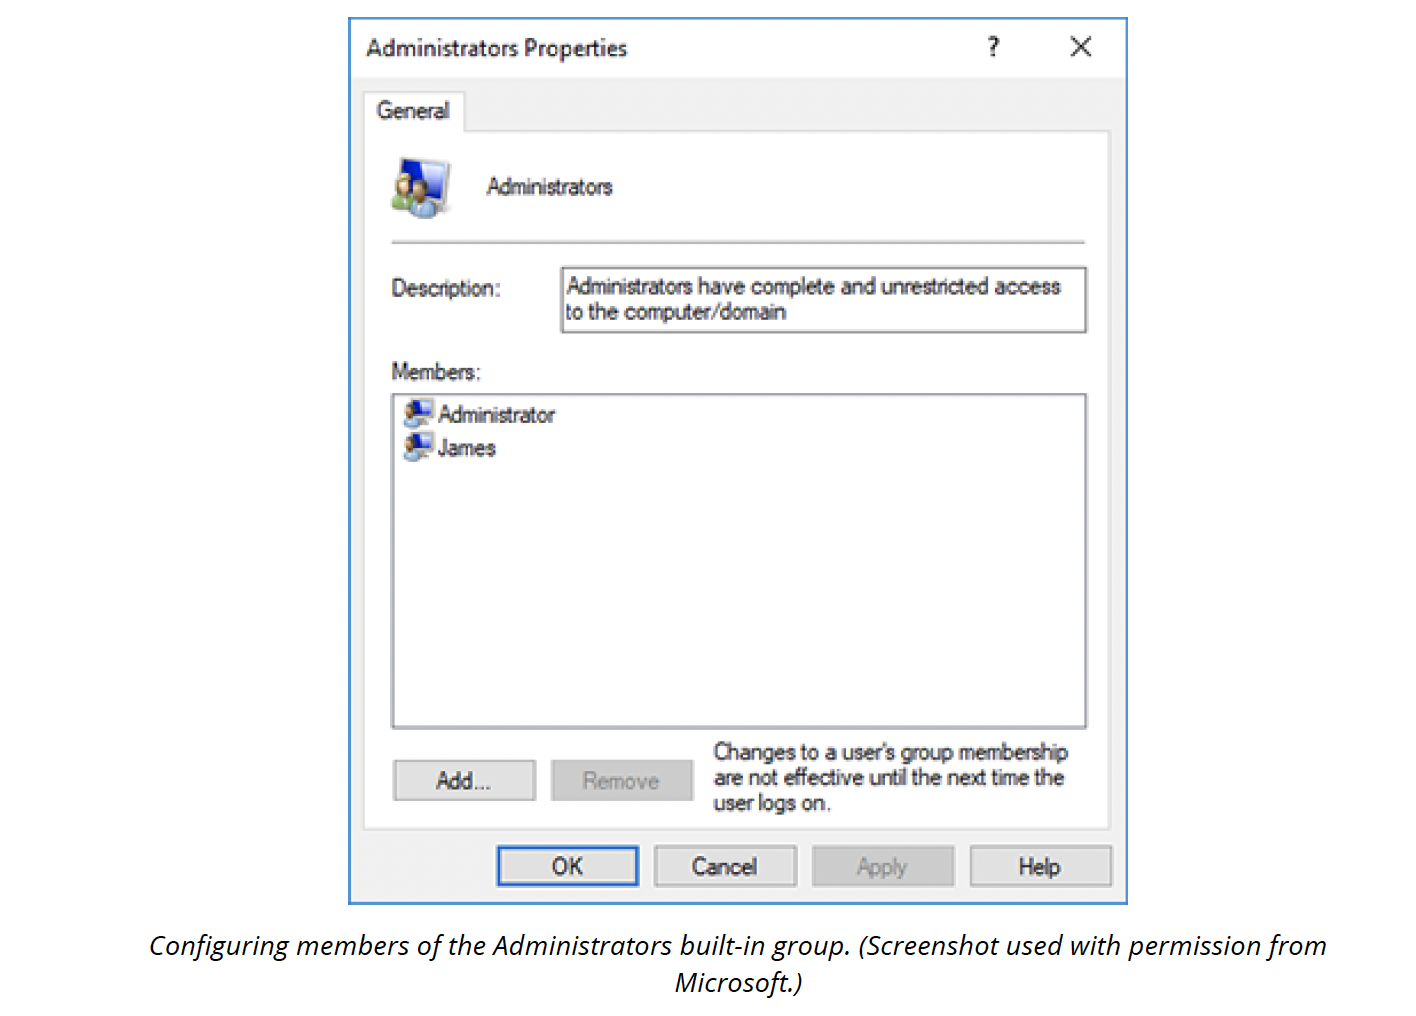
Adding a user to a group
When a user is made a group member, the user obtains all the permissions allocated to that group. A user account can be a member of more than one group account. To add a user to a group or remove a user from a group, right-click the group account and select Properties.
The net user commands
You can also manage accounts using the net user command at the command line. You need to execute these commands in an administrative command prompt:
net user dmartin Pa$$w0rd /add /fullname:"DavidMartin" /logonpasswordchg:yes
This example adds a new user account with the username: dmartin; the full name: David Martin); and forces the user to choose a new password at first login.
net user dmartin /active:no
Disables the dmartin account.
net user dmartin
Show the properties of the dmartin account.
net localgroup Administrators dmartin
Add the dmartin account to the Administrator local group.
Note: Don't confuse net user commands with net use for configuring file shares.
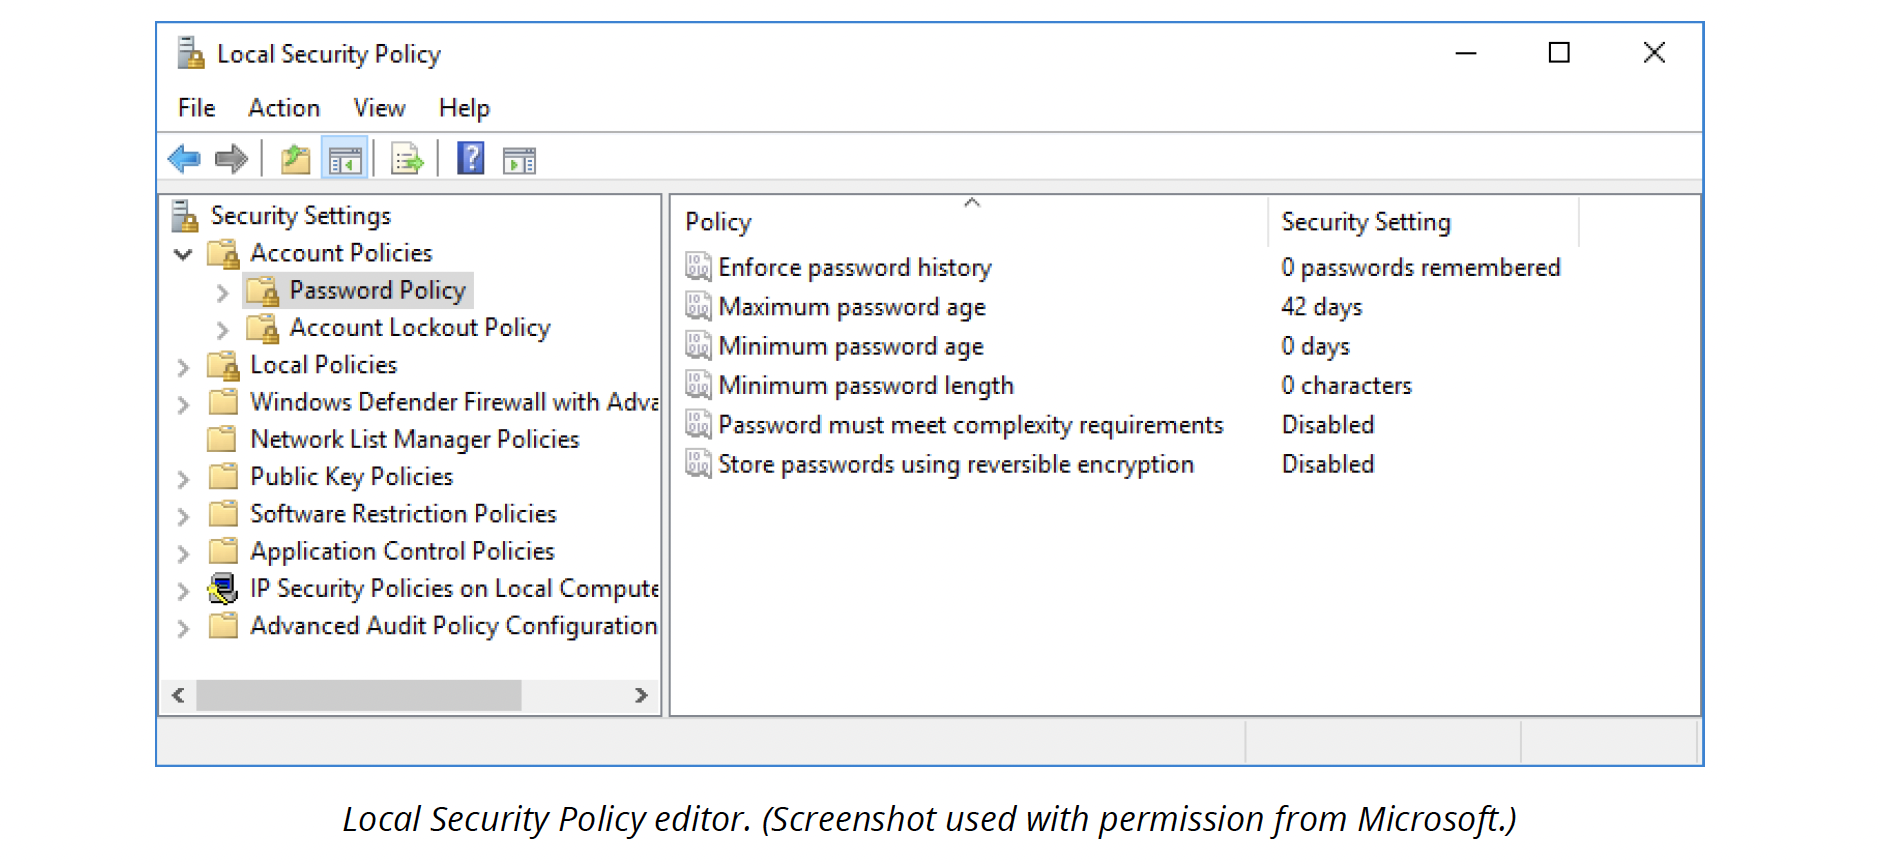
Local security policy
Policies are the most fine-grained means of adjusting registry settings outside of editing the registry directly.
Policies can be used to configure almost any aspect of Windows, from the colour of the desktop to the number of characters required in a user password.
On a standalone workstation, password and account policies can be configured via the Local Security Policy snap-in (secpol.msc) located in Administrative Tools. You would use this to force users to choose more complex or longer passwords or prevent users from reusing old passwords.
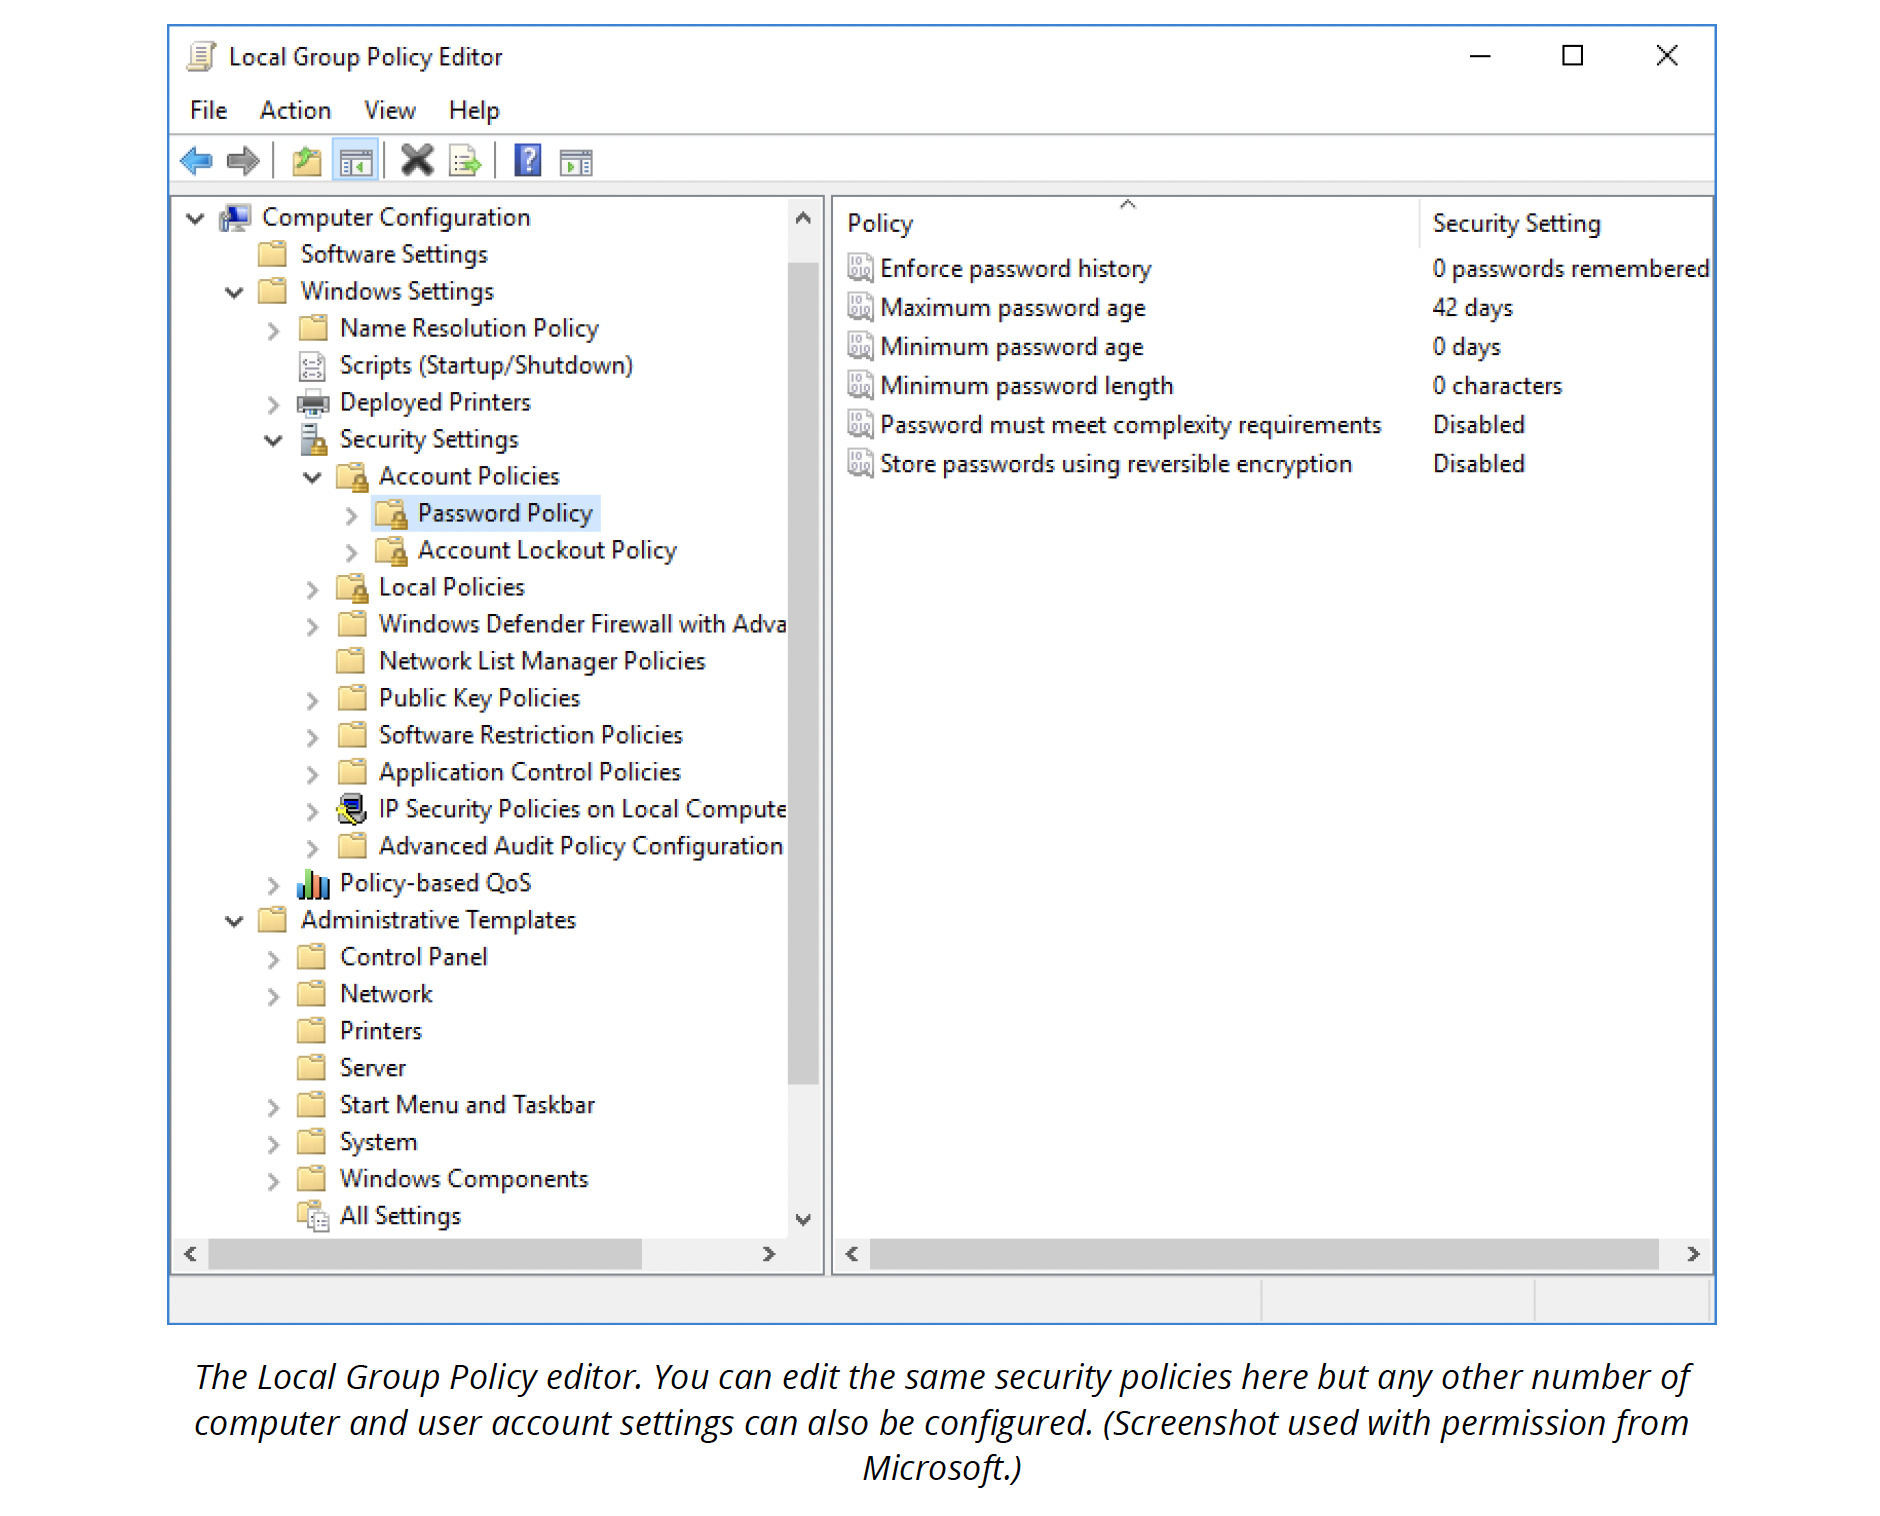
A wider range of settings can be configured via the Local Group Policy snap-in (gpedit.msc).
Group policy exposes the whole of the registry to configuration via a dialogue-based interface rather than editing individual keys through Regedit. Policies can be applied to the computer object or user accounts.
SSO and credential manager
Single Sign-On (SSO) means that a user only needs to authenticate to a system once to gain access to all the resources to which the user has been granted rights.
An example is the Kerberos authentication and authorization model for Active Directory domain networks. This means, for instance, that a user who has authenticated with Windows is also authenticated with the Windows domain's SQL Server® and Exchange Server services.
Another example is using a Microsoft account to sign into Windows and automatically sign into web applications such as OneDrive® and Office365®. The advantage of single sign-on is that each user does not have to manage multiple user accounts and passwords. The disadvantage is that if one account is compromised, it will impact multiple services.
Note: Users mustn't re-use work passwords or authentication information on third-party sites. Of course, this is almost impossible to enforce, so security managers must rely on effective user training.
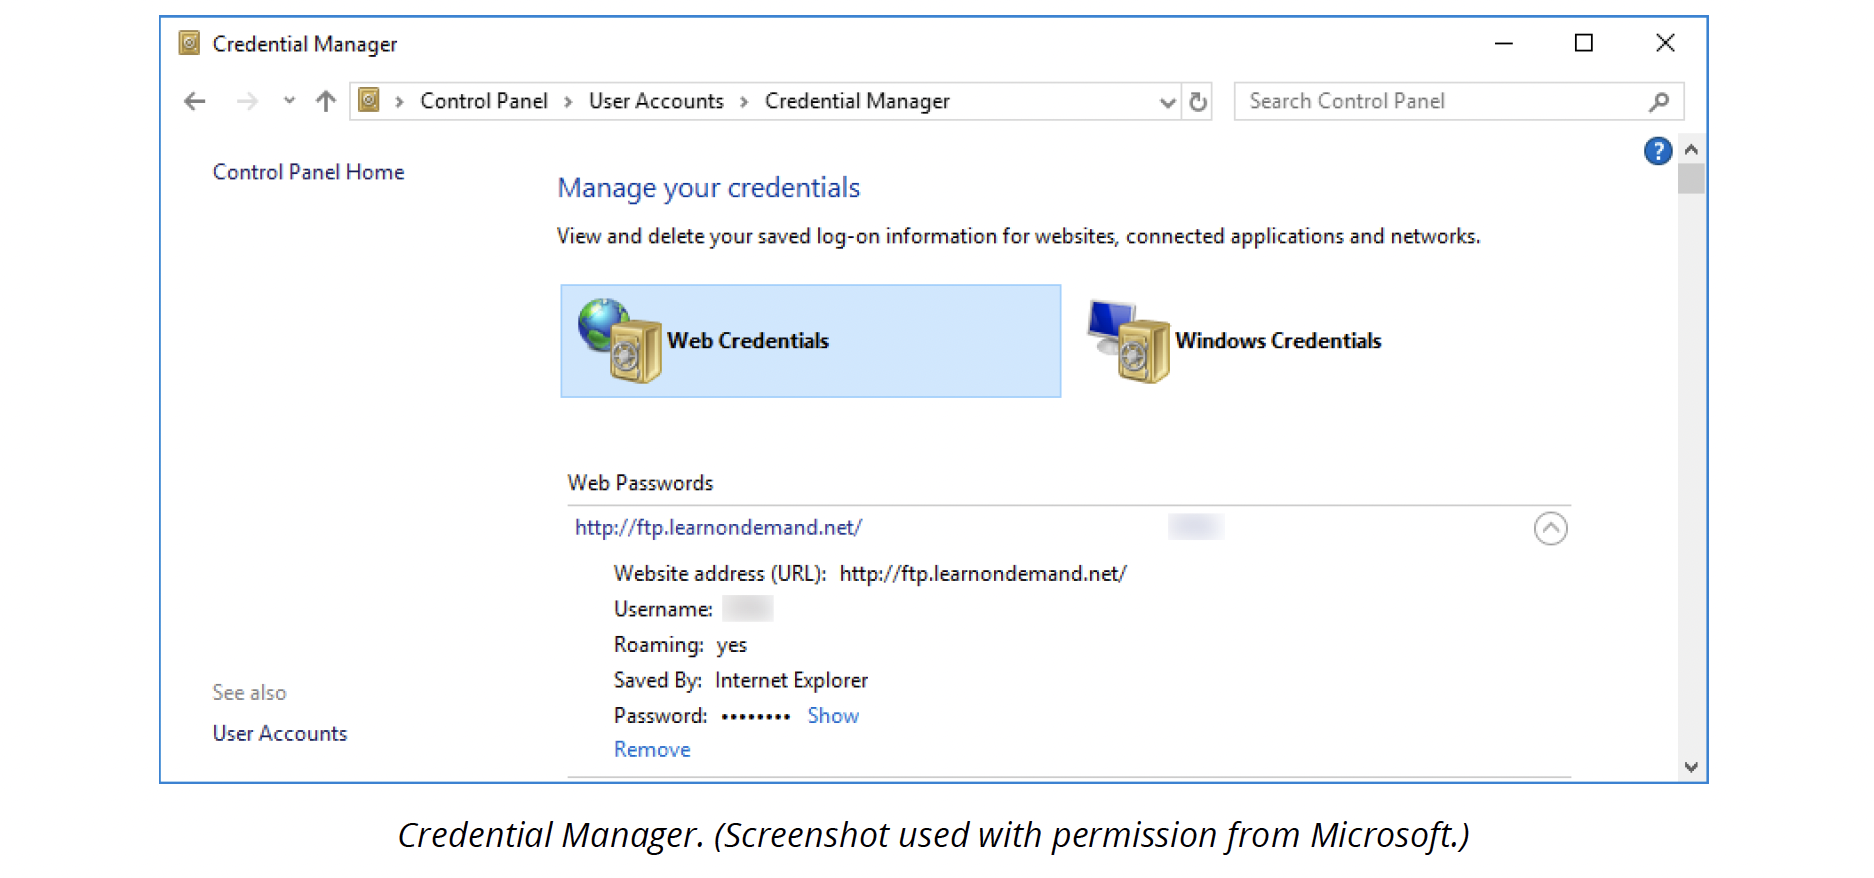
Credential manager
SSO is not available for many services.
Most users do not try to remember each password for every website or network they use. Instead, they use the OS to save (or cache) the password. Using the Control Panel app Credential Manager, you can manage cached passwords for websites and Windows/network accounts.
You can remove any credentials that you no longer want to store. Removing a credential may also resolve an authentication or service problem. You can view the plaintext of a web credential but not of a Windows credential.
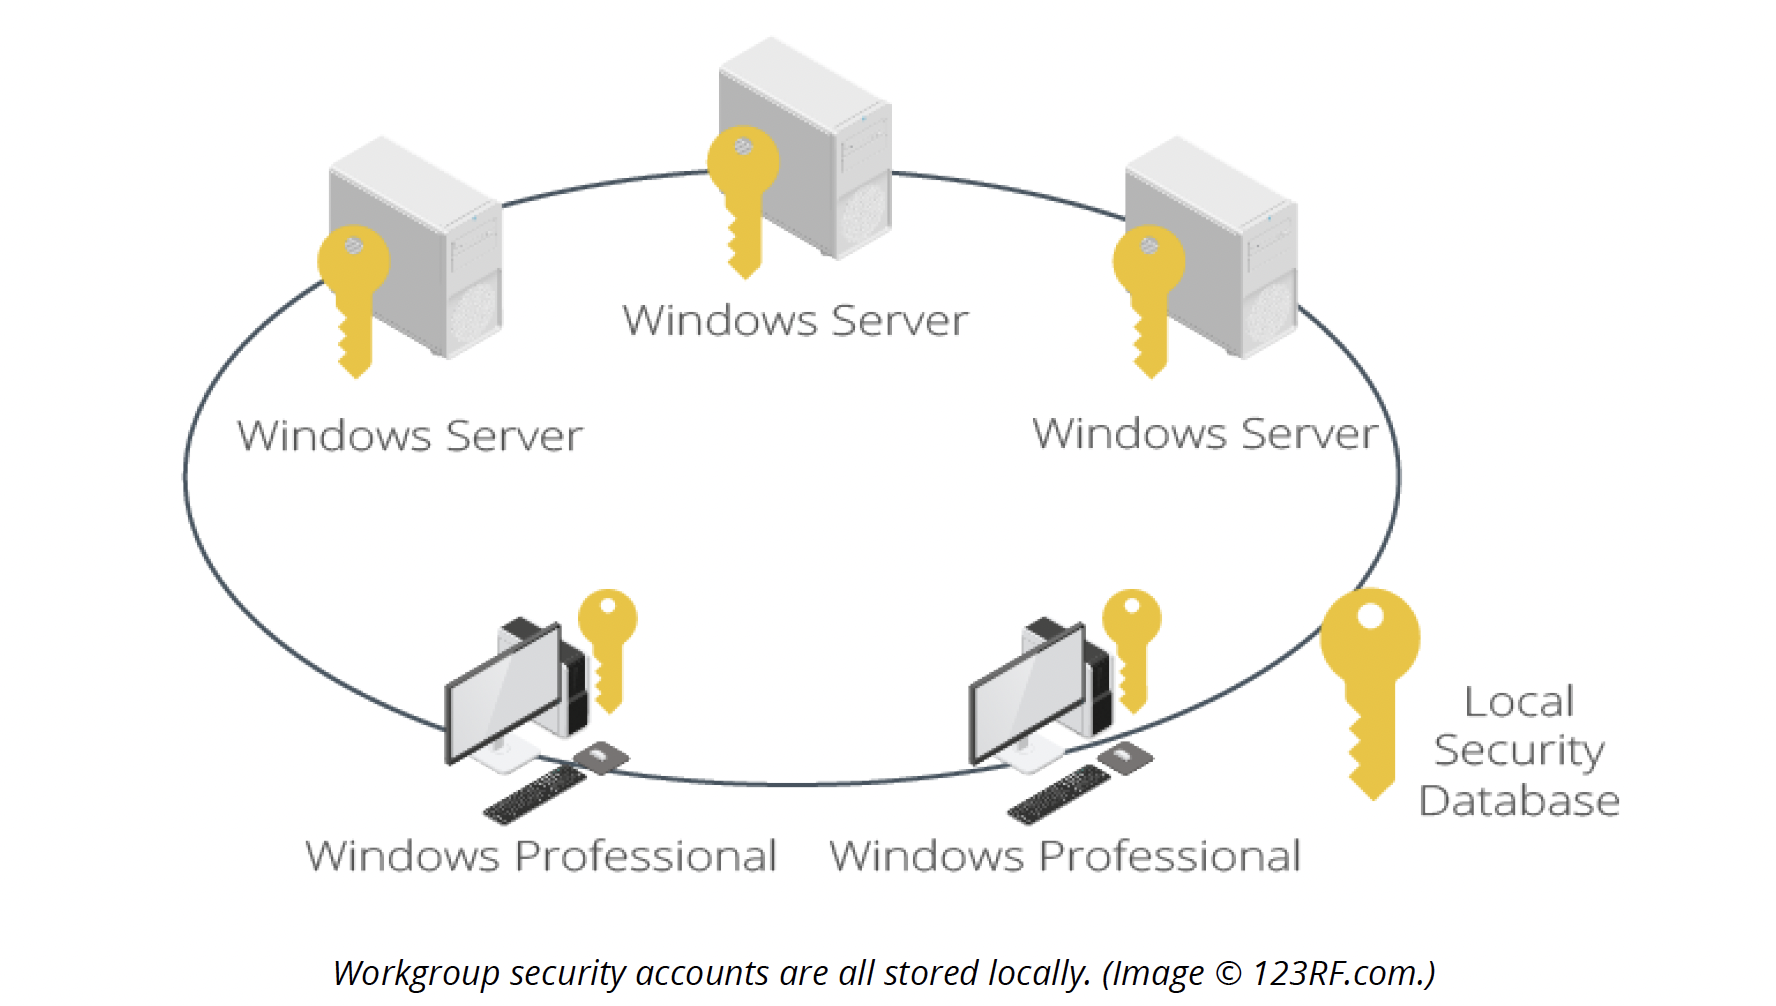
Workgroups
Each computer usually serves as a server and a client in a peer-to-peer network.
Each user administers their PC and the resources on it. The user can decide to give others access to files on their PC or printers attached to it. Under Windows, this type of network is described as a workgroup.
A workgroup is quite simple to set up initially but unreliable and difficult to organize.

For example, a user could switch off their machine while someone else accessed it. There are no good means of deciding who should access the network. It is difficult to grow the network, as when a machine or new user is added, additional user accounts must be added for the user to access the resources. In this case, user account management in Workgroup becomes very complicated.
Workgroups are designed to support small groups of users. There is no centralised management of user accounts or resources, and each machine requires a separate administrator. Desktop operating systems such as Windows can act as servers in a workgroup, but they are restricted in terms of the number of inbound connections they can support.
As different versions of Windows have been released, Microsoft has implemented different ways for users to set up home networks simply.
Note: The workgroup name can be changed using the Computer Name dialogue box from System properties. The workgroup name is cosmetic, however. It is almost always left set to "WORKGROUP."
Homegroup
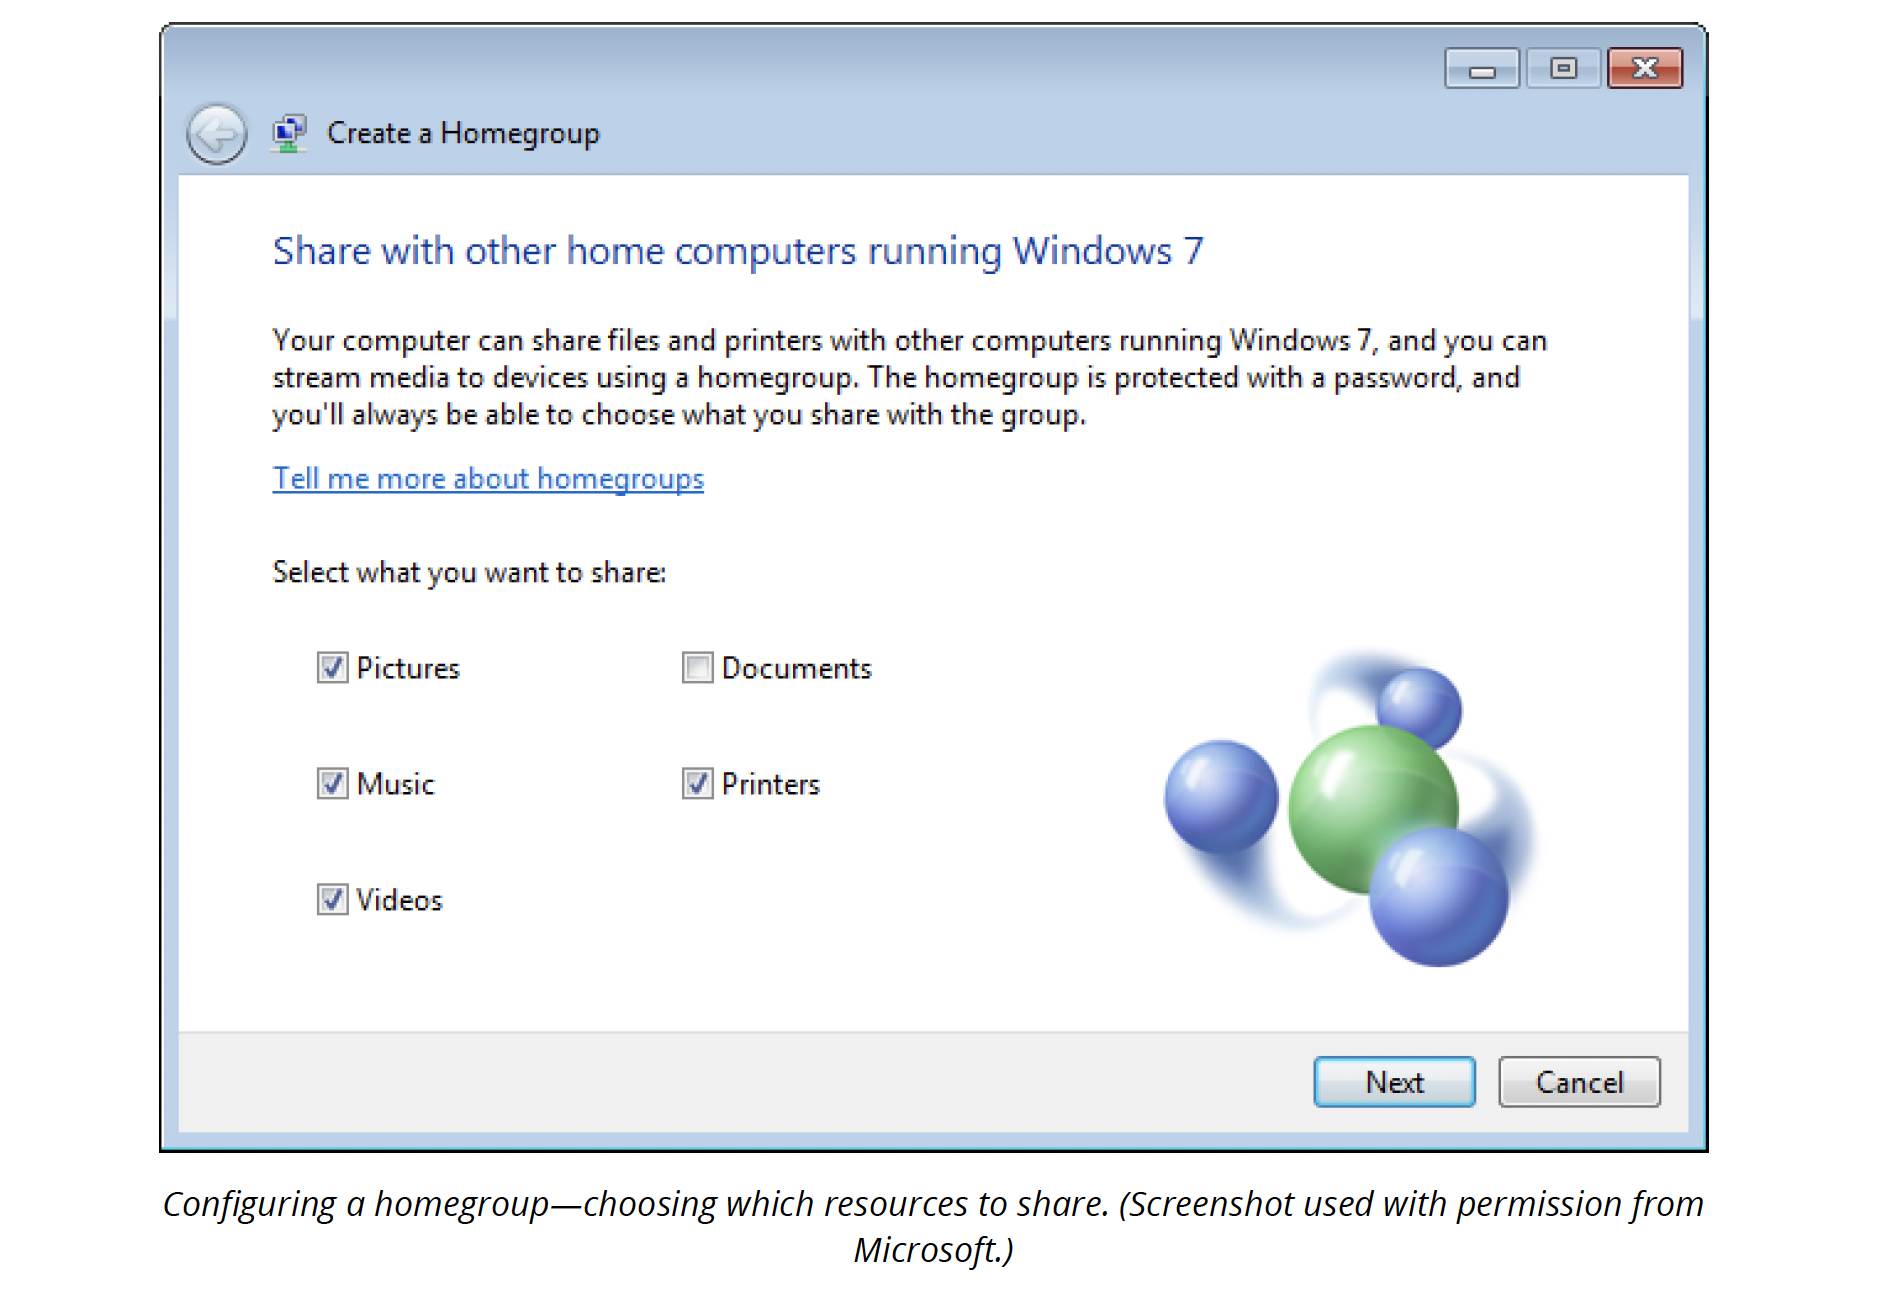
A home group is a feature introduced in Windows 7 and continued in Windows 8 to simplify secure access to shared folders and printers on a home network.
The problem with a workgroup network is that there is no centralized database of users. Sharing folders would require the local user's password to be shared, identical user, accounts to be set up and maintains on each machine or facilitated via the Guest account with no authentication.
Homegroups are secured via a simple password. A computer can only belong to one home group at a time. Homegroups can contain a mix of Windows 7 and Windows 8 computers.
Open the Network and Sharing Centre and select Choose homegroup and sharing options to set up a homegroup.
Joining a homegroup
When a homegroup has been configured on a network, you will see a Join now button when you are browsing the Homegroup object in Explorer. Having joined a group, network users can access shared libraries and folders and choose whether to share their libraries. Shared homegroup folders are shown via the Homegroup object in Explorer, which shows all the user accounts participating in the homegroup.
Windows 10 and homegroups
The early versions of Windows 10 continued to support the homegroup feature. With the release of Windows 10 (1803), support for homegroups was discontinued. Windows 10 (1803) computers cannot create or join a home group.
Note: At the time of writing, a bug means that homegroup options can still appear in a folder's Give Access To shortcut menu. These options do not do anything.
Troubleshooting homegroups settings
Homegroups are easy enough to set up and use if everything is working, but they seem prone to going inexplicably wrong. The best general troubleshooting approach is to reset everything (including the firewall), ensure all the relevant services and protocols are bound to the adapter (including IPv6) and ensure the date and time are synced correctly.
If the network is afflicted with a "ghost" homegroup, it can also be worth clearing the HomeGroup cache at:
C:\Windows\ServiceProfiles\LocalService\AppData\Roaming\PeerNetworking

Microsoft Homegroup technology is suitable for sharing resources within a home environment, but it is not appropriate for an enterprise setting. In an enterprise environment, users can log onto different devices, or multiple individuals can log onto the same devices. IT administration teams need a centralized method to administer the network devices and users. In a Windows environment, this is accomplished through Microsoft's Active Directory Domain Services. With the rise of cloud computing, this capability has been expanded to Azure Active Directory, allowing enterprises to manage access to cloud services based on user permissions and locations.
Active Directory
The Active Directory (AD) users and computers modules function similarly to the local users and computers feature. When a computer joins the Windows AD, it reconfigures the local users and permissions, enabling both local and network users to use the computer. Consequently, when logging onto a domain-joined computer, you need to specify whether you want to log on as a local user (using "." at the start) or a domain user (either "user@domain" or "domain\user").
Active Directory Domain Services is a feature on all Windows Servers since Windows Server 2000. You will find many guides for installing it (e.g. AD DS Installation and Removal Wizard Page Descriptions | Microsoft Learn).
Active Directory utilizes a hierarchical structure resembling a tree. At the top is a domain, and beneath it, there can be one or more domains, forming additional layers if needed. All domains within Active Directory must belong to a forest. When creating the first domain, you select the option to "add a new forest," which establishes a new forest. Subsequently, when adding more domains, they become part of the existing forest, expanding the hierarchy. This hierarchical setup enables centralized administration and resource sharing across multiple domains within the forest.

Windows Active Directory Domain Services (AD DS), like other network services, is a feature that must be installed. It converts the server into a “Domain Controller”. Other servers that are part of the domain are called “Member Servers”. Servers that have not been joined to the domain are called “Stand-alone servers”.
Once the AD DS feature has been installed it must be configured. Two pieces of information must be supplied.
The first item that is required is a root domain name. A common practice is to name the domain using “ad” or “corp” plus the company’s domain. For example, ad.contosso.com or corp.contosso.com will be unique even on the Internet. The domain name will also require a NetBios name. This is a short eight character name that is used as a shorthand for the domain name for example contosso. Users on the domain are written using the domain name contosso\user1 or as user1@ad.contosso.com.
The second item that is required is a Directory Services Recovery Mode (DSRM) Password. Should the Active Directory ever need to be restored, this password is required.
Towards the end, the wizard performs prerequisite checks, which typically generate two or three warnings. These warnings, indicated by yellow exclamation marks, notify about potential issues related to not supporting weaker legacy cryptography algorithms and the inability to create a DNS server delegation. The purpose of these warnings is to alert users to necessary changes that must be made before the Windows domain can function correctly, particularly if there are older computers or DNS systems operating on a Linux platform.
Activity

Creating two virtual machines
Although any hypervisor can be used, the instructions provided below are specifically for Microsoft Hyper-V. Before proceeding with creating the virtual machines, ensure that you have already set up a private switch named "Lab1" and downloaded the ISO files for both Windows Server 2022 and Windows 11. Once you have these prerequisites, follow the specifications below to configure two virtual machines:
| Machine 1 | Machine 2 | |
| VMName | WServer | WClient |
| Generation | 2 | 2 |
| RAM | 2GB (2048Mb) | 4GB (4096MB) |
| Switch (Private) | Lab1 | Lab1 |
| Virtual Hard Disk Size | 40Gb | 40GB |
Once you have created and installed the operating systems on the virtual machines and configured them as above follow the instructions below:
- Add Active Directory Domain Services to the server and configure it as a domain controller. Set the domain as ad.yoobeelab.com with the NetBios domain name of YOOBEE. Configure the DSRM password as “P@ssw0rd”. (https://infrasos.com/how-to-setup-active-directory-on-windows-server-2022/).
- Join the Windows 11 client to the domain you created in step 1. (https://learn.microsoft.com/en-us/windows-server/identity/ad-fs/deployment/join-a-computer-to-a-domain)
- In the Active Directory Users and Computers tool, located in the Users OU (Organizational Unit), create a security group called "New Users" (refer to Microsoft Learn's "Create a Group Account in Active Directory" for guidance).
- Add two users to the domain. You can refer to "Network Administration: How to Create a New User in Active Directory - dummies" for step-by-step instructions. Set the password for both users as "NewUser2023". When prompted for password options, select "Must change password at next logon".
- Add the two new users to the "New Users" security group. You can utilize any of the two available methods to accomplish this task.

One of the core network functions provides shared access to disk and print resources.
These services may be performed using proprietary protocols, such as File and Print Services for Windows Networks. A file server could also be implemented using standard protocols, such as File Transfer Protocol (FTP), though this lacks a lot of the functionality of Windows file services.
Server message block (SMB)/Common Internet file system (CIFS)
Server Message Block (SMB) is the application protocol underpinning file and printer sharing on Windows networks.
In all supported versions of Windows, version 2 of the protocol is used (SMB2), though there is support for legacy Windows clients. SMB usually runs directly over TCP on port 445 but can also run as part of NetBIOS over TCP/IP, UDP and TCP in the port range 137-139.
The Samba software package—a free software re-implementation of the SMB networking protocol—implements the protocol for Linux computers, enabling them to share and access resources on an otherwise Windows-based network. SMB is also sometimes referred to as the Common Internet File System (CIFS).
Apple filing protocol (AFP)
The Apple Filing Protocol (AFP) performs a similar file sharing function to SMB but on networks running the OS for Apple computers. AFP is associated with the use of two ports:
- UDP or TCP port 427—this is a port running the Service Location Protocol, used to advertise the availability of file shares. Later versions do not require OS X (10.2 and up).
- TCP port 548—this is the main port used by AFP.
Note: Apple is phasing out support for AFP in favour of its version of SMB2 (SMBX).
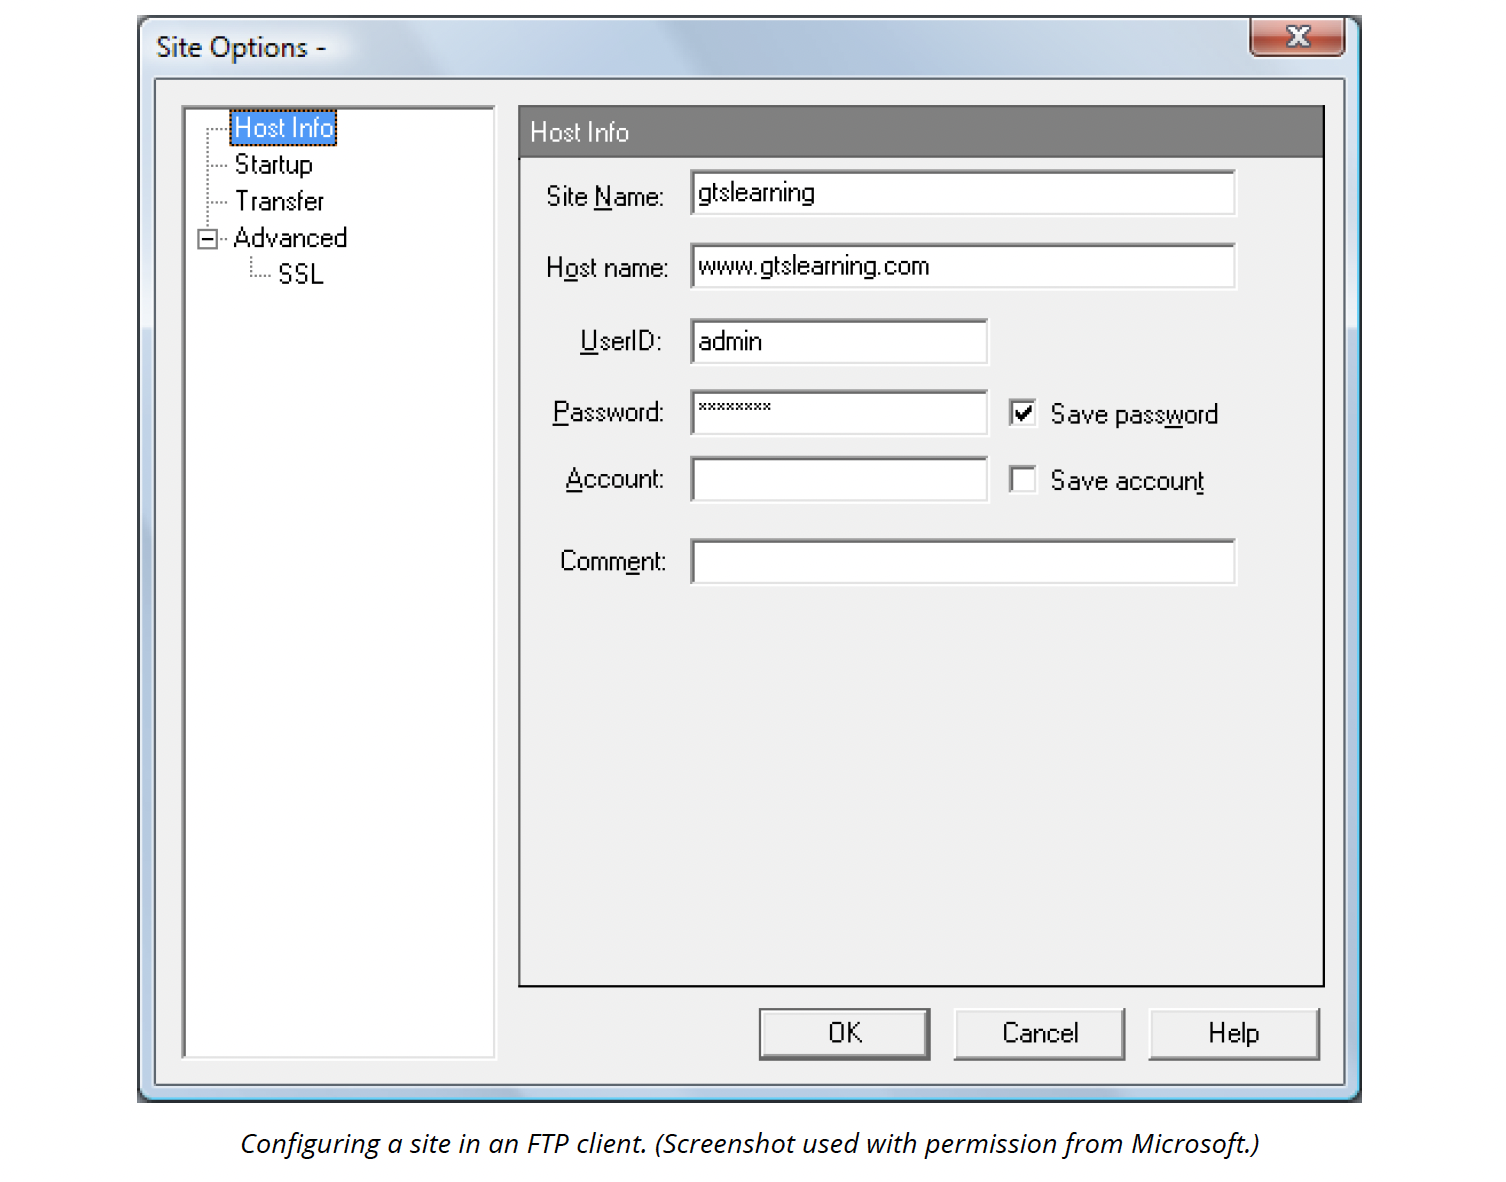
File transfer protocol (FTP)
The File Transfer Protocol (FTP) was one of the earliest protocols used on TCP/IP networks and the Internet.
As its name suggests, it allows a client to upload and download files from a remote server. It is widely used to upload files to websites. Also, if you have existing files that you want to make available to remote users, FTP is a simple service to install and maintain. Files made available through FTP can be in any format, including document, multimedia, or application files.
FTP is associated with TCP port 21 to establish a connection and either TCP port 20 to transfer data in "active" mode or a server-assigned port in "passive" mode. The FTP client may take a number of forms:
- Most installations of TCP/IP include a command-line client interface. The commands put and get are used to upload and download files
- Dedicated GUI clients allow you to connect to servers, browse directories, and upload and download files
- Internet browsers allow you to connect to an FTP service and download files.
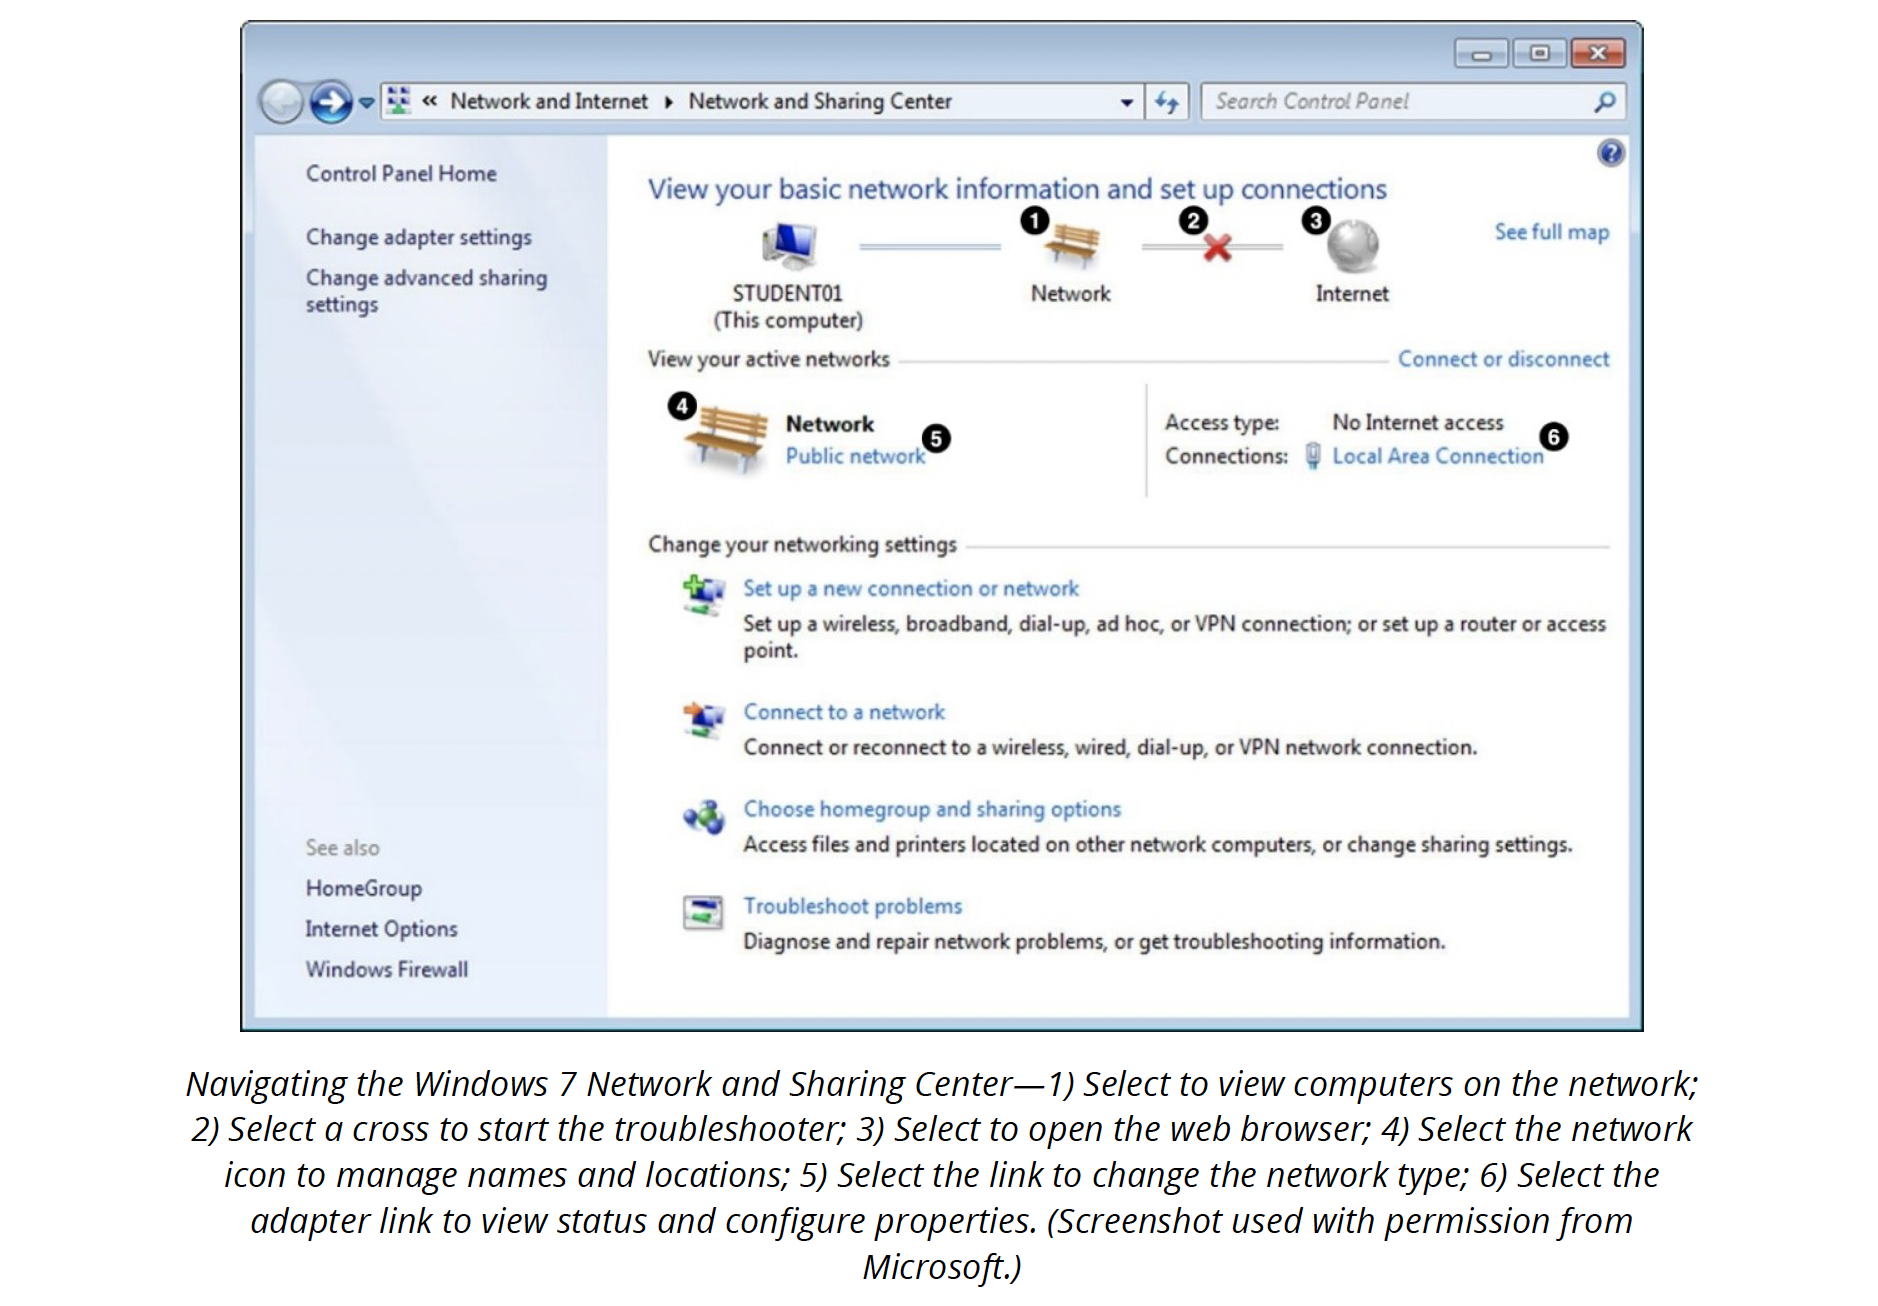
Network and sharing centre
Whenever a new network link is detected, Windows prompts you to define it as Public or Private (Home or Work). The former option disables file and printer sharing and network discovery on the link. You can customize the sharing options to include printers, disable password-protected sharing, etc. These options are configured via the Network and Sharing Centre.
In Windows 8 and Windows 10, the network map feature has been dropped, and there is no option to change the network location type. This is done via Windows Settings instead.
- Select Network & Internet and then Ethernet or WiFi as appropriate
- Under Network profile, select Public or Private
Note that the "Network profile" options do not appear if UAC is set to the highest "Always notify" level.
Advanced sharing settings
From the Network and Sharing Center, select Advanced sharing settings to configure the options for each profile. To share files on the network, Turn on network discovery and Turn on file and printer sharing must be selected.
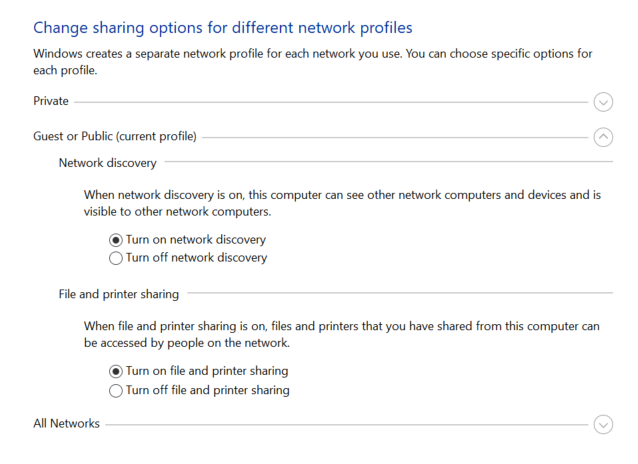
Windows has a pre-defined folder for sharing files (the Public folder), available to all PC users and network users if enabled here.
Turn off password-protected sharing
Under All networks, you can select Turn off password-protected sharing to allow anyone to access any file share configured on the local computer without entering credentials.
Turn off password-protected sharing; allows access to all sharing folders without asking for a password. You can enable access using the Guest User account, and that's why once you select Turn off password-protected sharing, the Guest user account will be enabled automatically.
Note: Network users must have an account configured on the local machine for password-protected sharing.
This is one of the drawbacks of workgroups compared to domains. Either you configure accounts for all users on all machines, use a single account for network access (again, configured on all machines), or disable security entirely.
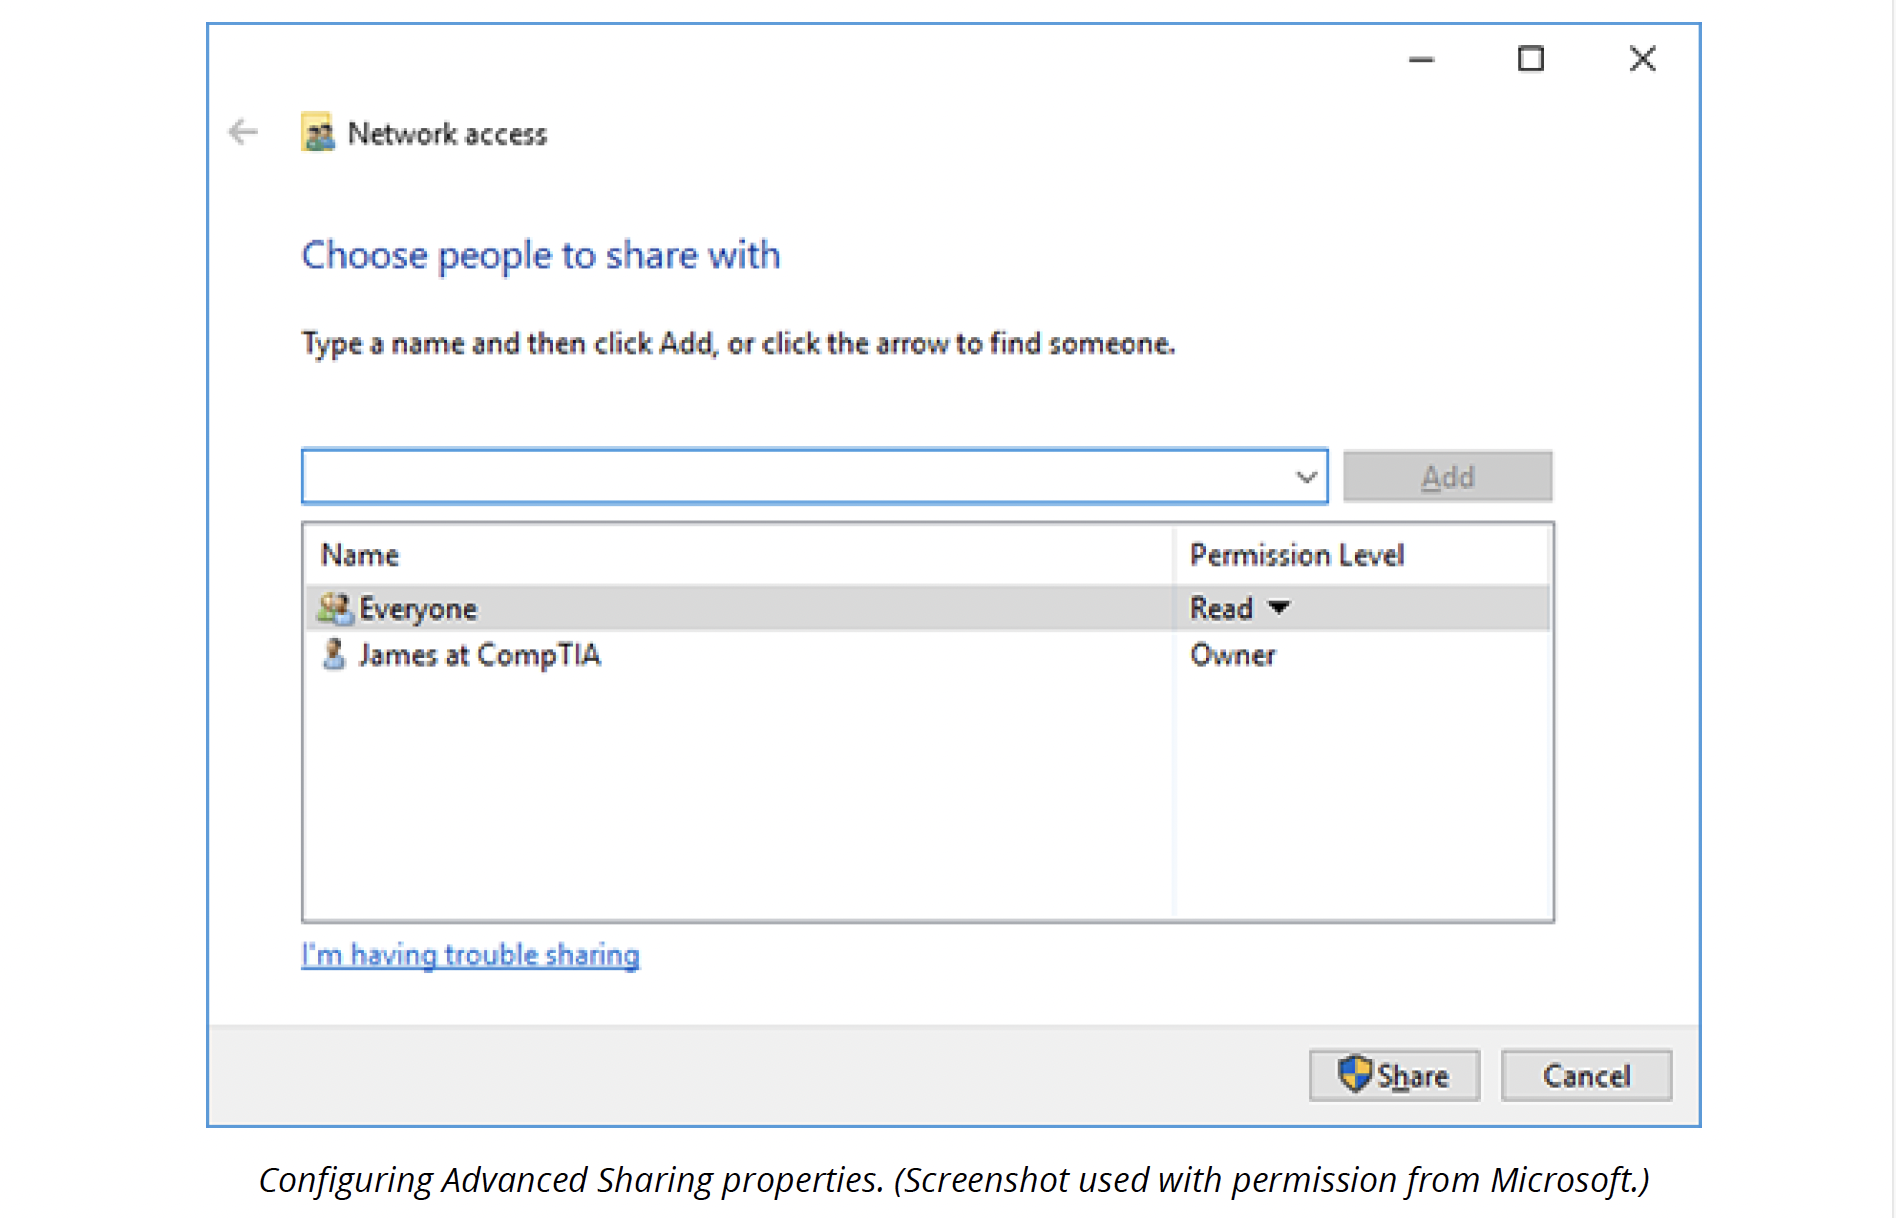
Network share configuration
You can share other folders by right-clicking and selecting Share with (Windows 7) or Give access to (Windows 10). Select an account, then set the Permission level to Read or Read/write as appropriate.
Advanced Sharing
In the folder's property dialogue box, you can use the Share tab to configure advanced share properties:
Share name and optional comment
The share name identifies the share on the network, while the comment can describe the purpose of the share. You can share the same folder multiple times with different names and permissions.
Maximum number of users allowed to connect at any one time
Windows desktop versions are limited to 20 inbound connections. Only Windows Server systems support more connections.
Permissions
Choose the groups or users allowed to access the folder and their type of access.
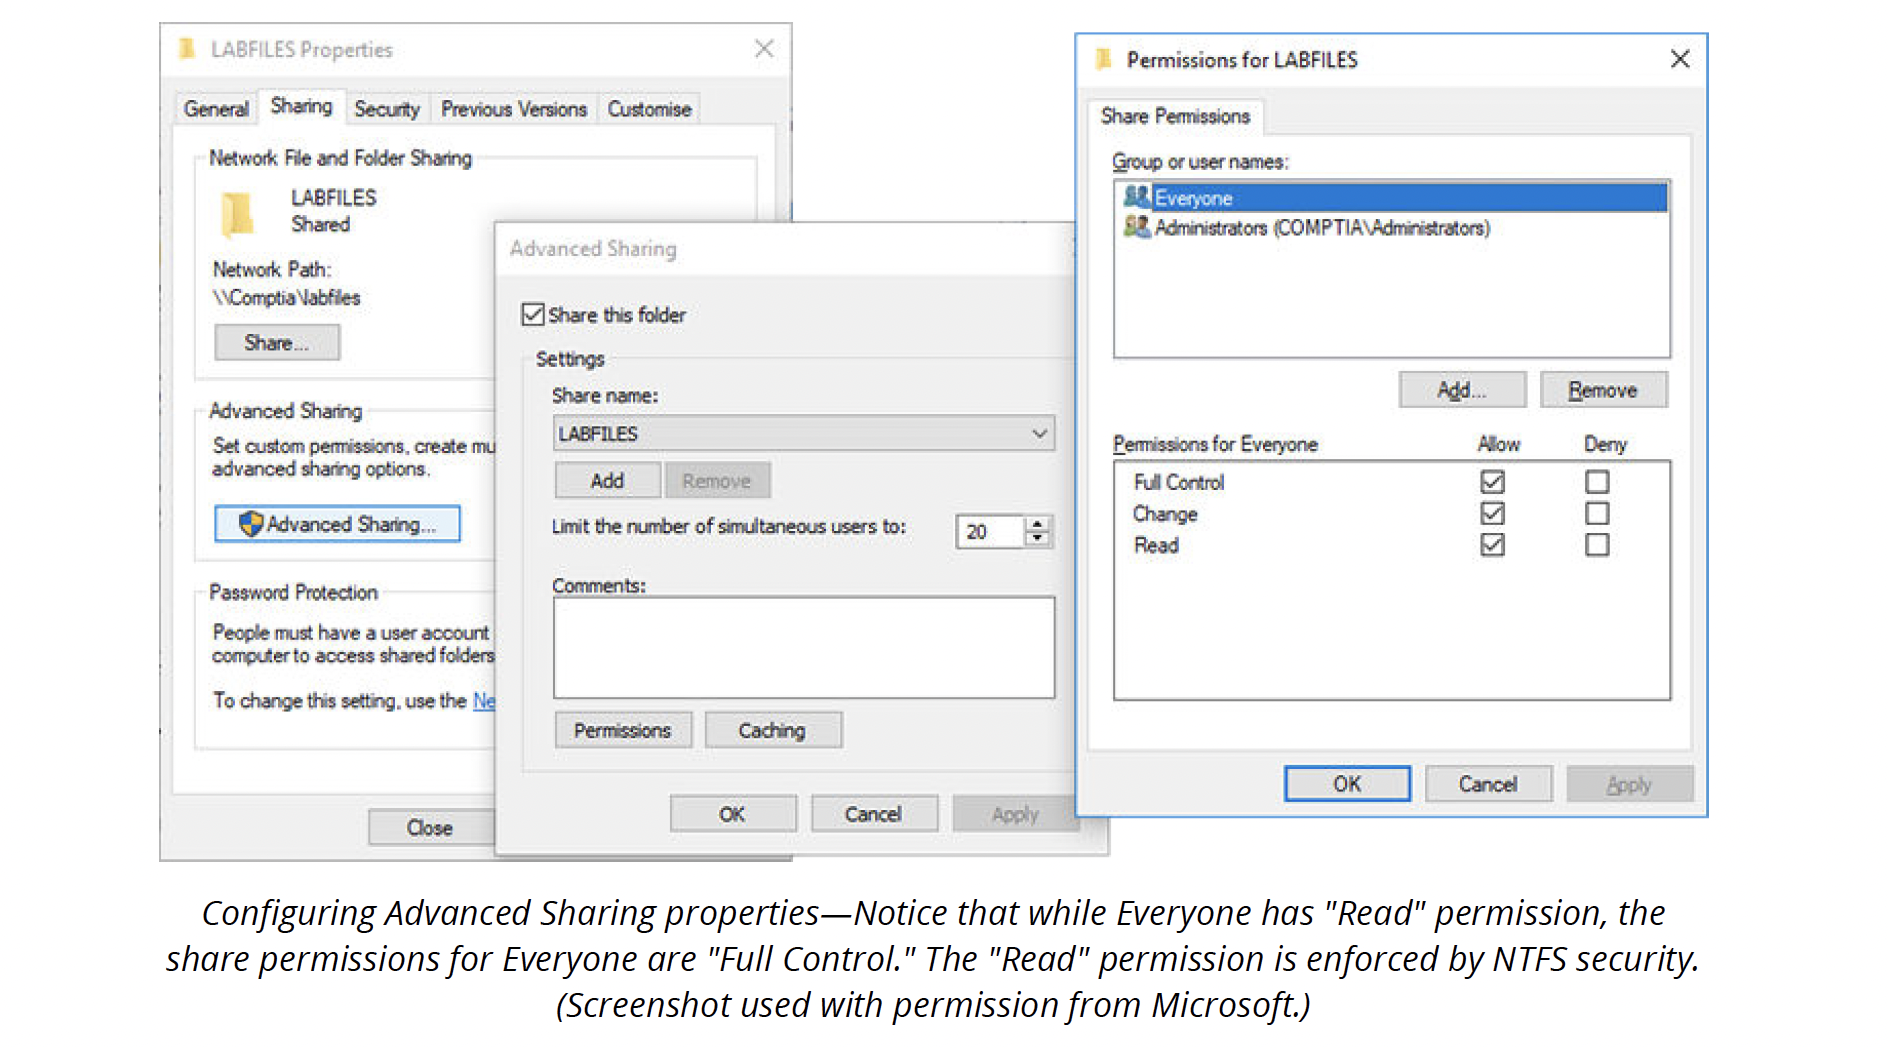
Windows provides three levels of share permissions:
- Full Control: Allows users to read, edit, create, and delete files and subdirectories and assign permissions to other users and groups.
- Change: This is similar to full control but does not allow users to set permissions for others.
- Read: Users can connect to the resource, run programs, and view files. They are not allowed to edit, delete, or create files. Most of the time, the shared folder permission is set to Full Control. The effective permissions are managed using NTFS security.
Managing shared folders
The Shared Folders snap-in (available through the Computer Management console) lets you view all the shares configured on the local machine and any current user sessions and open files.

Administrative shares
You can think of the shares configured manually on a computer using the process described previously as local shares.
In addition to any local shares created by a user, Windows automatically creates a number of hidden administrative shares, including the root folder of any local drives (C$), the system folder (ADMIN$), and the folder storing printer drivers (PRINT$). Members of the local Administrators group can only access administrative shares.
Note: If you disable password-protected sharing, the administrative shares remain password-protected.
If you add a $ sign at the end of a local share name, it will also be hidden from general browsing. It can still be accessed via the command line or by mapping a drive to the share name.
Browsing shares and mapping drives
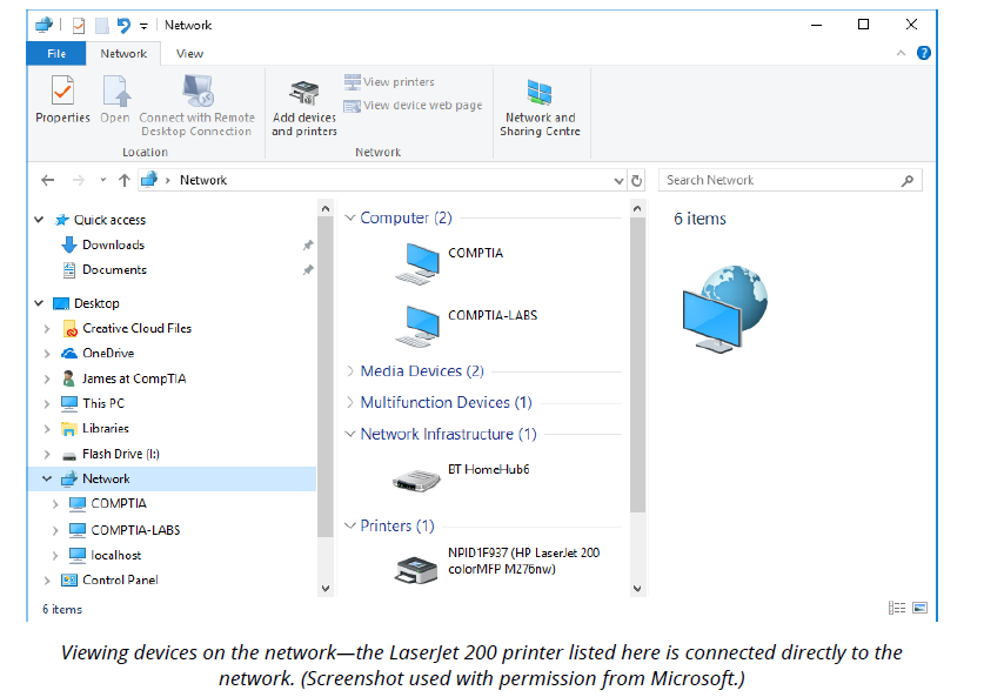
In File Explorer, network shares are listed by the server computer under the system object Network.
Network-enabled devices such as wireless displays, printers, smartphones, and routers/modems are listed here. The shortcut menu for Network allows you to open the Network and Sharing Center (via the Properties option) and map or disconnect network drives.
You can also access a shared folder using Universal Naming Convention (UNC) syntax (\\ComputerName\Path), where ComputerName is the server's host name, FQDN, or IP address and Path is the folder and (or) file path. Remember that you can view an administrative share this way (if you have the relevant permissions). For example, the path \\ PC102\Admin$ connects to the "Windows" folder on the " PC102" computer.
A network drive is a local share that has been assigned a drive letter. To map a share as a drive, right-click it and select Map Network Drive. Select a drive letter and keep Reconnect at sign-in checked unless you want to map the drive temporarily. The drive will now show up under Computer or This PC. To remove a mapped drive, right-click it and select Disconnect.
Printer sharing versus network printer mapping
Many print devices come with an integrated Ethernet and (or) Wi-Fi adapter. This means that they can communicate directly on the network. A printer can be mapped using the Add Printer wizard (from Devices and Printers). Just enter the printer's IP address or host name to connect to it.
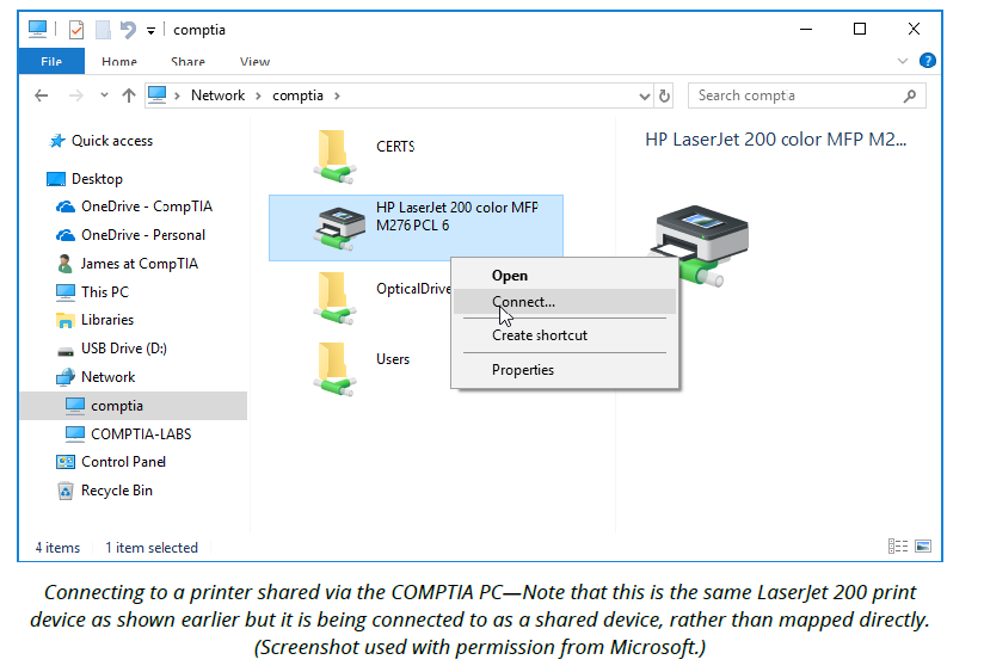
Any printer directly connected to a computer (whether via USB or direct network connection) can also be shared so that other network users can access it. A local printer is shared on the network via the Sharing tab on its Printer Properties sheet. To connect to a shared printer, open the server object from Network and the printer will be listed. Right-click it and select Connect.
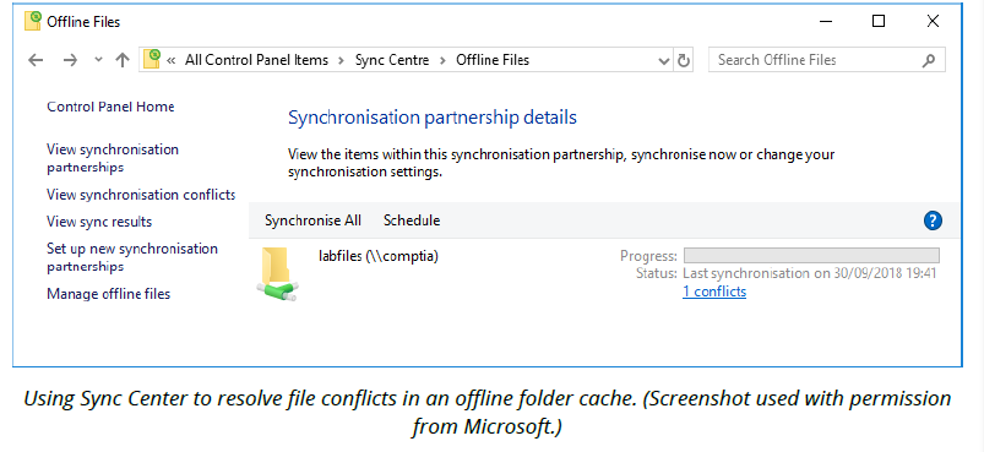
Offline files and sync centre
One of the issues with a workgroup is that a computer may get turned off by its use without the user consulting the rest of the workgroup first. There is no centralized control or administration over access to resources. If you need to use files on a network share where the connection is unreliable, you can use Windows' offline files feature to cache the files in the share on your local computer. To enable this, just right-click the share or mapped drive and Always select available offline.
When the connection is restored, any changes between the local cache and the network share are synchronized automatically. If there are any conflicts, these are reported in the ‘Sync Center Control Panel applet’. You can use the Resolve button to choose whether to keep one or both versions.
The net commands
There are several net command utilities that you can use to view and configure shared resources on a Windows network.
A few of the commands are provided here:
net /?
Can you view the full list by entering net /?
net use /?
Can you also view help on a specific command by entering net use /?
net use DeviceName \\ComputerName\ShareName
This command will connect to a network resource, such as a folder or printer.
net use M: \\MYSERVER\DATA /persistent: yes
This command will map the DATA folder on MYSERVER to the M: drive.
net use DeviceName /delete
This command removes a connection (net use * /delete removes all connections).
net view
Used without switches, this displays a list of servers on the local network. Use net view \\Host to view the shares available on a particular server (where Host is an IP address or computer name).
When configuring a network share, you can set share permissions for the accounts allowed to access the share. Share permissions have several limitations:
- The resource is only protected when a user connects over the network. Someone gaining access to the local machine would not have the same restrictions.
- The permissions set apply from the share's root, and all subdirectories and files within the share inherit the same permissions.
- Systems that use the File Allocation Table (FAT) can only support share permissions, but with NTFS, it is possible to implement a more comprehensive and flexible permissions system. NTFS security protects the resource even when it is accessed locally and has a configurable system of propagation and inheritance.
- Windows enforces local security on an NTFS volume by holding an Access Control List (ACL) as part of the record for each file and folder stored in the volume's Master File Table (MFT). When a user attempts to access a file or directory, the security system checks which users and groups are listed in the ACL. A list of permissions is then obtained for that user.
- Security can be applied to individual files or (more commonly) to folders. When folders are secured, the matter of inheritance needs to be considered.
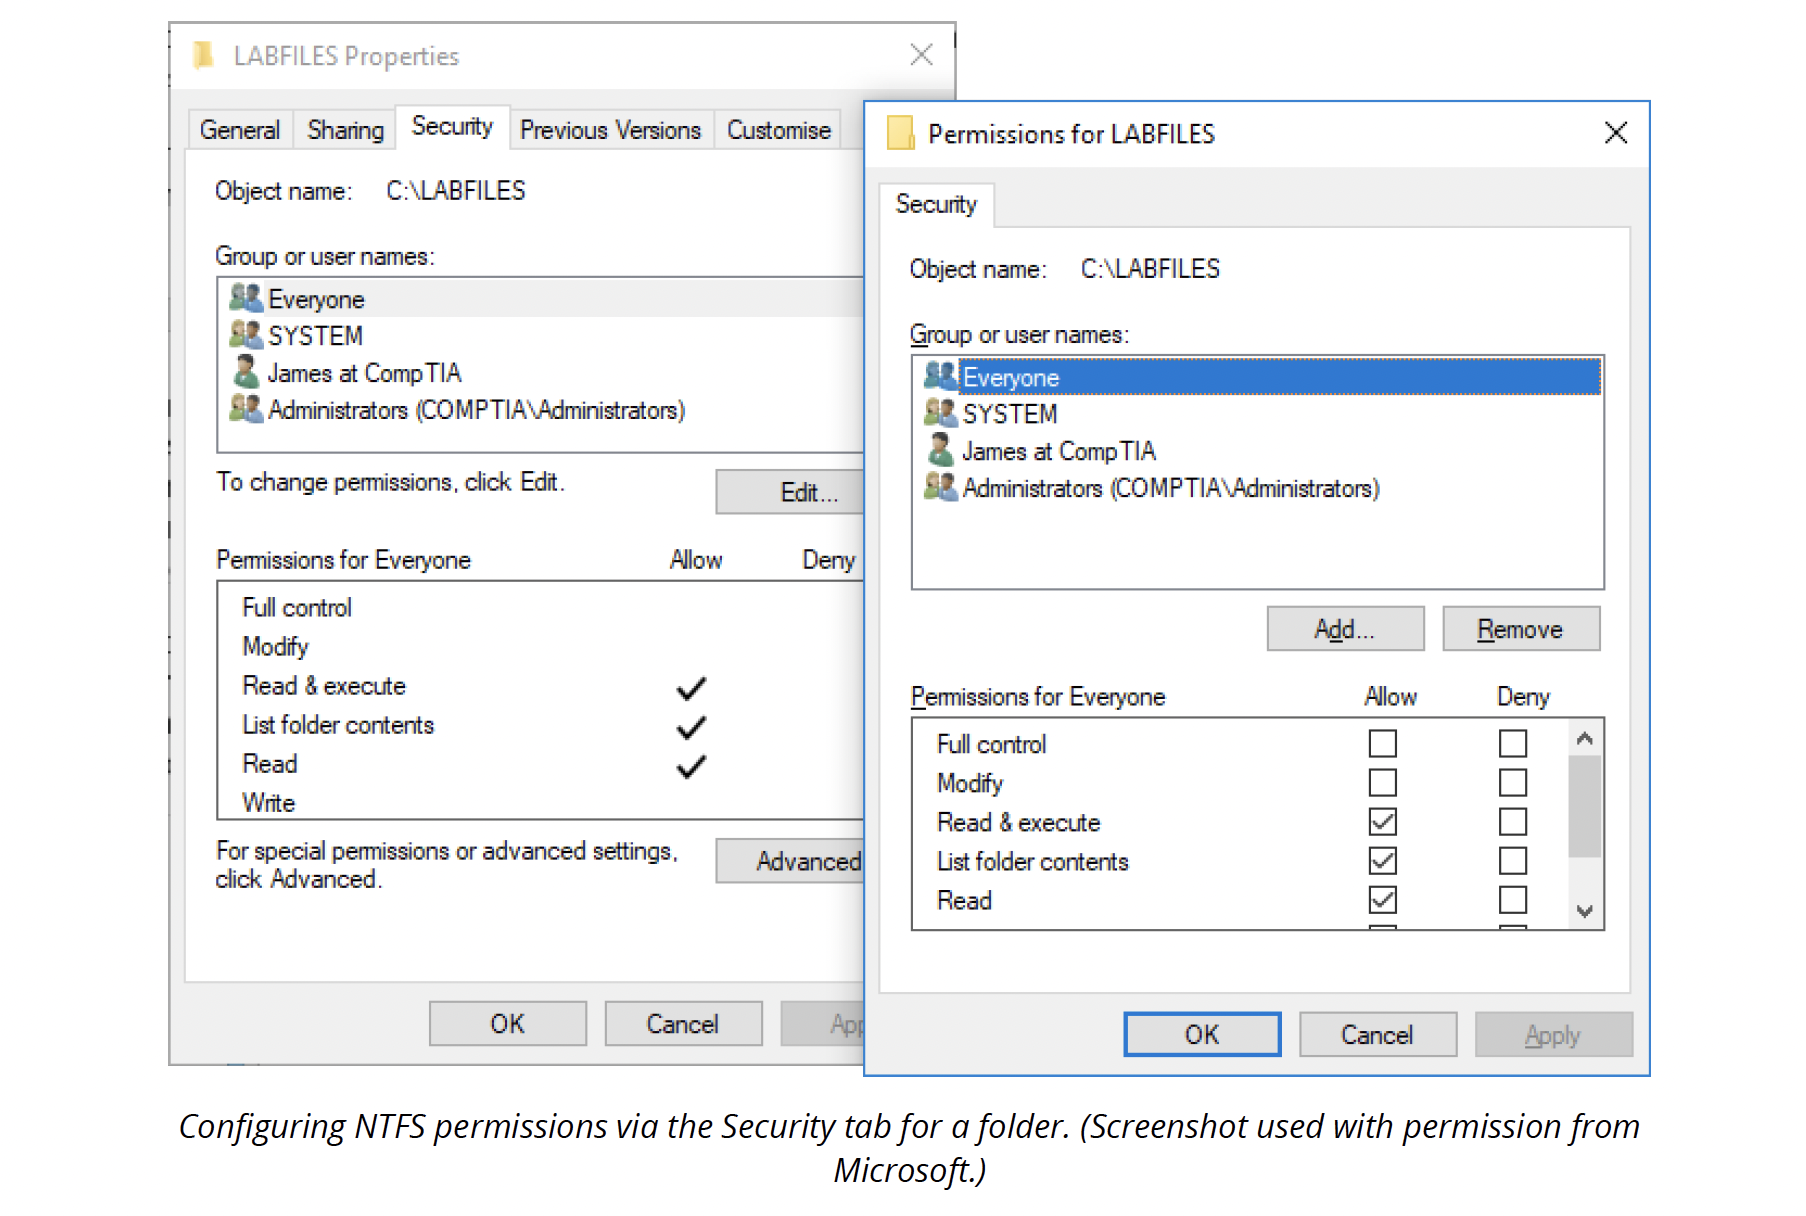
Configuring NTFS permissions
To configure the NTFS security settings of a file or folder, right-click the object, select Properties, and select the Security tab. Users that may set permissions are restricted to administrators, users with full control permissions, and the file or folder owner.
Permissions that may be applied to folders differ from those that apply to files. The differences are summarized in the following tables.28 Note that each permission may either be allowed or denied.
| Folder Permissions | Allows |
|---|---|
| Read | View files and subfolders, including their attributes, permissions, and ownership. |
| Write | Create new folders and files, change attributes, view permissions and ownership. |
| List | View the names of files and subfolders. |
| Read & Execute | Pass-through folders for which no permissions are assigned, plus read and list permissions. |
| Modify | Read/Execute and Write permissions, as well as the ability to rename and delete the folder. |
| Full Control | All the above, plus changing permissions, taking ownership, and deleting subfolders and files. |
| File Permissions | Allows |
|---|---|
| Read | Read the file's contents and view attributes, ownership, and permissions. |
| Write | Overwrite the file and view attributes, ownership, and permissions. |
| Read & Execute | Read permissions, plus the ability to run applications. |
| Modify | Read/Execute and Write permissions and the ability to rename and delete the file. |
| Full Control | All the above, plus changing permissions and taking ownership. |
Effective permissions and allow versus deny
Permissions are usually applied at one of three levels:
- The read/execute permission is granted to the appropriate group for application folders.
- For data areas, the modify or read permission is assigned as appropriate.
- Full control is assigned to the relevant user to home directories (personal storage areas on a network).
Users may obtain multiple permissions from memberships to different groups or have permissions allocated directly to their accounts. Windows analyses the permissions obtained from different accounts to determine the effective permissions. In this process, it is important to understand that "deny" overrides anything else (in most cases). If an account is not granted an "allow" permission, an implicit deny is applied. This is usually sufficient for most purposes. Explicit deny permissions are only used in quite specific circumstances.
Putting explicit deny permissions to one side, the user obtains the broadest "allow" permissions obtained from any source. For example, if one group gives the user "Read" permission and another group give the user "Modify" permission, the user will have "Modify" permission.
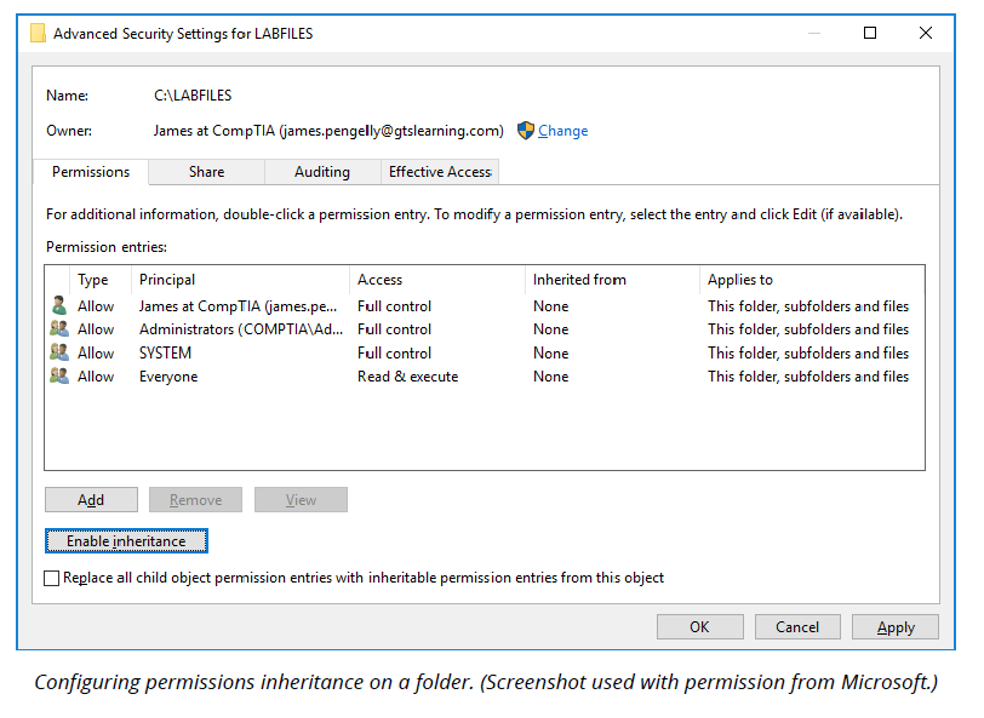
Permission propagation and inheritance
NTFS permissions assigned to a folder are automatically inherited by the files and subfolders created under the folder. Open the Security page, select Advanced, and select the Permission tab to prevent this. In Windows 7, select the Change permissions button to proceed.
Select the Disable inheritance button. In Windows 7, there is an Include inheritable permissions check box to uncheck rather than a button. Then, choose whether to Convert inheritable permissions into explicit permissions (in Windows 7, this is the Copy option) or Remove inherited permissions. You can then modify the permissions on this folder independently of its parent.
To apply security settings for the current folder to all child objects (permission propagation), check the box that says Replace all child object permission entries with inheritable permissions entries from this object.
Note: Directly assigned permissions (explicit permissions) always override inherited permissions, including "deny" inherited permissions.
For example, if a parent folder specifies deny write permissions, but an account is granted to allow write permissions directly on a child file object, the effective permission will allow writing access on the file object.

Ownership
The resource owner can manage that resource in terms of permissions and other attributes. Generally speaking, if a user creates a file, they will own it. Administrators can assign ownership to some other user (or group). This might be done because the current owner has been deleted from the user accounts database.
When a folder's ownership details are modified, the administrator can choose to propagate the changes down the tree to subfolders and their contents.
Moving and copying NTFS files and folders
The behaviour of NTFS permissions when moving and copying files under Windows is summarized in the following table.
| Action | Effect |
|---|---|
| Moving files and folders on the same NTFS volume | Write permission is required for the destination folder and Modify for the source folder. NTFS permissions are retained. |
| Moving files and folders to a different NTFS volume | Permission is required for the destination folder and Modify for the source folder. NTFS permissions are inherited from the destination folder, and the user becomes the Creator/Owner. |
| Copying files and folders on the same NTFS volume or different NTFS volumes | Write permission is required for the destination folder and Read for the source folder. NTFS permissions are inherited from the destination folder, and the user becomes the Creator/Owner. |
| Moving files and folders to a FAT or FAT32 partition | Modify permission is required for the source folder. All permissions and NTFS attributes (such as encryption) are lost, as FAT does not support permissions or special attributes. |
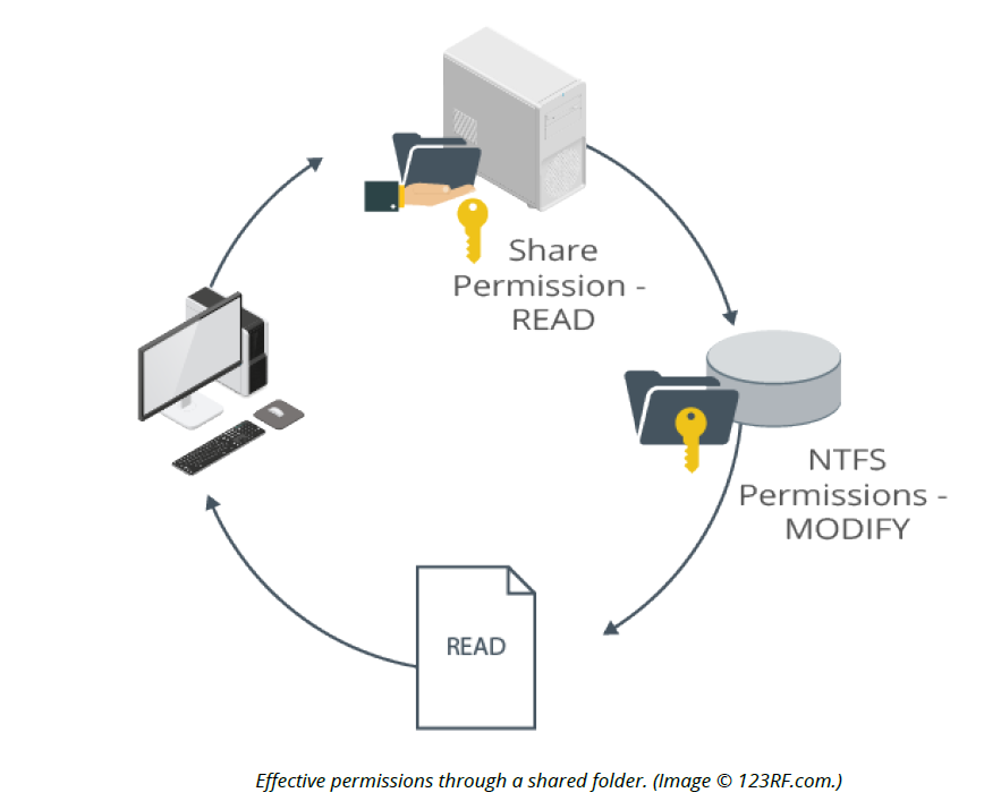
Combining NTFS and share permissions
It is possible to use a combination of share and NTFS permissions to secure resources. The factors to consider include:
- Share permissions only protect the resource when it is accessed across the network
- NTFS permissions are used to protect the resource from unauthorized local access
- Using the FAT file system, disk partitions can only be protected using share permissions
- Share permissions are set at the share's root, and all files and subdirectories inherit the same permissions
- NTFS permissions are combined with the share permissions to provide greater flexibility, for example, placing more restrictive permissions at lower levels in the directory structure
- If both share and NTFS permissions are applied to the same resource, the most restrictive applies (when the file or folder is accessed over the network). For example, if the group "Everyone" has Read permission to a share and the "Users" group is given Modify permission through NTFS permissions, the effective permissions for a member of the "Users" group will be Read.
Workgroup vs. domain setup
A workgroup is a Microsoft peer-to-peer network model in which computers are grouped with access to shared resources for organizational purposes.
A domain is a Microsoft client/server network model that groups computers together for security and to centralize administration.
Computers that are members of a domain have access to a shared central user account database, which means that an individual can use a single user account to log on to any computer within the domain.
You can have two main categories when you perform the installation:
- Attended and
- Unattended installation
Attended installation
Attended installation requires a person to input all different options asked by the computer during installation. It is achievable if you install only a handful of computers. You cannot join the computer to the domain until the installation is finished. The computer can be joined by reconfiguring System properties in Control Panel via the Settings interface.
Unattended installation
However, for unattended installation, it is designed to install an operating system in mass, for example, a couple of hundred computers. The computers can be joined during an unattended installation using an answer file or script.
There is no option to change the default workgroup name (WORKGROUP). In Windows networking, the workgroup name is now entirely cosmetic.
In Windows 7, you are prompted to configure the computer's hostname and choose a user name and password for the local administrator account.
In Windows 8/10, you can choose to use a Microsoft account rather than create a local account.
If the computer is not connected to the Internet, you will just be prompted to create a local account. You can convert a local account to a Microsoft account (or vice versa) using Windows Settings.
Mail servers
Email is a messaging system that can transmit text messages and binary file attachments encoded using Multipurpose Internet Mail Extensions (MIME).
Email can involve the use of multiple protocols. The following process illustrates how an email message is sent from a typical corporate mail gateway (using the Microsoft Exchange mail server) to a recipient with subscriber Internet access:
- The email client software on the sender's computer (sender@515support.com) sends the message to the Exchange email server using Microsoft's Message Application Programming Interface (MAPI) protocol. The mail server puts the message in a queue, waiting for the next Simple Mail Transfer Protocol (SMTP) session. SMTP uses TCP port 25 by default.
- When the Exchange SMTP server starts to process the queue, it first contacts a DNS server to resolve the recipient's address (for example, recipient@othercompany.com) to an IP address for the othercompany.com email server, listed as a Mail Exchanger (MX) record and Address (A) record in DNS.
- It then uses SMTP to deliver the message to this email server. The delivery usually requires several "hops", for example, from the main gateway to the sender's ISP, then to the recipient's ISP. The hops taken by a message delivered over the Internet are recorded in the message header.
- The message is put in the message store on the recipient's mail server. To retrieve it, the recipient uses their mail client software to connect with the mailbox on the server, using the Post Office Protocol (POP3) on TCP port 110 or Internet Message Access Protocol (IMAP) on TCP port 143. POP3 is more widely implemented, but IMAP provides extra features like support for mail folders other than inbox on the server and calendar functionality.
Note: Email communications between a client and server would normally be protected with SSL/TLS security. The default port numbers for these are 587 (SMTPS), 993 (IMAPS), and 995 (POP3S).
To configure an email account, you need the username, password, and default email address, plus incoming and outgoing server addresses and protocol types from the ISP.
Internet email addresses follow the mailto URL scheme. An Internet email address comprises the username (local part) and the domain name, separated by an @ symbol. The domain name may refer to a company or an ISP, for example, david.martin@comptia.org or david.martin@aol.com.
Different mail systems have different requirements for allowed and disallowed characters in the local part. The local part is supposed to be case-sensitive, but most mail systems do not treat it as such. An incorrectly addressed email will be returned (bounced) with a message notifying that it was undeliverable. Mail may also be rejected if it is identified as spam or other problem with the user mailbox (such as the mailbox being full).
Of course, there are many more network communication types than email. Network services are equally likely to support Voice over IP, videoconferencing, messaging, and integration with social media.
Scenario
You have been asked to set up a user management model for use in Windows 10 machines to support an organisation. There are 10 employees in the company and some of the information is extremely sensitive and can only be edited by the executive team. Describe the structure of your user management and the reasons for those decisions. Show which user groups you plan to use, and group names and their members. Consider security and system groups as well as file and network printer sharing within departments. The staff and their positions are shown below.
- John David: Chief Executive Officer
- Marianne Jackson: Chief Financial Officer
- Lara Drummond: Chief Operations Officer
- Martin Downs: System Administrator
- Jo Riddle: Administrative Assistant
- Marvin Howard: Administrative Assistant
- Bryce Davidson: Sales and Marketing Associate
- Alan Pickering: Sales Assistant
- Jen Myers: Marketing Assistant
- Jack Royal: Senior Graphic Designer
- Marcus Walker: Graphic Designer
Share your ideas with your peers about your user management model on the forum.