Databases are an essential component of web application development, as they provide a way to store and organize data in a structured manner. A database is essentially a collection of related data that is organized and stored in a way that allows for efficient retrieval and manipulation of that data.
Most modern applications contain some sort of database back-end. Generally, users never directly interact with the database. Instead, the database is accessed indirectly through an external application that handles connections and logic. In topic 6.8, you are shown an example of how to link your application to the database and expose the data to the user during the implementation of the blog post application.
When designing a database for a web application, it is important to consider the data requirements of the application and the relationships between the different types of data. This involves identifying the entities, attributes, and relationships that are relevant to the application, and organizing them in a way that is both efficient and easy to use.
There are several approaches to database design, including relational, object-oriented, and NoSQL databases. Each approach has its own strengths and weaknesses, and the choice of the database depends on the specific requirements of the web application.
In this topic, you will learn how to design and manage databases for your application. You are going to learn how to think when it comes to database design and what steps you should take. While learning how to connect your application to the database will be the primary focus, you will also be given an introduction to some database concepts and techniques to aid in the creation of your application.
Note that the examples in this topic are created on a Linux machine. We will provide links to additional resources in relevant places to enable students with Windows PCs to follow.
To get yourself familiarized with some database terms and operations, it is recommended that you complete the tutorial below:
- SQLite Tutorial
- Make sure you have installed SQLite on your PC.
- For installation on Windows machine, see the guide here: https://www.sqlitetutorial.net/download-install-sqlite/
- For installation on Linux machine, see the guide here: https://www.digitalocean.com/community/tutorials/how-and-when-to-use-sqlite
- SQLite is an open-source, zero-configuration, self-contained, stand-alone, transaction relational database engine designed to be embedded into an application.
- While the tutorial is mainly designed for developers who want to use SQLite as a backend database, completing this tutorial will give you a general idea of how things work especially when designing your database.

Before you go into designing a database for your application, there are several factors that you need to take into account. Apart from any methodology and project development process, you need to consider the following general, simple steps for any kind of project to design a database:
- Determine the requirements of your application and identify the entities that will be part of and interact with your database.
- Before developing your database, you need to clearly understand the requirements of your web application, know the goal of the project, understand what your client or product owner wants, how he/she intends to interact with the database through your application, what data type your web application will store, how the data will be accessed.
- In addition, you need to identify the entities that will be part of your database. Entity here is any object, concept or event that will be represented in the DB as a table. For example, refer to our flask blog example in topic 6.8. Object in this application is posts (if you have included the author table as recommended in the topic, then you have author and post as the objects of your DB). Objects in a typical e-commerce application will include products or services, customers, orders, and payments.
- Define the relationships between the entities and create a data model for your DB. These two things you need to consider here:
- First, after identifying the entities (objects, concepts, or events), you need to define the relationships between them. The relationship here defines how two or more entities are related to each other. For example:
- In Figure 9 of topic 6.8, a visual example of a relationship in the blog application was shown – a blog author can create one or many blog posts.
- In an e-commerce application, a customer can have many orders, and an order can have many products.
- Second, after having a clear understanding of what your entity-relationships will be, you need to provide a graphical representation (like a blueprint or plan) of the entities, relationships, and the attributes in your database. This representation is called the ERD diagram. This will be the visual snapshot of your database schema.
- There are online tools you can use to draw your ERD, e.g. Lucidchart, visio, drawio. There DB tools for doing this as well e.g., MSQL workbench.
- Figure 1 below shows a more comprehensive ERD diagram or visual database design for a blog post application. The diagram shows the logical organization of the data, as well as the relationships and constraints between different tables and columns in the database. It captures the following components:
- Tables: a collection of related data organized in rows and columns. Each table in a database schema represents a specific entity. In this case, the ERD includes 3 tables including author, post, comment. etc.
- Columns: A column is a named attribute of a table that holds a specific type of data, such as text, numbers, or dates. Each column in a table represents a specific property or characteristic of the entity it represents. For example, for the author’s table, the columns include id, first name, middle name, email address, password etc.
- Data types: A data type defines the type of data that can be stored in a column, such as text, numeric, date/time, or Boolean. As you can see, each column has an associated data type. For example, id’s are numbers/integers (big integers), names are usually character (varchars) or text (tiny text).
- Relationships: A relationship defines how two or more tables are related to each other. There are three types of relationships: one-to-one, one-to-many, and many-to-many. For example, in figure 1, there is a one-to-many relationship between "authors" and "posts", which is established through the "authorId" attribute in the "post" table. The "authorId" attribute in the "post" table is a foreign key that references the "id" attribute in the "author" table, ensuring that each post is associated with a valid author. This is done using crow foot notation(you should be able to read these notations)
- Constraints: A constraint is a rule that restricts the type or range of data that can be stored in a table or column. Examples of constraints include primary keys, foreign keys, unique constraints, and check constraints.
- First, after identifying the entities (objects, concepts, or events), you need to define the relationships between them. The relationship here defines how two or more entities are related to each other. For example:
![[ADD IMAGE'S ALT TEXT]](/sites/default/files/ERD%20Diagram.png)
- Ask your client or product owner what use cases for the project he/she has in mind, what his/her primary objective, and what data is the most important one at the end.
- Choose DB management system: Once you have an ERD with clear data model, you need to choose a Relational Database Management System (RDBMS) that supports the data model. For Flask Python application, you have several RDBMS options, including MySQL, PostgreSQL, and SQLite. Each RDBMS has its own syntax and features, so you need to choose the one that best fits your needs. Consider using the one that you and your team member have the skills to manage. In this topic, we will try and build the database in Figure 1 using SQLite as the RDBMS. Once you understand the fundamentals of one RDBMS and querying, it is quite easy to adapt one schema to another RDBMS.
- Implement your DB schema and Populate your DB. Use your ERD as blueprint for implementing your DB schema. Create tables, columns, indexes and constraints based on your data model. Once your schema is set and in place, you can either automate how you populate your DB by writing a script that import data from external sources or you can populate your DB manually.
- Test your DB and Connect it with your application: After populating the database, you need to test it to ensure that it works as expected. This includes testing queries, indexes, and constraints to make sure they work correctly. Then, you need to integrate the database with your web or desktop application. This involves writing code to connect to the database, execute queries, and handle errors. Like what we did for the blog post application in topic 6.
Considering the following factors can greatly help you maintain the integrity of your data and develop DB-based projects that are scalable:
- Database design is like Object Oriented Programming (OOP). In OOP, Class has some attributes, and an instance of a Class with its own attribute is called an Object. In database design, tables are similar to classes in OOP; the attributes of tables are its column, and rows are like objects. In OOP, you have classes and the more classes with less line you have, the better. Likewise, in database design Tables are like classes, and the more tables with less columns and rows you have the better.
- Avoid repeated data as much as possible to prevent inconsistency in data presentation.
- Reduce the number of links between tables as much as you can to avoid complexity.
- For the majority of the tables, a primary key is required. Any information may change but ID (the Primary key) never changes.
- If majority of the columns of two distinct tables are the identical, then create a parent table (super class) and make the two tables the children (sub classes) of the parent, so that they can inherit from the parent table.
- Note that the closest thing to inheritance in SQL is the creation of a foreign key for children and a primary key for the parent table. In SQL we don't have inheritance as a term, but by making a foreign key for children and Primary key for the parent table, we can accomplish this.

- In this section, we will build on what we learned about databases in topic 6.8 during our Flask blog application development. We will build the blog database described in Figure 1 using Python. We will use two files called init_db.py and schema.sql, similar to what we did in topic 6.
- First, we will create a .sql file that contains SQL commands to create the tables with a few columns for our DB. We will then use this file in our init_db.py file.
- Put the following SQL code inside your schema.sql file to create the three tables in Figure 1:
- If you have completed the SQLite Tutorial, it will be very easy for you to understand what the about SQL code does. In general, the first 3 line with DROP commands is to check if the tables already exist in our database, if they exist, we drop them and proceed to recreate. We use CREATE TABLE commands to create the ‘author’, ‘post’ and ‘comment’ tables. We create the tables with some columns using appropriate data type for each column. Note that for this example, we have set the PRIMARY KEYs of post and comment tables to AUTOINCREMENT for simplicity . Please avoid doing this as much as possible in your application. To learn more about Autoincrement see the tutorial below:
https://www.sqlitetutorial.net/sqlite-autoincrement/ - Follow the steps below to create and populate your database.
- Step 1: Create the db. Unlike other database management systems, there is no CREATE DATABASE command in SQLite: To create the blog DB, add the following code to your init_db.py file:
- The code snippet above would import sqlite, create a connection object connect to the sqlite database (blog.db), where connect() function takes in a string for the database name and returns a sqlite3.connection class object. If the database is already present, the functions just returns a connection object, else the database is created and then the connection object to the newly created database is returned. We then execute the sql statement in the schema.sql file.
- Step 2: Append the following lines of code to what you have in the init_db.py file. Please ignore the numbering.
- Step 1: Create the db. Unlike other database management systems, there is no CREATE DATABASE command in SQLite: To create the blog DB, add the following code to your init_db.py file:
- In line 1 of the code above, a connection object was used to get cursor access to the database. For us to be able to execute any operation on the sqlite database we created, we have to create a cursor object. This will be used to facilitate our communication with the database i.e., whenever will execute a SQL command, we execute on cursor object.
- In lines 2 -10, we use execute() method to insert one or more rows into the sqlite tables we created. Lines 2-3 insert queries will insert 2 authors with unique ids. Similarly, lines 4-6 queries will insert posts which are mapped to the authors id. In lines 7-9, we did the same for comments, map them to both author_id and post_id which are foreign keys in for table comment in our schema. Finally, we close the connection in line 10.
Step 3: RUN the init_db.py file:
- Run the file just like you will run your python script.
- If everything runs without error, then a blog.db file would be created, which is the name you gave your DB in
connection = sqlite3.connect('blog.db'). - This is your database. You can always delete this file and re-run the script to regenerate it.
Step 4: Test your DB schema : Note that the main reason why you would want to populate your database manually this way is to test the schema and run some extended sample queries ( similar to what you would expect a user to run through your connected application) across our DB. In your own application, after connecting your DB to the application , you will need to create a backend program logic to handle different user queries, and automate the insertion, deletion, and updating requests from users.
- Let’s view and test our blog DB here running some queries we will expect users to make through our application GUI:
- To view the blog db, do the following if you:
- Run sqlite3 blog.db
- This will open the DB. Your screen should be similar to below:

- This will open the DB. Your screen should be similar to below:
- Run sqlite3 blog.db
- To view the tables created in the db, do the following if you:
- Run .tables
- This will show the list of tables in the blog.db.
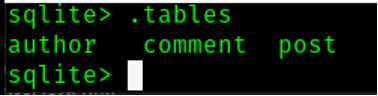
- You can see the 3 tables we created above.
- This will show the list of tables in the blog.db.
- Run .tables
- Now let’s run some queries on the tables.
- RUN SELECT * FROM comment WHERE post_id = 2;
- This will select and display comment on post with ID 2. See result below:

- This will select and display comment on post with ID 2. See result below:
- Run select queries on all the 3 tables to view the instances.
- RUN SELECT * FROM comment WHERE post_id = 1 and author_id = 101;
- This will select and display comment on post with ID 1 written by author with author_id=101. See result below:

- This will select and display comment on post with ID 1 written by author with author_id=101. See result below:
- RUN select * from author inner join post on (author.author_id = post.author_id);
- Here, we run query on multiple tables(post and author). The inner join clause will combine columns from the two tables. You can read more about inner joint here.

- Here, we run query on multiple tables(post and author). The inner join clause will combine columns from the two tables. You can read more about inner joint here.
Step 5: Inserting Multiple Rows : The each insert statement in the init_db.py file only insert a single record (row) to its associated table. We can also insert multiple rows using a single INSERT INTO query. To demonstrate how to do this, we will add, the following lines of code before connection.close() in line 10 in step 2.
- In the above code snippet, we used a data structure (python list) to store the records we want to insert into the author’s table. Then, we use executemany() method and pass the query and records list as arguments to the method. The print statement is to check if the query is executed successfully and inserted all the three records. We simply just printed the cursor.rowcount property.
- Now, Run the init_db.py script again after the above modification.

Figure above shows the confirmation that we have successfully inserted 3 records into author’s table. We can view the records in the table:

Additional Resources for running SQLite on Window PC:
- https://www.guru99.com/sqlite-database.html

- Now that we understand how to create, connect to, and interact with the SQLite database using python, Let’s use another example to demonstrate how to connect an application (desktop application in this case) to your DB. We have done something similar in topic 6.8, when we connect our blog.db to the flask web application. In this section, you will learn how to build a more flexible, more maintainable SQLite backend for your application using python.
- Backend for a Simple Library Management System
We will build a more maintainable and flexible backend for a library management application. The application will have two components: the student and the admin components. The student component of the application will allow student to be able to login to the library system, search for book, make book request and view book information. The admin component will allow library administrator to insert new book, update existing book information, delete book, search, and view book transactions (book request and issues).
The following steps show how the SQLite DB backend for the Simple Library Management System is implemented. Put the codes in a file called backend.py:
Unlike what we did in the previous example where we manually populate the DB, we will write small functions to do all the backend operations, including creating the book , book request and book issue tables and functions to manipulate and communicate with the tables.
Step 1: Create the book table to store book information.
- In this step, we created a function for connecting to the database. The function connect() will do 2 things:
- First, it runs the database connect() function , which takes in a string (book.db) for the database name and returns a sqlite3.Connection class object. If the database is already present, it just returns a connection object, else the database is created and then the connection object to the newly created database is returned.
- Second, the function will also initialize our book DB by creating a book table with attributes: id (as the PRIMARY KEY), title, author ,year and isbn.
Step 2: Write an insert function that takes new book information and insert new book into book table
Step 3: Function for viewing ALL book information.
- The function above fetches and return all the rows from the sqlite3 database table, named book.
Step 4: Function for searching for book
- The function above takes a book information, fetches and return the book that from the sqlite3 database table, named book.
Step 5: Function for deleting book information
- The function above takes a book id and delete the book.
Step 6: Function for updating book information
- The function above takes existing book information and update the book accordingly.
Step 7: Create request table function
- The above function will create a request table to store student’s book requests in the book.db.
Step 8: Write a function for storing book request into request table
Step 9: Write a function for viewing book request made
- This function fetches and return all the rows from the sqlite3 database table, named request.
Step 10: Write a function for deleting old request made
- This function will take a requested book title and delete the request.
Step 11: We also need to keep record of, and view book issued by administrator to student. To do this, an issue table function is created. Both insert and view functions are also created to store, view, and delete issue info respectively.
Reducing the duplicate codes:
If you follow the above code, you will notice that we have a lot of duplicate code statements. For example, we have repeated the following lines over and over in the functions created:
This was done to make it easy for readers to follow the example. However, to make your code cleaner, you may decide to create a reusable function that takes the 3 key arguments used repeatedly in the code : data-base name, query, and query parameters. See an example below:
The execute_query() function above will take the database name, a query with the parameter necessary to run the query statement, execute the query statement and return the result. We can call this function whenever we need to execute a query against a db.
Testing the Backend code:
Now that we have our backend implemented, we can begin to create our components, stating with the admin component.
- We will first build a simple GUI for the admin side of the application using Tkinter module (python's GUI toolkit). We will talk more about the Tkinter part of the code in topic 8. For now, just add the following code to a file called admin.py:
Make sure you format the code properly after copying and pasting, if you run the code successfully, your GUI for the admin side should be similar to the figure below:
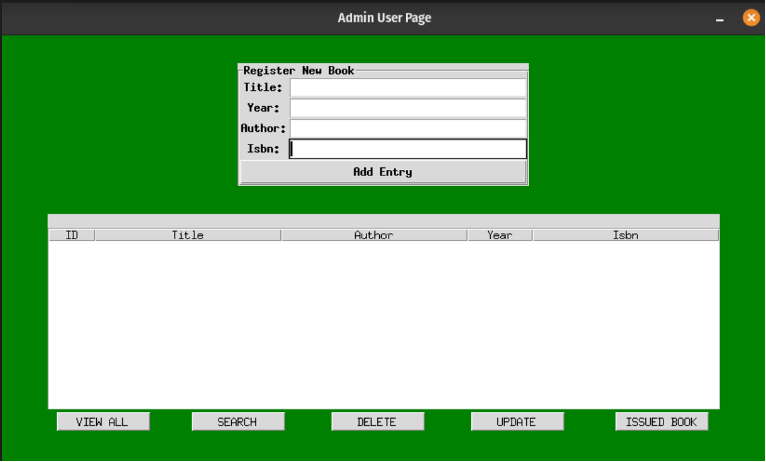
In the admin.py file, both tkinter library and the backend were imported. Pay attention to the following widgets:
- The LabelFrame : Frame for adding entries into the database.
- The TreeView : For displaying DB Book entries.
- Buttons : These are Onclick event handlers that we will use to call functions to do what the buttons’ labels say, and trigger database related operations or actions when user click the buttons.
- The only function we have called so far in the backend.py file is the connect() function, which will create the book DB connection object if not exit and then connect, else it will just connect.
o backend.connect()
- To enable the Tkinter button call our function to perform the DB operations, we need to assign the command option with the function name we want to call when the button is clicked.
- We will add 4 functions to start with:
- validation (): A simple input validation method.
- get_all_book() – This function will display all the books in the DB in the TreeView and will be triggered by the view all button.
- delete_book() – This function will delete a selected entry and will be triggered by the delete button.
- add_book() – This function will add new entry in the Register new book form to the book database and will be triggered by the add entry button.
Add the functions below to your admin.py file. Make sure you include the methods has the member of the admin class.
Let’s walk through the functions:
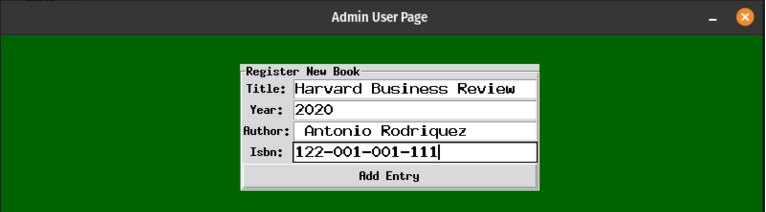
In the add_book() function, we use a validation function to check if the input text fields are not empty by checking if the length of the inputs are not equal zero. Then we call the insert function in our backend file and pass the input texts to it accordingly.
We clear the text fields after insertion.
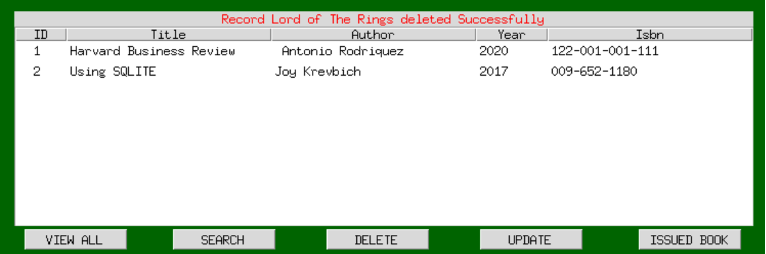
For get_all_book(), we clear the treeview each time we need to view the entries in the database to make sure we are displaying the current content of the DB. Then we use the view() method from the backend to display all the DB entries.
For the delete_book(), we first selected the item we want to delete and then send delete query to the DB using the id of the selected item. We call the backend.delete function in this case.
Update the Onclick Event Handlers to call the functions:
Now we can assign each function to the corresponding button’s command option. Make the following changes in your admin.py file:
Test Your Admin Page:
Let’s test the functionalities of the admin page. If everything runs successfully , you should be able to add, delete and view book entries.

Note: We will complete the implementation of the App in the topic 8 where you will learn the basics of python GUI libraries like Tkinter and dearpygui.
Normalizing your DB would help eliminate or reduce data redundancy and enhance the integrity of data in your tables. It also helps to better organize the data in the database. To Normalization generally involves multiple steps that sets the data into tabular form and removes the duplicate from the database tables.
If you have known background in DB design and normalization, it is recommended that you study the tutorial below:
It is important that all the attributes are in the correct table so that you will not face a problem in the future.
Beware of the following issues and address them during the normalization process:
- Modification issues-
- For example, consider a database that stores customer orders and product information in two separate tables. If the product information is duplicated across multiple customer orders, any modification to the product information (such as a change in price or availability) would require updates to all affected customer orders, which can be time-consuming and error prone.
- By normalizing the database, the product information can be stored in a separate table, with a unique identifier (such as a product code) that can be referenced in the customer orders table. This reduces the amount of duplicated data and ensures that any modification to the product information only needs to be made in one place.
- Additionally, the use of foreign keys and other constraints can help to enforce data integrity and prevent inconsistencies across the database.
- Insertion issues: An insertion anomaly occur when you try to insert new data into a table, but some of the required data is missing or incomplete.
- For example, suppose you have a table called "Employees" with the following columns:
- Employee ID
- First Name
- Last Name
- Department
- Supervisor ID
- If you were to add a new employee to this table, but you didn't know the supervisor's ID, you might leave that field blank. This would result in an insertion anomaly because you would have a record in the table with missing data.
- Normalization can address this issue by breaking up the "Employees" table into multiple tables that are more closely related to the specific data they represent. For example, you could create separate tables for Departments and Supervisors, and then link them to the Employees table using foreign keys.
- This would allow you to insert data into each table separately, without having to worry about missing data or other insertion anomalies. When you need to retrieve information about an employee, you can use joins to combine the data from multiple tables and get a complete picture of the employee's information.
- By breaking up the larger table into smaller, more focused tables, normalization can help to reduce the likelihood of insertion anomalies and ensure that your data is stored in a logical and consistent manner.
- For example, suppose you have a table called "Employees" with the following columns:
- Deletion issues: Deletion anomaly usually occur when we delete extra info accidentally because of a bad database design. You want to avoid accidental deletion of related data in other tables that should not be deleted when performing a delete operation or deleting a record from a table.
- For example, consider a database for a library. The library has a table for books, a table for borrowers, and a table for loans that records which books are loaned to which borrowers. If a borrower returns a book and the loan record is deleted, there could be unintended consequences.
- If the loan record is the only record that links a particular book to a particular borrower, deleting the loan record would also delete the information about which borrower checked out that book. This could cause problems if that borrower has checked out other books, because their borrower information would be lost.
- Normalization can address this issue by breaking up the loan table into two tables, one for loans and one for borrowers. The loan table would only include information about which book was loaned and when and would reference the borrower ID from the borrowers table. This way, deleting a loan record would not also delete borrower information.

SQLAlchemy is a Python package that provides a nice “Pythonic” way of interacting with databases. So rather than dealing with the differences between specific dialects of traditional SQL, you can leverage the Pythonic framework of SQLAlchemy to streamline your workflow and more efficiently query your data.
The SQLAlchemy package may need to be installed before use. Using the Python package manager pip, type pip installs SQLAlchemy in your terminal.
Resources
- The is a lot of resources available for you to learn SQLAlchemy: