In this topic, you will be introduced to some popular full-stack web development technologies that are widely used by modern developers. During your assessment, you will select the technology that best suits your Web application project, and that your team have the skill to use.
You are expected to take responsibility for your own learning and development, using your research/problem-solving skills to learn and adapt the technologies that you find suitable for your project. This topic will provide you with some resources you can explore to learn about some of them.
Building on your Python programming knowledge developed in CS 202, the examples provided in this topic introduce Flask, a lightweight Python Web framework that provides useful tools and features for creating Web applications using Python language.
The example will guide you through a full-stack experience from the back end to the front end.
A web development stack refers to the set of technologies, tools, and platforms that software developers use to build and maintain a web or mobile application. The stack typically includes a combination of programming languages, frameworks, databases, and tools that work together to enable the development process. The choice of technologies in the stack depends on the specific needs of the project and the preferences of the development team.
A typical web development stack might include:
- A front-end JavaScript framework such as React or Angular
- A back-end programming language such as Python or Ruby
- A back-end framework such as Ruby on Rails or Django
- A database management system such as MySQL, MongoDB or PostgreSQL
A mobile development stack might include:
- A programming language such as Swift for iOS or Java for Android
- A mobile development framework such as React Native or Xamarin
- Tools for testing and deployment, such as Xcode for iOS or Android Studio for Android.
It's worth noting that development stacks can be customized and extended to meet the specific requirements of a project.
Popular Full-Stack Web Development Technologies
There are several popular full-stack web development technologies that are widely used by developers today, including;
The MERN stack is a popular choice for building full-stack web applications and consists of MongoDB ( a NoSQL database), Express.js (a minimalist Web application for Node) , React ( A front end library), and Node.js (a server-side JavaScript runtime). This stack is easy to learn and provides a smooth development experience for building dynamic web applications.
Additional Resources for MERN STACK:
- https://www.mongodb.com/languages/mern-stack-tutorial
- https://github.com/bmorelli25/Become-A-Full-Stack-Web-Developer
- https://github.com/jeanrauwers/react-native-bootcamp
- https://www.youtube.com/watch?v=7CqJlxBYj-M
- https://www.youtube.com/watch?v=I7EDAR2GRVo
- https://www.youtube.com/watch?v=TlB_eWDSMt4
The LAMP stack is a classic choice for building dynamic websites and consists of Linux (an operating system), Apache, MySQL (a relational database management system), and PHP (a server-side scripting language). This stack is widely used and well-documented, making it a good choice for beginners.
Additional Resources for LAMP:
Ruby on Rails is a web framework for the Ruby programming language that makes it easy to build web applications quickly. Ruby on Rails is known for its ease of use and strong community support, making it a good choice for beginners.
Additional Resources for Ruby on Rails:
Django is a high-level Python web framework that is easy to learn and provides a smooth development experience. Django is widely used and has a large community of developers, making it a good choice for beginners.
Some Django Resources:
Spring Boot is a popular Java framework for building web applications and microservices. It is easy to learn and provides a smooth development experience for building both web and mobile applications.
Additional Resources for Spring Boot:
Svelte is a modern JavaScript framework that allows developers to build fast and efficient web applications. With its unique approach to compiling components at build time, Svelte eliminates runtime overhead, resulting in smaller bundle sizes and improved performance. It offers a simple syntax and smooth reactivity for building reactive user interfaces with ease. Svelte empowers developers to create high-performance web applications that load quickly and deliver exceptional user experiences.
Additional Resources for Svelte:
These development stacks are a good starting point for beginners and provide a solid foundation for building web and mobile applications. As you gain experience, you can explore other technologies and stacks that are more suited to your specific needs and interests.
Pros and Cons of Popular Web development Stacks
Below are some of the most popular web development stacks and their advantages and disadvantages.
| Development Stack | Pros | Cons |
|---|---|---|
| LAMP |
|
|
| MEAN |
|
|
| MERN |
|
|
| Flask (Python) |
|
|
| Django |
|
|
Selecting A Web Development Stack
Selecting the right web development stack can be a crucial decision for your project's success. When choosing a development stack, there are several considerations that your team should consider, including:
Your project requirements should be the primary consideration when selecting a web development stack. This includes factors such as the size and complexity of the project, the desired performance and scalability, and the specific technologies that are required to implement certain features.
You want to choose technologies that are easy to work with and have a strong developer community for support. This includes documentation, tutorials, and libraries, as well as the overall learning curve for new technologies.
The development stack should be capable of handling the expected load and performance demands of the project, as well as being able to scale as the project grows. Consider the scalability of the stack.
Will it be able to handle your project's growth over time?
Can it accommodate increased traffic and data storage?
The cost of the development stack should be considered, including licensing fees, hosting costs, and the cost of hiring specialized developers if needed.
Consider the expertise of your development team when selecting a web development stack. Choose a stack that your team is familiar with and can work efficiently with.
You should consider the compatibility of the development stack with other tools and systems that are already in place, such as a specific version control system or a particular continuous integration tool. Consider how well the stack integrates with other tools and technologies you may need to use.
A strong and active community of developers can provide valuable support, bug fixes, and updates for the development stack. Consider the community support available for the stack.
Is there a strong and active community that can provide support and resources when needed?
The security of the development stack should be considered, including the security of the framework, the programming language, and the underlying infrastructure. Consider the security features of the stack.
Is it secure and reliable?
Will it protect your data from vulnerabilities and attacks?
You should consider the long-term maintenance of the development stack, including ongoing support, bug fixes, and updates, as well as the potential for obsolescence.
Additional Resources:

We have chosen Flask for the example in this topic to leverage your existing python knowledge and skill set. Flask is a good choice for small to medium-sized projects but may not be as suitable for larger or more complex applications. It is important to carefully consider the pros and cons of each stack before making a choice.
Flask was created by Armin Ronacher in 2000 as a small, minimalistic and lightweight Python Web application framework. Flask depends on two popular frameworks:
- Jinja Template Engine - a full-feature template engine for Python.
- Werkzeug (WSGI) Toolkit - a comprehensive Web server Gateway Interface (WSGI) with a robust debugger, a URL routing system, a fully featured request and response objects and a powerful debugger.
WSGI is a specification for a standard, easy-to-use interface between Python web applications and web servers.
Flask is a non-full-stack framework. Therefore, high-level tasks like database access, web form and user authentication are supported through "extensions”.
Werkzeug addresses the Controller (C) in the MVC (Model-View-Controller) architecture, and Jinja2 addresses the View (V).
Flask does not provide an integrated Model (M) layer and lets you pick your database solution. A popular choice is Flask-SQLAlchemy with an ORM (Object-Relational Mapper) over a relational database such as MySQL or PostgreSQL.
Other dependencies
MarkupSafe comes with Jinja. It escapes untrusted input when rendering templates to avoid injection attacks.
ItsDangerous securely signs data to ensure its integrity. This is used to protect Flask’s session cookie.
Click is a framework for writing command-line applications. It provides the flask command and allows adding custom management commands.
In summary, the Flask framework provides:
- a WSGI compliance interface.
- URL routing and Request dispatching.
- Secure cookies and Sessions.
- a built-in Development Web Server and Debugger.
- Unit test client for unit testing that facilitates write-test-first.
- Jinja2 templates (tags, filters, macros, etc.).
You may manage HTTP and AJAX requests, user sessions between requests, request routeing to controllers, data evaluation and validation, HTML or JSON response, and other things with Flask.
Get started with Flask (Documentation and Tutorials):
To get started with flask, read the quick start guide and explore the tutorials available on the Flask website.
Setting up a python development environment
A Python virtual environment is a self-contained directory tree that contains its own Python installation and all the necessary packages and dependencies for a specific project or application. It allows you to isolate your project's dependencies from other projects and the system's default Python environment, making it easier to manage and avoid conflicts between different versions of packages.
When you create a virtual environment, you can install specific versions of packages for that project without affecting other projects on the same machine. You can also easily activate or deactivate the virtual environment to switch between different projects with different dependencies.
To create a virtual environment in Python, you can use the built-in venv module or third-party tools like virtualenv or conda. Once you activate the virtual environment, any package installations or modifications you make will only affect that environment.
It is strongly recommended to use a virtual environment when developing Python applications.
Reasons to use virtual environments
The more Python projects you have, the more likely it is that you need to work with different versions of Python libraries, or even Python itself. Newer versions of libraries for one project can break compatibility in another project.
Virtual environments are independent groups of Python libraries, one for each project. Packages installed for one project will not affect other projects or the operating system’s packages.
Setting up a programming environment provides greater control over Python projects and over how different versions of packages are handled. This is especially important when working with third-party packages.
You can set up as many Python programming environments as you would like. Each environment is a directory or folder on your server that has the scripts in it to make it act as an environment.
Python comes bundled with the venv module to create virtual environments.
Installing python and pip
It is strongly recommended to use a virtual environment when developing Python applications.
The more Python projects you have, the more likely it is that you need to work with different versions of Python libraries, or even Python itself. Newer versions of libraries for one project can break compatibility in another project.
Virtual environments are independent groups of Python libraries, one for each project. Packages installed for one project will not affect other projects or the operating system’s packages.
Setting up a programming environment provides greater control over Python projects and over how different versions of packages are handled. This is especially important when working with third-party packages.
You can set up as many Python programming environments as you would like. Each environment is basically a directory or folder on your server that has a few scripts in it to make it act as an environment.
Python comes bundled with the venv module to create virtual environments.
The examples in this topic are created on a Linux machine. You can follow the instructions in the Flask documentation to create your own python virtual environment if you are running a different operating system.
See Flask Installation documentation.
Follow the step below to set up your venv and create you first flask app.
Setting Up Python 3
Depending on the OS that you are using, recent operating systems comes with a version of python. On ubuntu 18.04 and other versions of Debian Linux ship with Python 3 pre-installed. To make sure that your versions are up to date, update your local package index, run :
Then upgrade the packages installed on your system to ensure you have the latest versions:
The -y flag will confirm that we are agreeing for all items to be installed, but depending on your version of Linux, you may need to confirm additional prompts as your system updates and upgrades.
Once the process is complete, we can check the version of Python 3 that is installed in the system by typing:
To manage software packages for Python, you can install conda or pip, a tool that will install and manage programming packages we may want to use in our development projects.
Follow the syntax to install packages:
The package_name here can refer to any Python package or library, such as Flask or Django for web development or NumPy for scientific computing.
There are a few more packages and development tools to install to ensure that we have a robust setup for our programming environment:
Once Python is set up, and pip and other tools are installed, we can set up a virtual environment for our development projects.
Setting Up a Virtual Environment
In this example, we use venv module to set up a programming environment in Python ( note that there are other ways to do this.). Install venv by typing:
Create a project folder and a venv folder within. We shall install Flask under a virtual environment (called flaskenv) under our project directory. You need to choose your own project directory.
cd /path/to/project-directory
python3 -m venv flaskenv
Before you work on your project, activate the corresponding environment:
Your command prompt will now be prefixed with the name of your environment, in this case it is called flaskenv. Your virtual environment is now ready to be used.
Install Flask
To install, run the following command:
Check installed packages:
Confirm the installation and version.
Flask blogging example app
The following instructions will guide you through the creation of a simple blogging app.
The app will:
- Display a user's posts, including the creation date and time.
- Allow users to create a post that includes a title and content.
- Allow users to edit posts
- Store posts in, and retrieve posts from an SQLite database.
In your project directory, create a new file named blog.py that contains the following script.
This blog.py file will serve as a minimal example of how to handle HTTP requests. Inside it, you will import the Flask object, and create a function that returns an HTTP response.
In summary, you imported Flask from the flask module, and created an instance of your flask application named app. Then, you pass the special variable __name__ that holds the name of the current Python module into your app. This will tell the instance where it is located (you need this because Flask sets up some paths behind the scenes).
You utilise the app instance you just created to manage incoming web requests and communicate user answers. With the decorator @app.route, a conventional Python function can be transformed into a Flask view function, which then transforms the method's return value into an HTTP response that can be viewed by an HTTP client, such as a web browser.
URL '/' is to be handled by main() route handler. You pass the value '/' to @app.route() to signify that this function will respond to web requests for the URL '/', which is the main URL.
Running the app
To run the Webapp, first, tell Flask where to find the application (the blog.py file in your case) with the FLASK_APP environment variable, and then run it in dev mode with the FLASK_ENV environment variable. You can do this by executing the following command from within your project directory.
export FLASK_ENV=development
flask run
You should see the following message displayed in the terminal
* Debug mode: on
WARNING: This is a development server. Do not use it in a production deployment. Use a production WSGI server instead.
* Running on http://127.0.0.1:5000
Press CTRL+C to quit
* Restarting with stat
* Debugger is active!
* Debugger PIN: 131-074-578
The output confirms the following
- The name of the application running – “blog”
- The environment in which the application is being run – “development”
- The Flask debugger is running. This is useful when developing because it gives us detailed error messages when things go wrong, which makes troubleshooting easier.
- The application is running locally on the URL http://127.0.0.1:5000/. 127.0.0.1 is the IP address that represents your machine’s localhost and :5000 is the port number.
Open a browser and type in the URL http://127.0.0.1:5000/, you will see the string “welcome to my blog”, this confirms that your application is successfully running.
Multiple routes
You can register more than one URL to the same route handler (or view function). Try adding @app.route('/post') directly after @app.route('/') in the blog.py file and save.
You will need to restart the application for the changes to take effect.
You should now see the same message when you visit http://127.0.0.1:5000/ and http://127.0.0.1:5000/post in the browser.
Debug mode
To avoid having to restart the application every time you make a change to your code, you can activate debug mode, which will automatically reload the application when you save a file in your project.
In your blog.py file replace app.run() with app.run(debug=True)
Try adding an additional route to your blog.py file and save it to test if auto-debugging and auto-reloading are enabled.
Serving HTML Pages
Currently, our app only returns the basic string “welcome to my blog”, with no HTML to provide structure or CSS styling.
You can return an HTML formatted string as a single line, like this
Or over multiple lines like this
Note that the multiline example also returns the optional HTTP response status code with the default value of 200 for “OK”.
While it is possible to return HTML formatted strings directly, It should be avoided because it violates the MVC (Model-View-Controller) architecture.
Instead, we can create “presentation” or “View” components that are separate from the controller (the blog.py file in this case) by including the response message in a separate HTML file known in Flask as a template.
Create a new subdirectory in the root of your project directory called “templates”
Create a new HTML file names blog.html in the templates directory that includes the following code.
Now at the top of the blog.py file, add render_template to the list of classes to import from flask.
Modify the function main() to return the rendered blog.html file.
If you receive the error “jinja2.exceptions.TemplateNotFound:” check that your template is located in the correct subdirectory and named correctly.
Jinja Template Engine
Flask uses Jinja template engine for rendering templates. the function render_template() is used to render a Jinja2 template to an HTML page for display in a web browser.
A Jinja2 template can contain expressions, statements, and other features. This will make managing HTML much easier by writing your HTML code in .html files as well as using logic in your HTML code.
Static Resources
Dynamic web applications also need static files. Images, CSS and JavaScript files are often hosted in a ‘static’ folder separate from the ‘templates’ folder. Create a folder called static in your project's root directory, and it will be available at /static in the application.
Create the static subdirectory and sub-sub-directories for img, css and js.
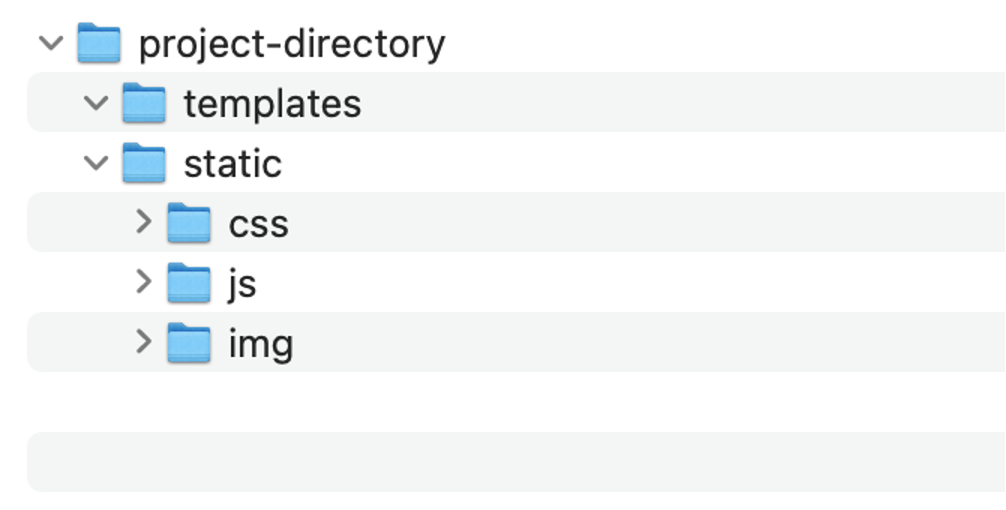
caption: How your project directory should be structure
Create a style.css file in the css directory that includes the following CSS rule
You can use the url_for() helper function to reference static resources. For example, to refer to the CSS file we just created /static/css/styles.css, you can use url_for('static', filename='css/styles.css')
Static resources are often referenced inside Jinja2 templates (which will be rendered as HTML pages).
In the blog.html template file, add the following link to the head tag after to reference the CSS file in a link element.
The double curly braces ({{ }}) are used to define placeholders in the template.
URL Building
To build a URL to a specific function, use the url_for() function. It accepts the name of the function as its first argument and any number of keyword arguments, each corresponding to a variable part of the URL rule. Unknown variable parts are appended to the URL as query parameters.
Why would you want to build URLs using the URL reversing function url_for() instead of hard-coding them into your templates?
- Reversing is often more descriptive than hard-coding the URLs.
- You can change your URLs in one go instead of needing to remember to manually change hard-coded URLs.
- URL building handles escaping of special characters transparently.
- The generated paths are always absolute, avoiding unexpected behaviour of relative paths in browsers.
- If your application is placed outside the URL root, for example, in /myapplication instead of /, url_for() properly handles that for you.
Template Inheritance
Adding additional routes and HTML templates to render could mean that a lot of the code is repeated in each file to display items that will appear on every page, like the navigation, headers and footers. We can avoid this by using template inheritance. A base template can be created that defines the structure of the application and includes common elements of your application pages, and defines blocks that child templates can override.
Create the following base.html file in your project template directory.
If you take a look at the base.html file, you will see that it begins as a normal HTML document and includes the necessary link and script elements for bootstrap and jQuery.
This is not a bootstrap tutorial. To learn more about the bootstrap and some of the classes used in this example, take a look at the bootstrap documentation.
Between the title tags, you can see {% block title %} {% endblock %}. This is how blocks that can be replaced are defined.
The base template also defines:
- a nav bar
- a container for the app's main content <div class="container">
- A block for the main content of each page {% block content %} {% endblock %}
You will also notice that a section in the container div for “flashed messages”. This will be covered later.
Replace the contents of blog.html with the following:
We use {% extends 'base.html' %} to define base.html as an inheritance source.
We can then replace the {% block content %} with the new content defined.
This content block contains an <h1> tag with the text “Welcome to my blog” inside a title block, which in turn replaces the original title block in the base.html template also with the text “Welcome to my blog”.
This avoids repeating the same text twice, as it works as both a title for the page and a heading that appears below the navigation bar inherited from the base template.
Template inheritance enables us, to reuse the HTML code we have in other templates (base.html) without having to repeat it each time it is needed.
Flask Variable Rules
You can build URLs dynamically in Flask by adding variable sections to the rule parameter. You can add variable sections to a URL by marking sections with
Your function then receives the
The URL rules of Flask are based on Werkzeug’s routing module. This ensures that the URLs formed are unique and based on precedents laid down by Apache.
Add a route that allows us to pass variables as arguments to the welcome message in the render_template() by adding the following route and function to your blog.py.
Import escape from markupsafe:
Modify your blog.html file to look like this:
In the code above, you have used the variable “author” defined in your blog.py function in the blog.html template file.
Navigate to http://localhost:5000/author/
You can also apply a type converter to the variable, in the form of
string: (default) accepts any text without a slash (/).
You can apply addition arguments such as length, minlength, maxlength, e.g.,
<string(minlength=4, maxlength=8):username>
int: you can apply additional argument such as min and max, e.g.,
float
path: accept slash (/) for URL path, e.g.,
uuid
any(converter1,...): matches one of the converter provided, e.g.,
See examples of Variable Rules in the Flask documentation.
Functions redirect(), url_for() and abort()
In your route handlers, you can use return redirect(url) to redirect the response to another URL or endpoint.
For example, we can redirect our home page to the main page by adding the following:
Instead of hard-coding URLs in your route handlers, you could use the url_for(route_handler) helper function to generate URL based on the route handler's name. We have done this previously when adding the style sheet to the original blog.html file. You can also see it being used in the base.html file in the anchor tag for the Blog link.
The url_for(route_handler) takes a route handler (view function) name and returns its URL.
- url_for('main'): returns the internal (relative) URL '/'.
- url_for('main', _external=True): will return the external (absolute) URL 'http://localhost:5000/'.
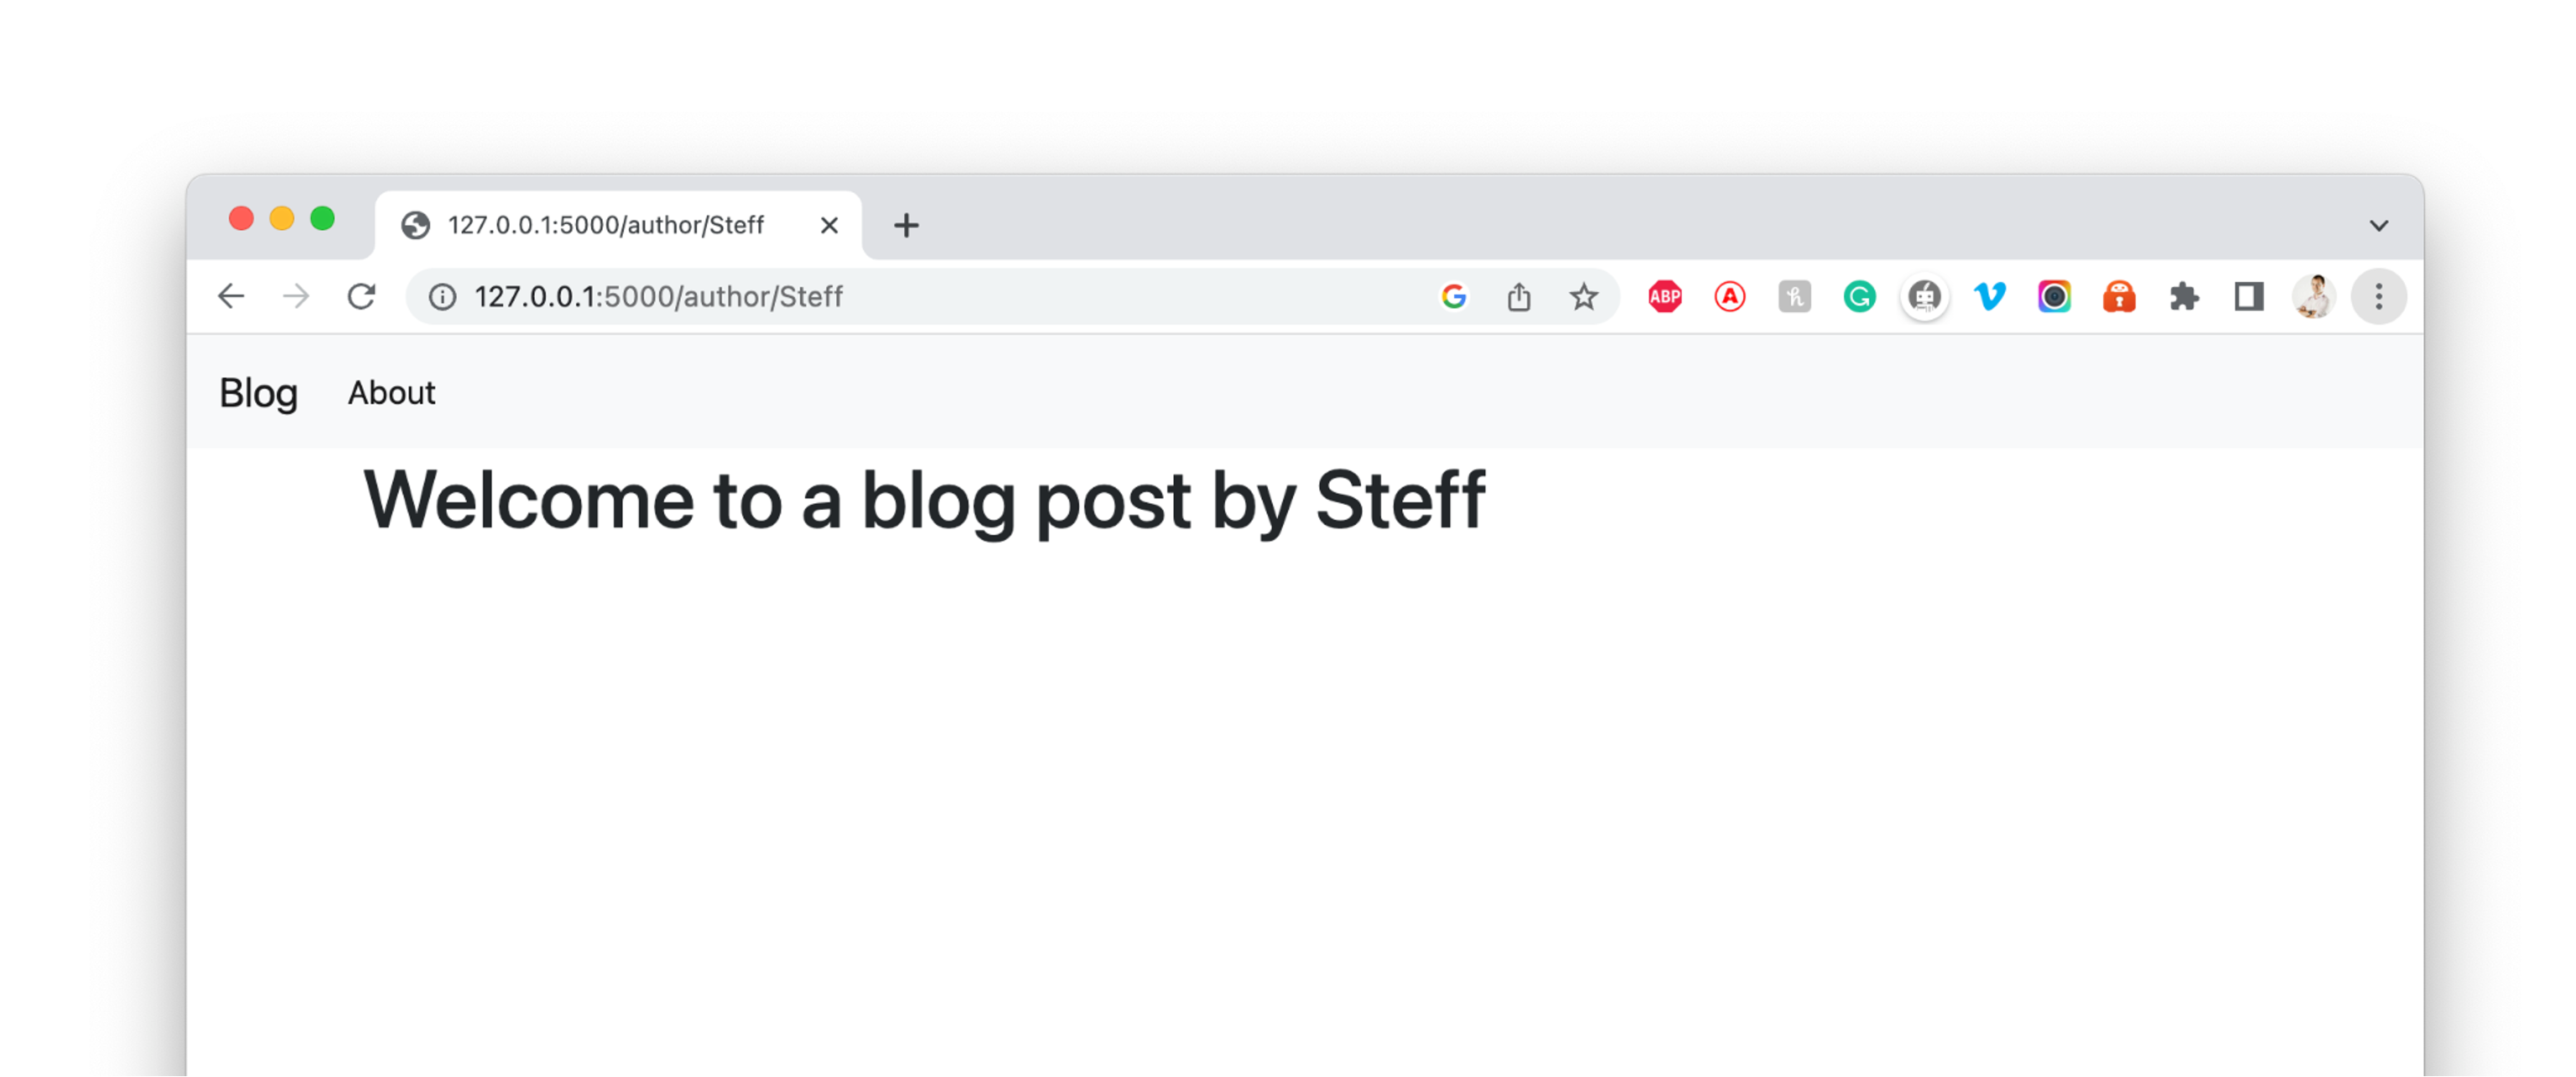
- url_for('author', authorname='Steff', _external=True): returns the external URL 'http://localhost:5000/author/Steff'.
We can abort a request early with an error code using the abort() function. We do not have a login page yet, so the user cannot access the page, we want 401 error to be displayed to indicate that access is denied.
Add the following route to blog.py
We can also customize the error page, you can use the errorhandler() decorator:
Note the 404 after the render_template() call. This tells Flask that the status code of that page should be 404, which means not found.
By default, 200 is assumed, which translates to: all went well.
Add the two functions to your blog.py and study how they work.
You will need to create the page_not_found.html in the templates directory. Try something like this.
Try navigating to a URL you haven’t created a route for yet, http://localhost:5000/help for example.
Read more about flask abort API here https://flask.palletsprojects.com/en/2.2.x/api/
Jinja2 Template Syntaxes
In Flask, the route handlers (or view functions) are primarily meant for the business logic (i.e., Controller in MVC), while the presentation (i.e., View in MVC) is to be taken care of by the so-called templates. A template is a file that contains static text, as well as placeholders for rendering dynamic content. Flask uses a powerful template engine called Jinja2.
Refer to the Jinja Documentation for the syntax and semantics of the template engine. This a useful reference when creating Jinja Templates.
Setting up a Database to Store the Blog Posts
To store the Blog Posts data for our application, we need to set up a database. We will use an SQLite relational database file to store our data.
Note that other relational databases like MySQL and PostgreSQL can be used with Flask. We have decided to use SQLite at this stage because the SQLite module, Is readily available in the standard Python library.
You can install SQLite if the following commands:
sudo apt-get install sqlite3 libsqlite3-dev
The entity relationship diagram (ERD) below shows the logical structure of our database:

A more complicated app might include tables for users or authors and show the relationships between tables.
To learn more about ERDs take a look at this video.
Create a file called schema.sql inside your blog project directory and add the following:
create a file named init_db.py inside the blog directory and include the following:
This script only needs to be run once.
Run init_db.py in the terminal using the Python command.
Once the file finishes execution, a new file called database.db will appear in your project directory. This means you have successfully set up your database.
The database will have two posts already added.
Displaying all Blog Posts
To create a connection to the database, we need to add import sqlite3 in the blog.py file, and include the following function after the import.
The function get_db_connection() opens and returns a connection to the database.db file. It also sets the row_factory attribute to sqlite3.Row. This will enable name-based access to columns, meaning that the database connection will return rows that behave like regular Python dictionaries.
After defining the get_db_connection() function, modify the main() function as follows:
The new function fetches all the posts from the database and passes them to the blog.html template so we can use a for loop to display each post on your main/home page.
Make the following modification to the blog.html file:
{% for post in posts %} opens a Jinja for loop, which is similar to a Python for loop except that it need to end with the {% endfor %}
each item in the posts list that was passed by the main() function in the line return render_template('blog.html', posts=posts), and is displayed with the post title in an anchor tag. This passes 'post' to the url_for() function as a first argument. This is the name of the post() view function, and since it accepts a post_id argument, you give it the value post['id']. The url_for() function will return the proper URL for each post based on its ID to the href of the anchor.
We display the title using a literal variable delimiter ({{ ... }}). Remember that post will be a dictionary-like object, so you can access the post’s title and content with post.title and post.content respectively. You also display the post’s creation date using the same method.
The post’s title link can display a single post by including the following functions and route in blog.py:
We also need to create a new template file called post.html to display an individual post’s content. Add the following to the file:
Test the URLs http://localhost:5000/post/1 to see the first posts you have in your database. Try clicking on a post tile from the main page.
Also, test to see if it throws an exception page_not_found.html with URLs http://localhost:5000/post/3. This is expected as there is currently no post with an ID of 3.
Using HTTP Methods in Flask
Web applications use different HTTP methods when accessing URLs.
You should familiarize yourself with the HTTP methods as you work with Flask.
https://developer.mozilla.org/en-US/docs/Web/HTTP/Methods
By default, a route only answers GET requests. You can use the method's argument of the route() decorator to handle different HTTP methods.
Creating New Posts, Modifying and Deleting Posts
We have made some great progress however, our blog app is only capable of displaying posts that already exist in the database. We need to create a way for users to publish new and edit existing posts. We will do this by sending requests and responses to and from the system using HTTP POST and GET methods.
Start by adding the request, flash, and redirect flask classes to the import line in blog.py.
The flash() function flashes a message when a request is processed.
The flash() function stores flashed messages in the client’s browser session, which requires setting a secret key.
This secret key is used to secure sessions, which allow Flask to remember information from one request to another, such as moving from the new post page to the index page.
The user can access the information stored in the session but cannot modify it unless they have the secret key, so you must never allow anyone to access your secret key. See the Flask documentation for sessions for more information.
Set the secret key by adding the following to your blog.py just after app = Flask(__name__) .
A secret key should be a long random string.
The following Python command can be used to generate an appropriate value.
The HTML to display the flashed messages is already included in the base.html file.
The global request object is used to access incoming request data that will be submitted via an HTML form.
Next, we will create a view function that will render a template that displays a form you can fill in to create a new blog post. Add this new route and function at the bottom of the blog.py file:
def create():
return render_template('create.html')
This creates a /create route that accepts both GET and POST requests. GET requests are accepted by default.
To also accept POST requests, which are sent by the browser when submitting forms, we will pass a tuple with the accepted types of requests to the method's argument of the @app.route() decorator.
Now create a template named create.html inside your templates directory for creating new blog posts. Add the following to the file:
To make a POST request with this form, we need to include the logic to do this inside the create() view function.
You can handle the POST request separately by checking the value of request.method.
With its value set to 'POST' the request is a POST request, you will then proceed to extract submitted data, validate it, and insert it into your database.
Modify the create() view function as follows:
Note that the flash() function is called if a title is not submitted in the form.
add the following link to the navigation bar in the base.html template to have easy access to this new page.
Now fill in the form with a title of your choice and some content. Once you submit the form, you will see the new post listed on the main page.
Edit Existing Post
To edit an existing post, we need to make an edit view function in blog.py that will first retrieve the post we want to edit from the DB using the post’s “id”, then we make changes and update the DB.
Add the following route and function to the blog.py file:
Create the edit view template, named edit.html.
Have a go at creating the template yourself.
You can reveal the solution here:
Include the following code in the edit.html file:
add a link to the blog.html file that points to the edit page for each post on the main page. You’ll want to use the url_for() helper function and pass in the post id.
Have a go at completing it yourself.
Add the following link to the for loop section of the blog.html file.
Your blog.html file should look something like this:
You should now be able to click the “edit” link to edit each post, give it a go now.
Extend the blog project by adding the ability for users to delete posts.

Heroku makes building and deploying applications really friendly for developers. It removes much of the burden related to building and running web applications, taking care of most infrastructure details and letting you focus on creating and improving the app.
Some of the details handled by Heroku include:
- Provisioning HTTPS certificate
- Managing DNS records
- Running and maintaining servers
Create an account
To deploy your blog app on Heroku, you will need the following:
First, set up Heroku Account if you don’t have one. It allows you to deploy non-commercial applications, personal projects, and experiments without spending money. Sign up here : https://signup.heroku.com/ . After signing up, you should be able to use Heroku.
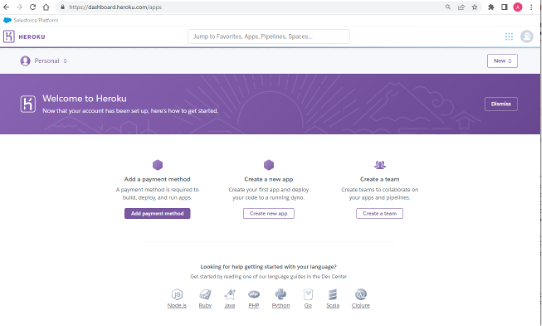
Your dashboard should look like the image below:
Heroku Command-Line Interface (CLI)
The Heroku command-line interface (CLI) is a tool that allows you to create and manage Heroku applications from the terminal. It’s the quickest and most convenient way to deploy your application. You can check the developer’s documentation for installation instructions for your operating system.
Here are the instructions for installing the Heroku CLI.
Log in by running heroku login in your terminal.
Using the Heroku CLI and Git to deploy your web application.
Create a file named Procfile in the project’s root directory. This file tells Heroku how to run the app. You can create it by running the following command:
Note that this filename must start with a capital letter. This file tells Heroku to serve your application using Gunicorn, a Python Web Server Gateway Interface (WSGI) HTTP server compatible with various web frameworks, including Flask.
Make sure to install Gunicorn and update the requirements.txt file using pip:
pip3 freeze > requirements.txt
The previous commands install Gunicorn and update requirements.txt to contain the list of all dependencies.
Set up your git repository by running the following commands:
echo venv > .gitignore
echo __pycache__ >> .gitignore
git add .gitignore app.py Procfile requirements.txt
git commit -m "Initialize Git repository"
venv should be same as the name of your virtual environment. We set this to ‘flaskenv’ at the beginning of this topic.
To deploy the application to Heroku, start by creating a Heroku application using the Heroku CLI.
The app can also be created from the GUI.
The previous command initializes the Heroku application, creating a Git remote named heroku.
you can push the Git repository to this remote to trigger the building and deployment process:
After pushing the master branch to the heroku remote, you will see that the output displays information about the building and deployment process:
Congratulations, the app is now online! The output shows the building process, including the installation of dependencies and the deployment. You will find the URL for your application. In this case, https://flaskblog-app.herokuapp.com/.
DRY stands for "Don't Repeat Yourself" which is a principle of software development that advocates for avoiding duplication of code. Writing DRY code in web development helps to reduce code complexity, increase maintainability, and make debugging easier. Here are some tips to help you write DRY code in your web development project:
- Use Functions and Classes: Functions and classes are great ways to encapsulate code that performs specific tasks. You can reuse the same function or class throughout your project instead of repeating the same code multiple times. This reduces the amount of code you need to write and makes it easier to modify the behaviour of the function or class in one place.
- Use Variables: Instead of hard-coding values into your code, use variables to store values that may change. This way, if the value needs to be updated, you only need to update it in one place.
- Use Libraries and Frameworks: There are many libraries and frameworks available that provide pre-written code to perform common tasks. Using these libraries can save you a lot of time and help you write DRY code.
- Avoid Copy and Paste: When you find yourself copying and pasting code, it's a sign that you could probably refactor the code to make it more reusable. Try to identify the common functionality between the duplicated code and refactor it into a single function or class.
- Use Inheritance and Polymorphism: Inheritance and polymorphism are concepts that allow you to create classes that inherit functionality from other classes or modify the behaviour of a class without changing its code. These concepts can help you write more reusable and flexible code.
- Keep your code simple and readable: Simple and readable code is easier to maintain and modify. Avoid over-engineering and using complicated solutions for simple problems. Keep your code easy to understand by using meaningful variable names, commenting your code, and breaking up long functions into smaller, more manageable pieces.