The Lumbo-Pelvic Hip Complex (LPHC) describes the musculoskeletal structures that stabilise and move the lumbar spine, pelvis, and hip. The LPHC is a region of the body that has a massive influence on the structures above and below it. It is a complex system with many moving parts that need to work harmoniously for efficient posture and movement. The function of this area plays a huge role in the body’s kinetic chain as it connects the upper and lower halves of the body. The LPHC essentially transfers the force created by the lower body to the upper extremities and provides stability for the upper body during upper extremity movements.
One of the key roles of the LPHC is the stabilisation of the pelvis. Maintaining a stable pelvis is critical for efficient movement. If muscle imbalances exist in the LPHC, it can result in altered force-couple relationships meaning muscles struggle to work in a coordinated fashion, which can alter joint action and increase stress on specific muscles, tendons and ligaments increasing the risk of pain or injury (Ritterbusch, 2015).
The LPHC has approximately thirty muscles that attach to the lumbar spine and pelvis. Several of the muscles that attach at the pelvis also cross other joints, e.g., the hamstring originates at the pelvis and crosses the knee joint to flex the knee.

Due to the number of muscles that act in this area of the body, muscle imbalances are common. These imbalances can change the position of the pelvis and impact other joints of the body from the neck to the feet. These effects are usually the result of work performed by other muscles to compensate for inactive musculature.
Some common causes of LPHC dysfunction include:
- structural abnormalities and limitations
- poor posture
- post-partum effects of childbirth
- obesity
- muscle weakness or recruitment issues, either within the LPHC or in other parts of the body
- over-active or tight musculature or fascia, either within the LPHC or in other parts of the body.
One of the most common sites of pain in the LPHC is the lumbar spine. It is estimated that up to 84% of adults will suffer from lower back pain (LBP) at some point in their life (Wheeler et al, 2023) and it appears that this problem is only worsening. In 1990, 377.5 million adults experienced LBP but by 2017, this had increased to 577 million (Wu et al 2020).
As a personal trainer, it is important to have a strong working knowledge of the structures and function of the LPHC as it is an area that many clients will experience issues with. The ability to recognise imbalances and the knowledge of how to improve or correct them will assist with posture, pain issues and performance of exercise.
Prepare for assessment
Prepare yourself for the upcoming assessment by familiarising yourself with Assessment 1B.
- Review the requirements provided to gain a clear understanding of what is expected.
- Manage your time carefully to work on this topic and assessment for a total of a 1 week period.
- Aim to complete and submit your assessment at the completion of this topic.
Click on the arrows below the following images to view the lumbar portion of the spine, also known as the lower back.
The lumbar portion of the spine, which includes the lumbar vertebrae, starts at the base of the thoracic vertebrae and extends down to the top of the sacrum.
The main functions of the lumbar spine include:
- providing support for the thoracic spine, cervical spine and head
- connecting the upper body to the lower limbs and pelvis
- bearing most of the weight of the body as well as any weight being carried
- moving the torso through bending, extension and rotation
- protecting the spinal cord and proximal spinal nerves
- providing numerous points of attachment for muscles, tendons and ligaments.
The sacrum is a large, shield shaped bone located at the base of the lumbar spine. It connects the iliac bones at the top of the pelvis and acts to stabilise and support the pelvis, allowing for muscular attachment of multiple muscles acting on the LPHC.

Bone structure of the lumbar spine and sacrum
The lumbar spine is made up of the L1-L5 vertebrae. These vertebrae are the largest in the spine and help support the lumbar spine, which primarily functions as a weight-bearing structure. The amount of weight they need to bear increases as you go down the lumbar vertebrae, with the greatest load-bearing occurring between the L5 vertebrae and sacrum joint.
The lumbar vertebrae share similar shapes, characterised by large kidney-shaped bodies, a triangular-shaped opening for the spinal cord to pass through, and prominent lateral and posterior processes for attaching ligaments and muscles.
Click on the arrows below the following images to view the veterbrae of the spine from a variety of angles.
The spine contains intervertebral discs located between the vertebrae, which are essential for bearing loads and distributing forces. Each disc consists of a durable outer layer made of fibrocartilage, enclosing a gel-like substance called the nucleus pulposus. This arrangement allows the discs to function as cushions between the vertebrae. It is relatively common for these discs to be injured or experience chronic degeneration.

Watch
Watch the following video by Veritas Health called Lumbar Spine Anatomy. The first minute is particularly helpful for reinforcing knowledge about the lumbar spine
The sacrum is a single bone composed of five fused separate vertebrae. The sacral vertebrae begin to fuse in late adolescence and early adulthood, with complete fusion usually occurring by the age of thirty. Shaped like an upside-down triangle, the sacrum is a thick bone capable of withstanding significant force. It serves as a stable platform, supporting the maintenance of an upright sitting position. The foramen, or holes, in the sacrum allow for the passage of nerves and blood vessels.
Joints of the lumbar spine and sacrum
There are three types of joints found in the lumbar spine and sacrum:
1. Disc joints
Disc joints are found where two vertebrae are connected by an intervertebral disc. These joints are made of cartilage and permit only minimal movement.
2. Facet joints
The facet joints are a pair of joints found on each vertebra. They are formed by the coming together of the superior and inferior articular processes of the neighbouring vertebrae. These joints are known as synovial joints and play a crucial role in enabling various movements of the spine, including flexion, extension, lateral flexion, and rotation.
![[ADD IMAGE'S ALT TEXT]](/sites/default/files/shutterstock_1576722_sE4rr-768x703.jpg)
3. Sacroiliac (SI) joint
The SI joint serves as a connection point between the sacrum and pelvis, effectively linking the spine and torso with the lower body. It plays a crucial role in transferring energy between the legs and torso. Due to the weight transfer and strain it experiences, it is essential for the connection between the sacrum and pelvis to be highly secure. Consequently, the SI joint allows for only minimal movement. According to SI-Bone (n.d.), the SI joint typically has a range of movement of approximately 2-4mm in any direction. The largest movement observed is around 4 degrees for rotation, while forward and backward or up and down translation is limited to only 1-1.5 mm.

Ligament structure of the lumbar spine and sacrum
The joints of the lumbar vertebrae are supported by several strong ligaments. These ligaments are the first line of defence against unwanted movement of individual vertebrae and play a vital role in protecting the spinal cord and spinal nerves. While most of these ligaments are extensions of the ones running along the entire spine, there is one ligament group specific to the lumbar spine.
Ligaments present throughout vertebral column
Anterior and posterior longitudinal ligaments
The anterior and posterior longitudinal ligaments are long ligaments that extend along the entire length of the vertebral column. They cover the vertebral bodies and intervertebral discs. These ligaments maintain the stability of the spinal cord and restrict the posterior and anterior movement of the vertebrae.
Ligamentum flavum
The ligamentum flavum is a connective tissue that joins the vertebral arches of neighbouring vertebrae and provides protection to the spinal cord from the posterior side.
Interspinous and supraspinous ligaments
The interspinous and supraspinous ligaments are connective tissues that play a crucial role in connecting the spinous processes of neighbouring vertebrae. These ligaments serve as essential structural components, helping to limit the flexion of the lumbar spine.
Intertransverse ligament
The intertransverse ligament is a structure that links the transverse processes of the vertebrae together and helps limit side flexion of the lumbar spine.
Click on the arrows below the following images to see these ligaments.
Ligaments unique to the lumbar spine
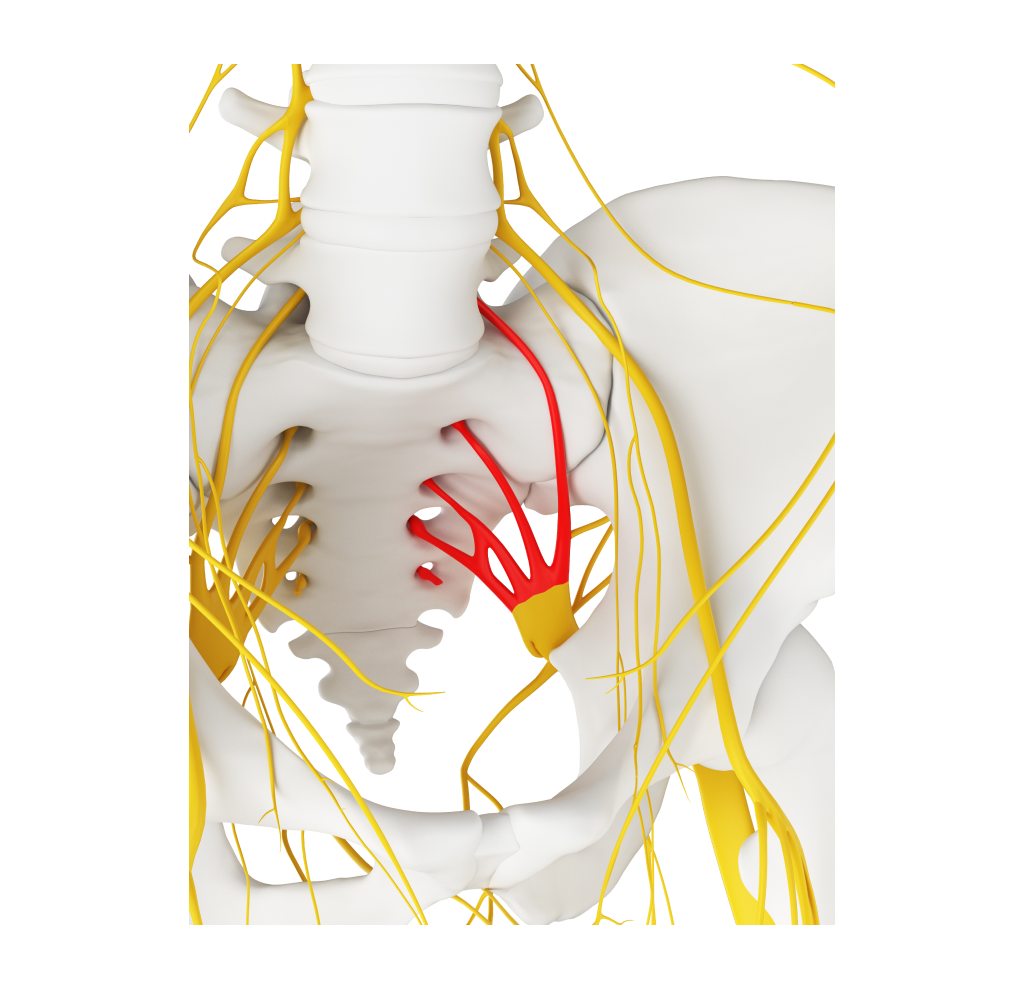
Iliolumbar ligaments
The iliolumbar ligaments are important structures that provide stability to the lumbosacral joint, which is situated between the L5 and S1 vertebrae. These fan-like ligaments radiate from the transverse processes of the L5 vertebra to the back of the iliac crest in the pelvis. Their primary function is to support and stabilize the lumbo-sacral joint.

Sacral ligaments
The sacrum’s connection to the pelvis at the SI joint requires a secure and stable set-up. This is achieved through the ‘inter-locking’ structure of the bones in the joint and supported by a strong and complex series of ligaments that restrict movement and protect the nerves that pass through this area to the legs.
The ligaments supporting the SI joint include:
The interosseous sacroiliac ligament is a short but very strong band that attaches the back of the sacrum to the ilium.
The posterior sacroiliac ligament is a long, strong ligament consisting of multiple bundles that join the lateral crest of the sacrum to the posterior portion of the iliac crest.
The anterior sacroiliac ligament is a thin, weak ligament that runs over the SI joint on an angle from the sacrum to ilium.
The sacrotuberous ligament is located at the inferior-posterior pelvis and runs from the sacrum to the ischial tuberosity at the very bottom of the pelvis.
The sacrospinous ligament attaches behind the sacrotuberous ligament and connects the outer edge of the sacrum to the coccyx.
The intricate network of ligaments surrounding the sacroiliac (SI) joint serves the crucial purpose of maintaining its stability while also connecting to the surrounding muscles. It is worth noting that the posterior sacroiliac ligament, which is notably robust, exhibits relatively less rigidity in women. This characteristic enables the ligament to accommodate greater stretching during pregnancy and childbirth (Kiapour et al., 2020).
Click on the arrows below the following images to see where the sacral ligaments are located.
Image Source: Anatomy and Biomechanics of the Sacroiliac Joint (hipkneetumoursurgery.com)
Watch
Watch the following short YouTube video by SI-Bone called SI Joint Anatomy, Biomechanics and Prevalence. It is helpful for reinforcing knowledge of the sacroiliac joint.
Musculature acting on the lumbar spine
The spine is naturally unstable on its own and requires the support of muscles. The musculature system surrounding the lumbar spine provides static and dynamic stability, as well as facilitating movement of the trunk and spinal vertebrae. These muscles can be categorized into four functional groups, each one reflecting the four key movements possible at the lumbar spine.
- Flexors: These muscles flex or bend the trunk forward.
- Extensors: These muscles extend or straighten the trunk backward.
- Lateral flexors: These muscles flex the trunk to the sides.
- Rotators: These muscles rotate the trunk to the left or right sides.
1. Flexors
The flexor muscles of the lumbar spine are located in front of the spine itself. The primary muscles responsible for bending the trunk forward are the rectus abdominis and oblique abdominal muscles. Despite not directly attaching to the lumbar spine, the rectus abdominis is the most powerful muscle for trunk flexion. It originates from the pubic symphysis, located at the base of the pelvis, and inserts at the xyphoid process of the sternum as well as the costal cartilages of ribs 5-7. This muscle flexes the lumbar spine by pulling the thorax forward and downward towards the pelvis.
Click on the arrows below the following images to see where these are located.
2. Extensors
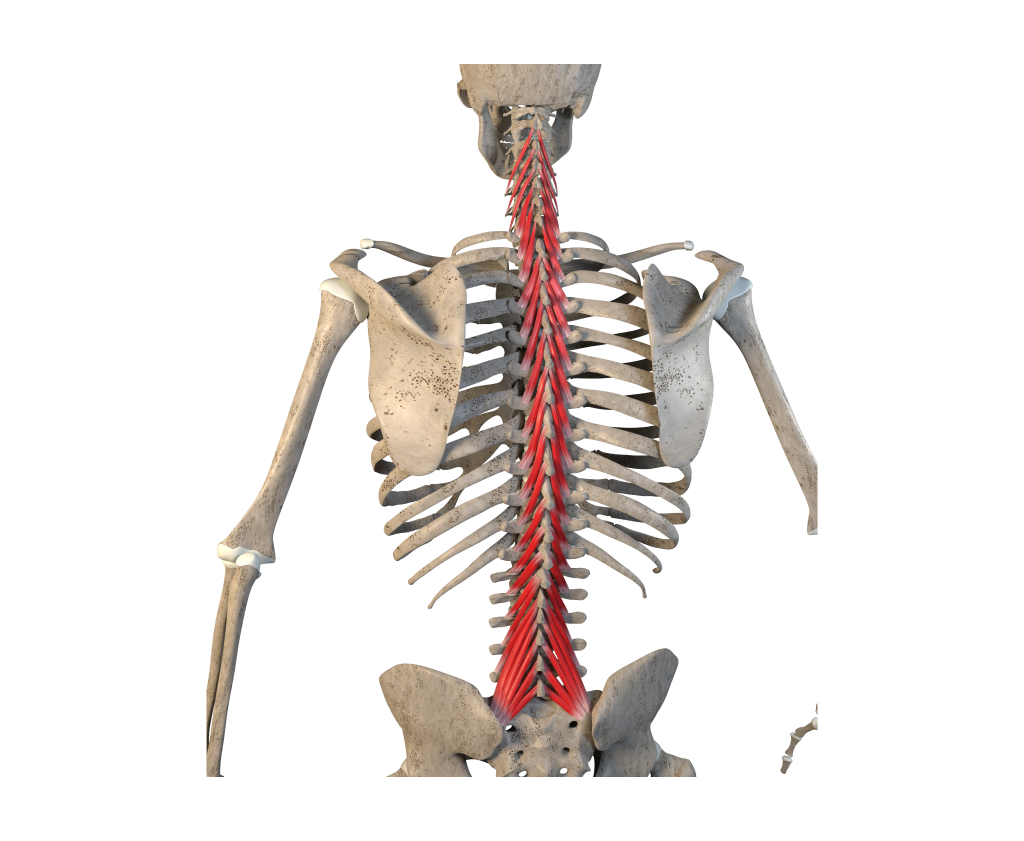
The lumbar spine extensors lie posterior to the lumbar vertebrae and include the erector spinae and multifidi. The most superficial layer of these is the erector spinae muscle. In this region, the erector spinae muscles include the longissimus thoracis and iliocostalis lumborum.
In the lumbar region, the longissimus thoracis muscle originates from the transverse and spinous processes of L1-L5, the medial sacral crest, the posterior sacrum, and the posterior iliac crest. It connects to the thoracolumbar fascia, which is a band of tendinous tissue in the lower back. This fascia serves as an attachment point for many muscles that connect to the pelvis and sacrum. The longissimus thoracis muscle inserts onto the transverse processes of T1-L5 and ribs 9 and 10. When this muscle contracts, it pulls the upper torso backward, resulting in the extension of the lumbar spine.
Click on the arrows below the following images to see where these are located.
The multifidus muscle is a long muscle that runs along the entire length of the vertebral column but is most developed in the lumbar region. It plays an important role in maintaining spinal stability and is responsible for extending the lumbar spine. In the lumbar region, it originates from the posterior surfaces of the upper sacrum and iliac spine, and it inserts into the spinous processes of all lumbar vertebrae, extending as high as T8. When both sides of the multifidus muscle contract simultaneously, they work together to extend the lumbar spine.
3. Lateral flexors
A number of muscles contribute to the lateral flexion of the lumbar spine. The main muscles responsible for lateral flexion are the internal and external obliques, erector spinae, and latissimus dorsi. They receive support from the quadratus lumborum, rectus abdominis, and the lateral and medial intertransversarii.
The quadratus lumborum muscle originates from the superior ilium and inserts into the transverse processes of T1-T4, as well as the underside of the 12th rib. The intertransversarii muscles run between the transverse processes of adjacent lumbar vertebrae. When these muscles contract, they assist in the lateral flexion of the lumbar spine.
Click on the arrows below the following images to see where these are located.
4. Rotators
Several muscles contribute to lumbar rotation. The main muscles involved in rotation are the internal and external obliques, along with the erector spinae, assisted by the quadratus lumborum.
Try it out
While a variety of acute injuries can impact the lower back, such injuries are typically within the domain of physical therapists. For the purpose of this topic, the focus will be on muscle imbalances that affect the lumbo-pelvic-hip complex (LPHC) as a whole. These imbalances often have a cause-and-effect relationship with the entire region and are areas where personal trainers can contribute to improvement. Therefore, before discussing common issues and corrective strategies, it is important to cover the anatomy of other structures within the LPHC.
Lower back pain
Lower back pain is a prevalent health issue that poses significant personal, societal, and financial burdens worldwide (Hoy et al., 2012). Studies indicate that a considerable proportion of individuals, up to 80%, will experience disabling lower back pain at some point in their lives (Mattiuzzi et al., 2020). Although lower back pain can affect individuals of all ages, it is most commonly observed in the 40–80-year age group, with females typically experiencing it more frequently than males. Over the past two decades, global reports of lower back pain cases presented to healthcare professionals have averaged around 250 million annually, with a concerning increase of 50% during this period (Mattiuzzi et al., 2020). Given New Zealand's ageing population, it is anticipated that this issue will persist in the coming decades.
Lower back pain is conventionally classed as either non-specific or specific. Non-specific lower back pain refers to instances where the exact cause is challenging to determine, while specific cases involve identifiable injuries or conditions such as herniated discs, fractures, osteoporosis, or arthritis. According to Mattiuzzi et al (2020) approximately 90% of all lower back pain cases are classified as non-specific, suggesting that postural problems or muscle imbalances resulting in increased strain on specific structures within the lumbar region are likely contributing factors.
The severity of back pain can vary, ranging from a persistent general ache, even during periods of rest, to shooting, burning, or stabbing sensations that can significantly impair movement. The pain can be localised at the site of the issue or radiate to other areas, often travelling through the buttocks and down the legs.

Common causes of lower back pain (LBP)
Lower back pain can stem from a variety of causes, the most common of these include:
Ageing
Lower back pain can arise from various age-related conditions that result in degenerative changes to the vertebrae. Osteoarthritis can lead to the wearing away of articular cartilage, while osteoporosis can weaken the vertebral bone, potentially causing fractures or alterations in vertebral shape. Lifelong exposure to repeated stress can also cause degeneration of intervertebral discs in the lumbar spine, potentially resulting in herniated discs or pinched nerves.
Physical Strain/sprain
Overuse of the muscles acting on the lumbar spine during repetitive or strenuous activities, particularly lifting tasks, can lead to stiffness or pain. Trauma and injury can cause damage to muscle tissue, ligaments, discs, joints, leading to nerve compression, herniation or the displacement of intervertebral discs.
Poor posture
Poor posture is considered a leading cause of LBP because it forces the body to make adjustments to compensate for muscle imbalances caused by incorrect standing or sitting positions. A common example is when individuals neglect to maintain the proper position of their pelvis, often due to weak abdominal muscles. This causes the pelvis to tilt forward, which places greater stress on the back extensor muscles when bearing weight, due to the increased curvature of the lower back.
![[ADD IMAGE'S ALT TEXT]](/sites/default/files/What_is_Anterior_Pelvic_Tilt_f4e13e9b-4e43-4595-8e9c-270ea551d823_600x400_crop_center%402x.progressive.png.jpg)
Excess body weight or pregnancy
Excess body fat around the abdomen or pregnancy can cause increased stress on the back extensor muscles due to the additional weight pulling the pelvis forward.
Click through the following images that depict examples of excess weight at the front of the torso that creates an imbalance and can cause stress on the back extensor muscles.
Sacroiliac (SI) joint pain
SI joint pain is generally experienced in the lower part of the back and buttocks. It occurs due to damage or inflammation in the SI joint, where the sacrum connects to the pelvis. The pain typically presents on one side of the lower back. When the torso is viewed from the back, you can often identify the SI joints as two dimples located next to the spine. According to SI-Bone (n.d.), approximately 15-25% of lower back complaints are related to issues in the SI joint region.
Click on the arrows below the images to view each example.
Acute SI pain can be caused by running or gait issues, as well as repeated stress to the area with suboptimal form, such as contact sports, heavy lifting, or labour-intensive jobs. Sitting for extended periods or maintaining poor posture while standing, especially when the core and lower back muscles are not well-conditioned, can also contribute to the development of SI pain over time.
In women, the risk of SI pain is higher during and after pregnancy and childbirth. This increased risk stems from carrying additional weight in the abdomen and hormonal changes that occur in the body during pregnancy, which can loosen the ligaments supporting the SI joint.
As we age, chronic SI pain may arise due to the stiffening of SI ligaments and the deterioration of cartilage between the bones of the joint. This degeneration allows the bones to rub together causing pain and inflammation in the joint.
The pelvis plays an important role in the functioning of the Lumbo-Pelvic Hip Complex. Maintaining proper pelvic position is essential for optimal mechanics of the joints in this region and is often the primary cause of issues originating in the LPHC.
The pelvis is the main point of connection between the upper torso and lower limbs. It houses muscles that connect the pelvis to the upper torso and others that link it to the lower limbs. Due to the pelvis being attached to a total of 36 muscles, it is common to experience muscle imbalances in this area. Consequently, achieving perfect coordination among all these muscles is challenging.
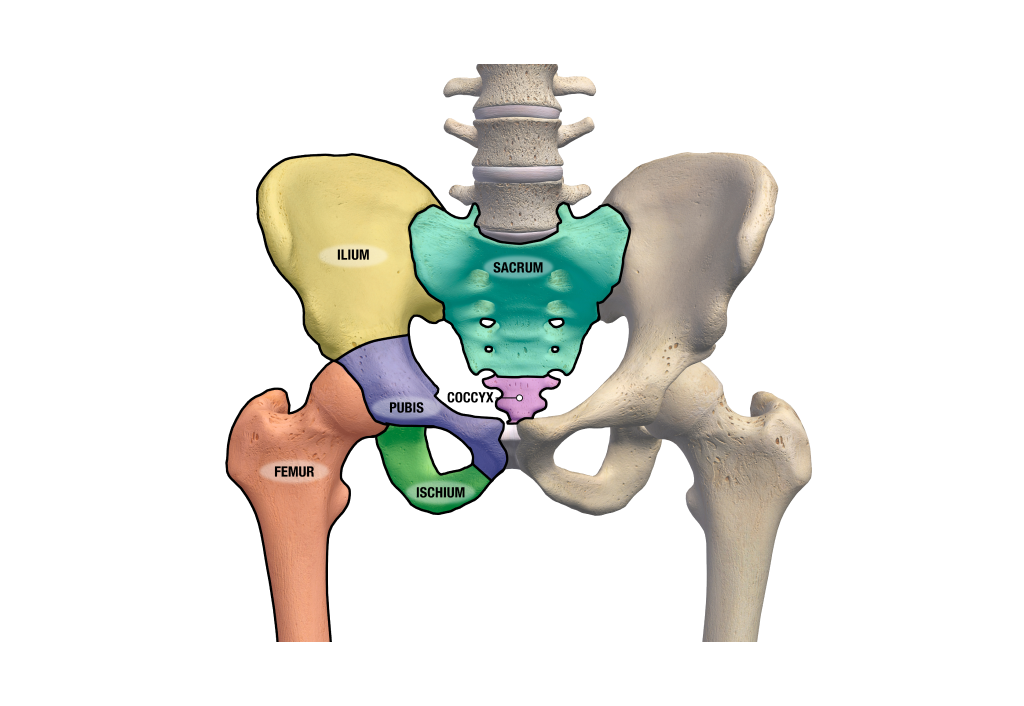
Bone structure of the pelvis
The pelvis consists of three bone structures known collectively as the left and right innominate bones.
1. The ilium
The ilium is a bone that resembles the shape of an elephant's ear or a fan. It is positioned on the outer side of both sides of the pelvis.
2. The ischium
The ischium refers to the back and lower part of the pelvis.
3. The pubic bone
The pubic bone, or pubis, is the front and lower part of the pelvis.
These three bones are separate at birth and through childhood and adolescence, though they are connected by cartilage. Once physical maturity is achieved, these bones fuse together to form the innominate bones of the left and right pelvis.
Gender differences
The anatomy of the pelvis differs significantly between men and women. The female pelvis is wider with a rounder pelvic cavity. Females also have a shorter and more posteriorly inclined sacrum, a wider pubic angle and a smaller hip socket. These differences are primarily to accommodate childbearing and childbirth.

Key bony structures of the pelvis
There are a number of significant bony structures it is crucial to understand since they serve as attachment points for major muscles and influence the movements of the pelvis.
THE ILIAC CREST
The iliac crest is the uppermost curved edge of the pelvic bone, specifically the ilium. It forms a prominent ridge that can be felt and seen on the side of the hip.
ANTERIOR SUPERIOR ILIAC SPINE (ASIS)
The Anterior Superior Iliac Spine (ASIS) is a bony projection located at the front and top of the pelvis. It is part of the ilium bone and can be felt as a small, bony prominence just below the waistline on either side of the abdomen.
POSTERIOR SUPERIOR ILIAC SPINE (PSIS)
The Posterior Superior Iliac Spine (PSIS) is a bony protrusion located at the back and top of the pelvis. It is part of the ilium bone and can be felt as a small, bony prominence just below the waistline on either side of the lower back.
THE ISCHIAL TUBEROSITY
The ischial tuberosity is a prominent bony structure located at the bottom and back of the pelvis. It is commonly referred to as the "sit bones" or "sitting bones" because it is the part of the pelvis that bears the body's weight when sitting.
The pubis symphysis
The pubis symphysis, also known as the pubic symphysis, is a joint located at the front of the pelvis where the left and right pubic bones meet. It is a cartilaginous joint that connects the two pubic bones, allowing for limited movement and providing stability to the pelvis.
Click on the arrows below the image to view the many key bone structures of the pelvis.
Joints of the pelvis
The pelvis articulates at five joints: two sacroiliac joints, two hip joints and the pubis symphysis.
Sacroiliac joints
The sacroiliac joints connect the sacrum and Ilium and are two of the strongest joints in the body.
Hip joints
The hip joints connect the acetabulum, a socket, of the pelvis with the head of the femur on each side of the pelvis. They are the most mobile joints of the pelvic girdle.
Pubis symphysis
The pubic symphysis joint is a cartilaginous joint between the two pubic bones.
Ligaments of the pelvis
The key ligaments that support the pelvic joints include:
The iliolumbar ligament
The iliolumbar ligament is a connective tissue that links the transverse processes of the fifth lumbar vertebra (L5) to the iliac crest.
The interosseous sacroiliac ligament
The interosseous sacroiliac ligament is a short but very strong band that connects the back surface of the sacrum to the ilium.
The posterior sacroiliac ligament
The posterior sacroiliac ligament is a long, strong ligament composed of multiple bundles that join the lateral ridge of the sacrum to the posterior part of the iliac crest.
The anterior sacroiliac ligament
The anterior sacroiliac ligament is a thin, and weaker, ligament that runs over the SI joint on an angle from the sacrum to ilium.
The sacrotuberous ligament
The sacrotuberous ligament is located at the inferior-posterior pelvis and runs from the sacrum to the ischial tuberosity at the very bottom of the pelvis.
The sacrospinous ligament
The sacrospinous ligament attaches behind the sacrotuberous ligament and connects the outer edge of the sacrum to the coccyx.
Click on the arrows below the image to learn about the location of these ligaments.
Movements of the pelvis
When discussing movements of the pelvis, it is important to distinguish between movements at the hip joint and the SI joints. Although the pelvis itself is not freely moveable due to its role in weightbearing and stability, movements of the pelvis are critical to the efficiency of movements at other joints in the body.
Since there are two halves of the pelvis, each half can move somewhat independently from the other. This independent movement is vital for movements such as walking and running.
There are three main categories to classify key movements involving the pelvis: closed chain, open chain trunk actions, and open chain hip actions.
Closed chain
Closed chain movements of the pelvis include:
- anterior tilt
- posterior tilt
- lateral elevation and simultaneous depression of the opposite side
- rotation in the transverse plan, where one side rotates anteriorly while the other rotates posteriorly.
Click on the arrows beneath the image to toggle through each example of thee closed chain movements.
Open chain trunk actions
Open chain trunk actions are common movements of the trunk including flexion and lateral flexion.
Open chain hip actions
Open chain hip actions are common movements of the hip joint including flexion and abduction.
Musculature acting on the pelvis
Many of the muscles that attach to the pelvis have a primary role in stabilising the pelvis and maintaining posture rather than producing movement. There are over 30 muscles that attach to the pelvis or sacrum.
Muscles that tilt the pelvis anteriorly
TENSOR FASCIA LATAE
The tensor fascia latae runs from the anterior superior illiac spine (ASIS) and Iliac crest of the pelvis to the Iliotibial band (ITB), a strong, thick band of tissue that runs down the outside of your thigh.
RECTUS FEMORIS
The rectus femoris forms part of the quadricep group and runs from the ASIS to the patella.

SATORIUS
The satorius runs from the ASIS to the superior medial edge of the tibia.

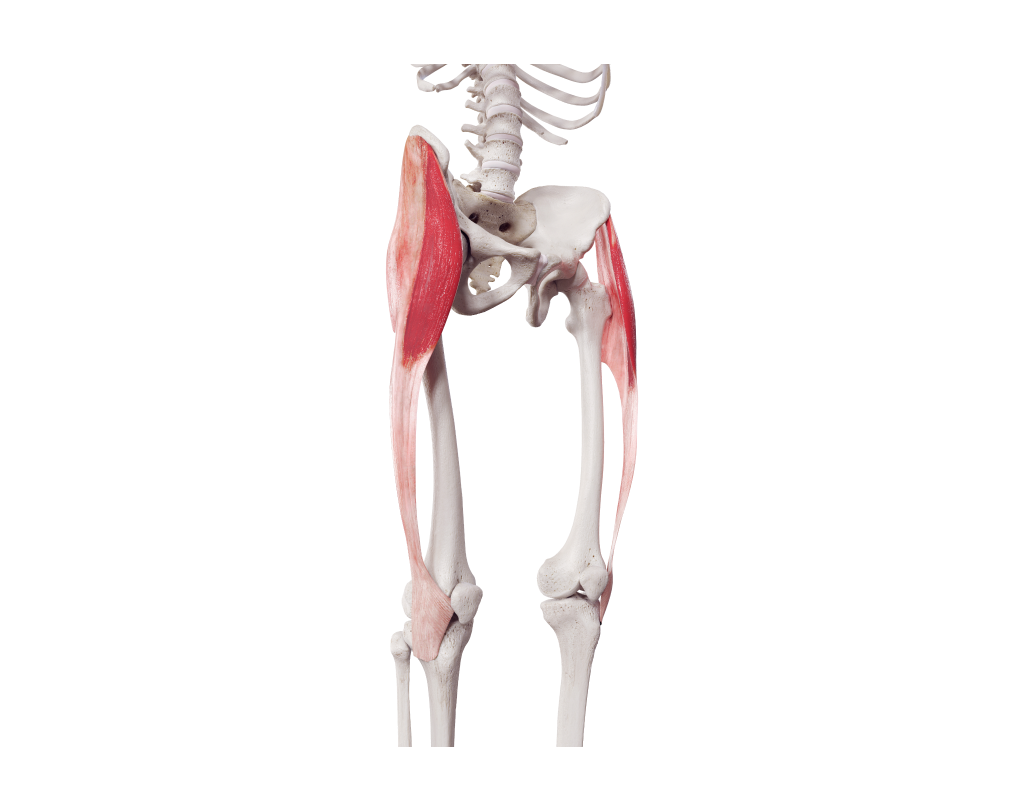
HIP FLEXORS
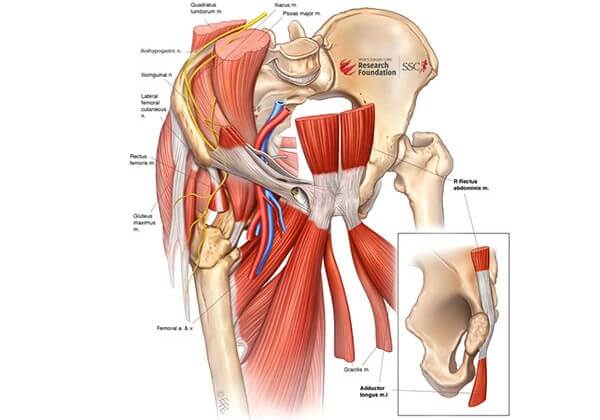
The hip flexors consist of two muscles: the psoas major and iliacus. The iliacus attaches to the iliac crest, while the psoas major attaches to the bodies and transverse processes of the T12-L5 vertebrae. Both muscles insert at the upper part of the femur.

THE ADDUCTOR GROUP
The adductor longus and adductor brevis orginate at the pubis and ischium portion of the pelvis and play a role in pulling the pelvis into anterior tilt. These muscles originate from the pubis and ischium regions of the pelvis and insert along the femur.

Muscles that tilt the pelvis posteriorly
HAMSTRINGS
As a group, the hamstrings, comprising the long head of the biceps femoris, semimembranosus, semitendinosus, extend from the ischial tuberosity to the head of the fibula and the medial head of the tibia. The short head of the biceps femoris doesn’t cross the hip joint and therefore does not directly influence movements of the pelvis.

GLUTEALS
All the gluteal muscles have the ability to posteriorly tilt the pelvis. The gluteus maximus extends from the iliac crest and lateral edge of the sacrum and coccyx to the superior posterior femur and ITB. The gluteus medius attaches to the posterior edge of the iliac crest, while the gluteus minimus attaches to the posterior surface of the ilium. Both the gluteus medius and gluteus minimus insert at the superior medial femur. The adductor magnus attaches to the pubis and ischium and inserts into the medical posterior upper two-thirds of the femur.
Click the arrows below the image to view the location of the gluteals and the adductor magnus.
Certain combinations of muscles also contribute to the elevation, depression, and rotation of the pelvis in the transverse plane. This occurs when specific muscles contract on one side only. Muscles involved in depressing the pelvis on one side include the tensor fascia latae (TFL), sartorius, gluteus medius, and gluteus minimus. Muscles capable of rotating the pelvis in the transverse plane include the adductor group, psoas major, gluteus maximus, gluteus medius, and gluteus minimus. Isolated elevation of the pelvis is a rare movement, usually involving "hiking" of the pelvis on one side, which requires depressing the other side and lateral flexion of the torso.
The hip joint is a synovial ball and socket joint. It is formed between the acetabulum, which is the socket portion of the pelvis, and the head of the femur.
Bone structure of the hip
The hip is largely designed for weight-bearing activities, which means that stability is as important as mobility. The head of the femur connects to the pelvic socket, which is deepened by a fibrocartilage collar called the acetabular labrum. The angle of the femoral neck and the shape and depth of the acetabulum can vary significantly among and even within individuals. As the hip is a synovial joint, it is surrounded by a fibrous capsule containing synovial fluid that covers the articulating surfaces of the joint.
Click on the arrows below the image to view the bone structure of the hip joint.
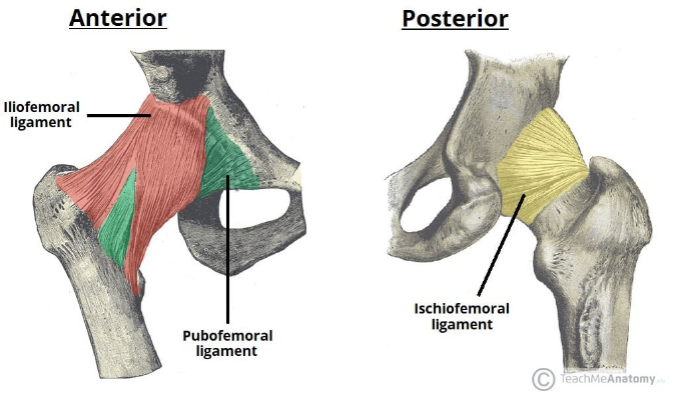
Ligaments of the hip
The hip joint is supported by three primary ligaments located outside the joint capsule. These ligaments contribute to the stability of the hip joint and connect the leg to the pelvis. They are named based on the bones they connect:
- Iliofemoral ligament (anterior): This ligament, resembling a "Y" shape, connects the anterior inferior ilium to the area between the femoral head and neck on the front side of the femur. It is the strongest of the three ligaments and prevents excessive hyperextension of the hip joint.
- Pubofemoral ligament (anterior): Shaped like a triangle, this ligament connects the upper surface of the pubis to the area between the femoral head and neck on the front side of the femur. Its main function is to restrict excessive abduction and extension of the hip joint.
- Ischiofemoral ligament (posterior): This ligament has a spiral shape and connects the ischium to the upper back and inner side of the femur. It prevents hyperextension of the hip joint and contributes to the proper positioning of the femoral head within the acetabulum.
Watch
Watch the following video called Normal Anatomy of the Hip Joint, for a complete overview of the hip joint structure including bones, ligaments and muscles.
https://www.robertmaylemd.com/normal-anatomy-of-the-hip-joint.html
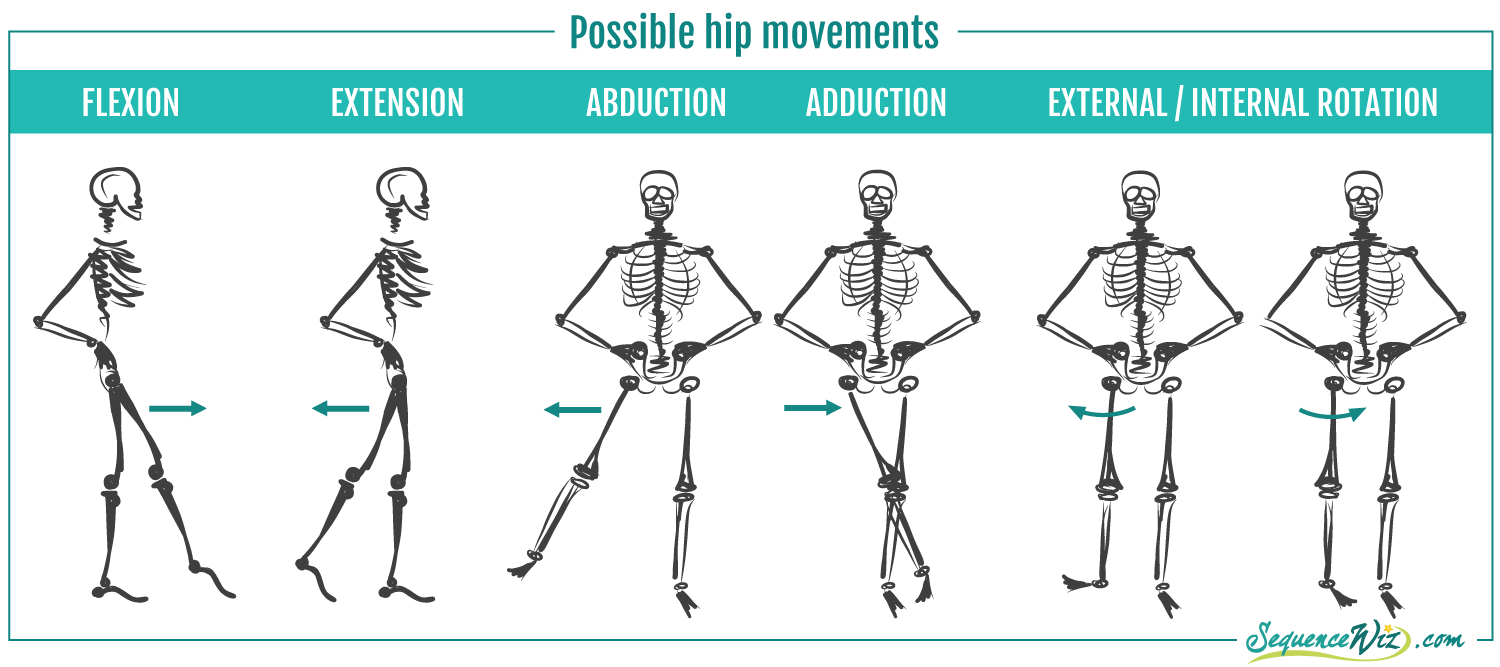
Movements of the hip
The hip joint allows for a wide range of movements due to its ball and socket structure. In this section, we will explore the muscles responsible for these movements. It is worth noting that most of these muscles have already been introduced and discussed earlier in the topic, as they play a role in multiple structures within the LPHC.
Musculature acting on the hip
Flexors of the hip
The flexors of the hip include the psoas major and iliacus, along with the rectus femoris, sartorius and pectineus muscles.
Click on the arrows located beneath the image to view each muscle that acts on the hip.
Extensors of the hip
Hip extension is performed by the gluteus maximus and hamstring muscles, including the semitendinosus, semimembranosus and the long head of the biceps femoris.
To view each of these examples, toggle between the images using the arrows located below.
Abductors of the hip
Abduction of the hip is primarily achieved through contraction of the gluteus medius assisted by contraction of the tensor fascia latae.
Click on the arrows located below the image to toggle between each.
Adductors of the hip
The main muscles involved in hip adduction are the adductor group, which includes the adductor magnus, adductor longus, and adductor brevis. These powerful adductors receive assistance from the gracilis and pectineus muscles.
Click on the arrows below the image to view the adductor group taking note of the muscles which also assist, gracilis and pectineus muscles.
Internal rotators of the hip
Internal rotation of the hip is accomplished through contraction of the tensor fascia latae and the anterior fibers of the gluteus medius and gluteus minimus muscles. These muscles receive support from the adductor group.
Click on the arrows below the image to view the muscles that assist the internal rotation of the hip.
External rotators of the hip
The primary muscles responsible for external rotation of the hip include the deep hip muscles such as the piriformis, obturators, superior and inferior gemellus muscles, and quadratus femoris. These muscles receive support from the strong gluteus maximus, gluteus medius, and biceps femoris.
To view examples of these muscles, click on the arrows beneath the image.
Common issues affecting the hip
The hip joint is connected to multiple muscles, which provides opportunities for muscle imbalances to arise. There are also various structural and functional factors that can contribute to these imbalances, such as variances in femoral neck angle and tilt, differences in acetabulum shape and depth, labral impingement and tears, and even SI joint pain caused by compensatory movements due to restricted hip mobility. Lower crossed syndrome is also a prevalent problem that affects the entire lumbo-pelvic hip complex (LPHC).
Lower Crossed Syndrome
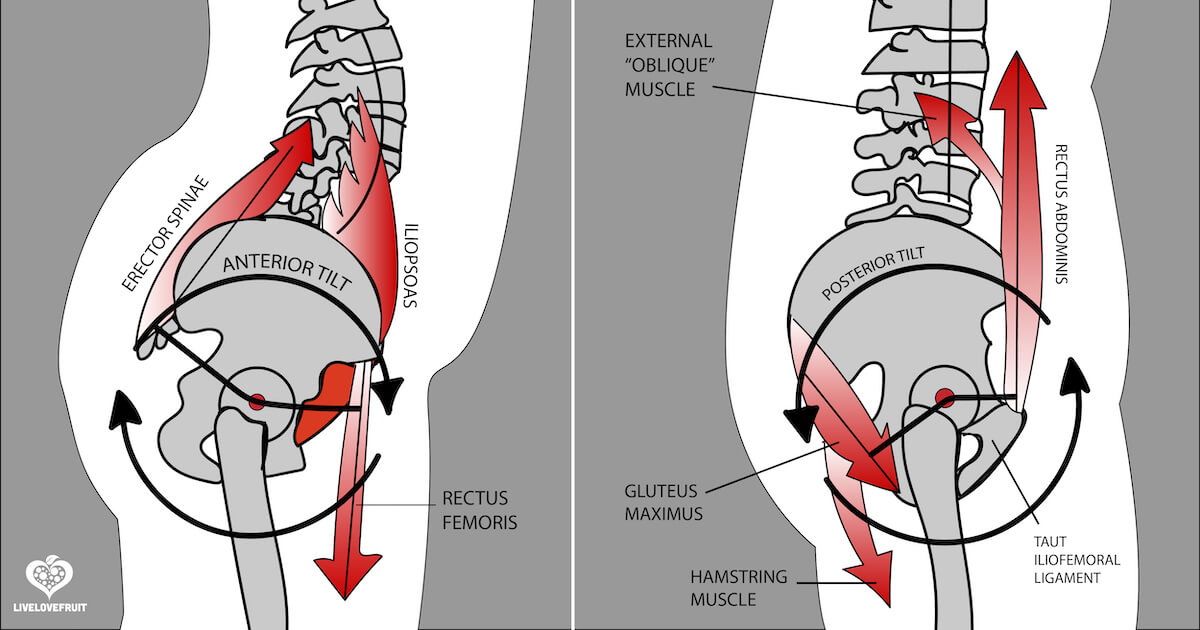
Lower crossed syndrome is a musculoskeletal condition marked by muscular imbalances, specifically weakness and tightness, in the muscles connected to the LPHC. It is characterised by an exaggerated anterior pelvic tilt and increased lumbar lordosis, or curvature of the lower spine, resulting in a cascade of effects throughout the body. To compensate for these imbalances, additional muscles engage from the feet to the head, causing various issues.

Lower crossed syndrome gets its name from the shape of an “X”, or cross, that can be drawn across the pelvis indicating muscles that are typically tight or overactive on one side and those muscles that are typically weak or poorly recruited on the other.
The cross-shaped pattern suggests that there is a combination of tight or overactive muscles in the front of the pelvis and the back of the pelvis. The cross also indicates muscle weakness or under activation in certain areas. These muscle imbalances typically lead to changes in the curvature of the lumbar spine, positioning of the pelvis and sacrum, which ultimately lead to a hollow lower back and associated compensatory measures.
According to the National Academy of Sports Medicine (n.d.) lower crossed syndrome is one of the most common compensatory patterns seen in the general population. The muscle imbalances associated with lower crossed syndrome are likely to be the effect of a sedentary lifestyle and sitting for prolonged periods of time. Holding this static position for long periods is believed to lead to adaptive shortening of key muscles acting on the pelvis and cause others to inhibit or switch off. Over time this is thought to lead to the compensatory adjustments that lead to lower crossed syndrome. (National Academy of Sports Medicine, n.d.)
![[ADD IMAGE'S ALT TEXT]](/sites/default/files/Lower-Crossed-Syndrome-Blog-Photo-1.jpg)
Sitting with poor posture can also contribute to the development of lower crossed syndrome. Imbalances can also arise from overtraining specific muscle groups while neglecting others. For example, focusing on strengthening the hip flexors and back without adequately training the gluteals and abdominals can create an imbalance that may lead to lower crossed syndrome.
Muscles commonly affected in Lower Crossed Syndrome
The following muscles are likely tight or over activated when lower crossed syndrome is present:
- Hip flexors
- Psoas major
- Iliacus
- Rectus femoris
- Tensor fascia latae,
- Adductor complex (magnus, longus and brevis)
- Spinal extensors
- Erector spinae
- Multifidus
- Transversospinalis group
- Quadratus lumborum
According to Nickelston (2007), other muscles or structures that may also become tight include the ITB, piriformis, and gastrocnemius.
Hip flexors are thought to become tight due to prolonged sitting with the thighs flexed at the hip. The spinal extensors may tighten because of extended periods of leaning forward whilst working. When bending forward, the lower back muscles work eccentrically to control the forward lean. Back extensors can also become tight as a compensatory measure in stabilising the spine due to weak abdominals or when carrying excessive abdominal weight.
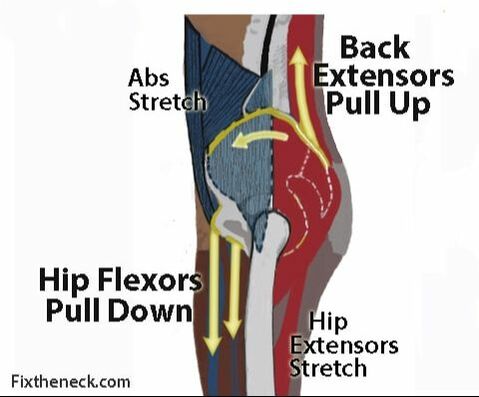
Tight and overactive flexors of the hip will pull the pelvis forward and downward, an anterior tilt. At the same time, tight back extensors will pull up on the pelvis from the back causing further anterior tilt.
The following muscles may be found to be weak or inactive in lower crossed syndrome:
- Abdominals
- Rectus abdominus
- External obliques
- Internal obliques
- Transversus abdominus
- Gluteals
- Gluteus maximus
- Gluteus medius
- Gluteus minimus
Nickelston (2007) also suggests the vastus medialis, tibialis anterior and plantar fascia of ten may present as weak in lower cross syndrome.
The hamstrings are also thought to become tight and weakened when the posterior pelvis is rotated forward and upwardly, moving away from them.
The weakness of the abdominal wall can be attributed to two factors: infrequent trunk flexion exercises against gravity and a lack of abdominal contraction to support the spine while sitting for extended periods. The gluteal muscles also become weak due to prolonged sitting, which keeps them in an elongated state for hours.
These imbalances ultimately lead to an increased anterior pelvic tilt and lumbar lordosis. Over time, individuals with uncorrected lower crossed syndrome may experience neuromuscular recruitment issues that add to the problem. This occurs when the brain begins to rely on the tight and overactive muscles to stabilize the lower back and pelvis, which further inhibits the weakened muscles and contributes to their ongoing weakness.
In addition to the facilitation and inhibition of musculature by the nervous system, prolonged sitting with lower crossed posture can result in fascial adhesions forming in the tissues. Over time, even the bones involved, primarily the vertebrae of the lumbar spine, might gradually deform due to the physical forces placed upon them. For example, the increased extension posture can cause compression of the posterior vertebral bodies of the lumbar spine, resulting in a wedge shape that worsens the extension posture (Muscolino, n.d.).
Associated issues caused by lower crossed syndrome
Lower crossed syndrome can have impacts throughout the body. Sahu and Phansopkar (2021) suggest individuals with lower crossed syndrome often present with lower back pain, piriformis syndrome, anterior knee discomfort, increased likelihood of upper crossed syndrome and muscular imbalances further down the kinetic chain.
Lower back pain comes from increased stress placed on the musculature and ligaments of the lower back as they are forced to compensate for weak abdominals in stabilising the lumbar spine. The increased curvature of the spine can also affect the way in which force is absorbed by the spine. In a well-functioning lumbar spine, the majority of force is absorbed by the vertebral bodies and the discs separating them. With increased lordosis, more force is translated to the facet joints which are not designed to withstand this and this can lead to impingement of spinal nerves, like sciatica, or disc degeneration and injury.
Piriformis syndrome presents when your piriformis muscle compresses your sciatic nerve. This causes pain or numbness in the buttock and down the back of your leg. Lower crossed syndrome alters the position of the pelvis and sacrum and can cause SI joint stress. This is thought to lead to piriformis syndrome.
Watch
Check out this quick video that explains the mechanism behind piriformis syndrome.
Muscolino (n.d.) suggests that the presence of lower crossed syndrome posture will predispose people to developing upper crossed syndrome. When the lumbar spine curvature is exaggerated, the centre of weight of the trunk shifts posteriorly. To compensate, the thoracic spine often increases its forward curvature to bring the centre of the weight back anteriorly. This increased curvature of the thoracic spine leads to rounding of the shoulders, medial rotation of the humerus and a head and neck that sit forward, leading to upper cross syndrome.

In some cases, lower crossed syndrome can cause muscular imbalances further down the kinetic chain. Increased anterior pelvic tilt and the associated upper crossed syndrome can result in exaggerated forward leaning posture as the centre of gravity is pushed anteriorly. This can lead to locking out the knees and increase dorsiflexion at the ankle requiring the calves to work harder to keep the body upright. Not only can this cause issues at the knee but it can also alter the length-tension relationship of muscles acting on the ankle. Most commonly the anterior tibialis becomes weak and the gastrocnemius tight.
The first step in assessing lower crossed syndrome is a static postural test. This is a process that involves observation of the client’s posture in stance.
Watch
Watch the following video, which is a Lower Crossed Syndrome Demonstration on a client.
The function of each of the muscles commonly affected by lower crossed syndrome can be systematically tested to determine their role as contributing factors.
The best way to become familiar with these tests is to practice them!
Remember, commonly tight or overactive muscles in lower crossed syndrome include:
- Hip flexors
- Psoas major
- Iliacus
- Rectus femoris
- Tensor fascia latae,
- Adductor complex (magnus, longus and brevis)
- Spinal extensors
- Erector spinae
- Multifidus
- Transversospinalis group
- Quadratus lumborum
- Iliotibial band (ITB)
- Piriformis
- Gastrocnemius
- Hamstrings (tight but weak)
These tight/overactive muscles can be assessed using range of length or range of motion tests.
Muscle length tests
Thomas Test
This simple test identifies if the hip flexors are tight. The results of this test can also be used to determine if the rectus femoris and external rotators are tight.
Straight Leg Test
This is a simple test of hamstring length, acting at the knee. A positive result is confirmed if the client can’t achieve knee extension of better than 20 degrees from vertical.
This test assesses hamstring length, acting at the hip. A positive result is confirmed if the client can’t flex the hip with a straight leg past 80 degrees.
Faber/Patricks Test
FABER stands for Flexion, Abduction and External Rotation test. It measures the extent to which abduction and external rotation can be performed in a flexed hip state. This can indicate how tight the adductor and internal rotators are.
Ober’s Test
This test evaluates a tight TFL or ITB.
Sit and Reach Test
It is challenging to specifically target and evaluate the length of the back extensors. When conducting a sit and reach test, the flexibility of both the hamstrings and lower back is assessed. If the back extensors are tight, it becomes apparent when the back cannot be rounded sufficiently to achieve an improved score on the test. This results in a more vertical orientation of the trunk rather than a horizontal one.
Sit and reach normative data:

(source: https://www.topendsports.com/testing/norms/sit-and-reach.htm)
Piriformis Test
This test evaluates whether the piriformis is tight or exhibiting piriformis syndrome.
Calf Length Test
This calf length test evaluates ankle dorsiflexion and mobility. If a positive test is recorded for this assessment, it indicates tight calf muscles.
Recruitment and strength tests for weak or under active muscles
Remember, the following muscles may be found to be weak or inactive when lower crossed syndrome is present:
- Abdominals
- Rectus abdominus
- External obliques
- Internal obliques
- Transversus abdominus
- Gluteals
- Gluteus maximus
- Gluteus medius
- Gluteus minimus
- Vastus medialis
- Tibialis Anterior
These weak or inhibited muscles can be tested with the following functional tests:
Abdominal recruitment tests
Straight leg lowering test
The straight leg lowering test is a test of core function, specifically focussing on the strength and recruitment of the abdominal muscles. This test measures the eccentric strength of the abdominals and their ability to support the spine during leg lowering. The concept behind this test is that weak or poorly recruited abdominals may result in the hip flexors taking over to control the descent of the legs. Consequently, the pelvis tilts anteriorly, increasing the lordosis or curvature of the spine and causing it to lose contact with the surface. The angle of hip flexion at which the lumbar spine loses contact with the surface is used as the test score.
Straight leg lowering test score chart
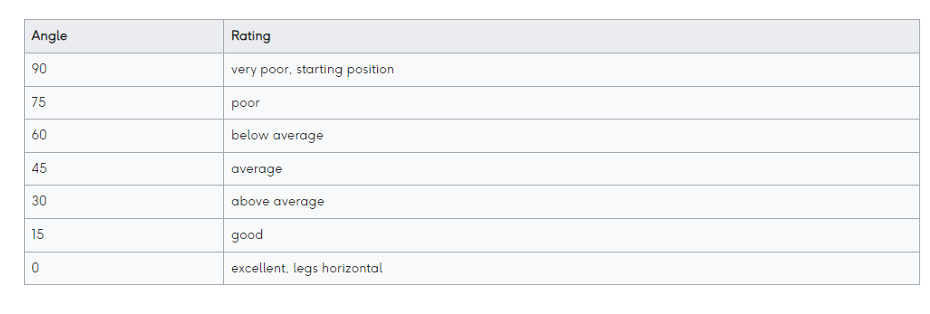
(Physiopedia.com)
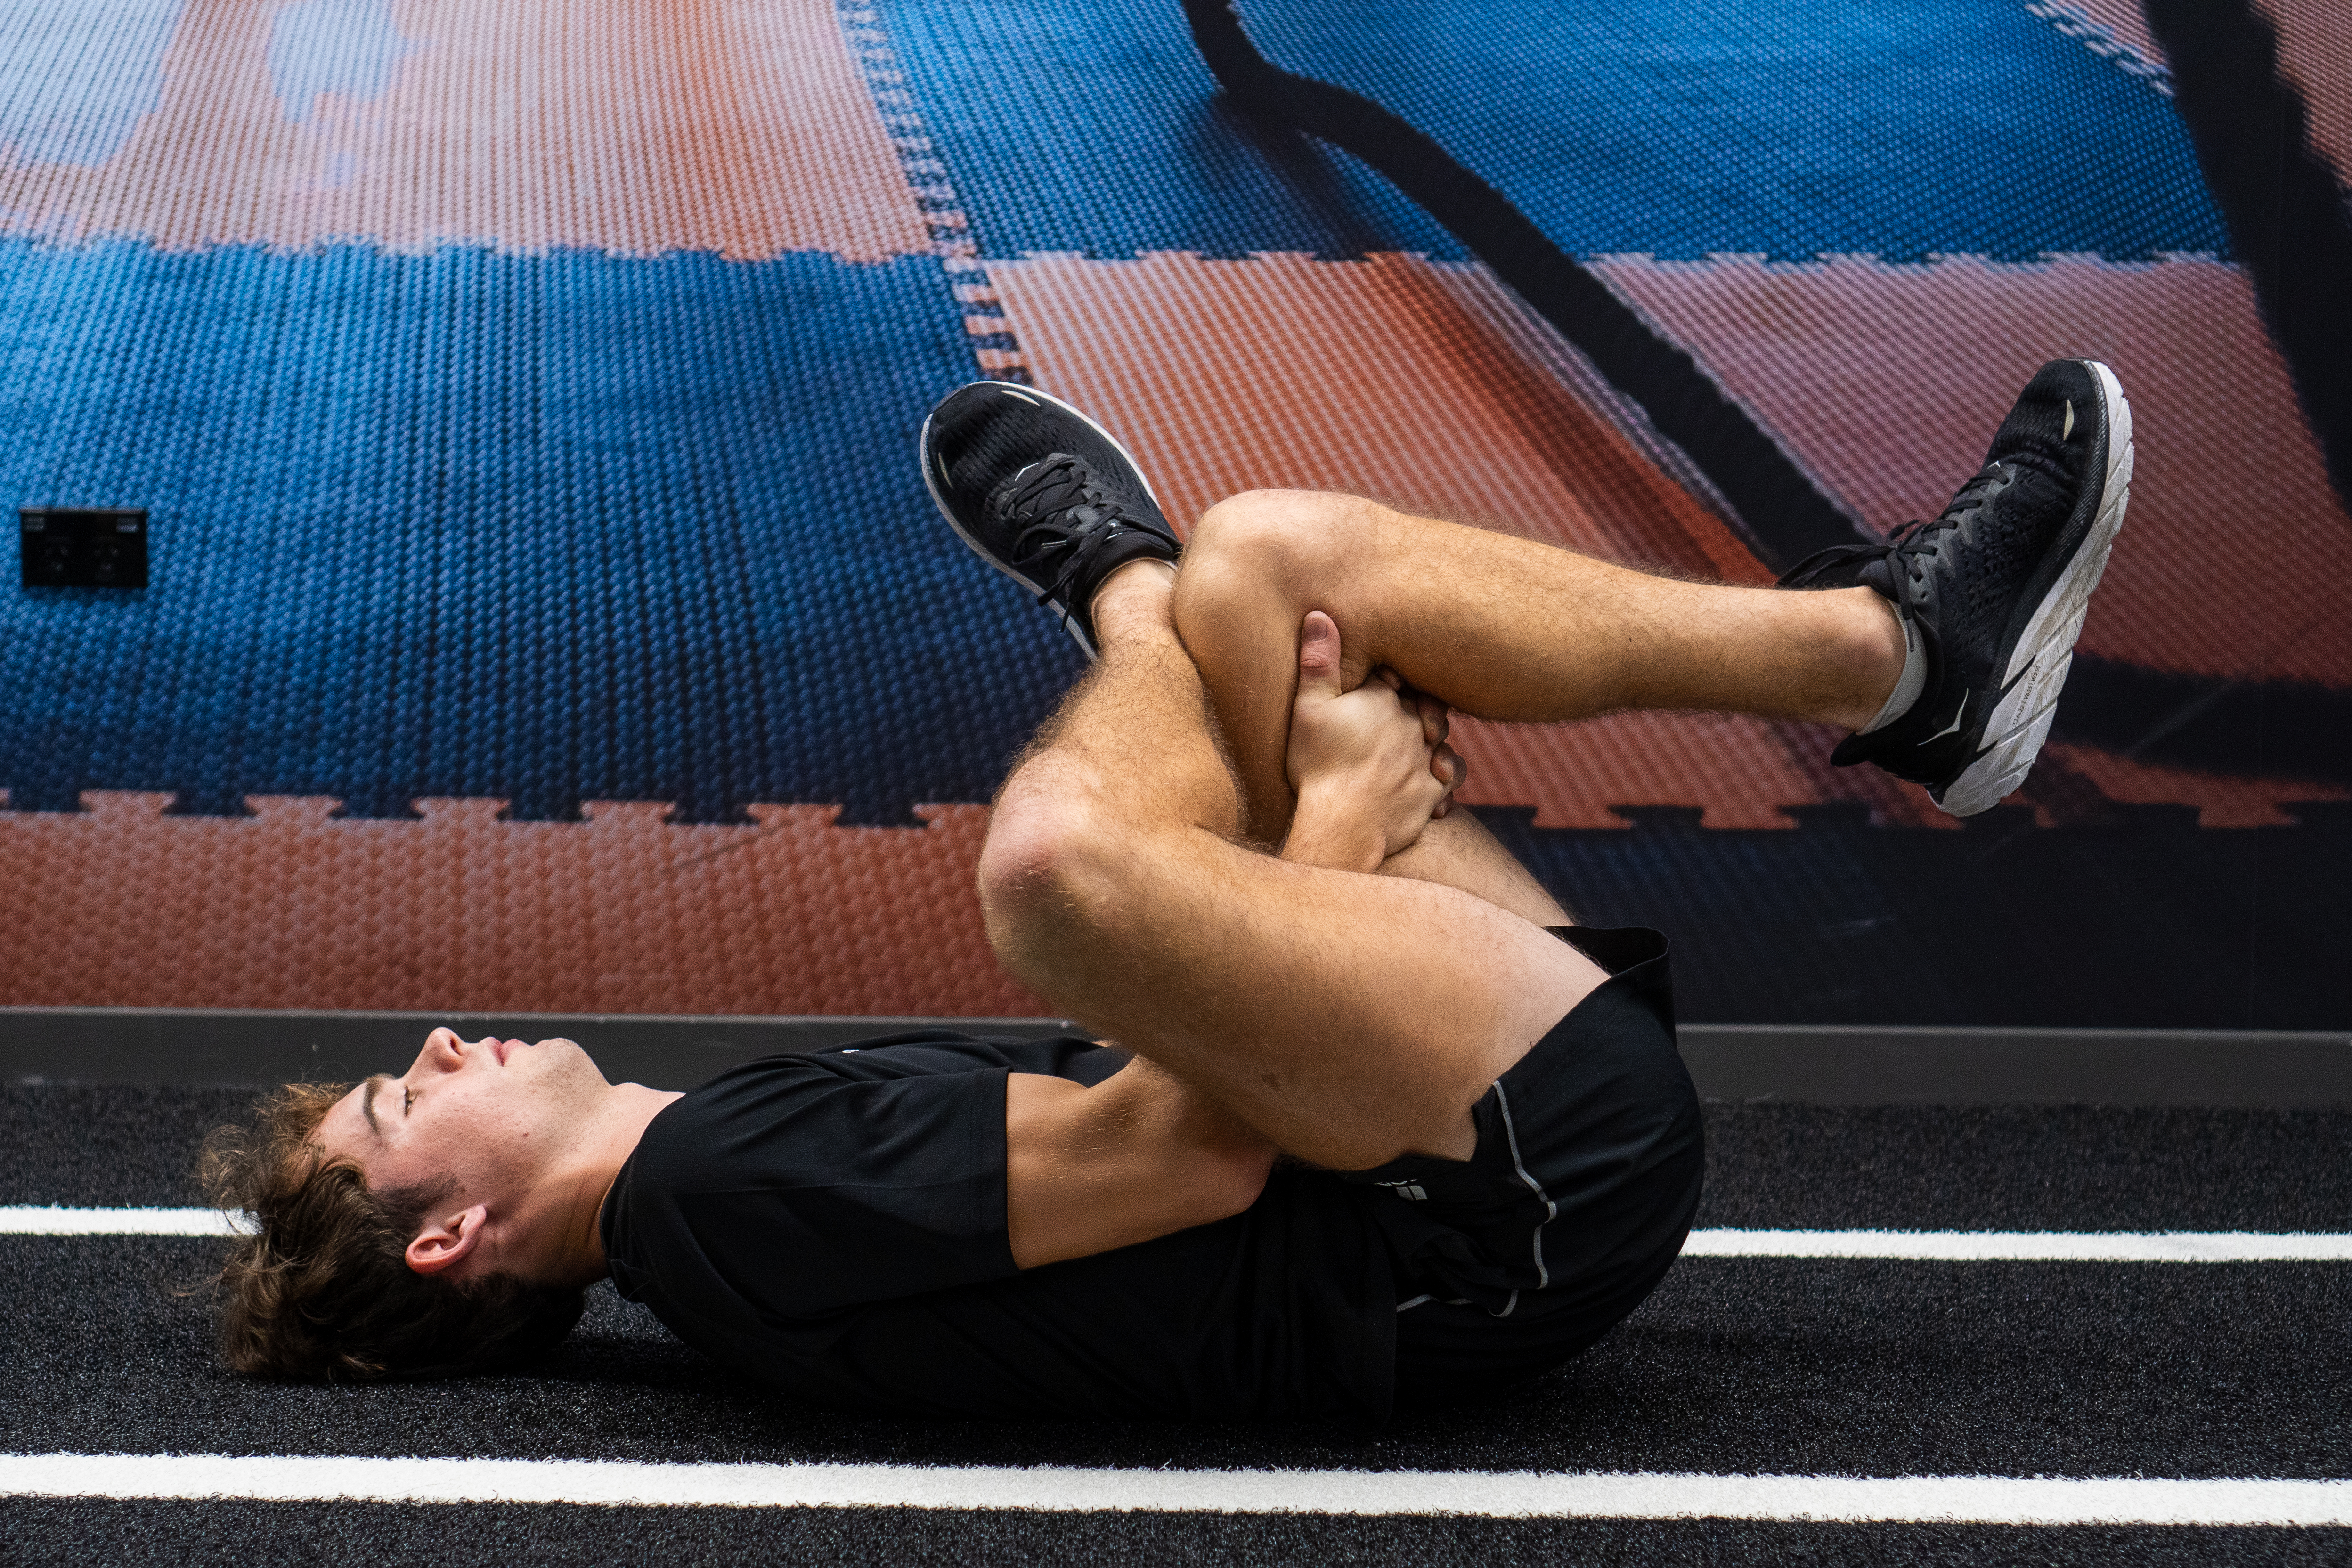
Knee hug to extend test
This test examines the function of the lower abdominal muscles and will determine if they are recruiting well, or whether the brain is relying on the hip flexors to hold the pelvis neutral during movement. In this test the client balances on their tail bone while hugging their knees to their chest. The objective of the test is to extend the knees so that the legs are straight and held just off the ground, without moving the trunk into extension. The more upright the torso is able to remain the more efficiently the lower abdominals and hip flexors are being recruited. A client with strong lower abdominals should be able to hold this position for over 30 seconds. Moving the torso into extension indicates weak or poorly recruited lower abdominals and a reliance on hip flexors.
Abdominal sequence test - Undertaker straight leg sit-up
This test examines the function of upper, middle and lower abdominal muscle fibres. If performed well, this test indicates that both abdominal strength and recruitment is sufficient. A client lies flat in a supine position with arms crossed across the chest and the heels pressed into the floor (not held). The test starts with the client slowly and smoothly performing an abdominal crunch to clear their head and shoulder blades from the floor then continuing in a smooth fashion to full sit up position (vertical trunk). If the client is able to perform the full movement without halting or lifting their heels from the floor, they have excellent strength and recruitment of upper, middle and lower abdominals through to hip flexor recruitment at the end of the movement. If the client is only able to lift their head and shoulder blades from the floor, upper abdominals have sufficient strength and recruitment, but middle and lower abdominals are weak or poorly recruited. A common occurrence in this test is where the client can perform the curl aspect of the test, but can then only complete the sit up if their feet leave the floor (indicating a reliance on hip flexors rather than lower abdominals. Note: it is important that the client is not allowed to use momentum in the movement, but instead performs it in a slow and steady fashion.
Gluteal recruitment and strength tests
Janda prone hip extension test
This test evaluates how well the gluteus maximus is recruited in active hip extension. The test is performed with the patient lying prone and alternately lifting each leg away from the table while the clinician observes and/or palpates the gluteus maximus, hamstrings, and lumbar paraspinal muscles to determine their relative order of activation/recruitment.
Gluteus Maximus strength test
This test evaluates the strength of the hip extensors
Hip and back extension recruitment and strength test
This test essentially involves a reverse curl motion. It helps assess the strength and endurance of the back extensors, as well as the strength of the gluteus maximus. If the client is able to lift their chest off the table and maintain that position, it indicates that their back extensors are in good condition. On the other hand, if the client can raise their abdomen to the anterior superior iliac spine of the pelvis, it suggests that their gluteus maximus is effectively engaged.
Hip abduction recruitment test
This test assesses the recruitment of the gluteus medius and helps with evaluating if other compensatory contractions are required to abduct the hip.
Hip abduction strength test
This test evaluates the strength of the gluteus medius and TFL as hip abductors.
Pelvic control test for gluteus medius strength
This is a simple test that provides valuable information about the strength of the gluteus medius as a pelvic stabilizer during single-leg stance.
Lateral flexion test
This test assesses the ability of the gluteus medius and obliques to stabilise the pelvis during lateral flexion of the torso.
Similar to upper crossed syndrome, addressing lower crossed syndrome requires a comprehensive approach, and in cases where the issue has persisted for a long time and there may be fascial adhesions or changes in bone structure, the involvement of another allied health professional may be necessary. However, for less severe cases of lower crossed syndrome, a personal trainer can likely achieve improvements by implementing the NASM Corrective Exercise Continuum.

Phase 1: Inhibit overactivated muscles
The following muscles are likely to be tight and overactivated in lower crossed syndrome:
- hip flexors
- rectus femoris
- TFL
- adductor complex, the magnus, longus and brevis
- spinal extensors
- iliotibial band
- piriformis
- gastrocnemius
- hamstrings, will be tight but weak.
Phase 1 is all about getting the muscles to de-activate. An effective way of achieving this is through self-myofascial release techniques using a foam roller. Foam rolling can neurologically decrease activity to the overactive muscle, making it easier to recruit the opposing muscle groups.
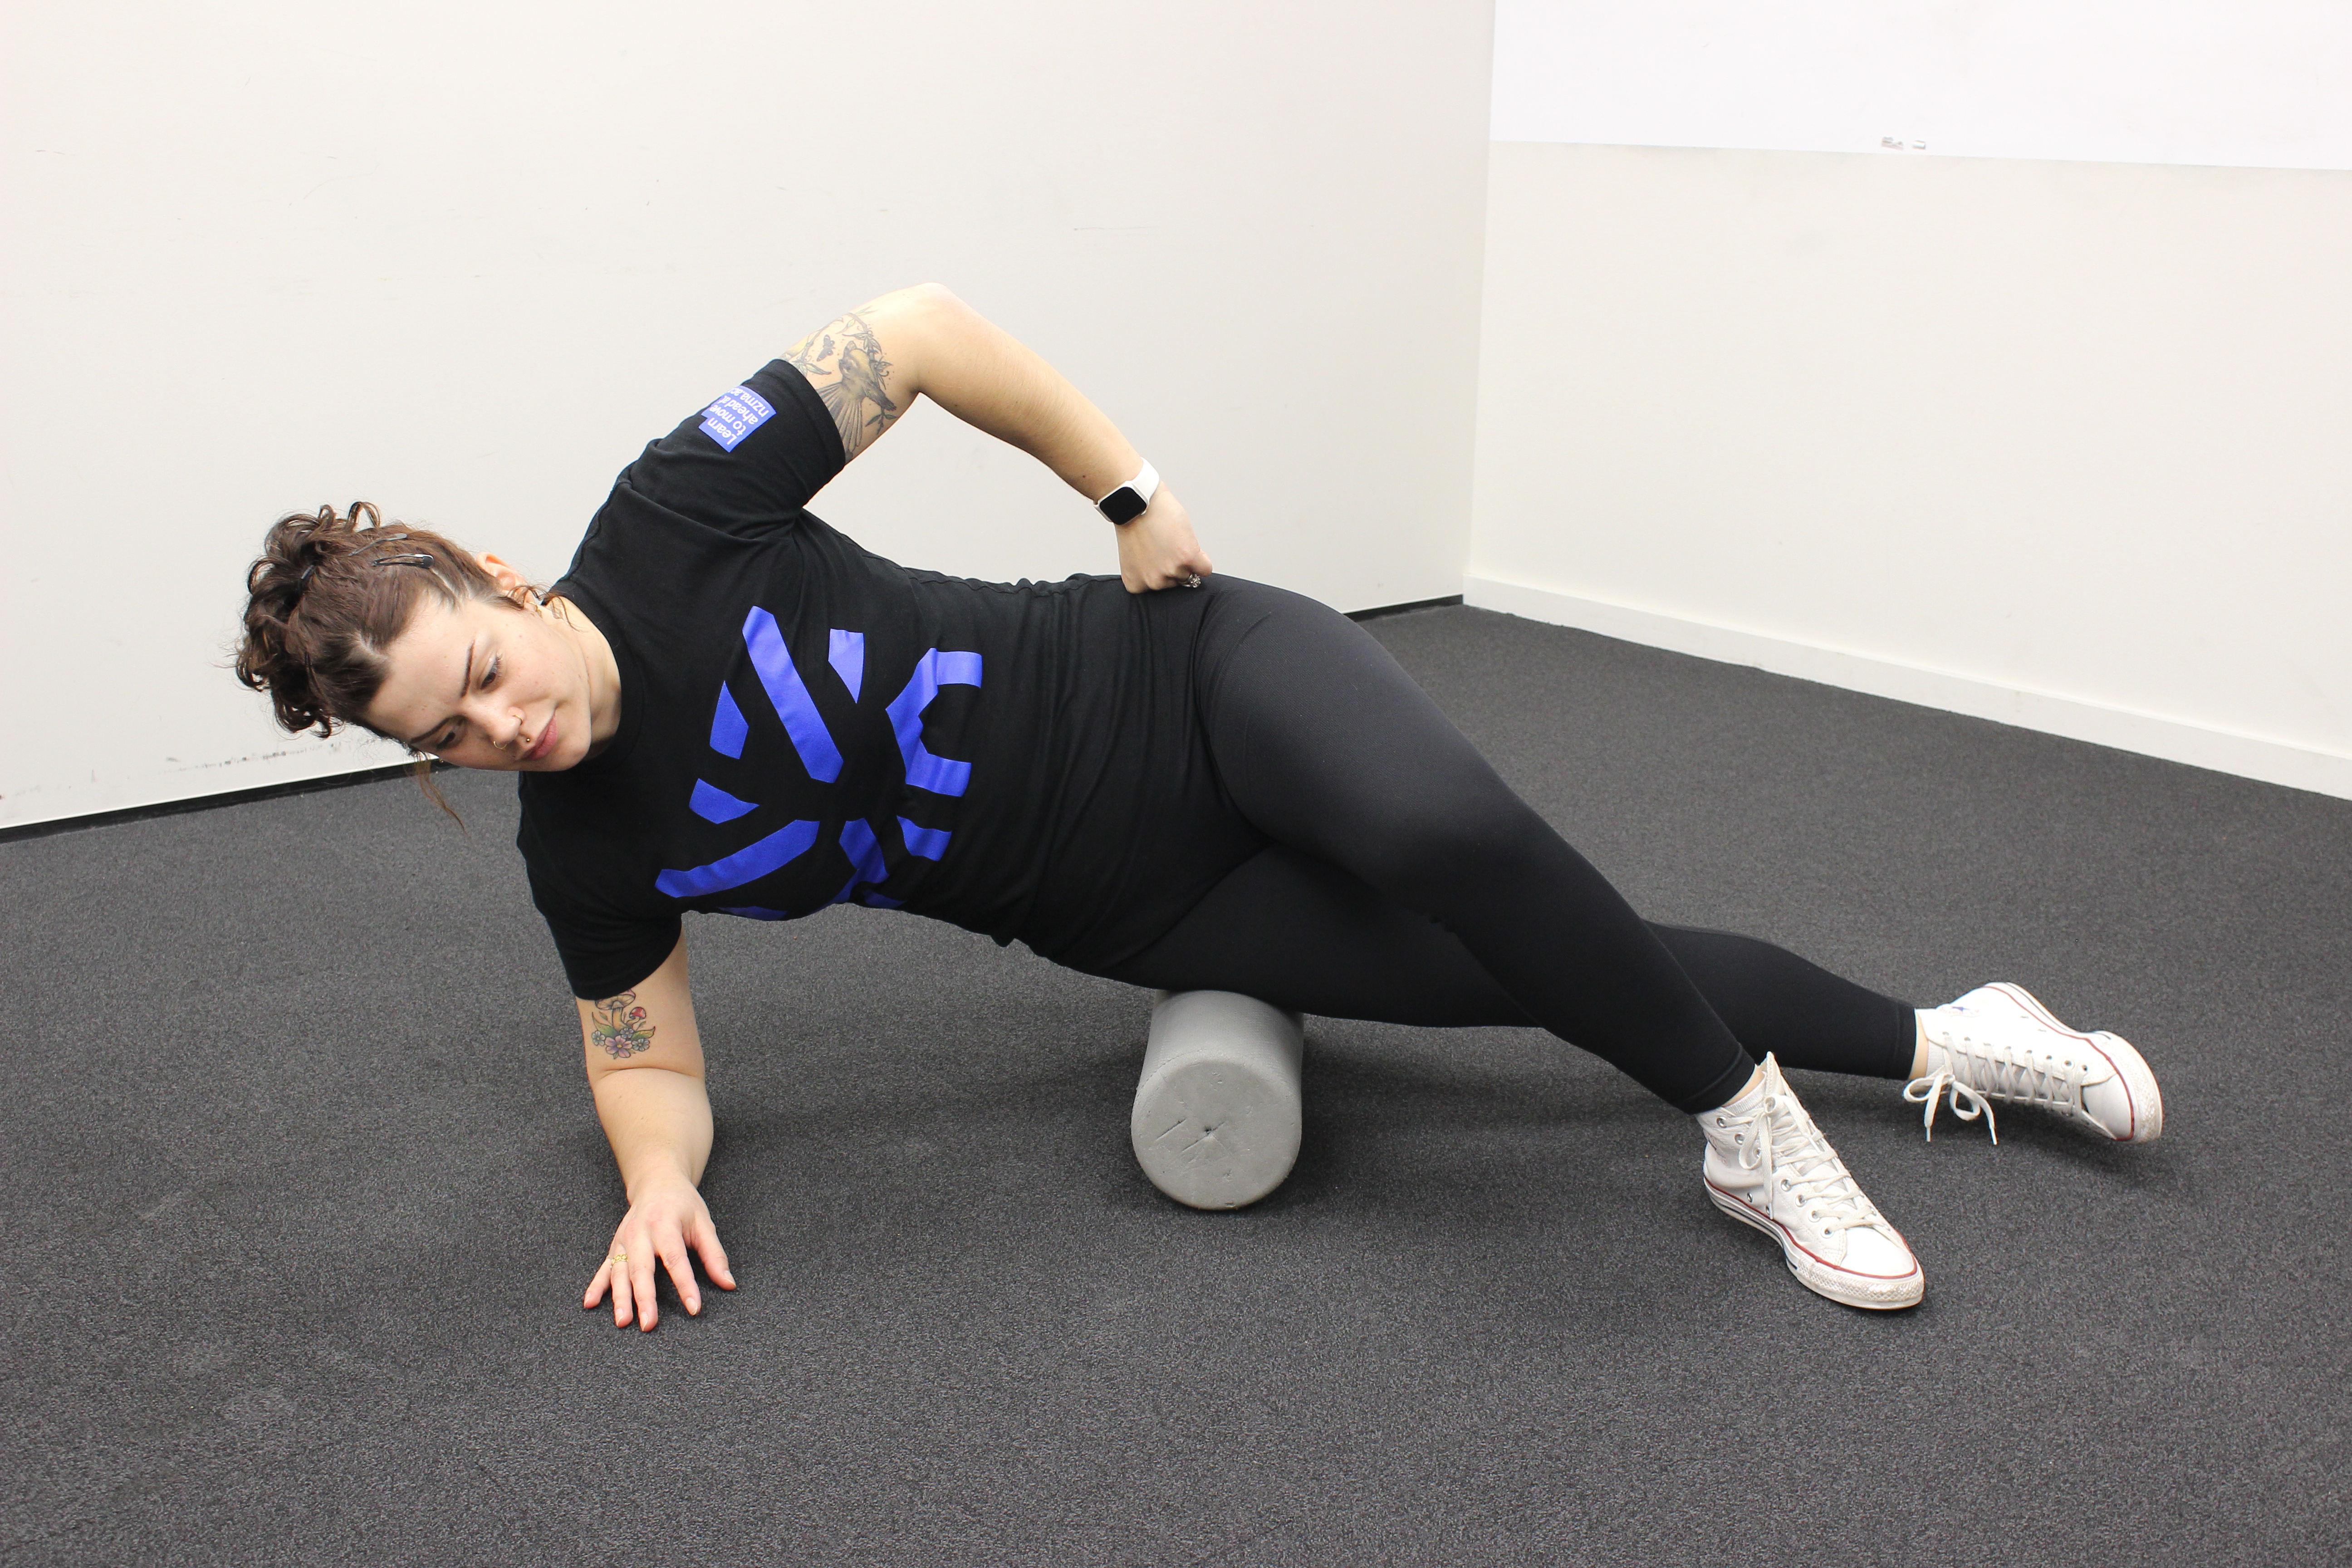
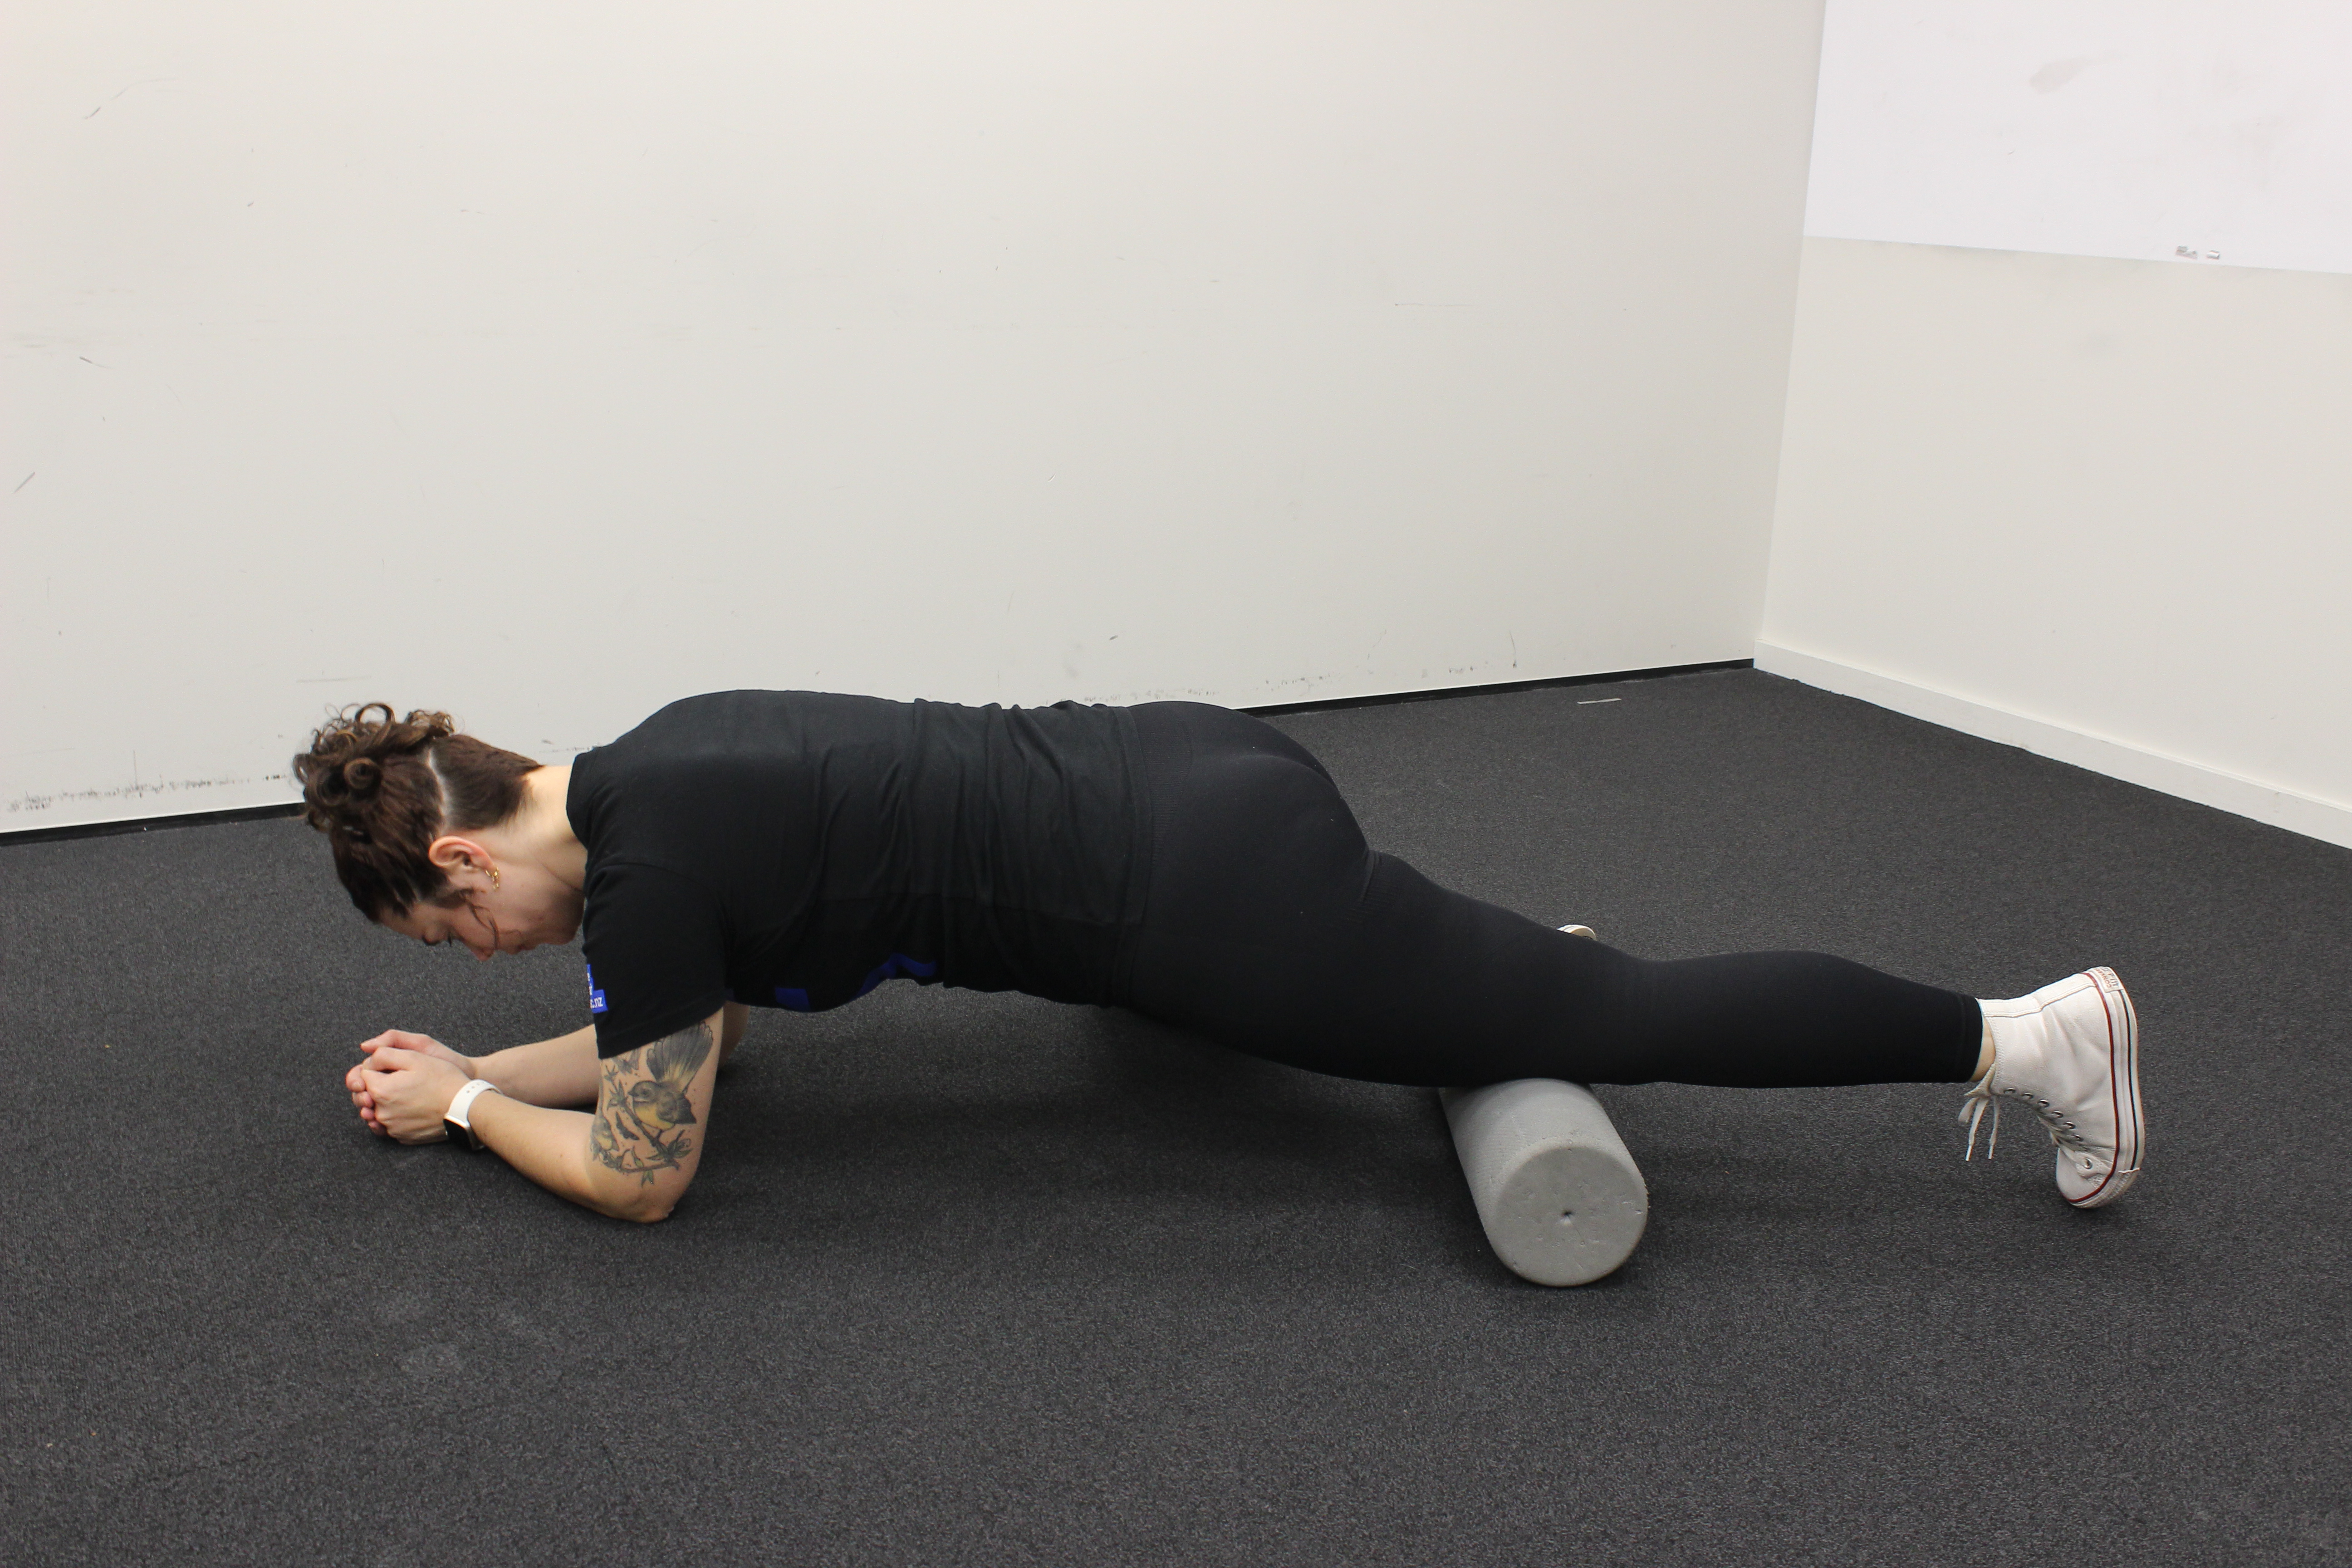
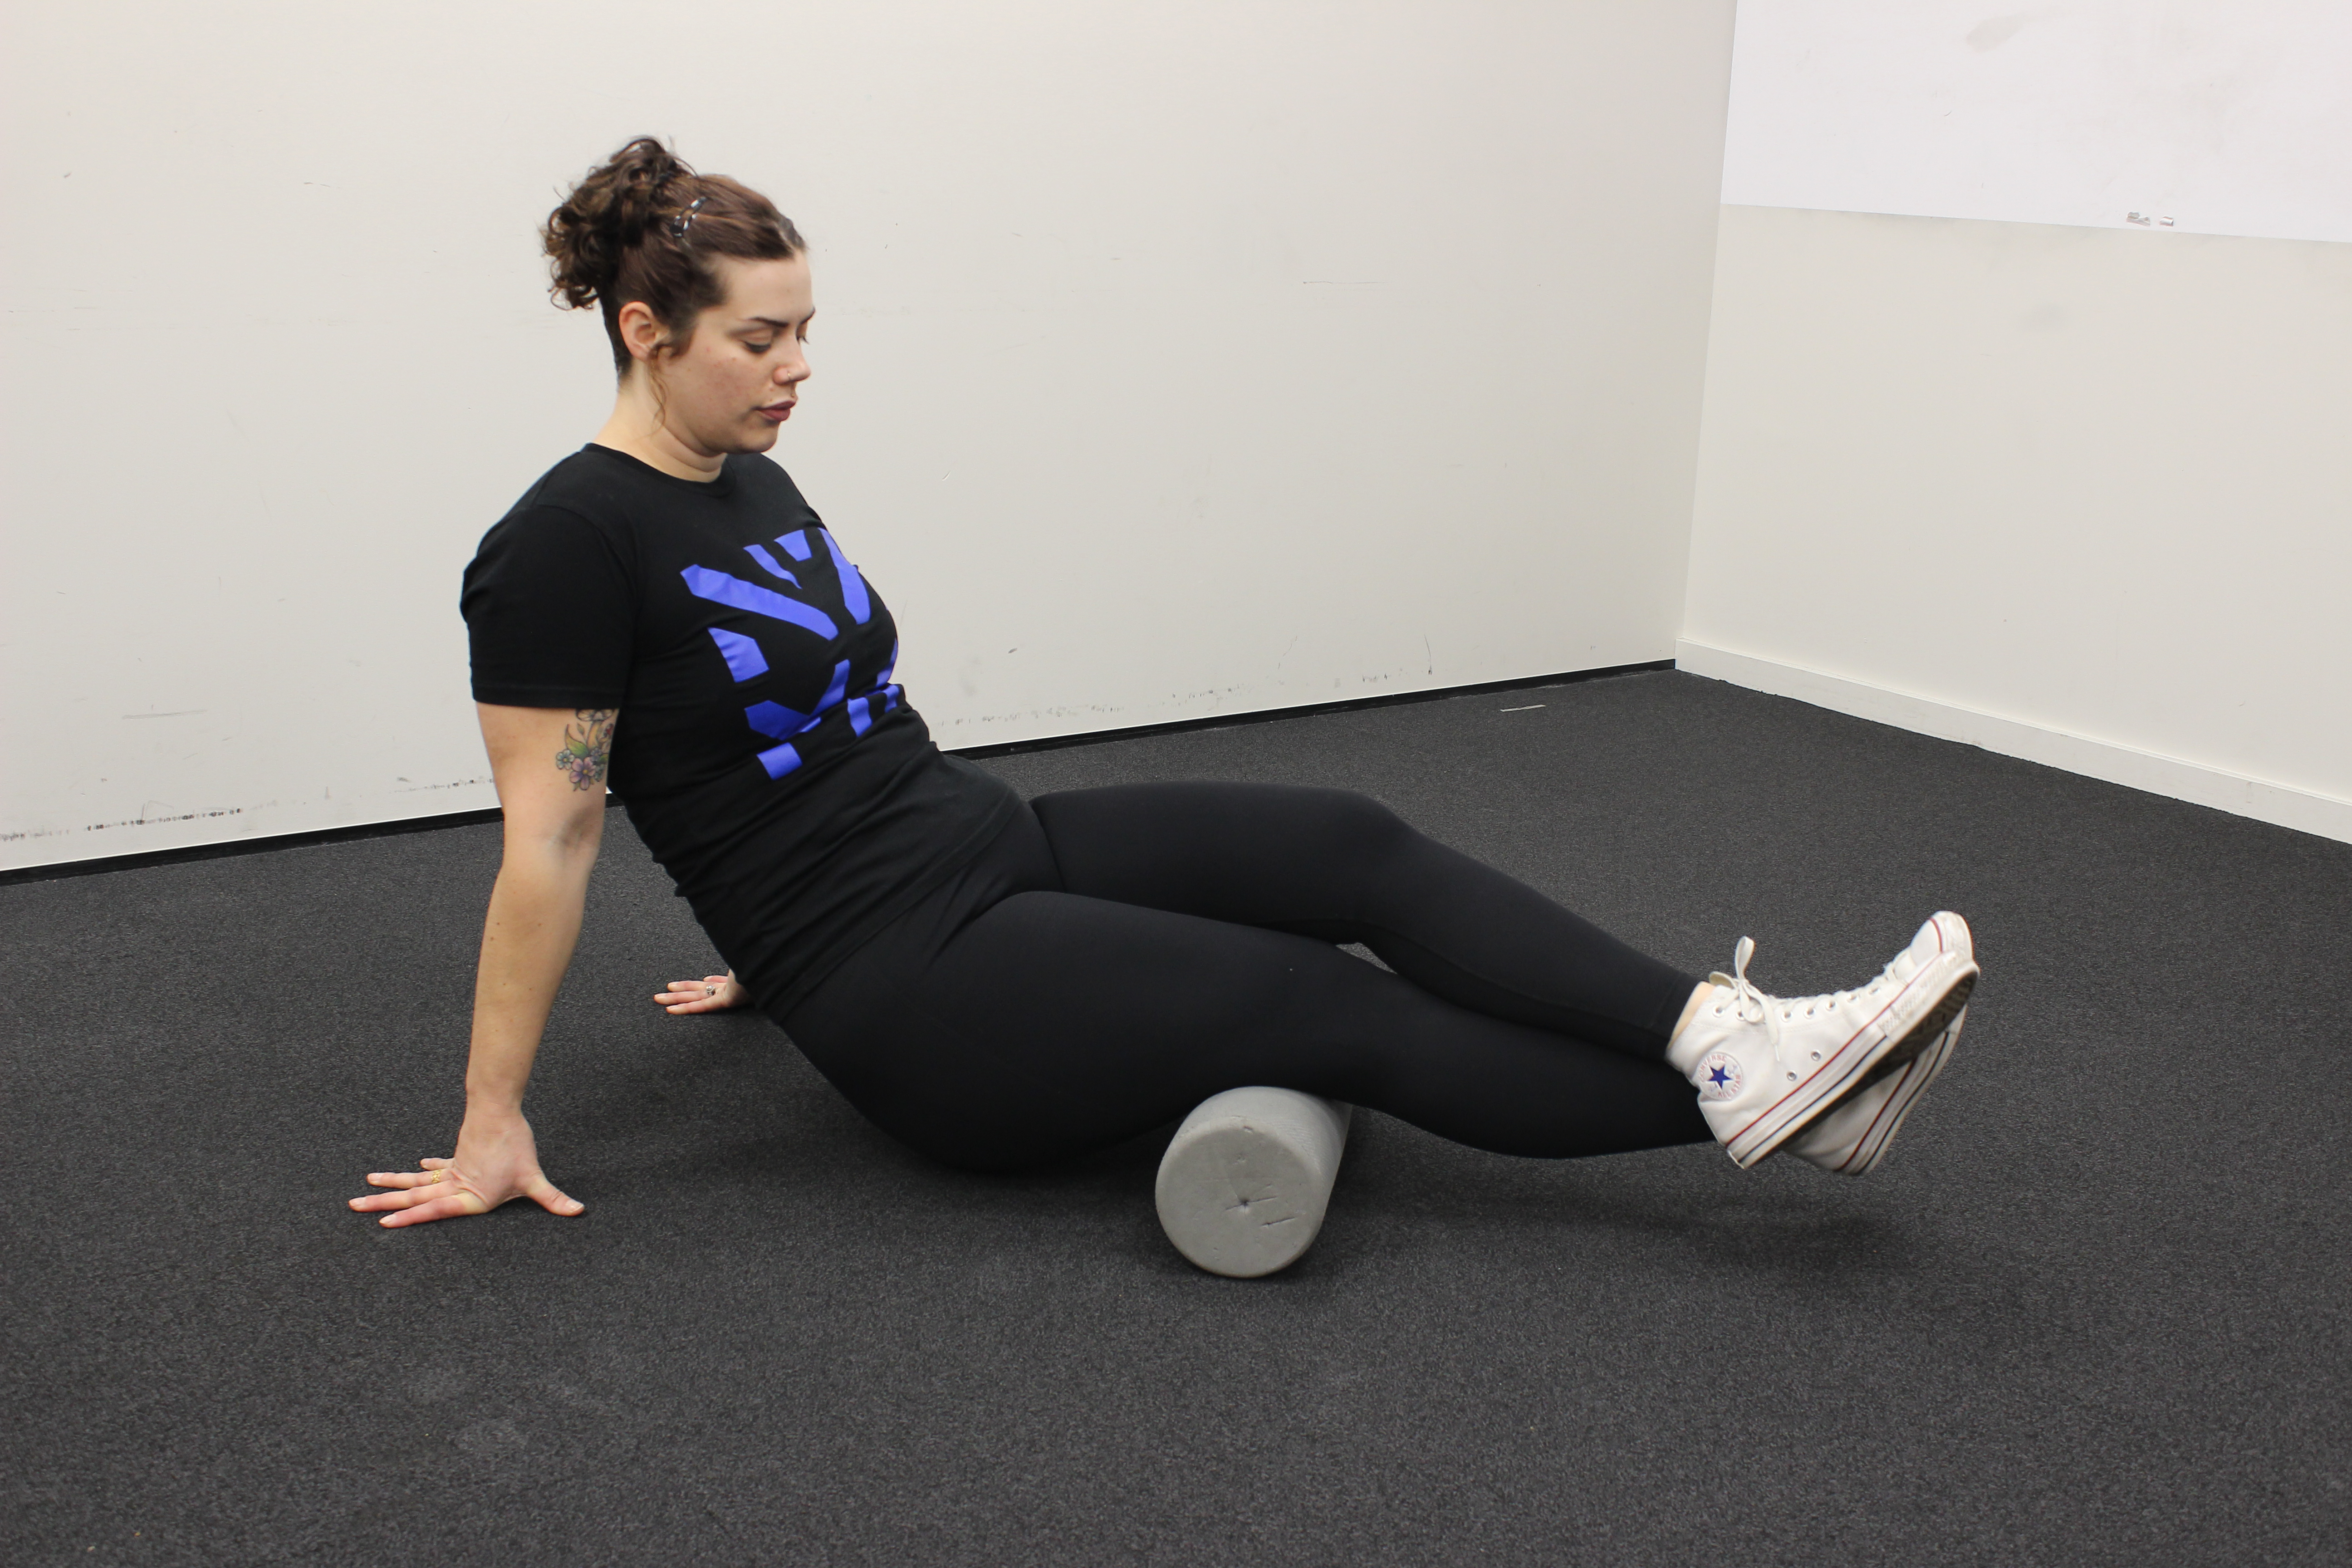
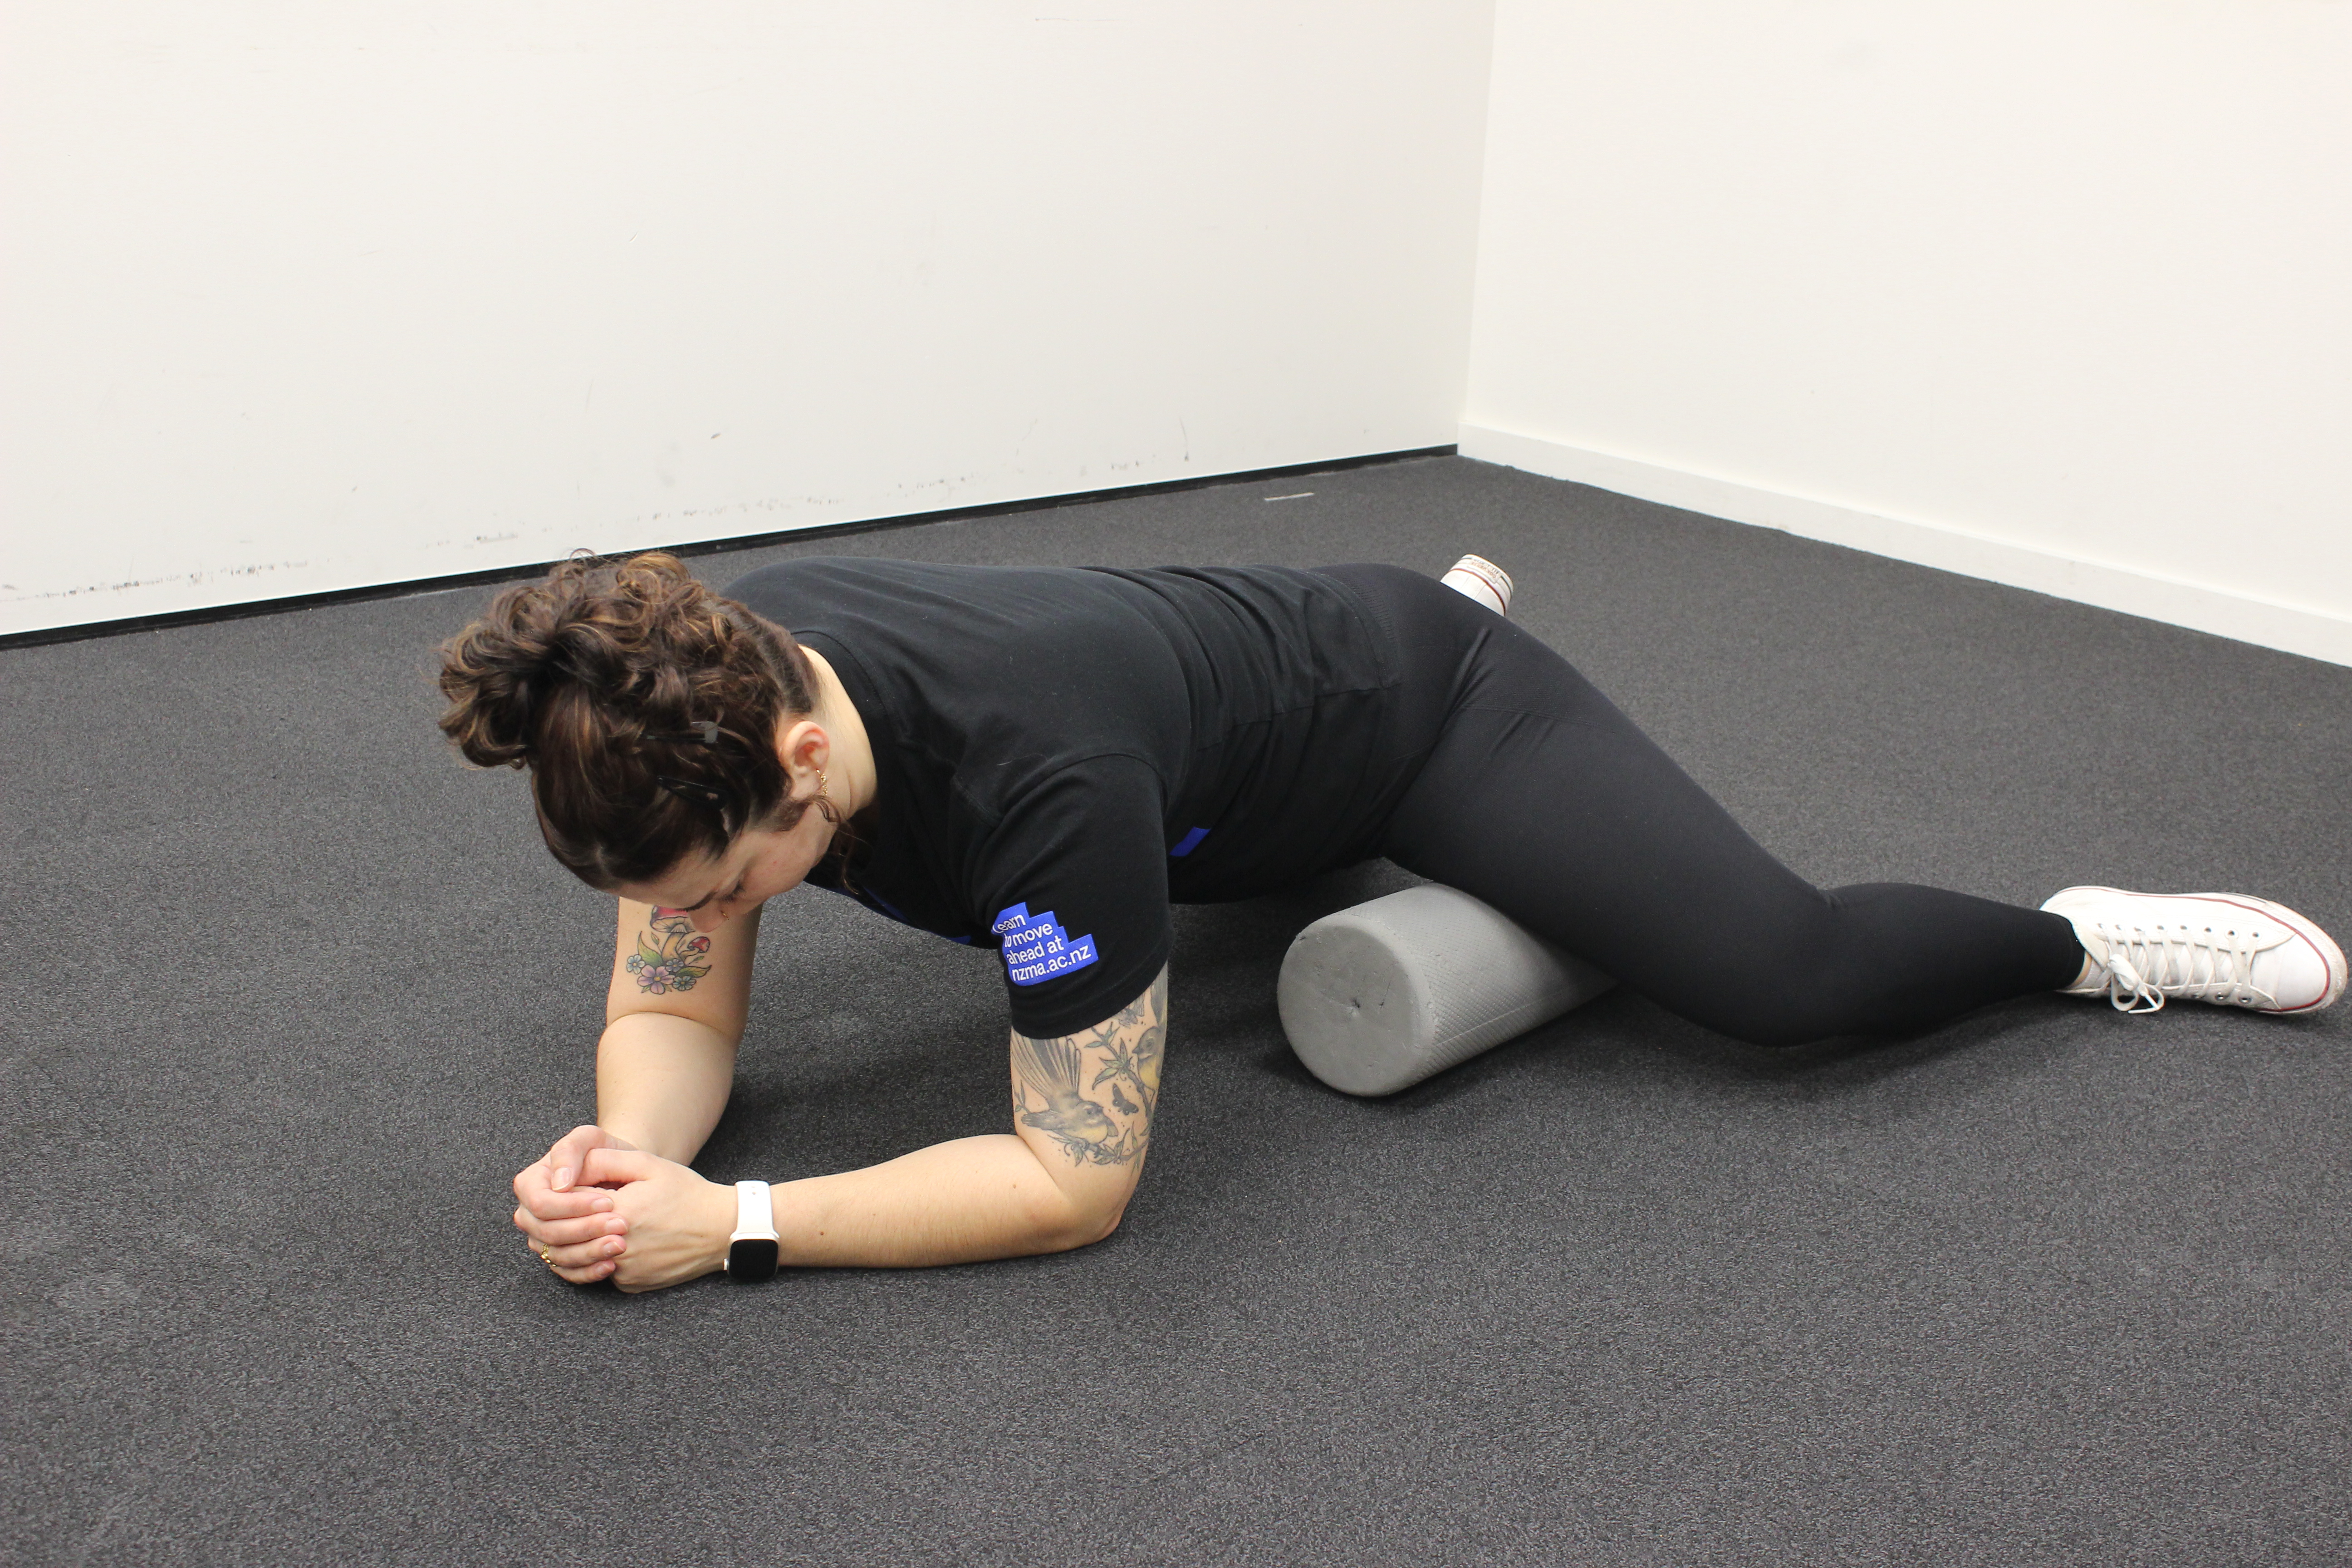
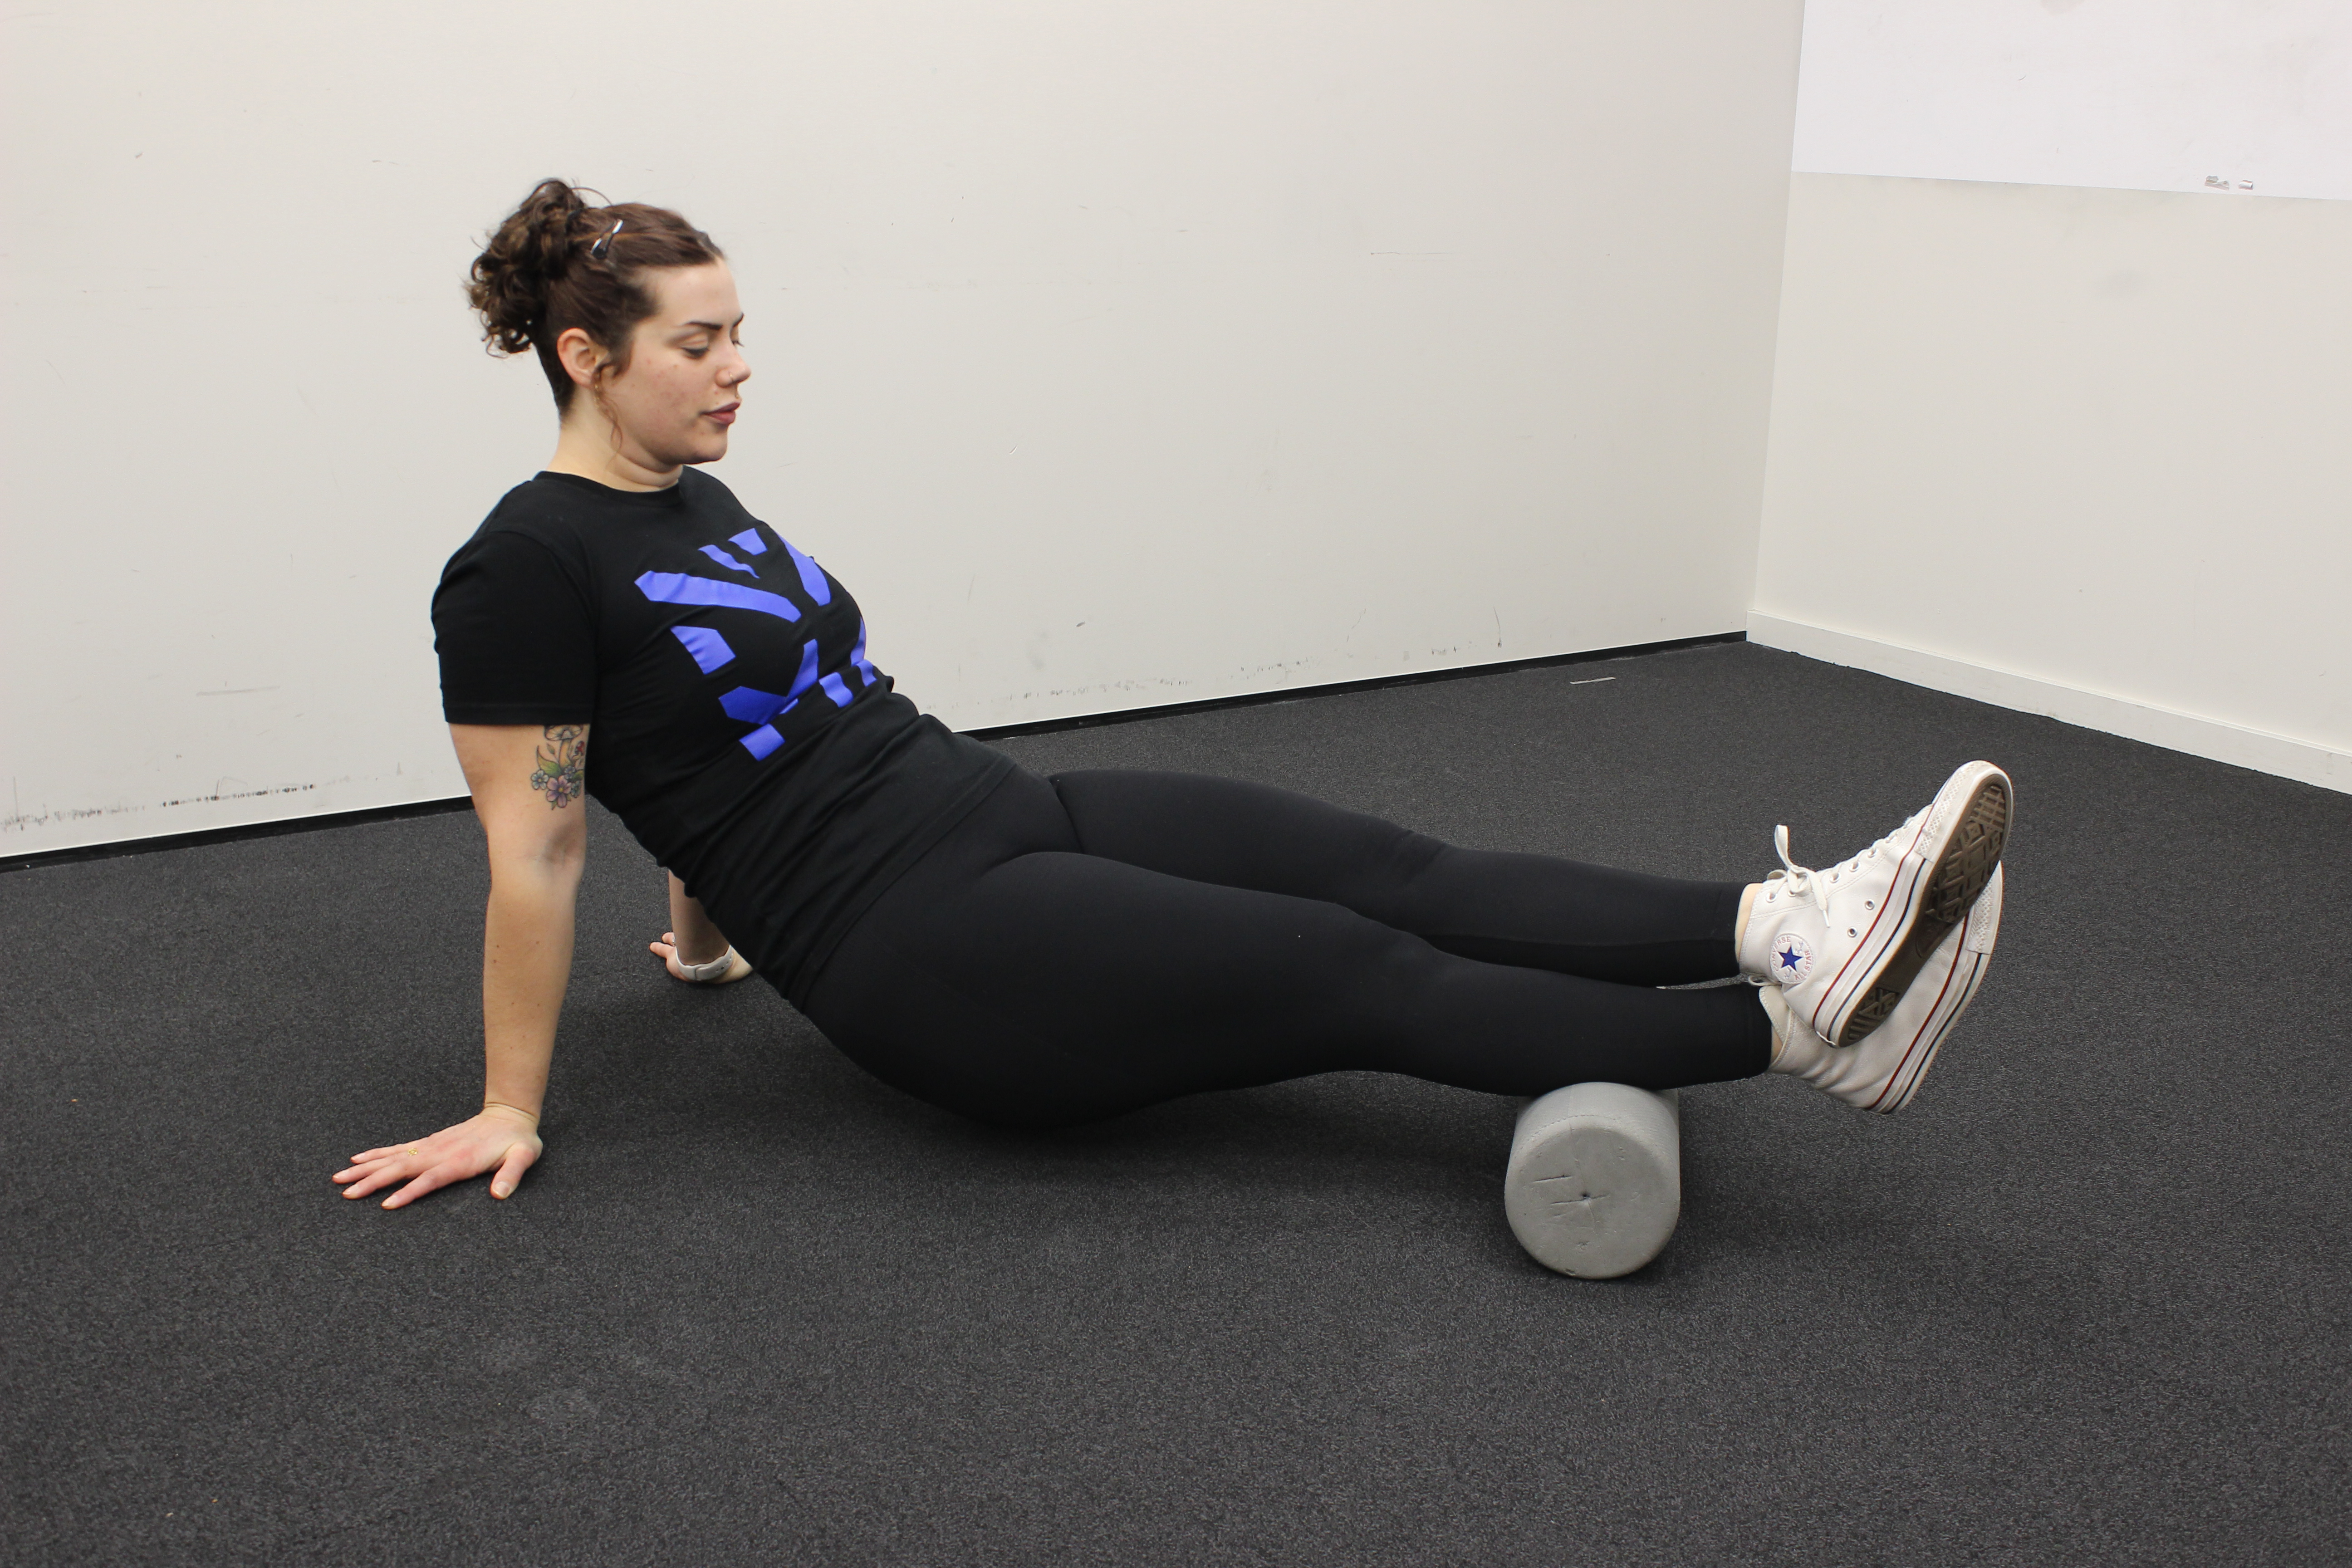
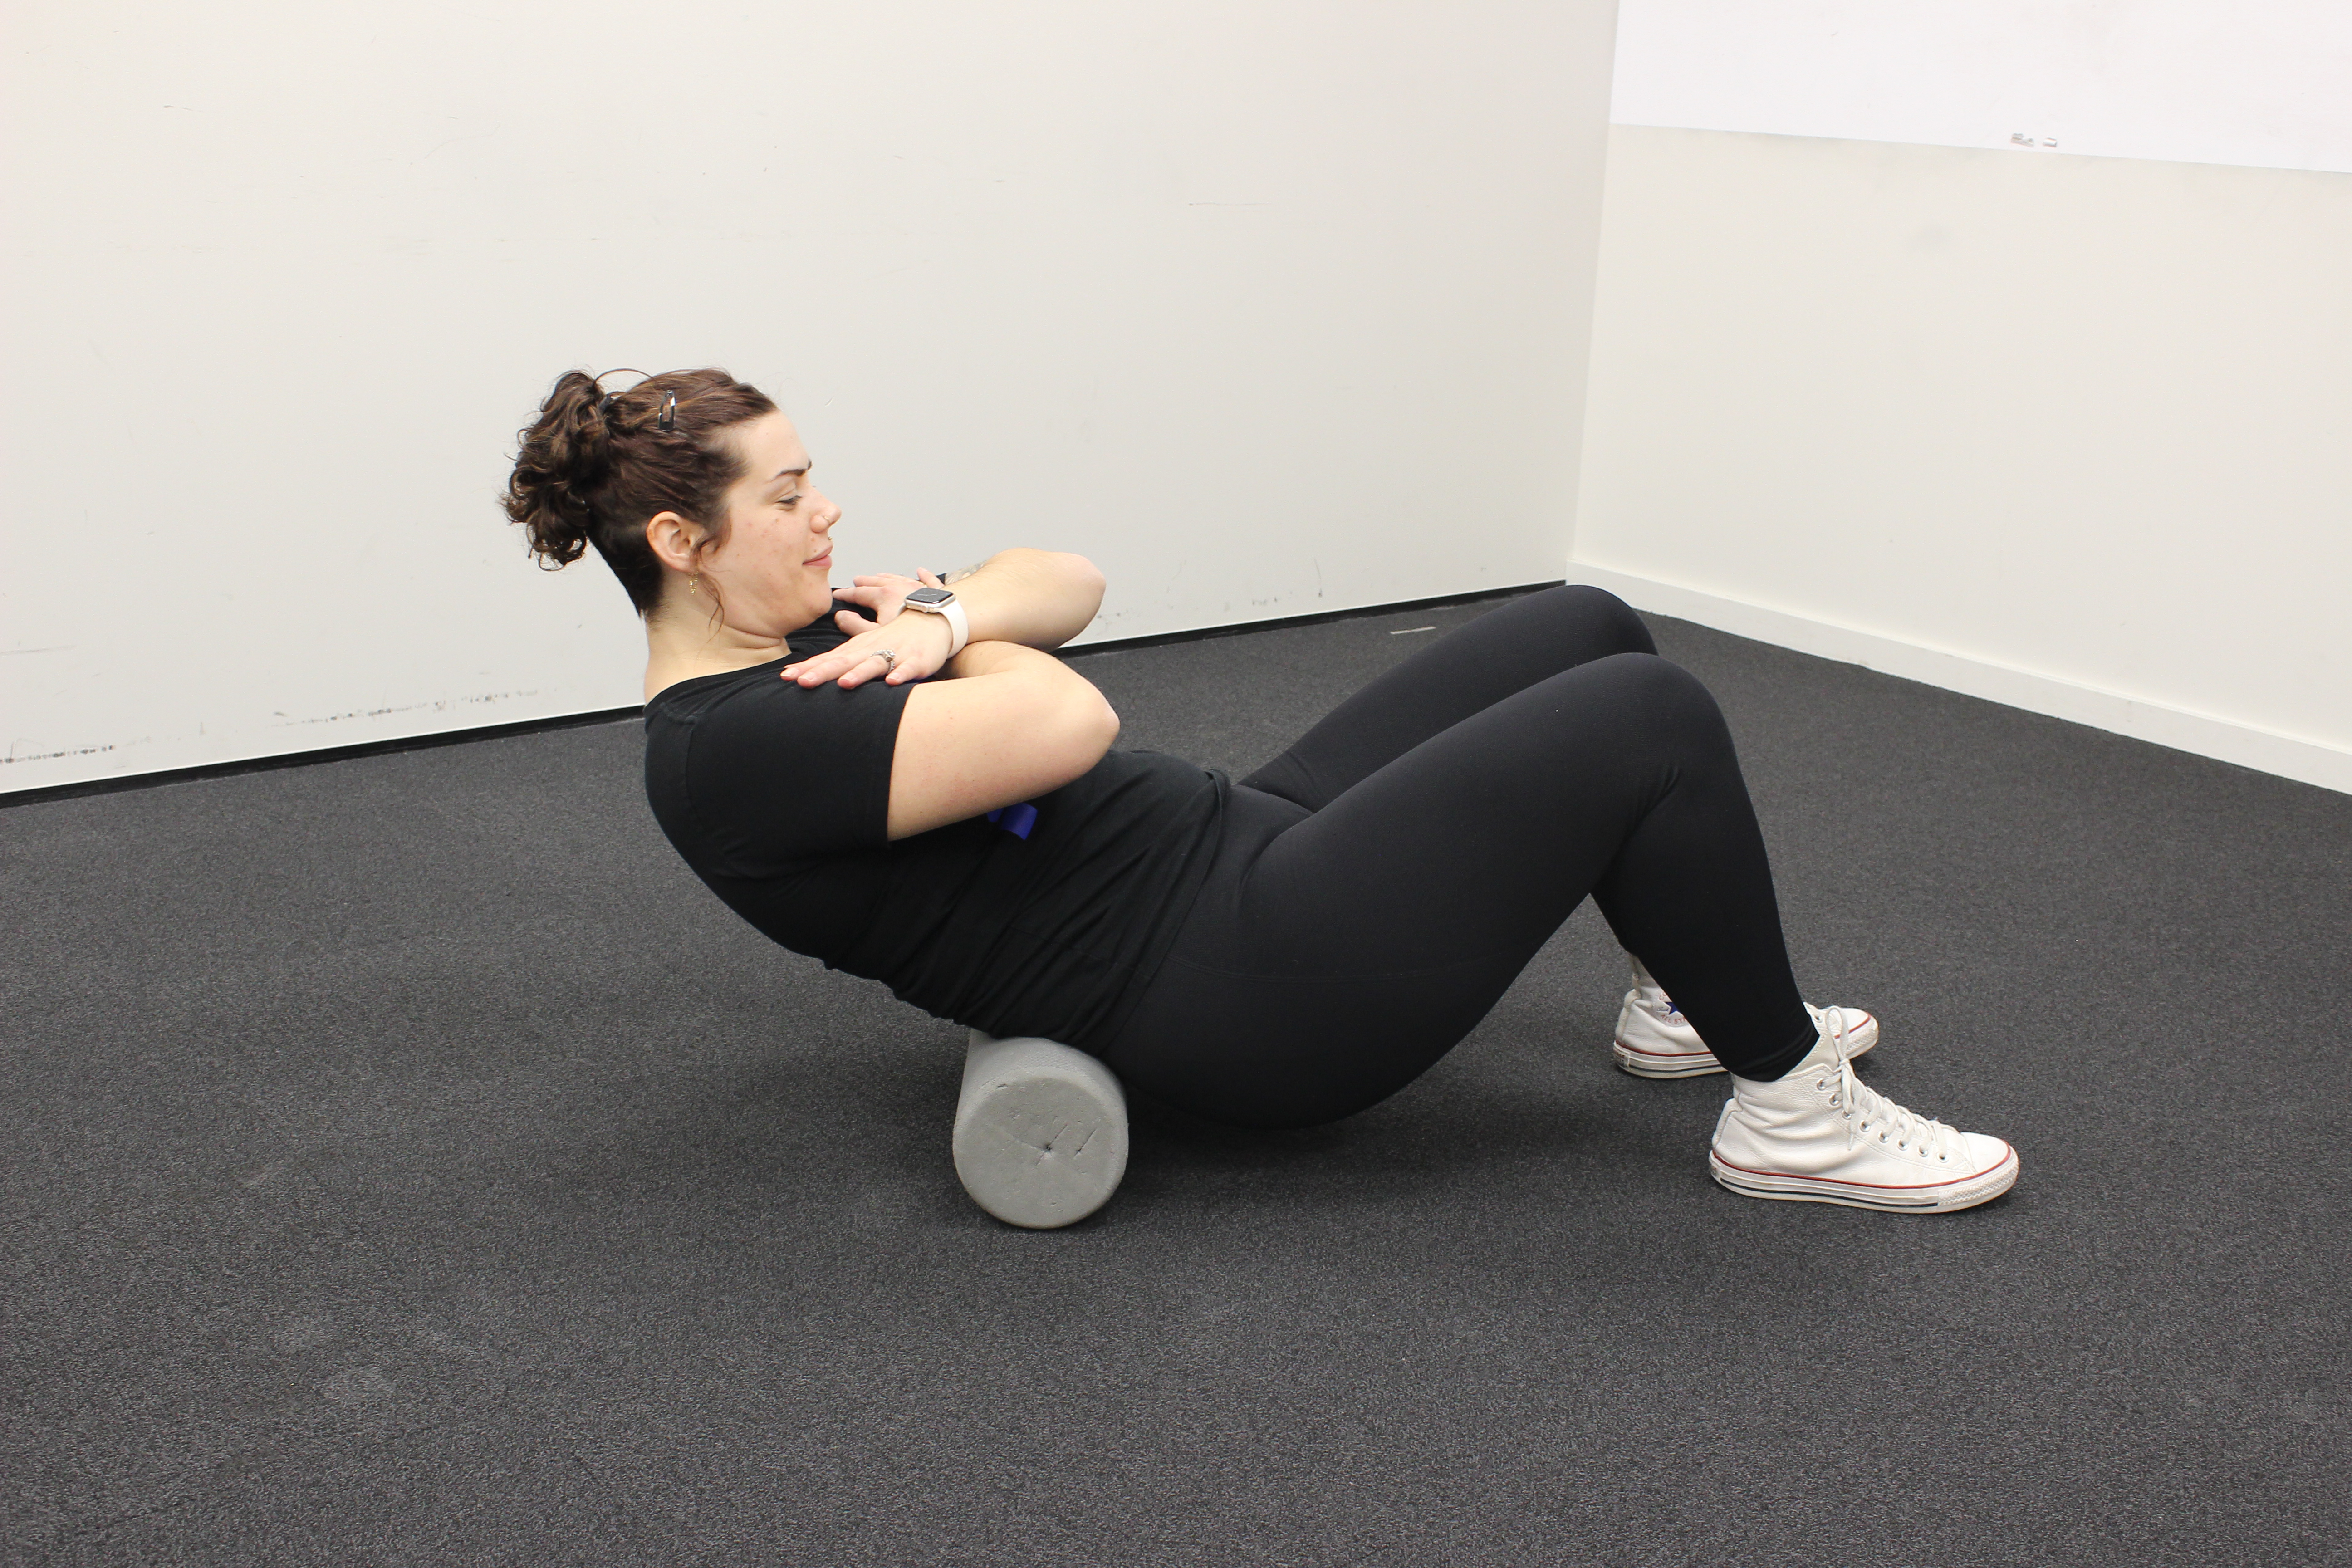
Foam Roller Technique
Using a foam roller or a similar device, such as a massage ball, slowly roll over the region while looking for tender areas. Once you find a tender spot, hold the roller in position for about 30 seconds. This will result in an approximate 50% decrease in tension. If there are areas that are difficult to reach with a foam roller, you can use a massage gun, which can also be effective. It is important to avoid rolling over or massaging bony areas and to stick to soft tissue areas only. If any movement during this treatment causes pain instead of discomfort, stop the exercise immediately.
Hip Flexors
Gluteals
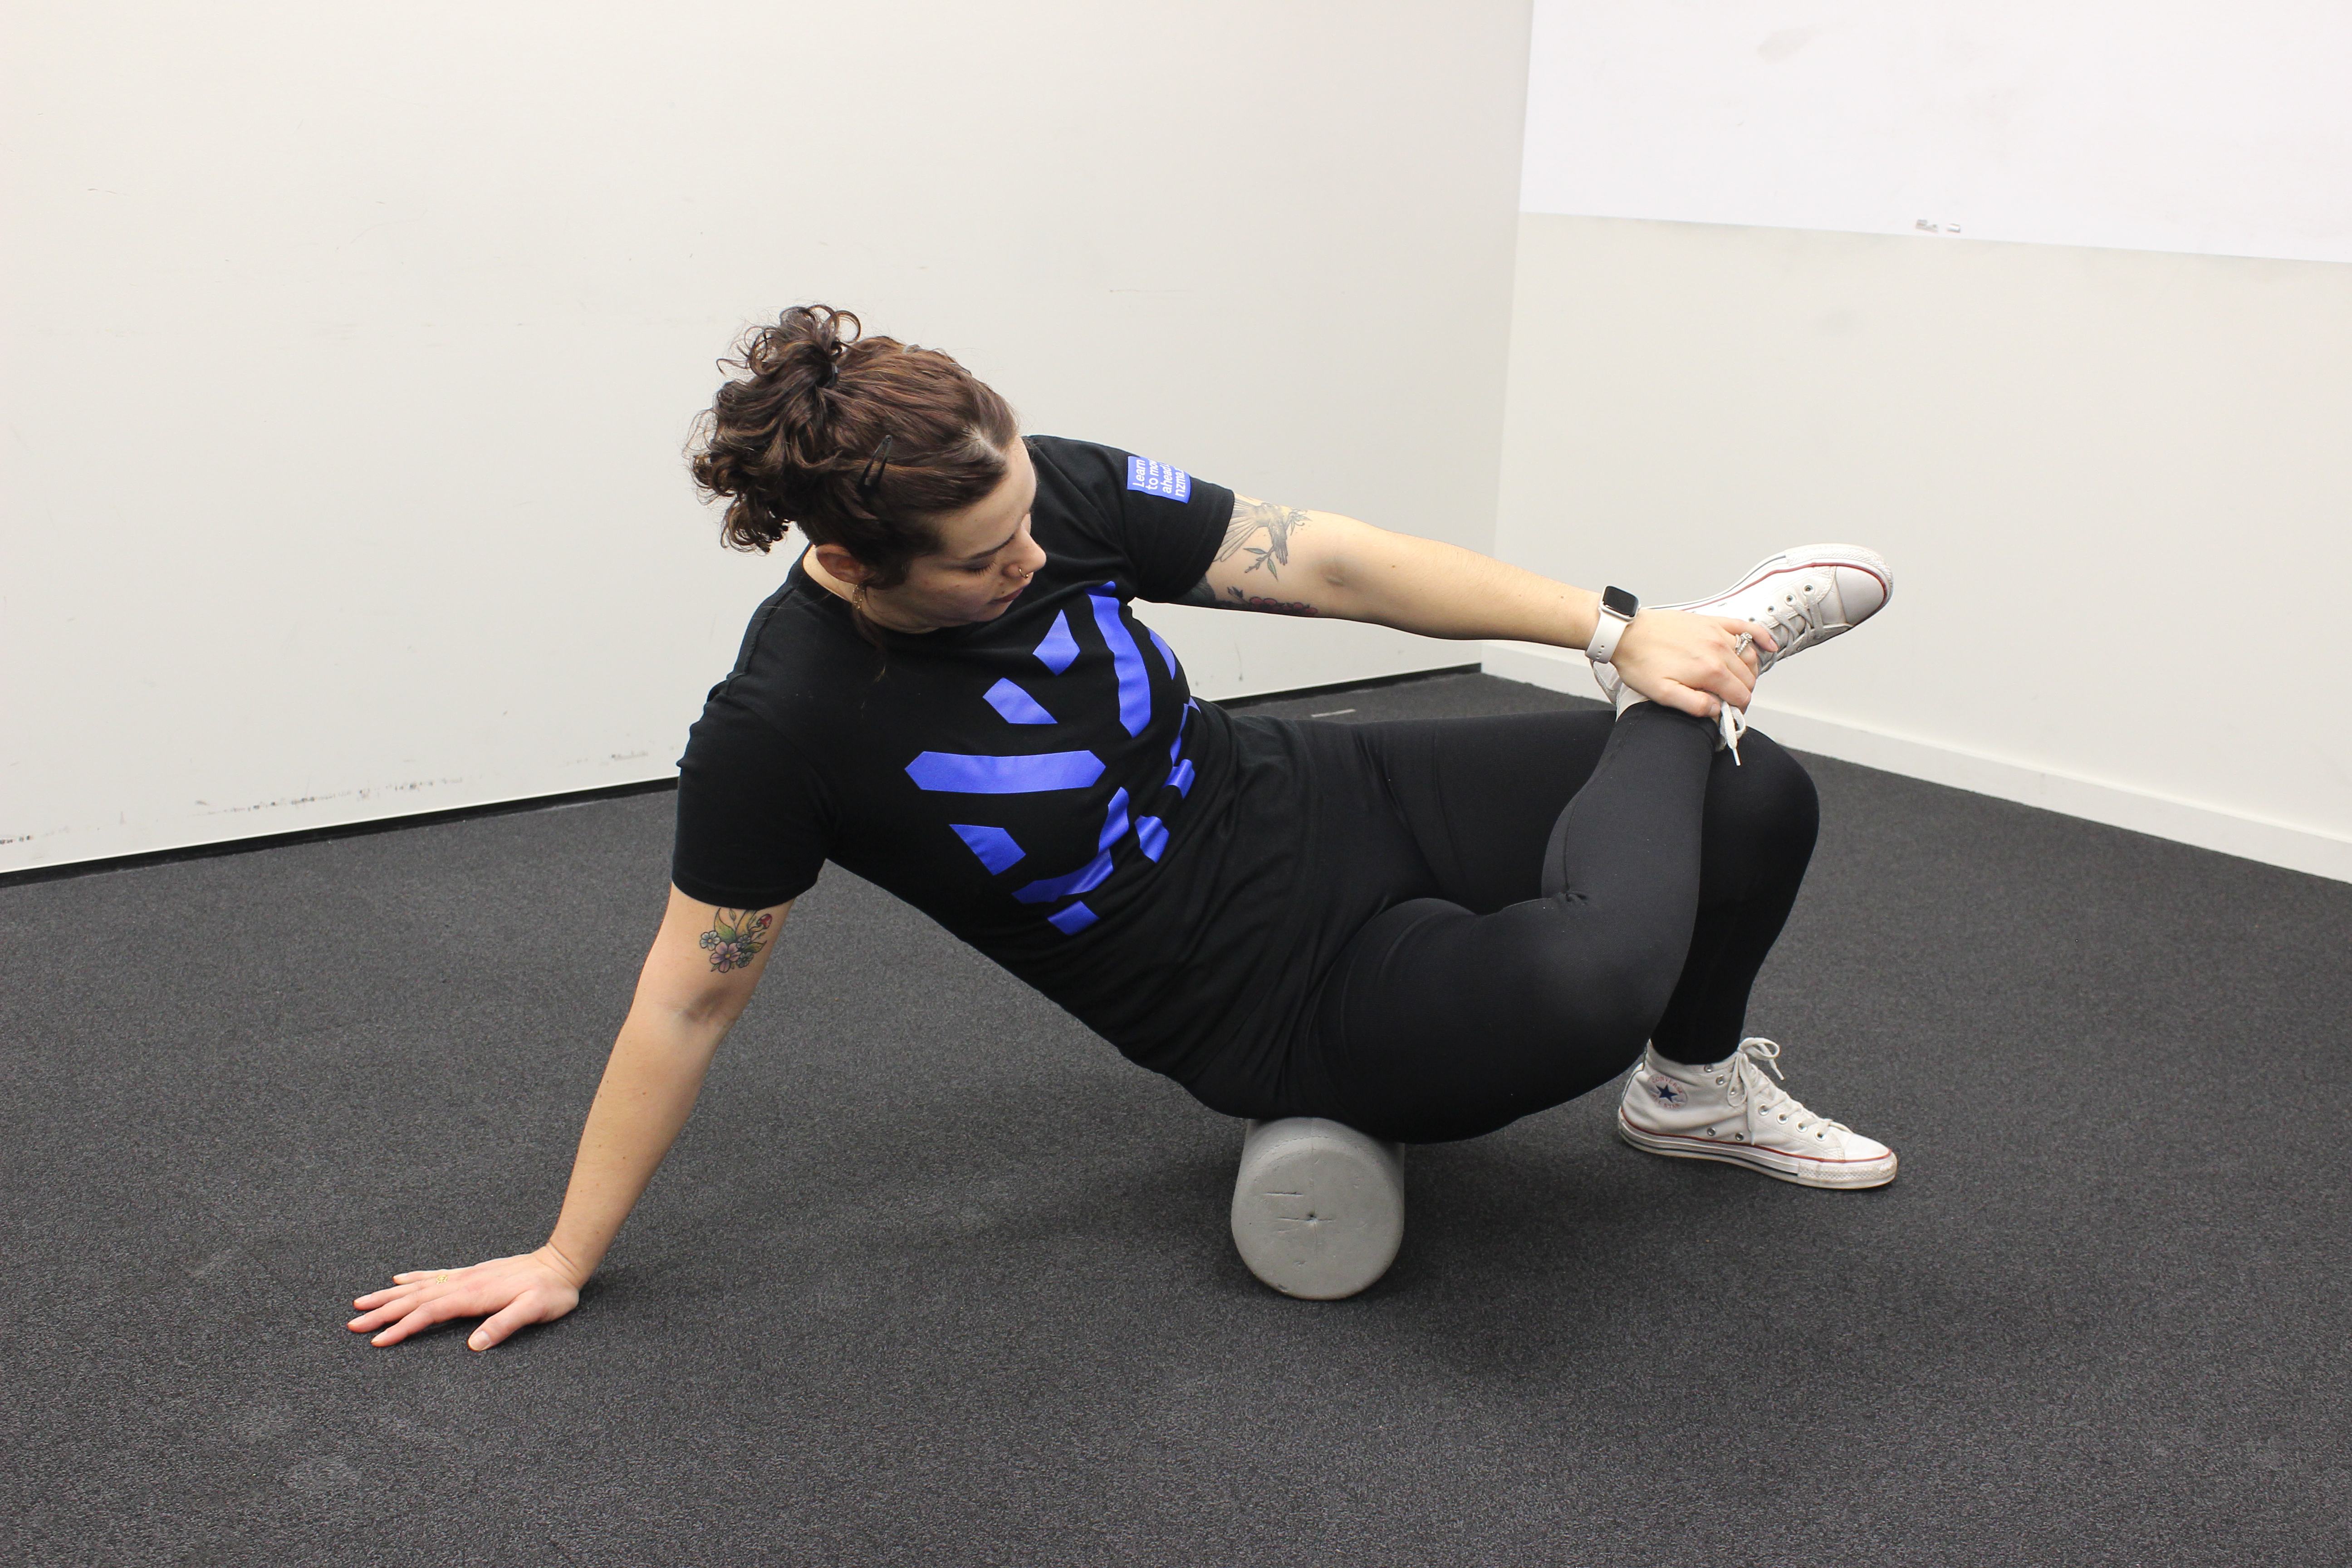
Tensor Fascia Latae (TFL) and Iliotibial Band (ITB)
Quadriceps
Hamstrings
Adductors
Calves
Lower Back
Phase 2: Lengthen or release tight muscles
During this phase, it may be beneficial for the client to consider consulting another allied health professional such as a massage therapist. However, there are several specific stretches that can be taught to the client, that performed regularly can help lengthen tight muscles that contribute to lower crossed syndrome.
These stretches should be performed until the point of discomfort, but not to the extent of causing pain. Each stretch should be held for at least 30-45 seconds and repeated multiple times during a session. It's crucial to perform stretching exercises when the muscles are warm and flexible. This means that a suitable warm-up should be completed before engaging in static stretching. It's worth mentioning that stretching immediately after a workout only brings the muscles back to their pre-workout length. Additional stretching will be required to further lengthen the muscles.
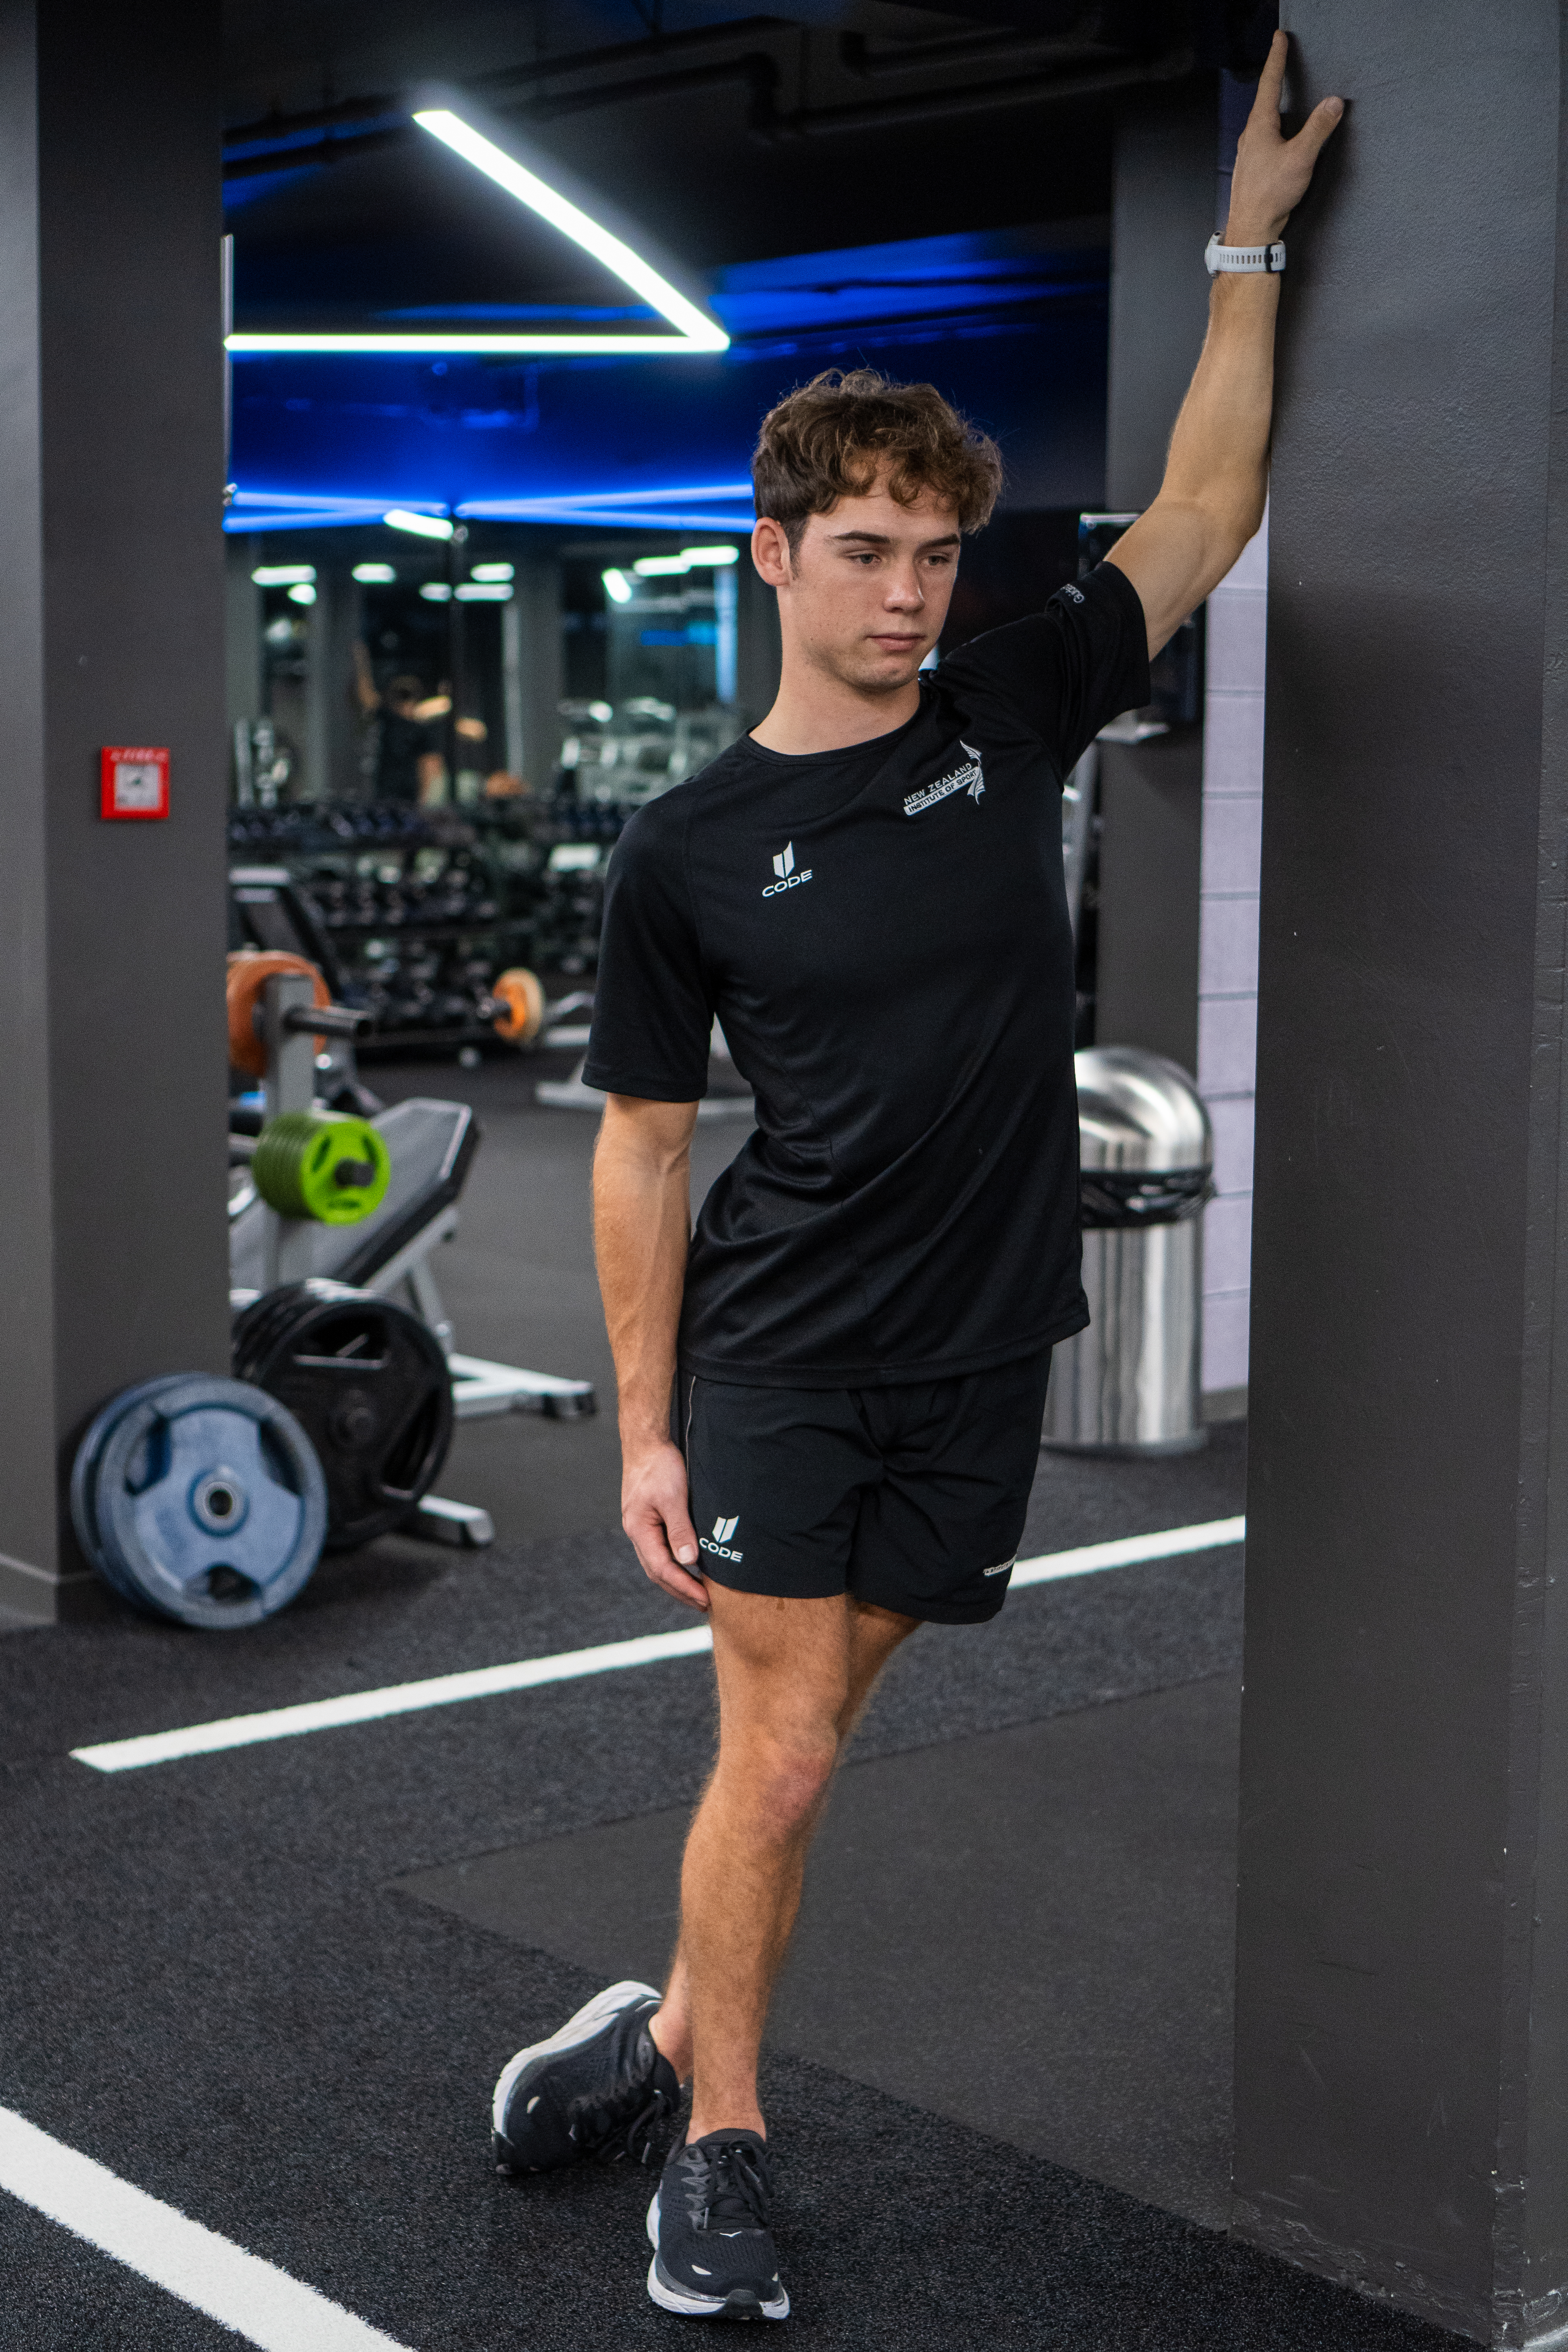
Hip flexor stretch
The following video shows how to support a client to perform a hip flexor stretch correctly.
Quadriceps stretch

TFL stretch
Adductor stretch

Spinal extensors stretch
Click on the arrows beneath the image to view six examples of the spinal extensor stretches.
Iliotibial band (ITB) stretch
Click on the arrows beneath the image to view each stretch.
Piriformis stretch
Calf stretches

Hamstring stretches
Click on the arrows beneath the image to view each stretch.
Phase 3: Activate weak or inactive muscles
Phases 3 and 4 are where trainers can have the most impact. In minor cases, a broad exercise approach can be effective. This approach focuses on exercises that specifically target the muscles commonly identified as weak during functional testing for lower crossed syndrome including:
- Abdominals
- Rectus abdominus
- External obliques
- Internal obliques
- Transversus abdominus
- Gluteals
- Gluteus maximus
- Gluteus medius
- Gluteus minimus
- Vastus medialis
- Tibialis anterior
The following exercises can be performed during programmed sessions with clients, however, it is even more beneficial to teach clients versions of these exercises that can be done at home daily. The focus should be on building endurance with light resistance, optimal form and lots of repetitions.
Exercises to improve pelvic tilt
LYING PELVIC TILT
An exercise that helps clients learn how to get the pelvis into a “neutral position” and “posterior tilt”. Initially, this involves teaching the client how to find a posterior tilt position, then moving between anterior and posterior tilt. Using the coaching cue “push the lower back into the ground" is useful during this exercise. Hold the posterior tilt for 10-15 secs for 8 reps. Progress to holding for longer periods of time, up to 30-60 secs for 3-5 reps. Hint: remember to breathe!
STANDING PELVIC TILT (STP)
This is a progression exercise for when the client manages to perform the lying pelvic tilt and understands how to control pelvic alignment. "Squeeze the glutes" is an excellent cue for the SPT as it triggers the client to contract the glutes and posteriorly tilt the pelvis. Hold the posterior tilt for 10-15 secs for 8 reps. Progress to holding for longer periods of time, up to 30-60 secs for 3-5 reps. Hint: remember to breathe!
Exercises to activate the abdominals
Rather than doing traditional abdominal exercises like sit ups and crunches, these exercises are more about strengthening the abdominals as pelvic stabilisers. When lower crossed syndrome is present the brain is not effectively choosing the abdominals to do this. Phase 1 and 2 of the corrective exercises should have deactivated and lengthened some of the tight muscles that have been dominating pelvic stability, so now we should be able to “switch on” the abdominals. These exercises will call on the abdominals to stabilise the pelvis during lower limb movements. They should be stopped as soon as pelvic position is altered, that is, when anterior pelvic tilt occurs.
HEEL SCRAPE EXERCISE
This exercise is a good starting point for clients with weak or inhibited abdominals. Lie the client on their back with their legs straight. Ask them to brace their abdominal muscles and gluteals and gently lift one leg off the floor, bend their knee and gently scrape your heel across the floor towards their buttock. Then ask them to return it back to the start position using the opposite motion. Repeat with the opposite side. Progress from 5 slow and controlled heel scrapes each side to 15 heel scrapes each side, 3 times per day.
STRAIGHT LEG LOWERING VARIANTS
The key to these exercises is maintaining contact between the lower back and the floor. The exercise should be performed until the back loses contact with the floor. As core stability improves, gradually increase the range of motion, allowing the back to stay in contact with the floor for a longer duration during the exercise. Trainers may assist clients by passively lifting the leg back to the top position until abdominal recruitment improves. Otherwise, clients may rely on poor recruitment patterns, such as the hip flexors, especially when fatigued. Repetitions should be executed slowly and with control, continuing until contact with the floor is lost. Trainers can place their hand under the lower back to monitor this. Once clients have improved abdominal recruitment and strength, they can actively perform both the upward and downward portions of the exercise.
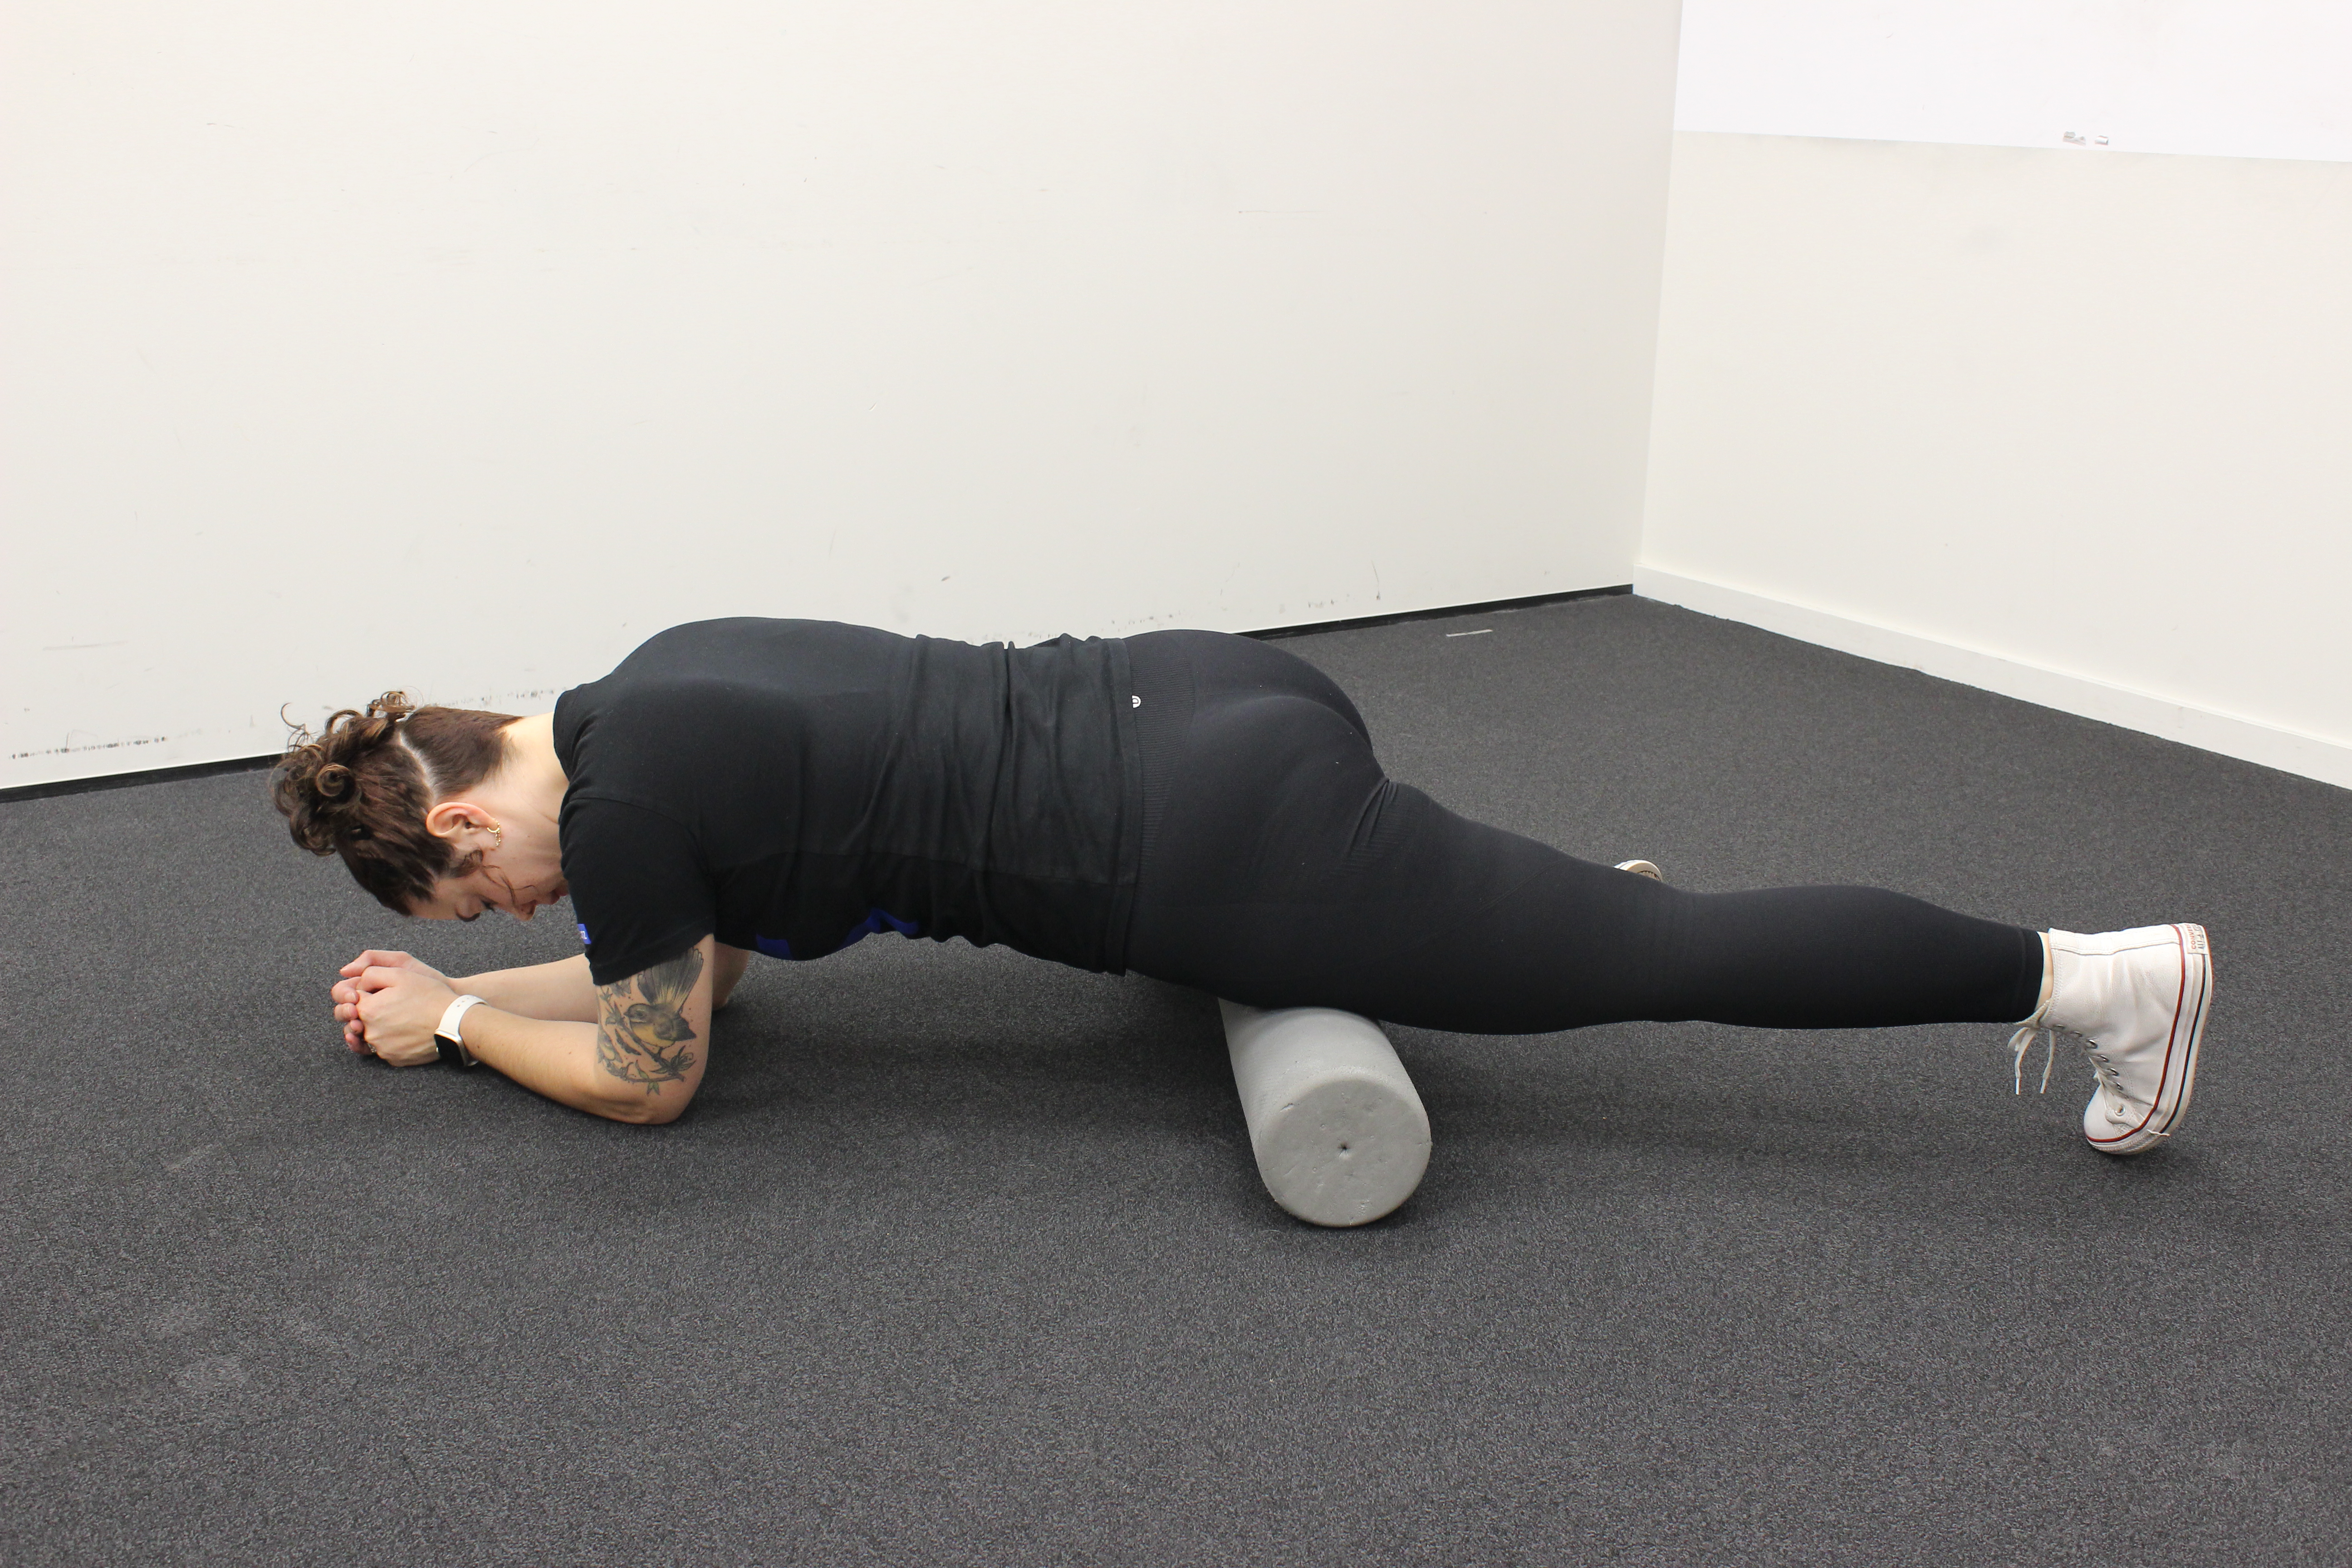
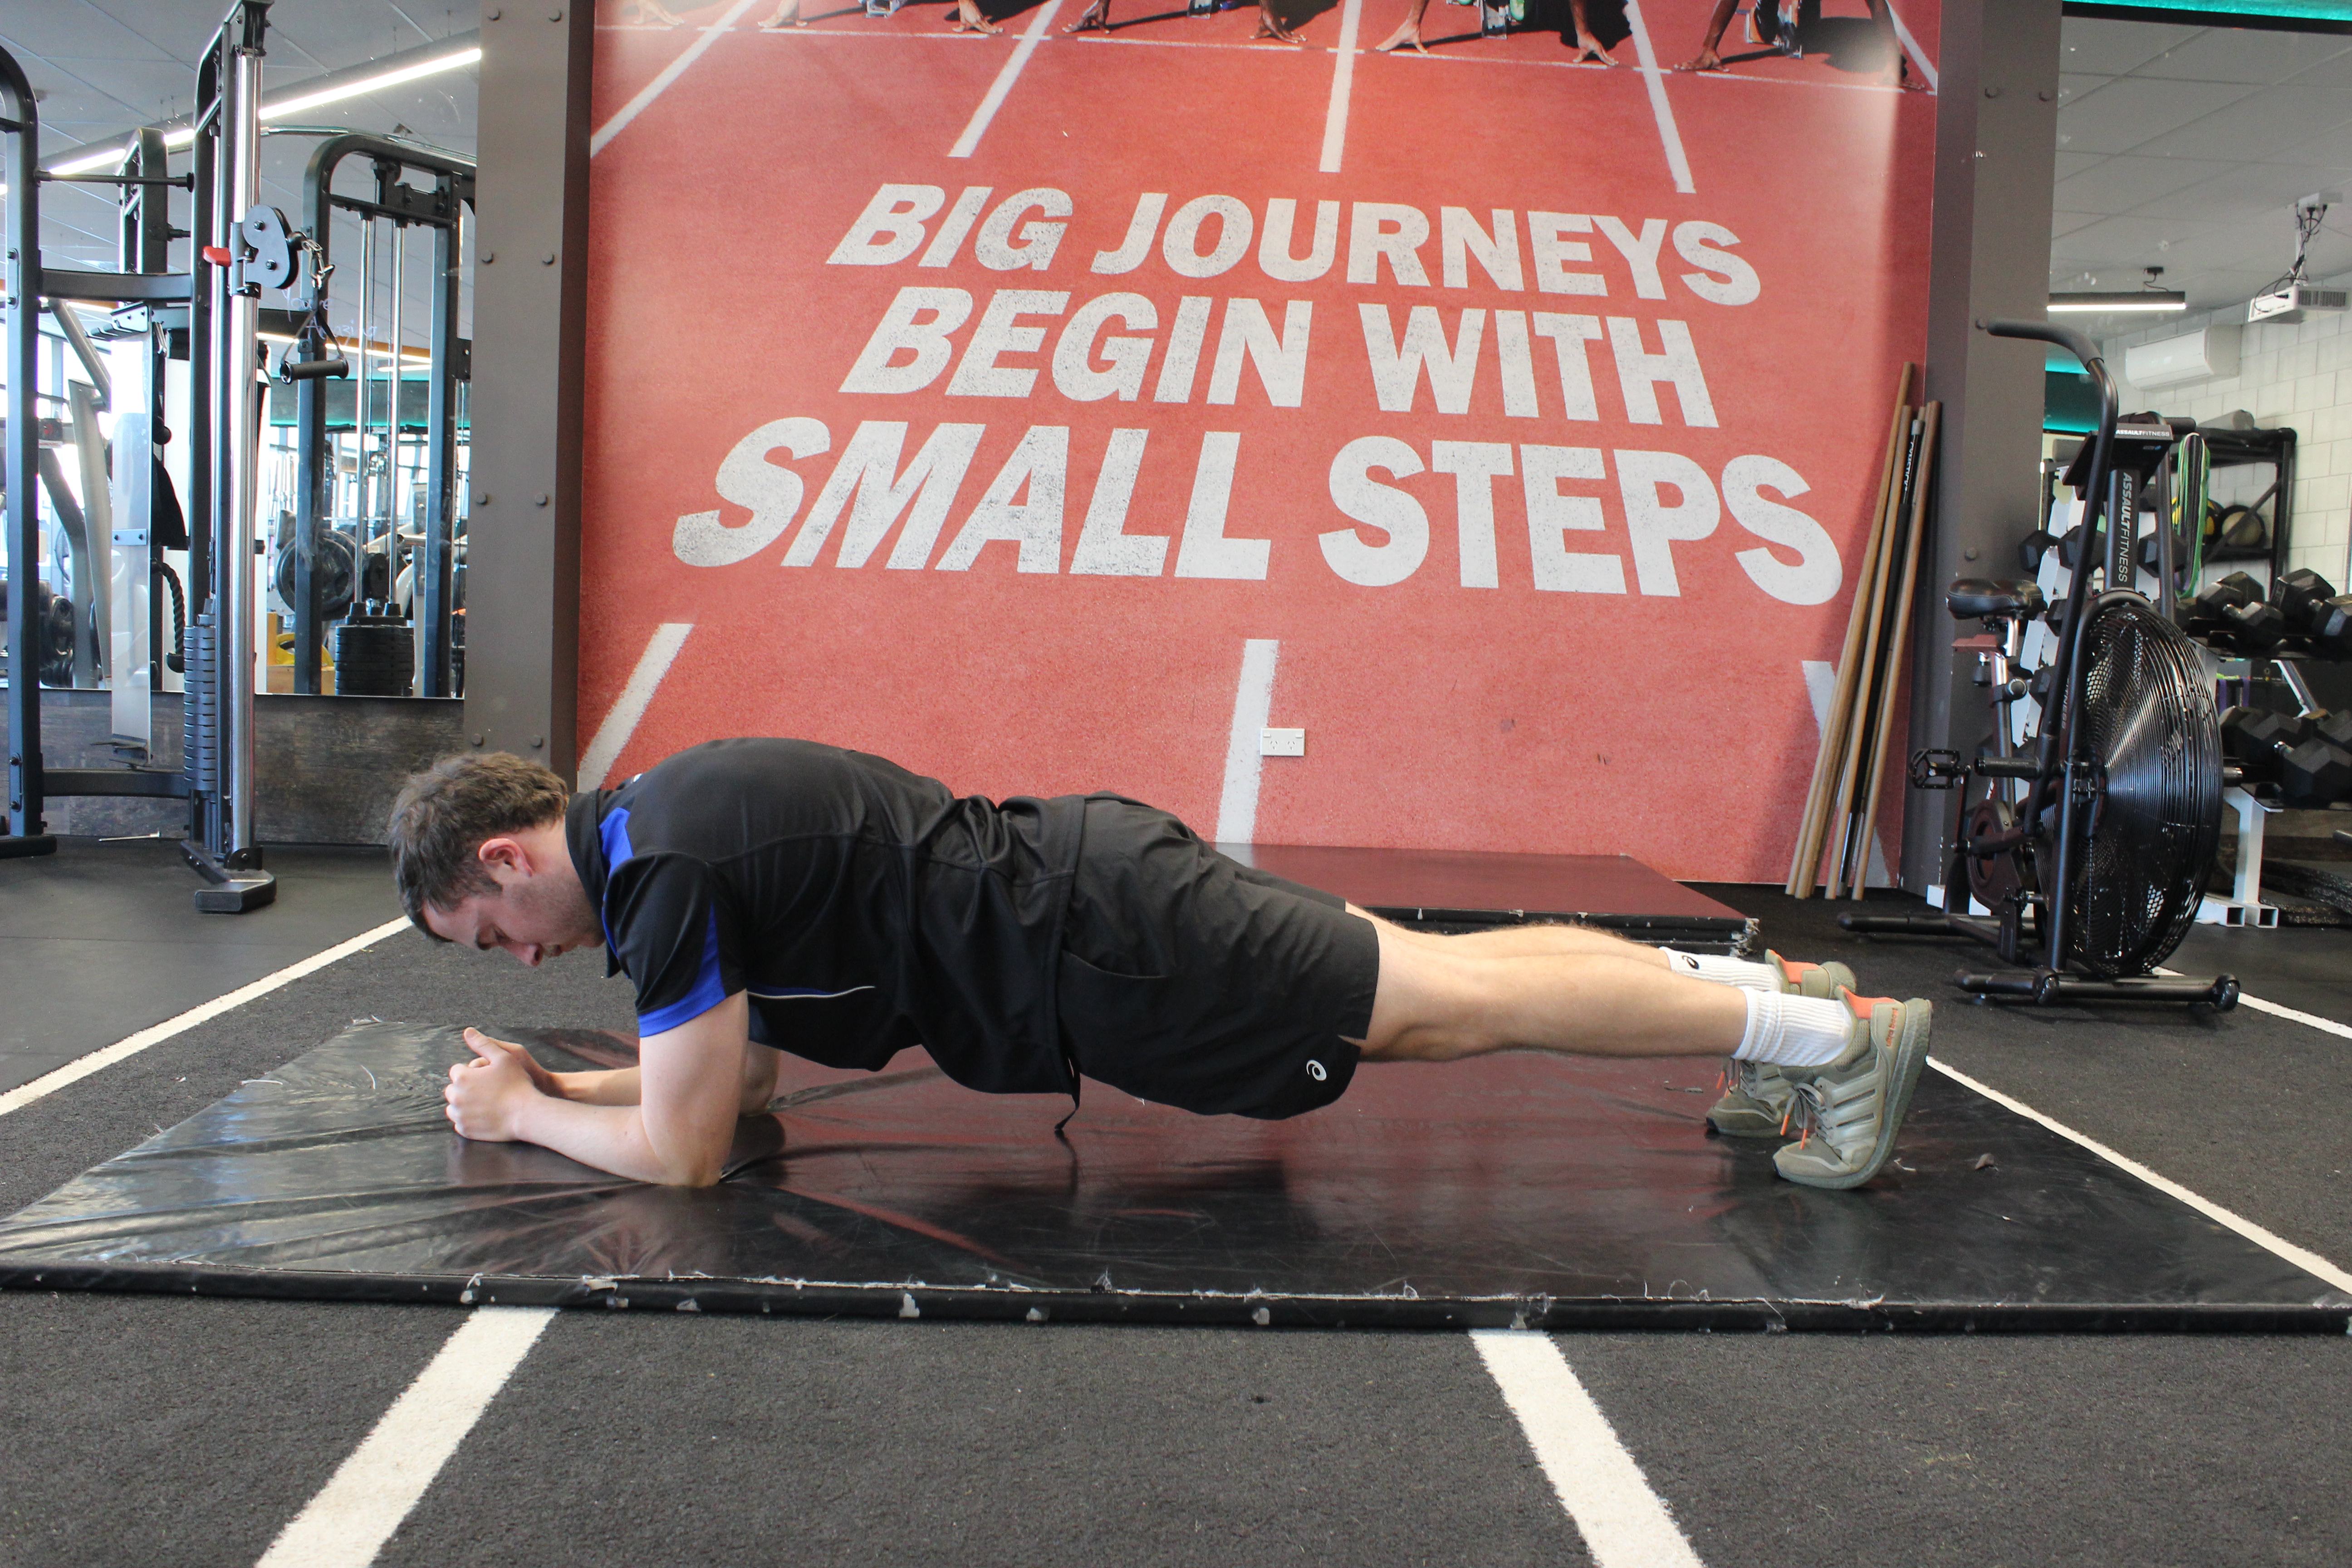
THE PLANK
A common exercise but performing it correctly is crucial, especially considering the poor recruitment of important muscles such as the abdominals and gluteals in lower crossed syndrome. Initially, it may be necessary to keep the repetitions brief, lasting only a few seconds, and gradually work towards extending them to 30 seconds. It is essential to stop each repetition once optimal pelvic positioning is compromised.
Exercises to activate the Hip Extensors
HIP EXTENSION EXERCISES
This exercise can initially be performed with a straight leg, then progressing to a flexed knee hip extension movement. This exercise is particularly important if the client is exhibiting very weak or poorly recruited gluteus maximus muscles. It is designed to improve muscle recruitment in hip extension, so needs to be monitored by the trainer initially to ensure the client doesn’t rotate the pelvis or over-use the lower back to lift the leg. The number of reps will depend on the client’s ability to perform the movement with good recruitment. Repetitions should be controlled and held at the top for 2-3 seconds. Try to build up to 3 sets of 15-20 reps on each leg.
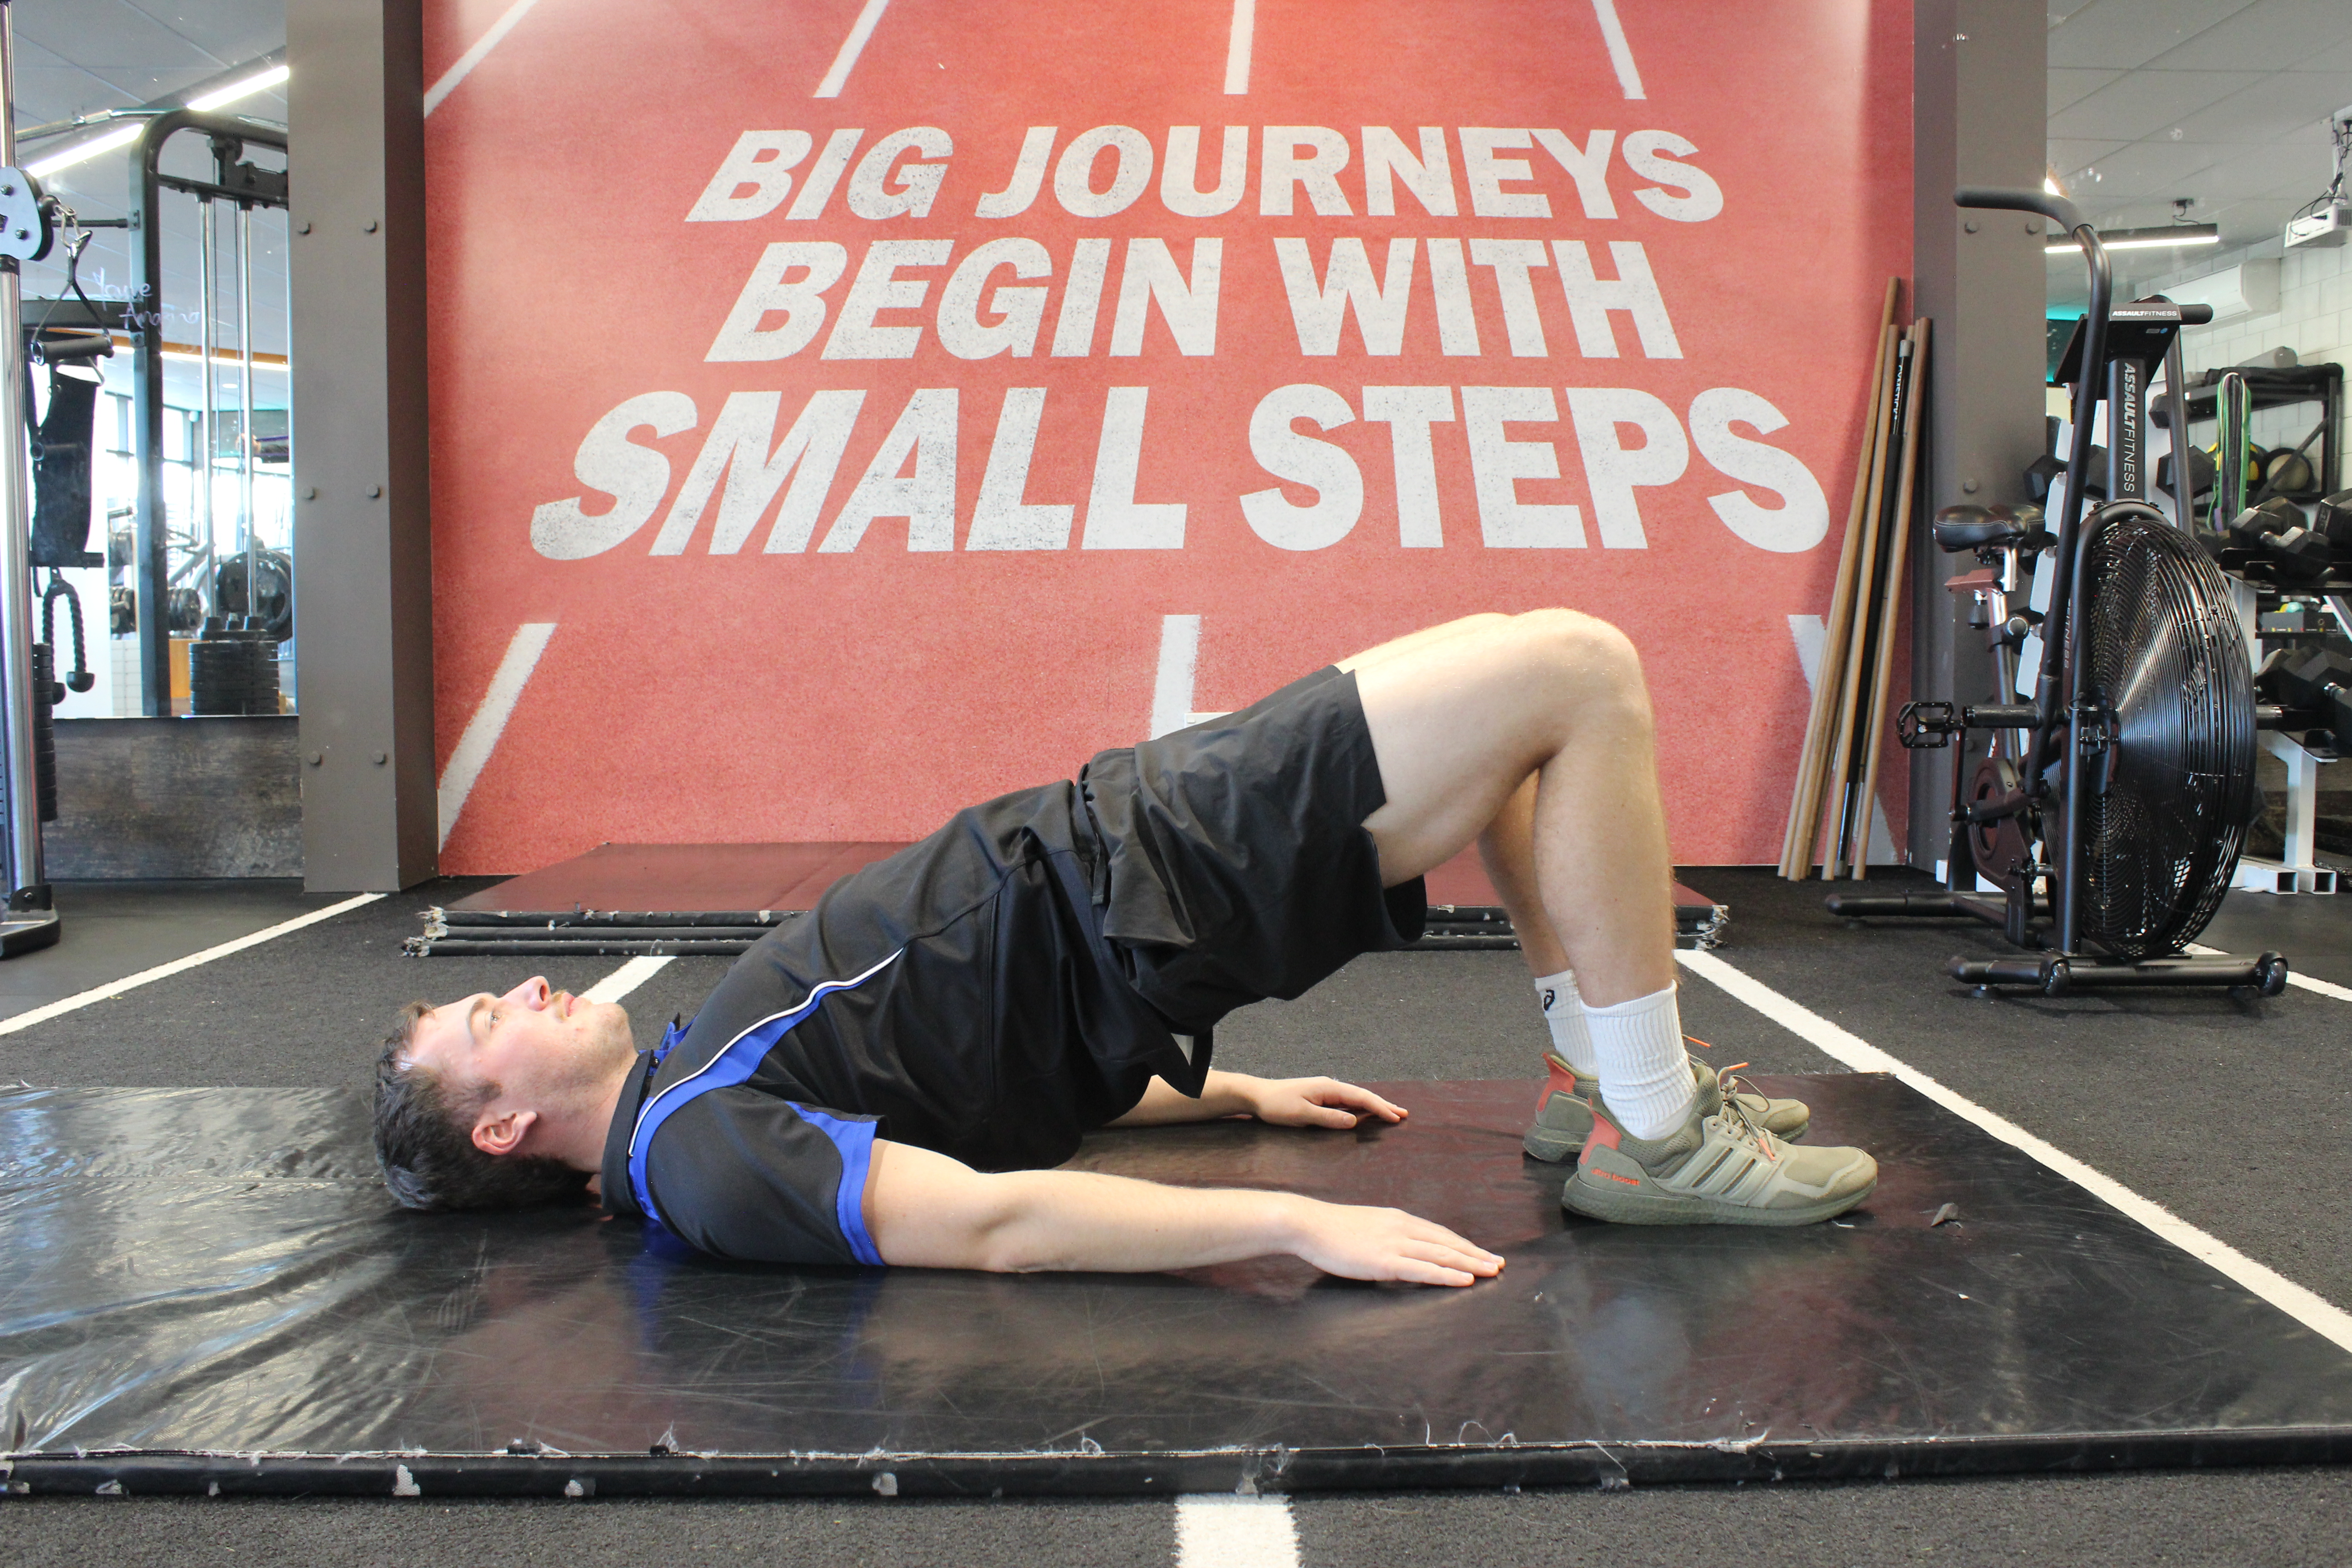
GLUTE BRIDGES
A common exercise to target the hip extensors while maintaining pelvic control through isometric contraction of the abdominals. Aim for 10-15 slow and controlled repetitions with a 2 second hold at the top of each repetition. Once clients exhibit proper recruitment of the gluteus maximus, they can progress to weighted exercises for both isolated hip extensions and glute bridges.
Exercises targeting gluteus medius
Watch this great video to see five gluteus medius exercises from lower to higher intensity.
HEEL DROP FOR VASTUS MEDIALIS
A great exercise for working the vastus medialis and gluteals. Start with a low step and increase the height as strength and stability improve. Be conscious of limiting hip flexion and ensuring the knee does not cave in. It can be useful to use a stability device such as a wall or pole when starting out with a client with significant weakness.
TOE RAISES
Seated toe raises are a great beginner exercise that is surprisingly difficult when the tibialis anterior muscles are weak, even without additional resistance. Hold each rep for 2-3 seconds and continue until there is a burning sensation in the shins. Rest and repeat. Aim to build up to 3 sets of 15-20 repetitions.
Standing toe raises are a simple progression from the exercise above.
Phase 4: Integrate exercises
The following exercises provide an excellent opportunity to engage these muscles in whole-body movements. It is important to keep in mind that optimal form, including alignment of the upper spine, neck, and pelvis, remains crucial.
4-Point alternate arm and leg lift
This exercise works on core and pelvis stability while moving the upper and lower extremities. Movements should be slow and controlled with pelvic stabilisers engaged throughout. The focus should be on limiting lateral shift, lumbar lordosis and rotation of the pelvis during the movement. Continue to perform reps until form deteriorates with an aim of achieving 3 sets of 15-20 repetitions over time.
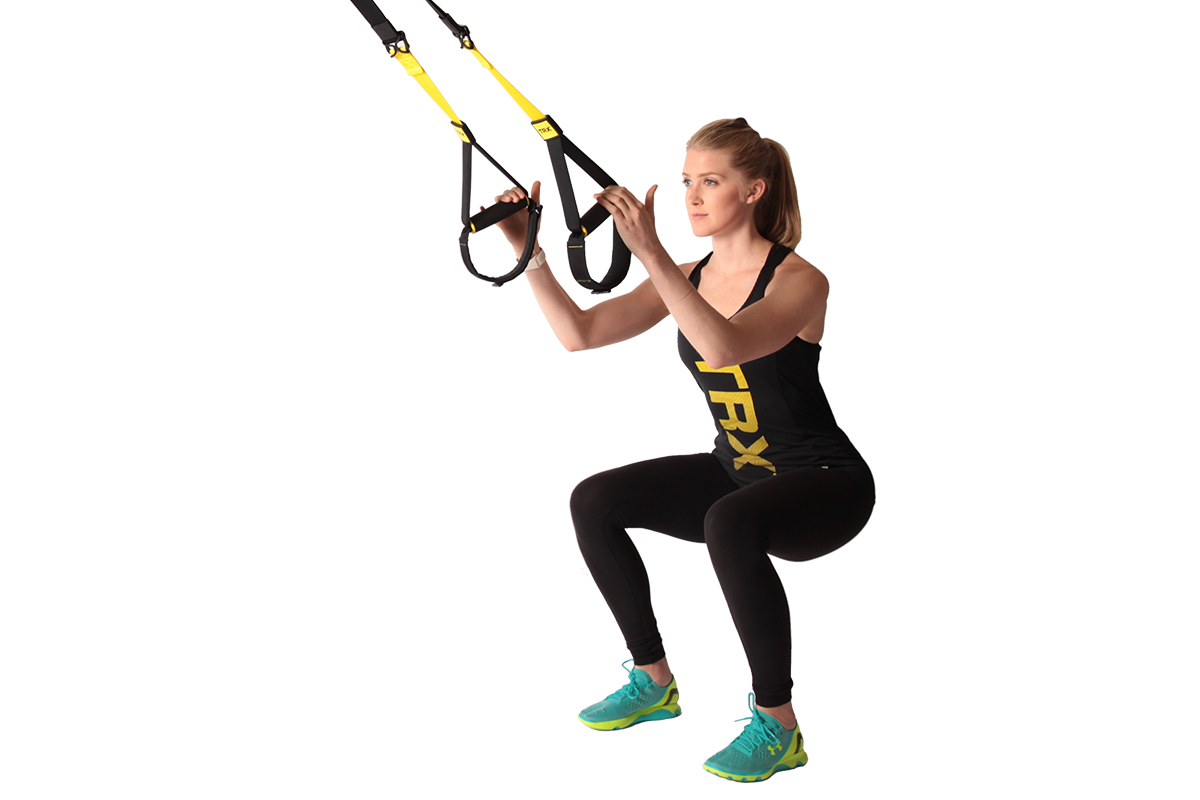
Assisted squat with TRX
The assisted squat with TRX helps to coordinate how the brain chooses the muscles of the lower back region. Using the TRX allows the client to stay more upright in the squat which creates good patterns of engagement, particularly glute activation. Using a slow and controlled tempo, aim for 2-3 sets of 10 repetitions with optimal form.
Cable or resistance band hinge pull-through
This exercise establishes proper hinge movement mechanics and muscle recruitment before moving clients onto weighted hinge movements. This exercise targets the glutes and hamstrings while requiring engagement of the lower back, abdominal and upper back. Start the exercise by perfecting the movement with light resistance, then increase resistance to perform 10-15 repetitions with optimal form.
Lunges with overhead reach
This exercise progression emphasises the synergy between the upper and lower kinetic chains. It promotes pelvic stability in all planes and targets the gluteal, hamstring, and vastus medialis muscles. It serves as an effective final progression before advancing to more conventional weighted exercises. Aim for 10-15 repetitions on each leg while maintaining optimal form. Focus on engaging the core to maintain pelvis and torso alignment and ensure that the knee does not collapse inward during the lunge.
Right, time to apply what you have learned. Head to your assessment to find an assessment guide video and instructions on how to submit your assessments.
The assessment guide video explains your assessment task, which requires you to use the information you have learned on this topic to help a case study client. This assessment will require you to apply the knowledge you have learned and practised by completing the following tasks:
- Identify the musculoskeletal issue the client is likely exhibiting
- Identify and explain the likely muscle imbalances contributing to the issue
- Select and justify your selection of functional tests to perform on the client to confirm whether the muscle imbalances exist.
- Exhibit proficiency in conducting the functional tests you have chosen (on a willing client)
- Suggest appropriate corrective strategies that should lead to improvement of the issue.