This topic focuses on the knee, ankle, and foot. Become familiar with issues and conditions that personal trainers must be aware of for these body parts and how to address these issues and conditions when working with clients.
The knee and ankle are the largest two joints of the lower limbs. Before getting started, here are some fundamental facts.
The knee is:
- the largest joint in the body and functions to keep you upright in stance, move via different gait patterns and keep your balance.
- a weight-bearing joint and, as such has a structure that is designed for stability but also provides for limited movement that is critical for efficient walking and running.
The ankle and the foot:
- form the kinetic link between the ground and the body as a rigid structure for weight-bearing. They also offer the flexibility to conform to uneven terrain.
- have a key role in balance, shock absorption, and the transfer of ground reaction forces necessary to move our body within our environment (Physiopedia, n.d.).
The lower limbs are some of the most injured parts of the body due to their weight-bearing requirements. Over the last 10 years, there have been approximately 50,000 annual claims in NZ related to injuries to the knee, ankle, or foot (Statistics NZ, 2023).
According to Sancheti et al, (2010) knee injuries account for 41% of all sporting injuries. While ankle injuries (especially sprains) are thought to be one of the most common sporting injuries, their true prevalence is hard to gauge as many people don’t seek medical attention for ankle sprains (Doherty et al, 2014).
The prevalence of knee and ankle injuries suggests many in the general population will have ongoing issues at these joints that personal trainers will need to target to improve or workaround. An in-depth understanding of the anatomical structure of these joints and the commonly associated issues will allow you to apply functional testing processes and appropriate correctional strategies to combat these issues in your clients.
Prepare for assessment
Prepare yourself for the upcoming assessment by familiarising yourself with Assessment 1C.
- Review the requirements provided to gain a clear understanding of what is expected.
- Manage your time carefully to work on this topic and assessment for a total of a 1-week period.
- Aim to complete and submit your assessment at the completion of this topic.
The knee is a hinge-type synovial joint formed mainly between the inferior femur (thigh bone) and the superior tibia (shin bone). However, there are four bones that make up the entire joint.
Some anatomists believe that the knee is more like a shallow ball and socket joint due to its bi-condylar structure (i.e. the femur has two pronounced balls at its inferior end that sit within two shallow sockets). The reason it is mainly classified as a hinge joint is because it primarily moves in one plane (sagittal) and has two primary movements, allowing for flexion (bending) and extension (straightening) movements of the leg.
A small degree of movement in the medial and lateral rotation is also possible and is a vital part of efficient gait movements.
Bone Structure of the Knee
Four bones make up the structure of the knee joint, along with associated structures (ligaments and cartilage). These are:
- The distal end of the femur.
- The proximal ends of the tibia.
- The proximal ends of the fibula.
- The patella.
The main articulation occurs between the femur and the tibia. These are the two largest bones in the human body. The distal end of the femur has two large condyles (balls) that articulate with the shallow tibial plateau of the tibia.
The fibula provides attachment sites for the lateral ligaments and muscles of the joint but does not directly articulate with the femur and is not a weight-bearing bone.
The patella (or kneecap) rests against the anterior surface of the lower end of the femur and protects the knee joint. It is both formed and resides within the quadriceps femoris tendon. This allows it to serve as a fulcrum for the quadriceps (for increased leverage/strength) by holding the quadriceps tendon away from the femur. It also serves as a stabilising structure that reduces frictional forces placed on femoral condyles.
Joint articulations of the knee
There are two main articulations at the knee joint. These are known as:
- Tibiofemoral: Where the medial and lateral condyles of the femur articulate with the tibial condyles (or plateau). This is the weight-bearing component of the knee joint.
- Patellofemoral: Where the anterior aspect of the distal end of the femur articulates with the patella.
![[ADD IMAGE'S ALT TEXT]](/sites/default/files/Femur.png)
There is one further articulation between the proximal ends of the fibula and tibia. This is known as the proximal tibiofibular joint.
This joint is a plane where the bones glide over one another to create very small amounts of movement. The tibia and fibular are also connected along their length by the interosseous membrane, which maintains their relationship.
There is also a distal tibiofibular joint found in the ankle. All articulating surfaces of the knee are covered in a protective layer of hyaline (articular) cartilage, and the entire joint structure, except for the patella, is contained within the joint capsule. The joint capsule is a fibrous ligament structure that contains the lubricating synovial fluid.
https://teachmeanatomy.info/lower-limb/joints/tibiofibular-joints/
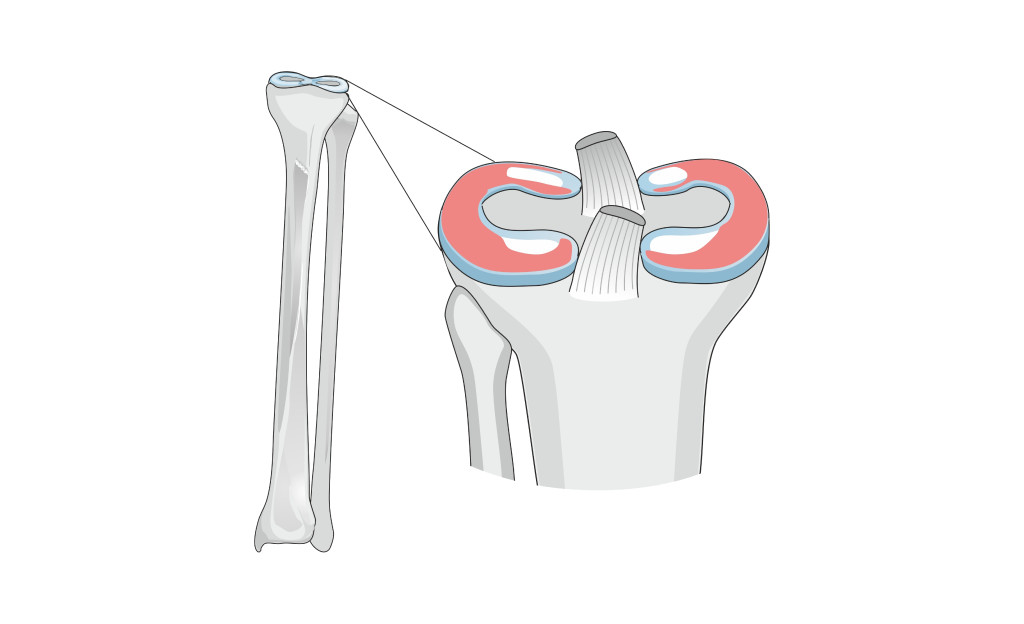
Menisci
The knee has C-shaped fibrocartilage structures called menisci. These structures deepen the tibial plateau, making the connection with the femoral condyles more stable. Additionally, they function as shock absorbers between the large bones of the knee joint. The menisci are attached to the tibia and have a thicker outer edge that gradually tapers towards the centre, creating a "cup" to hold the femoral condyles in place.
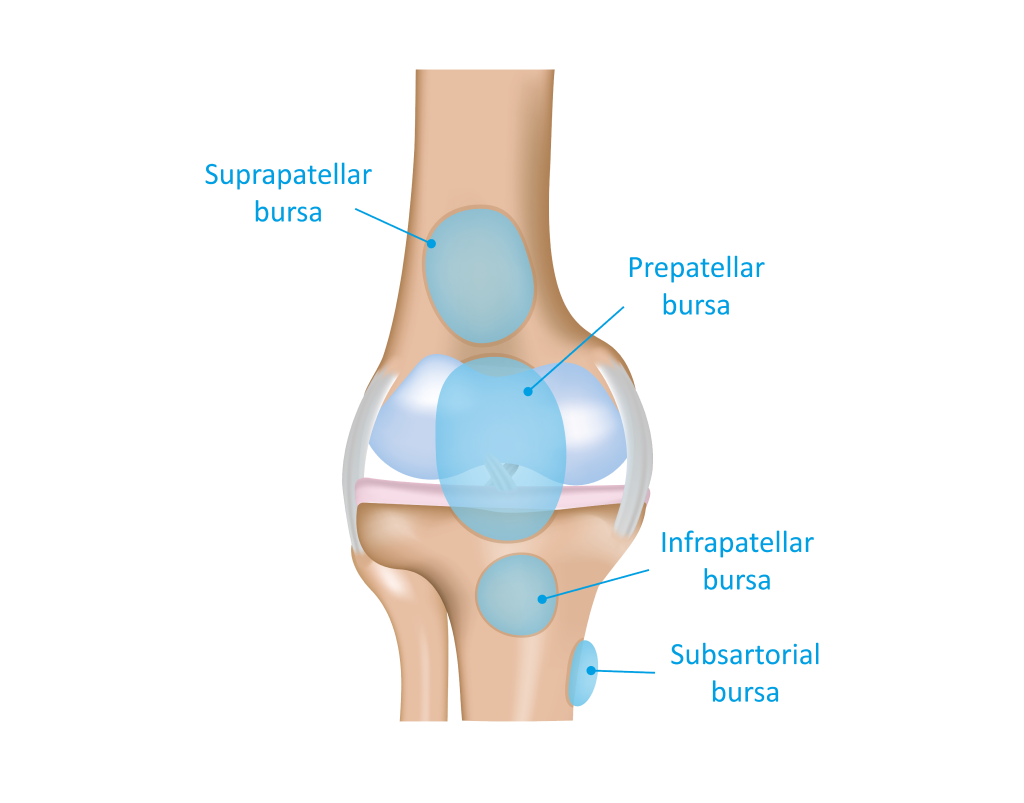
Bursa of the knee
Similar to the shoulder, the knee has a number of bursa (fluid-filled sacs) to protect the moving structures within the joint. The function of the bursa reduces the wear and tear of the articulating structures. There are four key bursae found in the knee joint:
- The suprapatellar bursa: Found between the tendon of the rectus femoris and the femur. It permits free movement of the tendon as it glides over the femur.
- The prepatellar bursa: Found between the anterior surface of the patella and the skin. It protects the patella and allows it to glide under the skin. It is thought that this bursa forms due to direct pressure or force in the first few years of life.
- The infrapatellar bursa: In two parts that essentially surround and protect the patella tendon as you flex and extend the knee. The deep bursa sits between the tibia and the patella ligament. The superficial bursa separates the patella ligament from the skin.
- The semimembranosus bursa: The only bursa located posteriorly in the knee joint. It sits between the semimembranosus muscle and the medial head of the gastrocnemius and allows these two muscles to glide over each other.
Ligaments of the knee
The bones of the knee joint are supported by a collection of extremely strong ligaments that each play a key role in knee stability. The following are the major ligaments found in the knee:
- The cruciate ligaments.
- The collateral ligaments.
- The patella ligament.
The cruciate ligaments
These are made up of two short, strong ligaments that connect the femur and tibia in the centre of the joint. They are known as ‘cruciate’ ligaments because they cross each other. The word “cruciate” is Latin word for ‘like a cross’.

- The anterior cruciate ligament (ACL): Originates from the anterior centre of the tibia where it blends with the medial meniscus. It ascends posteriorly to attach to the femur in the gap between the femoral condyles. Its key function is to prevent the tibia from moving forward in relation to the femur.
- The posterior cruciate ligament (PCL); Attaches towards the centre of the rear of the tibia and ascends anteriorly to attach towards the anterior portion of the medial femoral condyle. Its key function is to prevent the tibia from moving backwards in relation to the femur.
The collateral ligaments
“Collateral” means on the sides, and that is exactly where you find these two strap-like ligaments. Thinner and weaker than the cruciate ligaments, these ligaments act to keep the hinge movement of the knee in one plane by preventing excessive medial or lateral movement.
- The medial collateral ligament (MCL): A wide and flat ligament found on the medial side of the knee joint. It is larger than the lateral collateral ligament as the condyles of the femur and tibia are larger on the medial side. The MCL runs from the medial condyle of the femur to the medial condyle of the tibia. Its main role is to prevent valgus force (force applied to the knee that would collapse it inwardly).
- The lateral collateral ligament: Thinner and rounder than the MCL, this ligament runs from the lateral condyle of the femur to a depression on the lateral surface of the fibular head. The LCL sits outside of the joint capsule. Its main role is to prevent varus force (the force that would shift the knee outward).
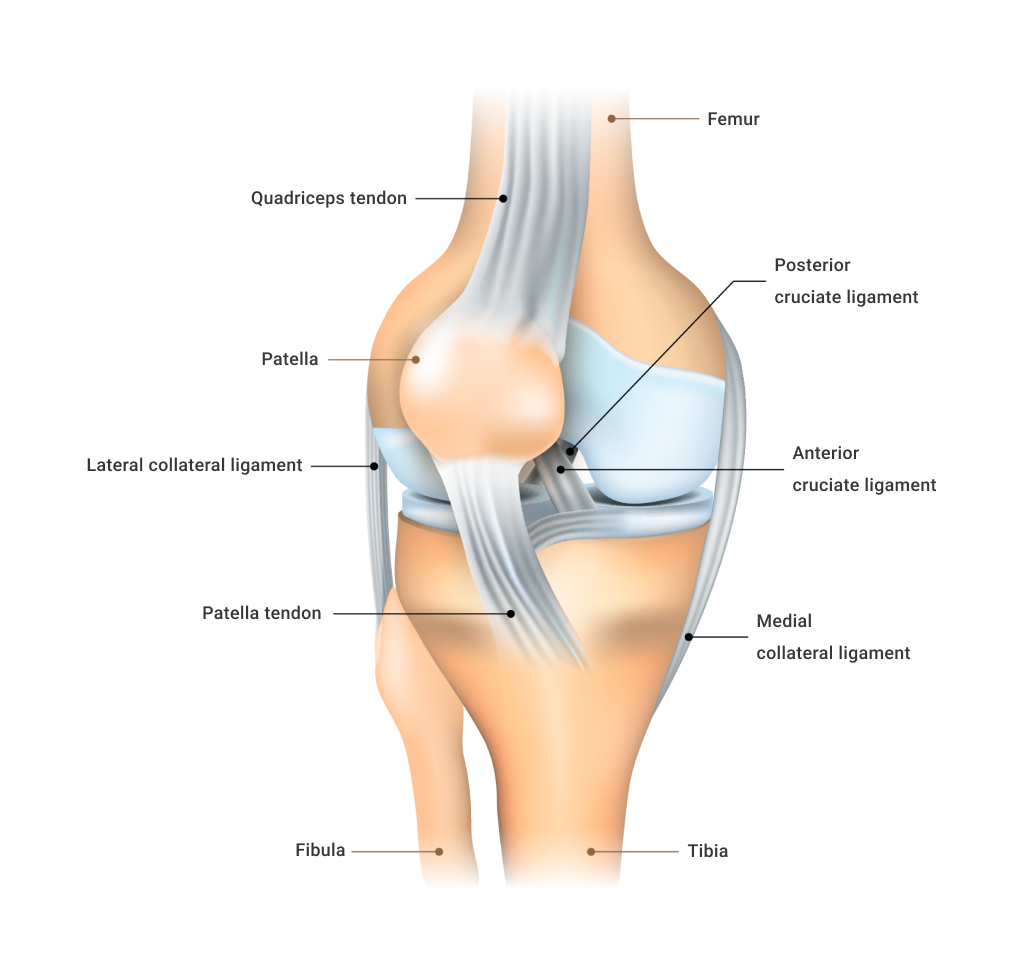
The patellar ligament
This strong ligament is a continuation of the quadriceps femoris tendon. It grows from the inferior surface of the patella and attaches to the tibial tuberosity. This is a bony prominence on the superior anterior aspect of the tibia.
The patellar ligament is a bit of an anomaly in the body as it is a ligament that functions to create movement. This is because the patellar ligament transfers the force from the quadriceps to the tibia, to allow for knee extension. Though it is usual for the ligament to function in such a way, this set-up is due to the formation of the patella within the quadriceps femoris ligament, which means the tendon connection between the quadriceps and the bone that it acts on (the tibia) is broken by another bone.
Remember, bone-to-bone connection is a function of ligaments, thus, this structure is named the patellar ‘ligament’ despite acting like a tendon. This is why you will often hear the term patellar “tendon” used interchangeably with the term patellar “ligament”.
The main function of this structure is to extend the knee, but it also serves to keep the protective patella bone centred within the patellofemoral groove.

Movements of the knee joint
Due to its role in weight-bearing activity and its requirement for stability, the knee has a limited array of movement compared to many other synovial joints. The active movements of the knee joint include:
- Flexion.
- Extension.
- Medial Rotation (internal).
- Lateral Rotation (external).
Flexion
Normal knee flexion range of motion with the hip held neutral is 130-140 degrees. However, the ability to flex the knee is somewhat dependent on other joint positions (primarily the hip. Brahmia and Kelaiaia (2019) reported that the ability to flex the knee was increased when the hip was flexed (140 degrees) and reduced when the hip was extended (120 degrees).
The most flexion possible at the knee appears to be in a deep squat position, such as when squatting down to pick something up from the floor (160 degrees).
Flexion at the knee can also be increased with assistance (e.g. during a standing quadriceps stretch where you pull the knee into greater flexion), but the limit of total flexion is the calf muscle meeting the back of the thigh. It is also worth noting that the degree of knee flexion you can achieve can be affected by movements at other Picture below shows the average knee flexion achieved in the subjects involved in their research (Brahmia and Kelaiaia, 2019).
![[ADD IMAGE'S ALT TEXT]](/sites/default/files/Knee%20Joint%202.png)
Extension
Normal knee extension is from full flexion to zero degrees of flexion (i.e. fully straightened leg). Passive knee hyperextension of up to 10 degrees is considered normal.
Medial Rotation (internal)
A limited internal rotation of 10 degrees from neutral is considered normal. This small amount of internal rotation assists normal foot pronation in walking and running.
Lateral Rotation (external)
External rotation of 30-40 degrees is considered normal. Lateral rotation of the knee assists the external rotation of the feet.
Note: Knee rotation can only occur when the knee is flexed. Medial/lateral rotation occurs at the hip if the knee is not flexed.
TRY IT OUT
Sit with feet flat on the floor and knees flexed at 90 degrees. Hold your thigh in place so the knees do not rotate. Then internally and externally, rotate your tibia from the knee. Notice that your foot will turn in and out as you do this.
Can you feel how much more external rotation is possible than internal rotation? Now straighten your leg out in front of you and attempt to rotate your tibia from the knee. Not so easy, right?
When you do turn your foot out and in, you can see how the force required to do this movement is generated from your hip and not your knee.
Musculature acting on the knee
With a limited range of movements associated with the knee, there are considerably fewer muscles acting on this joint than on some other joints, such as the hip and shoulder. As well as their obvious role in moving the knee joint, muscles play an important role in the dynamic stability of the joint. Given the high loads that are placed on the knee, the importance of muscular balance and synergy at this joint cannot be understated in the prevention of injury.
The muscles acting on the knee and the movements they are responsible for include:
- Anterior muscles
- Posterior muscles.
Anterior muscles acting on the knee
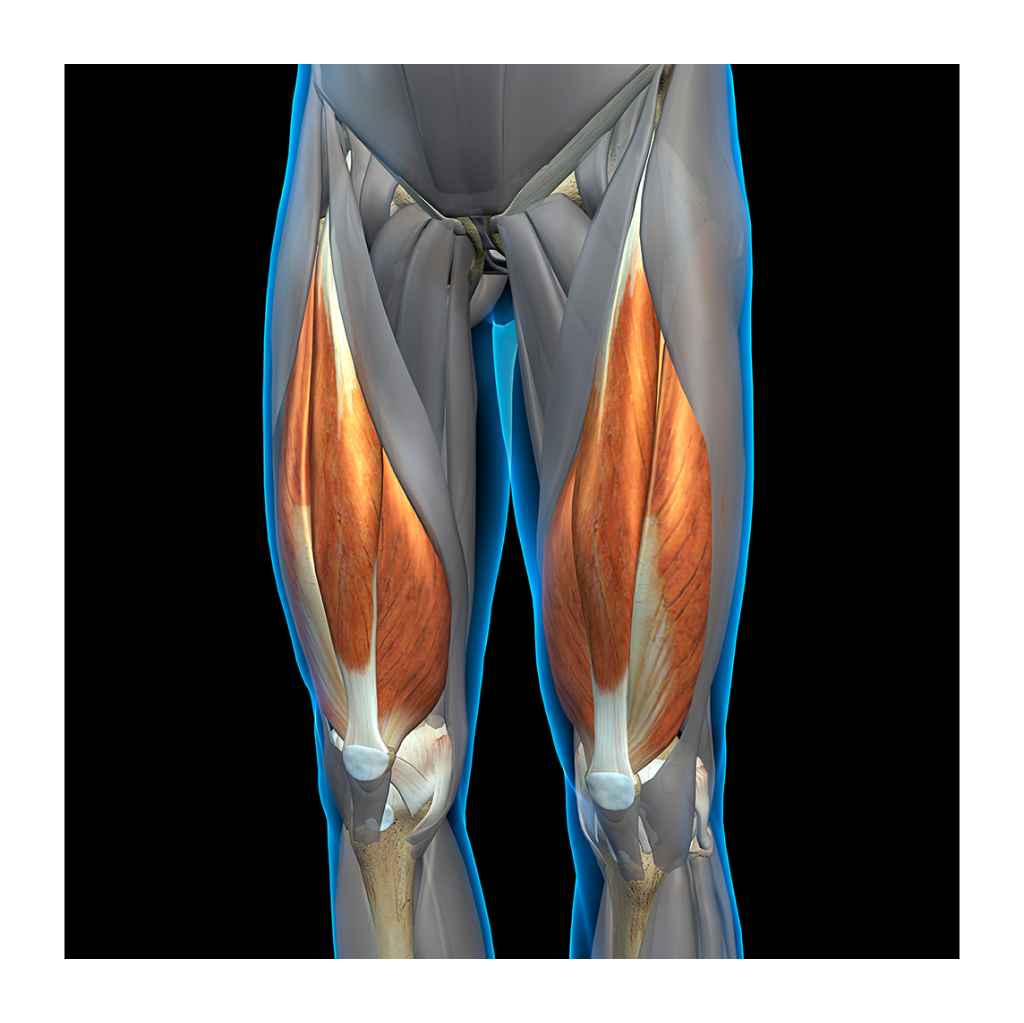
THE QUADRICEPS
The following muscles are the prime movers of the quadriceps in a knee extension movement.
- Rectus femoris: The rectus femoris is the only quadricep muscle that also crosses the hip joint. It is a powerful knee extensor when the hip is in extension (back) but weaker when the hip is flexed. The rectus femoris originates from the Anterior Inferior Iliac Spine (AIIS) on the pelvis and inserts into the superior aspect of the patella via the quadriceps tendon (then through the patellar ligament to the tibial tuberosity).
- Vastus medialis: Found on the medial side of the thigh. A powerful knee extensor also plays a role in stabilising the knee joint. This muscle originates from the superior anterior portion of the femur and inserts into the superior patella via the quadriceps tendon (then through to the patellar ligament and tibial tuberosity). The portion of this muscle that sits just above and slightly medial to the patella is the vastus medialis oblique (VMO). The VMO plays an important role in keeping the patella central to the knee (by creating equal and opposite force to structure that would pull the patella laterally).
- Vastus lateralis: Found on the lateral side of the anterior thigh. Extends the knee joint and provides a counter force to the vastus medialis in maintaining the central position of the patella. This muscle originates from the superior lateral aspect of the femur and inserts into the superior surface of the patella via the quadriceps tendon (then through the patellar ligament to the tibial tuberosity).
- The satorius: Introduced in the hip topic. A long thin muscle that runs from the front of the pelvis to the upper medial shaft of the tibia. It assists the hamstrings with knee flexion and can help internally rotate the tibia when the knee is flexed.
Posterior muscles acting on the knee
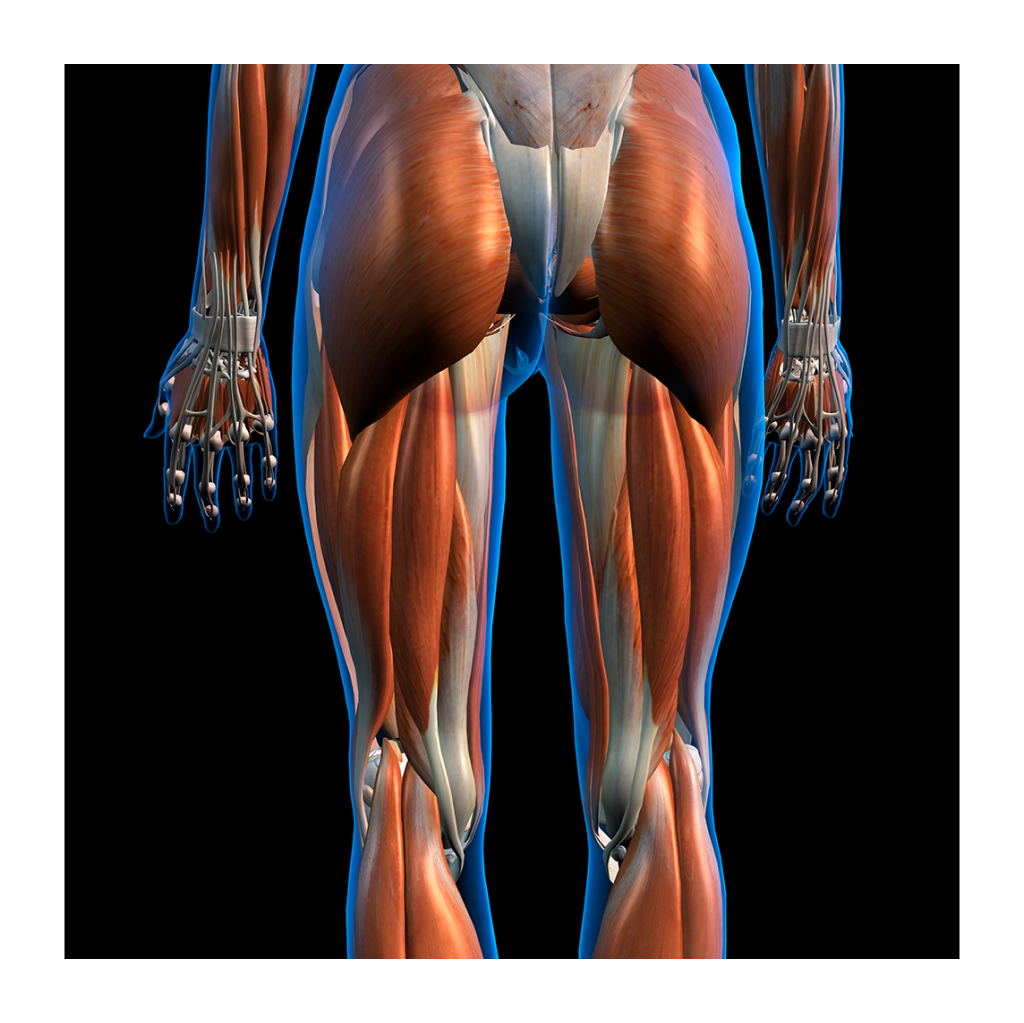
THE HAMSTRINGS
The following muscles are the prime movers of the hamstrings in a knee extension movement.
- Biceps femoris: Comprised of long and short heads. The long head is more superficial and the short head deeper. The long head originates from the ischial tuberosity on the inferior pelvis and inserts onto the lateral aspect of the head of the fibula. The short head originates from the posterior surface of the middle third of the femur and has the same insertion as the long head. The actions the heads of this muscle have on the knee are flexion and assisting lateral rotation of the tibia when the knee is in flexion.
- Semitendinosus: Named after the long tendon it has at its insertion, this hamstring muscle is long and thin. It contributes to flexion of the knee and is also a weak internal rotator of the tibia when the knee is flexed. This muscle originates along with the long head of the biceps femoris from the ischial tuberosity of the pelvis. The muscle itself ends a little below the middle of the femur, but it has a long round tendon that curves around the posterior medial condyles of the femur and upper tibia (passing over the lower portion of the MCL). It inserts into the superior medial surface of the tibia. This is the tendon you can feel on the medial side of the back of the knee.
- Semimembranosus: The most medial of the three hamstring muscles. It is deeper and flatter than the semitendinosus. The semimembranosus flexes the knee and assists with the internal rotation of the tibia. This muscle also originates from the ischial tuberosity of the pelvis and inserts into the posterior medial condyle of the tibia.
- Gracilis: A long muscle that runs from the side of the pubis symphysis of the pelvis and inserts just below the medial condyle of the tibia. This muscle assists the hamstrings with knee flexion and internal rotation of the tibia.
- Popliteus: A small, thin muscle found at the back of the knee. It is one of the main posterior knee stabilisers. The popliteus originates from the lateral condyle of the femur and inserts into the upper posterior tibia. This muscle helps flex the knee and is one of the main internal rotators of the tibia when the foot is off the ground.
- Gastrocnemius: The large superficial calf muscle at the back of the lower leg. Its two heads originate from the posterior surfaces of the lateral and medial condyles of the femur. It inserts into the calcaneal tendon (an eventually the calcaneus). Because this muscle originates from the femur, it plays a role in knee flexion. Interestingly, the gastrocnemius’s role in ankle plantarflexion is reduced when the knee is flexed. Conversely, when the ankle is plantarflexed, the gastrocnemius’s ability to assist with knee flexion is reduced. The gastrocnemius is also a weak rotator of the knee, with the lateral head assisting lateral rotation and the medial head assisting medial rotation.
The following table summarises all the muscles that act on the knee.
| Muscles acting on the knee | ||
|---|---|---|
| Just action | Prime movers | Assisting muscles |
| Muscles that contribute to the extension of the knee | Quadriceps:
|
|
| Muscles that contribute to flexion of the knee |
Hamstrings:
|
Gracilis Popliteus Sartorius |
| Muscles that contribute to internal rotation of the knee | Popliteus Semimembranosus Semitendinosus |
Sartorius Gracilis Gastrocnemius: Medial head - (weak) |
| Muscles that contribute to lateral rotation of the knee | Biceps Femoris | Gastrocnemius: lateral head - (weak) |
There are a vast number of injuries and conditions that can affect the knee joint, from degenerative conditions like arthritis and functional or mechanical issues leading to conditions like tendinitis and bursitis to ligament sprains, meniscal tears, capsular damage and fractures caused by impact or excessive force. Many of the most common acute injuries of the knee are the domain of the medical professional and physiotherapist.
As personal trainers, we focus on the most common issues affecting the knee joint that fall within our scope of practice.
While we can certainly play a key role in the final phase of rehabilitation of acute injuries, this will mainly revolve around identifying ongoing muscle imbalance and strategies for correction.
Sources of pain in the knee
Knee pain can arise from various sources, including impaired range of motion, patellofemoral pain, and patellar tendinopathy. Each issue has its own unique characteristics and is often associated with specific muscle imbalances. Let’s learn more about each of these issues, the way they present, and the common muscle imbalances that are present with each.
Impaired range of motion (ROM) at the knee
Reduced range of motion is a common occurrence in clients (particularly from middle age on). Reduced range of motion in the knee can stem from a number of contributing factors. The most common of these are:
- Swelling: This can occur from inflammation or increased fluid within the joint capsule. This could be from repeated aggravation from poor mechanics or residual effects of an injury.
- Pain: Pain can prevent the brain from wanting to take the joint to the extent of the range of motion. This could result from soft tissue injury related to the sight (e.g. muscle, tendon) or degeneration of the joint structure (cartilage or bone).
- Muscle/tendon tightness: A tight muscle can restrict ROM and also cause inhibition of its functional antagonist (poor recruitment). This can lead to compensatory movements that alter the normal movement pattern of the knee joint.
- Muscle weakness: Typically a residual effect of previous injury, a neuromuscular recruitment issue or due to lack of movement (sedentary lifestyle).
- Wear and tear: Degeneration of bone tissue or supporting tissues and the inflammatory effects of these conditions—for example, arthritis, tendinopathy etc.
In a personal training setting, this issue will likely present as an inability to complete exercises involving the knee with proper technique and will likely result in several movement compensations displayed. An example of this could be during a movement like the squat or lunge, where a client cannot achieve the desired depth. This lack of ROM will often be combined with pain that the client will let you know about!
Patellofemoral pain
Patellofemoral Pain Syndrome (PFPS) is an umbrella term used to describe pain arising from the patellofemoral joint or the adjacent soft tissue. It is a chronic condition that tends to worsen during activities like squatting, sitting, climbing stairs and running (Nascimento et al, 2017). While the pain often presents in the anterior knee (around or under the patella), the pain associated with this condition can be felt in all parts of the knee.
PFPS can occur due to direct patella trauma, but is more commonly a combination of several factors, including but not limited to:
- Overuse or overload of the patellofemoral joint.
- Anatomical or biomechanical abnormalities.
- Muscular weakness, imbalance or dysfunction.
These three key factors are often co-contributors to the issue, meaning the cause of PFPS is likely to be multi-factorial rather than an isolated cause.
Physiopedia (n.d.) suggests that one of the main causes of PFPS is the improper alignment of the patella and connecting structures. These are the patellar ligament and quadriceps femoris tendon.
When the patella does not glide efficiently in the groove between the femoral condyles (facies pattelaris) this can cause overuse/overload pressure on the femur or posterior surface of the patella resulting in pain, discomfort or irritation. Let’s dive a little deeper into the possible causes of patella misalignment.

Watch the following video that details how patellofemoral pain can occur, and, furthermore, how health professionals treat this issue to help prevent further conditions such as arthritis. Take note of the anatomy and how the misalignment or imbalances of the body contribute to patellofemoral pain.
Patella alignment (or tracking) varies from person to person and even within the knees of one person. This can be due to anatomical malalignment of either the patella shape itself or the shape of the femoral contact point (facies pattelaris). If it is a structural issue, then it can result in muscular imbalances and biomechanical inefficiencies. Conversely, muscular imbalances and biomechanical inefficiency can result in patellar deviation and lead to PFPS. While we are unable to change the structure of bone, muscle imbalances are something that we can improve.
One structural issue that can alter the patellofemoral mechanism and lead to PFPS is increased “Q angle”. This is the quadriceps angle.
The Q angle is the angle that exists between the line of the femur shaft and the vertical line of the patella through the tibial tuberosity.
According to Emami et al, (2007) the female Q angle should be less than 22 degrees with the knee in extension and less than 9 degrees with the knee in 90 degrees of flexion. In men, the Q angle should be less than 18 degrees with the knee in extension and less than 8 degrees with the knee in 90 degrees of flexion. A typical Q angle is 12 degrees for men and 17 degrees for women (Emami et al, 2007).
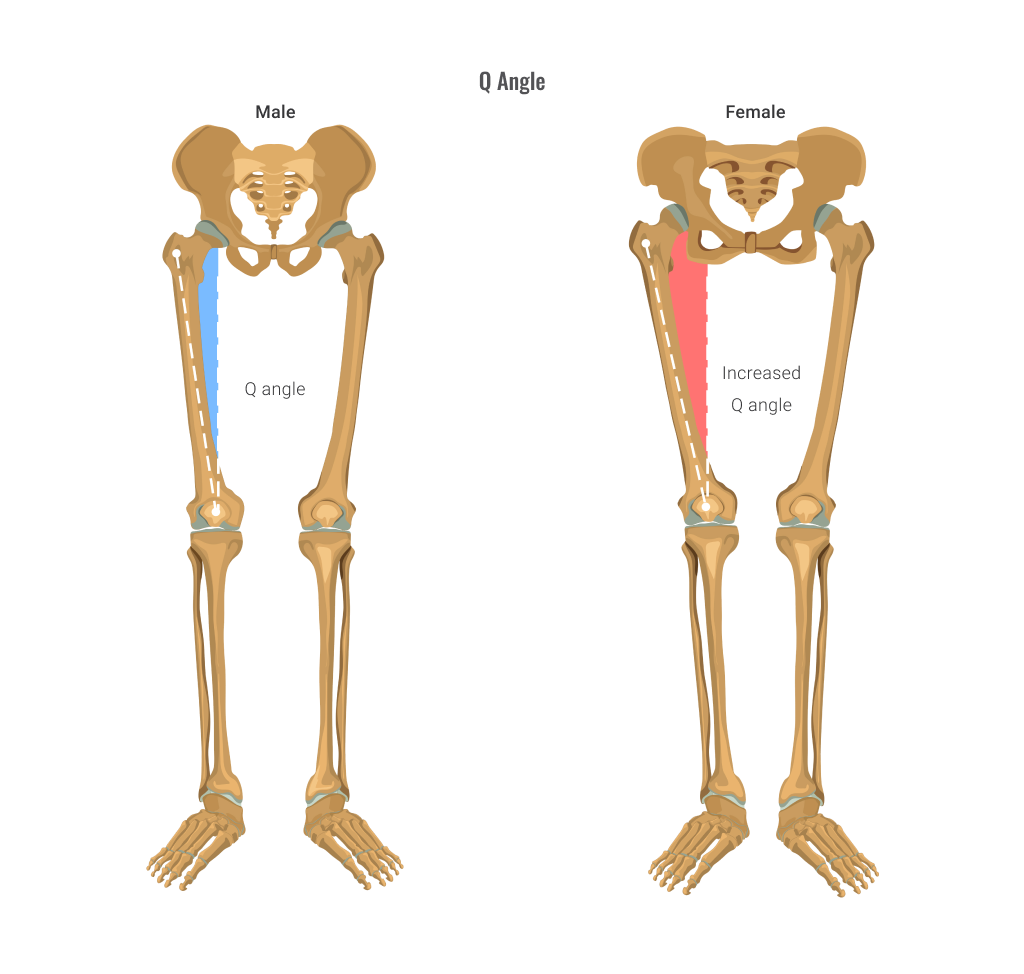
An increased Q angle is believed to increase the lateral pull of the quadriceps on the patella, placing stress on the femur. As shown above, the Q angle in females is generally higher and multiple studies have reported that females are 2-3 times more likely to suffer from PFPS than males (Boling, 2011).
The research is far from conclusive regarding the link between increased Q angle and PFPS. In a systemic review on this topic by Waryasz and McDermott (2008), they found out of seven studies performed to explore this relationship, three studies concluded that Q angle was significantly related to PFPS, while four studies reported no relationship between the two. At this point, it remains a possible causal factor.
Many of the muscle imbalances discussed below can lead to an increase in Q angle from a functional rather than structural perspective. This occurs as the angle that the quadriceps tendon attaches to the patella is altered.
MUSCLE IMBALANCES CONTRIBUTING TO PFPS
The following information is taken from an article entitled “Patellofemoral pain syndrome (PFPS): A systemic review of anatomy and potential risk factors” by Waryasz and McDermott (2008).
Common weak or poorly recruited muscles associated with PFPS include:
- Weak vastus medialis oblique (VMO): When the VMO isn’t strong enough, the vastus lateralis can exert a higher force and pull on the patella, causing it to glide, tilt or rotate laterally. This can lead to increased pressure on the lateral aspect of the facies pattelaris and result in pain and discomfort. Weakness of any of the quadricep muscles could cause affect the patellofemoral mechanism and lead to this issue, however, the VMO is most commonly where the weakness lies.
- Hip flexor weakness: A weak hip flexor group can destabilise the pelvis and lead to greater internal rotation of the femur, which increases the Q angle and can lead to PFPS.
- Weak hip abductors and lateral rotators: A weak gluteus medius or piriformis may allow internal rotation of the femur, increasing the Q angle and can lead to PFPS.
Common tight/overactive muscles associated with PFPS include:
- Tight hamstring muscles: Tight hamstrings may either cause slight flexion of the knee during activities or necessitate higher quadriceps forces to overcome passive resistance of the tight hamstrings, both of which may increase patellofemoral joint reaction forces and lead to PFPS.
- Tight quadriceps muscles: Tight quadriceps may cause high patellofemoral stress. A study by Kibler (1987) cited in Waryasz and McDermott (2008) reported 61% of the subjects suffering from PFPS in their study had rectus femoris tightness.
- Tight calf muscles: Having tight calves can lead to decreased dorsiflexion leading to internal rotation of the tibia and femur during hip and knee flexion activities (to compensate). This is thought to increase the Q angle and contribute to PFPS.
- Tight ITB: A tight iliotibial band can place excessive lateral force on the patella and externally rotate the tibia, which can upset the balance of the patellofemoral mechanism.
FOOT ISSUES
There is also evidence that a functional foot/ankle issue may be a contributing factor in PFPS. Over-pronation or supination of the foot is also thought to be a factor worth considering. Over-pronation (rolling in) of the foot causes compensatory internal rotation of the tibia and femur that can upset the patellofemoral mechanism, and over-supination (rolling out) of the foot provides less cushioning for the leg when it strikes the ground in running/walking so more stress is placed on patellofemoral mechanism.
As you can see, a wide range of muscle imbalances could be contributing to this issue. Functional testing will help you determine which imbalances exist. More on that soon!
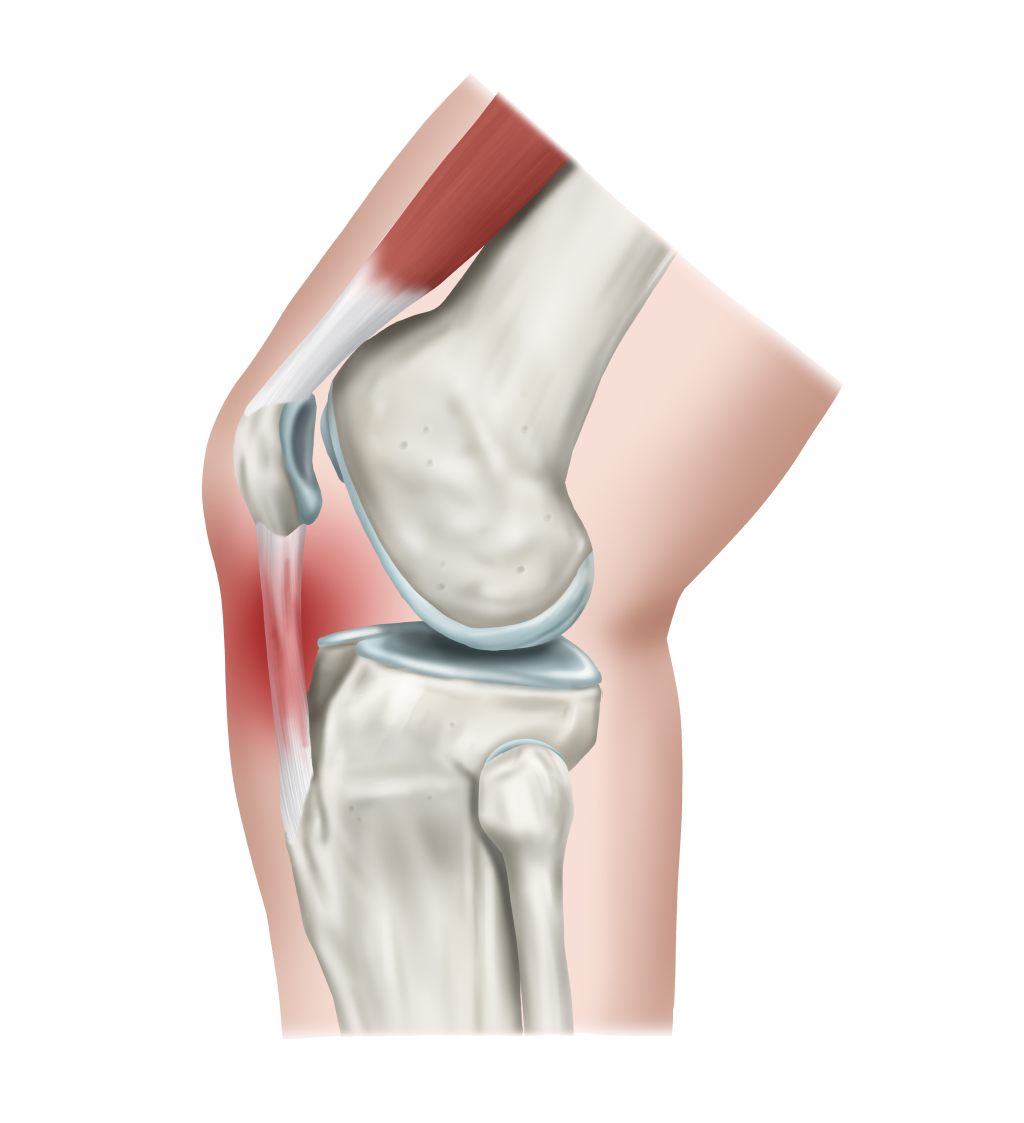
Patellar Tendinopathy
Patellar tendinopathy is another source of anterior knee pain. Tendinopathy is a more recently used term that has somewhat replaced tendonitis. Tendonitis is inflammation of the tendon, but more recent studies into patellar tendon pain have found that inflammation is not always present in this condition.
Many studies report early inflammation in line with acute injury response in the very early stages of the condition, but different mechanisms are responsible for ongoing pain. Tendinopathy is an umbrella term encompassing tendonitis and tendinosis (the breakdown or degeneration of collagen fibres in the tendon over time).
Patellar tendinopathy is common. If you work with young athletes, you will have clients managing this condition. Hutchison et al, (2019) reported that 32% of elite basketballers and up to 50% of elite volleyballers present with patellar tendinopathy. These numbers are reportedly higher in high school and college-aged athletes. If you work with clients over 35, you will also encounter clients managing this condition.
The onset of this condition can usually be traced back to one of two things:
- A sudden increase in tendon loading: Such as beginning a new sport or training regime, starting training for a new season or increasing running volume too quickly. This causal factor usually affects relatively young athletic people, especially men, who participate in sports such as basketball, volleyball, athletic jump events, tennis, and football which require repetitive loading of the patella tendon (Bjerkestand and Engebretsen, 2005). In a personal training setting this could be a client who has returned to the gym after a period of inactivity.
- Problems with the health/condition of the tendon: This affects how tendon is able to handle load. Factors that influence tendon condition include age, genetics, smoking, general health and lifestyle factors (nutrition and inactivity). This casual factor is more likely to affect adults over 35 as their tendons become more rigid and stiff as part of the normal ageing process.
SYMPTOMS OF PATELLAR TENDINOPATHY
Pain can be experienced anywhere along the patellar tendon but is most commonly felt at the inferior surface of the patella or within the patellar tendon (ligament). This pain tends to be aggravated by loading and increased with the demands placed on knee extensor muscles (quadriceps), notably in activities that store and release energy in the patellar tendon, like jumping. Unlike other knee conditions, pain from patellar tendonitis is usually localised to the tendon itself.
Muscle imbalance involved in Patellar Tendinopathy
Limited studies have been performed to examine muscle imbalance issues contributing to patella tendinopathy, although it is generally accepted that the imbalances that we discussed in PFPS that lead to improper tracking of the patella, could likely aggravate the patellar tendon/ligament also. A study by Witvrouw et al, (2001) did investigate the relationship between muscle imbalance and patellar tendinopathy. They suggested that the only significant factor contributing to patellar tendinopathy was the flexibility of the quadriceps and hamstring muscles.
Now we know the mechanism behind these common issues causing knee pain, let’s explore some functional tests that will help us identify whether contributing muscle imbalances exist, so we can programme some targeted exercises for improving knee function and a reduction in symptoms of pain. Bear in mind we will only work with these clients once an initial diagnosis has been confirmed by a medical professional or physiotherapist. These functional tests are only performed to isolate the weak or tight soft tissue that may be contributing to the issue so that we can design a targeted exercise approach.
Many functional tests can be performed for the knee to test the range of motion and also the knee's strength.
Potential muscle weaknesses contributing to knee pain can include:
- Weak vastus medialis oblique (VMO)
- Hip flexor weakness
- Weak hip abductors and lateral rotators.
Let’s take a look at the various functional testing that can be conducted for your client’s knees.
Active ROM testing of the knee
This is a nice starting point for knee assessment. It will help you isolate whether movement restriction at the knee is contributing to poor form in lower or full-body exercises and will also help you determine what movements cause pain or discomfort for your clients. This video will show you how to assess both ROM of the key movements of the knee (flexion, extension, internal and external rotation) and will also show you how to assess patella tracking.
Vastus medalis oblique (VMO) strength test
This simple test is designed to see if the VMO is able to be strongly activated during knee extension. If a client is unable to straighten the leg, or resist against the downward force, or the VMO does not strongly engage in the movement, then VMO weakness is confirmed. Any pain/discomfort in the affected knee should also be noted.
The knee extension MMT
This test is a more general quadriceps strength test to see if a difference exists in strength between legs. This test will help you gauge if one quadriceps is stronger than the other by performing a knee extension. By watching (or palpating) the VMO, you can also see whether it engages strongly. If weakness exists, the client may try to compensate by using other muscles. This will generally involve trying to use hip muscles and will result in them leaning to the opposite side or back or one buttock leaving the table. This is a useful test to see if weak quadriceps might contribute to the painful knee on the affected side.
Hip flexor strength test
Here is a simple test to determine if hip flexor strength is weak on the affected side. Compare the strength of the hip flexors from one leg to the other.
Note: Always provide resistance with the same hand and from the same position of stability. Otherwise, it may be your own muscle weakness that you are noticing! If weakness exists, the client may try to compensate by using other muscles. This will generally involve using the other hip or upper torso muscles, resulting in them leaning to the opposite side or back.
Weak hip abductors (gluteus medius) tests
Performing functional testing for weak hip abductors is important even when testing for knee strength because the hip abductors play a crucial role in knee stability and function. Here's why:
- Kinetic chain connection: The hip abductors, including the gluteus medius and gluteus minimus muscles, are responsible for stabilising the pelvis and controlling the movement of the femur (thigh bone). The alignment and control of the hip directly impact the position and stability of the knee joint. Weak hip abductors can result in altered biomechanics, such as excessive inward collapse of the knee (valgus collapse), which can increase stress and strain on the knee joint.
- Compensation patterns: When hip abductors are weak, other muscles may compensate to provide stability and control during movement. These compensatory patterns can lead to altered movement mechanics and increased stress on the knee joint. By performing functional testing for weak hip abductors, it becomes possible to identify compensations that may be occurring and contributing to knee-related issues.
- Injury prevention: Weak hip abductors are associated with various knee conditions, including patellofemoral pain syndrome and anterior knee pain. Identifying and addressing hip abductor weakness through functional testing can prevent or reduce the risk of knee injuries and improve overall knee function.
The following functional testing can be used when assessing the knee’s strength:
- The hip abduction recruitment test: Assesses whether the gluteus medius is recruiting well in abduction or whether other muscles are being used to compensate.
- The hip abduction strength test: Assesses strength of hip abductors between legs.
- The pelvic control test for gluteus medius: Assesses whether gluteus medius supports the pelvis during single leg stance (also relates to walking and running gait).
- The lateral flexion test: To assess the strength of gluteus medius (and obliques) in lateral flexion.
Hip External Rotation MMT
This functional test assesses the weak lateral rotators of the hip (piriformis). This simple test allows you to evaluate the strength of the hip external rotators between legs to see if weak external rotators are a potential cause of knee pain. Having weak external rotators will allow internal rotation of the femur, which is known to contribute to patellofemoral pain.
The following list presents potential muscles that can experience tightness, which contributes to knee pain:
- Tight hamstring muscles.
- Tight calf muscles.
- Tight ITB.
- Tight quadriceps muscles.
Tight hamstring muscles tests
To maintain optimal knee function, it is important to address tight hamstrings through stretching, strengthening exercises, and overall flexibility training. Improving hamstring flexibility can enhance the range of motion at the knee joint, reduce stress on knee structures, and promote better alignment and function during movement.
You can perform the following tests:
- The 90-90 straight leg raise: A single leg test to evaluate hamstring length between legs.
- The passive straight leg raise: assesses hamstring flexibility by evaluating the ability to raise the leg while keeping the knee extended and observing the range of motion and any symptoms experienced.
- The ankle dorsiflexion: This test helps elevate the calf length (tightness).
- Ober’s test: This helps with assessing ITB length (tightness).
Quadriceps length test
To assess the length of the quadriceps, you can conduct the:
- heel scrape exercise.
You can also do the following test.
The Ely’s Test
Another test that evaluates active knee flexion and indicates quadriceps length is the prone knee flexion test, also known as "Ely’s Test". If active knee flexion creates an angle of more than 120 degrees, it indicates tight quadriceps. You can also assess differences in quad length by flexing both knees at once. If the client’s hips raise off the table (during maximal active flexion), it indicates a tight rectus femoris.
Once you have identified any muscular imbalances that may be contributing to anterior knee pain or restricted range of motion, the next step is to address these imbalances through targeted exercise. Firstly, let's look at the research recommendations for treating painful knee conditions like patellofemoral pain syndrome (PFPS) and patellar tendinopathy.
Treatment strategies for patellofemoral pain syndrome (PFPS)
A systematic review of research evaluating the effectiveness of exercise in treating patellofemoral pain conducted by Harvie et al, (2022) concluded that studies that reported the best outcomes for subjects with PFPS followed the following criteria:
- Duration: At least 6 weeks of targeted intervention exercises
- Frequency: performed corrective exercises at least 5 days a week
- Intensity: A focus on control, proper alignment and reinforcement of good motor patterns rather than improvement of raw strength. This means initial corrective sessions were of low intensity, with the progressive overload principle applied over the coming weeks
- Strength: All successful programmes contained strengthening exercises. Those interventions that had the best outcomes included the following exercises that targeted the following muscle/muscle groups:
- Quadriceps
- Gluteus maximus
- Gluteus medius (and associated hip abductors)
- External rotators (piriformis)
- The studies concluded that the hip exercises, along with quadricep exercises, had better outcomes than those only using quadriceps strengthening exercises. Recommended repetitions of these exercises included a total of 20-40 controlled total repetitions per exercises. When the clients performed the exercises with two to four sets of 10-12 repetitions, they appear to have greater benefits.
The following exercises were those used by the studies with the most positive results.- Knee extensions
- Squats
- Stationary cycling
- Isometric quadriceps contractions
- Active straight-leg raises
- Step-up/down exercises
- Hip abductions
- External rotations
- Single-leg balance exercises
- Stretches targeting the ITB, hamstrings and Hip flexors.
- Flexibility: Combining muscle strengthening with the lengthening of commonly tight muscles associated with patellofemoral pain syndrome (PFPS) seems to yield additional benefits. Research indicates that focusing on the hamstrings, gastrocnemius, ITB (iliotibial band), and hip flexors produces favourable outcomes. Specifically, studies have suggested that stretching exercises targeting the ITB and hip flexors have the greatest impact on PFPS. It is important to note that there is currently no evidence supporting the notion that stretching alone is as effective in improving PFPS compared to a combined approach involving both strengthening and stretching.
Treatment strategies for patellar tendinopathy
A review of current concepts in the treatment of patellar tendinopathy by Reinking (2016) suggests a corrective programme for the improvement of symptoms should include:
- An initial reduction in loading of the tendon. Rather than completely resting the tendon it is suggested a reduction in overall training volume, including a reduction of activities known to cause pain
- Frequency: Best results appear to support 3-5 corrective training sessions a week
- Intensity: Highly individual but should be based on pain levels. It is important to note that treating patellar tendinopathy is not a pain-free process. Initial recommendations are that clients should continue exercises eliciting a 0-5 out of ten pain rating. If an exercise elicits consistently low pain ratings, the suggestion is that intensity (or loading should increase). Tendinopathy will not improve without strengthening the tendon. Strengthening will not occur without putting stress on the tendon.
- Strengthening: A preferred strengthening approach over the last 20 years is the eccentric strengthening of the tendon. Current research appears to continue to support this approach. Exercises that elicited the most positive results in subjects with patellar tendinopathy included:
- Drop squats (progressing from slow and controlled partial variations to full range faster and then weighted versions.
- Single leg /partial squats – 15-30 degree incline (limiting the squat depth to knee flexion of less than or equal to 60 degrees to avoid overload on the tendon).
- Decline squats
- Eccentric leg extensions
- Repetitions: Start with an endurance approach – light resistance and 10-12 repetitions. Build the number of repetitions, then apply the progressive overload principle and move towards more heavy resistance training protocols.
- Flexibility: Lengthening of the hamstrings and/or quadriceps through stretching. This depends on the results of functional testing. It appears that a flexibility approach works best in conjunction with strengthening exercises.
The following table is adapted from Malliaras et al, (2013) and is a useful guide to pain and programming of different exercises to target patellar tendinopathy for clients. It also indicates an appropriate progression for exercise type over the programme.
| Exercise Type | Sets and Reps | Frequency | Progression | Pain |
|---|---|---|---|---|
| Eccentric | 3 x 15 | Twice daily | Bodyweight to external loading | Enough load to achieve moderate pain (4/5 out of 10) |
| Eccentric/concentric (endurance) | 3 x 10-20 | Daily | Endurance and form (slow and controlled), then increase loading, increase speed | Enough for load to be painful by end of 3rd set |
| Eccentric/concentric (heavy resistance) | 4-8 | 3 x /week | Loading | Acceptable if pain is not worse after |
Corrective exercises for patellofemoral pain syndrome
Phase 1: Inhibit
The inhibition of the commonly tight muscles contributing to PFPS are:
- hamstring muscles
- calf muscles
- ITB
- quadriceps muscles.
Tight hip flexors can also present in some cases (functional tests will confirm this).
An effective way of achieving de-activation of these tight muscles is using self-myofascial release techniques using a foam roller. Foam rolling can neurologically decrease activity to the overactive muscle, making it easier to recruit the opposing muscle groups.
Technique: Using a foam roller or similar device (such as a massage ball), slowly roll over region looking for tender areas. Once you find a tender spot, hold position for about 30 seconds (until about 50% decrease in tension). Note: use of a massage gun can also be effective in areas that are hard to reach with a foam roller. Safety note: It is important to avoid rolling over or massaging bony areas. Stick to soft tissue areas only and if any movement in this treatment causes pain (rather than discomfort), stop the exercise immediately.
Foam roller exercises for targeting tight muscles contributing to PFPS:
Phase 2 Lengthen
This is a phase where a client could benefit from seeing another allied health professional, such as a massage therapist. However, there are a number of targeted stretches you can teach a client that, if performed regularly, will help lengthen tight muscles contributing to the lower crossed syndrome.
These stretches should be performed to the point of discomfort (not pain). Each stretch should be held for at least 30-45 seconds and repeated more than once in a session. Safety note: Stretching should always be performed when tissues are warm and pliable. This means a suitable warm-up should be performed prior to static stretching. Also, note that simply stretching after a workout only returns muscles to pre-workout length. Additional stretching will have to be done to lengthen muscles. See the following recommended stretches.
- Quadriceps stretch (Rectus femoris)
- Hamstring stretches
- Calf stretches
- Hip flexor stretch
- Iliotibial band (ITB) stretches
QUADRICEPS STRETCH (RECTUS FEMORIS)
HAMSTRING STRETCHES
CALF STRETCHES
ILIOTIBIAL BAND (ITB) STRETCHES
Image 1 Source: https://www.livestrong.com/article/13721137-it-band-stretches-for-runners/
Image 2 Source: https://www.vivehealth.com/blogs/resources/how-to-stretch-it-band
Phase 3: Activate
Now it is time for activation of weak/underactive muscles. Isolated strengthening of the common weak/underactive muscles associated with PFPS are:
- weak vastus medialis oblique (VMO)
- hip flexor weakness
- weak hip abductors and lateral rotators.
Exercises should initially be done slowly and under control with a focus on technique and recruitment of the target muscle. Each exercise set should end when fatigue sets in and before form is compromised, keeping in mind the pain scale. If you consider the exercise pain-free, you score it a 0, moderate pain is a 5 and excruciating pain is a 10.
The aim should be to build muscular endurance first (up to 15 repetitions for 3 sets). Then the progressive overload principle can be applied to gradually increase the intensity through increased loading (and a concurrent reduction in repetitions) to focus on strength.
Note: When addressing leg-specific muscle imbalances, targeting the affected leg during exercises is important. However, there is no harm in performing the exercises on the other leg as long as the intensity and volume are the same as that of the imbalanced leg. This approach helps prevent the perpetuation of imbalances.
During all exercises, a key focus should be placed on actively limiting internal rotation of the femur and knee valgus (caving in).
Starting exercises for early-stage rehabilitation
The following exercises focus on partial range and isometric contractions, a great starting point for a strengthening programme as it prepares the tendon for future loading with more intensive exercises.
ISOMETRIC QUADRICEPS EXTENSIONS
Targeting VMO: Seated quadriceps extensions with palpations
Isometric knee extensions (with contralateral leg resistance)
Single leg quarter squats
Strengthening exercises targeting weak quadriceps
Strengthening exercise to target weak hip flexors
- Active straight-leg raises
Strengthening exercises targeting weak hip abductors
- Side lying hip abductions
- Standing cable hip abductions
Strengthening exercises for weak external rotators
- Clams with a band
- Fire hydrant for Gluteus medius and piriform
Phase 4: Integration Exercises
In this phase we integrate the key muscles in multi-joint exercises to work on recruitment patterns and synergy of muscle action. The focus with these movements should be to avoid knee valgus (cave in) and initially restrict knee flexion over toes. The following exercises are in order of progression.
- Banded supported squat/TRX squat: This is great starting point for integrated movement. This exercise allows you to sit back into the squat, keep your shins parallel and achieve depth in the squat without excessive patellofemoral stress.
- Banded squats: A great exercise to fight the natural tendency towards knee valgus. Helps recruit the gluteus medius and piriformis while strengthening the gluteus maximus and quadriceps
- Sumo bodyweight squat.
- Step-up/down exercises.
- Barbell squats (Not shown in the following video)
- Single leg squats: Start with pole support, then gradually remove the pole and increase depth over time
See the following video that goes through all the listed exercises (excluding barbell squats).
Exercises for Correction of Patellar Tendinopathy
According to the research, a combined stretching and strengthening approach is recommended to improve patellar tendinopathy. The identified tight muscles in the research were the quadriceps and hamstrings. You already have the necessary tools to complete phases 1 and 2 of the corrective approach, which involve foam rolling and stretches.
The strength exercise progression outlined in the research includes isometric and eccentric loading of the patellar tendon, followed by isotonic muscular endurance training, and finally, heavy resistance training. While phases 3 and 4 will incorporate many standard quadriceps exercises, the research also highlighted a few specialised exercises that yielded the best results in studies conducted on patellar tendinopathy.
Eccentric and Isometric exercises
The following includes videos to the following exercise movements:
- Spanish squats: Eccentric squat with isometric hold.
- Isometric leg extension: Holds at 60 degrees of flexion. 45 second holds x 5 repetitions
- Single-leg eccentric leg extensions
- Drop squats: Simply dropping into a squat (can use upper body assistance to come back up). Start with a partial squat and slow speed, then progress depth and speed over time, using the pain scale as a guide for progression.
- Single-leg Eccentric decline squats: 15-30 degree decline (limiting the squat depth to knee flexion of less than or equal to 60 degrees to avoid overload on the tendon). Weight on the affected leg, concentric phase mainly on the unaffected leg.
The ankle joint is a synovial hinge joint that connects the lower leg to the foot and, in doing so is our connection with the ground allowing us to transfer ground reaction force to our body for movement. The average moderately active person takes around 7,500 step/day. If you maintain that daily average and live until 80 years of age, you’ll have walked about 216,262,500 steps in your lifetime, which is the equivalent of walking about five times around the Earth, right on the equator (Leach, 2019).
Because of its pivotal role in weight bearing during walking, running, jumping and other forms of gait, the ankle is a common site of injury, with ankle sprains being the most common injury. Fong et al, (2007) suggests that the ankle is the 2nd most likely joint to be injured in sport and that ankle sprains make up over 40% of ankle injuries. Lateral ligament injuries make up 85% of all ankle sprains, with females having the highest rate of occurrence (Fong et al, 2007). According to ACC statistics published by Statistics NZ (2023) there were approximately 18 to 19 thousand ankle injury claims a year over the last 20 years in NZ. This figure is actually likely to be considerably higher as most ankle sprains are minor and go unreported as people tend to self-administer treatment.
The prevalence of ankle injuries suggests that many personal training clients will have experienced ankle trauma and therefore may be experiencing ongoing effects of injury that a trainer can target to improve or will have to work around. An in-depth understanding of the anatomical structure of these joints and the common associated issues will allow you to apply functional testing processes and appropriate correctional strategies to combat these issues in your clients.
Bone Structure and Joints of the Ankle
Three key bones make up the structure of the ankle joint. These are the tibia, talus and fibula bones. Together these bones make up a bracket-shaped socket-type joint known as the “ankle mortice”.
The distal end of the fibula has a bony prominence (lump) called the lateral malleolus, which forms the lateral border of the ankle. The distal end of the tibia has a similar prominence called the medial malleolus, which forms the medial border of the joint. These prominences form the edges of the bracket-shaped hinge joint where the base of the tibia fits snuggly over the body of the talus to form the main connection of the talocrural hinge joint.
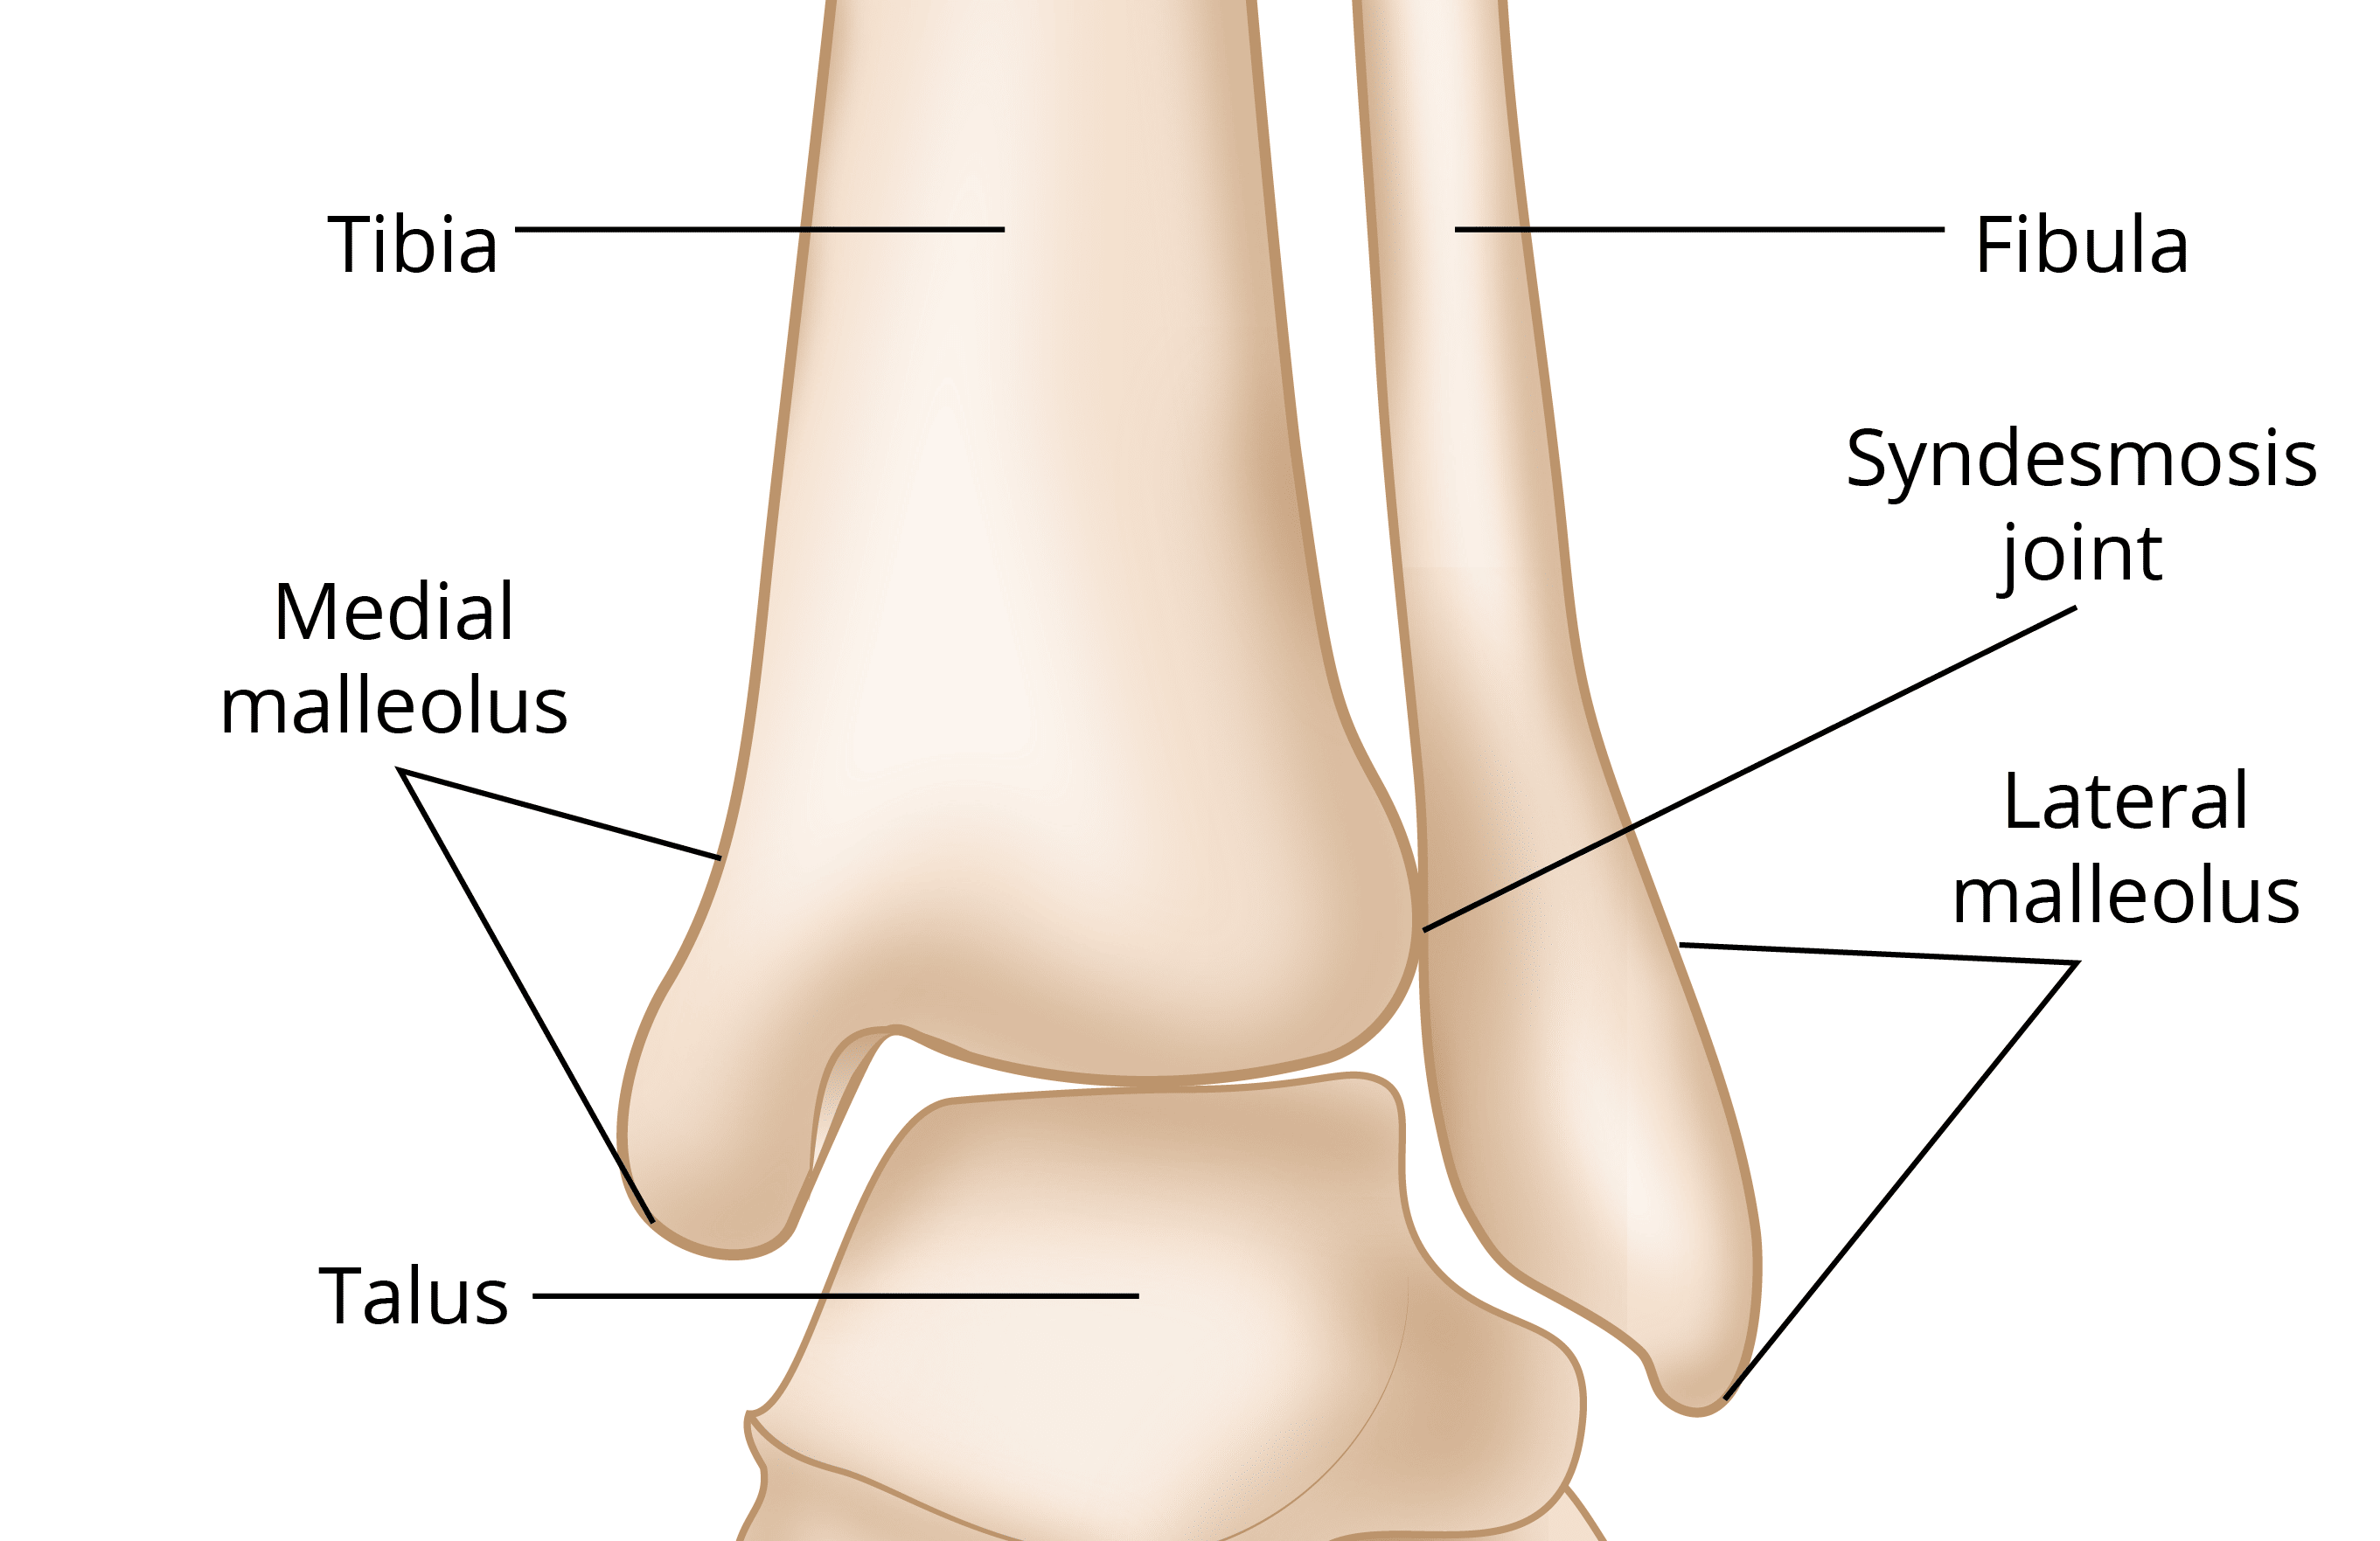
There are additional bones that articulate with those of the ankle joint. The talus articulates with the calcaneus (or heel bone) inferiorly and with the navicular bone anteriorly. The connection between the calcaneus and talus is known as the sub-talar joint, which is responsible for allowing two key movement of the foot (pronation and supination) that are vital for efficient movement.

Ligaments of the Ankle
The main ligaments of the ankle can be broadly defined as medial or lateral ligaments.
Medial ligaments
The medial ligaments are also known as the deltoid ligament. This ligament structure consists of four ligaments forming a triangle that connects the tibia to the navicular, calcaneus and talus. These ligaments offer medial stability, especially when the foot is turned out (eversion) and prevent subluxation and dislocation of the ankle joint.
Lateral ligaments
There are three separate ligaments that stabilise the lateral ankle. These are the anterior and posterior talofibular ligaments and the calcaneofibular ligament. They resist stress arising from inversion (foot turned in) and internal rotation stress from the tibia.

The movements that occur at the talocrural joint proper are Plantarflexion and Dorsiflexion.
Plantarflexion is the widening of the angle between the tibia and foot. In most instances, this involves either pointing the toes down or raising the heels upwards. Dorsiflexion is the narrowing of the angle between the tibia and foot. This can be achieved in two ways: By pointing the toes up (as in walking on your heels) or by shifting the tibia forward over the foot (as in a lunge motion).
Other movements occur at the sub-talar joint, including eversion and inversion, along with supination and pronation of the foot. These are much-confused terms and essentially amount to the same paired movements (with minor differences in the plane of movement used).
Eversion is when the foot rotates so the sole faces away from the body's midline. When standing, the weight would be placed along the inside of the foot and big toe.
Inversion is where the foot rotates so that the sole faces the body's midline (inward). When standing, the weight would be placed more on the outside of the foot. Think of inversion and eversion as the position of the foot.
Pronation refers to how your foot rolls (inwardly) as it accepts force in contact with the ground. It is an important mechanism in the absorption of force from ground contact. Normal mechanics in walking would see your foot roll slightly inwardly from the centre heel to the ball of your foot and big toe.
Overpronation is a common issue at the foot that can cause issues further up the kinetic chain. We will discuss this more shortly.
Supination is when your weight rolls to the outer edges of your foot in weight acceptance and is generally not a desirable trait.
![[ADD IMAGE'S ALT TEXT]](/sites/default/files/image327.png)

The muscles of the leg divide into anterior, posterior and lateral compartment. The following table gives details of each muscle and the movements they contribute to:
| Compartment | Muscles | Action on the ankle |
|---|---|---|
| Posterior | Superficial muscles | |
| Gastrocnemius | Plantarflexion (prime mover when the knee is extended) | |
| Soleus | Plantarflexion (prime mover when the knee is flexed) | |
| Plantaris | Weakly assists plantarflexion | |
| Deep muscles | ||
| Tibialis anterior | Assists plantarflexion and inversion | |
| Flexor digitorium longus | Assists plantarflexion and flexes toes (not big toe) | |
| Flexor hallucis longus | Assists plantarflexion and flexes the big toe | |
| Lateral | Peroneals | |
| Peroneus brevis | Weak plantar flexors | |
| Peroneus longus | Eversion | |
| Anterior | Tibialis anterior | Dorsiflexion Inversion |
| Extensor digitorum longus | Dorsiflexion Extends four smaller toes |
|
| Extensor hallucis longus | Dorsiflexion Extends the big toe |
|
| Peroneus tertius | Assists dorsiflexion Assists eversion |
|
The following video gives an overview of the ankle anatomy.
An array of injuries can affect the ankle joint. The most common of these is ligament damage/sprains. Acute injury diagnosis and initial treatment is the domain of the medical professional and physiotherapist. Rather than focus on injuries to the ankle, we will briefly discuss two common causes of pain in the lower limb region that you will likely come across in clients. Both of these issues are complex and have many contributing factors. While the diagnoses and treatment of these conditions falls outside of the scope of practice for personal training, our discussion of these issues will be limited to potential muscle imbalances that are thought to contribute to the issues, the functional tests that can confirm these imbalances, and the suggested correction strategies. The two issues we will discuss are:
- Medial tibial stress syndrome (shin splints)
- Achilles tendinopathy
Medial Tibial Stress Syndrome (MTSS)
MTSS is a common lower extremity overuse injury characterised by pain along the tibia. According to Deshmukh and Phansopkar (2022), pain can present anywhere along the tibia, but is most often diagnosed at the anterior medial border of the distal tibial. MTSS is exacerbated by activity, particularly those involving repetitive plyometric movements like running and jumping.
MTSS often leads to a prolonged period of physical complaints and reduced ability to participate in physical pursuits involving weight bearing. Athletes involved in running sports are the most prone to this disorder. Other risk factors for MTSS include gender (being female), body weight (more prevalent in those with higher BMI), a hyper-mobile navicular bone, a sudden increase in training volume and training on uneven or hard surfaces, improper footwear and poor running mechanics are also implicated as causes.
From a biomechanical perspective, causes attributed to MTSS include foot arch deformities, uneven leg length (structural), and excessive pronation of the foot (Deshmukh and Phansopkar, 2022).
While there are many factors that can contribute to MTSS, there are a few functional muscle imbalances that could be worth addressing. These muscle imbalances can contribute to over-pronation at the ankle, commonly associated with shin splints.
Over-pronation of the ankle
Over-pronation occurs when the way you walk or run causes the arches of your feet to flatten more than they should. Essentially, your foot rolls inwardly as you accept weight on it. This can affect the absorption of force from the ground contact and increase stress on the bones and muscles associated with the lower limb.
While there are structural and genetic reasons why people might over-pronate, some muscular imbalances can be contributing factors.
Muscle imbalances indicated in this condition include:
- Weak gluteus medius: They can lead to internal rotation of the femur and tibia when running, leading to over-pronation at the ankle/foot.
- Weak posterior and anterior tibialis: These muscles evert the foot and help maintain the arch of the foot. Weakness can lead to an arch collapse in weight acceptance and overpronation. They also reduce impact during foot strike in running and walking as they work eccentrically to reduce foot slaps. Increased foot slap when running and walking can lead to an increased force translated up the tibia.
- Tight plantar-flexor muscles (calves): Thought to restrict dorsiflexion leading to a collapse in the medial arch of the foot (over pronation) early in the weight acceptance phase of running and walking.
- Tight hip flexors: They can lead to internal rotation of the femur, causing valgus of the knee and internal rotation of the tibia leading to excessive pronation.
Let’s take a look at functional tests that assess the weakness of the tibialis anterior.
Functional test tibialis anterior weakness
- Tibialis Anterior Strength Test
Strengthening exercise for tibialis anterior
These exercises should be performed with a muscular endurance focus.
- Seated toe raises: 3 sets of 12-15 repetitions.
- Heel walks: 12-15 steps for each foot.
Achilles Tendinopathy
Achilles Tendinopathy is a condition arising from changes to the structure of the Achilles tendon, usually due to overuse or excessive stress placed upon the tendon. It can occur equally in athletic and non-athletic populations. The Achilles tendon is the largest and strongest tendon in the human body. It joins the gastrocnemius and soleus to the base of the calcaneus.

Risk factors for Achilles tendinopathy
While a number of contributing factors have been suggested for increasing the risk of Achilles tendinopathy, including lack of blood flow to the area, long periods of inactivity and poor nutrition, the most common cause of this issue appears to be malalignment of the ankle joint due to overpronation of the foot.
Other risk factors for the development of this issue are older age, higher weight and BMI, and genetics
The process of Achilles tendinopathy
According to Physiopedia (n.d.) Achilles tendinopathy is thought to begin with non-inflammatory micro-trauma of the tendon due to systematic overloading above its limit for stress. These repetitive micro-traumas are thought to link to tension between the gastrocnemius and soleus muscles, causing frictional forces leading to abnormal Achilles tendon loading. Without adequate rest and recovery, over time, this can lead to inflammation of the tendon sheath (the elastic fascia-type substance that surrounds the tendon and allows it to move freely between surrounding tissues). Next comes degeneration of the tendon. Failure to recognise this and perform specific strengthening exercises will likely lead to degenerative tendinopathy.
Most commonly, Achilles tendinopathy can be traced back to acute overload of the tendon or acute fatigue of the calf muscles. Generally, this results in edema (fluid build-up) followed by adhesions forming off the tendon. If the person continues to overload the tendon through the same activity, the tendon tries to repair itself through increased protein production. This appears to cause separation of the collagen fibres that make up the tendon (which weakens the tendon).

How Achilles Tendinopathy presents
The most common sign of Achilles tendinopathy is morning pain localised to the tendon. Points of tenderness appear to occur in one of two areas, mainly the mid portion of the tendon towards the muscle insertion site or the insertion point on the calcaneus. Pain increases when the tendon is put under tension. Over time, the tendon can also start to thicken along its length (but particularly at the sites of pain).
Muscle imbalance and Achilles tendinopathy
A number of muscle imbalances could lead to this issue. Imbalances arising from the hip and pelvis all the way down to the ankle itself can contribute. Essentially any muscle imbalance that results in impaired mechanics of the lower limbs and misalignment at the hip, knee or ankle can lead to increased stress on the Achilles tendon. Some key imbalances suggested by the research include those that allow internal rotation at the hip and knee, like weak gluteus medius and external rotators of the hip, along with tight adductors and hip flexors. The flexibility of the hamstrings and quadriceps has also been indicated, but one of the main imbalances appears to be tight calves.
Great news! You have already been introduced to (and practised) all the functional tests you need to check for these imbalances, plus you have already covered all the corrective strategies required to improve them.
A medical professional or physiotherapist best handles initial Achilles tendinopathy treatment. The first step in treatment is, of course de-loading (rest). Rest gives the tendon time to heal itself. This is a great time to begin working on associated muscle imbalances, which won’t place stress on the tendon.
Inhibiting the calves through foam rolling is a great start, followed by stretching of the calves and other tight muscles and strengthening exercises of muscles indicated as weak through functional testing.
Once the client is given the all-clear to target the area with strengthening exercises, the best practice approach to this is:
- Isometric Loading: Allows the tendon to be put under tension without changing its length
- Eccentric loading: Strengthens the tendon and helps increase the mobility of the ankle
- Isotonic Loading: Shortening the muscle against load to strengthen the tendon
- Energy Storage and Loading: those exercises that make the tendon work like a spring (plyometric).
As with all corrective exercises, the initial focus is on building endurance. The following exercises should be performed for between 10 and 15 repetitions with light resistance and a focus on correct form and engagement. A pain scale should be implemented for all exercises ensuring that the level of pain on the scale is nothing over 5/10. Remember, if you consider the exercise pain-free, you score it a 0, moderate pain is a 5 and excruciating pain is a 10. Progression of exercise should only be made when multiple sets can be performed with minimal discomfort.
The following exercise regime for Achilles Tendinopathy has been adapted from Physiopedia (n.d.).
Phase 1: Inhibit
Isometric loading exercise
Isometric tendon loading through single-leg heel/calf raise holds can help to reduce pain in tendons whilst preserving some strength. Depending on the client’s symptoms and tendon irritability, these can be performed with either double or single legs. For highly irritable Achilles tendons, double leg holds, often shorter duration, and fewer repetitions may be performed. The position of the isometric hold can either be mid- or end-range (i.e. right up on the toes or halfway up) but should progress through the range as the pain diminishes.
Phase 2: Lengthen
Eccentric loading exercise
Performing a heel/calf drop exercise involves standing on a raised platform and gradually lowering the heels below the level of the platform, thereby stretching the Achilles tendon. This eccentric stretch promotes tendon healing and can aid in rehabilitation by strengthening the tendon and reducing pain associated with Achilles tendinopathy.
Phase 3: Activate
Isotonic loading
Once your pain level and the tendon’s irritability reduce, you can start these exercises. There are no ‘hard and fast’ rules for when to start on isotonic loading to rehabilitate Achilles tendinopathy. Graduated isotonic loading is initiated once you have less than 5/10 pain or tolerable and acceptable pain on repeated single-leg heel/calf raises, and your morning tendon stiffness significantly reduces.
SEATED CALF-RAISE FOR SOLEUS
This exercise can be performed with a gradual increase in loading. Perform 10-15 repetitions, with each repetition lasting 3-6 seconds in length, to develop tension in the tendon.
ISOTONIC STANDING CALF RAISES
Initially, these exercises should be performed mid-range of the muscle’s movement (and unloaded). The benefit of performing the exercise in the mid-range is that it will avoid the compression of the tendon at the end of the range, which can occur with exercising with heavier loads. For example, at the very end range of ankle plantarflexion (toes pointed) or dorsiflexion (think letting the heel drop off the edge of a step), the Achilles tendon is subject to compressive loads against the heel bone (calcaneum), which can be potentially irritating and pain-producing. If the unweighted exercise is tolerated well, move onto external loading and increase the range of movement dependent on pain response (nothing over a 5/10).
Unloaded: Standing bodyweight calf raise
Loaded: Weighted calf raise
Look at the following video that will take you through each progression for Phases 1-3. This video excludes the unloaded bodyweight calf raise and includes the following exercises:
- Single leg heel raise
- Eccentric heel drop exercise
- Seated soleus calf raise
- Weighted calf raise.
Phase 4: Integrate
Energy Storage and Loading: Plyometric Exercises
The critical last stage of the rehabilitation process is the inclusion of ‘energy storage’ tendon exercises. These exercises deform the tendon with jumping and hopping-based exercises. They help the tendon regain its capacity to absorb and release energy via the stretch-shortening cycle. This happens when you land and then push off.
You can start these exercises with a client when they have a marked reduction in morning stiffness in the Achilles tendon on waking. In addition, you must have progressed well through the eccentric and isotonic calf exercises, have very mild tenderness on palpation of the Achilles tendon, and be able to tolerate light running without a flare-up in tendon irritability and aggravation of symptoms.
EXERCISE PROGRESSION
The following videos take you through the exercise progression for this part of the corrective exercise programme. Aim for 3 sets of 10 repetitions for each.
- Double-leg hop
- Single-leg hop
- Single-leg step hops
- Hopscotch with activation band
Right, time to apply what you have learned. Head to your assessment for an assessment guide video and instructions on submitting your assessments. The assessment guide video explains your assessment task, which requires you to use the information you have learned on this topic to help a case study client.
This assessment will require you to apply the knowledge you have learned and practised by completing the following tasks:
- Identify the musculoskeletal issue the client is likely exhibiting.
- Identify and explain the likely muscle imbalances contributing to the issue.
- Select and justify your selection of functional tests to perform on the client to confirm whether the muscle imbalances exist.
- Exhibit proficiency in conducting the functional tests you have chosen (on a willing client).
- Suggest appropriate corrective strategies that should lead to improvement of the issue.