Welcome to Postural Analysis and Movement Competency Screening (MCS)! After gaining a deeper understanding of the key joints of the human body and the structures that act on them. You now have the ability to identify common issues related to joints, test for muscular imbalances that could be contributing to these issues, and apply corrective exercise techniques that should lead to improvements in your clients' function, pain, and movement efficiency.
This final topic will allow you to put together everything you have learned so far. It begins with learning how to conduct static and dynamic postural assessments on a client and then asks you to apply your learning from the earlier topics. This is a highly practical topic of learning where you will practice implementing the knowledge and skills you have acquired on a real client.
Note: It would be worth organising a client now for later in the week.
In this topic, you will:
- learn how to conduct a static postural assessment on a client and analyse their posture to identify potential imbalances.
- learn how to conduct a movement competency screen to assess dynamic movement in a client and analyse the results of this assessment to identify potential imbalances.
- apply functional test procedures to confirm or rule out muscle imbalances
- identify and explain a correctional strategy for key imbalances identified.
But first, let's get a little more insight into posture and why it is important.
Prepare for assessment
Prepare yourself for the upcoming assessment by familiarising yourself with Assessment 1D.
- Review the requirements provided to gain a clear understanding of what is expected.
- Manage your time carefully to work on this topic and assessment for a total of a 1 week period.
- Aim to complete and submit your assessment at the completion of this topic.
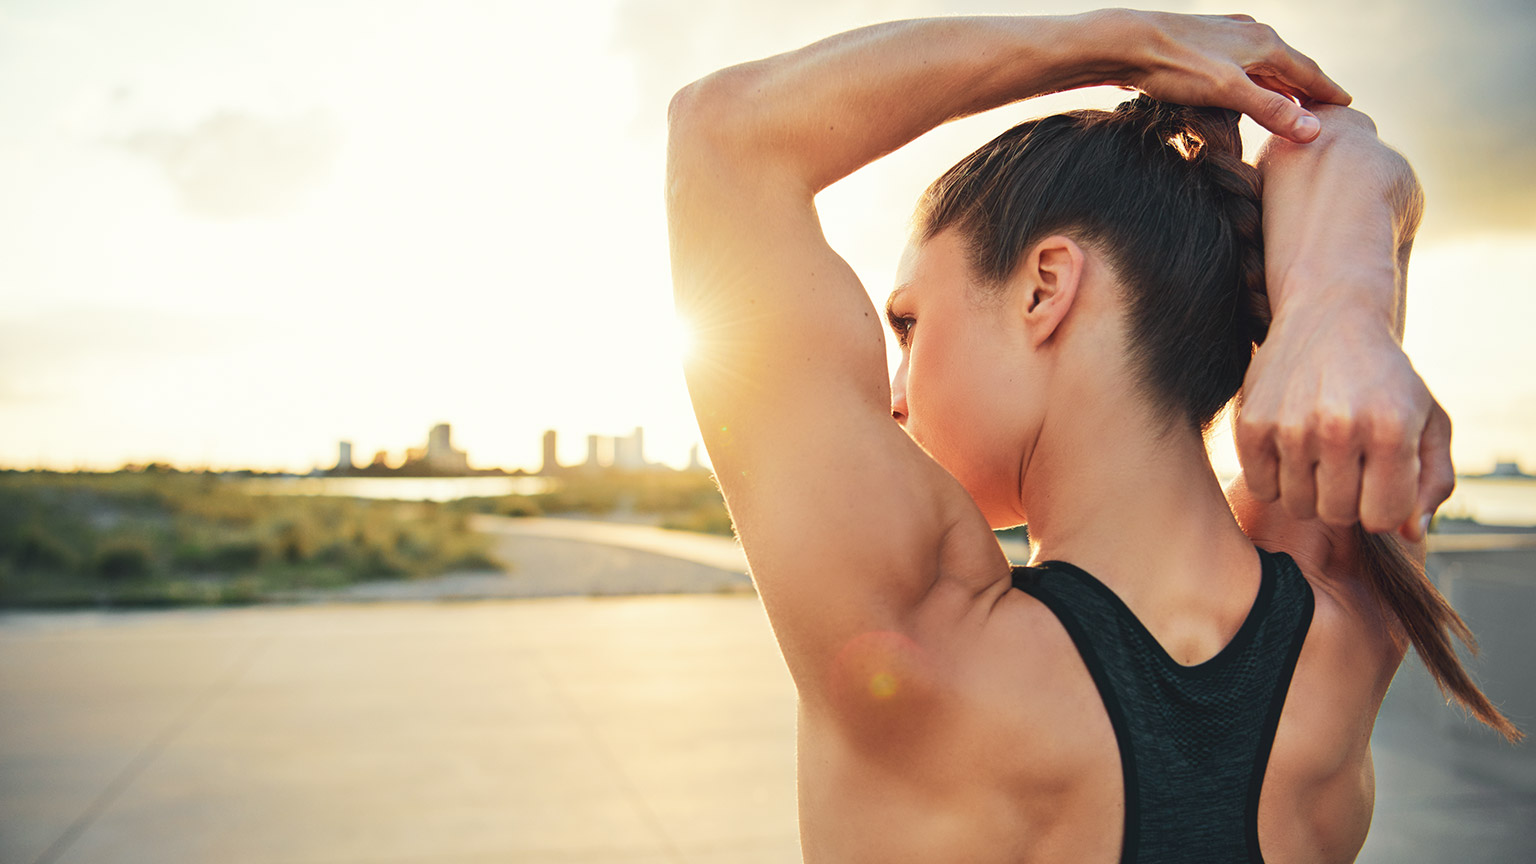
Watch the following video about the benefits of good posture.
Good posture is about more than simply standing up straight to look your best. Posture plays an important role in your long-term health. It aids your organs in functioning optimally and helps prevent pain, injuries, and other health problems. When the body is poorly aligned, muscles and ligaments must bear the strain of resisting gravity's effects. These effects can lead to imbalance and strain due to the following reasons:
- muscle weakness allows greater separation of the parts to which the muscles are attached
- muscle shortness holds the parts to which the muscle is attached closer together
- stretch weakness can cause muscles to remain in an elongated and weak condition
- adaptive shortening can develop in muscles that remain in a shortened position.
Posture is “a position of the body, or the way in which someone holds the body when standing, sitting or walking."The Cambridge Dictionary (n.d.)
Posture refers to the overall alignment and position of the body at a given moment, and it is determined by the positions of the various joints in the body. It is important to understand that the position of each joint can have an impact on the position of other joints (Physiopedia, n.d.).
Based on these definitions, correct posture can be defined as the position in which you apply the least amount of stress to your joints while standing or sitting. On the other hand, poor posture refers to a position that increases stress on the joints.
Typically, there are two types of posture a trainer would analyse:
- Static posture: the alignment of body segments maintained in standing, sitting, lying or kneeling.
- Dynamic posture: the position the body or segments of the body are held in while moving for example when walking, running, jumping, throwing or lifting.
For the purposes of this topic, we will focus on two methods of assessment.
- Static postural analysis using the New York Posture rating test.
- Dynamic assessment using the Movement Competency Screening tool.
What is good posture?
When assessing posture, it is crucial to have a clear understanding of what constitutes good posture. This serves as a reference point for comparison during the assessment process. The key to good posture lies in the position of the spine, which naturally consists of three curves: one at the neck, another in the mid/upper back, and a third in the lower back. Maintaining these curves without further exaggerating them is essential for proper posture. Your head should align above your shoulders, while the top of your shoulders should align with your hips.
In order to determine ideal posture, it is important to observe how the line of gravity intersects with specific points on the body. This can be done by superimposing a vertical line on a client's photo to assess where this line aligns in relation to important joints.
When viewed from the side, the line of gravity should pass through the lobe of the ear, the shoulder joint, the hip joint, the upper lateral part of the femur, slightly in front of the midline of the knee joint, and finally, in front of the lateral malleolus of the ankle.
When viewed from the front or back, the vertical line passing through the body's centre of gravity should theoretically divide the body into two equal halves, with the weight evenly distributed between both feet.

Causes of poor posture
A variety of factors can contribute to poor posture.
- Anatomical impairments: These include pathological conditions, trauma, or injuries that result in protective postures. For instance, someone holding their arm close to their body following a shoulder injury.
- Physiological impairments: Muscle imbalances, respiratory conditions, hearing problems (such as turning your good ear to hear sounds), sickness, or fatigue can all affect posture.
- Psychological impairments: Worry, stress, or shyness can lead to adopting a closed or hunched posture, characterized by a lowered head and rounded shoulders.
- Bony structure abnormalities: Conditions like Lordosis, kyphosis, scoliosis (which are genetic and involve increased curvature of the spine), or uneven leg length can contribute to poor posture.
- Habitual posturing: Engaging in activities such as slouching, sitting improperly at a computer desk or hunching over a phone, or standing for extended periods with poor posture can all negatively impact alignment.
As well as the factors above there are several environmental factors that may contribute to poor posture.
- Lack of exercise and associated muscle weakness
- Poorly designed furniture
- Participating in sports that promote muscle imbalances
- Improper job station setup or repetitive work actions leading to imbalances (e.g., prolonged shovel use)
- Clothing choices, such as wearing high-heeled shoes
It's worth noting that some contributors to poor posture, such as structural or genetic factors, may be beyond the control of personal trainers. These include abnormalities in joint structure, such as deep or shallow sockets or exaggerated spinal curvature.

One area where we can assist clients is in identifying and correcting muscle imbalances that contribute to poor posture and inefficient movement.
While upper and lower crossed syndromes are key common postural faults, the spine conditions of kyphosis, lordosis and scoliosis are more significant than these functional postural issues.
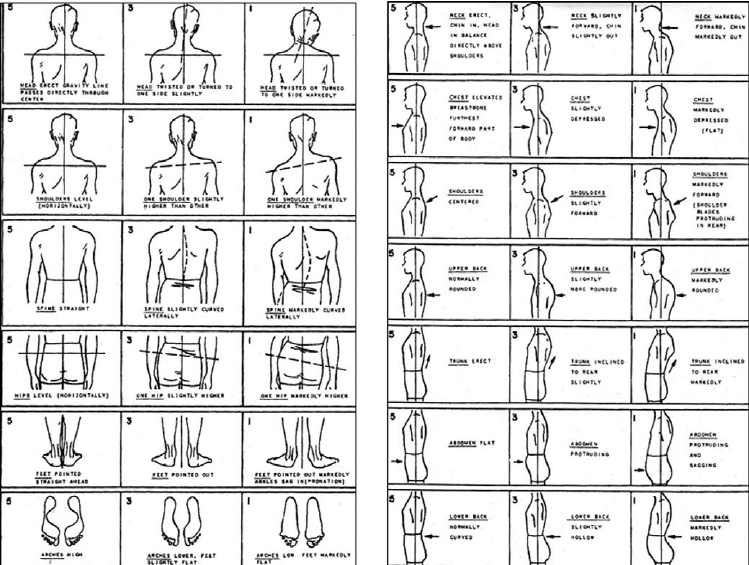
The New York Posture Rating Test was developed in 1958 and has been widely used as a tool for assessing posture. A study conducted by Mcroberts et al (2013) examined the test's effectiveness as a posture evaluation tool and concluded that it remains a valid measure of posture assessment. However, the authors noted that its validity increases with the experience of the person administering it. In other words, the more familiar someone is with using the assessment tool, the better and more reliable it becomes.
The New York Posture Rating Test is designed to be simple and user-friendly. To administer the test, a trainer needs to compare posterior and anterior images of their client with the corresponding images on the test chart (refer to the image below). Scoring is indicated in the individual picture boxes on the chart. A score of 5 points is given for good posture of the specific body area shown, while 3 points and 1 point are assigned for progressively poorer posture. In recent years, the scoring system has been adjusted to accommodate in-between scores (e.g., a score of 4 or 2) when a client's posture falls between the images depicted on the chart.
You can score all the analyses (excluding the final row on page one) based on the images you have uploaded of your client. To conduct the foot arch analysis, have the client stand in water and take two steps forward before standing momentarily on dry concrete. Then, take a photo of the footprints left by their wet feet and compare them to the images on the chart. The following video, Postural Analysis- Collecting images of feet using water, takes you through the process.
After conducting the New York Posture Rating Test, calculate the total score by adding up the individual scores. Then, refer to the chart below to determine your client's position in terms of score (out of 65), percentile ranking (compared to normative data), and achievement level (out of 10). This will provide you with a comprehensive assessment of your client's posture.
| Posture Score | Percentile Rank | Achievement Level |
|---|---|---|
| -- | 99 | 10 |
| 65 | 98 | 9 |
| 63 | 93 | 8 |
| 61 | 84 | 7 |
| 59 | 69 | 6 |
| 55-57 | 50 | 5 |
| 49-53 | 31 | 4 |
| 45-47 | 16 | 3 |
| 39-43 | 7 | 2 |
| 35-37 | 2 | 1 |
| 0-33 | 1 | 0 |
Source: Mcroberts, Lisa & Cloud, Rinn & Black, Catherine. (2013).
The New York Posture Rating Test serves two purposes: firstly, it helps identify specific areas of the body that require further analysis and attention. Secondly, it allows for the establishment of a total score, which can be used to track improvement through targeted corrective strategies.
To visualise how the test is conducted on a client's images, watch the following video. It provides an example of a New York Posture Rating Test in action.
Using the analysis you have performed
Now that you have performed your analysis and identified some areas of concern regarding your client's posture, it is time to put your detailed knowledge of joint anatomy to use. The next step is to consider possible factors contributing to the postural issues you have identified. You will now be able to examine these issues with a diagnostic lens. For each postural asymmetry you uncover, you should be able to think of the muscle imbalances that could be contributing to the issue. Initially, you may have to revisit your module notes for each affected area of the body to remind yourself of the likely contributing factors. However, with practice, it will become natural to you.
Try it out
Let's have a practice to see what you remember. Remember issues relating to one side only may involve tight muscles on one side, pulling the structure up/down/forward/back, or weakness on the other side, allowing it to be pulled up/down/forward/back.
The process of static posture assessment process follows a logical sequence:
Step 1 - Collecting photographs of the client’s standing posture from an anterior, posterior and lateral perspective. Marking of bony landmarks before taking the photographs can simplify the subsequent analysis process.
Step 2 – Comparing the client’s posture to the correct posture. This is usually done by examining the alignment of joints and bony landmarks in relation to a plumb line that can be superimposed over the images.
Marking bony landmarks for postural analysis

Marking these bony landmarks will facilitate the analysis process, particularly when assessing the client's posture from an anterior and posterior perspective. However, when observing the lateral aspect, certain structures such as the ear and lateral malleolus of the ankle are clearly visible and do not require marking.
Bony landmarks
To accurately assess posture, you will need to identify and mark the following bony landmarks:
The acromion process of the scapula (point of the shoulder)
The acromion process of the scapula, often referred to as the "point of the shoulder," is an important marker for determining the levelness of the shoulders in a standing position. It represents the highest bony prominence within the shoulder complex. While it is easily identifiable in individuals with low body fat and limited shoulder muscle, it can be more challenging to locate in clients who are obese or have significant muscle mass. If you're having trouble finding this bony landmark, a useful technique is to trace along the clavicle until you reach the acromioclavicular (AC) joint, where the acromion process can be found. In the case of females, their bra strap typically rests on either side of this bony prominence.

The anterior superior iliac spine (ASIS)
The anterior superior iliac spine (ASIS) refers to two prominent bones located on the front and upper part of the pelvis. These bony landmarks are crucial for assessing the levelness of the pelvis in a standing position. In males, they typically sit around the belt line. It is recommended to allow the client to locate these landmarks themselves since it is a sensitive area that most people prefer not to have touched. Once the client believes they have found the ASIS points, step back and verify if the areas they are touching are equidistant from the midline of the body. Take over their position by placing your own finger on the site and ask the client to return to their normal stance. This will help you mark the ASIS accurately. It's important to note that clients with excess body fat in this area may feel uncomfortable during this process as their body fat might cover the ASIS. If you suspect this may be the case, it's advisable to skip this marking since the ASIS will not be visible.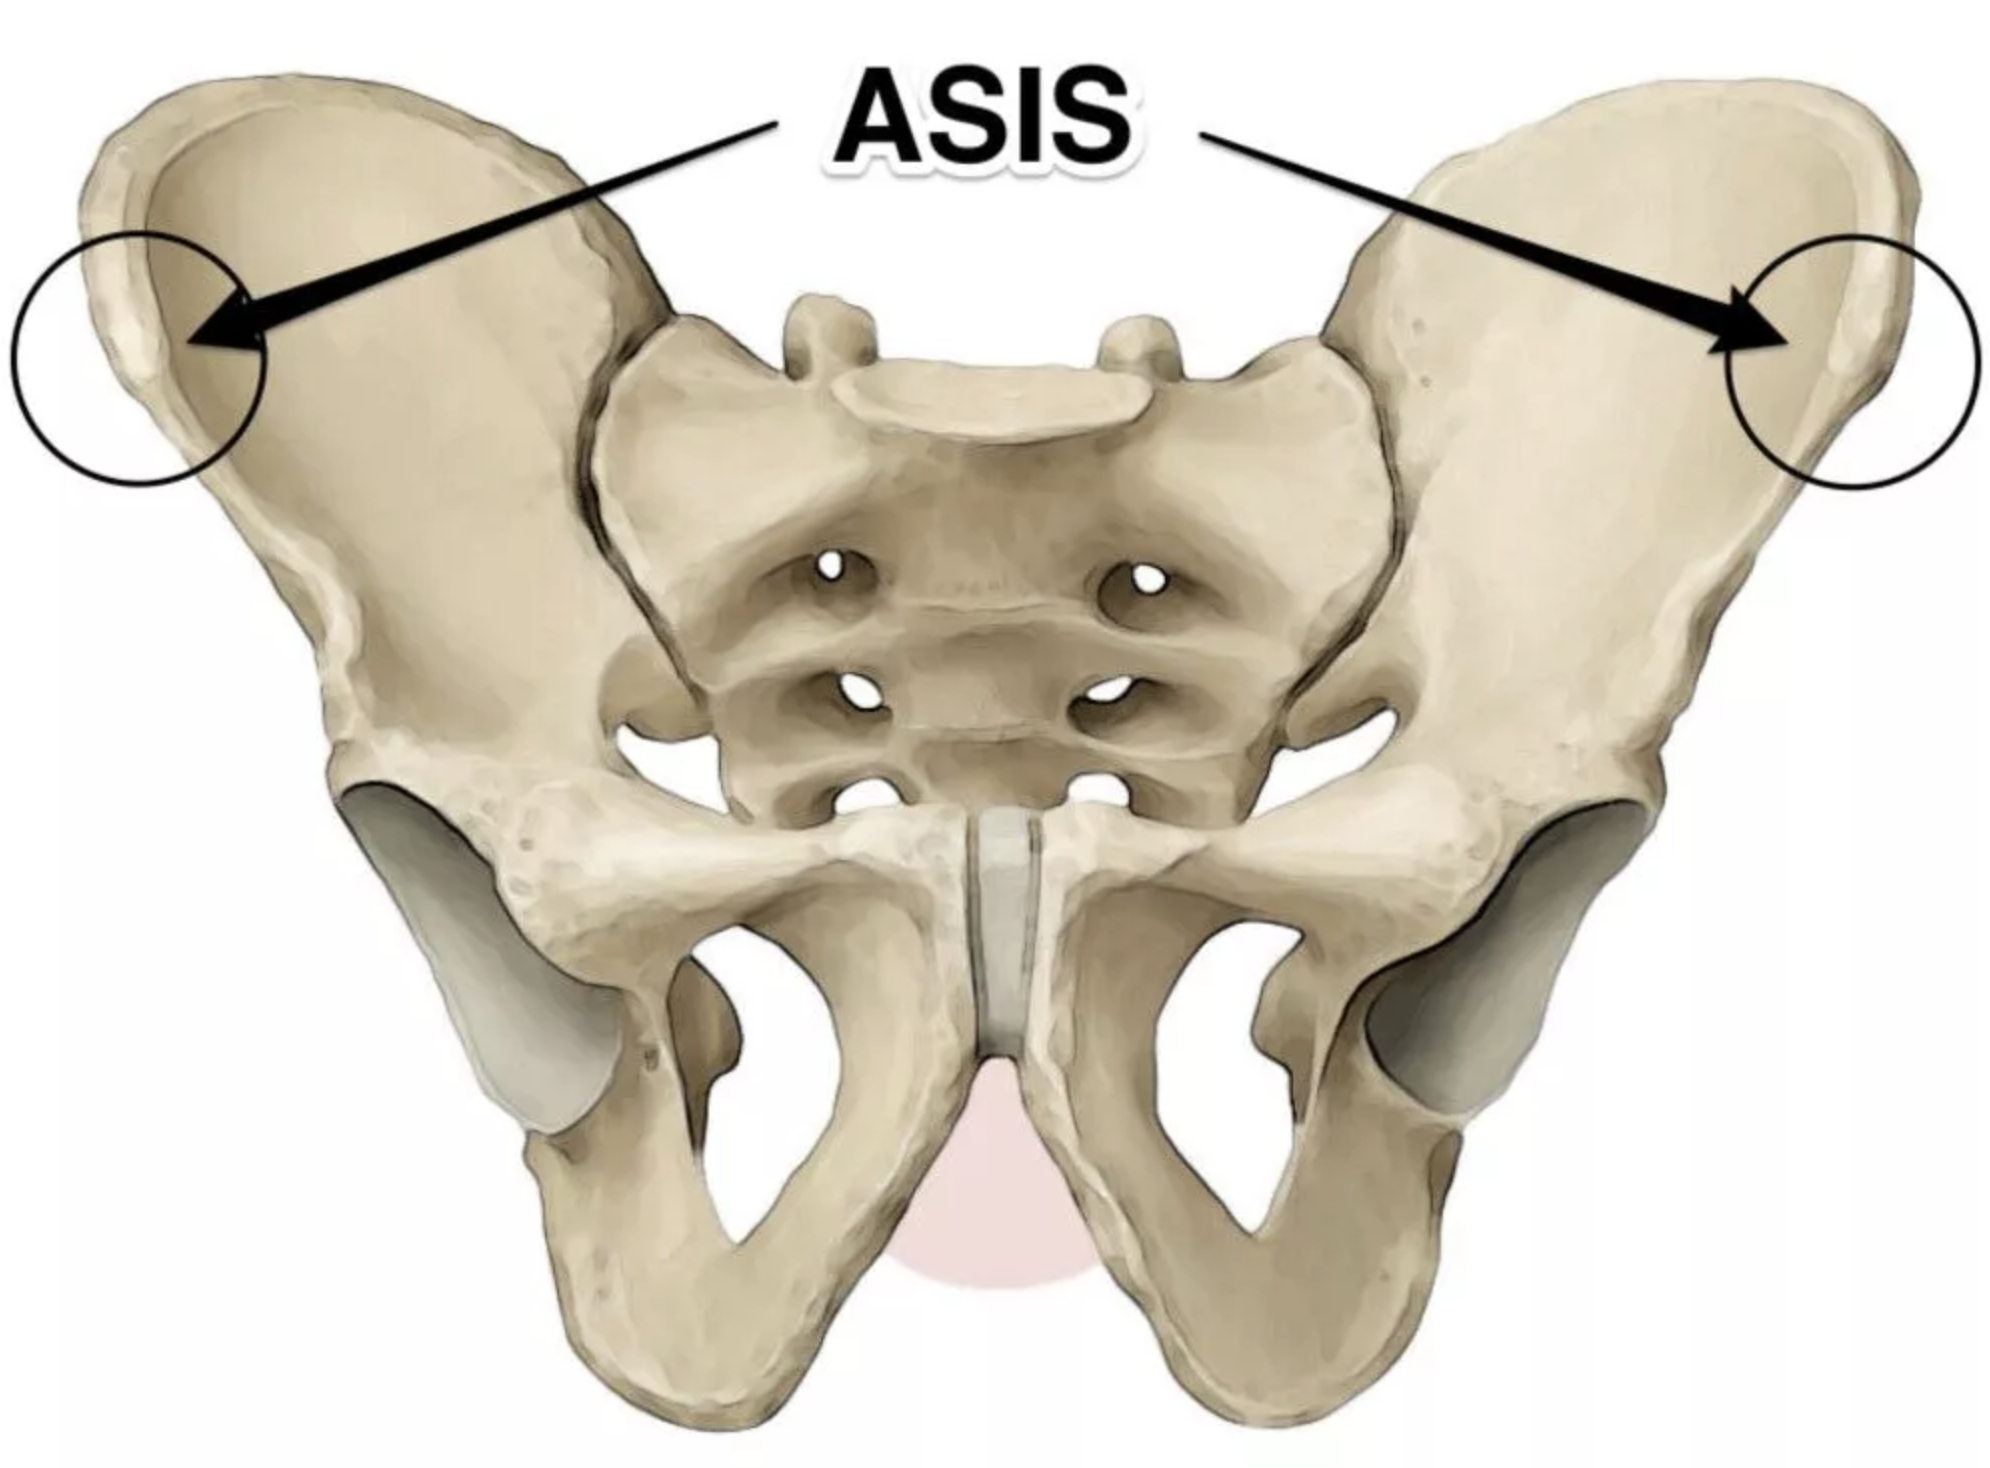
The centre of the patella (the kneecap)
The centre of the patella, also known as the kneecap, can be marked using various methods. The important aspect is to mark the same spot on each leg consistently. One recommended technique is to palpate the edges of the patella using your index finger and thumb until you locate the widest point. Then, draw a straight line connecting your finger and thumb. It's crucial to be cautious and avoid moving the patella while performing this procedure. Additionally, ensure that your client is in a normal stance position and not looking down to observe your actions. This marking is helpful for assessing the levelness of the patella in a standing position.
The inferior border of the scapula
The inferior border of the scapula, or the lower edge, can be marked to assess the levelness of the scapula in a standing position. To locate it, palpate along the medial border of the scapula until you reach the most inferior point where the scapula "turns the corner." To verify that you have found the correct spot, mark it and apply pressure to feel the bone. Then, apply pressure just below the marked point, and you should feel flesh (muscle) instead of bone. It's important to remind your client to stand in a normal stance while you make this marking.
The posterior superior iliac spine (PSIS)
The posterior superior iliac spine (PSIS) is located in the lower back, on either side of the spine. In individuals with low body fat, these bony landmarks can be identified as two small scoops (dimples). However, women often have more body fat stored in this area, which can make it more challenging to locate the PSIS. In clients with excess body fat, finding the PSIS will typically be difficult. It is recommended to involve the client in locating their own PSIS. If they are unable to locate them, it is advisable to proceed to the next marking.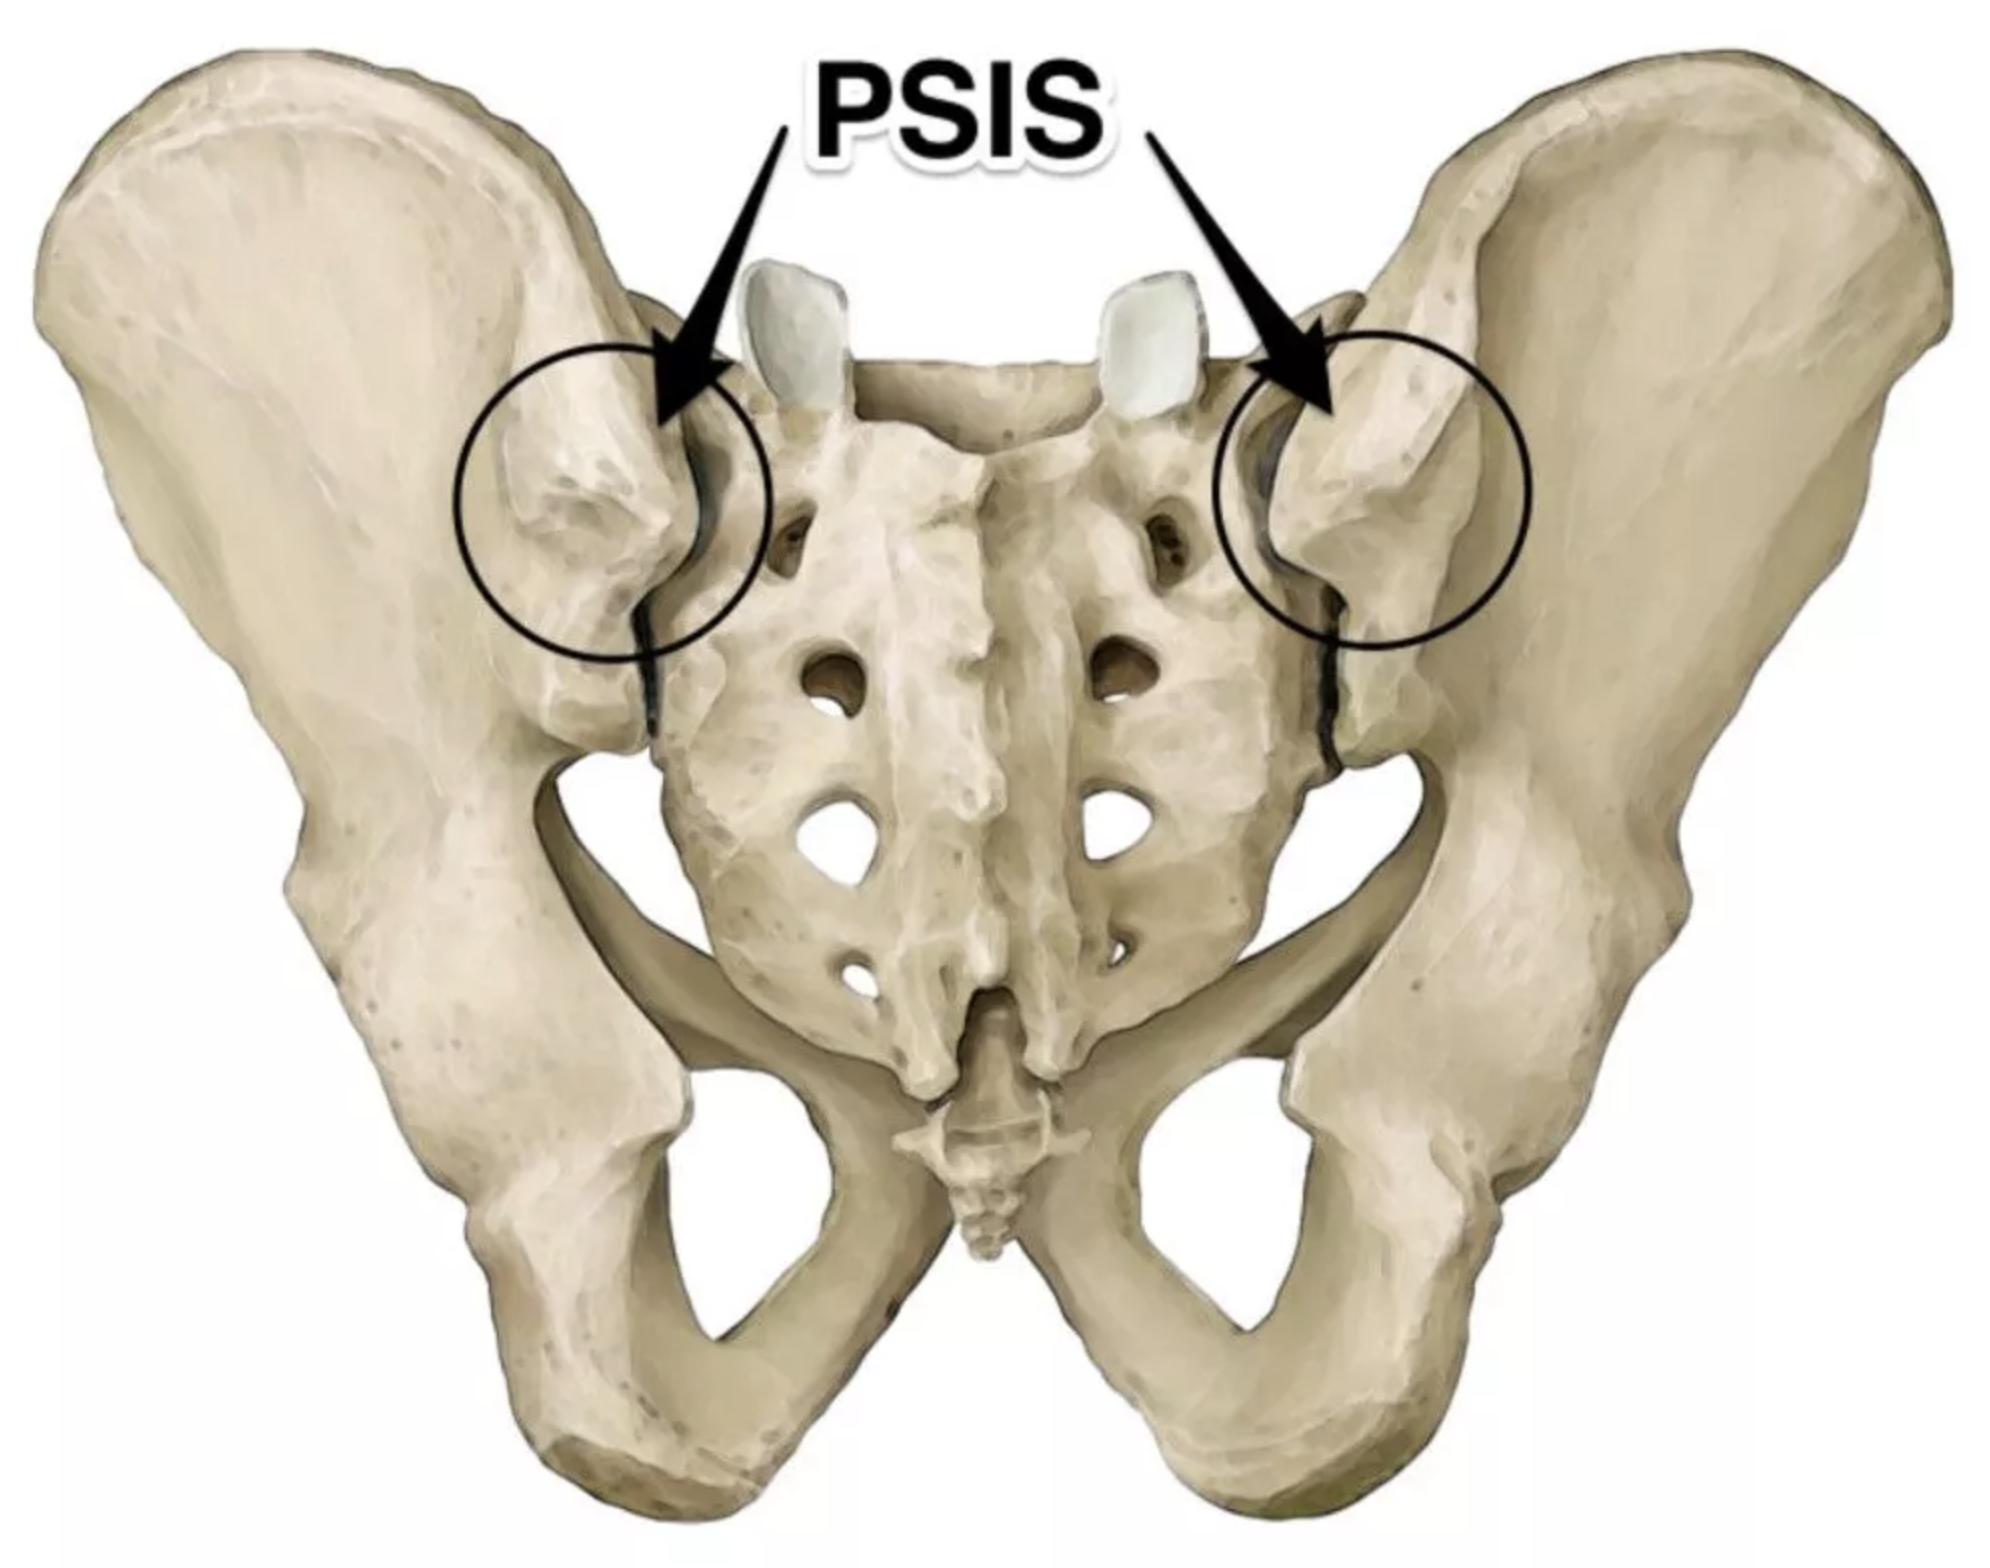
The crease at the back of the knee
The crease at the back of your knee is characterised by at least one visible horizontal line. Some individuals may have two such lines. These lines typically have a slightly darker colour than the surrounding skin, making them easy to identify. Draw a line across the middle or most horizontal part of the line(s). If there are two lines, choose either the superior or inferior one, and mark the same spot on both knees. This line provides an indication of knee height.
The lateral malleolus
The lateral malleolus is a prominent bony bump on the ankle, that is easily identifiable. It can be found on the outside of your ankle joint. We mark this specific point to ensure easy identification when adding a plumb line over the lateral photo. The lateral malleolus serves as the starting point for our line.

The following video shows you how to mark a client prior to taking photographs. To properly mark a client before taking photographs for a posture assessment, follow these key points:
- Choose a comfortable environment where the client can expose the necessary sites for the assessment. Avoid using the gym floor, as it may not be appropriate.
- If the client would feel more at ease with someone of their own gender present, try to arrange for that. The more sites we can see, the more accurate the analysis will be. However, if a client is not comfortable wearing minimal clothing, ask them to wear a singlet (to expose the shoulders) and shorts (to expose the knees). It's also helpful to have small clips to hold hair or clothing aside, allowing markings to be clearly visible.
- Ensure the client is standing in their usual stance and not exaggerating their posture or looking down at your actions.
- Use a non-permanent marker with a colour significantly different from the client's skin tone. This will make the markings visible in the photographs.
- Communicate to the client exactly where you will be touching them, so they know what to expect. In areas that may be close to intimate parts or potentially embarrassing, ask the client to try and locate the sites first.
- When marking the skin, do not stretch it. Instead, apply pressure on the bony point. On most skin tones, this should create a pale circle under your finger, which you can then fill in with the marker.
- Before capturing any photographs, double-check each marking while the client is standing in a normal stance and in the position they will be in for the photos. Skin can shift, so re-mark any sites if necessary to ensure accuracy in the analysis.
TRY IT OUT
First, try to locate the bony landmarks on your own body. You should be able to find all of them, except for the inferior border of the scapula and the lines on the back of your knees.
Next, find someone who is willing to let you practice on them. Practice explaining the purpose of finding and marking each site, as well as what each marking will help you learn about their posture. This practice is essential because during the assessment, you will be required to perform these markings, and any mistakes will be evident. The person who helps you practice might be the perfect client for your assessment task!
Taking photographs for analysis
As mentioned earlier, the ideal views to analyse posture from are anterior, posterior and lateral views.
![[ADD IMAGE'S ALT TEXT]](/sites/default/files/analysis.png)
To ensure that you have high-quality images for your analysis, please follow the suggestions below:
- Find a well-lit area with a clutter-free background. The greater the contrast between the back wall and the client, the better. This will enhance the image quality.
- Capture the client's entire body in each picture, from feet to head. Crop any excess area from the photo afterward to maintain focus on the client.
- Make sure your camera is level. You can determine this by aligning it with the skirting boards or where the floor meets the wall. This is crucial for accurate analysis. If you discover that your photos are not level and your client is no longer present, you can use a free online photo straightening tool such as https://www.fotor.com/photo-editor-app/editor/basic.
- After checking the bony markings, step back and ensure they are visible to the naked eye. If you can see them, the camera will be able to capture them effectively.
- If your client is not comfortable wearing minimal clothing, ensure that what they are wearing is tight or tucked in. This will allow for better visibility of the joints. For instance, baggy t-shirts hinder the assessment of the lumbar spine curve or anterior pelvic tilt. Long pants may obstruct knee markings, while long shorts can cast shadows over the knees, so it's best to roll them up.
- When you are ready to take the photos, have the client adopt a natural posture. You can achieve this by asking them to take a deep breath in and then exhale. Capture the picture when they have finished exhaling.
- Double-check that you have all the necessary pictures before having the client get dressed again. This will help avoid any additional effort or inconvenience.
By following these guidelines, you will ensure that you have high-quality images to work with for your analysis.
Preparing your images
Now you have the images you need, what do you do with them? A simple way to analyse them is to upload the images into a word document. The following video, Posture Image Preparation, walks you through the process of setting up your images for analysis.
Analysing the images
Now you have your images ready, it’s time to analyse your client’s posture. Keep it simple, noting any obvious asymmetry or misalignment of joints and bony markings next to the images.
The following video, Posture Analysis Guide, demonstrates how to complete a basic analysis of a client’s posture.
Now you can look at a postural issue and analyse the possible muscle imbalances that may be causing it. The next step is to utilise the specific functional tests you have learned in this module. These tests will help you determine whether the suspected muscle imbalances are indeed contributing to your client's condition. With practice, these tests will become as familiar to you as exercises designed to target different muscle groups.
The final step
Once you have confirmed the presence of a suspected muscle imbalance, you can proceed to create a targeted corrective exercise program using the Corrective Exercise Continuum, which involves the Inhibit, Lengthen, Activate, Integrate process. You have already acquired the necessary tools for this task through your previous learning in this module. To assist you in developing these corrective exercise programs, make sure to review your course notes and completed case studies.
In rare cases where you are unable to detect evidence of a functional muscle imbalance, there is no cause for concern. Keep in mind that there might be structural factors contributing to the issue, which cannot be resolved through corrective exercise alone. In such situations, redirect your attention to the areas where you can make a positive impact on your client's posture.
The second part of the postural analysis process is evaluating movement competency. This assessment evaluates the dynamic function of a client in performing primal movements and helps a trainer ascertain whether a client is ready to be loaded with resistance in certain movements or whether movement dysfunction is present.
Movement competency is the ability to move free of discomfort or pain, while movement dysfunction refers to compensatory movement strategies that are associated with injury or pain (Kritz n.d.).
The Movement Competency Screening (MCS) tool is made up of 5 movements that provide trainers with the opportunity to evaluate clients' movement competency within each fundamental movement pattern. The MCS movements are performed with bodyweight load only and include:
- Squat
- Lunge and twist
- Bend and pull
- Push-up
- Single-leg squat
Assessing each of these movements can allow a trainer to highlight potential muscle imbalances that exist in their clients, which will require corrective exercise approaches to improve before clients can add load to movements. The MCS can also be used as a means of showing progress in clients' functional movement, demonstrating that the corrective strategies employed have worked.
The movement competency screening process
The movement competency screening process is a simple one and includes a series of tests designed to evaluate an individual's movement patterns, mobility, stability, and overall physical performance.
Introduce the client to the MCS
Every movement requires specific instructions for the client to follow. It is crucial for trainers to provide clear guidance and demonstrate each movement effectively before clients attempt them. If a personal trainer is unable to demonstrate a movement adequately, they should show a video clip of an excellent demonstration to the client.
| MCS Movement Instructions | |
|---|---|
|
|
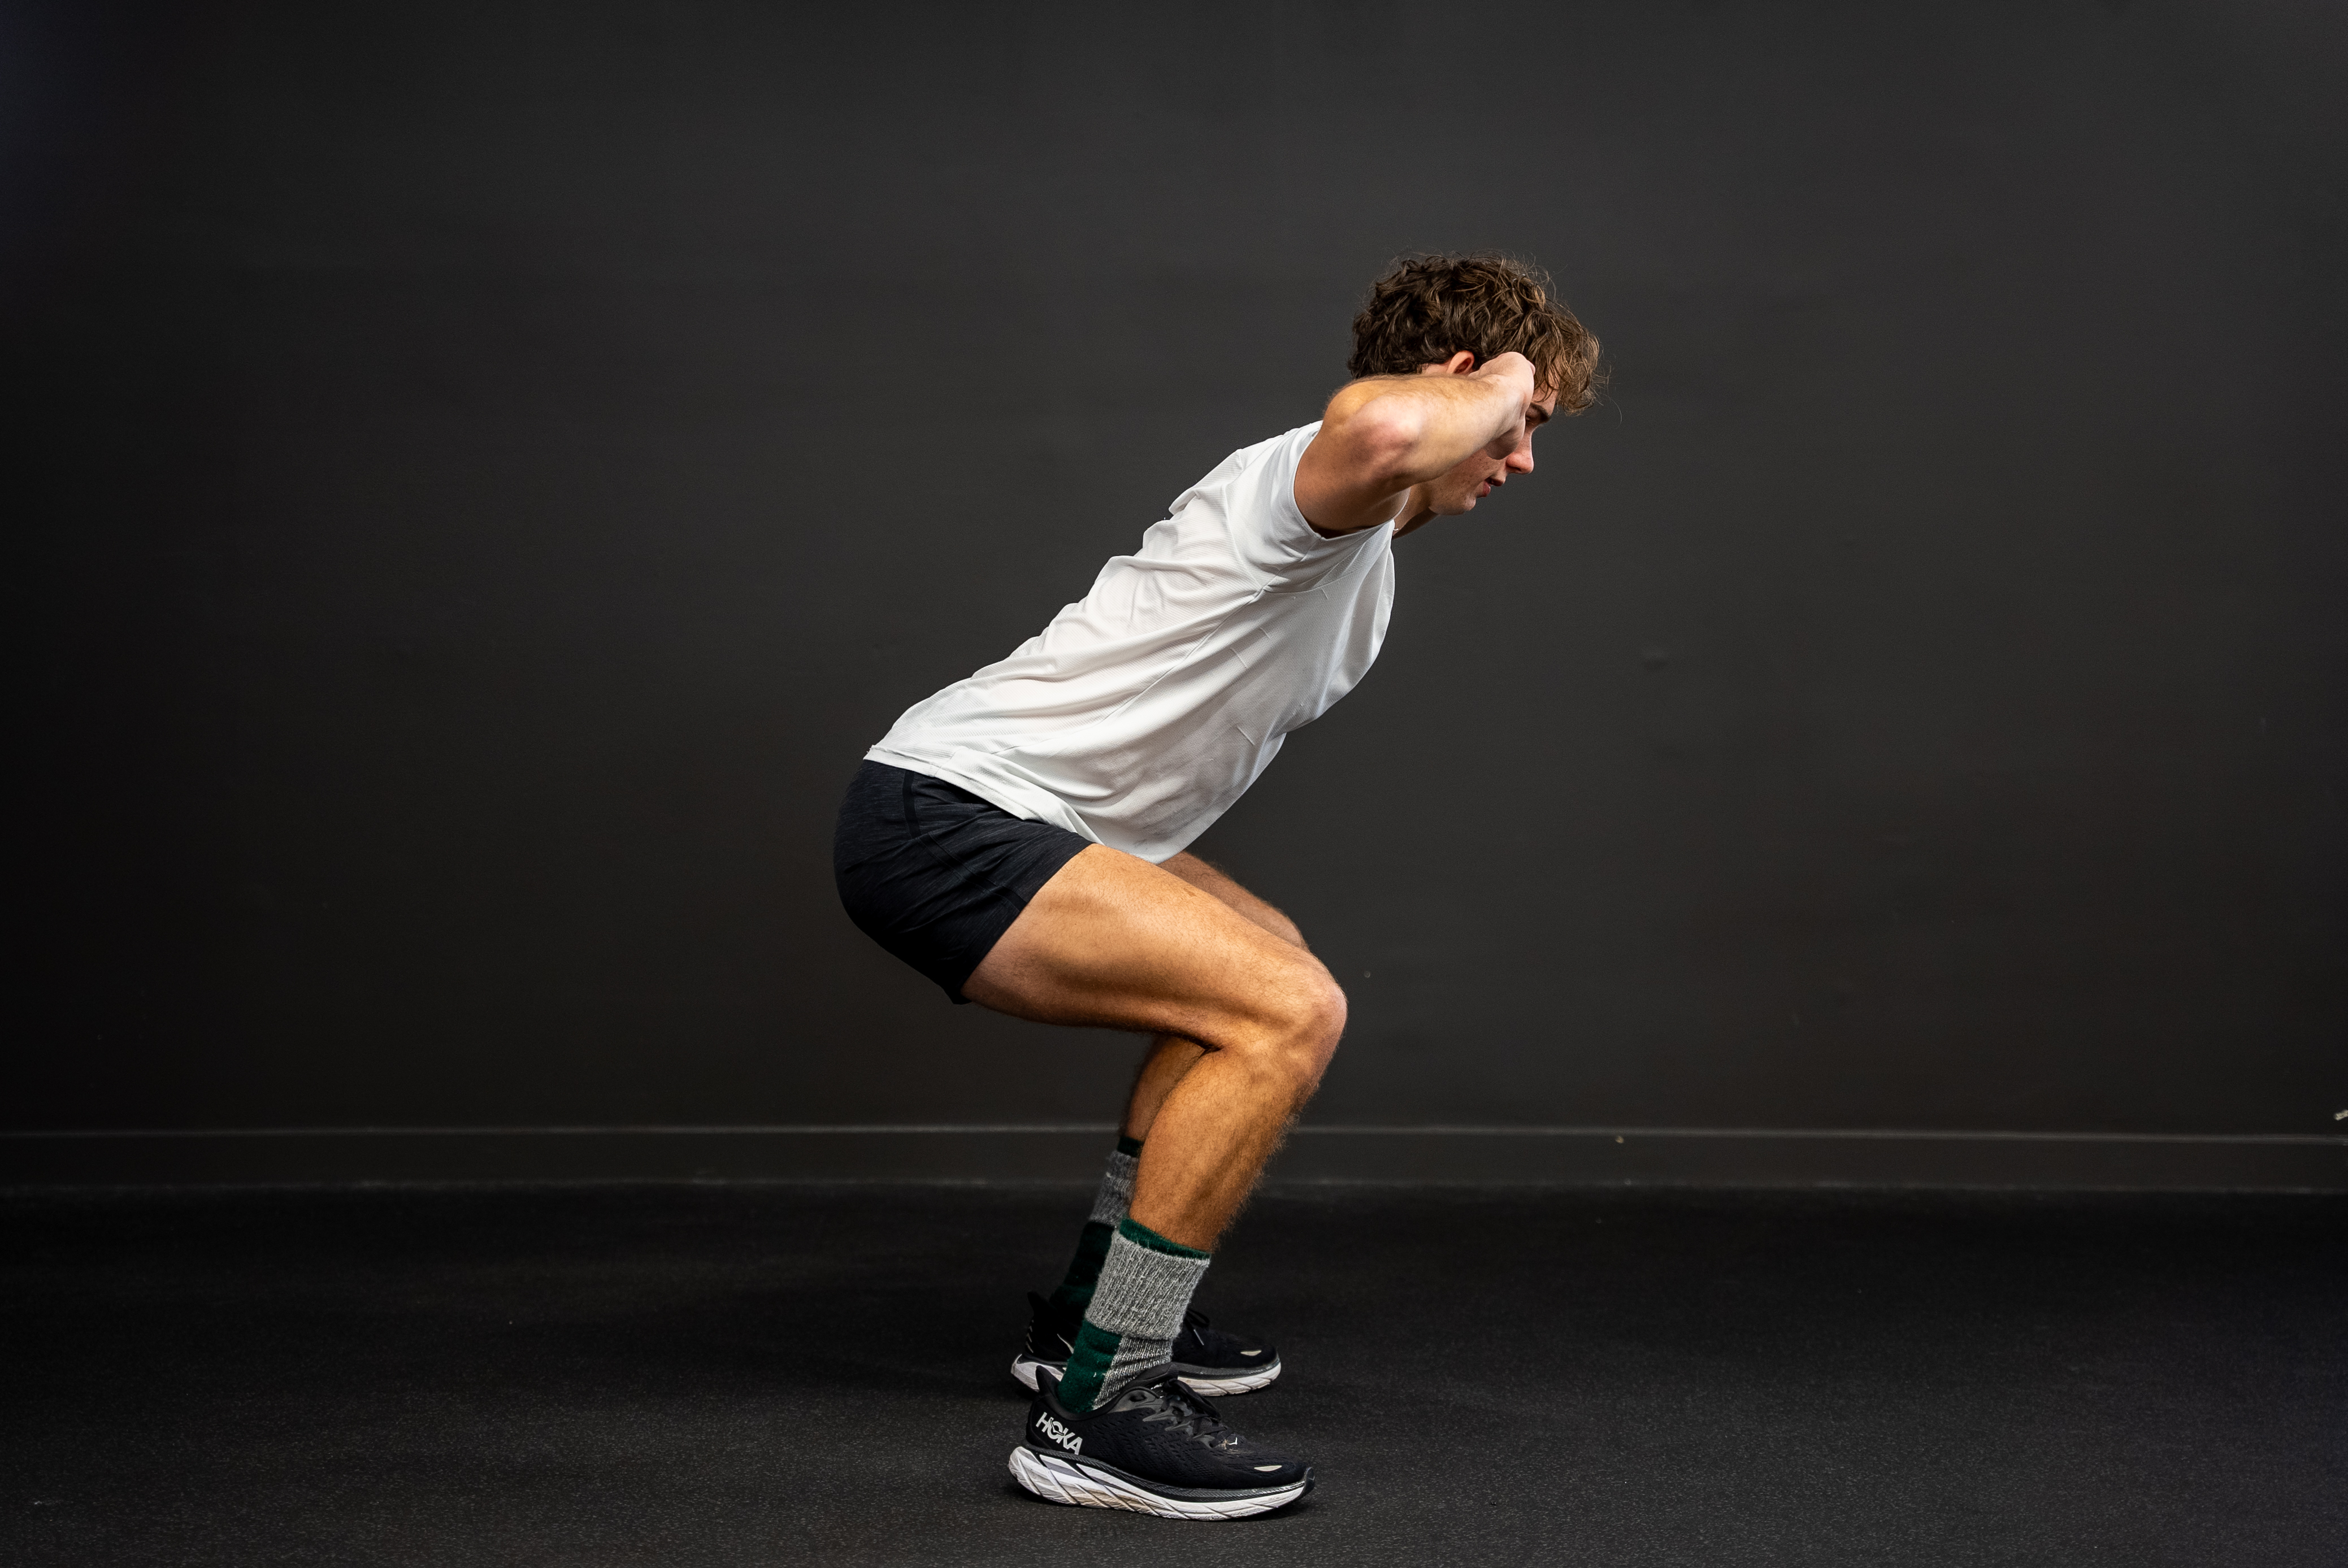
Body Weight Squat Perform a body weight squat with your fingertips on the side of your head. Squat as low as you can comfortably. |
|
|
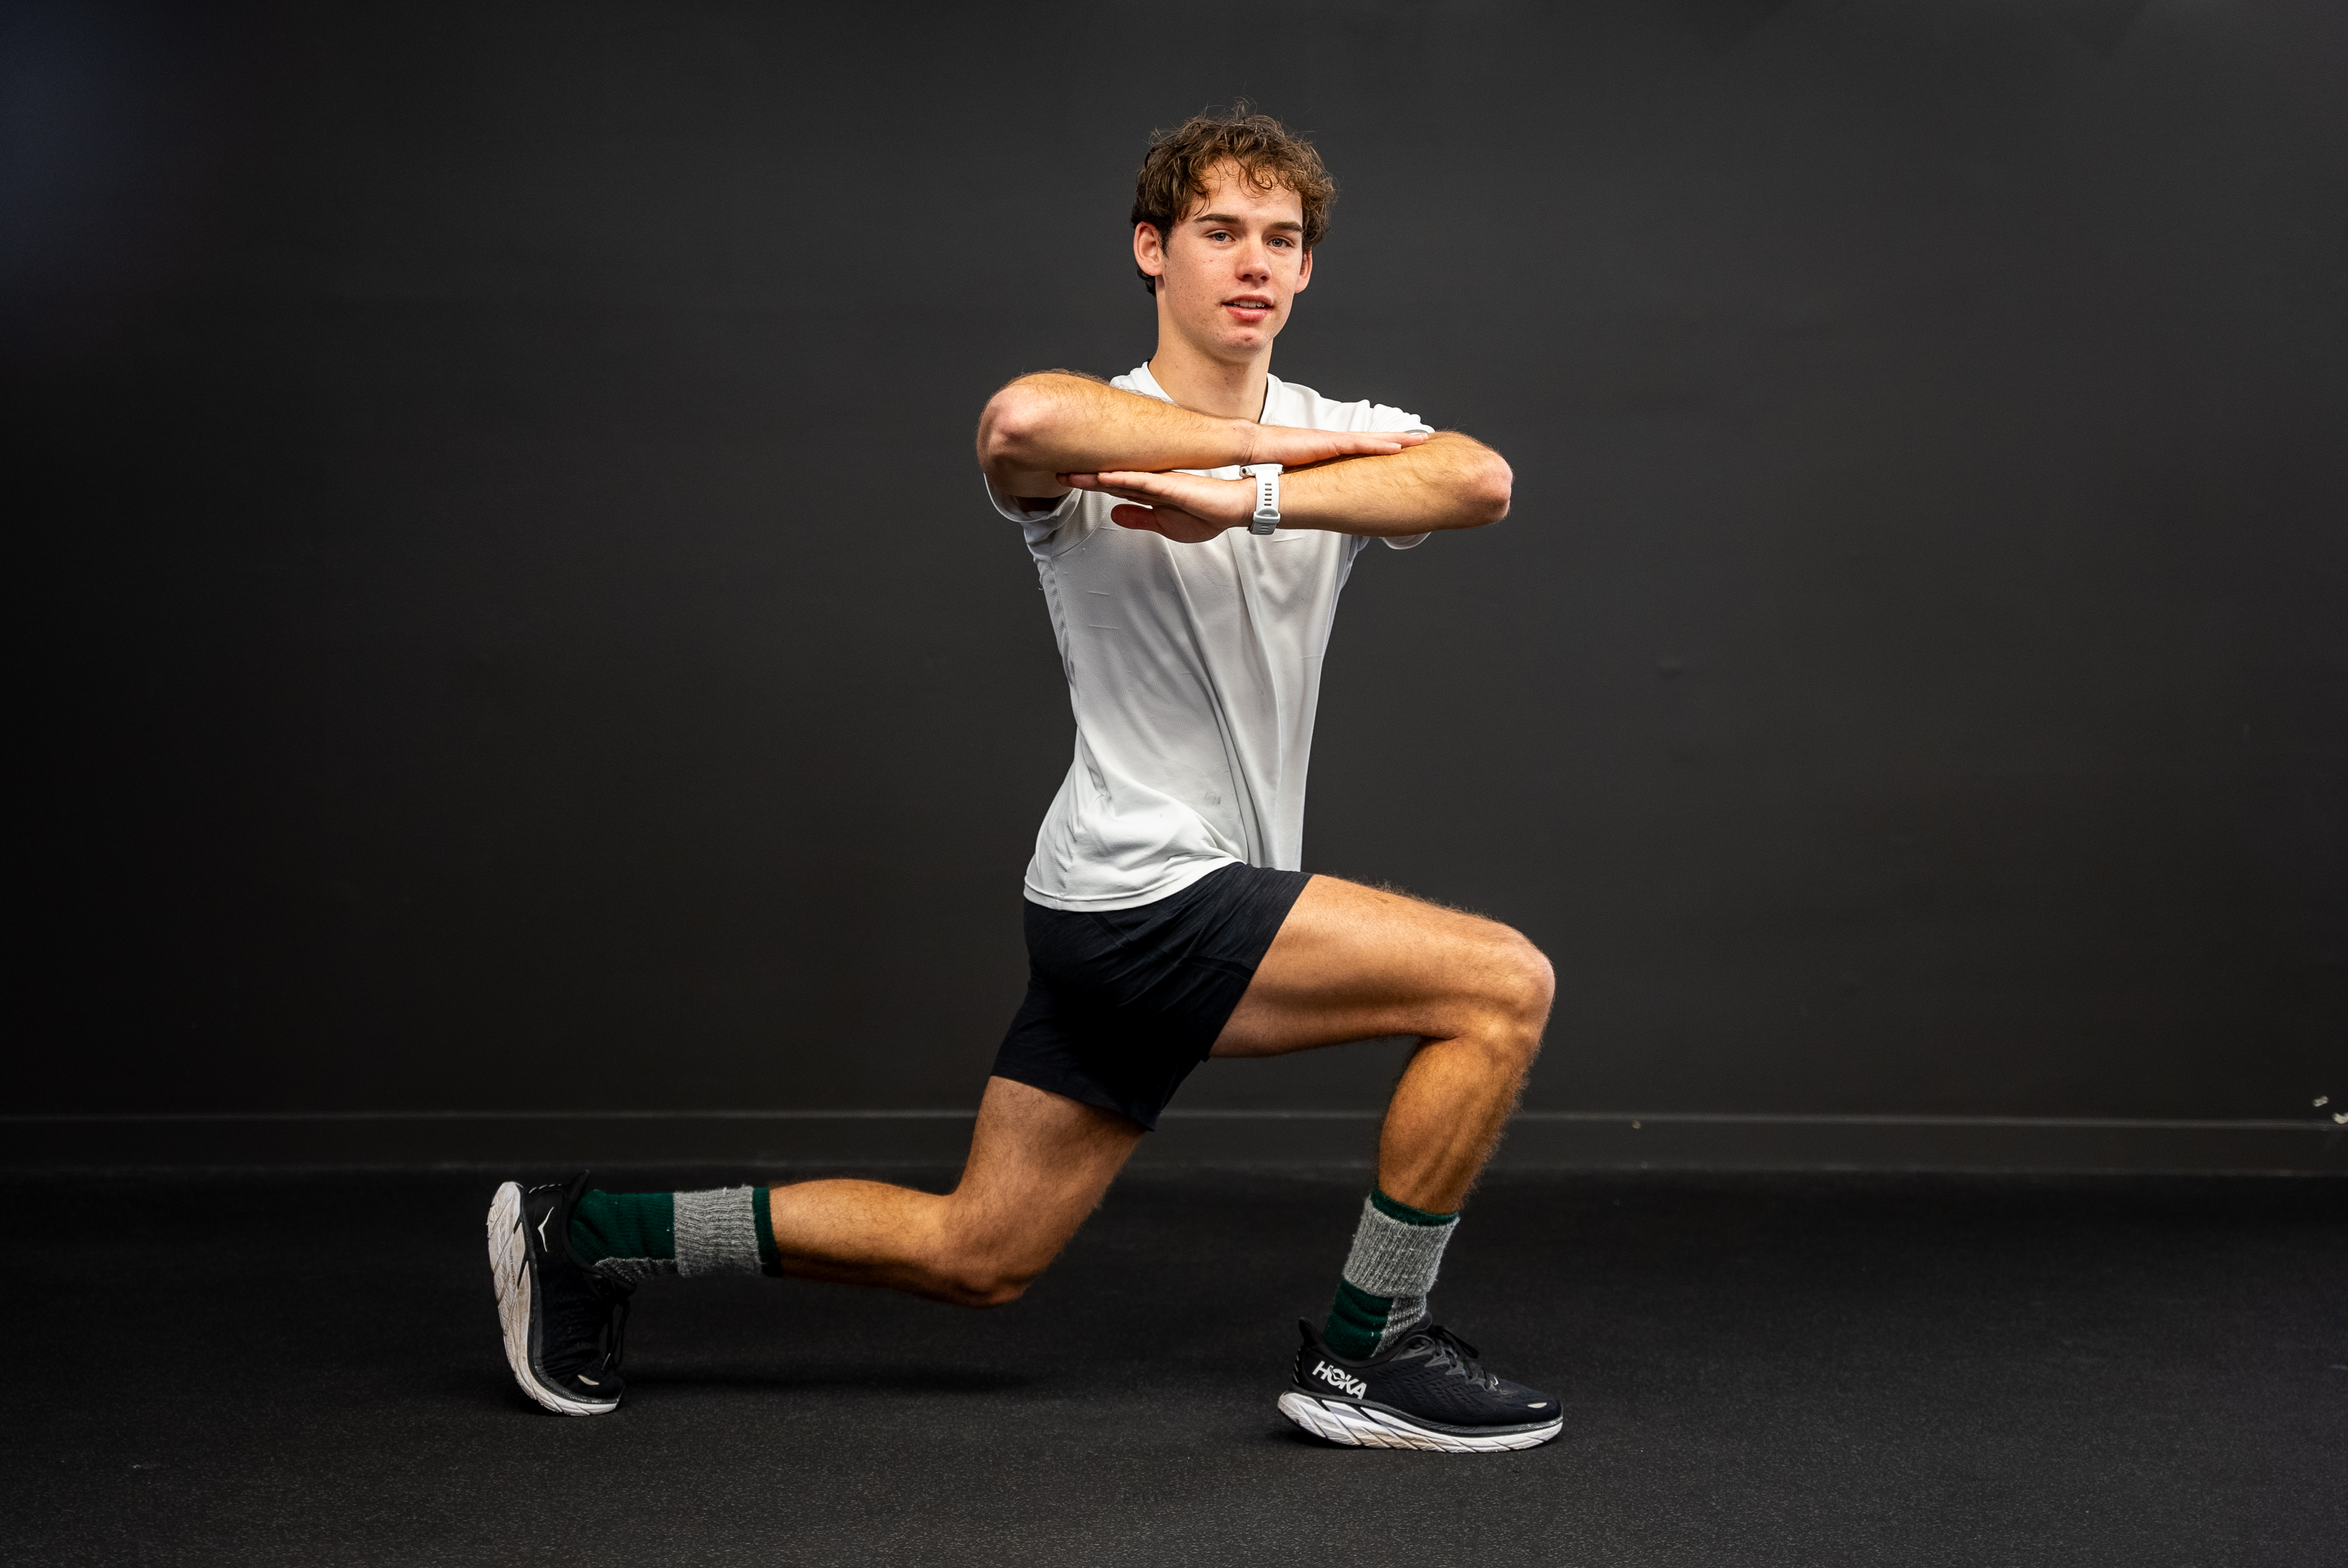
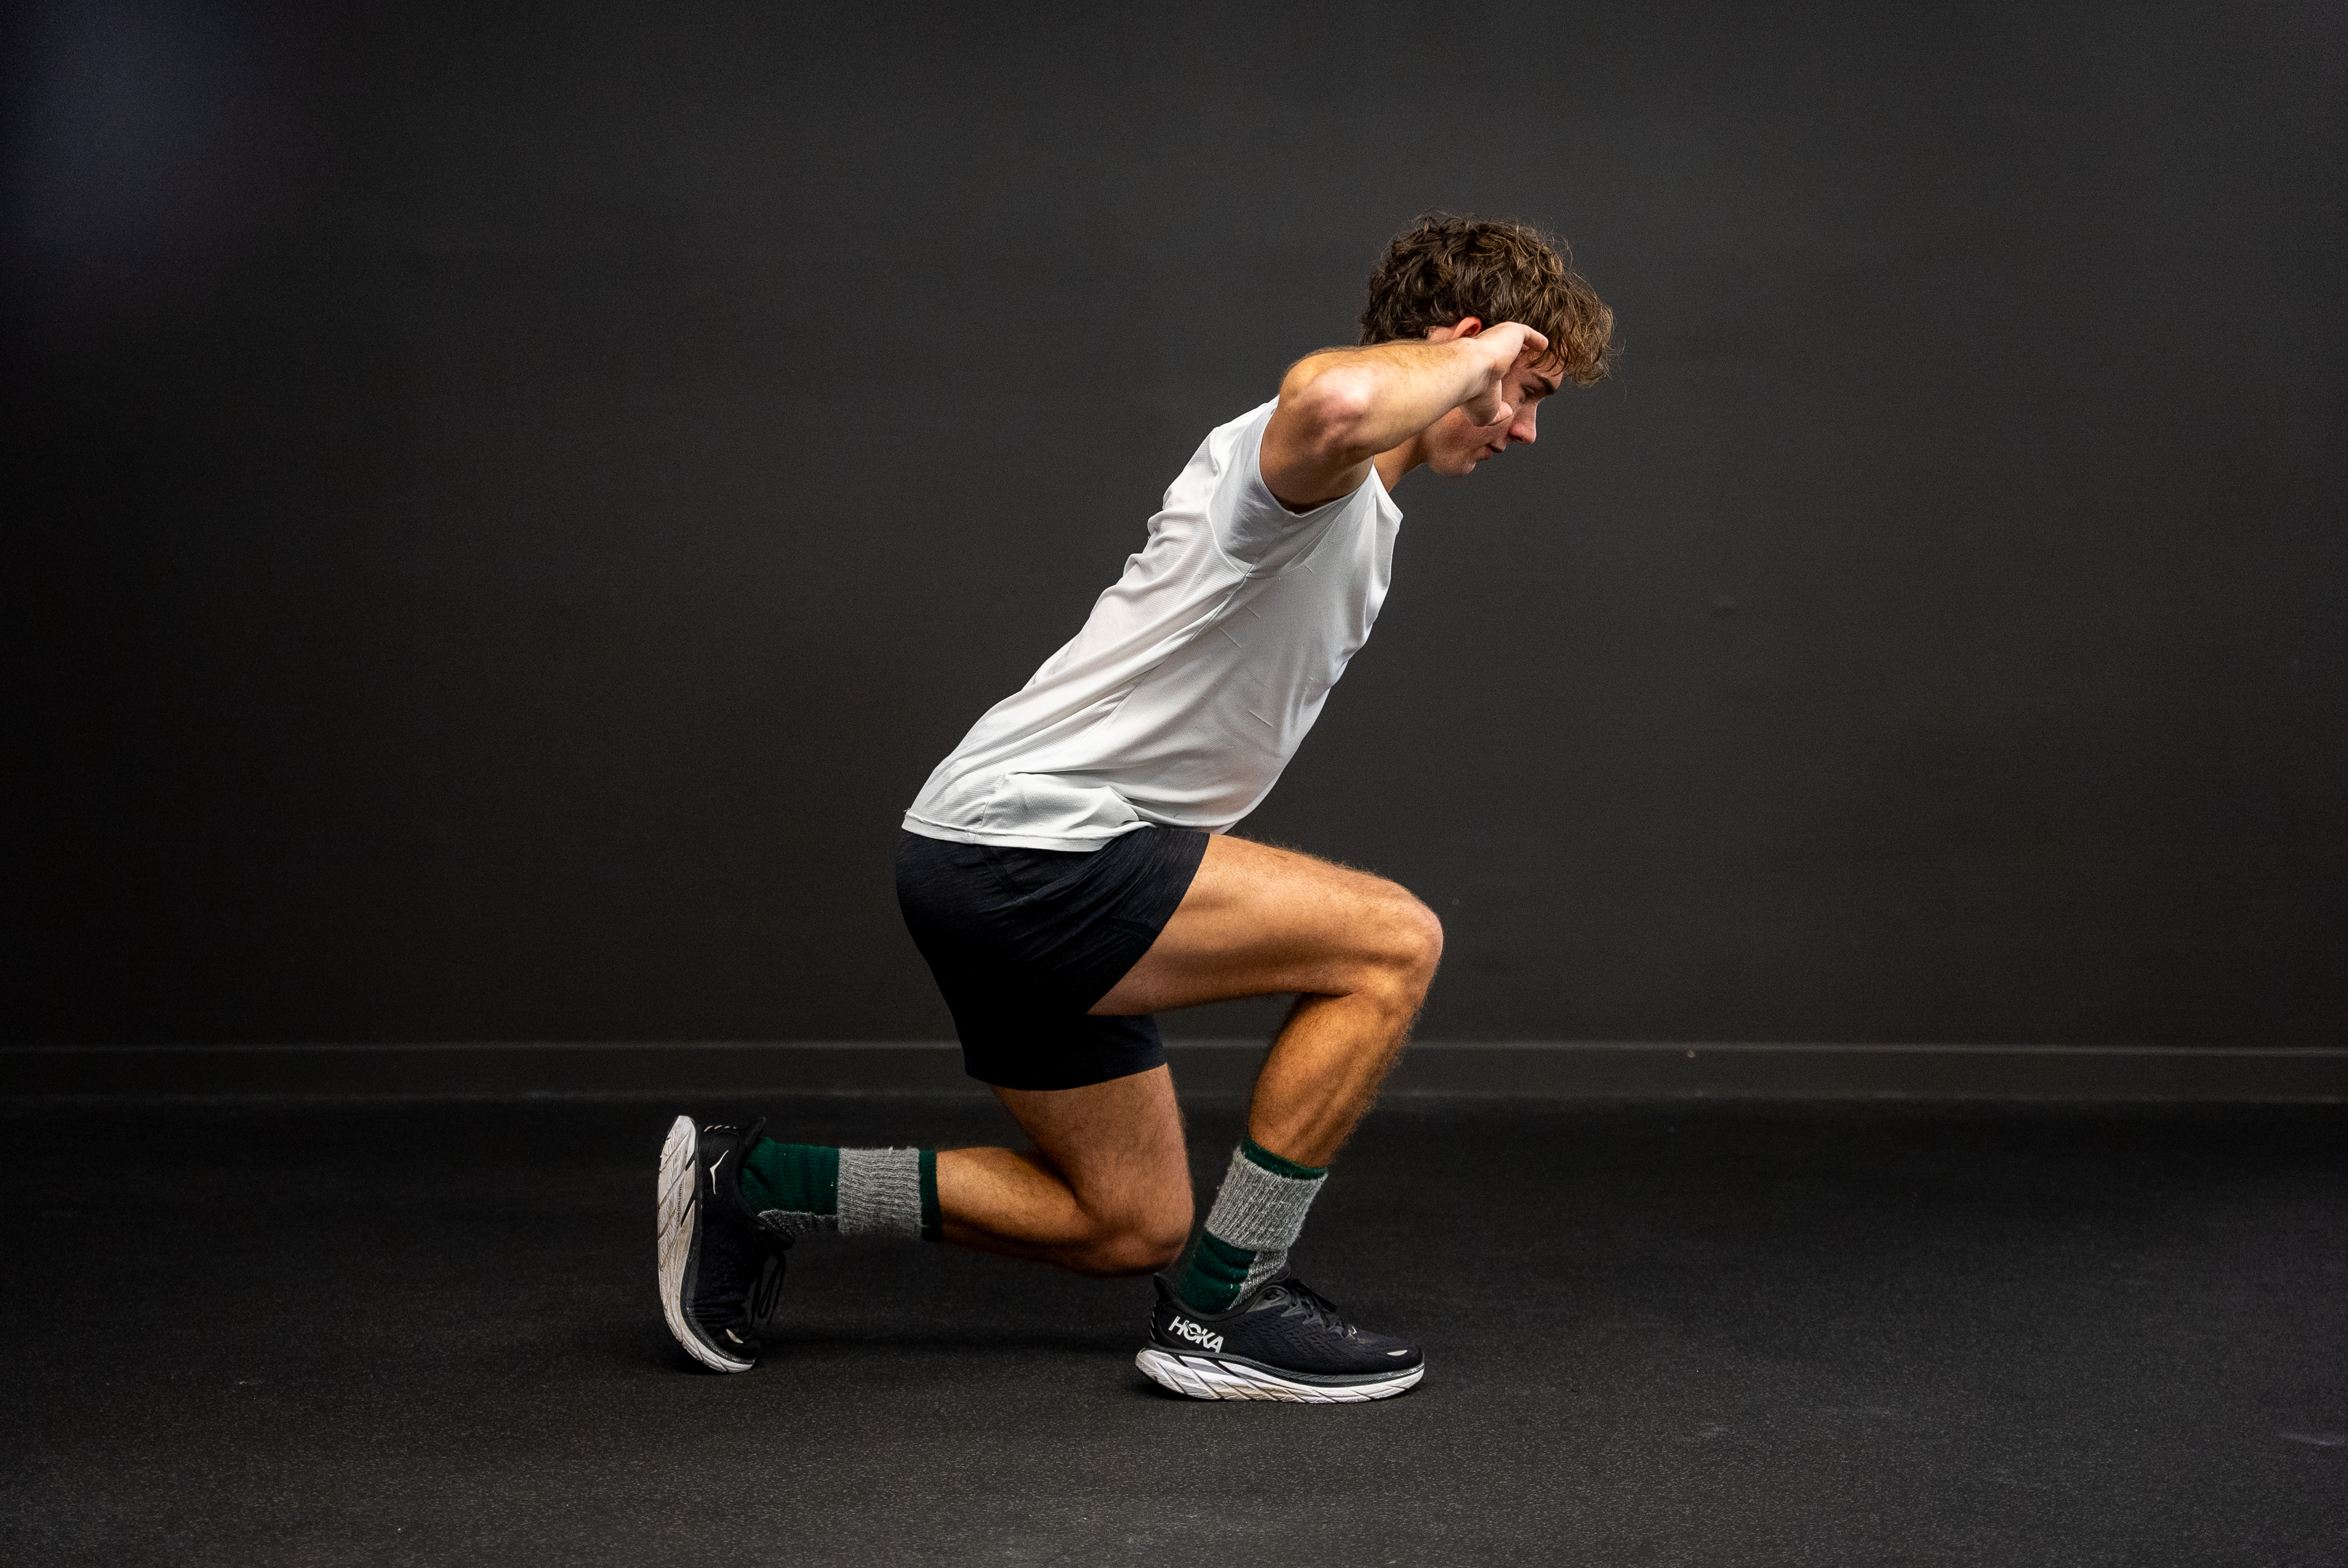
Lunge and Twist Cross your arms and place your hands on your shoulders with your elbows pointing straight ahead. Perform a forward lunge then rotate toward the forward knee. Just rotate toward the knee then return to centre and return to the standing position. Alternate legs with each rep. |
|
|
Push Up Perform a standard push up |
|
|
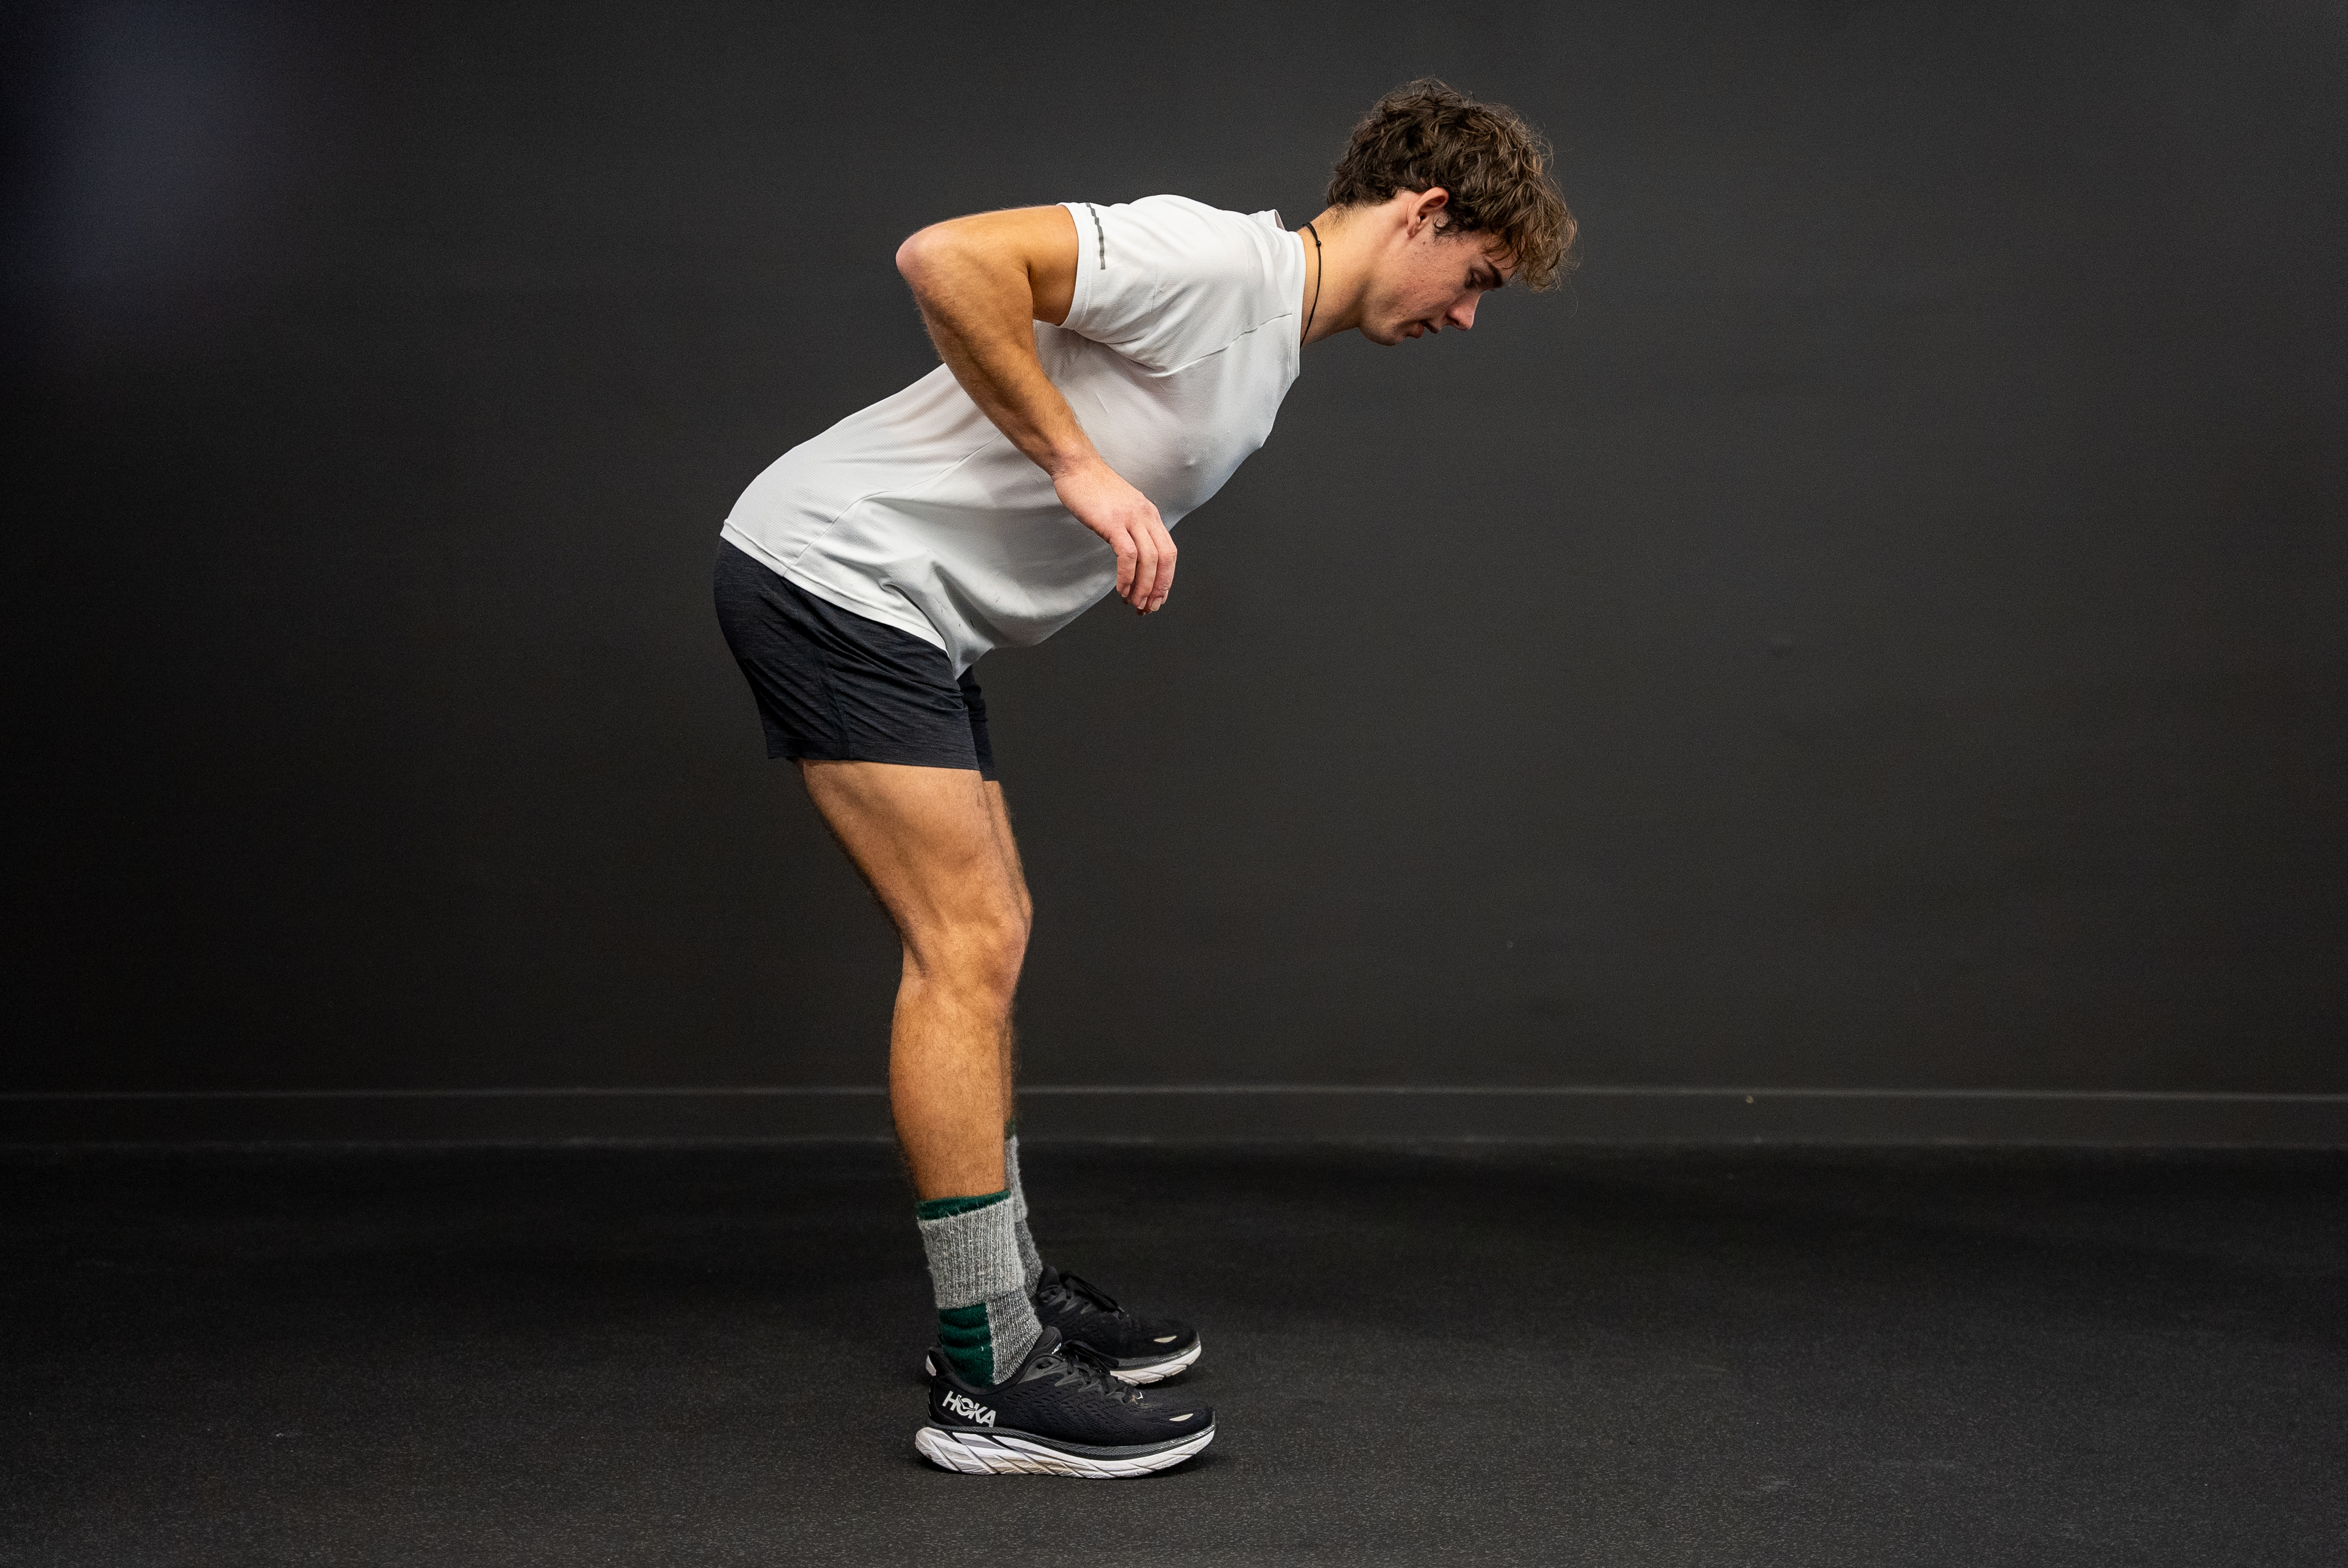
Bend and Pull Start with your arms stretched overhead. Bend forward allowing your arms to drop under your trunk. Pull your hands into your body as if you were holding onto a bar and performing a barbell rowing exercise. Return to the start position with your arms stretched overhead. |
|
|
Single Leg Squat Perform a single leg body weight squat with your fingertips on the side of your head and the non-stance leg positioned behind the body. Squat as low as you can comfortably |

Source: https://websites.mygameday.app/get_file.cgi?id=1454102
Developed from work by Matthew Kritz (2015) The Movement Competency Screen (MCS).
Below, you'll find a video demonstrating the MCS analysis movements, complete with valuable tips for a few of these actions. It's important to keep in mind that the athlete in the video isn't showcasing flawless form- she's being analysed. Nevertheless, the video serves as an excellent guide for proper setup and execution of these movements.
Video source: Matt Kritz, (2015)
Record the client performing each movement
Record a video of the client performing three repetitions of each movement from an anterior and lateral perspective. The client should perform a quality warm-up prior to completing the MCS. Ensure good lighting and make sure the client is wearing clothing that is conducive to analysis, allowing you to see the key joints and movements. Even if you become well-practiced with MCS analysis and feel there is no need for a video, video is a useful tool for showing clients where their movement dysfunction lies. It is a good idea to let the client practice each movement for a few repetitions to understand the neuromuscular requirements for each.
Analyse the client’s movement competency
Use the MCS screening sheet to analyse the client's movement competency in each of the movement patterns. The MCS screening sheet comes complete with a set of screening criteria for correct movement patterns at each key joint or body part included in the movement. These criteria can then be used to identify where movement dysfunction exists in the body.
| Movement Pattern | Screening Criteria |
|---|---|
| SQUAT | Head: Centred. Shoulders: Held down and away from the ears. Elbows should be kept behind the ears throughout the squat. Lumbar Spine: Maintained in a neutral position throughout the squat. Hips: Movement originates from here. They should be aligned, and extension should be evident. Knees: Stable and aligned with the hips and ankles. Ankles/Feet: Aligned with the knees and hips. The heels should remain in contact with the ground at the bottom of the squat and appear stable. Depth: Thighs at least parallel to the ground. Balance: Maintained throughout the squat. No lateral shifts should occur. |
| LUNGE AND TWIST | Head: Centred. Shoulders: Held down and away from the ears. Rotation occurs in the thoracic region of the spine. Lumbar Spine: Maintained in a neutral position. It should not hyper-extend during the lunge or flex laterally during the twist. It should appear stable during rotation. Hips: Kept at a horizontal level throughout. They should accommodate the stance width with obvious mobility. Knees: Aligned with the shoulders, hips and feet, Both the front and back leg should achieve 90 degrees of flexion. Ankles/Feet: The heel of lead leg should remain in contact with the floor, while the trail foot should be flexed and balanced on the forefoot. Depth: The lead thigh should be parallel to the ground. Balance: Maintained for each leg. |
| PUSH UP | Head: Centred. Shoulders: Held down and away from the ears, with hands positioned directly under the shoulders. The scapulae should be in a good, retracted position at the start. Ensure smooth and rhythmic movement throughout. Lumbar Spine: Maintain a neutral position, without extending or flexing during the movement. Hips: Align them with the trunk and hold them stable. Knees: Keep them stable. Ankles: Align them properly. Feet: Align them properly. Depth: Lower the chest to touch the floor. Balance: Maintain balance throughout. |
| BEND AND PULL | Head: Centred and moves with the trunk. Shoulders: Held down and away from the ears when the arms are extended in a row. The scapulae should remain in a good starting position as the hands drop below the torso to begin the pull. The scapulae should move smoothly and in a balanced fashion during the pull, with obvious protraction and retraction. Lumbar Spine: Maintain a neutral spine maintained during the bend. Avoid flexion during the bend and hyper-extension during standing. Hips: Initiate the bend from the hips with no shifting to the left or right. Maintain proper pelvis positioning during the movement. Knees: Keep the aligned and avoid hyper-extension. Ankles: Align them properly. Feet: Align them properly. Depth: Lower the trunk parallel to the ground during the bend. Balance: Maintain balance throughout. |
| SINGLE LEG SQUAT | Head: Centred. Shoulders: Held down and away from the ears. Keep the elbows positioned behind the ears throughout the squat. Lumbar Spine: Maintain a neutral position throughout the squat. Hips: Movement initiates from the hips. They should be aligned and exhibit obvious extension. Knees: Keep them stable and aligned with the hips and ankles. Ankles: Align them with the knees and hips. Feet: The heels should remain in contact with the ground at the bottom of the squat and appear stable. Depth: Ensure the thigh is parallel to the ground. Balance: Maintain balance for each leg. |
Source: https://websites.mygameday.app/get_file.cgi?id=1454102
Developed from work by Matthew Kritz (2015) The Movement Competency Screen (MCS).
Score each movement
Once you have identified the areas in which your client's movement patterns do not match the screening criteria, use the next page of the screening document to identify the primary and secondary issues by circling or checking the corresponding issue area. The "bend and pull" movement's bend and pull portions are evaluated separately on the scoring sheet.
| Pattern | Primary | Check | Secondary | Check | Load Level | Comments |
|---|---|---|---|---|---|---|
| SQUAT |
Shoulders Lumbar Hips Ankles/feet |
Yes/No |
Head Knees Depth Balance |
Yes/No |
1 2 3 |
|
| Yes/No | Yes/No | |||||
| Yes/No | Yes/No | |||||
| Yes/No | Yes/No | |||||
|
LUNGE & TWIST |
Balance Lumbar Hips Ankles/feet |
Yes/No |
Head Knees Depth |
Yes/No |
1 2 3 |
|
| Yes/No | Yes/No | |||||
| Yes/No | Yes/No | |||||
| Yes/No | - | |||||
| LUNGE & TWIST (The Twist) |
Shoulders Lumbar Hips Ankles/feet |
Yes/No |
Head Knees Depth Balance |
Yes/No |
1 2 3 |
|
| Yes/No | Yes/No | |||||
| Yes/No | Yes/No | |||||
| Yes/No | Yes/No | |||||
| BEND & PULL (The Pull) |
Shoulders Lumbar Hips Depth |
Yes/No |
Head Knees Ankles/feet Balance |
Yes/No |
1 2 3 |
|
| Yes/No | Yes/No | |||||
| Yes/No | Yes/No | |||||
| Yes/No | Yes/No | |||||
| PUSH UP |
Head Shoulders Lumbar Depth |
Yes/No |
Hips Knees Ankles/feet Balance |
Yes/No |
1 2 3 |
|
| Yes/No | Yes/No | |||||
| Yes/No | Yes/No | |||||
| Yes/No | Yes/No | |||||
| SINGLE LEG SQUAT |
Depth Lumbar Hips Ankles/feet |
Yes/No |
Head Shoulders Knees Balance |
Yes/No |
1 2 3 |
|
| Yes/No | Yes/No | |||||
| Yes/No | Yes/No | |||||
| Yes/No | Yes/No |
Source: https://websites.mygameday.app/get_file.cgi?id=1454102
Developed from work by Matthew Kritz (2015) The Movement Competency Screen (MCS).
Allocate a load level
You can use the following instructions to determine the load level for each movement pattern. The load level indicates the safe level of resistance to be used for a specific movement pattern with a particular client. You can also add comments in the Comments column for future reference. The following table illustrates that if a client's movement pattern exhibits more than two primary issues or four secondary issues, they would be assigned Load Level 1. Load Level 2 would be appropriate if there is one primary issue and/or 1-3 secondary issues, while Load Level 3 would be assigned when no primary issues are observed and there are fewer than two secondary issues.
| Scoring Instructions | ||||
|---|---|---|---|---|
| Load Level | Primary | Secondary | Considerations | |
| 1 | 2 + | and/or | 4 | The numbers in the PRIMARY and SECONDARY columns depict the number of areas that were marked during the screen. Select the 1, 2 or 3 in the Load Level column after adding up the checked areas for each pattern. |
| 2 | 1 | and/or | 0-3 | |
| 3 | 0 | and/or | 0‐2 | |
| Scoring | ||||
| Good | Moderate | Poor | ||
| 17-21 | 11-16 | 7-10 | ||
Source: https://websites.mygameday.app/get_file.cgi?id=1454102
Developed from work by Matthew Kritz (2015) The Movement Competency Screen (MCS).
The load levels reflect the level of resistance that your client is ready for in order to challenge the pattern in a progressive and safe manner. These load levels indicate the following levels of resistance:
Load Level 1: Assisted Load
Load Level 2: Body weight Load
Load Level 3: External loading
The objective of progressing a pattern with an accommodating load is to challenge the pattern with a resistance that promotes good mechanics. In other words, use a load level that allows the client to perform the fundamental pattern correctly. Load Level 1 assists the pattern by reducing the force of body weight. Load Level 2 challenges the pattern using the force of body weight. Load Level 3 introduces modalities that provide additional external resistance, such as free weights or barbells.
For example, in the case of squats:
Load Level 1: TRX squat (where body weight is reduced by utilizing the upper body for support)
Load Level 2: Body weight squat
Load Level 3: Goblet Squat with a 12kg kettlebell
Download the following example of a completed MCS screening. As you can see, areas of issue have been indicated. During the squat movement, issues were noted at the shoulder, lumbar spine, and hips (primary), along with the knees (secondary). Based on the scoring system, the client's squat was assigned a Load Level 1 as they had three primary and one secondary issue in their pattern. This means the client should begin with assisted squat movements only.
Click the following to download: Movement Competency Screening Template- completed example.
Source: https://websites.mygameday.app/get_file.cgi?id=1454102
Developed from work by Matthew Kritz (2015) The Movement Competency Screen (MCS).
Try it out
Like any process, practice is the key to proficient use of this screening tool. In this practice task, you will be presented with short video clips of a client performing key movements from the MCS screening process. These videos will showcase the client performing the movements poorly. Your challenge is to use the screening criteria to identify where you believe dysfunction is present in the movement. After watching the videos, you will answer questions based on the criteria to assess the client's movement quality.
Time to put all you have learned into practice. The final assessment case study task will be performed on a real "client."
Your task is to conduct a static postural assessment using the New York Posture Rating Test and a functional assessment using the Movement Competency Screening tool on this client.
Head to your assessment for an assessment guide video and instructions on submitting your assessments. The assessment guide video explains your assessment task, which requires you to use the information you have learned on this topic to evaluate a real client's static posture and movement competency. In this assessment, you are asked to complete the following tasks:
- Mark a client using the techniques learned in this module and take appropriate photographs of the client's posture from an anterior, posterior, and lateral perspective.
- Upload the images of your client using the process learned in this module and conduct a New York Posture Rating Test on the client's posture.
- Select two postural issues you believe are at the root of the client's postural issues and suggest the likely muscle imbalances that could be contributing to these issues.
- Conduct relevant functional muscle tests on the client to confirm or rule out the suspected muscle imbalance.
- If a muscle imbalance is confirmed, suggest two corrective exercises to target the improvement. If a muscle imbalance is not confirmed, suggest what other factors may be contributing to the issue.
- Conduct an MCS on your client, including scoring and load level allocation. Comment on the major issues you see in each movement pattern using photographic evidence.
Tip
We've crafted a personalised NZIS MCS template just for you, and it's ready to be downloaded and cherished. Plus, here's the exciting part: you can use this document for Assessment 1D. The choice is yours—print it out for a hands-on experience or seamlessly record your findings right within the PDF using Adobe Acrobat