Animation is a dynamic form of visual communication that brings inanimate objects, characters, or scenes to life.
About this topic
Welcome to Animation, where we will explore the art of using animation to bring your rigged 3D models to life through timing, spacing, and movement. In this topic, we will delve into keyframes, Maya’s Graph Editor, polishing animation, animation cycles, and creating walk cycles. To help you integrate the techniques you will come across, you’ll also practice animating a character’s tail swing.
Animation involves manipulating digital objects or characters to create movement, expression, and storytelling. Animators use specialised software and tools to define and control the motion of objects or characters over time. They create keyframes, which are key positions or poses that define specific moments in the animation, and then interpolate or fill in the in-between frames to create smooth and continuous motion.
Through carefully manipulating timing, spacing, and movement, animators can convey a wide range of ideas, emotions, and storytelling elements.
Games known for their exceptional animation
Several games known for their exceptional animation have received widespread acclaim and positive feedback. Here are three examples:
- God of War (2018): Santa Monica Studio's God of War reboot features stunning animation work. The animations of Kratos and his son Atreus, along with various mythical creatures and enemies, are meticulously crafted and imbued with a sense of weight, fluidity, and impact, enhancing the combat and exploration aspects of the game.
- Ori and the Will of the Wisps: Moon Studios' Ori and the Will of the Wisps is lauded for its fluid and beautifully animated gameplay. The character animations, including Ori's movements, interactions with the environment, and various creature animations, are smooth and visually captivating, contributing to the game's enchanting atmosphere.
- Cuphead: Studio MDHR's Cuphead is celebrated for its hand-drawn animation reminiscent of 1930s cartoons. The game's visuals and animations mimic the style of traditional animation techniques, with characters and environments exuding charm and capturing the essence of classic animated films.
These games represent just a few examples where animation has been highly regarded and received positive feedback from players and critics alike. The dedication to delivering high-quality animation dramatically contributes to the overall immersion, believability, and enjoyment of the gaming experience.

In animation, "keys" refer to the keyframes that mark important positions or poses within an animated sequence. Keyframes are specific frames where the animator defines an object's or character's desired position, orientation, or attribute. These keyframes guide the animation software to calculate and interpolate the movement and appearance of the object or character between the keyframes.
Keyframes are essential for creating smooth and coherent animation. By placing keyframes at strategic points in time, animators can establish the primary poses and movements that define the animation's progression. These keyframes act as reference points that help maintain the overall motion and timing of the animated sequence.
The term "key" in keyframes comes from traditional animation practices, where animators would draw or paint the main frames, or key poses, in a sequence. These key poses represented the most important positions and actions, and the in-between frames were later filled in by assistant animators or through interpolation.
In modern computer animation, keyframes are typically created using animation software. Animators manipulate objects or characters in specific frames, setting attributes such as position, rotation, scale, or facial expressions. The software then automatically calculates the motion and appearance of the object or character between the keyframes, creating a smooth transition from one keyframe to the next.
By adjusting the timing and spacing of the keyframes, animators can control the animation's speed, rhythm, and overall feel. The placement and quality of the keyframes greatly influence the believability and expressiveness of the animated sequence, as they define the major actions, poses, and changes in movement that occur over time.
Editing Keys
Editing keys in animation involves modifying the attributes and timing of keyframes to refine and adjust the animation sequence. To edit keys in Maya, you can follow these steps:
- Open the Animation Editor: In Maya, go to the Animation menu and select Animation Editors. Choose the desired editor, such as the Graph Editor or the Dope Sheet. These editors provide different views and functionalities for editing keys.
- Select the Keyframes: In the Animation Editor, select the keyframes you want to edit. You can click and drag to create a selection box around the desired keyframes or use the Shift or Ctrl/Cmd key along with mouse clicks to add or remove specific keyframes from the selection.
- Modify Keyframe Attributes: Once you have the keyframes selected, you can modify their attributes in various ways. You can directly manipulate the attributes in the Animation Editor by dragging the keyframes, or you can adjust the values in the Attribute Editor or Channel Box. You can modify position, rotation, scale, or any other animated property based on your needs.
- Adjust Timing and Interpolation: In the Animation Editor, you can also adjust the timing and interpolation of the selected keyframes. This includes changing the timing of keyframes by sliding them along the timeline, adjusting the interpolation curves to control the easing and motion between keyframes, or changing the interpolation type to achieve different animation effects.
- Add or Remove Keyframes: To add new keyframes, you can position the time slider at the desired frame and use the Set Key or Auto Keyframe buttons in the Animation menu. To remove keyframes, select them in the Animation Editor and press the Delete key or use the Delete Key command from the Animation menu.
- Preview and Fine-tune: Play back the animation in the Maya viewport or use the playback controls in the Animation menu to review the changes you've made. Continuously iterate and refine the animation by adjusting the keyframes, timing, and interpolation until you achieve the desired result.
Remember to save your animation work regularly to avoid losing any changes. Maya provides a range of tools and functionalities for keyframe editing, so exploring the available options and experimenting with different techniques will help you achieve the desired animation effects in your Maya project.
Tutorial 5a: Navigate the Time Slider and set Keyframes
By the end of this tutorial, you’ll be able to navigate Maya’s Time Slider, set Keyframes, and set the playback speed to create a basic animation with a tennis ball. To work through the tutorial, follow these steps:
- Watch the tutorial’s video below (2min 32sec).
- Interact with the tutorial and Maya.
- Have fun, and ask us if you need any help!
In Maya, the Graph Editor is a powerful tool for visualising and editing animation curves. It provides a graphical representation of the animation curves, allowing you to manipulate and fine-tune the motion of objects or characters in your scene. The Graph Editor gives you precise control over an animation's timing, interpolation, and overall smoothness.
Here are some key features and functions of the Graph Editor:
- Curve Visualization: The Graph Editor displays animation curves as graphical representations, with the horizontal axis representing time and the vertical axis representing the animated attribute (such as position, rotation, or scale). The curves show how the attribute changes over time.
- Keyframe Manipulation: You can select and manipulate individual keyframes within the Graph Editor including moving, scaling, or rotating keyframes to adjust their timing or values. You can also delete or add new keyframes directly in the editor.
- Tangent Manipulation: The Graph Editor allows you to control the tangents of animation curves, which determine the interpolation between keyframes. You can adjust the tangent's shape and angle to control the animation's easing and speed.
- Curve Editing: With the Graph Editor, you can edit animation curves directly by manipulating their shape including modifying the curve's slope, creating smooth or sharp transitions, or adding secondary animation effects such as overshoot or anticipation.
- Value Editing: The Graph Editor can modify the values of animation curves numerically. This ability allows for precise control over an object's exact position, rotation, or other attributes at specific points in time.
- Animation Layer Editing: If you work with animation layers in Maya, the Graph Editor supports editing and blending multiple layers simultaneously. You can adjust the animation's weight, visibility, and timing to create complex animation compositions.
Inside the Graph Editor
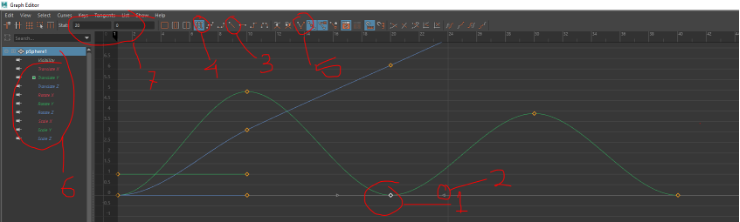
- Key - You can see on what frame the key is on and the value of it on 7 (select the keys to use other tools to work)
- Tangents - This can be moved to fine-tune the curves
- Can break the tangents to give a bouncy or hard-hit type animation
- Set the targets to give ease in ease out animation
- Break the targets so that they can be moved separately
- Shows the graph of each channel that is animated or that has keys.
Tutorial 5b: Adjust the timing of your animation
By the end of this tutorial, you’ll be able to adjust the timing of your animation using Maya’s Time Slider and Graph Editor. To work through the tutorial, follow these steps:
- Watch the tutorial’s video below (3min 42sec).
- Interact with the tutorial and Maya.
- Have fun, and ask us if you need any help!
Polishing animation refers to the process of refining and enhancing an animated sequence to achieve a higher level of quality, visual appeal, and professionalism. It involves fine-tuning various animation elements, addressing any issues or inconsistencies, and adding additional details and polish to create a more polished and refined final result.
To polish your animation in Maya, you can follow these steps:
Remember, polishing animation is an iterative process. It requires careful observation, attention to detail, and a willingness to make adjustments. You can refine your animation skills and create more polished and professional results in Maya with practice and persistence.
Animation cycles, also known as looping animations or repetitive animations, are sequences of animated actions that seamlessly repeat in a continuous loop. These cycles are designed to repeat indefinitely without noticeable breaks or transitions between the end and the beginning, allowing for smooth and uninterrupted playback.
Animation cycles are commonly used in various applications, including video games, films, and interactive media, to create repetitive motions such as walking, running, breathing, or any other action that can be looped seamlessly. They are especially useful for animating characters or objects that require continuous and repetitive movements.
The benefits of using animation cycles include the following:
- Efficiency: Animation cycles can save time and effort by creating reusable animations that can be seamlessly repeated. Instead of animating a full range of unique motions for each instance, a single cycle can be looped to create the illusion of continuous movement.
- Realism: Well-crafted animation cycles can enhance the realism of repetitive actions. By carefully observing and capturing the nuances and variations in the motion, cycles can mimic the natural irregularities in real-life movements, making the animation more believable.
- Smooth Playback: Animation cycles ensure smooth and continuous playback, eliminating any visible seams or disruptions when the animation loops. This seamless looping is important for maintaining immersion and preventing distracting visual glitches.
- Memory Optimisation: In real-time applications like video games, using animation cycles can help optimise memory usage. Instead of storing and loading unique animations for every instance, a single cycle can be shared among multiple characters or objects, reducing the overall memory footprint.
Examples of animation cycles include a character's walk or run cycle, a rotating wheel, a fluttering butterfly's wing motion, or the repetitive swinging of a pendulum.
When creating animation cycles, animators typically focus on capturing the key poses, timing, and motion characteristics of the action they are animating. They ensure that the first and last frames of the animation blend seamlessly, allowing for a smooth transition between the end and the beginning when the cycle loops.
Overall, animation cycles are a valuable technique in animation production, providing efficient and realistic solutions for repetitive motions, enhancing the visual quality of the animation, and optimising memory usage in real-time applications.
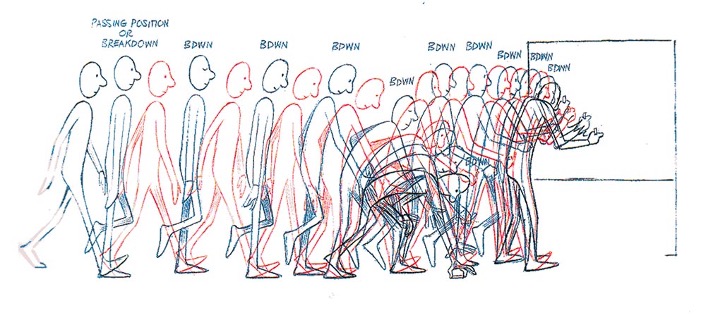
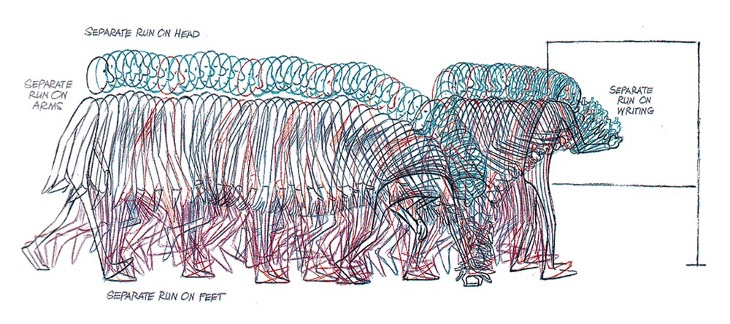
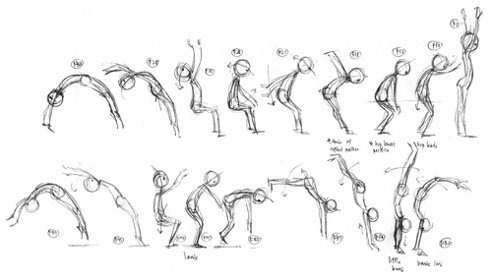
Walk cycles are animation cycles that depict the motion of a character walking. They consist of a series of poses and movements that simulate the natural gait and rhythm of a walking motion.
Here's a general step-by-step guide on how to create a basic walk cycle in Maya:
Remember that creating a convincing walk cycle may require practice and observation of real-life reference footage. Continuously studying human locomotion and refining your animation skills will help you create more lifelike and appealing walk cycles in Maya.
Tutorial 5c: Create a walk cycle animation
Welcome to your final tutorial in this course! By the end of this tutorial, you’ll be able to create a walk cycle animation using Maya, with a proper breakdown and step-by-step animation process.
Remember, in the assessment you need to rig and animate a walk cycle of a biped character. Work through this tutorial carefully, focussing on important steps and useful tips mentioned by the presenter. Pause the video and actively practice the demonstrated techniques yourself as you interact with the tutorial.
To work through the tutorial, follow these steps:
- Watch the tutorial’s video below (50min 11sec).
- Interact with the tutorial and Maya - the video description on YouTube provides timestamps to indicate the starting point for each tutorial component.
- Have fun, and ask us if you need any help!
In this topic, you’ve become familiar with the various tools and techniques animators use to define and control the motions of objects. Now it’s time to practise animating the swing of a character’s tail to identify what you’ve learnt.
Follow the steps below to complete this activity. After selecting a character model with a tail, focus on animating the character’s tail swing movement, editing and refining the animation as needed. Then share your completed tail swing animation with your peers on the designated forum.
- Access Maya: Open Maya on your computer.
- Select a Character Model: Search the Content Browser and choose a character with a tail you want to work with.
- Create a Tail Swing Animation:
- Add tail joints to the rig, identifying the appropriate location for the tail joints and ensuring they are correctly connected to the existing rig.
- Adjust joint settings to ensure smooth and natural movement for the tail swing animation.
- Edit the Animation:
- Use Graph Editor in Maya to set key timeframes for the tail swing animation.
- Move to different frames to adjust tail joint positions to create the desired tail swing movement.
- Refine and Preview the Animation: Make any necessary adjustments to the joint positions or keyframes to refine the animation until you achieve your desired result.
- Share the Tail Swing Animation:
- Record a playbast of your tail swing animation.
- Post a link to your playbast to the forum thread Learning Activity 5: Create and edit a tail swing animation.
- Reflect on the skills you developed or enhanced through the animation process. Highlight any new techniques or strategies you discovered during this activity.
Next steps
Animation breathes life into your rigged models, and in this topic, you've explored the art of keyframing, polishing animation, and creating animation cycles. From Maya's Graph Editor to perfecting walk cycles, you're honing your skills in storytelling through movement, essential to game art.
Animation is all about practising and refining your skills. Take on different animation challenges, experiment with different characters, and bring their personalities to life through movement. Share your animated sequences and seek feedback from your peers to continuously improve and inspire others.
Now that you’re gaining new skills in rigging and animation, it's time to put everything together in the next topic, Practice, where you'll apply your knowledge and creativity to practical exercises, preparing you for this course’s assessment, where you'll rig and animate a character's walk cycle.