Let’s follow the journey through this case study to explore exercise science, its relevance to you as a personal trainer, and how it benefits your clients. By delving into exercise science, you'll gain valuable insights to enhance your services.
Within this case study, we will understand an easy process that you can stick with when applying exercise science in your role as a trainer. For this case study, we are going to go through:
- The scenario
- Anatomical structures
- Common issues
- Functional testing- where you also have the opportunity to experience the tests yourself
- Final analysis
- Case study solution
Let’s begin!
As a trainer we understand the correct set-up, grip, and form of squats. However, you may have noticed that many people at the gym tend to squat differently. Applying the correct technique to ensure maximum benefits and avoid injury is crucial.
A text-book approach to the squat technique will inform you if the squat is performed adequately. The following table describes what techniques will assist in achieving proper form.
| Stance | Grip (high bar) | Upper body | Core and lower body | Depth |
|---|---|---|---|---|
|
|
|
|
|
The question is, can most people meet these criteria considering the functional and structural differences we've talked about?
MEET CARL

Carl is new to the gym and has been doing some introductory resistance training with you over the last few weeks. He is now keen to have a go at getting under the bar and learning how to do a perfect barbell squat.
You explained the setup for the barbell squat and gave Carl an awesome demonstration of what he should be aiming for in his squat technique. Now it was Carl's turn to give it a go.
Unfortunately, it didn't go quite as you had hoped. Carl was only able to squat a little before his back flexed, and the bar tracked noticeably forward. His heels raised from the ground, and he couldn't achieve anywhere near parallel thigh depth.
You also noticed that when he began the upward phase of the movement, he shifted his weight over towards one side.
When Carl attempted to reach proper squat depth, he ended up in a position similar to the following image.
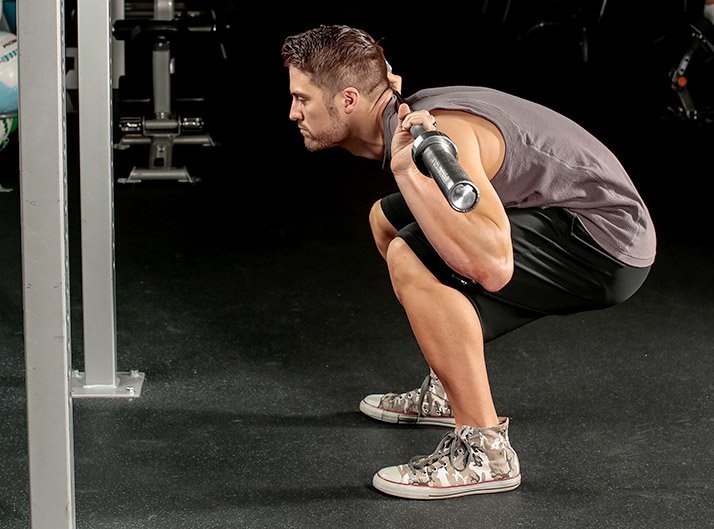
Of course, you tried to improve Carl's technique with appropriate cues, regressions, and physical prompts, but nothing you tried seemed to have a meaningful effect on his technique.
Where do your initial thoughts lead you in terms of identifying the causes of the issues we observed in Carl's technique?
Myer et al (2015) suggests that deficits (in technique) that are commonly associated with poor squat performance can be categorised as either:
- Neuromuscular – Inefficient muscle recruitment or co-ordination (this is common in new lifters who haven’t had time for their neuromuscular system to hone the new skill).
- Muscular – weakness of certain muscles, strength asymmetry (dominant/non-dominant limb) or joint instability
- Mobility – joint immobility or muscle/tendon tightness
Previously, when trainers encountered poor technique like this, their initial thoughts led them towards issues with recruiting the correct muscles. The general assumption is that if the client spent enough time practicing the movement and received excellent coaching, their technique would significantly improve. It is true that practice and quality instruction are necessary for the client to make the required neuromuscular adaptations for efficient movement.
However, movement impairment can also be a result of soft tissue issues, such as tight muscles and tendons. These issues can impede achieving a full range of motion and lead to compensatory movements, which we identify as technique deficiencies. For instance, tight calves can serve as an example of such a limitation.
Kim et al (2015) reported a significant association between ankle dorsiflexion range of motion and squat depth in their study on 101 subjects. Tight calf muscles are thought to limit ankle dorsiflexion which then causes compensatory movements to achieve desired squat depth.
TRY IT OUT
Check out this great tool at My Squat Mechanics
By adjusting the “max ankle flexion” you can see how limiting ankle flexion (dorsiflexion) will increases the forward lean in the model figure located below the scales.
Have a go!
- Adjust the “max ankle flexion” scale (top right), then move the “squat position” scale from “standing to squatting”.
- Adjust the “max ankle flexion” scale again and compare the results.
This is just one isolated example of how a functional issue like tight calves can impact the squat technique. Given the large number of muscles associated with an exercise like the squat, any number of muscle imbalances could be contributing to poor squat form.
Wouldn’t it be nice to have a process you could follow to test Carl’s muscle function and get to the root of the issue?
To address and correct structural or functional issues in any exercises, including Carls, you will require the following:
- A comprehensive understanding of the anatomy associated with the joints we focus on.
- The knowledge of common issues that have potential impact for each joint and how they present.
- The mastering of a range of general and specific functional muscle and neuromuscular tests, you will be equipped to identify potential causes of these issues.
- The skills to identify and implement corrective strategies to improve or resolve the identified issues.
It's important to remember that not all issues can be easily resolved. But what if your functional testing doesn't provide a clear answer or identify the cause of the problem?
In such cases, it's possible that you're dealing with a structural issue. Unfortunately, structural issues are more prevalent than you might realise.
The challenge with structural issues is that many of them cannot be fixed or significantly improved. The reality is that some individuals have limitations that prevent them from performing squats with optimal form.
Why can’t we all squat with “proper form”?
We can’t all squat with “proper form” because of our unique structural or functional differences.
“Proper form” is based on the assumption that we are all symmetrical in terms of our body structure. This simply isn’t the case! Trying to get every client to squat in exactly the same way is a very frustrating and ultimately pointless exercise.
While factors like experience with the squatting exercise play a role in the quality of performance, other factors will likely have a larger influence on squat technique in your clients.
This quote from a blog by Building Better Athletes (2016) sums it up nicely…
"I’ve worked with close to a thousand athlete’s and guess what? They all squat differently....and that’s ok. If I work with a group of 20 athletes and had them all squat with a stance of their own preference, to a depth they are all comfortable with, with a toe angle that allows them the most freedom, you know what I would find? 20 different squats with different widths, foot angles, depths, trunk angles, etc"
Let’s research some possible contributing factors to Carl’s squatting woes!
Structural issues
No two skeletal structures are the same. Significant variations exist among individuals regarding the shape, alignment, positioning, and angles of specific bones and joints. As a result, one person's ability to move a joint can be entirely different from another person’s.
Certain joints have a limited range of motion that ends when bones come into contact with each other. The hip joint is an example of such a joint.
When a range of motion (ROM) is restricted due to bone-to-bone contact, it's impossible to increase the range of motion without causing harm to the joint or forcing neighbouring joints to compensate by increasing their movement.
This is often why we observe individuals leaning forward more during squats as they attempt to achieve a deeper position.
Femoral neck angle and tilt differences
The alignment and positioning of the femoral neck and head can vary, leading to different angles and tilts when they insert into the hip socket, known as the acetabulum. It's important to observe the diverse insertion angles of the femoral head and neck into the socket, which can be posterior or anterior, as depicted in the images below. These variations in insertion angles contribute to the unique structure and movement potential of each individual's hip joint.
Click the arrows below the following images for some of these examples.
Zalawadia et al (2010) demonstrated that a difference in posterior (retroversion) or anterior (anteversion) tilt of the femoral neck and head of as much as 24-degrees was common in humans. The following image shows these differences using three different femurs from humans.
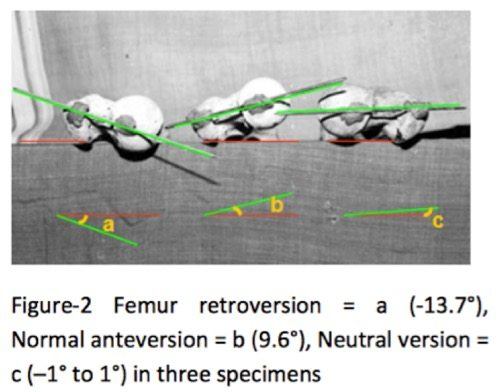
According to the authors, individuals with a posterior tilt of their femoral neck may experience an earlier contact between their femoral head and the pelvic bone compared to those with an anterior tilt. As a result, their range of motion becomes more limited, restricting their ability to perform deep squats without resorting to compensatory movements.
Strength and conditioning coach Dean Somerset (2015) suggested that a variance of up to 20 degrees could be the difference in being able to squat to the floor and being forced to stop at above parallel.
Understanding this concept is important because it sheds light on the underlying factors that can affect an individual's squatting ability. By recognising the impact of femoral neck tilt on the range of motion and the potential need for compensatory movements, we can tailor training strategies and exercises to accommodate each client's unique anatomical characteristics. This knowledge allows us to approach squatting techniques with a greater understanding of the factors that may limit or enhance performance, ultimately helping our clients optimise their training outcomes.
Zalawadia et al (2010) also demonstrated that there were also significant differences in the right and left hip structure on the same subject. The following table shows how common these differences are.
Table-2 Distribution of femoral anteversion angle
| Angle of Anteversion (In degree) | Female | Male | Total % | ||||||
| Left | Right | Left | Right | ||||||
| No. | % | No. | % | No. | % | No. | % | ||
| <0 | 1 | 3.7 | 1 | 4.3 | 1 | 4.5 | 3 | 15 | 6.5 |
| -1 to +1 | 1 | 3.7 | 1 | 4.3 | 2 | 9 | 1 | 5 | 5.4 |
| +5 to +10 | 4 | 14.8 | 2 | 8.6 | 0 | 0 | 2 | 10 | 8.6 |
| +10 to +15 | 3 | 11.1 | 3 | 13 | 3 | 13.6 | 11 | 55 | 33.6 |
| +15 to +20 | 11 | 40.07 | 2 | 8.6 | 9 | 40.9 | 1 | 5 | 25 |
| >20 | 7 | 25.9 | 0 | 0 | 4 | 18.1 | 0 | 0 | 11.9 |
| Zalawadia et al (2010) | |||||||||
In the bottom row you can see that 25.9% of the studies female subjects had an anterior tilt of more than 20 degrees in their left hip, but none of them had an anterior tilt to their femoral neck on the right leg. This likely means that these subjects wouldn’t be able to squat with a standard foot position as the neutral position for individual legs would be somewhat different. It would also mean that one hip would reach its limit for hip flexion sooner than the other, causing compensatory measures to achieve full depth.
These compensatory measures could include things like:
- valgus knees, a medial collapse at the knee (caving in)
- a lateral shift towards the leg with a greater range of motion, or
- increased flexion of the spine.
These are all things that can happen daily with clients in the gym.
Hip Socket and Shape Differences
Laborie et al (2012) noted that anteversion and retroversion aren't strictly contained to the femoral head. It can also be present in the acetabulum (hip socket).
They looked at over 2000 samples of centre-edge angles of the acetabulum and found angles differed from 20.8-45 degrees. The shape of the hip socket will again determine the range of motion the femoral head and neck can achieve without hitting the pelvic bone. Shallower sockets will allow more total range of motion than deep sockets. Those that are deep anteriorly and posteriorly and shallow laterally will mean a person is limited with hip flexion and extension but has a greater range in abduction.
Click the arrows below the following images to view examples of differently shaped hip sockets.
Dr Stuart McGill, considered one of the world’s foremost experts in spinal health, sums this issue up nicely -
"The most important matter on all of this (squat depth) is the depth of the hip socket.....There are groups in the world with very shallow hip sockets (allow greater hip flexion) and some with deep hip sockets (make it difficult for deep hip flexion)."
So, the ability to squat deep with good form seems to be mainly dictated by hip joint structure.
Leg length differences
Another factor to consider, many individuals possess slight differences in leg length! Knutson (2005) looked at leg length and found that about 90% of people have a discrepancy with an average difference of about half a centimetre. If this is a marked difference, it could result in a lateral shift during the squat lift.
In summary, there are issues that you, as a trainer, will have to work around rather than try and fix. Therefore, it makes sense that we will see a range of different techniques used in the gym to accommodate individual issues.
Key takeaways from the anatomical structure in this case study:
- Most of us are asymmetrical.
- Everyone has differences in their hip structure.
- Some people may have actual structural impairments and will never achieve “perfect” form or depth.
According to experts, it is acceptable to deviate from the traditional "proper form" in squats as long as individuals are squatting without pain, maintaining a flat back position, ensuring the bar follows a vertical path, and keeping their knees tracking in line with their toes.
There are some common issues associated with structural limitations and squats. Structural limitations (related to bone structure) are something you cannot change.
Trying to get a client with structural limitations to squat to full depth with “proper form” could cause more harm than good.
If you don’t have the hip structure for squatting low, you will eventually pay the price for trying. Common issues resulting from this include:
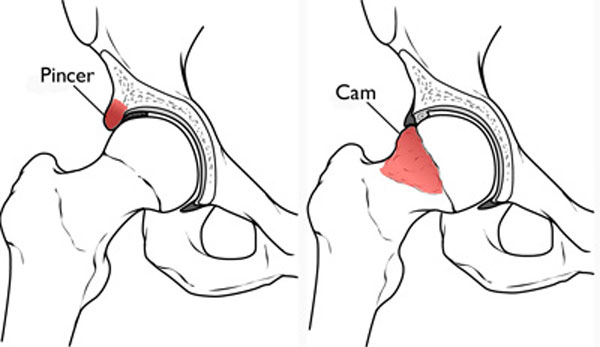
- Femoroacetabular (Cam) impingement
- Pincer lesions (callus formation on the pelvic bone)
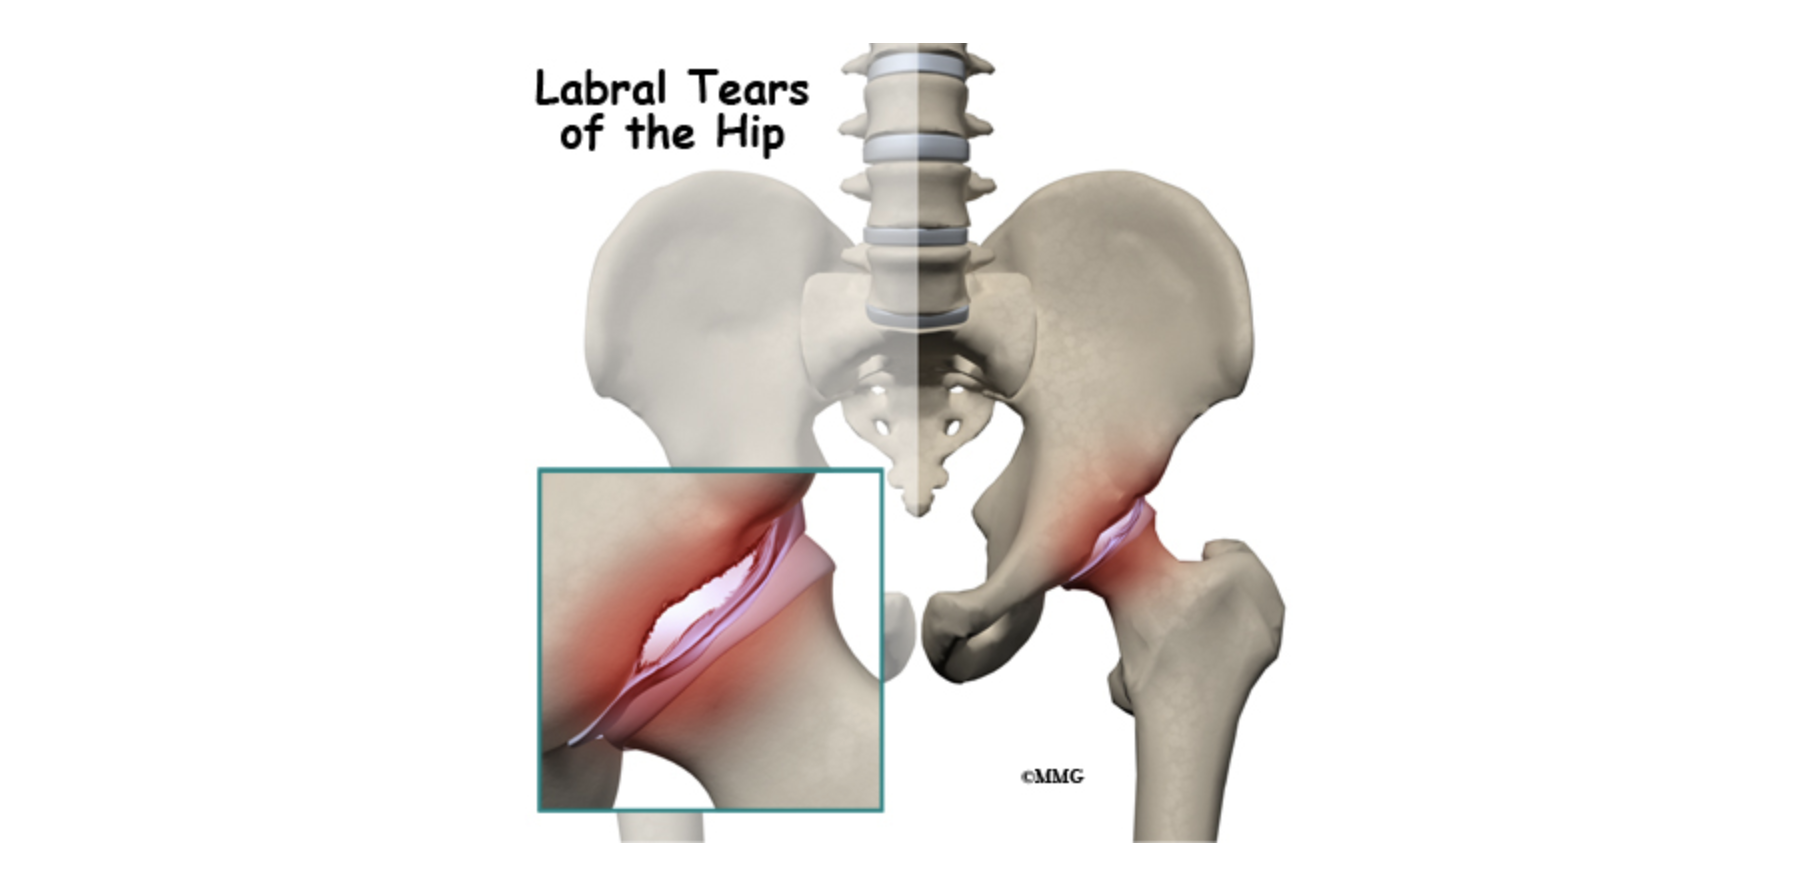
- Labral tears
- Sacro Iliac joint pain
Let's learn more.
Femoroacetabular (Cam) impingement
The femoral head changes shape and grinds against the socket causing irritation of the labrum (a layer of soft tissue that sits between the femoral head and the socket). This video shows the mechanism of hip impingement and the issues it causes.
Pincer lesions (callus formation on the pelvic bone)
Caused by bone-on-bone contact and the body laying down additional calcium deposits as protection. These may need to be surgically removed and can restrict movement altogether.
Labral tears
Tearing of the soft tissue labrum due to grinding of the femoral head into the socket.
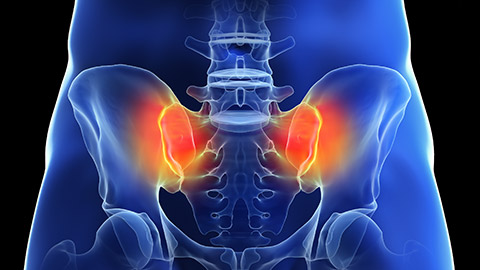
Sacro Iliac joint pain
These are from compensatory movements (particularly excessive forward bend or lateral shift during lift).
The video from Hopkins Medicine gives a comprehensive view of hip impingement. It illustrates clearly how hip impingement is caused, its symptoms and treatments.
How common is this issue?
Fabricant et al (2015) found 37% of asymptomatic individuals (no symptoms) had significant markers of hip impingement. (54.8% in athletes).
Morgan et al (n.d) showed that 47% of people who suffered from SI joint pain had deep hip sockets and impingement.
Ok, so we have established the multiple causes that could be associated with Carl’s poor squat form. He may have a structural limitation, like deep hip sockets. He may have:
- a functional issue like tight calves
- a neuromuscular issue like poor recruitment of key muscles required to squat (e.g. gluteals).
Once we are aware of the possible contributing factors, we need to try and narrow things down a little. Luckily, the experts in our field have developed a range of tests that we, as trainers can use to try and isolate the key factors contributing to poor technique.
Let’s look at a few broad tests related to squatting that can help identify solutions for Carl’s issue. You can use these to begin practicing early on in your learning.
More importantly, these tests can be performed on clients in the gym to immediately optimise their squatting stance and approach given their current issues (i.e. workarounds).
Let’s take a look at the following three tests.
Supported Squat Test: Tests hip flexion range of motion in the squat
This method offers a simple way to determine a client's ideal squat stance and depth while working around their current limitations. By conducting a supported squat test, you can identify the key factors contributing to their issues. This test will help you find their optimal stance and depth, ensuring their back position remains uncompromised during squat exercises.
For some clients, this may mean they can only achieve a parallel squat position or even slightly above parallel. This is perfectly fine and indicates limited hip flexion ability, a structural limitation. The primary goal is to identify a safe range of motion for the client to work within.
Note: It's important to note that the foot positions attained during this test may differ for each client. Remember, this variation can be attributed to the inherent differences in hip structure within individuals, as we have previously learned.
The Hip extension mobility test/ The hip bridge test
This test is designed to assess a client’s ability to extend their hips and their range of motion. The inability to extend the hips may come down to poor recruitment or strength of the gluteal muscles. In squatting, if the gluteals are not firing properly or they are weak, the lower back is often used as a compensatory source of force, and this can lead to back pain.
The Goalie Stretch: Tests lateral hip range of motion
This test assesses a lateral range of motion at the hip. This is a useful test to help determine how wide your stance for squats should be. If a client can achieve considerable range in this movement, it would suggest that their hip socket is shallow laterally, allowing for greater mobility in this plane. If their socket is deeper anteriorly and posteriorly, they will likely find it easier to achieve deeper hip flexion and therefore squat depth with a wider stance.
These three tests can give you a lot of information about a client in a short time:
- What position gives your client the best squat depth (i.e. what is the limit of their ability to go into hip flexion)
- How much hip extension they have (indicative of mobility and gluteal function/strength)
- How much lateral mobility they have.
From this, you can determine whether they have a lot of mobility, a specific directional limitation, or are generally limited in hip mobility. It will also help you determine a squatting stance allowing them to squat safely.
Analysing your tests
Here is a useful way of analysing the results of the three tests and what they mean for you and your clients.
- Suppose your client struggles with all three tests (i.e. they have low flexion, extension and lateral movement). This means that, likely, achieving depth with good form will always be an issue for your client. Doing partial squats to a box may be their reality.
- If the test show that your client has good flexion but low extension and lateral movement.
While clients should be able to perform squats effectively, it is possible for them to experience issues where their back becomes excessively engaged during exercises. Shoulder width stance will be fine for your client, but going wider than this will probably cause some lateral hip discomfort.
- If your client's results indicate that they have good flexion, low extension, and good lateral movement.
They can pick their squat stance from a wide array of possibilities and still squat to good depth without compromising their back position. - If your client has low flexion, low extension, and high lateral movement.
They can squat deep but need a wider stance to maintain their back position. If they try to squat with a slightly wider than shoulder width, they will lose their ability to squat to depth without compromising back position. - On the other hand, if the three tests showed your client had great flexion, high extension and lateral movement, and very mobile hips!
Your client can pretty much adopt any stance they like (including very narrow stances) and will have no problem achieving good depth while maintaining form.
Analysing the Overhead Squat test
Another broad testing tool that can be used to identify factors contributing to squat performance is the overhead squat test. This testing tool is actually a subjective screening tool that trainers commonly use to assess total body dynamic posture while squatting.
The test is designed to identify compensatory movements and helps a trainer identify muscle imbalances (over or under-active muscles). The test comes complete with a solutions table that suggests which muscles are over or under-active and offers targeted solution exercises to combat these.
To conduct the overhead squat test, you will need to take three photos (anterior, lateral and posterior) of a client adopting the overhead squat position indicated in the following images:

See the following process and steps:
- Collecting the data
Conduct a meaningful warm-up with the client. Ask the client to remove their shoes, as different types of shoes can shift your weight in certain directions (often forward). It is also important that you can assess how the ankle and foot behave during the testing. Your instructions should be kept simple, and a demonstration of the movement you are looking for is a good idea.
Instruct the client to...- raise their arms straight above their head (upper arms next to ears) and attempt to hold them in that position throughout the test.
- squat as low as they feel comfortable for a few repetitions. If you suspect the client is not performing the movement well due to unfamiliarity with the movement, you may offer coaching and cues.
- perform the movement to the bottom of the squat and hold the position (for a picture to be taken at the bottom of the movement/lowest point of squat).
- turn 90 degrees and repeat the task twice more to get the lateral and posterior views (Note: you can also take a video of the movement and pause the video for scoring/analysis).
- Evaluating the data
You will now evaluate the client’s overhead squat from the three different points of view and compare the client’s performance of the movement against the ‘Overhead Squat Solutions Table’ (National Academy of Sports Medicine) - Observable common issues
The following images depict some compensations you might see when your client performs their overhead squat
Click the arrows below the following images to identify where compensations can be seen during an overhead squat.
4. Evaluation and Correction
Once you have identified the probable issues causing compensation movements, the NASC Solutions Table offers corrective strategies employing the stretch-strength hypothesis (i.e. stretches for the tight muscles, strengthening exercises for the weak muscles). Note: These corrective strategies will be useful in improving functional muscle imbalance but will have no effect if structural issues are present).
Try it out:Self-analysis: Overhead squat
In this activity, self- analysis functional test, you will have the opportunity to dive into the realm of functional testing by trying out the following specific tests:
- Overhead squat.
The purpose of this acitivity is to enhance your understanding of these tests and provide you with firsthand experience of how it feels to perform the overhead squat.
By engaging in this activity, you will learn to analyse the valuable information each test provides, enabling you to assist your clients better.
Moreover, this functional test and others such as the supported squat, hip extension and goalie stretch will serve as a foundation for devising corrective strategies tailored to your clients' needs.
Through this hands-on experience, you will gain a deeper appreciation for the practical application of these tests and their role in developing effective training programmes. Get ready to uncover the insights that functional testing can offer you!
To complete this activity task, you will need the following:
- A phone or camera to collect images as evidence of completion.
- Another person (or stable phone/camera stand) to take the images you need.
- A suitable space to conduct the tests. You don’t need any special equipment, but a space with an uncluttered background is preferred (for clarity of image).
Clothing suggestion
Non-baggy sportswear (it is important we can see body angles). Avoid clothing that restricts movement. Choose a colour that is significantly different from the colour of the background you will be performing the tasks in front of. This helps get a clearer view in the photographic images.
Warm up protocol
Complete the following sequence of events before conducting the Self-analysis: Overhead Squat functional testing.
- 90 secs of heart rate-raising activity
For example, Jogging, brisk walking, running on the spot, cycling erg, rowing machine etc. - Dynamic movements: (20 secs each)
For example, Arm circles forward, arm circles backwards, cross-body arm swings (hug yourself to open wide), leg swings (forward to back – left and right), leg swings (lateral – left and right), high knees, butt flicks, calf pumps. - Activate- Body weight exercises: (10 reps each)
For example, Air squats, elevated (or on knees) push-ups, reverse lunges with torso rotation (both legs), side lunges, and glute bridges. - Practice the movements of the functional test
For example, practice the overhead squat a few times before taking the photographic image.
Try it out: Final analysis
Head to the forum and complete the following:
- If you feel comfortable, add the photographic images of your Overhead squat. (Anterior, lateral and posterior view).
- Describe what you discovered when analysing your own images.
- Based on your analysis, which of the following hip function descriptors do you think you identify most with?
- You have low flexion, extension and lateral movement.
- You have good flexion, low extension and low lateral movement.
- You have good flexion, low extension, and good lateral movement.
- You have low flexion, low extension, and high lateral movement.
- You have great flexion, high extension and high lateral movement. You have very mobile hips!
SOLUTIONS FOR CARL
Great news!
After applying the functional tests on Carl, it appears that Carl may have a structural issue at the hip. His limited flexion and extension, along with good lateral mobility, point towards this. During a supported squat, it became clear that Carl can only squat to parallel and maintain a proper back position when he widens his stance and points his feet outward. Otherwise, he compensates by leaning forward excessively.
Further functional tests indicated that Carl has tight calves and hip flexors, and his gluteus maximus may be weak or not activating properly. To address these issues, you've introduced a wider stance for Carl's squats, which helps him improve his technique and neuromuscular control.
You have instructed that over the next few weeks, Carl focuses on improving his calf and hip-flexor flexibility through targeted stretches and foam roller exercises.
Additionally, you've incorporated specific gluteal exercises into his gym sessions to activate his glutes effectively.
After a few weeks, you have made note that these interventions have resulted in a remarkable improvement in Carl's squatting technique. While he will always need to squat with a wider stance, he can now perform the exercise efficiently and safely.
Let’s continue to learn more into the fascinating world of joint anatomy and common issues related to exercise. Understanding these details is crucial for your journey as a personal trainer. If you enjoyed exploring the functional tests we've covered so far, get ready for more! These tests will set you apart from other trainers, helping you pinpoint the likely causes of your clients' issues. But that's not all. We'll also equip you with corrective strategies to address, improve, or even eliminate these issues. It's an exciting journey of knowledge and practical skills that will empower you in your training career. Let's Get started!