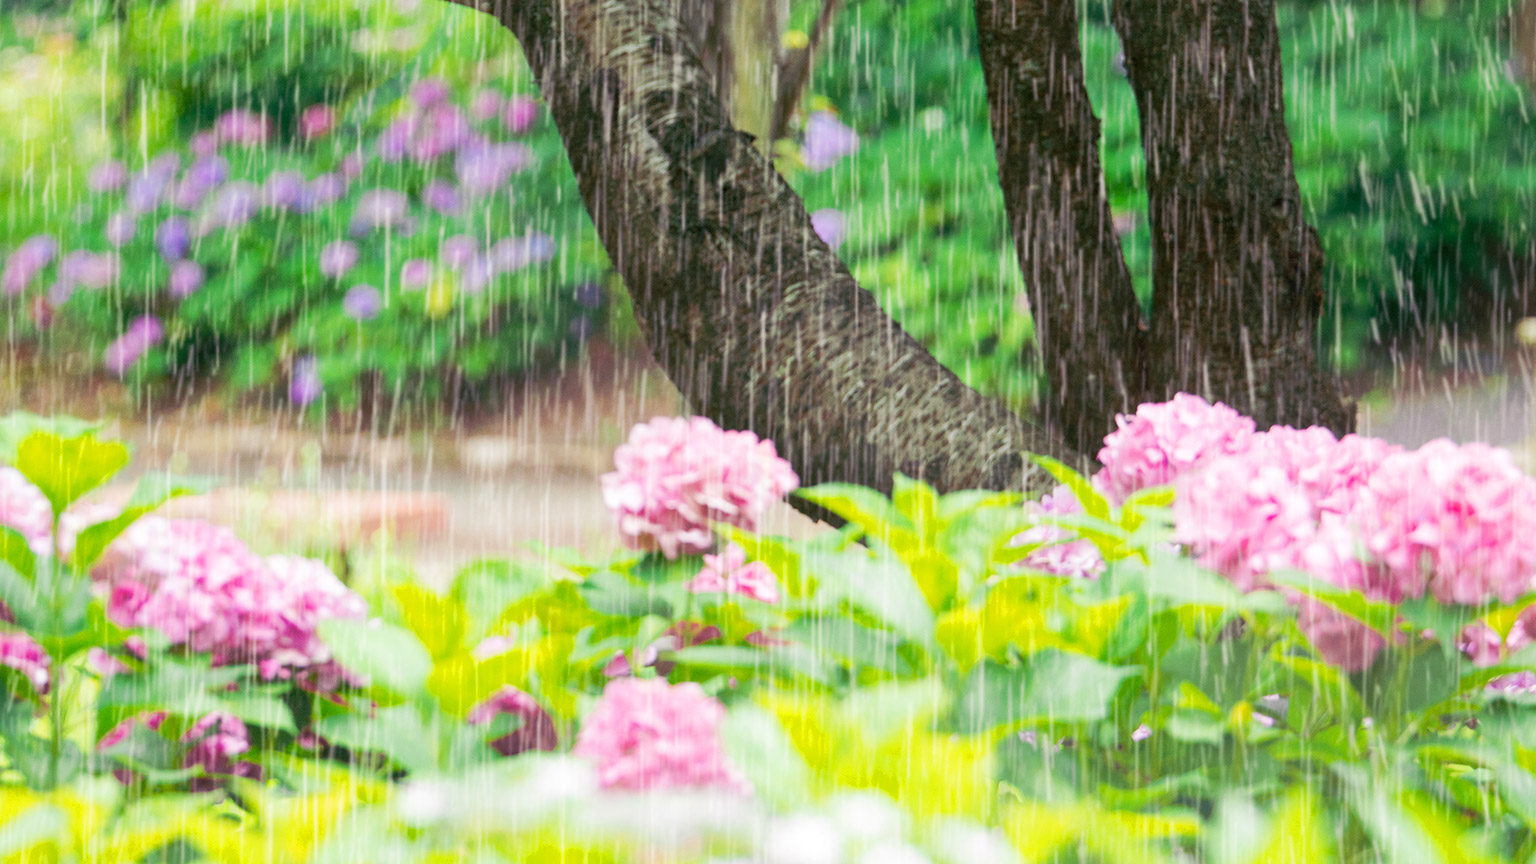
There are times when you don't have to do anything to water your garden, but sit back, grab a cuppa and stay dry. These hydrangea blooms (Hydrangea macrophylla) don't mind a bit of rainfall.
The two main ways of applying water to outdoor growing are:
- rainfall
- irrigation.
In this topic, we'll take a look at each in more detail.
Generally rain falls across a wide area. It falls on our plants, on the soil, on hard surfaces, such as roads, driveways and decks, and it falls on building roofs.
Rainfall is measured in millimetres (mm) — not millilitres (ml). That means 1mm of rain across one square metre (m2) equals 1 litre (L).
Infiltration

Where the surface is level or at a low point in the ground, puddles may start to form as very localised, small-scale flooding. We call this ponding.
Water that ponds on soil will eventually infiltrate the soil and the ponding will disappear. If rain falls on a solid surface, like concrete, ponding will only disappear when the water evaporates, as it can’t infiltrate the soil.
Run-off
When it falls on sloped ground, and it's raining heavily enough, the water will run downhill rather than infiltrating (entering) the soil. This is called run-off. Think of the image of grapes growing on a hill above. The run-off drains out of the sloped garden.
Run-off into our gardens needs to be considered as well. In the same way that excess water may run off our in-ground raised garden beds down the small slope into the garden pathways, water from surrounding areas may run into our garden. Imagine if you had a garden at the bottom of the hill of grapes and there was a big storm, your garden would bear the brunt of the excess water from run-off in addition to the water it took in from the heavy rainfall.
It’s important to observe if this happens in your garden when it rains heavily because it could waterlog your soil and impact plant health. This is something to take into account when planning a site location.
Collection
When water falls on hard surfaces, it can be collected, stored, and used when it's needed. The most common example is houses that collect rainwater from their roofs. This is the main water source for many rural properties around Aotearoa. However, as we face the effects of climate change and extreme weather events, storms and droughts become more frequent. As a result, more urban homes are being fitted with rainwater collection tanks.
Remember how we said that 1mm of rainfall over 1m2 equals 1L?
Here’s why that's a handy fact to know:
If we know the horizontal area of our roof, we can work out how much rain we would collect for each 1mm of rain that falls on the roof. We use the horizontal area rather than the sloped area of the roof because rain typically falls straight down.
![[ADD IMAGE'S ALT TEXT]](/sites/default/files/Horizontal%20Area.png)
There is an easy way to find the horizontal area of your roof: use the Measure tool in Google Earth.
Follow these steps:
- In a web browser go to: https://earth.google.com/web/
- Click the magnifying glass icon and type your address or use your mouse to pan (move the map side-to-side by clicking and dragging) or zoom (get closer by scrolling your mouse wheel) until you get to your house.
- Click the ruler icon then click a point on the map at one corner of your roof.
- Move your mouse and click at the next corner. Keep going until you get back to your first point.
- As you move your mouse close to the first point the text “Close shape” will be displayed. Now click the mouse.
- In the top right corner you’ll see measurements for both the perimeter and the area.
- The area should say m2 after the number. If it doesn’t click on the area value (number) and choose “Square metres” from the list.
Now you know the horizontal area of your house roof. In our example, the building (chosen at random) has an area of approximately 550m2.
![[ADD IMAGE'S ALT TEXT]](/sites/default/files/Horizontal%20Area%202.png)
Write down your roof area then click the “Start new” button just under where the area measurement is displayed. If you have any other buildings, repeat the process for them, then add the area measurements together.
To see how much water you could collect, find past rainfall data in mm, and multiply this value by the horizontal roof area.
MetService Te Ratonga Tirorangi has historical data for many towns and cities. To find rainfall data from previous months and years:
- Go to https://metservice.com
- Click the “Towns & Cities” link at the top of the page.
- Either use the search or click on the location nearest to you, in the list further down the page.
- The page should have a row of links, starting with “Next 48 Hours”, “7 Days”, “Extended” and so on. Click the “Past Weather” link.
- If there is no link with that title, go back to the previous page and choose another location near to you and see if that one has the “Past Weather” link.
- Click the “Historical Data” link.
- Hold your mouse over the bar graph records at the bottom of the page to display the value for any record. In our example the rainfall for May 2022 in Gore was 109.0mm.
![[ADD IMAGE'S ALT TEXT]](/sites/default/files/MetService.png)
Now let’s put the two parts of the equation together:
- Our building roof area: 550m2
- Rainfall for May 2022: 109mm.
550 x 109 = 59,950
This shows that if we were collecting rainwater from the building roof we would have collected close to 60,000L of water in May 2022 alone!
Though obviously, most houses aren’t as big as the one we used in our example.
Were you surprised by how much water you could collect from your house?
Retention
In soil water management, the term retention refers to the ability of the soil to hold onto water. As we’ve learned, the amount of water that a soil can hold is determined by factors such as soil texture, structure, and organic matter content. Retention is important because it determines how much water is available to plants and other organisms in the soil.
In soil science we talk about three key measures of a soil in relation to its retention:
| Saturation |
The most water the soil can hold. Saturation point is reached when all micro-pores and macro-pores are full of water. No air is left in the soil. Saturation occurs after heavy rainfall but is only temporary. |
| Field capacity (FC) |
The most water the soil can hold after excess water has drained away. Field capacity is reached when rainfall stops, and water drains out of the saturated soil under its own weight due to the force of gravity. It is the maximum water content that can be held against gravity. |
| Permanent wilting point (PWP) |
The point at which plants can no longer extract water from the soil. Permanent wilting point is the amount of water left in the soil when the plants have drawn as much water as they can for transpiration. |
With those definitions in mind, what is the key difference between FC and PWP? See if you can come up with the correct answer before expanding the label to see if you are right.
Plant available water is the difference between FC and PWP.
Watch the first 3:30 of this video by EarthScienceMovies, where Allan Rodhe from the Department of Earth Sciences at Uppsala University demonstrates these concepts.
These terms will come in handy when we talk about soil water budgeting again and investigate irrigation scheduling.
Recharge
Recharge refers to the process by which water enters the soil and replenishes the groundwater supply. Groundwater is the water that is found underground in the pores and cracks of rock and soil. It is typically located deeper below the surface than soil water.
Groundwater is often used as a source of drinking water and irrigation for agriculture and horticulture, as well as for industrial purposes.
Recharge is important because it helps to maintain the water table and ensure that there is enough water available for the uses mentioned.
Now that we know how rainfall adds water to the water component of soil, let’s see how irrigation contributes.

Let’s recap what we know about irrigation with this activity.
Some facts about irrigation.
| In lieu of rainfall |
It is typically used in areas where there is not enough rainfall to support plant growth for some parts of the year. For indoor growing, such as in glasshouses, irrigation is the only source of water plants receive. |
|---|---|
| Timing can be controlled |
It can also be used where crops require specific amounts of water at specific times in their growth cycle. For example, flooding rice fields during the reproductive stage, which is when the rice plants develop their panicles and grains. |
| Must be managed |
It can be an effective way to increase crop yields, but it can also have negative environmental impacts if not managed carefully. |
Over-irrigation can lead to:
- waterlogging
- soil salinisation – the accumulation of salt in soil to a level that negatively affects plant growth
- leaching – the movement of nutrients or other substances through the soil profile as water moves through it.
Proper management practices, such as using efficient irrigation systems and monitoring soil moisture levels, can help to minimise these impacts and ensure sustainable water use in agriculture.
Irrigation systems
No matter how simple or complex, irrigation systems have:
- a water source
- components that apply the water to the plants, known as emitters
- components that connect the water source to the components that apply the water.
Small irrigation systems
In Module 2 we investigated small irrigation systems. In addition to hand watering using a hose or watering can we looked at small permanent irrigation systems and movable systems. These small systems may use rotary sprinklers, spray nozzles, drip irrigation or a combination of these.
If you need to remind yourself about these systems and components, please reread topic 2.4 of Module 2.
Larger systems
In commercial horticulture operations, irrigation systems may be large, complex, and expensive. Installation of some of the more expensive systems can run into the millions of dollars.
There are several different types of irrigation systems for large-scale commercial growing, including fixed and moving systems.
Fixed irrigation systems
The three most common types of fixed irrigation systems are:
- Overhead
- On-ground
- Subsurface.
Overhead
Overhead irrigation uses pipes and emitters that spray water down onto the plants below them.
- Advantages:
- They are used in orchards and vineyards and can serve the added benefit of protecting plants from frost damage by covering the frost-tender leaves, flowers, or fruit with ice. (As strange as that sounds, it really works.)
This video from Netafim explains how.
- They are used in orchards and vineyards and can serve the added benefit of protecting plants from frost damage by covering the frost-tender leaves, flowers, or fruit with ice. (As strange as that sounds, it really works.)
- Disadvantages:
- Depending on the air temperature and humidity, a proportion of water may evaporate before it reaches the soil.
- If operated when windy, the water may be blown away from the crop onto nearby soil or plants.
- Applying water to plant foliage can increase the likelihood of diseases.
On ground
On ground irrigation involves installing sprinklers in fixed locations (sometimes called a “solid set” or “fixed grid irrigation”) or laying drip lines near plant roots. Pipes may be underground or sit on the ground surface. Drip lines are commonly used in orchards and vineyards where they remain close to the trees or vines and out of the way of people and machinery.
- Advantages:
- Less influenced by the wind than overhead systems.
- Drip line systems have virtually no wind or evaporation losses.
- Repairs are easier to make than for overhead or subsurface systems.
- Disadvantages:
- On ground irrigation pipes and drip lines are more susceptible to damage than subsurface lines.
Subsurface
Subsurface irrigation involves delivering water directly to the root zone of plants through a network of pipes or tubing buried beneath the soil surface. This method of irrigation is becoming increasingly popular as a water-efficient and cost-effective way of delivering water to plants, particularly in arid and semi-arid regions.
- Advantages:
- No water loss due to wind or evaporation.
- Less risk of plant disease because water is not applied to plant leaves, flowers, or fruit.
- Disadvantages:
- It can be more difficult to troubleshoot and make repairs than for other types of system because the pipes need to be uncovered. Finding the location of a fault can be particularly difficult and time-consuming.
This video from Thinkwater Canterbury shows the process of installing subsurface irrigation and talks about some of the benefits of this type of system. More information can be found here: Thinkwater: Sub Surface Drip Irrigation.
Advantages and disadvantages of fixed systems
In addition to the specific advantages and disadvantages of each system mentioned above, fixed systems have the following general advantages and disadvantages:
- Advantages:
- Less wear and tear than moving irrigation systems because there are fewer moving parts.
- Can adjust the amount of water applied based on crop type, soil type or other factors, even within a field.
- Disadvantages:
- Unless well designed from the beginning it can be expensive to extend these systems when new areas are converted to crop production.
Moving irrigation systems
The main types of moving irrigation systems for larger operations are:
Water cart
Water cart irrigation involves transporting water in a tank or a container and applying it directly to the crops or plants using a hose or a spray nozzle. This may take the form of a tractor towing a water tank trailer, or a three-point-hitch-mounted water tank. High-volume spray nozzles may be mounted to the water tank or may be at the end of a hose which a person operates by directing the water onto the plants that need it.
- Advantages:
- Water cart systems are comparatively cheap to buy and can operate in areas where larger moving irrigation systems can’t.
- People operating the hose nozzles can add more or less water to plants based on their visual condition.
- Disadvantages:
- Water cart systems are time-consuming and labour-intensive.
- Water carts can cause significant soil compaction, particularly where crops need irrigating during spring, when the soil is relatively wet and soft.
- Depending on the air temperature and humidity, a proportion of water may evaporate before it reaches the soil.
- Applying water to plant foliage can increase the likelihood of diseases.
Travelling irrigator
Travelling irrigators draw water from a water source such as a pond or irrigation main line (large pipe). Once connected to the water source the irrigator travels slowly across the area that needs to be irrigated, usually in a straight line. When it reaches the end it is repositioned and run again to cover a different area.
There are two main designs:
1: Hose-reel remains at the water source and lets out hose as the irrigator travels. The following video by Bauer shows the set up and operation of one of these travelling irrigators:
2: Hose-reel and irrigator are connected and travel forward while letting out hose. The following video by Andries Pals shows this type of system in operation and being repositioned.
- Advantages:
- Requires less labour than a water cart system.
- Cheaper to buy than a central pivot or linear irrigator.
- Disadvantages:
- More expensive than a water cart system.
- More time-consuming and labour-intensive than a central pivot or linear irrigator.
- More susceptible to moisture loss by evaporation and wind than all other systems because the water cannon shoots water high into the air in order to cover a greater area.
- Water application rate cannot be adjusted to suit the needs of individual plants.
Central pivot and linear irrigators
Central pivot irrigation systems consist of a long central pipe that rotates around a pivot point, supported by a series of wheeled towers. The sprinklers or spray heads are attached to the central pipe that runs the length of the system, and as the system rotates, the water is distributed evenly over the crop area. Linear irrigators are similar to central pivot systems, but instead of rotating around a pivot point, they move back and forth along a straight line.
This video, What is a Center Pivot? Pivot 101, by Valley Irrigation shows how central pivot irrigators work:
- Advantages:
- Some systems can adjust the amount of water applied based on crop type, soil type or other factors, even within a field.
- Disadvantages:
- Expensive to buy.
Advantages and disadvantages of moving systems
Moving systems have the following general advantages and disadvantages:
- Advantages:
- It is difficult to find advantages that are common across all types of moving systems.
- Disadvantages:
- Moving systems have more wear and tear because they have a greater number of moving parts.
- Because the systems move, there is a chance that animals or vehicles may be run over.
- Because all moving systems apply water from above they are susceptible to water loss due to wind or evaporation.
- They increase the risk of plant disease because water is applied to plant leaves, flowers, or fruit.
Common system components
Now that we’ve learned about different irrigation systems – effectively the different emitter components – used in commercial horticulture operations, let’s look at some of the bits most have in common:
- headworks
- computer control systems
- controllable values.
Headworks
The headworks of an irrigation system is the collection of components that regulate the flow of water from the source to the distribution system. It is the starting point of an irrigation system and commonly includes intakes, screens, pumps, and pipes. It may also include structures such as dams and weirs.
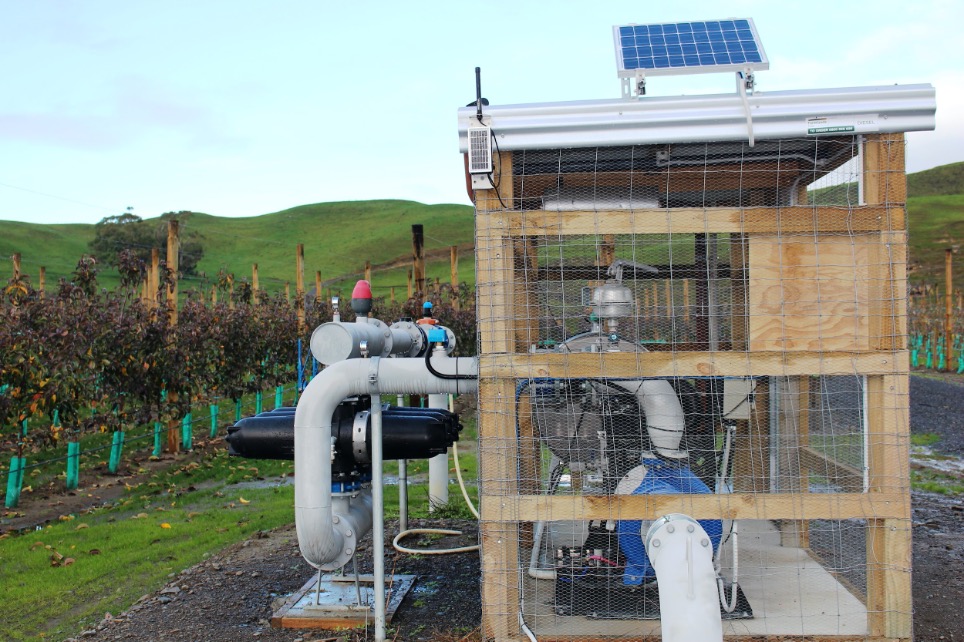
For more information about the irrigation system shown in the photo, read the case study on the Irrigation Services website: Case Studies: Apple Orchard Development.
Computer control systems
Computer irrigation control systems (also called controllers) are used to manage and control the operation of the irrigation system. These systems use sensors, data analysis, and algorithms to determine when and how much water to apply to the crops based on factors such as weather conditions, soil moisture levels, and plant water requirements.
Controllers vary in complexity. Simple controllers work on the principle of “time on target.” This means we tell the controller when to start irrigating and how long to run for. We don’t tell it how much water to apply, as in “10mm of irrigation water”, instead, if we want to apply 10mm of water we need to know the system's application rate (how much the system applies per hour) and then do the maths ourselves.
More advanced systems involve either rain sensors or soil moisture sensors that are buried in the root zone.
Rain sensors can be used to let the control system know when and how much rain has fallen. The control system can use this information to adjust the upcoming irrigation cycle based on how much water has already been applied. It uses a soil water budgeting approach.
Soil moisture sensors (also called probes) which are buried in the root zone send up-to-date information back to the controller about the actual percentage of water in the soil, rather than how much rain has fallen.
In addition to the changes to the scheduling mentioned above, the most advanced controllers can accept “prescriptions” which are maps that tell the irrigation system how much water to apply to different areas.
These can work with fixed, but also some moving irrigation systems, as this video by Valley Irrigation shows:
Controllable valves
For large irrigation systems to operate effectively they need valves that can be opened and closed at points far away from the headworks. The most common way to control these valves is with an electrical device called a solenoid. A solenoid is an electromagnet which, when electric current passes through it, causes the water valve to open.
Some sprinklers have a solenoid built into them. These sprinklers are known as valve-in-head sprinklers. For ones that don’t, a solenoid valve can be installed before (upstream from) the sprinkler. More commonly though, a solenoid valve will be installed where it can control a group of sprinklers together. When the valve is open all of those sprinklers will run. This group of sprinklers is known as a block.
In this way a fixed irrigation system doesn’t need to be able to run all emitters at the same time. It can run one block, then the next, then the next, and so on. Configuring it to run this way means the headworks can be smaller – it doesn’t need to be able to supply as large a volume of water all at once.
This video, How Do Sprinkler Valves Work?, from Rain Bird Irrigation shows how solenoid valves work.
Putting it all together
When we put all the pieces together we end up with a system that applies water efficiently and saves us time.
This short animation by NZ Sports Turf Institute shows typical components of a large irrigation system used at a sporting venue. Note the water source, headworks, valves, both controllable and manual, pipes (most of which would be underground) and emitters.
Repairs and maintenance
Repairs and maintenance will vary from system to system. For instance, maintenance on moving irrigation systems will include maintenance of the drive system, including lubrication of moving parts, checking tyre pressures and so forth.
The main repairs and maintenance tasks are:
- Preventative maintenance
- Corrective maintenance.
We’ll look at both types, below, by sharing some examples (we’ll ignore the drive system of moving irrigators).
Preventative maintenance
Preventative maintenance includes the actions taken to stop the irrigation system needing expensive repairs. It's proactive.
It includes actions such as:
- Periodically checking that all parts of the systems are working as intended.
- Pumps are running at the correct pressure and are not under undue load, as indicated by pressure valves and they sound how they are meant to sound when operating.
- Run cycles start at the correct time and run for the correct time.
- Each emitter operates when it’s meant to, e.g. block two emitters all run after block one emitters.
- Each emitter irrigates the area it is meant to. Some emitters, such as sprinklers and spray heads have adjustable spray arcs, and these can change if the emitter gets knocked. The following video by Smart Irrigation (7:08) shows the process of adjusting Rainbird in-ground pop-up sprinklers: Rainbird Spray Nozzle Adjustments
- The system applies water uniformly, according to its design.
- Rain sensors are clean and in good condition.
- Periodically inspecting for leaks.
- Visually observing all above-ground components for signs of leaks. When the system is not running there should be no water moving through it.
- Checking the water meter to see if any water has passed through while the system hasn’t been running. If so, this would indicate a leak.
- Cleaning, tightening, and adjusting components.
- Headworks will usually have filters or filtration units which need to be cleaned periodically. In many cases, especially with large irrigation systems, headworks maintenance will be done by an irrigation technician.
- Sprinklers and spray heads often have small filters built into them. These should be taken out and cleaned regularly. How often they need to be cleaned will depend on how clean the water is.
- Some irrigation system joints use a sleeve that is tightened by a wrench or spanner. It is possible to cause damage by over tightening so these joints should only be tightened if they are leaking, and if so care must be taken.
- Overwintering the irrigation system. In areas that are subject to heavy frosts, irrigation systems need to be drained before winter. If not the water in the pipes may expand as it turns to ice and lead to pipes rupturing and joints splitting. This may be a task for an irrigation technician.
Corrective maintenance
Simply put, corrective maintenance is repairing the system when something stops working as it should.
Examples of corrective maintenance are:
- Finding and repairing a leak. Generally the best approach is to start at the headworks and work outwards. If system components are below-ground look carefully for signs such as an area of soil that is far wetter or darker than the surrounding area.
- Fixing an emitter or block that won’t operate correctly. Generally this involves starting at the defective end (the emitter or block) and trouble-shooting to work out the problem. This often involves running the irrigation system to see how other, nearby components behave.
- Repairing a broken pipe. From time-to-time pipes get damaged and need to be repaired.

The water needs of the sloped part of the garden are different from the elevated portion in part because of the slope. Irrigation for gardens with different heights will need to be considered for each portion of the garden.
A simple way to measure how effective our irrigation system is, is known as the catch can test. The catch can test helps us calculate the application rate of our system (or a chosen part of the system) and how uniformly it applies the water.
Watch the first 10:30 of this video by Phil Busey from Miami Dade College. It gives a useful overview of the catch can test. Don’t worry about trying to follow along with Phil’s calculations. Instead see if you can understand the concepts of application rate, and uniformity.
Now it’s your turn!
We'll use this same approach to measure the rate and uniformity of our own irrigation system, even if our system is hand-watering.
What you’ll need:
- 8-10 containers of the same size and shape. They can be large – like ice cream containers – or small – like plastic cups – as long as they are all the same.
- A small stone to go in each container
- A pen and paper
- A stopwatch or timer app on your phone
- A measuring cylinder with 1ml or 5ml graduations/increments
- An irrigation system or a hose with nozzle
- An area that you can apply irrigation to. If your garden doesn’t need watering right now, you can do this on your lawn or driveway instead. Mark out the perimeter of the area so you know where to water. If you’re doing this on your driveway, you can use the hose to “draw” the edges.
What to do:
- Set your containers in a grid or random pattern in an area of your garden you want to water.
- Put a stone in each container if you are worried about it tipping over.
- Get your irrigation system or hose set up and ready to run.
- Turn on the irrigation system or hose and at the same time start your timer.
- Immediately run your irrigation system or start hand watering. Go for as long as you think you need to in order to give the plants a good watering across the whole area. When you’re satisfied that you applied enough water, stop the timer and stop watering.
- Mark out the approximate locations of your containers on a sheet of paper.
- Tip the contents of the one container into your measuring cylinder and record the value in millilitres (ml) next to the relevant location on the sheet of paper.
- Tip out the measuring cylinder.
- Repeat steps 7 and 8 for each of the remaining containers.
Finding: uniformity of irrigation
Have a look at your sheet of paper. Did all the catch cans collect about the same amount of water?
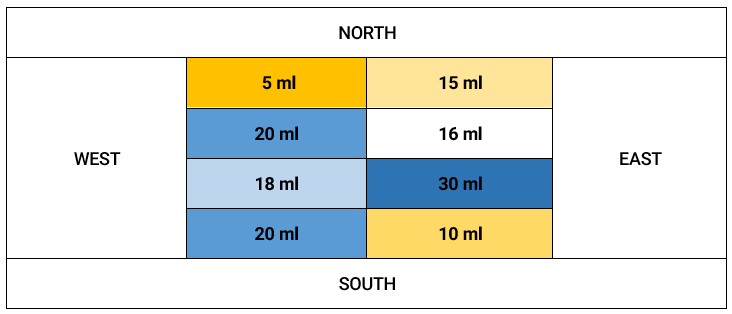
Here is our example:
- We calculated the average by adding all values together and dividing by the number of cans which gave us the value of 16.75ml.
- Then we colour-coded them to show which ones collected more water (blue) and which ones collected less water (yellow).
- We can see that there was a lot of variation; our hand watering is not very consistent even for just a few minutes. One container caught six times as much as another (30ml vs. 5 ml)!
This should give you an idea of how good the irrigation system (or person doing the hand watering) is at getting the same amount of water across the whole area. This is called irrigation uniformity.
Finding: application rate
Now we're going to work out how much water our irrigation system would apply in an hour if we kept it running. When dealing with irrigation systems, we measure their application rate in mm/hr.
Let’s do the maths.
Calculation 1: Time in decimal minutes
If you ran your irrigation for an exact number of minutes, e.g. 4:00 or 15:00, go to the next calculation.
If not:
- Take the number of seconds and divide this by 60.
- Add the value to the number of minutes. This is the irrigation runtime in decimal minutes (t).
In our example we hand watered the area for 4:40, so 40 / 60 = 0.66 + 4 minutes = 4.66.
Calculation 2: Container surface area
If your container is circular:
- Measure the diameter (d) at the top from inside lip to inside lip in centimetres (cm).
- Divide this by two to get the radius (r).
- Multiply the radius by itself (this is the same as getting the “square” of the number (x2)) and then multiply by Pi (3.14).
- This can be represented by the following formula: Surface area (a) = r x r x 3.14.
In our case, the cup was 6.8cm, so 6.8 x 6.8 x 3.14 = 145 cm2, which is the surface area (a).
If your container is a rectangle or square:
- Measure the width and length at the top from the inside lip to the inside lip in centimetres.
- Multiply one by the other to give the surface area (a).
For example, an ice cream container that is 17cm x 17cm would give a surface area of 289cm2.
Calculation 3: Average water collected
- Calculate the average irrigation water collected per container (i) by adding all values together and then dividing by the number of containers (n).
In our example, we had 5 + 20 + 18 + 20 + 15 + 16 +30 + 10 = 134, which when divided by 8 gives an average value of 16.75ml.
Calculation 4: Average irrigation applied
- We can calculate the average irrigation we applied during our runtime in mm by using the following formula: i / a x n.
In our case this is 16.75 / 145 x 10 = 1.16mm.
This means that if we were watering the area uniformly, we would have created a depth of water of a little more than 1mm across the whole area in 4 minutes and 40 seconds.
Calculation 5: Average application rate
As mentioned, when dealing with irrigation systems we usually talk about the application rate in mm/hr.
- To work this out we can use the following formula: i / a / t x 600.
For our example this is 16.75 / 145 / 4.66 x 600 = 14.87mm.
This means that if we continued to hand water the same area for an hour, we would apply, on average, 15mm across the whole area. This of course assumes that we have a very uniform application.
To help you manage irrigation, you should be going through this thought process:
- How uniform was your irrigation application?
- How could you improve this?
- How much water did you apply during the runtime (the answer to calculation 4)?
- Was this more or less than you expected?
Hopefully, now you understand the concepts of irrigation uniformity and application rate. Ka rawe!
When using a soil water budgeting approach, knowing how much water is coming into your soil is useful but it only tells part of the story (the “income”). We also need how much water is draining out (the “expenses”). That way we can work out if there is enough water in the soil that is plant available. We’ll come to that part later.
If we go back to our bank account analogy, the soil water budgeting approach is how people managed their money before phone and internet banking existed. Back then if you wanted to know how much money you had in your account you needed to know what the balance was at an earlier point and then add all income and subtract all expenses.
Soil moisture sensors
Nowadays we can easily check our account balance using a phone app or online banking. This ability to see our account balance in real-time removes a lot of effort. In the world of soil water management, this ability to check the soil water “account balance” is made available by soil moisture sensors.
There are a wide range of soil moisture sensors that vary from simple and cheap, but inaccurate, to complex and accurate, but expensive. The main types are:
- Electric soil moisture meters
- Tensiometers.
Electric soil moisture meters
|
These measure electric values of the surrounding soil water to determine the water content or water potential of the soil.
|
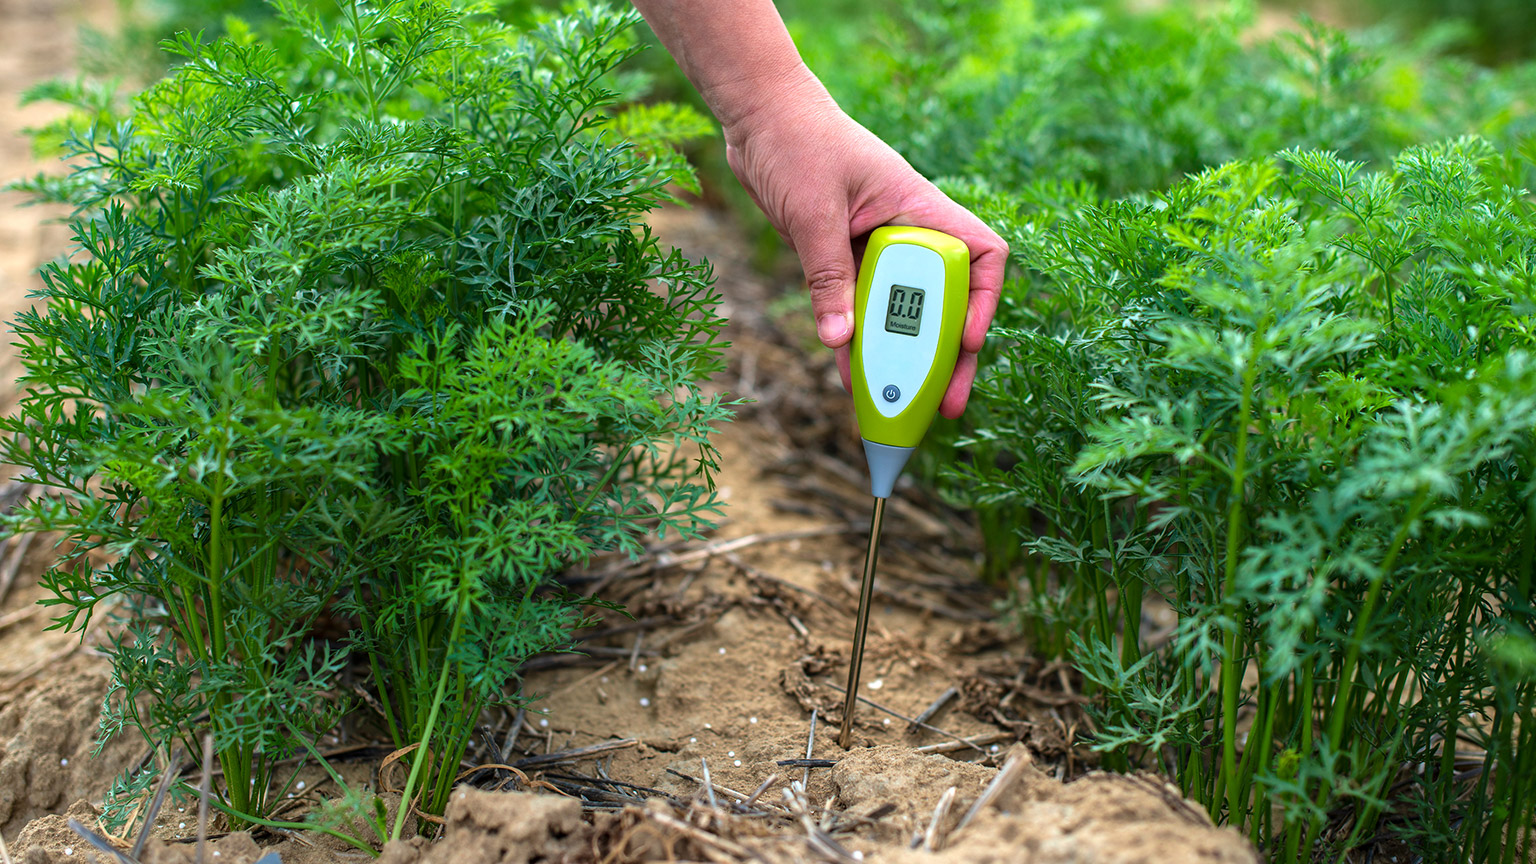 |
Soil moisture meters may be in-situ (remain in a fixed location) or portable.
For a more technical explanation of the various types of soil moisture meters and how they work, check out Soil moisture sensors—How they work on the Meter Group. Notice that some are not research grade.
In the following video by OklahomaGardening, Saleh Taghvaeian shows Kim Toscano how electric soil moisture meters are being used in a research vineyard.
Tensiometers
| Tensiometers work on the principle of capillary action. A tensiometer consists of a hollow, porous ceramic cup or tube, typically filled with water, and a vacuum gauge. The ceramic cup has small pores or perforations that allow water to slowly move out into the surrounding soil. To use a tensiometer, the ceramic cup is buried in the soil at the desired depth. | 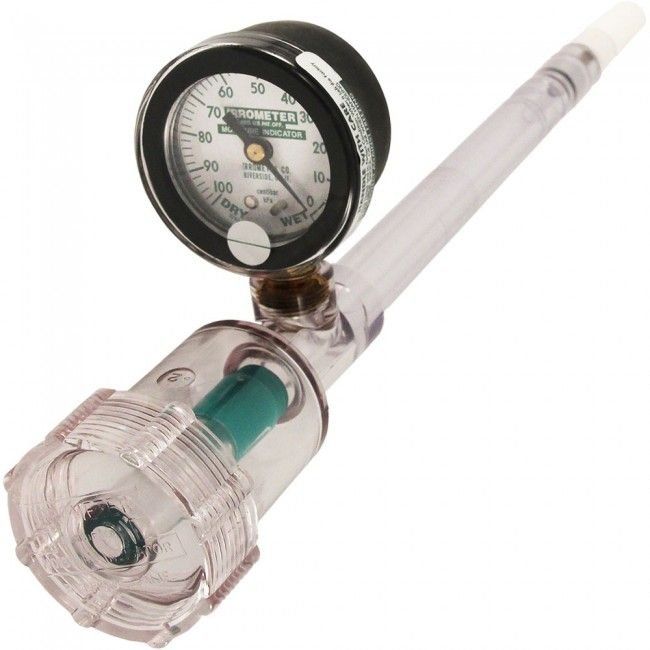 |
As the soil moisture level changes, water is either drawn into the cup from the soil or moves out of the cup into the soil. The tension or suction in the soil, caused by the attraction between the soil particles and water molecules, influences the movement of water in and out of the ceramic cup.
The vacuum gauge connected to the tensiometer measures the pressure required to pull water out of the cup or the pressure exerted by the water inside the cup.
The following video by Avocadoes Australia provides a great overview of the installation and operation of tensiometers in avocado orchards. While tensiometers are commonly used in orchards they can also be used for vegetable crops and other plants.
As we learned in Module 4, water is held in the soil through a number of processes:
- It is held on the surface of the clay particles by a process called adsorption. Clay particles have a high surface area, which means that there are many sites on the surface of the clay particle where water molecules can interact. These sites have a negative charge due to the presence of minerals such as aluminium and silicon in the clay structure.
- Water molecules, on the other hand, have a partial positive charge due to the molecule's arrangement of hydrogen and oxygen atoms. This means that they are attracted to the negatively charged sites on the surface of the clay particles. As a result, water molecules can adhere to the surface of the clay particles through electrostatic forces, forming a thin layer of water around the particle.
- It is somewhat held on the silt and sand surface by adsorption, but more so through capillary action. Capillary action occurs when the surface tension of water causes it to rise through small spaces, such as the pores between soil particles. The smaller the spaces, the higher the water can rise through capillary action.
- It is held in organic matter through absorption – think of it like a sponge.
Plant available water
Let's refresh our understanding of plant available water. Complete the following activity.
How available water is to a plant depends on the soil texture. The table below gives some basic guidance.
| Soil texture | Plant available water in top 1m of soil profile |
|---|---|
| Sand | 0-75mm |
| Loam | 75-150mm |
| Clay | 150-225mm |