Now that you have identified and interpreted the animal’s behaviour, it is time to use that information to decide how best to interact with it.
Your approach to an animal is everything you do to get near enough to actually touch the animal.
But there is one final step you must take before you approach an animal – make sure all other animals in the area are safe and secure.
Secure all other animals
It is easier and safer for you and the animal if you can focus on handling one animal at a time. So, ensure all other animals are secured. This minimises unexpected interactions between animals.
Depending on your workplace, checking that other animals are secure may mean:
- checking all enclosures are properly closed and locked
- closing gates, doors and windows to prevent an animal from unexpectedly entering the space or escaping from it
- notifying other staff that you are about to take an animal out of its enclosure.
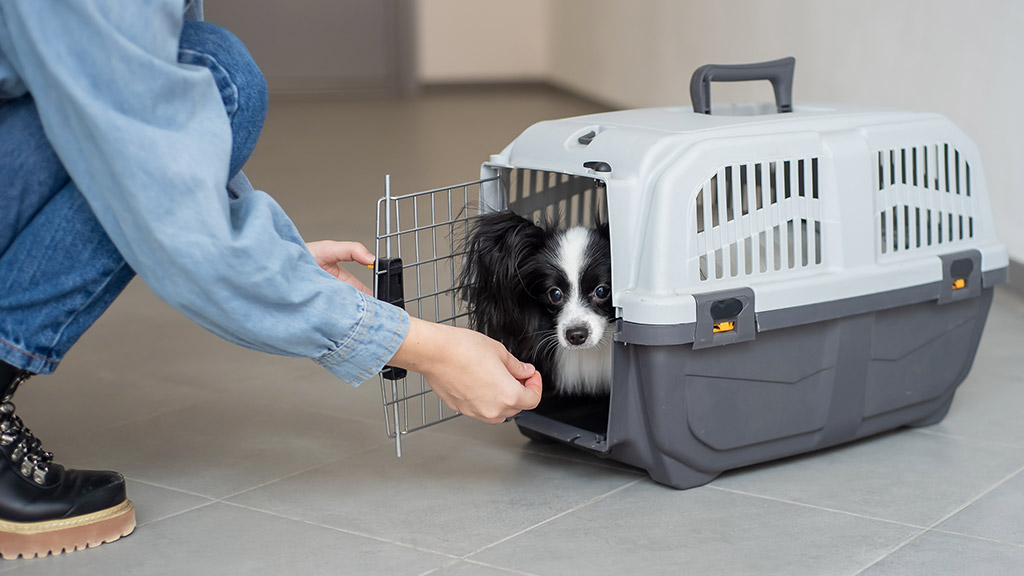
For your safety and that of the animals in your care, it is vital that you follow your workplace procedures to secure all other animals. Where an animal is in shared housing, it can be a little more difficult to remove the individual that you need to work with. If the enclosure is large enough for you to enter, go in and close the door behind you. Secure the individual you need, such as placing a slip lead on the required dog, then leave the enclosure with the animal, making sure to close the door behind you again.
Depending on the species you are working with and your particular workplace, the design of the enclosure may make it easier to ensure only one animal can leave at a time. For example, many exhibited animal enclosures have an anteroom or airlock – a small enclosure attached to the main enclosure, through which you must pass to enter or exit the main enclosure. Many anterooms have locks on the doors that will only allow one door to be open at a time. They force you to enter the anteroom and close the external door before you can open the door to the enclosure. That way, if an animal escapes from the enclosure, they are contained in the anteroom.
In other situations, you may require additional people to help contain the other individuals inside the enclosure while you remove the required animal.
With smaller animals, such as rodents or birds, placing a towel over the entrance to the cage can help deter and prevent animals from escaping while you reach inside to catch the required individual.

Approach the animal calmly
Having interpreted the animal’s behaviour, you should be able to determine the PPE and handling equipment required for that animal at that moment. Make sure all the required equipment is clean, in good working order and on hand. You don’t want to be scrambling for a new lead rope when you discover the snap hook is faulty.
The following approach techniques are non-threatening and suitable for most species or breeds:
- Approach quietly and calmly, in a non-threatening manner so as not to startle the animal.
- Approach from the side or from slightly behind, rather than from directly in front.
- Use slow but deliberate movements in the approach. Avoid sudden or jerky movements.
- Avoid direct and prolonged eye contact.
If, at any point during your approach, the animal displays behaviours associated with high levels of arousal, particularly when also in a negative emotional state, it is best to stop your approach and leave the animal alone until the arousal level has reduced. You can try again later when the animal is at a lower arousal level.
Low stress handling
Low stress handling techniques uphold the Freedom from fear and distress by the handler being sensitive to and considerate of an animal’s emotional state and arousal level and adjusting their handling in response.
As with approaching an animal, there the following general low stress handling techniques are suitable to use when working with most species:
- Minimise handling – only handle an animal when necessary.
- Be efficient when handling the animal. Don’t rush, your sense of time pressure may transfer to the animal as stress. However, try to complete the interaction smoothly and quickly.
- Use the minimal amount of equipment and restraint necessary to keep you and the animal safe.
- Where possible use your hands directly, rather than handling gloves or equipment that can make it harder to adjust your grip position or pressure on the animal.
- Continually adjust your hand and body position and restraint techniques to suit the animal’s needs in that moment.
- Talk quietly and avoid loud or sudden noises.
- Don’t make sudden movements.
- If possible, avoid prolonged or repeated struggling form the animal.
- Support the animal or provide it with a non-slip surface. Most animals have an instinctive fear of falling.
Observe the animal throughout the interaction and watch for changes in emotional state or arousal level. Be responsive to the animal and try to de-escalate arousal, where possible, to keep the animal in the green, rather than yellow or red. If the animal reaches over-threshold, consider returning it to its enclosure to calm down before completing the animal care activity.
If you must complete the activity, it may be appropriate to use more handling equipment or ask for assistance. Sometimes it will be less stressful for the animal just to get the activity over and done with, rather than experience multiple attempts to complete it while in a calm emotional state.
Secure, move, position and manage the animal
Once you have approached the animal, you next need to secure it – capture and contain it. For small animals, such as rabbits and lizards, securing may simply mean picking them up. For larger animals, such as dogs and horses, securing may require attaching a lead rope or other equipment that allows you to control the animal’s movement.
When you have secured the animal, you can then move the animal to where it needs to go, position it appropriately for the activity required and manage its movements during the interaction.
Secure the animal safely
The specific techniques and equipment used to secure an animal will depend on the species and breed as well as your behaviour assessment of the animal. However, in all instances, a secure animal is one that cannot escape and that you have significant influence over its position and movement.
There are several ways to secure and restrain animals safely. Your distance assessment of the animal will help you choose the appropriate techniques for that animal.
The following list of general methods of restraint is ordered from lowest to highest levels of restraint. In all situations, use the lowest level of restraint required to keep the animal and yourself safe.
- Using light hand pressure
- Using a collar, halter or lead to keep the animal still
- Holding the animal against your body and ensuring control over the animal's head and limbs
- Confining the animal using a towel or other cloth
- Using fitted restraints
- Using chemical restraints.
A towel or other material is a very versatile piece of equipment when interacting with animals of all species. The following list provides some examples of ways to use a towel.
For example, you can use a towel to:
- throw over a bird to catch it
- cover a box to keep an injured possum in the dark
- line a carrier as padding when transporting a pocket pet
- restrain a fractious cat with a kitty burrito
- make a temporary muzzle for a dog
- bandage/splint/stretcher during first aid for an injured wombat.
The following are some general tips to consider when securing birds, rabbits and cats.
Securing birds

Birds have hollow bones and so are often much lighter than you think they are. Be firm but gentle when capturing birds. It is important to note that birds are very easily stressed and quickly go into a state of stress-torpor – a state of lowered consciousness. So, be calm and confident, and work efficiently to minimise your contact with them.
- Make sure you are in a room with all the doors and windows closed.
- Use a small, thin towel or another piece of material to capture the bird. Thick gloves are not recommended because they make it difficult for you to tell how much pressure you are using, which means you could inadvertently injure the bird.
- Put your hand in the cage door and use the towel to capture the bird. Try to do this in one swift motion so you don’t have to chase the bird around the cage, causing it additional stress. Aim to grab the whole body, not just the tail or a wing or a leg, which will stress the bird and likely cause injury (Douglas et al. 2022, pp. 329-330).
- Do not hold the bird too tightly. Birds breathe with their whole body, so the more tightly you hold them, the more stressed they will become.
Swiftly snatch a bird, using a motion that ensnares or surrounds the animal, avoiding pinning or crushing it.Douglas et al. 2022 p. 329
Securing rabbits
Rabbits are another species that are prone to stress. Many resist handling, so you must be particularly careful to ensure the animal is restrained properly so that it can’t twist or leap away unexpectedly and become injured.
It is important always to support the back when securing or carrying a rabbit. If they twist or kick out, they can seriously injure their spine.
To pick up a rabbit safely:
- Scoop up the rabbit’s backside with one hand to support the hind legs.
- Wrap your other arm around the rabbit and place your hand on its back. If the rabbit is in a high state of arousal, you can tuck its head under your arm for greater control and to reduce the visual stimuli for the animal.
- Hold the rabbit gently but firmly to prevent them from squirming, twisting or kicking.

Securing cats
Cats are notorious for lashing out unexpectedly. Conduct a distance assessment before you approach a cat. If the cat is in a carrier, if possible, take off the top half of the carrier rather than trying to pull the cat out through the door. The doors are small and awkward and force you to put your hand towards the cat’s face, which can be very threatening.
If you can access the cat from above:
- Place one hand under the chest and one under the stomach and lift the cat up.
- Tuck the cat’s bottom under your arm and hold them close to your body.
- Use your other arm to support the body and make the cat feel secure.
Highly aroused cats can be secured using a towel to keep their claws and teeth under greater control.
Securing dogs
In most workplaces, you will be required to secure dogs of all breeds with a slip lead, leash or similar.
Keeping calm and confident when handling any animal is important because any hesitation on your part can increase their anxiety. So, when securing a dog:
- Approach confidently, use the dog’s name, and have a slip lead ready before opening the enclosure door.
- Ask and wait for the dog to sit (if possible) then open the enclosure door slightly.
- Either slip inside the enclosure, making sure to prevent the dog from escaping, or put your hand with the lead through the door and secure it around the dog’s neck.
- Open the door fully and lead the dog out.
Don’t get into the cage and shut the door behind you if the dog is highly aroused or fearful.
Review the following video, How to Get Dog In/Out of Kennels (2:01 min), for a demonstration of how to secure a dog in a kennel before moving it out of its housing.
Body positioning
As a handler, you can use your body positioning to influence the movement of an animal. For example, standing in a doorway may encourage an animal to move in the other direction. Where you place your hands on the animal will also help direct the animal’s movement. Wrapping your arm and hand around a dog’s head will enable you to support and turn its head, while cupping a cat’s elbow will allow you to hold its arm still for a blood sample.
You can also control the animal’s body position to be most suitable for the activity required of the interaction. Should the animal be standing? Sitting? Lying down on its stomach, side or back? Holding an animal in a particular position is called restraint. See the following section for more information about species-specific restraint techniques.
Cues
A cue is any signal to an animal to perform a particular behaviour. Cues can be auditory (sound), visual (sight) or tactile (touch).
Auditory cues include verbal commands, whistles, tongue clucks, squeakers or other sounds of choice. Visual cues include hand signals, body positioning, target sticks or other training equipment. Tactile cues are often used when riding horses and include the use of “balance, weight, and pressure. These three are often related and used in combination. For example, if a rider changes his balance by leaning slight forward or rearward, the horse will feel a difference in where pressure is applied by the rider's weight distribution” (Matschull n.d.).
The following video, Preparing our parrots for health checks! (1:24 min), provide an excellent demonstration of using visual (hand signals and targets), and tactile cues (targets) to influence exhibited parrots’ behaviour to assist with future health checks at Aukland Zoo. Learning these cues acts as enrichment for the animals and benefits them in the long term by reducing their potential stress levels during health checks and interactions with veterinaries.
Positive reinforcers
Reinforcement is anything that increases the likelihood of an animal repeating a behaviour. Reinforcement can be very useful in influencing an animal’s movement and behaviour. A reinforcer is any item or action that acts as a reinforcement of behaviour.

Treats (food rewards) are easy reinforcers for a handler to use when interacting with an animal. The treat should not be the animal’s regular food but shouldn’t be so novel that the animal avoids it because they are not sure what it is. Only a tiny amount of the treat is needed for the animal to feel rewarded (Fear Free Pets 2022).
Other reinforcers include verbal praise and affection. Selecting the appropriate reinforcer for the individual animal can help the animal build positive associations and convert a negative emotional state into a neutral or even positive state.
Positive reinforcement (adding something to the situation to encourage the animal to repeat the behaviour) is most effective in influencing an animal’s behaviour when it occurs immediately after the desired behaviour. The faster reinforcement is given, the quicker and more accurately the animal will form an association between the behaviour and the reward. When there is a delay between the wanted behaviour and the reinforcement, there is a risk that the animal will associate the reward with a different (potentially unwanted) behaviour (Cherry 2023).
If there is an unavoidable delay between behaviour and reinforcement, such as too large a distance to cover to give the animal a treat immediately, a marker can be used as a ‘promise’ of a reward. A clicker is a very common tool used to mark the wanted behaviour. The animal makes two associations – one between the behaviour and the sound of the clicker and another between the clicker and the reward a few moments later.
In the following video, Teach a Puppy to Sit | Teacher's Pet With Victoria Stilwell (5:37 min), Victoria Stilwell demonstrates using auditory and visual cues, and positive reinforcement to influence the movement of the puppy to sit.
Species-specific restraint techniques
Recall that restraint is the process of keeping an animal’s movement under control. There are several species-specific restraint techniques. It is important to use the correct technique on the right type of animal to prevent injury to that animal or to yourself. Best-practice and low stress restraint techniques also take the comfort and requirements of each species into consideration.
The following are just a few examples of the more common restraint techniques for the more common companion animals.
Methods for safely restraining dogs
The two most popular restraints for dogs are the:
- Headlock restraint
- Lying down restraint.
You can also use these restraint techniques for cats.
Remember that you may need to muzzle the dog before you start your restraint.
Use the arrows following the slider to see an example of:
- Image 1: The headlock restraint
- Image 2: The lying down restraint
- Image 3: A bandage muzzle
Headlock restraint
- Stand beside the dog, facing the dog’s body.
- Place your forearm snugly around the dog’s neck and hold the head still (headlock formation).
- Place your other arm under the dog's belly close to the hips. Hold this position firmly.
- Some dogs may find it difficult to stand like this so they can lie down. When the dog is lying down, place your other hand (that would have been under the dog) around the dog’s body holding the body firmly into your body.
Lying down restraint
- Start by standing alongside the dog. Make sure that the front of your body is along the side of the dog.
- Coming from over the top of the dog, hold the front and hind leg that is closest to you.
- Ask someone to hold and guide the dog’s head as you gently pull the dog’s legs out from under them. At this point, there may be some struggling, so be prepared.
- Once the dog is down do not let go of the legs otherwise, the dog will be able to stand again.
- Using your elbow at the front of the dog gently apply pressure to the dog's neck. This will prevent the dog from lifting its head, allowing you to have control.
In the following video, Placing a Dog on His Side | drsophiayin.com (0:27 min), Dr Sophia Yin demonstrates how to (and how not to!) position and restrain a dog on its side.
Methods for safely restraining cats
There are several different ways to restrain cats. Three of the most popular cat restraints are the:
- side restraint
- cat bag restraint
- head-raising restraint.
Use the arrows following the slider to see an example of:
- Image 1: A cat bag
- Image 2: The head-raising restraint.
Side restraint
- Use the same technique as with dogs to position the cat on its side.
- Hold the leg that is closest to the table just above the elbow joint. Place your forearm across the cat’s neck and shoulder with the minimal amount of pressure required to stop the cat from getting up.
Cat bag restraint
- Place the cat’s head into the opening at the top of the bag.
- Tighten the neck opening so the cat cannot get its front foot out.
- Either hold the cat off the table and zip the bottom up or turn the cat onto its back to zip the bottom up.
- Be careful of the cat’s fur and tail when zipping the bag up.
- The bag can then be unzipped slightly to allow particular limbs to be exposed.
- Mesh cat bags allow the cat to be shampooed and rinsed while in the bag.
Head-raising restraint
- Hold the cat's front legs with one hand.
- With the other hand hold the cat’s head and raise it to the roof, stretching the cat's neck out.
- You can also stretch the cat over the examination table to allow for extra stretching.
Methods for safely restraining rabbits
Rabbits need to be restrained properly as they can be very wriggly and can easily seriously injure themselves with incorrect restraint or if you drop them. When holding them, make sure to fully support both the front and hind legs while keeping light pressure on their back to prevent squirming.
The most popular way to restrain a rabbit, other than with just your hands, is with towel wrapping.
Use the arrows following the slider to see an example of:
- Image 1: Safely holding a rabbit
- Image 2: Towel-wrapping a rabbit.
Towel wrapping
- Place the towel, blanket or another piece of cloth on the examination table.
- Pick up the rabbit, ensuring that you are always supporting its back, and place the rabbit in the middle of the towel.
- Wrap the towel under the neck and around the body of the rabbit leaving only the head and ears out.
Methods for safely restraining birds
The type of restraint to use on a bird will depend on the size and type of bird.
Small birds
Many small birds are very sensitive to restrictions to their breathing, including any pressure on their body during handling and restraint. Small birds are also very sensitive to high and low ambient temperatures, which also affects their ability to breathe. Signs that a bird is in respiratory distress include:
- gaping (holding their mouth open)
- panting
- closed eyes
- drooping head
- lethargy (Palmer et al. 2022, p. 586).
The bander’s grip or ringer’s grip is the most ethical way of restraining small birds. This hold is most effective with birds about the size of a pigeon or smaller. The bander’s grip allows you to control the head and wings with one hand, while allowing the bird’s body to expand for free breathing.

Place your hand over the back of the bird and position its head between your pointer and middle finders. Gently, but firmly, wrap your thumb and index finger around the bird to pin its wings to its sides. You can release one wing at a time to examine or treat them, if necessary.
If using a towel to restrain the bird, hold the bird around the neck and ensure the towel is not too tight around the bird’s body.
Large birds
Larger birds, such as chickens, ducks, geese and swans, will require two hands to restrain. Place one hand on either side of the bird’s body, securing the wings, then lift it up. You can then tuck the bird under one arm or wrap one arm over the bird and use the other hand to control its head and beak so that it doesn’t bite you or any other staff members.
Raptors

The most dangerous part of a raptor (bird of prey) is its feet. When restraining raptors, such as owls, hawks and falcons, use thick gloves (falconer’s gloves) and hold them around their “lower body and upper legs, so that the wings and legs are secured” (Olsen 2022, p.595).
For smaller birds, you may be able to contain the wings and feet in one hand. For larger species, you will need both hands. Use one hand to hold and separate the thighs and the other hand to wrap around the wings and tail. Covering the head with a loose bag or properly fitted falconry hood will help keep the bird calm (Olsen 2022, p.595).
Flight zone, pressure zone and point of balance
Flight zone, pressure zone and point of balance are principles used for a low stress technique of influencing animal movement that is most commonly used with herding livestock, such as cattle and sheep.
Think of the flight zone of an animal as its personal space. When a handler moves into the flight zone, the animal moves away. The tamer the animal and the more familiar it is with people and handling, the smaller its flight zone. When working with livestock, the more time the handler spends walking through the herd or flock will help to reduce the size of the flight zone. Most companion animals have very small or even no flight zone (Grandin 2022).
The flight zone of sheep is beautifully demonstrated in the following video, 5. The flight zone of sheep (1:31 min).
Animals use their flight zone to maintain a safe distance and to keep the handler in sight. It also means that the animals tend to walk in the opposite direction to the handler’s movement.
The point of balance is a place on the animal, usually at the edge of the animal’s peripheral vision. Movement of the handler past this point will cause the animal to move in the opposite direction. In other words, livestock will walk forwards when the handler stands behind the point of balance and back up if the handler is in front of the point of balance.
Moving past the point of balance will only work when the handler is on the edge of the flight zone. If the handler is just outside this zone, called the pressure zone or the zone of awareness, the animal will turn to face the handler, rather than move away.
You can observe the effects of the pressure zone and flight zone if you come across a group of animals in the wild, such as kangaroos. When you approach, all the animals in the group will turn to face you. If you keep getting closer and cross the invisible line of the slight zone, they will move away from you as a group.
Applying the principles of flight zone and point of balance enables handlers to move groups of animals through a chute or race (narrow fenced path) without the need to touch the animals.
The following video, 3. Using parallel movement to move sheep (1:35 min), demonstrates the application of the flight zone and point of balance principles. In particular, watch how the movement of the handler (from 0:47 – 0:57 min) causes the sheep to speed up, slow down, stop and even back up, just by altering how quickly he moves and the direction he moves in.
Responsive handling

When handling an animal, no matter how perfect your technique, you must be responsive to the animal. Responsive handling means continually adjusting your handling in response to changes in the animal’s position, arousal level and emotional state. Be mindful of the task that is occurring, remember the specific needs of the individual animal and ensure that your handling keeps the animal and all staff safe.
There are particular body regions that most animal species find particularly sensitive and will likely resist the handling of these areas. The resistance is because, in the wild, these areas are common targets during an attack and are easily seriously injured. Sensitive areas include the head and neck, legs and feet, groin and abdomen as well as any area that is painful (VMCLI n.d.).
In particular, avoid directly restraining the animal’s legs whenever possible as this universally induces even more struggling and aggression.Veterinary Medical Center of Long Island, n.d.
However, some tasks may require the handling of these sensitive areas. In these instances, ensure you are maintaining the low stress principles of handling and use restraint equipment or a second pair of hands if required.
Load and transport the animal
In some instances, you may need to transport the animal to a different location. When loading an animal for transport, you must consider both the safety of the animal and that of the driver, if the animal is in the vehicle with the driver.
Transporting in a trailer
Large animals, such as horses and livestock, are transported in a trailer. When loading animals into a trailer, make sure to always position yourself between the animal and the exit so the animal can’t trap you in the trailer where you are at risk of a crush or kick injury.
Transporting horses

Horse trailers are often called horse floats. When loading a horse into a float, ensure that:
- you correctly fit any equipment, such as knee or hock boots, bandages or hoods, on the horse before loading
- the internal surface of the float is non-slip and free from obstruction that could cause you or the horse to trip
- each horse in the float can stand in a natural position
- when multiple horses are transported together, there is enough space between animals for good air circulation and the individuals are separated by partitions
- when transporting a single horse in a multiple-horse float, it is tethered on the driver’s side of the float
- when transporting two horses, the heavier individual is tethered on the driver’s side of the float
- the vehicle exhaust does not pollute the float (Agriculture Victoria 2023).
The calmer the horse is getting onto the float, the calmer it generally is during travel. When loading a nervous horse, ensure all the doors and dividers are open as wide as they can go to give the horse plenty of space. A bucket of feed or a treat may encourage a horse to step onto the float of its own accord without needing to be led. You could also consider parking the trailer next to a shed or fence to help channel the horse into the trailer while blocking off a possible exit for the horse.
How to safely load a horse into a float is demonstrated in the following video, Trailer Loading Tips to Safely Tie Your Horse (3:49 min).
Transporting livestock

Livestock are typically transported in a stock trailer and are not tethered. However, it is important to select an appropriately sized trailer for the number of animals that are being transported. This is referred to as loading density – the number of animals per set area of the trailer.
Appropriate loading densities reduce stress, bruising and deaths during the journey.Biosecurity Queensland, n.d.
The size of the animals and the length and shape of their horns, as well as weather conditions and the distance to be travelled, are factors that determine the most appropriate loading density. Ideal loading densities mean that the animals provide each other with mutual support to prevent trips or falls during the inevitable bumps of the journey. Overloading, or too many animals on the trailer, increases the risk of an animal being unable to get up again if they do fall. Large trailers can be split up into pens. Ensure the loading density of each pen is appropriate.
Transporting in the vehicle
When transporting the animal in the vehicle with the driver, the animal must be secured at all times. A loose animal is a distraction for the driver and may cause a traffic incident. An unsecured animal is also at risk of falling over or becoming injured during the motion of the vehicle.
Crates and carriers

Small animals should be transported in a crate or carrier. Any container can be used as a transportation crate, provided it is ventilated and prevents the animal from escaping. Place the crate in the backseat or the boot, rather than in the front passenger seat to avoid the risk of injury from a deployed airbag. The crate should then be attached to the car with the seatbelt or to an attachment point to prevent the crate from sliding around.
The transportation crate should have a non-slip internal surface and provide the animal with enough space to sit, stand and lie down in natural positions. Lining the crate with towels helps to provide the animal with a non-slip surface as well as padding to protect them from being jostled.
If you are transporting a bird in its housing cage, make sure to remove all the furniture (swings, mirrors, seed bells, etc.) before loading so that they can’t injure the bird during transport.
Harnesses

Dogs that are too large for a crate or carrier should be secured to the car using a harness. The harness should be long enough to allow the dog to move around, sit, stand and lie down in natural positions, without being so long that the dog can fall off the seat or climb into the driver’s space.
Again, the backseat or boot is the safest location for a harnessed dog.
Other transport considerations
Regardless of the species, the following considerations should be made when preparing and loading an animal for transport.
- Thermoregulation. Animals can suffer the potentially fatal effects of heat stress very quickly. When transporting an animal, ensure that it has adequate airflow and that the trailer, crate or container is at an appropriate temperature. If the animal is inside the vehicle, check that it has air conditioning.
- Length of journey. If the animal needs to be transported a long distance, the driver will need to stop to provide them with water, food and the opportunity to evacuate their bladder and bowels. Reduce the amount of food provided on long journeys to reduce the risk of motion sickness and the need to defecate.
- Emotional state of the animal. If the animal is known to find transport stressful, it may be appropriate to use pheromones to help reduce arousal levels. Training, familiarisation and creating positive associations with the crate, car, trailer, etc., will also help to reduce arousal levels and improve emotional state during travel.
- Suitability of destination. Consider where the animal will be unloaded and ensure the area is prepared to receive the animal.
Once the animal is secured and in the correct location, a huge range of activities may then take place. During the interaction with the animal, continue to monitor its arousal level and emotional state. Make sure to use responsive handling techniques that are suitable to the species, breed and individual animal’s needs.
Animal activities can be grouped into four broad categories, as follows:
- Manual lifting and moving
- Grooming tasks
- Preventative health, hygiene and infection control tasks
- Medical procedures.
Manual lifting and moving
Manual lifting of an animal is very common when the animal is small. Common circumstances when you will need to lift an animal include lifting it:
- into and out of an enclosure or carrier
- onto and off an examination or grooming table
- into and out of a bath.
When an animal is too large for a single person to lift, you can either get the assistance of a second person, or use lifting equipment such as a stretcher, or lifting harness and spreader bar for stricken horses or livestock.
Positioning animals or moving them between locations is also extremely common. Again, consider the needs of the animal with which you are working. We have already discussed ways to influence the movement of an animal in the previous Subtopic. However, to recap, common methods of moving an animal include:
- body positioning
- clear instruction or cues
- species-specific holding or restraint techniques
- positive reinforcers
- principles of flight zone, pressure zone and point of balance
- leading the animal on a rope or leash
- carrying the animal in your arm or in a carrier
- transporting the animal in a vehicle or trailer.
Numeracy skills for lifting and moving animals

Weight
When an animal needs to be lifted, it is important that you can estimate the weight of the animal. You should know your own lifting capacity and should never attempt to lift an animal that is heavier than you can comfortably handle. Remember that lifting a wriggling animal is very different to lifting a static object of the same weight. So, it is safer to overestimate the weight of the animal and underestimate your lifting and carrying capacity.
In Australia, weight is measured in grams (g) or kilograms (kg).
1 kg = 1000 g
You will get better at estimating the weights of animals, the more you handle and weigh them.
Numeracy activities
Activity 1
You are about to lift and carry a Dachshund in its crate. You estimate the dog to weigh approximately 10 kg and the crate to weigh around 4 kg. What is the total weight of the load you are about to lift?
10 + 4 = 14 kg
Activity 2
A veterinarian has recommended that a Persian cat be fed 50 g of Royal Canin’s Persian Adult per day. How many days will a 2 kg box last?
2 kg = 2000 g
2000 ÷ 50 = 40 days
Area
Area is the measurement of a particular space. It is calculated by multiplying the length by the width of the space.
Area is important in the animal care industry in terms of housing, exercising and transporting animals. The Freedom to express normal patterns of behaviour states that an animal should have the space to move freely, including the ability to sit, stand and lie down in natural positions. An animal that is housed, exercised or transported in an inadequate area will not be able to express normal behaviours and movements.
Area is measured in square metres or metres squared (m2).
Numeracy activities
Activity 3
Biosecurity Queensland (n.d.) recommends that cattle weighing 250 kg should have 1.63 m2 of space on a trailer. How many head of cattle (individual animals) will fit on a trailer deck that is 2.5 m by 12.2 m?
Trailer area = 2.5 × 12.2 = 30.5 m2
30.5 ÷ 1.63 = 18.71 = 18 head of cattle (you can’t have 0.71 of an animal)
Grooming tasks

Grooming is the process of washing, brushing an animal and maintaining its appearance. All animals can groom themselves to some extent. However, some human assistance can go a long way, especially for animals with long coats.
Grooming is also important for the coat and skin health of the animal. Washing removes dirt while brushing removes any grass seeds or burrs, dead skin and hair. Grooming prevents the matting of hair, which can cause skin issues and encourage excessive licking by the animal (Greencross Vets n.d.). Grooming also provides an excellent opportunity to examine the skin for any injuries, lumps or parasites.
Common grooming tasks include:
- bathing or washing
- brushing
- nail and claw clips
- fur clips and cuts.
Numeracy skills for grooming animals
Volume
Volume is the amount of three-dimensional space something takes up. Volume is typically used to measure amounts of liquid.
In Australia, the volume of a liquid is measured in millilitres (mL) or litres (L).
1000 mL = 1 L
1 cup = 250 mL
Ratio
Dilution is the process of mixing a concentrated product with water to achieve the correct strength of the product. Many grooming products require dilution. Dilution rates are typically expressed as a ratio, with the product listed as the first number and the water as the second. For example, a dilution ratio of 1:10 (one to ten) means you need to dilute one part of the product with 10 parts of water. Dilution ratios do not specify volumes so that you can make up any amount of the product to the correct strength.
Always refer to and follow the manufacturer’s instructions regarding dilution ratios.
The following steps outline the process of how to calculate the correct dilution rate for the total volume you require, based on a dilution rate of 1:10 and a total volume of 25 L.
| Step instructions | Example calculation |
|---|---|
| 1. Add the ratio numbers together. | 1 + 10 = 11 |
| 2. Determine the total volume required. | 25 L |
| 3. Divide the total final volume by the total ratio number. This is the amount of concentrated product you need. | 25 ÷ 11 = 2.27 L |
| 4. Subtract the amount of product from the total final volume. This is the amount of water you need. | 25 – 2.27 = 22.73 L |
| 5. Add the volume of the product to the volume of the water to make your perfect solution. |
Numeracy activities
Activity 4
Calculate the amount of product and water needed to make up 10 L of a shampoo with a dilution rate of 1:40. Provide your answer in whole mL and L to 3 decimal places.
10 ÷ 41 = 0.244 L = 244 mL concentrated shampoo
10 – 0.244 = 9.756 L = 9756 mL water
Time
Different animal care tasks will take different amounts of time to complete. Estimating how long it will take you to complete a particular task is important for planning your day. For example, grooming salons make bookings for clients based on their groomers’ schedules and availabilities. Poor understanding of time or poor time management will result in inconvenienced clients.
Depending on the tasks required, it may be best to round up to the nearest 10 or 15-minute block. In other words, if it only takes you 6 minutes to clip all 20 of a cat’s claws, allow a full 10 minutes in your planning. Rounding up gives you a bit of extra time to clean up between tasks or to deal with a less compliant animal in a low stress manner. If you do not give yourself enough time, you will feel rushed, and your stress may pass on to the animal, making it more difficult to handle.
Numeracy activities
Activity 5
If it takes 100 minutes to complete a full wash, dry, nail and coat clip on a dog, what time will you be finished if you start at 1:25 pm?
100 minutes = 1 hour and 40 minutes.
1:25 + 1:40 = 2:65 = 3:05 pm.
Preventative health, hygiene and infection control tasks

Preventative health care are treatments routinely performed on animals to prevent health problems. Preventative treatments are typically less invasive than treating the health problem that may arise without preventative measures. Preventative health care can help prevent both infectious diseases and non-infectious health problems.
Common preventative health care tasks include providing:
- Vaccinations against infectious diseases
- internal parasite control, such as heartworm and intestinal worms
- external parasite control, such as mites, ticks, fleas and lice
- hoof care and nail or claw clips
- dental care
- eye and ear cleaning
- medication for ongoing or chronic conditions.
- the expression of anal glands.
Hygiene and infection control tasks prevent the spread of pathogens between animals and people. Hygiene tasks are routinely performed, while infection control tasks are typically only performed when an animal is known to be infected with or suspected of having an infectious disease.
Hygiene tasks will be discussed in more detail in the following topic. However, common hygiene tasks include:
- cleaning and/or all animal items, such as bedding, food bowls, enrichment toys, etc.
- cleaning and/or sanitising surfaces, including enclosures
- correctly storing and preparing food items
- correctly disposing of waste.
Infection control tasks include all of the items on the previous list, with the addition of disinfecting all items and surfaces and disposing of wastes in the biohazard or clinical waste bin. Other infection control tasks include:
- preparing suitable enclosures to isolate infected animals
- communicating infection to relevant staff members
- reporting the incident to biosecurity bodies, if required.
Numeracy skills for animal health
Volume, weight and ratio
Many preventative health care treatments require a knowledge of the individual animal’s weight. For example, preventative parasite treatments are available in different dose sizes based on the weight range of the animal. Choosing the correct product for the animal and administering the correct number of tablets or volume of the liquid topic is critical for the health of the animal. So, make sure to weigh the animal rather than just estimate its weight.
As with grooming products, many cleaning and disinfecting products are in a concentrated form and must be diluted according to manufacturer instructions and dilution ratios. The process for dilution is the same as described in the previous section.
Medical procedures
A medical procedure is different to a preventative health care task in that medical procedures are to treat an illness or injury rather than to prevent one. Medical procedures can be invasive or non-invasive. Invasive procedures break the skin, in other words, require surgical intervention. Non-invasive procedures do not require entry into the body, either through the skin or body opening.
Common medical procedures include:
- conducting health check-ups
- diagnosis of diseases or injuries
- conducting dental examinations or procedures, such as tartar removal
- taking blood for diagnostic purposes
- providing first aid
- conducting surgery.
Numeracy skills for medical treatment animals
Volume, weight and ratio
As with preventative health tasks, many medical procedures require an excellent understanding of how to measure and calculate volume, weight and ratios. Dose volumes of all medications, including anaesthetics, are calculated as a ratio, based on the weight of the animal.
Complete the following five (5) activities to check your knowledge and understanding of the key concepts of this topic. You may repeat this activity as often as you like. Use the arrows to move between the different activities.