Learning to observe and draw the figure is one of the cornerstone practices of becoming an animator. Your fundamental knowledge of character animation depends on a solid understanding of movement – but before movement is form, shape, line of action, and perspective. Basic drawing knowledge is at the heart of it all.
From mastering the basics of sketching to understanding the intricate details of anatomy, and from the art of capturing light and shadows to the magic of creating depth through perspective, this topic will offer you the guidance and resources you need to observe and draw figures.
So get ready to learn the basics so you can fill your sketchbook, build your portfolio, and breathe life into your characters.
Subtopics that you can explore
In this Observation Drawing topic, you’ll explore six key subtopics, each offering valuable insights and techniques to elevate your animation game. These subtopics are:
- Sketchbook
- Portfolio
- Basic Shapes and Silhouettes
- Line of Action and Gesture
- Anatomy and Proportion
- Shading, Light and Perspective
Use the Observation Drawing Forum to share your coursework
When you complete a learning task, always read its What should you do after completing this task? section to check if you need to share your coursework (e.g. image or multimedia files) in this topic’s Forum.
You'll get specific guidance on when to do this but it's a good idea to get a headstart and set up your personalised forum thread for Observation Drawing now by working through the task below.
Practice
Set up your forum thread for Observation Drawing
Set up your forum thread for this topic. By doing this, you'll be able to:
- Share your animation coursework you create while completing learning tasks.
- Get constructive feedback from your facilitator and fellow students to help you improve your animation skills and knowledge of animation principles and techniques.
- Learn from different perspectives, techniques and creative solutions shared by fellow students.
What steps should you take to complete this task?
- Find this topic’s Forum by selecting this link: Forum: Observation Drawing or by using the navigation menu on the left.
- Select the New thread link once you land on the Forum.
- In the Subject field, enter your first and last names.
- In the Message field, enter one or two sentences describing what you know about observation drawing.
- Select Post to forum at the end of the page.
You can also watch this playlist below of two short videos (6:38m) to find out how to set up your forum thread and share your coursework in your forum thread.
Use the hamburger icon in the top right of the playlist to access the video menu if you need to.
What should you do after completing this task?
Keep progressing through this topic. Whenever you get to a learning task, read it carefully to check whether you need to share your animation coursework (e.g. a JPEG or MP4 file) to the Forum.
Remember, reach out to your facilitator if you have questions about how to use the Forums or any other aspect of your study.
Learning tasks that will help you develop and practise animation skills
Practice
Use your skills and build your knowledge
Dive into this topic’s learning tasks confidently – they're your stepping stones to getting to grips with fundamental animation tools. Completing the learning tasks will build your observation drawing skills and empower you to create great animations.
Look out for this PRACTICE box throughout this topic to identify learning tasks and resources, letting you know exactly what to do. The information below outlines what learning tasks to expect in Observation Drawing and how much time you should allocate to each one.
| # | Learning Task Name | Duration (Hours) | |
|---|---|---|---|
| 1 | Sketch everyday objects | 1 |  |
| 2 | Sketch basic shapes for five objects | 2 | |
| 3 | Draw ten silhouettes | 2 | |
| 4 | Redraw ten dynamic poses | 2 | |
| 5 | Draw ten gesture sketches | 2 | |
| 6 | Sketch the human form | 2 | |
| 7 | Sketch an animal | 3 | |
| 8 | Use shading techniques on ten circles | 1.5 |  |
| 9 | Use light and shading techniques | 3 | |
| 10 | Draw a box using two-point perspective | 1 | |
| 11 | Draw a study ising basic shapes, perspective, and shading | 1 | |
| 12 | Check your knowledge | 0.5 | |
Feedback and support is woven through the learning tasks as you complete them. Reach out if you have any questions about what to do!
In this Sketchbook subtopic, you’ll discover the elements of practice and observation. Learn about tools you can use to transform your sketchbook into your observation gateway to animation creativity,
Practise, practise, practise!
As you progress through this Observation Drawing topic, you’ll learn about fundamental concepts and practices of observational drawing, but practising is essential to developing observational drawing skills.
Important
Take your sketchbook everywhere
During this Foundations module, remember to keep a sketchbook and draw from observation regularly. It’s through regular practice that you can apply the knowledge, concepts and ideas you will be learning.
So take a sketchbook with you in your day-to-day activities, and aim to observe and draw people, objects, animals, vehicles and environments.
How to observe
Learning to draw is sometimes described as learning to see. This is what is meant by observational drawing, or drawing what you see.
Drawing what is in front of you requires paying close attention to what you see, and breaking down what you see into different aspects and details. Drawing better requires having better observation tools.
No rules, just tools
In this Observation Drawing topic, you’ll learn tools that will help you observe properly. There will be no rules as to exactly how you should assimilate the tools, but through repetition and practice, you’ll become better at running through those tools in your mind as you study and draw a subject or person.
It’s helpful to think of the tools as a checklist of questions constantly running through your mind as you draw. Although the checklist will eventually become an everyday part of your drawing, you’ll need to initially write your own checklist and repeatedly ask yourself each question as you draw.
You can frame these tools as questions in a checklist, as you observe and draw a human figure.
Select + to view the checklist questions.
- What basic shapes do I see in the figure before me?
- What is the line of action?
- Would it be stronger/more dynamic if I adjust the pose or my viewpoint?
- What are the distinct aspects of the silhouette?
- Are there negative spaces?
- Would it be stronger/more dynamic is I adjust the pose or my viewpoint?
- What is the angle of the hips and shoulder line?
- How do they impact the curve of the spine?
- Where is there muscular compression, extension, flexion?
- What skeletal information is evident on the surface?
- How can I develop my basic shape information using knowledge of anatomical proportion?
Now, you’re observing!
Tip
Keep track of your progress
Did you know that the ‘Mark as read’ feature in the Online Campus can help you stay organised and keep track of your progress? It allows you to indicate which items you have explored, making it easier to manage your learning journey.
When you’ve interacted with a subtopic, click the ‘Mark as read’ option by clicking the three dots in the top left – this action means that you’ve engaged with the content. You can always change it to ‘Mark as unread’ as well.
Dive into this Portfolio subtopic and explore how to showcase your creative identity. Explore how to assemble and present your best work, setting the stage for a successful animation career.
Purpose of a portfolio
The purpose of a portfolio is to showcase your skills and abilities as an artist.
Whether your drawings are originally made on paper and then scanned or photographed, digital drawings drawn using a digital pen and tablet using drawing software, or a mixture of both, it is recommended that you develop a practice of collating your work in one portfolio in a PDF format.
Collating your work will make it easier for you to share at short notice when someone is interested in seeing your work by sending your portfolio in PDF formator as a link to an online PDF portfolio, e.g., contained in a Google Drive folder.
Features and contents of a portfolio
What features should your portfolio have?
What should your portfolio show?
Whether you’re starting from scratch or need to update an existing portfolio, it should give some insight into your developing abilities, experimentation in different mediums, and familiarity with processes, tools and possibly software.
Nobody expects a portfolio to be perfect, but you should concentrate on showing a selection of your best work. A portfolio can include more than just finished pieces: it can be helpful to include some examples of how you arrived at the final result. For instance, seeing a few rough sketches, developmental work, or ideas alongside the final result would be great.
We all value originality and creativity, but sometimes derivative work, even copies, can help understand your capabilities. Although you may have heard warnings not to include copied or derivative work in professional portfolios, if you’re using your portfolio to apply to study, showing what you have learnt from artists you admire might be helpful if you’re using your portfolio to apply to study. This can even help give insight into how you think and approach your artwork.
Tip
Be selective!
Don't put everything in your portfolio – your ability to be selective with the drawings you decide to include is also important.
What types of drawings can you include?
Practice
Task 1: Sketch everyday objects
Incorporate regular sketching practice into your routine using a sketchbook. Through consistent practice, you’ll enhance your observational drawing skills, applying the principles and techniques covered in this module.
It’s about accumulating what animators call 'pencil mileage', where the focus is on regular drawing rather than achieving perfection. By sketching everyday objects, you'll build a foundation for more advanced techniques later.
What tools or resources do you need for this task?
Make sure you have access to:
- Sketchbook (physical)
- Pencil
- Variety of everyday objects from your surroundings
- Phone camera.
What steps should you take to complete this task?
1 Hour

Set aside one hour to complete steps 2-6 below.
- Revisit the Sketchbook and Portfolio subtopics to reinforce what you know if you need to.
- Ensure you have a sketchbook and pencil ready to start your practice.
- Choose a variety of everyday objects from your surroundings, such as household items.
- Begin by sketching these objects roughly and simply. Fill at least two pages with your sketches.
- Aim for speed and simplicity in your sketches. Capture the basic shapes and simple details of each object.
- Pay attention to the object’s overall shapes and essential features. Don’t worry about perfection; the key is to observe and draw.
What should you do after completing this task?
- Take a moment to review your sketches and reflect on what you observed and captured. Set a date and time for your next sketching practice in the upcoming Basic Shapes and Silhouettes subtopic.
- Use your phone to take a clear and well-lit photo(s) of your sketches.
- Share your photo(s) to the Forum:
- Select your forum thread in Forum: Observation Drawing.
- Select Reply to your first Forum post.
- Enter the words ‘Task 1’ in your reply.
- Select the Post your response button, then select Edit in your reply when it shows up.
- Upload your photo(s) using the Attachment field.
- Select Save changes to share your coursework to your forum thread.
- Get feedback on this and other learning tasks at the next Live Session – check the Live Session calendar for dates and times.
Remember, the journey of improvement starts with the first sketch. Happy sketching!
Unlock the power of simplicity in animation with this Basic Shapes and Silhouettes subtopic, and learn how these artistic building blocks can help improve your ability to plan for strong animation.
Tip
Ask questions, get answers
Learning is about curiosity and growth. If you're unsure about the steps or actions needed to complete any task or exercise, don't hesitate to seek guidance. Asking questions is a powerful way to clear your path and excel in your learning journey.
If you would like to chat with your facilitator about any aspect of your study, you can email them or send them a message through the Yoobee Online messaging. Or, use their Calendly link and book a 1:1 meeting directly.
Basic shapes
In this section, you’ll discover why you should use basic shapes in observational drawing and how they can enhance your drawing skills in multiple creative fields.
One key aspect of observational drawing is using basic shapes as a foundation – breaking down complex forms into simplified shapes helps make those complex forms easier for you to draw.
What are basic shapes?
Basic shapes serve as the building blocks of complex objects and forms. When you observe a subject, breaking it down into basic shapes makes it easier to see its structure in a simplified way and understand its underlying geometry.
These shapes, such as circles, squares, triangles, rectangles, and ovals, provide a framework for proportion and shape relationships, no matter what objects you draw. This approach means first visualising and lightly sketching basic shapes that make up an object, before adding smaller surface details.
What are the benefits to you using basic shapes?
Drawing basic shapes makes it easier to:
- Quickly capture the essence of what you see
- Translate that information when drawing the same object from different angles
- Plan more complex drawings that include many different objects in a more organised and manageable way.
Select + to view three areas where you will find using basic shapes useful.
- Observing basic shapes makes it easier to compare the relative sizes of shapes and more accurately represent the relationships between different elements.
- Basic shapes assist in understanding perspective and make it easier to draw objects with three-dimensional form, starting with two-dimensional surfaces and then extending those surfaces as shapes.
- Basic shapes aid in composing more complex drawings, enabling you to arrange the elements within the picture, measure and adjust relative distances, and create a balanced and visually appealing composition.
What are some other advantages to using basic shapes?
Drawing using basic shapes enhances your ability to animate complex forms, movements and characters, due to a better understanding of space, proportion, distances and paths. Drawing an object or character from different angles also improves your ability to plan poses and staging for strong animation.
Drawing skills are important in character design and storyboarding. Animation is an extension of both skills (especially 2D animation), but a solid understanding of drawing will also help a 3D animator visualise and explore different poses and movements.
Incorporating basic shapes into observational drawing is also used in the fields of illustration, product design, and fine art to create captivating illustrations and paintings and design functional products.
Practice
Task 2: Sketch basic shapes for five objects
Practice sketching basic shapes to break down complex forms and capture the essence of real-life objects quickly. This skill will help you plan more complex drawings that include many different objects later on.

What tools or resources do you need for this task?
Make sure you have access to:
- Sketchbook (physical)
- Pencil
- Five images of real-life objects
- Phone camera.
What steps should you take to complete this task?
2 HourS
Set aside two hours to complete steps 2-4 below.
- Revisit the Basic Shapes subtopic to reinforce what you know if you need to.
- Find five images that encompass a variety of subjects, such as household objects, animals, plants, or human poses.
- On an A4 page or in your sketchbook, sketch basic shapes using each image.
- Focus on keeping your drawings simple and observing basic shapes and proportions. Don’t worry about detail or rendering ‘finished’ drawings.
What should you do after completing this task?
- Consider how breaking down complex forms into simpler shapes can make your drawing process more efficient and effective. Reflect on any challenges you faced and how you overcame them during this practice.
- Use your phone to take a clear and well-lit photo(s) of your sketches.
- Share your photo(s) to the Forum:
- Select your forum thread in Forum: Observation Drawing.
- Select Reply to your first Forum post.
- Enter the words ‘Task 2’ in your reply.
- Select the Post your response button, then select Edit in your reply when it shows up.
- Upload your photo(s) using the Attachment field.
- Select Save changes to share your coursework to your forum thread.
- Get feedback on this and other learning tasks at the next Live Session – check the Live Session calendar for dates and times.
Now, move to Silhouettes. This technique will further enhance your understanding of shapes and prepare you for more intricate drawing techniques. Enjoy the journey of discovery and creativity in the upcoming section!
Silhouettes
In this section, you’ll explore the fundamentals of silhouettes and how to use them to enhance your observational drawing skills.
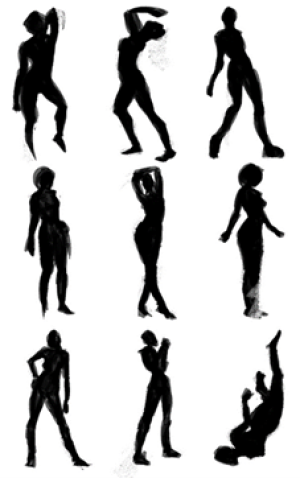
What are silhouettes?
A silhouette is an object or figure's dark outline or shape against a lighter background. It is typically created by blocking the light source and capturing only the external form, resulting in a solid, shadow-like representation.
Silhouettes are a valuable tool in observational drawing, including life drawing. They involve capturing a subject's outline or basic shape without including any internal details or features.
What are the benefits to you using silhouettes?
Silhouettes serve various purposes and can greatly contribute to the development of your drawing skills.
Select + to find out why silhouettes are used in observational drawing and how they can enhance your drawing skills.
- Silhouettes allow artists to focus on the overall form and gesture of a subject. By reducing the subject to its basic outline, you can better understand its underlying structure, proportions, and movement.
- Silhouettes help simplify complex forms, making them easier to analyse and capture in your drawings.
- Working with silhouettes encourages you to observe the subject more attentively. You learn to recognise and isolate the essential shapes and contours that define its unique characteristics.
- This process improves your ability to visualise and conceptualise the subject in your mind, which in turn strengthens your observational and drawing skills.
- Silhouettes offer an opportunity to explore and experiment with different compositions and arrangements within a drawing. Since the focus is on the overall shape and outline, you can play with the placement, balance, and negative space around the subject.
- This exercise trains your eye to see and create aesthetically pleasing compositions.
- Silhouettes provide a platform for artistic expression and experimentation. By stripping away details and focusing on the essence of the subject, you have the freedom to interpret and stylise the form.
- This allows for creative exploration, pushing the boundaries of traditional representation and encouraging your unique artistic voice to emerge.

What should you consider when using silhouettes?
Select + to find out what you should do when working with silhouettes:
- Ensure that the silhouette is distinct and easily recognisable. The outline should convey the essential characteristics of the subject, making it identifiable even without internal details.
- Pay attention to the balance and proportions within the silhouette.
- Strive for harmony and coherence in the overall shape, avoiding any awkward or imbalanced contours.
- Consider the use of negative space around the silhouette.
- The space surrounding the subject can play an equally important role in the composition, enhancing the visual impact and creating a sense of balance and tension.
- Explore different types of silhouettes to expand your artistic repertoire. Don't limit yourself to just one style or approach – experiment with open silhouettes, closed silhouettes, complex shapes, and abstract interpretations.
- This experimentation will broaden your understanding of form and composition.
Working with silhouettes in observational drawing offers you a fresh perspective. It encourages you to see and interpret subjects in new ways. It develops your observation skills, compositional sense, and ability to capture the essence of a subject.
Through experimentation and exploration, silhouettes can become a powerful tool in your artistic toolbox.
Practice
Task 3: Draw ten silhouettes
Develop your ability to quickly capture the essence of various subjects by drawing silhouettes. This task will enhance your understanding of form and gesture and your ability to convey subjects in new ways. You’ll also use the Line of Action website’s Figure Study tool to select your subjects.
What tools or resources do you need for this task?
Make sure you have access to:
- Sketchbook (physical)
- Pencil
- Line of action website (Figure study tool)
- Phone camera.
What steps should you take to complete this task?
2 HourS
Set aside two hours to complete steps 2-3 below.
- Revist the Silhouettes subtopic to reinforce what you if you need to.
- Open the Line of Action website’s Figure Study tool by following this link: Line of Action: Figure study tool. Once on the website:
- Under ‘What do you want to draw?’, select ‘Cover and Clothing’ and ‘Ages’ options.
Warning: The tool uses nude models (both male and female) unless you use the ‘Only Covered Models’ option. - Under ‘What kind of session?’, select ‘All the same length'.
- Under ‘What time interval?’ select ‘5 minutes’.
- Select the ‘Get Drawing!’ button to start your drawing session.
- Under ‘What do you want to draw?’, select ‘Cover and Clothing’ and ‘Ages’ options.
- Draw ten silhouettes – one per image generated by the Figure Study tool– on a single page in your sketchbook. Keep to five minutes per image.
What should you do after completing this task?
- Consider how drawing silhouettes has influenced your understanding of form, gesture, and capturing the essence of subjects in a limited timeframe. Reflect on any challenges and improvements you observed during the process.
- Use your phone to take a clear and well-lit photo(s) of your sketches.
- Share your photo(s) to the Forum:
- Select your forum thread in Forum: Observation Drawing.
- Select Reply to your first Forum post.
- Enter the words ‘Task 3’ in your reply.
- Select the Post your response button, then select Edit in your reply when it shows up.
- Upload your photo(s) using the Attachment field.
- Select Save changes to share your coursework to your forum thread.
- Get feedback on this and other learning tasks at the next Live Session – check the Live Session calendar for dates and times.
Move to Line of Action and Gesture to deepen your understanding of dynamic posing and gestures. This subtopic will help you increase your ability to bring life and movement into your observational drawing.
Welcome to the Line of Action and Gesture subtopic, where lines are your dynamic tools that help you infuse your drawings with movement and vitality.
Line of action
In this section, you’ll find out how using the fundamentals of line of action can enhance your observational drawing.
In drawing, line of action helps improve poses by making them more dynamic and expressive – it captures the movement of a pose. Line of action enables you to depict the figure in a more dynamic and expressive way, emphasising the flow and rhythm of the body.
Using it, you can create a sense of movement and vitality in your drawings.
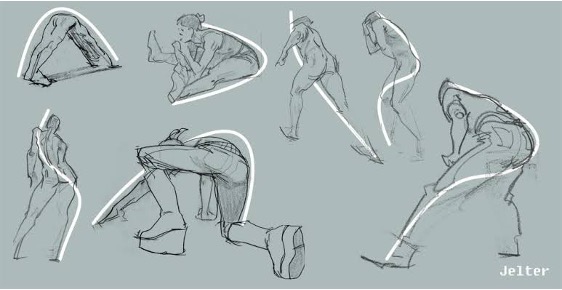
What is line of action?
A line of action is an imaginary line that runs through the figure, capturing the pose’s overall movement, direction, and energy. It serves as a visual guide to simplify complex ideas in form and pose.
![[ADD IMAGE'S ALT TEXT]](/sites/default/files/Lines%20Of%20Action.jpg)
What are the benefits to you using line of action?
The human body is a complex and intricate form with various curves, angles, and planes. Observing line of action helps you identify and simplify an overall sense of movement within the major gesture and establishes a solid foundation for the drawing.
Building basic shapes and proportions around a line of action makes it more likely that the overall essence of the pose will show in the final drawing.
![[ADD IMAGE'S ALT TEXT]](/sites/default/files/Line%20Of%20Action_0.jpg)
- The line of action plays a crucial role in establishing balance and unity in a drawing. It provides a sense of cohesion, connecting different parts of the body and ensuring that the figure appears harmonious and well-proportioned.
- By considering the line of action, you can maintain a sense of visual equilibrium and avoid disjointed or awkward compositions.
- Studying and interpreting the line of action helps sharpen your observation skills. It encourages us to carefully observe the subject and analyse its underlying structure and movement.
- By continuously practicing and refining your ability to identify and draw the line of action, you become more adept at capturing the essential qualities of any pose or subject.
- This enhanced observational skill can be applied to various areas of art, such as figure drawing, character design, and even landscape or still-life compositions.
Tip
Sharpen your tools
Regularly sketching from life models or using reference images will help refine your observation and drawing abilities, including your skills in capturing line of action.
With time and dedication, line of action will become an invaluable tool in your artistic repertoire, enabling you to create more dynamic, expressive, and visually engaging drawings.
What should you consider when using line of action?
Select + to read about working with line of action within your poses:
- Focus on capturing the energy and flow of the pose through the line of action. Observe how different body parts relate to one another and contribute to the overall movement.
- Pay attention to the distribution of weight and how it affects the line of action. This understanding will help convey a sense of balance and stability in the drawing.
- Don't be afraid to exaggerate or emphasise the line of action to enhance the expressiveness of the pose. Experiment with different variations to add drama and interest to your drawings.
- Ensure that the line of action extends throughout the entire figure, creating a cohesive and unified composition. Avoid abrupt changes or disjointed lines that may disrupt the flow of the drawing.
Practice
Task 4: Redraw ten dynamic poses
Hone your drawing skills using line of action to create dynamic and expressive poses. This task will enhance your observation and drawing abilities, focusing on the flow and rhythm of the body so you can create engaging movements that are fundamental in animation.
What tools or resources do you need for this task?
Make sure you have access to:
- Sketchbook (physical)
- Pencil
- Ten images of dynamic poses
- Phone camera.
What steps should you take to complete this task?
2 Hours
Set aside two hours to complete steps 2-6 below.
- Revisit the Line of action section to reinforce what you know if you need to.
- Select ten reference images that portray dynamic poses. Look for photographs featuring sports athletes or dancers as they convey great dynamic poses.
- For each selected pose, identify and sketch the line of action that captures the dynamic movement within the pose.
- Redraw each pose using the line of action technique. Ensure the line of action influences the entire pose, creating a sense of flow and movement.
- After redrawing the initial poses, push the boundaries by exaggerating the action line further. Redraw each pose, accentuating the action line to create a more intense and dynamic version.
- Review your series of redrawn poses and compare them to the original reference poses. Think about how applying line of action and exaggeration techniques transformed the dynamics and expressiveness of each pose.
What should you do after completing this task?
- Apply what you've learned to your future sketches and animations. Practice incorporating dynamic lines of action and exaggeration to infuse vitality and energy into your characters and scenes.
- Use your phone to take a clear and well-lit photo(s) of your sketches.
- Share your photo(s) to the Forum:
- Select your forum thread in Forum: Observation Drawing.
- Select Reply to your first Forum post.
- Enter the words ‘Task 4’ in your reply.
- Select the Post your response button, then select Edit in your reply when it shows up.
- Upload your photo(s) using the Attachment field.
- Select Save changes to share your coursework to your forum thread.
- Get feedback on this and other learning tasks at the next Live Session – check the Live Session calendar for dates and times.
When you’re ready, explore the Gesture sketching section to deepen your understanding of capturing movement and expression in drawings.
Gesture sketching
In this section, you’ll explore the fundamentals of gesture sketching and how to use it to enhance your observational drawing skills.
What is a gesture sketch?
A gesture sketch is a quick, loose, and simplified drawing that captures the essence and movement of a subject. It aims to convey the energy, posture, and overall gesture of a figure or object in a short time, usually within a few seconds to a few minutes.
Gesture sketches are often used as a foundation for more detailed artwork or as a practice exercise to improve observation and understanding of form and motion.
![[ADD IMAGE'S ALT TEXT]](/sites/default/files/Gesture%20Sketching_0.jpg)
Select + to find out why gesture sketching is a useful skill for you to develop.
- Gesture sketches aim to capture the human figure’s liveliness, fluidity, and dynamic nature. You can quickly and spontaneously sketch the subject to convey its gestures, poses, and overall energy.
- Gesture sketches help you depict the vitality and natural flow of the figure, making your drawings more engaging and livelier.
- Gesture sketches require keen observation and a deep understanding of the human body's structure and movement. Through regular practice, you develop a trained eye to quickly analyse and interpret the figure's proportions, angles, and relationships between body parts.
- Your heightened observation skill transfers to other areas of drawing and improves your ability to depict subjects accurately.
- Gesture sketches encourage a more spontaneous and intuitive approach to drawing. They allow you to trust your instincts and capture the immediate impression of the subject without getting caught up in tiny details.
- This freedom of expression promotes artistic exploration and nurtures your style and creativity.
- Gesture sketches focus on using loose, fluid lines that convey movement and rhythm. Regular practice of gesture sketches helps improve your draftsmanship and line quality. You learn to convey the figure’s weight, structure, and contours with economy and confidence.
- This skill translates to more precise and expressive lines in your finished drawings.
What should you consider when working with gesture sketches?
Select + to find out how to best work with gesture sketches.
- Gesture sketches should be done rapidly, with an emphasis on capturing the immediate impression of the subject.
- Avoid spending too much time on any one area and instead focus on the overall gesture and movement of the figure.
- In gesture sketches, simplify the figure into basic shapes and lines that convey the essential gestures and proportions.
- Don't worry about capturing every detail but rather focus on the overall impression and energy of the pose.
- Experiment with different line weights and speeds to convey the different qualities of the figure's forms and movement.
- Use lighter, quicker lines for areas of less importance and heavier, more deliberate lines for areas of emphasis.
- Treat gesture sketches as the foundation for your drawings. They provide a loose and energetic framework upon which you can build more detailed and refined renderings in subsequent stages.
How does gesture sketching enhance your drawing skills?
Gesture sketches are invaluable in life drawing as they help you capture the essence and vitality of the human figure. They enhance your observational skills, promote artistic intuition, and cultivate a dynamic and expressive approach to drawing.
Tip
Keep on sketching
Incorporating gesture sketches into your regular drawing practice will see a significant improvement to your overall drawing abilities.
Practice
Task 5: Draw ten gesture sketches
Practice the technique of gesture sketching, a fundamental skill in quickly capturing vitality and movement. This task is designed to help you experience the benefits of gesture sketching, demonstrating its pivotal role in refining your observational skills and artistic expression.
What tools or resources do you need for this task?
Make sure you have access to:
- Sketchbook (physical)
- Pencil
- Line of Action: Figure study tool
- Phone camera.
What steps should you take to complete this task?
2 Hours
Set aside two hours to complete steps 2-3 below.
- Revisit the Gesture sketching section to reinforce what you know if you need to.
- Open the Line of Action website’s Figure Study tool by following this link: Line of Action: Figure study tool. Once on the website:
- Under ‘What do you want to draw?’, select ‘Cover and Clothing’ and ‘Ages’ options.
Warning: The tool uses nude models (both male and female) unless you use the ‘Only Covered Models’ option. - Under ‘What kind of session?’, select ‘All the same length’.
- Under ‘What time interval?’ select ‘1 minute’.
- Select the ‘Get Drawing!’ button to start your drawing session.
- Under ‘What do you want to draw?’, select ‘Cover and Clothing’ and ‘Ages’ options.
- Draw ten gesture sketches – one per image generated by the Figure Study tool – on a single page in your sketchbook. Keep to one minute per image.
What should you do after completing this task?
- Experiment and iterate to refine your technique further. Take the insights gained from your sketching practice and prepare to apply them to your next stop in this module.
- Use your phone to take a clear and well-lit photo(s) of your sketches.
- Share your photo(s) to the Forum:
- Select your forum thread in Forum: Observation Drawing.
- Select Reply to your first Forum post.
- Enter the words ‘Task 5’ in your reply.
- Select the Post your response button, then select Edit in your reply when it shows up.
- Upload your photo(s) using the Attachment field.
- Select Save changes to share your coursework to your forum thread.
- Tune in to Live Session: Get feedback on this and other learning tasks at the next Live Session – check the Live Session calendar for dates and times.
Understanding the physical form and its proportions is foundational for creating believable and captivating character performances, so get ready to enhance your drawing skills to bend and break the rules in the Anatomy and Proportion subtopic.
Animation is about creating the illusion of lifeBrad Bird
Animation is about describing life or giving the “illusion of life”. In animation, you combine classical drawing, sculpture, acting and puppetry skills to provide a performance. This Anatomy and Proportion subtopic will help you make these performances visually appealing and believable.
A solid foundation in the principles of anatomy will also help you better use and describe movement, weight and timing. Learning these principles is relatively simple compared to more complex areas of animation, such as empathy, conveying feeling, and use of expression.
Learning the basic principles and rules of anatomy means you can:
- Use and apply the principles to your drawing and animation.
- Stretch, bend and break the rules to improve your drawing and animation.
Tip
Remember to stay loose
Focussing on the details of anatomy may make your drawings tight and restricted. After all, the purpose of understanding anatomy is to make your drawings better.
It’s important to distinguish between anatomy for animation and artistic study versus anatomy for medical study. Anatomy in animation and artistic study primarily involves:
- skeletal structures
- muscular forms and structures
- their influences on the surface appearance of the body.
You’ll learn more about these anatomical structures and their influences on the body in the following sections.
Human anatomy – the skeleton
In this section, you’ll explore the structure of the skeleton and its impact on the surface appearance of the human body.
Important
Know your bones
Understanding the skeleton’s structure and its influence on the body’s surface appearance is extremely important in drawing and animation. It helps you to more accurately describe position, line of action, weight, and movement.
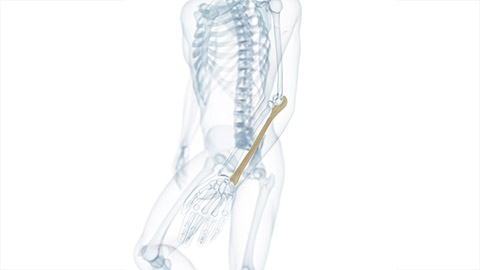
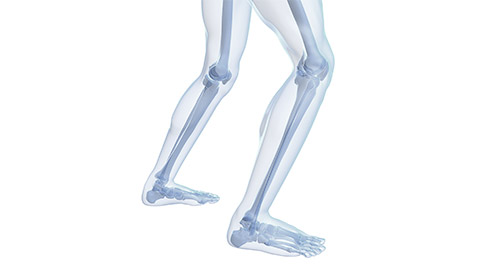
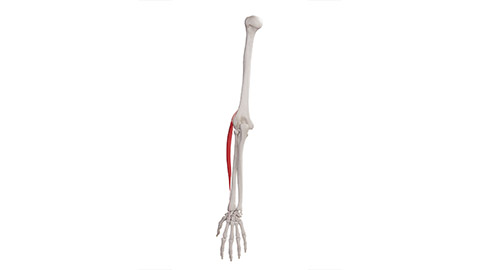
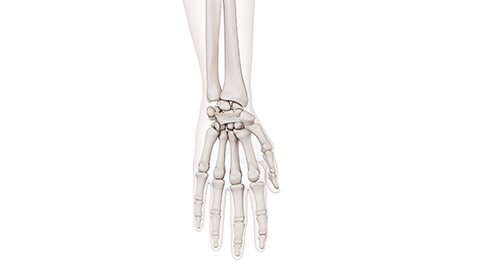
What are the main bones of the human body?
Did you know there are approximately 206 bones in the human body? Some groups of bones fuse in adults, making the exact number of bones vary from person to person.
Position of bones
Externally visible bones
Select + to view two examples of where main bones in the arms and legs clearly influence the surface appearance of the body.
- Ulna - one of the two human forearm bones, located on the medial (pinky finger) side of the arm.

- Femur, Patella, Tibia, Fibula – the four main bones of the human leg.

What are key connective structures that support the human skeleton?
Tendons and ligaments
Select + to view information about these two fibrous tissues and their roles in relation to the skeleton.
- Tendons are fibrous tissue that attaches muscles to bones in two places.
- Point of origin – attaches to the bone that remains still as the muscle contracts.
- Point of insertion – attaches to the bone that moves as the muscle contracts.

- Ligaments are fibrous tissue that attaches bones to other bones.
- They wrap around the bones where they join, holding them together but allowing for movement and flexibility.


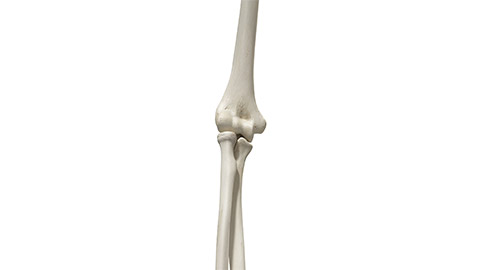
Joints
Types of joints are classified according to the shape of their articular surfaces. Select + to view information about three types of joints.
- Only flexion and extension are possible in this type of joint.

- Flexion, extension, adduction and circumduction are possible in this type of joint.


- This joint is part Hinge joint and part Ball and Socket joint. It allows for flexion, extension, pronation and supination.

How can you use the skeleton to draw from the inside out?
In animation, we stress the importance of ‘construction’ whether our characters have a skeleton or not. To apply this principle properly, you have must think like a sculptor, and draw from the inside out.
By first understanding the position of the bones and their relationship to each other, you can build your drawings from the inside out.
- When looking at the model, begin by seeing the position of the spine, pelvis and ribcage and use their positions to place the head and limbs.
- As you build your drawing, examine the external, visible parts of the drawing that best describe the structure of the skeleton beneath.
- Check that the body’s external shape of the body properly describes the skeleton’s form and position of the skeleton.
How do ‘bony landmarks’ enhance your drawing?
Regardless of age, gender or weight distribution, humans all have the same basic skeletal structure, externally visible at specific points of the body. These are known as ‘bony landmarks’, and they help you ‘see’ the skeleton first as you draw and map the positions of its structure.
Bony landmarks help better describe your drawings in space with depth and perspective. They often indicate Point A and Point B, the opposite ends of a bone. Although the muscle in-between hides the rest of the bone, the drawing will look wrong if the bony landmarks are offset or misaligned.
Tip
When cheating is good
Sometimes, you must change the drawing slightly to make things look ‘right’. For example, when a part of a shape is obscured from view and protrudes in another place, the visual connection could appear incorrect because of its unusual shape.
In this instance, it would look better to change the shapes slightly so its construction follows through behind the other shapes in a clearer way. In animation, we call this ‘cheating’, and in this instance, cheating is good!
How can you balance clarity and creativity when working with the skeleton?
The best animation is clear and easy to understand. Sometimes, when creating key positions in animation, your character’s anatomical structure will restrict your ability to describe its position from a particular viewpoint clearly.
Don’t settle for an average-looking picture; make it stronger. Change the position of shapes, change the viewpoint, or cheat!
The same applies when describing an action. Sometimes, an action will look stronger when your character achieves a physically and anatomically impossible position – this not only applies to rubbery, cartoony characters but can also be very effective for realistic characters in dynamic action sequences.
Tip
Stretch, bend, and break
Remember, learning the principles and rules of anatomy not only means you can apply them to your drawing, but also stretch, bend, and break the rules to make your animation even better.
Bend that spine for a more dynamic pose! Break that elbow joint for a couple of frames to add impact! Separate those two bones for a longer stretch!
Human anatomy – the muscles
In this section, you’ll examine the muscle structure and its influence on the human body’s surface appearance.
Important
Know your muscles
Understanding how muscles work will improve your ability to recognise the body’s muscle groups and how they appear in various positions. In turn, this will improve your ability to describe them in your drawings.
What are the main muscle types in the human body?
Did you know there are more than 600 major muscles in the human body? Around 240 of these have specific names.
Select + to discover the three main types of muscles.
- These make the body move and help hold the skeleton together.
- They are also referred to as striated muscles due to the alternating light and dark bands that comprise the thousands of tiny muscle fibres that make up each muscle.
- Each fibre has many core elements called nuclei. The muscle fibres are held together by connective tissue.
- They make up a large part of the chest, abdomen, neck, arms legs and face.
- These are found in the body’s organs, for example, the walls of the stomach, intestines, bladder, and blood vessels.
- They are not striated like skeletal muscles and have only one nucleus in each fibre.
- These have smooth and skeletal characteristics and are found only in the heart.
- They have striations and have only one nucleus in each fibre.
How do major muscle groups influence surface appearance?
Major muscle groups in the arms, legs, and trunk influence the surface appearance of the human body.
Select the arrows to see their influence.
Anatomy uses precise terminology to describe muscles in the human body that reflect characteristics such as the muscle location, shape, size (e.g. magnus for large, brevis for short, longus for long) and function.
Feel free to use the internet to help you identify each muscle in the two diagrams below by dragging the correct anatomical term to its matching number. Select the images to make them larger.
You can also refer to the leg and arm/shoulder muscles with precise anatomical terms.
Feel free to use the internet to help you identify each muscle in the two diagrams below by dragging the correct anatomical term to its matching number. Select the images to make them larger.
How do muscles work?
Muscle properties – flexion and extension
Opposing muscle groups work against (or with) each other to control movement. As one muscle or group of muscles flexes (closes and shortens), an opposing muscle or group of muscles extends (opens and lengthens).
Tip
Remember tendons?
When you worked through the Human anatomy – the skeleton section, you learnt that muscles are attached to bones by fibrous tissue called tendons. You can read through that section again if you need a refresher on these connective structures that support both the muscles and the skeleton.
![[ADD IMAGE'S ALT TEXT]](/sites/default/files/Major%20Muscles.jpg)
As you can see in the image above, the bicep is an easy muscle to describe the difference between flexion and extension. However, it is important to get familiar with many different muscles and how they appear in both states.
In drawing, the mass of any muscle remains the same in any position and simply squashes or stretches as you describe flexion and extension. Be careful that you seek to accurately describe the position of each muscle and the bones to which it is attached.
Avoid incorrectly describing generic muscle masses that appear to begin and end at points on the same bone. In many places you can accentuate the transition from muscles to tendons in order to make your drawings stronger and clearer.
How can muscle movement and structure enhance your animation?
Muscle movement
In animation, your ability to correctly describe muscle groups with varying degrees of flexion and extension will markedly strengthen your key positions.
- During anticipation poses, particular muscles move into a state of flexion as they prepare to explode into action, while opposing muscle groups are in extension.
- Many muscles pop into full extension (and beyond) when the body springs into action before settling into the next pose.
- During cushioning sequences, both fully extended and flexed muscles become relaxed slightly.
These differences will be noticed, especially in strong squash and stretch sequences They will give your anticipation poses and cushioning an extra level of life and realism.
During life drawing, look carefully at each pose and seek to identify varying states of flexion and extension in muscles. This will bring the muscles into action in your drawing, representing them functionally and aesthetically.
Muscle structure
Select + to find out what to consider when focussing on muscle structure in life drawing.
- Start by studying surface anatomy, which involves identifying the major muscle groups visible on the body's exterior. These include the deltoids, pectorals, biceps, triceps, abdominals, quadriceps, hamstrings, and calf muscles.
- Observe how they appear and contribute to the overall shape and form of the figure.
- While having a general understanding of the muscle structure is important, avoid getting overwhelmed by intricate details. Instead, focus on capturing the major muscle masses and their general shapes.
- Simplify their forms into basic shapes and planes to establish a solid foundation for your drawing.
- Pay attention to the proportions and relationships between different muscle groups and body parts.
- Observe how they overlap, connect, and contribute to the overall balance and harmony of the figure.
- Understanding these relationships helps you accurately represent the body's structure and achieve a realistic and cohesive drawing.
- Remember that the appearance of muscles can vary depending on factors such as age, body type, and fitness level.
- Additionally, muscles can change in appearance when contracted or relaxed.
- Practice drawing figures in different poses and explore how the muscles adapt and change shape accordingly.
By studying and accurately depicting the muscle structure in your life drawings, you will better understand the human body's form, proportions, and movement. This knowledge enhances your ability to represent the figure realistically and expressively.
Remember to combine your knowledge of muscles with observation and practice regularly to refine your drawing skills and bring your artwork to life.
Practice
Task 6: Sketch the human form
Immerse yourself in the human form, a fundamental subject for animators, and observe the basic anatomy of the human body. The goal is to develop your ability to capture the essence of the human form quickly and accurately, laying the groundwork for more detailed and refined character illustrations.
What tools or resources do you need for this task?
Make sure you have access to:
- Sketchbook (physical)
- Pencil
- Phone camera.
What steps should you take to complete this task?
2 Hours
Set aside 2 hours to complete steps 2-4 below.
- Revisit the Human anatomy section (both the skeleton and the muscles) in this subtopic to reinforce what you know, if you need to.
- Fill two pages with quick, small study sketches of the human form. Keep your sketches simple.
- Aim to observe and capture the basic aspects of the reference images you’re drawing - the overall shapes and key details.
- Let go of the pressure for perfection. Simply draw and accumulate ‘pencil mileage'. Each stroke adds to your journey of mastering the human form in your animations.
What should you do after completing this task?
- Reflect on your sketches and the experience of observing and portraying the human form. Remember, perfection isn't the goal right now—what matters is the practice. Each sketch adds to your learning journey.
- Use your phone to take a clear and well-lit photo(s) of your sketches.
- Share your photo(s) to the Forum:
- Select your forum thread in Forum: Observation Drawing.
- Select Reply to your first Forum post.
- Enter the words ‘Task 6’ in your reply.
- Select the Post your response button, then select Edit in your reply when it shows up.
- Upload your photo(s) using the Attachment field.
- Select Save changes to share your coursework to your forum thread.
- Get feedback on this and other learning tasks at the next Live Session – check the Live Session calendar for dates and times.
Next time, aim to enhance your drawings of the human form by applying what you know about the skeleton and muscles, but for now, appreciate the mileage you've gained and the growth it signifies in your artistic abilities. Keep drawing, keep evolving!
Reflection
Almost ready to unlock your human anatomy knowledge?
Take time to reflect on what you've learnt about how human anatomy works.
- How does a solid understanding of the skeleton enhance the realism of your drawings?
- How can you use your knowledge of muscle groups to covey fluidity or exaggeration?
- What role does your awareness of anatomy play in creating flow and rhythm?
Reflecting on questions like this will enhance your skill in describing the human body in your drawings. Now, channel your knowledge to create clear, insightful drawings and renderings that showcase your grasp of anatomy. Your ability to describe the human anatomy in your work will set you apart!
Animal anatomy
In this section, you’ll uncover key aspects of animal anatomy to help depict them in your drawing, Animal anatomy within the context of observation drawing refers to the study and understanding of the structure and form of animals to accurately depict them in visual art. It involves observing and analysing the various parts, proportions, and relationships of the animal's body and its internal structures.
When drawing animals, having a solid understanding of anatomy is crucial for creating realistic and believable representations.
![[ADD IMAGE'S ALT TEXT]](/sites/default/files/Animal%20Structure.png)
What are the key aspects of animal anatomy in observation drawing?
Observing the anatomy allows an artist to capture animals’ correct proportions, movements, and gestures, resulting in more accurate and lifelike drawings.
Practice
Task 7: Sketch an animal
Explore the anatomy and movement of animals to enhance the scope of your animation. This task gives you the space to practice drawing an animal’s anatomical structures, a critical skill for creating realistic and believable animal-based animated performances.
What tools or resources do you need for this task?
Make sure you have access to:
- Sketchbook (physical)
- Pencil
- Reference images of your chosen animal
- Phone camera.
What steps should you take to complete this task?
3 Hours
Set aside three hours to complete steps 2-5 below.
- Revisit the Animal anatomy section in this subtopic to reinforce what you know if you need to.
- Choose an animal and find references to its skeletal structure.
- Redraw the animal’s skeletal structure on a single A4 page in your sketchbook.
- Gather various images of the chosen animal to understand its movement.
- Draw six one-minute sketches on a single A4 page, focusing on different aspects of the animal's movement
What should you do after completing this task?
- Analyse your six sketches. How well did you capture the skeletal structure and movement of the animal? Can you identify areas for improvement?
- Use your phone to take a clear and well-lit photo(s) of your sketches.
- Share your photo(s) to the Forum:
- Select your forum thread in Forum: Observation Drawing.
- Select Reply to your first Forum post.
- Enter the words ‘Task 7’ in your reply.
- Select the Post your response button, then select Edit in your reply when it shows up.
- Upload your photo(s) using the Attachment field.
- Select Save changes to share your coursework to your forum thread.
- Get feedback on this and other learning tasks at the next Live Session – check the Live Session calendar for dates and times.
Now that you've practised drawing human and animal forms, it's time to learn how to bring your sketches to life through shading and lighting techniques, and using perspective. In the Shading, Light and Perspective subtopic, you'll learn these techniques to add dimension and realism to your sketches. Get ready to breathe more life into your drawings!
Explore
Dive into the world of anatomy!
Explore these books from our recommended reading list.
Human anatomy:
- Albinus on Anatomy. Hale & Coyle. ISBN: 0-486-25836-X
- Anatomy for the Artist. Barrons. ISBN: 0-7641-5603-9
Animal anatomy:
- An Atlas of Animal Anatomy for Artists. Ellenberger, Baum & Dittrich. ISBN: 0-486-20082-5
Discover how to give form and depth to your drawings in this Shading, Light, and Perspective subtopic. Learn how to breathe life into a drawing, making them appear as though they exist in a three-dimensional world.
Shading
In this section, you’ll find out how shading (also known as rendering) helps give a sense of weight and grounded volume to your drawings, giving the illusion of realism.
By adding tonal value to imply form, texture and light direction to a drawing, you’re able to create a sense of objects occupying space in a believable environment.
How does shading contribute to realism in drawings?
Select + to find out how shading can help you with your observational drawing.
- By adding shading and texture to a drawing, you create the illusion of depth, form, and texture, making the subject appear more realistic and convincing.
- This is particularly important in life drawing, where the goal is to create accurate and lifelike representations of the human figure.
- Shading allows you to create the illusion of depth and volume, giving the subject a sense of weight and dimensionality.
- This is especially important in life drawing, where the human body has complex and nuanced forms that require careful attention to light and shadow to achieve a convincing representation.
- Shading requires mastery of various technical skills, including observation, tonal value, and texture.
- These skills are essential in developing your drawing abilities and improving your overall artistry.
- Shading can also be used to express emotion and mood.
- By manipulating light and shadow, you can create dramatic and evocative effects, conveying a range of emotional states and moods.
What should you consider when using shading?
What are some different rendering techniques?
Different rendering techniques offer a range of options for creating tonal values and texture, allowing you to experiment and find your unique style.
Practice
Task 8: Use shading techniques on ten circles
Using shading techniques, enhance your drawing skills by making them more lifelike and three-dimensional. By practising these techniques, you'll discover how to give your drawings a sense of weight and volume, making your subjects look like they pop off the page.
What tools or resources do you need for this task?
Make sure you have access to:
- Sketchbook (physical)
- Pencil
- Phone camera.
What steps should you take to complete this task?
1.5 Hours

Set aside 1.5 hours to complete steps 2-5 below.
- Revisit the Shading section in this subtopic to reinforce what you know if you need to.
- Start by drawing ten flat circles neatly on a single page.
- Use four different shading techniques – stippling, hatching, cross-hatching, and smooth shading – to shade each circle, creating the illusion of three-dimensional spheres.
- Experiment and observe how each technique influences the circles’ perceived weight and grounded volume.
- Draw a small, simple arrow alongside each sphere to indicate the direction of light. Understanding light's influence on shading is key to conveying emotion and mood.
What should you do after completing this task?
- Apply what you've learnt to give more depth and realism to your sketching, honing your ability to make forms appear three-dimensional and lifelike.
- Use your phone to take a clear and well-lit photo(s) of your sketches.
- Share your photo(s) to the Forum:
- Select your forum thread in Forum: Observation Drawing.
- Select Reply to your first Forum post.
- Enter the words ‘Task 8’ in your reply.
- Select the Post your response button, then select Edit in your reply when it shows up.
- Upload your photo(s) using the Attachment field.
- Select Save changes to share your coursework to your forum thread.
- Get feedback on this and other learning tasks at the next Live Session – check the Live Session calendar for dates and times.
Having experienced how shading techniques can transform two-dimensional shapes into lifelike three-dimensional forms, further your understanding by moving to the Light section, where you'll deepen your knowledge of how light interacts with objects and how they add a sense of realism to your drawings.
Light
In this section, you’ll learn how light interacts with objects and surfaces, which is essential for depicting form, depth, and realism in your drawings.
By practising lighting techniques, you can make two-dimensional objects appear as though they occupy space in a believable environment.
How can you use light to depict tones in your drawing?
Every surface that reflects light, even indirectly, becomes a light source.
By controlling your use of values – the range of tones from light to dark – you can describe various tones that result from the light sources acting on a figure. To keep things simple, use only one direct light and one reflected light.
Tip
Edges and tones
Core tones help show the corners of the form and help describe changes in shape and surface contours. In your drawings, use sharp edges when forms are sharp, and broader softer edges to describe broader shapes/forms.
Try to keep the edges of core tones soft as opposed to the sharp edges of the cast shadow that are created by shapes blocking the light source. Highlights are used in the same way.
How do different tones enhance figures in drawings?
Practice
Task 9: Use light and shading techniques
Inject realism into your drawing by using light and shading. Continue to practice and explore how these two techniques interact to help you transform two-dimensional objects into appearing as if they occupy a three-dimensional environment.
What tools or resources do you need for this task?
Make sure you have access to:
- Sketchbook (physical)
- Pencil
- Phone camera.
What steps should you take to complete this task?
3 Hours
Set aside three hours to complete steps 2-4 below.
- Revisit the Light section in this subtopic to reinforce what you know, if you need to. You might also want to refresh the knowledge you learnt in the Shading section.
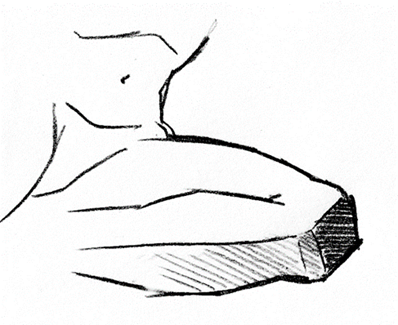
- Create a one-page tonal study of a form (e.g., an arm or leg, like that shown in the Light section) using any shading technique – stippling, hatching, cross-hatching, or smooth shading.
- Describe a specific light source influencing the form.
- Draw a small, simple arrow alongside your drawing to show the direction of the light source.
What should you do after completing this task?
- Review your tonal study. Continue to observe the world around you and experiment with different light and shading techniques to enhance your drawing.
- Use your phone to take a clear and well-lit photo(s) of your sketches.
- Share your photo(s) to the Forum:
- Select your forum thread in Forum: Observation Drawing.
- Select Reply to your first Forum post.
- Enter the words ‘Task 9’ in your reply.
- Select the Post your response button, then select Edit in your reply when it shows up.
- Upload your photo(s) using the Attachment field.
- Select Save changes to share your coursework to your forum thread.
- Get feedback on this and other learning tasks at the next Live Session – check the Live Session calendar for dates and times.
Great job completing this task! Next, take your skills to the next level by exploring how to incorporate depth and space into your drawings in the next section, Perspective, where you’ll discover how perspective can elevate the illusion of space and realism in your artwork.
Reflect
Ready to elevate your drawing skills?
Before you explore perspective, reflect on what you've discovered about shading and light, and how they can give your drawings a sense of form, depth and believability.
- Have your experiments with shading and different rendering techniques influenced your ability to capture texture and depth in your drawings?
- How has your understanding of using light to depict tones in your drawings evolved, and how has it impacted the way you sketch objects?
Your thoughtful reflection is your key to success in your assessment tasks and will help ensure your drawings and assignment examples vividly reflect your understanding of shading and light – and perspective, which is up next!
Perspective
In this section, you’ll explore perspective. This term describes techniques used to create the illusion of depth and three-dimensionality in two-dimensional drawings.
Understanding and using perspective in your drawings can greatly enhance your ability to represent space and form accurately.
How does perspective enhance the impact of your drawings?
Perspective techniques add a sense of believability and presence to drawings, making them more engaging to viewers. Using perspective techniques means you can:
- Convey the relationships between objects and figures in space, which helps viewers interpret size, position, and relative distance from their viewpoint.
- Make it easier to depict foreshortening and clarify where objects are overlapping
- Communicate the relative distance between objects in an environment, bringing depth and spatial coherence to drawings.
Elevating your animation skillset
Learning how to use perspective in drawing is more than just a skill; it's a gateway to enhancing your observation abilities and elevating the impact of your artwork.
Select + to discover five benefits of learning perspective.
- Learning perspective trains you to see and interpret spatial relationships more accurately.
- It encourages careful observation of how objects and figures relate to each other and your viewpoint.
- Perspective improves your ability to interpret and capture proportions, angles, forms, and structure effectively.
- Perspective is a powerful tool for creating visually compelling compositions and camera angles in animation art and storyboards.
- By using perspective, you can lead the viewer's eye through a drawing, directing them to focal points and creating depth and movement while maintaining a harmonious composition.
What are perspective terms you neeed to know?
Two essential terms: Horizon line and Vanishing point
![[ADD IMAGE'S ALT TEXT]](/sites/default/files/Vanishing%20Point.jpg)
In the drawing above, an artist has drawn hills in the distance across the horizon line.
Follow the train tracks to the horizon. Do you notice the lines drawn to represent the two parallel tracks get closer together until they appear to converge at the horizon? The point where the lines converge is a vanishing point.
Also, there seems to be the one main vanishing point. If you were to rule a line through the base of the row of trees or along the fence line, those lines also converge at the same vanishing point.
One-point, Two-point, and Three-point perspective
How does the horizon line affect perspective in drawing?
Remember how the horizon line represents the viewer’s eye level? This fact leads to a core concept in drawing – foreshortening – which can be described with these two statements:
- Objects drawn above the horizon line appear seen from below, giving the viewer the impression of looking up at those objects.
- On the other hand, objects drawn below the horizon line appear seen from above, making it seem as if the viewer is looking down at them.
Practice
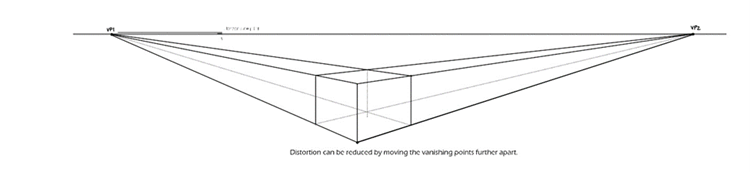
Task 10: Draw a box using two-point perspective
Develop a deeper understanding of spatial relationships and enhance your drawing skills by practising different types of perspectives to incorporate them in your observational drawing. This task aims to help you practice using two-point perspective in your drawing.
What tools or resources do you need for this task?
Make sure you have access to:
- Large (ideally) piece of paper
- Pencil
- Ruler
- Phone camera.
What steps should you take to complete this task?
1 Hour
Set aside one hour to complete steps 2-4 below.
- Revisit what you have read so far in the Perspective section to reinforce what you know. Know the concept of two-point perspective, focussing on vanishing points and how they describe the position and alignment of objects.
- Gather a large (ideally) piece of paper, a ruler and a pencil.
- Draw a cube using two-point perspective (as shown below).
- Leave your working lines visible so that you mark and label both vanishing points.
What should you do after completing this task?
- Experiment with various objects and shapes using two-point perspective. Observe how different placements of vanishing points affect your drawings.
- Use your phone to take a clear and well-lit photo(s) of your sketches.
- Share your photo(s) to the Forum:
- Select your forum thread in Forum: Observation Drawing.
- Select Reply to your first Forum post.
- Enter the words ‘Task 10’ in your reply.
- Select the Post your response button, then select Edit in your reply when it shows up.
- Upload your photo(s) using the Attachment field.
- Select Save changes to share your coursework to your forum thread.
- Get feedback on this and other learning tasks at the next Live Session – check the Live Session calendar for dates and times.
Keep practicing and incorporating two-point perspective into your artwork to refine your skills – perspective is a technique that improves with regular practice!
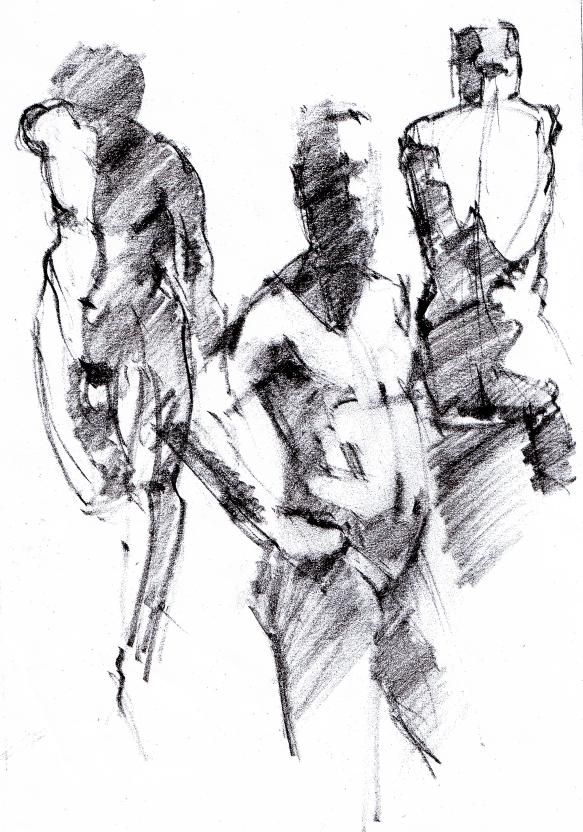
How does perspective enhance character staging and sizing?
Understanding perspective helps you develop your observation skills by training you to see and interpret spatial relationships accurately. It encourages you to carefully observe how objects and figures appear in relation to each other and to your viewpoint.
This heightened observation skill also helps you capture proportions, angles, and the overall structure more effectively in your drawings. It’s handy in animation when staging characters and ensuring their relative sizes are clear and maintained when viewed from different angles and in different positions in a shot or scene.
![[ADD IMAGE'S ALT TEXT]](/sites/default/files/Perspective_0.jpg)
Take a closer look at the image above. The characters are all approximately the same size (i.e. height) and proportion. If you rule a line across the horizon through any point on one character, it will pass through the others in the same position.
Practice
Task 11: Draw a study sketch using basic shapes, perspective, and shading
Get ready to level up your drawing game! Boost your observational drawing skills by integrating drawing techniques such as basic shapes, shading, and perspective. By creating a study sketch that combines these elements, you're not just drawing: you’re also bringing form and light to life in your artwork.
What tools or resources do you need for this task?
Make sure you have access to:
- Sketchbook (physical)
- Pencil
- Phone camera.
What steps should you take to complete this task?
1 Hour
Set aside one hour to complete steps 2-4 below.
- If you haven’t already, review the Shading, Light and Perspective subtopic before completing this learning task. You might also want to quickly refresh your memory of basic shapes from the Basic Shapes and Silhouettes subtopic.
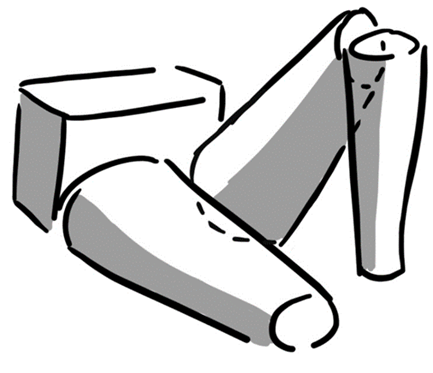
- Start by sketching the basic shapes that will form the foundation if your study sketch. Consider spheres, cubes, cylinders, or cones to represent different objects or elements.
- Use perspective techniques to position and orient your basic shapes within the composition.
- Incorporate shading techniques to depict light and shadow, emphasising the forms and adding depth to your sketch.
What should you do after completing this task?
- Review your study sketch, focusing on the impact of using basic shapes, perspective, and shading. Reflect on your drawing processes while creating the sketch. What adjustments would you make to improve your study sketch's overall coherence and visual impact?
- Use your phone to take a clear and well-lit photo(s) of your study sketch.
- Share your photo(s) to the Forum:
- Select your forum thread in Forum: Observation Drawing.
- Select Reply to your first Forum post.
- Enter the words ‘Task 11’ in your reply.
- Select the Post your response button, then select Edit in your reply when it shows up.
- Upload your photo(s) using the Attachment field.
- Select Save changes to share your coursework to your forum thread.
- Get feedback on this and other learning tasks at the next Live Session – check the Live Session calendar for dates and times.
Keep practising and experimenting with these techniques and the other tools and methods you’ve discovered in this Observation Drawing topic. Continue evolving and stretching your drawing skills for different or more advanced animation challenges ahead. Remember, basic drawing knowledge is at the heart of animation!
In this topic, you’ve uncovered the essentials of observational drawing. You’ve:
- learnt about the significance of sketchbooks and portfolios
- explored the power of basic shapes and silhouettes
- honed your skills in using line of action and gesture
- found out how to use anatomy principles to stretch and bend the rules
- discovered how to inject depth and realism using shading, light and perspective.
Remember, practice is vital. Consistent effort in honing your drawing skills will enable you to bring your animation creations to life.
Check what you know about observation drawing
Use the quiz below to test your knowledge of observation drawing to help ensure you’re on the right track, and identify areas where you may need to revisit subtopics.
Practice
Task 12: Check your knowledge - Observation Drawing
Get ready to put your observation drawing knowledge to the test! This quiz is designed to help reinforce your understanding and is not part of the formal assessment process. So treat it as a valuable tool to gauge your progress and identify areas for improvement.
You'll encounter a variety of question formats, including multiple choice, true or false, and fill in the blanks. So approach each question with a critical eye and draw on your learning to choose the best answers – you've got this!.
What steps should you take to complete this knowledge check?
30 minutes
Set aside 20-30 minutes to complete this knowledge check.
- This quiz has 20 questions. Read each question carefully. Make sure you understand what is being asked before attempting an answer.
- Provide the most accurate and complete answers you can. If a question stumps you, make an educated guess based on your knowledge.
- Don't let difficult questions discourage you. Stay confident and do your best. Remember, it's a learning opportunity, and not a formal assessment!
- Once you've reviewed your answer and are satisfied, click the ‘Check button’ to see if you chose the correct answer. You can also retry questions and show solutions.
Good luck, and enjoy the challenge!
What should you do after completing this knowledge check?
Building a solid understanding of observation drawing is crucial for enhancing your animation skills. Take the time to practice the concepts covered in this knowledge check.
Put your learnings into practice by incorporating observation drawing into your animation projects. The more you apply these concepts, the more proficient you'll become.
Remember, continuous learning and practice are key!
Reflect on what you’ve learnt, practised, and achieved
As you wrap up this topic, take a moment to reflect on what you've learnt, practised, and achieved by completing the various learning tasks in this topic.
Observational drawing is rewarding and dynamic, and you've taken active steps towards mastering its fundamental building blocks. Your sketchbook has become your faithful companion, capturing ideas and observations that will fuel your creative journey.
| # | Learning Task Name | Duration (Hours) | |
|---|---|---|---|
| 1 | Sketch everyday objects | 1 | |
| 2 | Sketch basic shapes for five objects | 2 | |
| 3 | Draw ten silhouettes | 2 | |
| 4 | Redraw ten dynamic poses | 2 | |
| 5 | Draw ten gesture sketches | 2 | |
| 6 | Sketch the human form | 2 | |
| 7 | Sketch an animal | 3 | |
| 8 | Use shading techniques on ten circles | 1.5 | |
| 9 | Use light and shading techniques | 3 | |
| 10 | Draw a box using two-point perspective | 1 | |
| 11 | Draw a study using basic shapes, perspective, and shading | 1 | |
| 12 | Check your knowledge | 0.5 | |