Character design is a crucial aspect of animation involving creating and developing a character's visual appearance and personality in a story. It’s an art form that requires a mix of technical skill, creativity, and storytelling ability.
A well-designed character can be instantly recognisable and memorable to an audience and help bring a story to life. A successful character design requires careful consideration of personality, backstory, physical appearance, and movement.
Character designers must:
- Understand anatomy, colour theory, and storytelling to create visually appealing and emotionally engaging characters.
- Take into account production constraints such as animation software and rigging.
- Consider how characters – brought to life through movement and performance – will move and interact with the world around them.
So get ready to learn about character design, a vital part of the animation process and an exciting opportunity for artists and storytellers to create unique and compelling characters that can capture the imagination of audiences of all ages.
Subtopics that you can explore
In this Character Design topic, you’ll explore six key subtopics, each offering valuable insights and techniques to elevate your animation game. These subtopics are:
- Character Bio and Research
- Exploration: Character Archetypes
- Silhouettes
- Shape Language
- Turnaround Model Sheets
- Poses and Facial Expressions
Use the Character Design Forum to share your coursework
When you complete a learning task, always read its What should you do after completing this task? section to check if you need to share your coursework (e.g. image or multimedia files) in this topic’s Forum.
You'll get specific guidance on when to do this but it's a good idea to get a headstart and set up your personalised forum thread for Character Design now by working through the task below.
Practice
Set up your forum thread for Character Design
Set up your forum thread for this topic. By doing this, you'll be able to:
- Share your animation coursework you create while completing learning tasks.
- Get constructive feedback from your facilitator and fellow students to help you improve your animation skills and knowledge of animation principles and techniques.
- Learn from different perspectives, techniques and creative solutions shared by fellow students.
What steps should you take to complete this task?
- Find this topic’s Forum by selecting this link: Forum: Character Design or by using the navigation menu on the left.
- Select the New thread link once you land on the Forum.
- In the Subject field, enter your first and last names.
- In the Message field, enter one or two sentences describing what you know about character design.
- Select Post to forum at the end of the page.
You can also watch this playlist below of two short videos (6:38m) to find out how to set up your forum thread and share your coursework in your forum thread.
Use the hamburger icon in the top right of the playlist to access the video menu if you need to.
What should you do after completing this task?
Keep progressing through this topic. Whenever you get to a learning task, read it carefully to check whether you need to share your animation coursework (e.g. a JPEG or MP4 file) to the Forum.
Remember, reach out to your facilitator if you have questions about how to use the Forums or any other aspect of your study.
Learning tasks that will help you develop and practise animation skills
Practice
Use your skills and build your knowledge
Engage confidently with the learning tasks in this topic: they are the essential building blocks to help you use fundamental animation tools. By completing these learning tasks, you'll enhance your character design skills and gain the ability to craft exceptional animations.
Keep an eye out for this PRACTICE box throughout this topic, highlighting learning tasks and resources and providing clear guidance on what actions you should take. The following information outlines the learning tasks in Character Design and the recommended time allocation for each.
| # | Learning Task Name | Duration (Hours) | |
|---|---|---|---|
| 1 | Create a character concept | 4 |  |
| 2 | Create a hero character concept | 2 | |
| 3 | Create dynamic silhouettes for your hero character | 3 | |
| 4 | Use shapes to create designs of your hero character | 3.25 |  |
| 5 | Create a turnaround model sheet of your hero character | 6 | |
| 6 | Create pose and expression sheets of your hero character | 6 | |
| 7 | Check your knowledge | 0.5 |  |
Feedback and support is woven through the learning tasks as you complete them. Reach out if you have any questions about what to do!
Step into this Character Bio and Research subtopic and discover how to use character bios, mind mapping, and reference boards, igniting your imagination and guiding you in crafting memorable and compelling characters.
Character bios
A character bio – short for ‘character biography’ – is an important tool in character design. It provides a detailed background and personality profile for a character concept.
Knowing the physical and psychological characteristics of a character is essential in the character design process because it informs every aspect of the design.
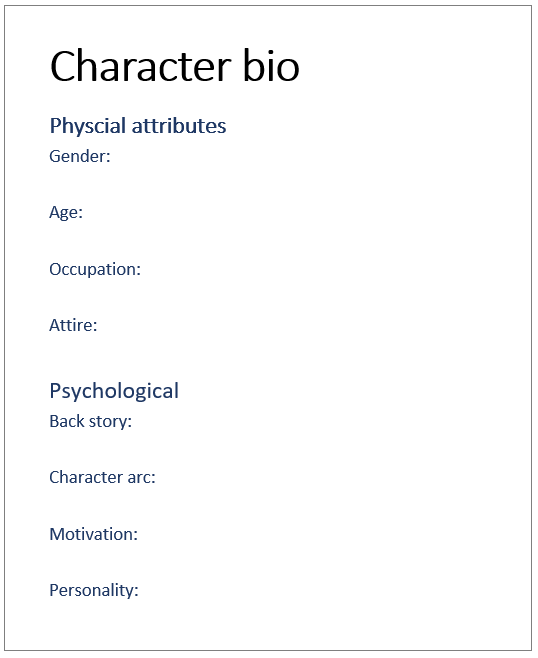
What physical characteristics should you include in a character bio?
What psychological characteristics should you include in a character bio?
Mind maps and Reference boards
What is mind mapping and how do you use it?
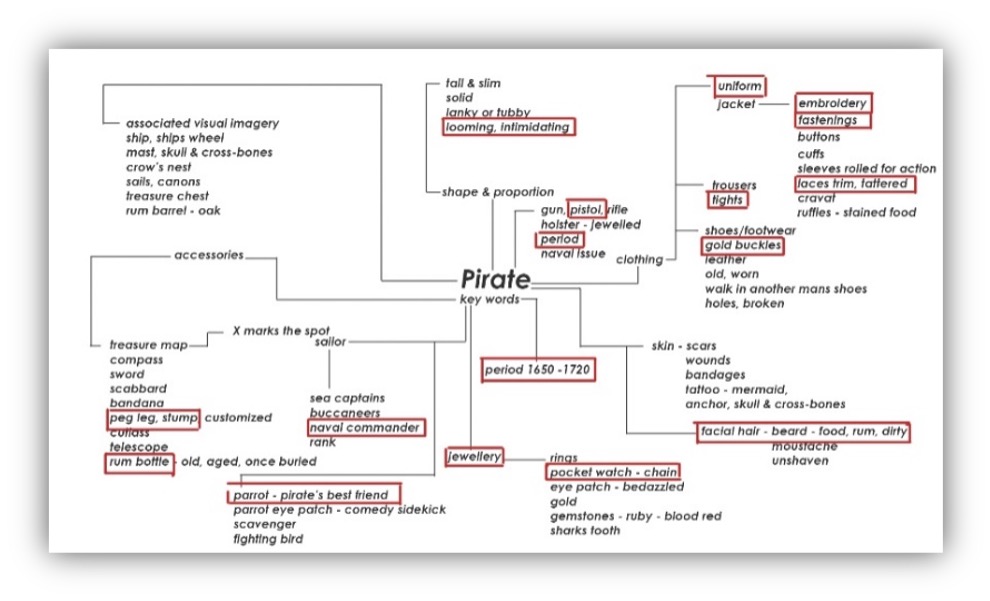
When creating a character concept, use mind mapping. It’s a helpful visual tool to organise and represent information.
Mind mapping allows you to generate a wide range of ideas and explore different possibilities before settling on a final concept and filling out the character bio details.

Tip
Click play
This course includes a number of insightful videos that describe and explain the nuts and bolts of animation, helping you grasp ideas and review information at your own pace.
Observe the techniques shown in the videos. Pause the videos to practise or experiment with steps or tools. If a video presents challenges, pause it to attempt the tasks or find out the solution.
Have fun, and ask us if you need any help!
Watch Jade demonstrate using mind mapping to create a character design. (5:45m)
What are reference boards and why use them?
After using your mind map to settle on a character concept and fill out the character bio, you’ll move on to your reference board.
Reference boards are a valuable tool in character design, as they help you:
- Gather and organise your ideas and visual and conceptual references.
- Stay focused and consistent.
- Create engaging, memorable, visually and conceptually cohesive characters.
Reference boards are collections of images, colours, textures, patterns or other visual elements that inspire and inform the character design. These can be gathered from various sources, such as photographs, artwork, films, and real-life references.
![[ADD IMAGE'S ALT TEXT]](/sites/default/files/Reference%20Board.svg)
Tip
Mind map physical characteristics
When looking for research imagery, it often helps to create another mind map made up of keywords that describe your character's physical characteristics. After you come up with all the keywords, select a few keywords to aid in your research process.
Practice
Task 1: Create a character concept
Develop your skills in preparing for character design by creating a character concept. Use this learning task to practise:
- Mind mapping techniques to generate ideas and shape your character's physical and psychological traits.
- Writing up a character bio to describe your character in more detail and help to inform your character design choices
- Using a reference board to categorise your ideas and ensure a consistent and engaging character design.
What tools or resources do you need for this task?
Make sure you have access to:
- Pencil/pen and paper, or device and a digital tool (e.g. Adobe Photoshop)
- Phone camera (if using pen/pencil and paper).
What steps should you take to complete this task?
4 Hours

Set aside up to four hours to complete steps 2-4 below. Remember to save your work as you go if you're using a digital tool.
- Revisit the Character Bio and Research subtopic to reinforce what you know if you need to. If you haven’t already, watch Jade’s mind-mapping video to help you work through Step 2 of this task.
- Mind Map a Character Concept (30-60 minutes)
- Start by selecting a central idea for your character concept and write this in the centre of your page or digital tool. Jot ideas about your character’s physical and psychological characteristics around the central theme.
- Create a web-like structure by forming branches and interconnecting ideas. Explore connections between your ideas freely. Jot more ideas down.
- Review your mapped ideas and prioritise the physical and psychological characteristics that strongly resonate with your character concept and storyline.
- Create a Character Bio (30-60 minutes)
- Use the prioritised ideas from your mind map to describe your character’s characteristics on a new page or a digital tool.
- Understand what drives your character, their ambitions, desires, and what they aim to achieve in the story. Tailor your character bio to fit the intended character design, making it a solid foundation for further design and development.
- Define the character's personality, including their strengths and weaknesses. Review and refine the character bio as needed, ensuring it remains consistent and enhances the character's depth and appeal.
- Create a Reference Board (1-2 hours)
- Collect images, colours, textures, and patterns that inspire your character concept from various sources. Categorise your inspirations based on themes or characteristics relevant to your character.
- Use a digital tool or a physical board to arrange and display your visuals. Add short labels explaining how each item relates to your character bio.
- Review the board for cohesion and easy understanding. Keep it accessible for reference during character design and animation.
What should you do after completing this task?
- Take a moment to review your sketches and reflect on how character concepting can ignite your imagination and guide your character design.
- If you have used paper or physical boards to create your work, use your phone to take clear and well-lit photos of your mind map, character bio, and reference map. If you have used a digital tool, save your work on your device.
- Share photo(s) to the Forum:
- Select your forum thread in Forum: Character Design.
- Select Reply to your first Forum post.
- Enter the words ‘Task 1’ in your reply.
- Select the Post your response button, then select Edit in your reply when it shows up.
- Upload your photo(s) using the Attachment field.
- Select Save changes to share your coursework to your forum thread.
- Get feedback on this and other learning tasks at the next Live Session – check the Live Session calendar for dates and times.
When you’re ready, move to Exploration: Character Archetypes and explore how to use archetypes like the hero and villain to enhance the depth and impact of your character designs. Get ready to start unlocking the potential of your characters!
In this Exploration: Character Archetypes subtopic, explore how character archetypes can help you develop exceptional character designs. Learn how classic characters have leveraged archetypes and why key visual characteristics can elevate your designs.
Recognising archetypes
An archetype is a typical character, action, or situation representing universal patterns of human nature.
Archetypes are used during character design to quickly convey a character’s intention, motives, history, and relationship with other characters.
What are some character archetypes?
Common visual characteristics
Case Study
The Villain
As you’ve discovered, the Villain archetype is the antagonist who represents the opposite of the hero and embodies evil, cruelty, and a desire for power.
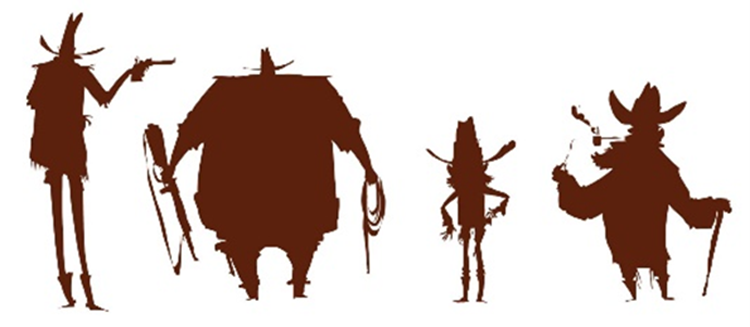
So, how do visual characteristics contribute to the Villain’s portrayal in animation? Consider the following four sets of examples.
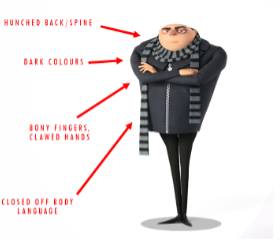
- Look at the four villain characters below and focus on their physical attributes. What do they all have in common? Consider their body language, expressions, shapes and colours.
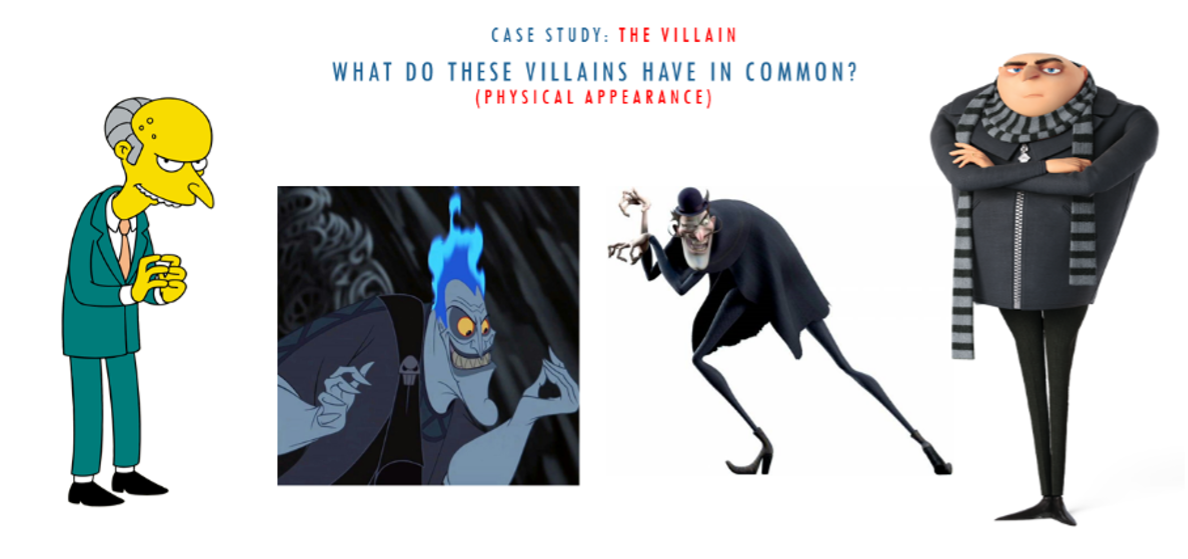
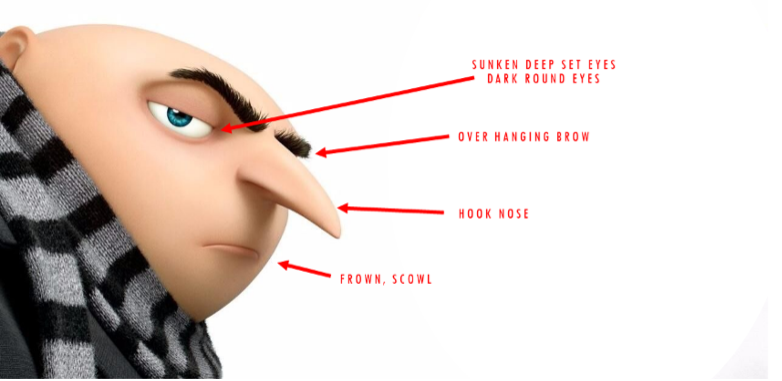
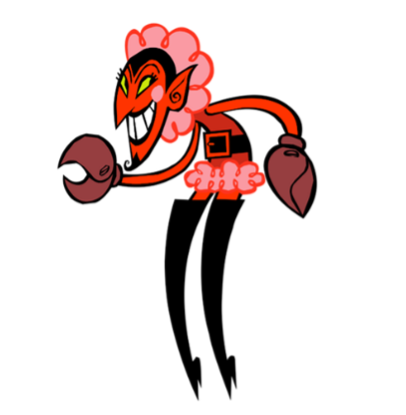
- Look at the villain below. What do you notice about the face and body? When identifying physical attributes, you can see that villains often have the same features.
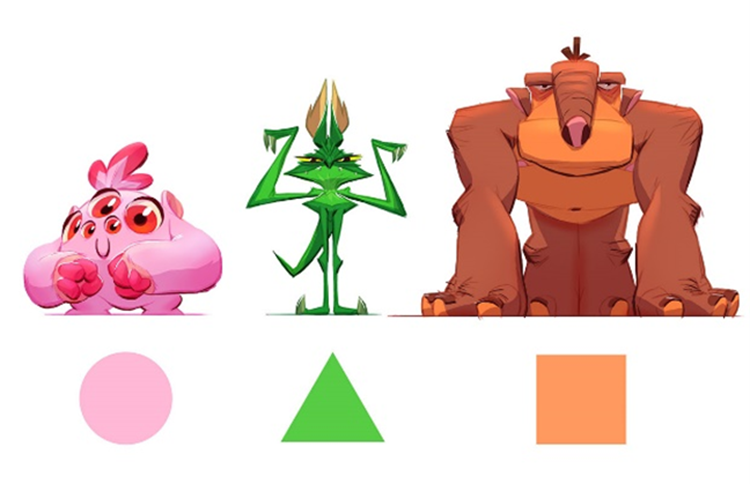
- Look at the three animals below. What do you think the reason is that villain designs have the same physical characteristics?
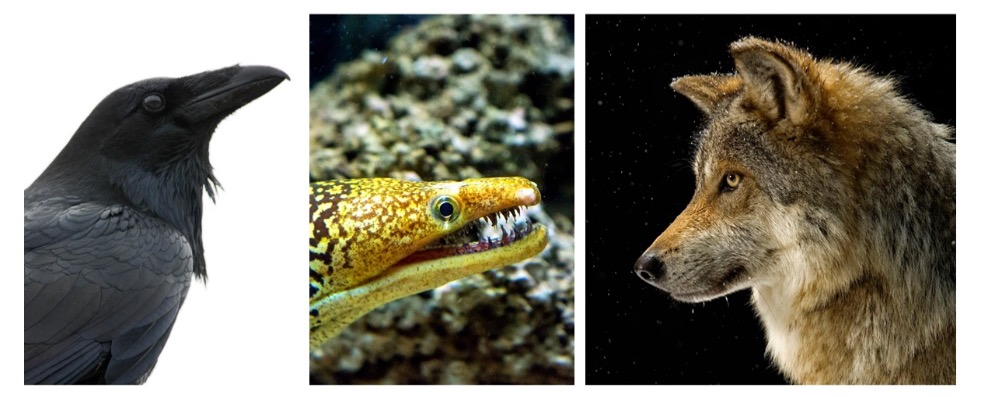
The answer can be found through psychology. We often look at sharp and soft things differently; we sense danger with sharp objects. For example, many dangerous creatures often have sharp features such as teeth, eyes, claws or ears.
Understanding how psychology works with character design can help you create a design that fits better with the character bio. - Look at the three sets of images below. How can specific physical characteristics in portraying villains be used to convey personality traits or emotions?
When villains have a hunched back/spine, this can visually convey cowardness and describe crouching or hiding.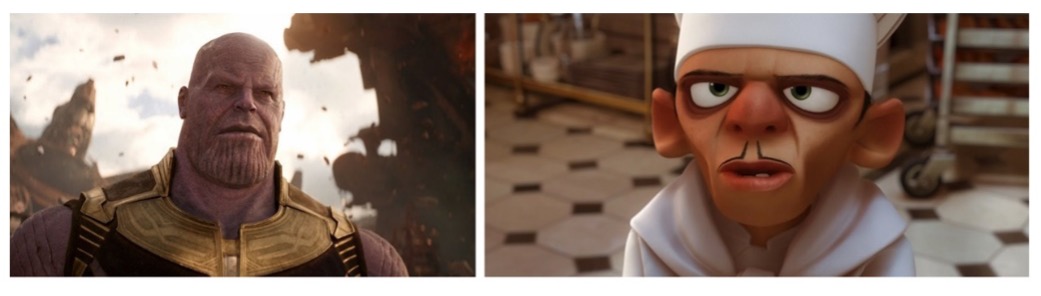
When villains have a frown or scowl, this can visually convey negative emotions and anger, the opposite of positive.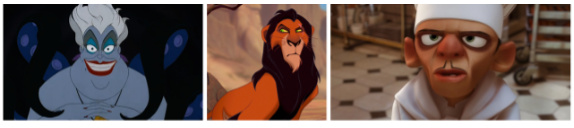
When villains have dark sunken eyes, this can visually represent the eye mask of a criminal or thief, a way to hide one’s identity or true intent, covering the ‘windows of the soul’.
Recommendation: Know your character archetypes in depth. If you do, you can make design decisions that enhance the outcome of your overall character design.
Practice
Task 2: Create a hero character concept
Recognise how classic character models have used the hero and mentor archetypes and identify their visual characteristics to unlock the secrets of character design.
Use this learning task to develop your skills in designing a hero character concept, drawing upon the archetypes you've explored.
What tools or resources do you need for this task?
Make sure you have access to:
- Pencil/pen and paper, or device and a digital tool (e.g. Adobe Photoshop)
- Phone camera (if using pen/pencil and paper).
What steps should you take to complete this task?
2 hours
Set aside up to two hours to complete steps 2-4 below. Remember to save your work as you go if you're using a digital tool.
- Revisit the Exploration: Character Archetypes subtopic to reinforce what you know if you need to.
- Begin by selecting five hero characters and five mentor characters from five different shows. Ensure you choose different styles.
- Focus on your selected characters and identify recurring visual characteristics such as appearance, expressions, and postures that are used within the hero and mentor character archetypes.
- Using the visual characteristics you've identified, design a hero character concept that embodies the hero archetype on a page or using a digital tool.
What should you do after completing this task?
- Take a moment to appreciate your creativity and the knowledge you have gained. Practice and exploration are the keys to sharpening your character design skills and creating engaging characters.
- If you have used paper or physical boards to create your hero character concept, use your phone to take clear and well-lit photo(s) of it. If you have used a digital tool, save your work on your device.
- Share photo(s) to the Forum:
- Select your forum thread in Forum: Character Design.
- Select Reply to your first Forum post.
- Enter the words ‘Task 2’ in your reply.
- Select the Post your response button, then select Edit in your reply when it shows up.
- Upload your photo(s) using the Attachment field.
- Select Save changes to share your coursework to your forum thread.
- Get feedback on this and other learning tasks at the next Live Session – check the Live Session calendar for dates and times.
Making thoughtful design choices for your character sets the foundation for the following subtopic Silhouettes, where you'll discover how to start visually representing your character’s form to reflect your character concept.
Welcome to the Silhouettes subtopic, where you’ll discover silhouette concepting, uncover best practices in creating dynamic silhouettes for characters, and learn how silhouettes aid the creative pre-production process in character design.
Enhancing character recognition
What are silhouettes, and why use them?
In character design, a silhouette refers to the outline or shape of a character. It's a basic visual representation of the character's form without details or textures.
You can use silhouettes in character design to:
- Make characters instantly recognisable and distinguishable from other characters or objects in a scene.
- Help characters stand out and be easily identified from a distance or in a crowd.
Silhouettes also help animators and artists quickly and easily identify a character's form and shape, allowing them to animate and pose the character more efficiently.
Important
Think about who your character is
When designing a character's silhouette, consider the character's personality and role in the story. A character's silhouette should reflect their unique traits and characteristics, making it easy for the audience to identify and remember the character.
Creating silhouettes
Watch Jade demonstrate how to create silhouettes. (8:05m)
Improving silhouette designs
Practice
Task 3: Create dynamic silhouettes of your hero character
Practise creating silhouettes from objects and animals, and transfer your silhouette skills into character design using your hero character concept. Use this learning task to develop your ability to convey character personality and uniqueness through dynamic silhouette concepting, an invaluable skill in character design.
What tools or resources do you need for this task?
Make sure you have access to:
- Pencil/pen and paper, or device and Adobe Photoshop
- Phone camera (if using pen/pencil and paper).
What steps should you take to complete this task?
3.5 Hours

Set aside up to 3.5 hours to complete steps 2-4 below. Remember to save your work as you go if you're using Adobe Photoshop.
-
Revisit the Silhouettes subtopic to reinforce what you know if you need to. If you haven’t already, watch Jade’s silhouette video to help you with this task.
- Identify Characters (5 mins)
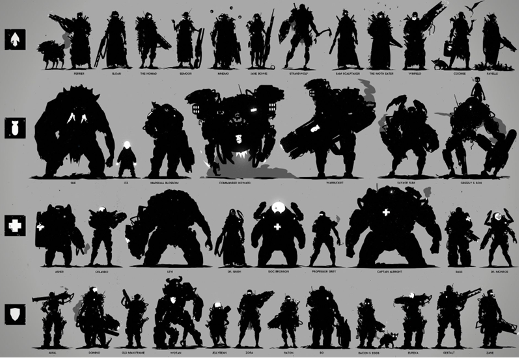
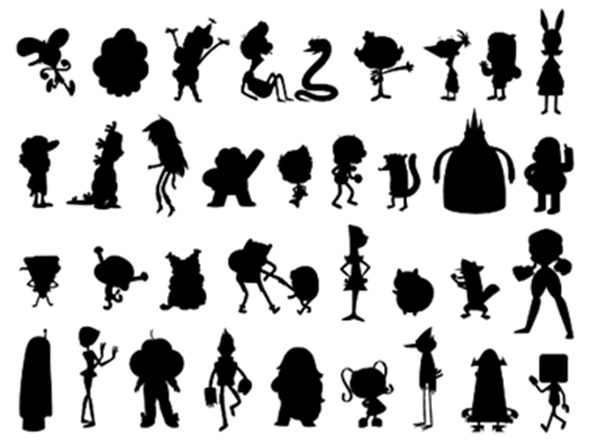
-
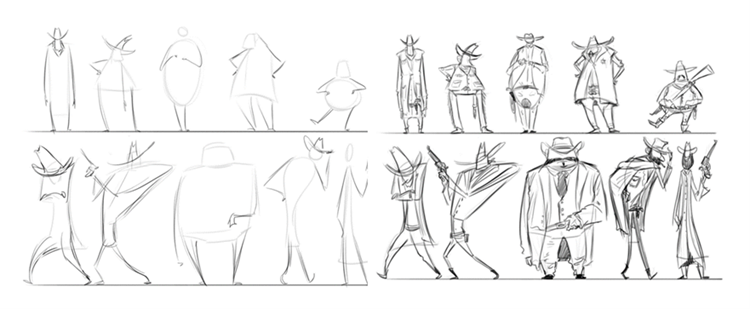
Begin by identifying as many characters as possible from the silhouettes featured below. This warm-up step hones your observation skills and primes your mind for silhouette creation.
-
- Create Silhouettes of Objects or Animals (30 mins)
- Select five different objects or animals and transform them into recognisable and distinct silhouettes on a page or Adobe Photoshop.
- Make your silhouettes ‘readable’ so that someone unfamiliar with the subject matter can identify the silhouettes.

- Create silhouettes of your hero character (3 hours)
- Referencing your character bio, create 5-10 polished silhouettes of your hero character on a page or Adobe Photoshop.
- Use the insights gained from Step 3 above to ensure the silhouettes effectively convey your character's personality and traits.
What should you after completing this task?
- Review your hero character silhouettes. Consider how each silhouette uniquely portrays aspects of your hero character bio and how your silhouette concepting skills are developing.
- If you have used paper to create your hero character silhouettes, use your phone to take clear and well-lit photo(s). If you have used Adobe Photoshop, save your work on your device.
- Share photo(s) to the Forum:
- Select your forum thread in Forum: Character Design.
- Select Reply to your first Forum post.
- Enter the words ‘Task 3’ in your reply.
- Select the Post your response button, then select Edit in your reply when it shows up.
- Upload your photo(s) using the Attachment field.
- Select Save changes to share your coursework to your forum thread.
- Get feedback on this and other learning tasks at the next Live Session – check the Live Session calendar for dates and times.
You've now set the stage to transition into the next subtopic, Shape Language, where you'll learn how to use this powerful design principle to further convey your character’s personality.
Dive into this Shape Language subtopic and discover the importance of using shapes to enhance character design. Find out how shape language is a powerful tool to enhance designs within pre-production, allowing you to convey engaging characters.
Conveying characters using shapes
Shape language is a design principle in character design that refers to the use of specific shapes, lines, and forms to convey a character's personality, emotions, and traits.
Why use shape language?
In character design, different shapes and forms can evoke different emotional and psychological responses in the audience.
For example, you can use:
- sharp and jagged shapes to convey aggression or danger, or
- round and soft shapes to convey warmth or friendliness.
![[ADD IMAGE'S ALT TEXT]](/sites/default/files/Shape%20Language_0.png)
Recognisable characters
Use shape language to create a cohesive and consistent visual language throughout a character's design.
Using consistent shapes and forms throughout a character's design makes the character instantly recognisable and memorable to the audience.
![[ADD IMAGE'S ALT TEXT]](/sites/default/files/Shape%20Language%202_0.png)
Character movement and behaviour
Shape language is vital in animation as it helps animators and artists portray the character's movement and behaviour. By understanding the character's shapes and forms, animators can create movements and poses consistent with the character's personality and traits.
Important
Do you know your character?
When designing your character's shape language, it is important to consider the character's personality, backstory, and role in the story.
Use different shapes and forms to emphasise various aspects of your character's personality and story, making the character more interesting and engaging to the audience.
Using shape language
Watch Jade demonstrate how to experiment with shapes and apply shape language to character design. (7:37m)
Practice
Task 4: Use shapes to create designs of your hero character
Experiment with shape language and specific shapes to enhance your character design. By practising using shapes to convey personality and story in this learning task, you’ll discover how thoughtful shape selection can make your hero even more recognisable.
What tools or resources do you need for this task?
Make sure you have access to:
- Pencil/pen and paper, or device and Adobe Photoshop
- Phone camera (if using pen/pencil and paper).
What steps should you take to complete this task?
3.25 Hours

Set aside up to 3.25 hours to complete steps 2-3 below. Remember to save your work as you go if you're using Adobe Photoshop.
- Revisit the Shape Language subtopic to reinforce what you know if you need to. If you haven’t already, watch Jade’s shape language video to help you with this task.
- Create Three Character Designs (15 mins)
- Begin by using three basic shapes (circle, square, triangle) to create three distinct character designs. This warm-up step allows your creativity to flow.
- Begin by using three basic shapes (circle, square, triangle) to create three distinct character designs. This warm-up step allows your creativity to flow.
- Create 5-10 hero character designs (2-3 hours)
- Choose a range of shapes that resonated with elements of your hero character bio. Consider shapes that reflect their personality and story.
- Use the selected shape to create 5-10 designs on a page or Adobe Photoshop. Experiment with combinations, proportions and placement of shapes.
- Ensure your designs align with your hero character bio and convey personality, backstory and role in the story.
What should you do after completing this task?
- Review your designs and think about how you would adjust them based on your creative insights. Reflect on how your shape selection influences the portrayal of your hero character and how an audience would respond.
- If you have used paper to create your hero character designs, use your phone to take clear and well-lit photo(s). If you have used Adobe Photoshop, save your work on your device.
- Share photo(s) to the Forum:
- Select your forum thread in Forum: Character Design.
- Select Reply to your first Forum post.
- Enter the words ‘Task 4’ in your reply.
- Select the Post your response button, then select Edit in your reply when it shows up.
- Upload your photo(s) using the Attachment field.
- Select Save changes to share your coursework to your forum thread.
- Get feedback on this and other learning tasks at the next Live Session – check the Live Session calendar for dates and times.
When you’re ready, move to the Turnaround Model Sheets subtopic and learn how to transform your hero character designs into a consistent blueprint, detailing your character's form and shape from multiple angles.
Work through this Turnaround Model Sheets subtopic and explore the significance and structure of this character design tool. You’ll find out how to create a turnaround model sheet and become familiar with a step-by-step process you’ll use to provide multiple views of the characters you design.
Blueprinting a character
In character design, a turnaround model sheet is a set of drawings that show a character from multiple angles and positions.
It's essentially a blueprint of the character that provides a consistent visual reference for animators, artists, and other production team members.
Why use turnaround model sheets?
A turnaround model sheet (‘model sheet’ for short) is an essential tool in character design and animation, helping to ensure that the character's design and movement are consistent and accurate throughout the production process.
Select + to uncover two key reasons for using model sheets.
- A model sheet ensures the character's design is consistent and accurate throughout the animation process.
- Without a model sheet, different artists and animators may interpret the character's design differently, resulting in a disjointed or inconsistent appearance.
- A model sheet helps animators and artists understand the character's form and movement, making it easier to create believable and expressive animation.
- A model sheet helps ensure that the character's movements and poses are anatomically correct and consistent by providing multiple views of the character.
What does a turnaround model sheet include?
A model sheet typically different views of the character and close-up views of specific features like the face, hands, and feet.
These drawings are usually done in a clean and simple style, without shading or texture, to emphasise the character's form and shape.
Number of views
The number of views included in a character turnaround can vary depending on the production's needs and the character design's complexity.
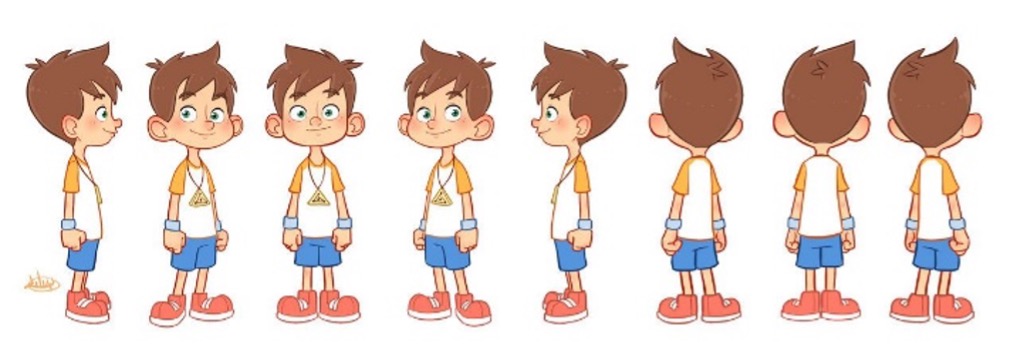
A turnaround typically includes three views, consisting of the critical angles for character modelling, animation, and rigging. These three views are:
- front
- side
- back.
These three views provide clarity to help understand the character's proportions, silhouette, and overall design.
Tip
Complex characters
You may need to create additional views for more complex character designs.
For example, a character with complex clothing or accessories may require additional views to show how these elements interact with the character's body.
Similarly, a character with a unique posture or body shape may need additional views to convey their design accurately.
Creating a character turnaround
Follow the guide below to go through the steps of creating a character turnaround using a model sheet.
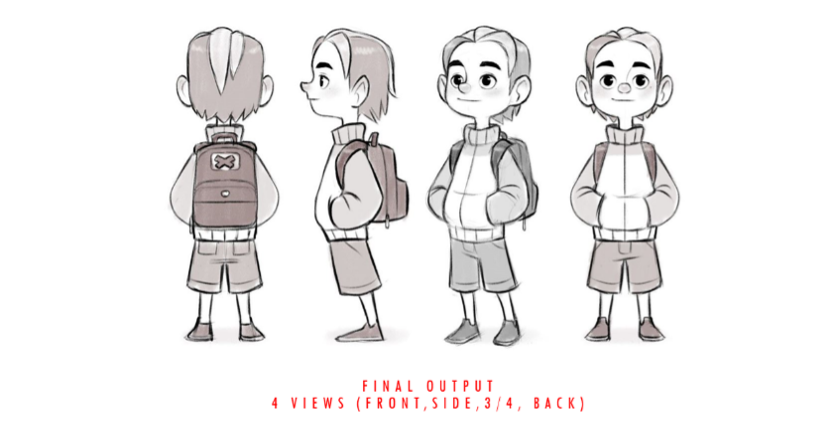
It's best to start with a 4-point model sheet. This model sheet consists of four views:
- front
- side profile
- three-quarter
- back.
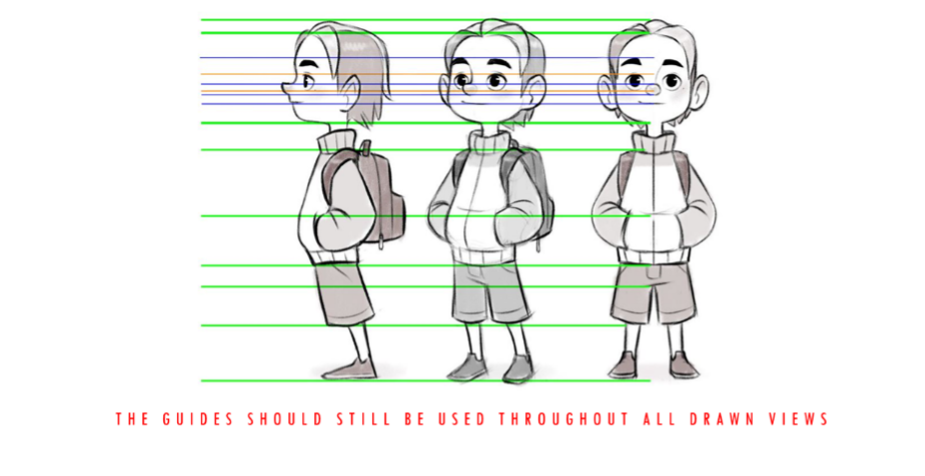
This guide will transition you into each view, starting with the front view, then moving on to side profile view, three-quarter view, and finally, capturing the character from the back view.
Note: Refer to the accompanying three videos for detailed guidance and demonstrations at each critical step of the character turnaround creation process.
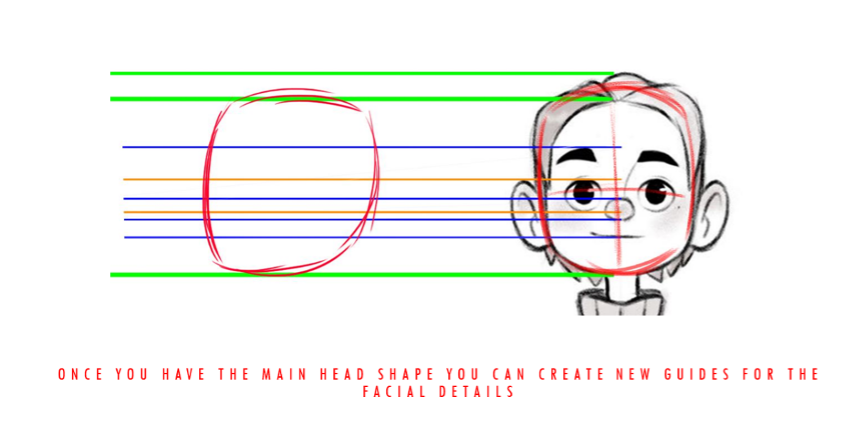
Front view
Select + to view Steps 1-2.
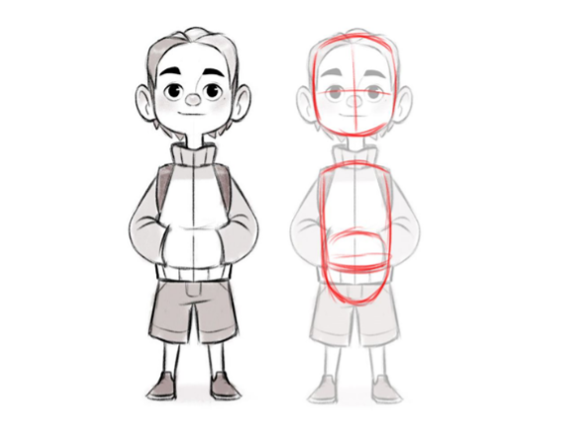
- Redraw your final character design in a front view pose, serving as the starting pose for the turnaround.
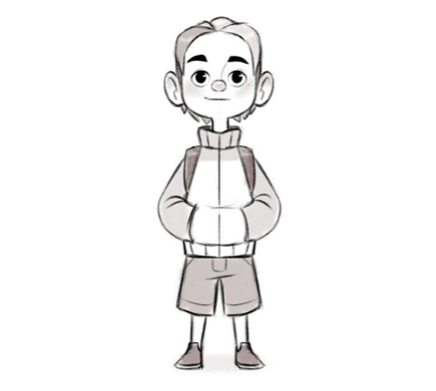
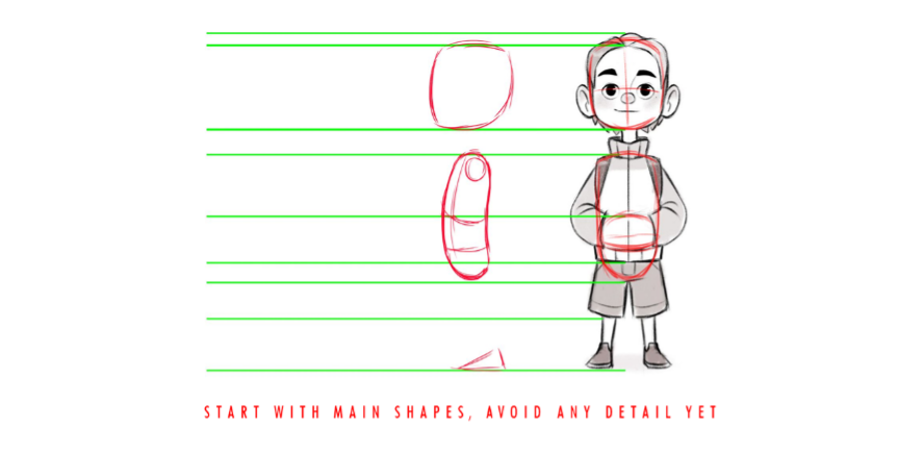
- Draw core shapes lightly over the character (or use another layer digitally) to help you recognise and focus on the core shapes you must draw from different angles.
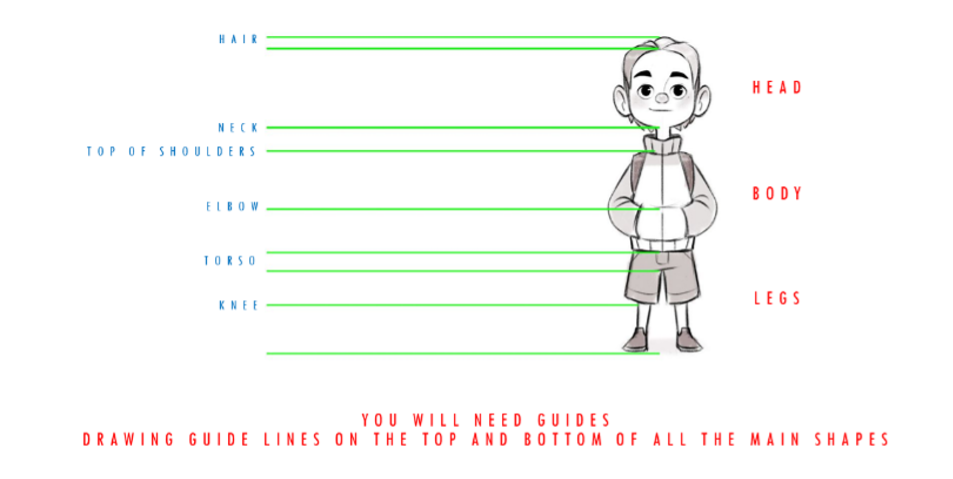
Watch Jade demonstrate steps 1-2 and use guidelines to locate the main proportions of the character. (4.48m)
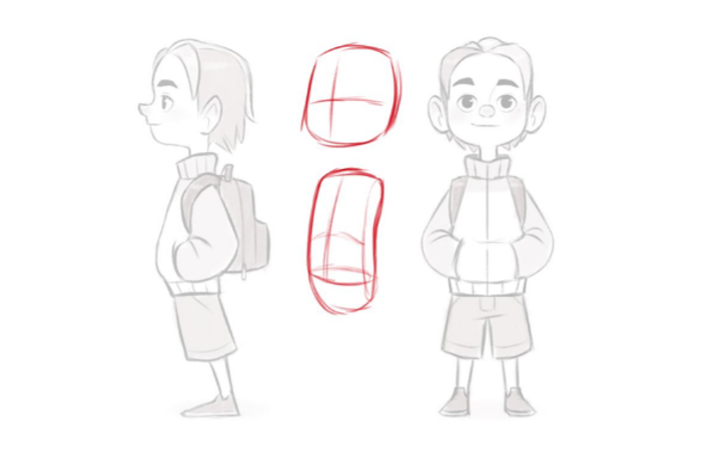
Side profile view
Select + to view Steps 3-5.
- When drawing the side profile view, pay attention to the spine’s anatomical structure. A common mistake for beginners is drawing a side profile with no curves within the spine, neck and face.
- Add guidelines to help body part proportions remain consistent.
Tip: It's important to start with the basic core lines for the key body shapes; later, you can add finer details for facial features and clothing. Starting with basic core lines avoids too many guidelines on the canvas simultaneously.
- Draw core shapes on a side view.
- Add detailed guidelines to help with the facial features.
Watch Jade demonstrate steps 3-5. (6.48m)
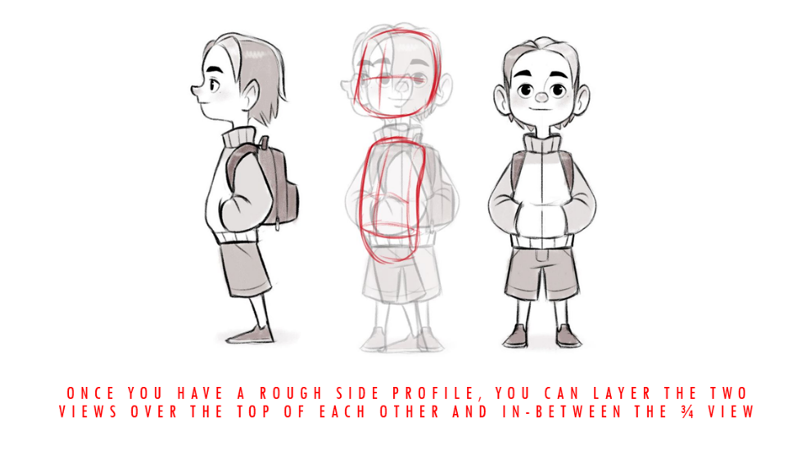
Three-quarter view and back view
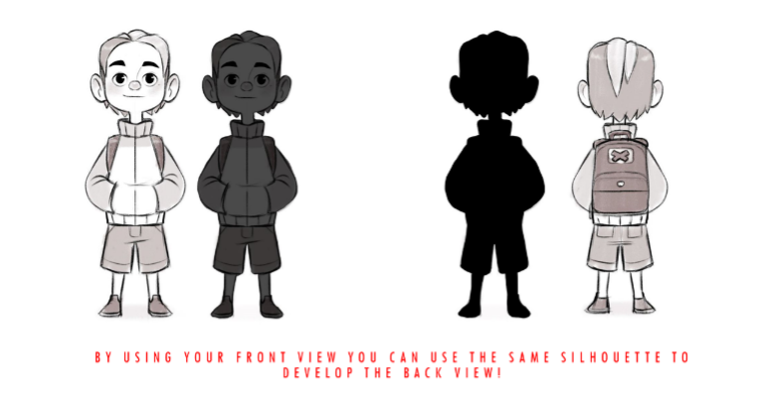
Select + to view Steps 6-10.
- Duplicate and overlay the side profile and front view to help create your three-quarter view.
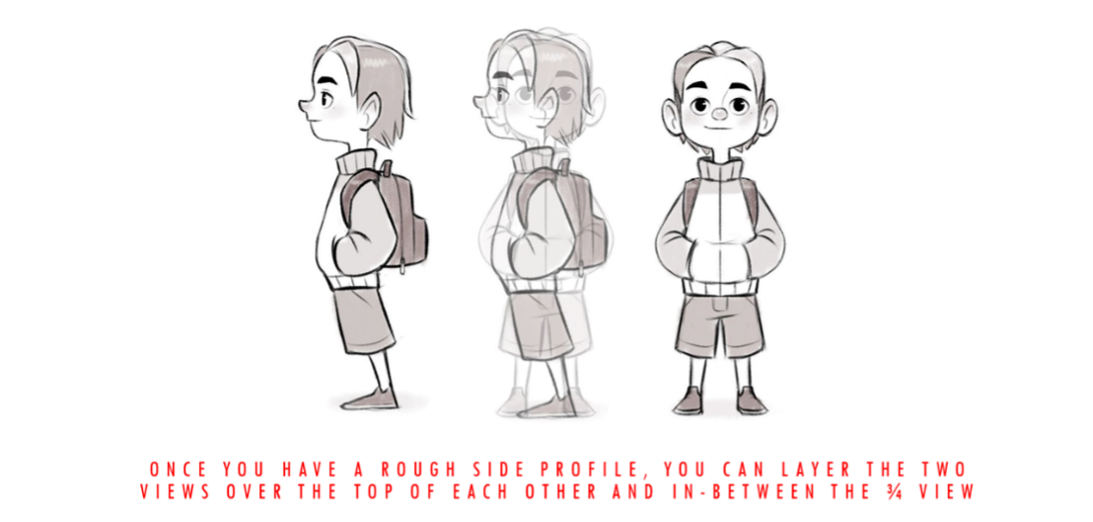
- Apply the in-between method using the side profile and front views to create the three-quarter view.
- Maintain guideline usage to ensure consistency across all drawn views.
- Use the front view as a reference to construct the back view. The front view will give the same silhouette as the back view, but flipped horizontally.
- Review all views, checking proportions and guidelines for accuracy.
- Refine the line work, adding details and colours to complete the character turnaround.
Watch Jade demonstrate steps 6-10. (4.59m)
Explore
Refresh your knowledge
In the videos above, you’ve noticed Jade refer to basic shapes, line of action, gestures, and anatomy.
If you need to refresh your knowledge on these foundational tools and techniques within a sketching context, you can visit the Observation Drawing topic within this Foundations module at any time. Happy exploring!
Practice
Task 5: Create a turnaround model sheet of your hero character
Grow your knowledge of character turnaround processes by creating a 4-point turnaround model sheet for your hero character. Use this learning task to practice consistency of character design by portraying multiple angles and emphasising proportions.
What tools or resources do you need for this task?
Make sure you have access to:
- Pencil/pen and paper, or device and Adobe Photoshop
- Phone camera (if using pen/pencil and paper).
What steps should you take to complete this task?
6 Hours
Set aside up to six hours to complete steps 2-5 below. Remember to save your work as you go if you're using Adobe Photoshop.
- Review the 10-step Character Turnaround Guide in the Turnaround Model Sheets subtopic if you need to refer to detailed information when working through this learning task. If you haven’t already, watch Jade’s character turnaround video to help you with this task.

- Read the character bio and look at your final design for your hero character. Familiarise yourself with the key characteristics and design elements.
- Create a 4-point turnaround model sheet for your hero character, drawing the front, side profile, three-quarter, and back views.
- Review each view, checking proportions and guidelines to ensure accuracy.
- Refine your line work and add details and colour to complete the character turnaround.
What should you do after completing this task?
- Once you’ve completed your character's turnaround model sheet, take a moment to reflect on your work. Consider how it acts as a blueprint for production teams to use as a consistent visual reference.
- If you have used paper to create your turnaround model sheet, use your phone to take clear and well-lit photos. If you have used Adobe Photoshop, save your work on your device.
- Share photo(s) to the Forum:
- Select your forum thread in Forum: Character Design.
- Select Reply to your first Forum post.
- Enter the words ‘Task 5’ in your reply.
- Select the Post your response button, then select Edit in your reply when it shows up.
- Upload your photo(s) using the Attachment field.
- Select Save changes to share your coursework to your forum thread.
- Get feedback on this and other learning tasks at the next Live Session – check the Live Session calendar for dates and times.
Dive into the next subtopic, Pose and Facial Expressions, where you’ll unpack pose and expression sheets and explore their significance in helping artists and animators stay true to your character’s personality and role.
In this Poses and Facial Expressions subtopic, learn about the importance of pose and expression sheets as integral components of a character model sheet pack and explore their pivotal role in character design.
Reflection
What are your thoughts on character design so far?
Reflect on what you've created, read and watched on this topic up to now and how you're combining our technical skills, creativity and storytelling abilities.
- Consider what you've learnt about character bios, research-driven design and character archetypes – how will you ensure that your character's design stands out visually and conveys a compelling story through their appearance?
- Think about the impact of silhouettes, shape language, and turnaround model sheets on character design. Using these tools, how can you elevate your characters, making them visually appealing and more dynamic and consistent in their design?
Help yourself to succeed by planning how you can apply your learning to your character design work in the assessments for this module.
Maintaining a character’s design
Pose sheets and expression sheets are both essential in character design because they help maintain consistency and continuity in the character's design throughout the animation process.
These two sheets also help animators and artists stay true to the character's personality and traits, ensuring that the character's movements and expressions are consistent with their overall design.
What is a pose sheet?
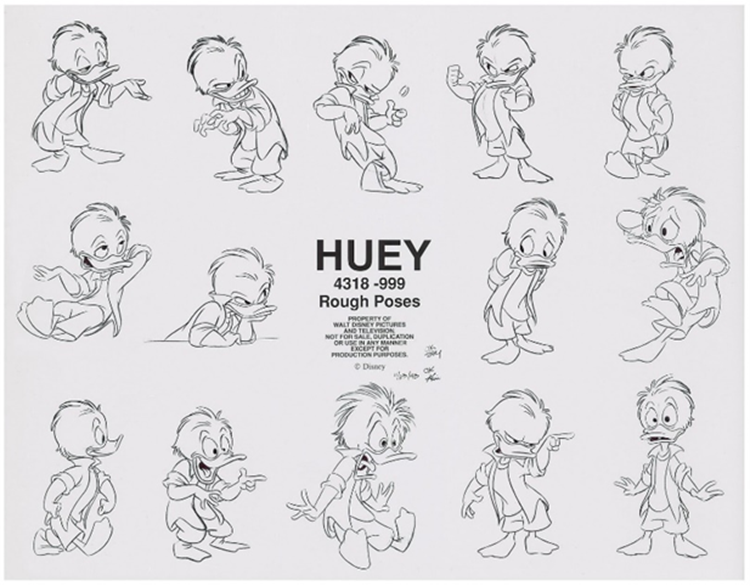
Depicting poses
Watch Jade demonstrate how to create dynamic poses using line of action, silhouettes, research, and basic shapes. (7:17m)
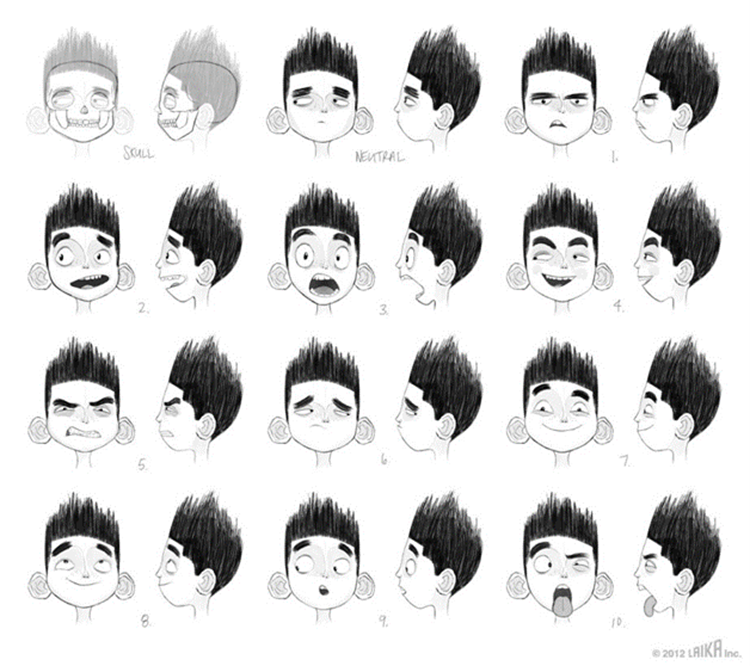
What is an expression sheet?
Depicting expressions
Watch Jade demonstrate how to depict facial expressions using facial anatomy and research, including photo references. (4:52m)
Practice
Task 6: Create pose and expression sheets of your hero character
Focus on creating pose and expression sheets that depict your hero character in different positions and display various emotions and reactions. Immerse yourself in this final Character Design learning task and better understand how movement and emotions contribute to a character’s depth.
What tools or resources do you need for this task?
Make sure you have access to:
- Pencil/pen and paper, or device and Adobe Photoshop
- Phone camera (if using pen/pencil and paper).
What steps should you take to complete this task?
6 Hours
Set aside up to six hours to complete steps 2-5 below. Remember to save your work as you go if you're using Adobe Photoshop.
- Revisit the Poses and Facial Expressions subtopic to reinforce what you know if you need to. If you haven’t already, watch Jade’s pose and expression video to help you with this task.
- Create a variety of dynamic poses for your hero character, ranging from simple, relaxed positions to complex, action-oriented poses that showcase the character's personality and role.
- Create a range of exaggerated facial expressions for your hero character, conveying emotions and reactions to different situations.
- Review and refine the poses and expressions you’ve created, ensuring clarity, coherence, and consistency with your hero character design.
- Select the most appealing poses and expressions. Organise and assemble these selected poses and expressions into two sheets: one sheet for poses and the other sheet for expressions.
What should you do after completing this task?
- Once you’ve completed your pose and expression sheets, think about their role in character design and how they can ensure the continuity of your hero character design throughout the animation process
- If you have used paper to create your pose and expression sheets, use your phone to take clear and well-lit photos. If you have used Adobe Photoshop, save your work on your device.
- Share photo(s) to the Forum:
- Select your forum thread in Forum: Character Design.
- Select Reply to your first Forum post.
- Enter the words ‘Task 6’ in your reply.
- Select the Post your response button, then select Edit in your reply when it shows up.
- Upload your photo(s) using the Attachment field.
- Select Save changes to share your coursework to your forum thread.
- Get feedback on this and other learning tasks at the next Live Session – check the Live Session calendar for dates and times.
Keep updating your foundational skills by exploring the techniques you've encountered in this Character Design topic. Experiment with concepts, archetypes, silhouettes and shapes to help finalise your character designs in your model sheet packs. Stay inspired and continue pushing the boundaries of your creativity!
In this topic, you’ve learnt about character design, a crucial aspect of animation. You’ve:
- developed a character bio and used research techniques
- explored character archetypes to enrich character designs
- uncovered best practices to create dynamic character silhouettes
- experimented with shape language to enhance character designs
- created model sheets for character turnarounds, poses, and expressions.
A character’s ability to convey emotions, backstory and personality through movement and appearance is crucial for engaging storytelling – so keep practising the character design techniques you’ve discovered in this topic.
Check what you know about character design
Use the quiz below to test your knowledge of character design to help ensure you’re on the right track, and identify areas where you may need to revisit subtopics.
Practice
Task 7: Check your knowledge - Character Design
Get ready to put your character design knowledge to the test! This quiz is designed to help reinforce your understanding and is not part of the formal assessment process. So treat it as a valuable tool to gauge your progress and identify areas for improvement.
You'll encounter a variety of question formats, including multiple choice, true or false, and fill in the blanks. So approach each question with a critical eye and draw on your learning to choose the best answers – go for it!
What steps should you take to complete this knowledge check?
30 Minutes
Set aside 20-30 minutes to complete this knowledge check.
- This quiz has 18 questions. Read each question carefully. Make sure you understand what is being asked before attempting an answer.
- Provide the most accurate and complete answers you can. If a question stumps you, make an educated guess based on your knowledge.
- Don't let difficult questions discourage you. Stay confident and do your best. Remember, it's a learning opportunity, and not a formal assessment!
- Once you've reviewed your answer and are satisfied, click the ‘Check button’ to see if you chose the correct answer. You can also retry questions and show solutions.
Good luck, and enjoy the challenge!
What should you do after completing this knowledge check?
Developing a strong grasp of character design is essential to elevate your animation abilities. Take the time to practise the concepts covered in this knowledge check.
Put your learnings into practice by incorporating character design concepts into your animation projects. The more you apply these concepts, the more proficient you'll become.
Remember, continuous learning and practice are key!
Reflect on what you’ve learnt, practised, and achieved
As you wrap up this topic, take a moment to reflect on what you've learnt, practised, and achieved by completing the various learning tasks in this topic.
Character design is about bringing your imagination to life, and you've taken active steps towards advancing your proficiency in an art form that mixes technical skills, creativity, and storytelling. Great work!
| # | Learning Task Name | Duration (Hours) | |
|---|---|---|---|
| 1 | Create a character concept | 4 | |
| 2 | Create a hero character concept | 2 | |
| 3 | Create dynamic silhouettes for your hero character | 3 | |
| 4 | Use shapes to create designs of your hero character | 3.25 | |
| 5 | Create a turnaround model sheet of your hero character | 6 | |
| 6 | Create pose and expression sheets of your hero character | 6 | |
| 7 | Check your knowledge | 0.5 | |