Using fundamental art and animation concepts and techniques is crucial for aspiring animators, enabling them to craft engaging visual stories with precision and creativity.
This topic lets you focus on areas that underpin art and animation, from traditional hand-drawn animation and digital animation techniques to colour theory, composition, and digital painting tools. These areas are all instrumental in shaping your artistic and animator journey and will provide a solid groundwork for your creative growth.
So, get ready to explore the basics of art and animation and gain essential knowledge and skills to help you create compelling animation.
Subtopics that you can explore
In this Art and Animation Basics topic, you’ll explore five key subtopics, each offering valuable insights and techniques to elevate your animation game. These subtopics are:
- Traditional 2D Animation Basics
- 2D Digital Animation
- The Colour Wheel
- Composition
- Digital Painting
Use the Art and Animation Basics Forum to share your coursework
When you complete a learning task, always read its What should you do after completing this task? section to check if you need to share your coursework (e.g. image or multimedia files) in this topic’s Forum.
You'll get specific guidance on when to do this but it's a good idea to get a headstart and set up your personalised forum thread for Art and Animation Basics now by working through the task below.
Practice
Set up your forum thread for Art and Animation Basics
Set up your forum thread for this topic. By doing this, you'll be able to:
- Share your animation coursework you create while completing learning tasks.
- Get constructive feedback from your facilitator and fellow students to help you improve your animation skills and knowledge of animation principles and techniques.
- Learn from different perspectives, techniques and creative solutions shared by fellow students.
What steps should you take to complete this task?
- Find this topic’s Forum by selecting this link: Forum: Art and Animation Basics or by using the navigation menu on the left.
- Select the New thread link once you land on the Forum.
- In the Subject field, enter your first and last names.
- In the Message field, enter one or two sentences describing what you know about the basics of art and animation.
- Select Post to forum at the end of the page.
You can also watch this playlist below of two short videos (6:38m) to find out how to set up your forum thread and share your coursework in your forum thread.
Use the hamburger icon in the top right of the playlist to access the video menu if you need to.
What should you do after completing this task?
Keep progressing through this topic. Whenever you get to a learning task, read it carefully to check whether you need to share your animation coursework (e.g. a JPEG or MP4 file) to the Forum.
Remember, reach out to your facilitator if you have questions about how to use the Forums or any other aspect of your study.
Learning tasks that will help you develop and practise animation skills
Practice
Use your skills and build your knowledge
Engage confidently with the learning tasks in this topic: they are the essential building blocks to help you use fundamental animation tools. By completing these learning tasks, you'll strengthen your art and animations skills and reinforce your abilities to craft exceptional animations.
Keep an eye out for the PRACTICE box throughout this topic, highlighting learning tasks and resources and providing clear guidance on what actions you should take. The following information outlines the learning tasks in Art and Animation Basics and the recommended time allocation for each.
|
# |
Learning task name |
Duration (hours) |
|
|---|---|---|---|
|
1 |
Check your knowledge - Part 1 |
0.25 |
 |
|
2 |
Create a simple character |
2 |
 |
|
3 |
Draw and build a fish |
2 |
|
|
4 |
Create a character’s face |
4 |
|
|
5 |
Create a lip sync for character audio |
2 |
|
|
6 |
Build and animate a mouth |
4 |
|
|
7 |
Create a motion guide |
1 |
|
|
8 |
Animate a ball: Bouncing on the spot |
3 |
|
|
9 |
Animate another ball: Bouncing across your screen |
4 |
|
|
10 |
Animate a hand gesture |
6 |
|
|
11 |
Animate a rain shower |
4 |
|
|
12 |
Animate a flour sack jumping |
6 |
|
|
13 |
Check your knowledge - Part 2 |
0.25 |
|
|
14 |
Create colour palettes |
2 |
|
|
15 |
Check your knowledge - Part 3 |
0.25 |
|
|
16 |
Create an influence map |
3 |
|
|
17 |
Blend two values |
3 |
|
|
18 |
Create a wood texture |
3 |
|
|
19 |
Create a sphere diagram |
2 |
|
|
20 |
Create a cube diagram |
2 |
|
|
21 |
Create a character colour study |
6 |
|
|
22 |
Recreate an image |
6 |
|
Feedback and support is woven through the learning tasks as you complete them. Reach out if you have any questions about what to do!
In this Traditional 2D Animation Basics subtopic, explore fundamental concepts and processes used to create hand-drawn animation, as used by studios worldwide. Find out about aspects of traditional and contemporary practices which have been synthesised into modern animation workflows and production management practices.
Tip
Check your knowledge with confidence
At the end of this subtopic you can boost your knowledge of traditional 2D animation concepts and processes by using a knowledge check.
Before attempting the knowledge check, give this subtopic a read-through, ensuring you're well-prepared. Feel free to refer back as you answer – consider it an open-book challenge!
Animation pipeline
The term animation pipeline describes the series of processes used to create animation. Generally, many different departments and artists are involved in making animation. Each department in an animation studio consists of a team of artists typically supervised by an experienced Head of Department.
The three main stages of making animation in the traditional way are categorised as:
- Pre-production
- Production
- Post-production.
What does the pre-production stage involve?
Select + to view elements of the Pre-production stage.
Script writing for animated films and television requires understanding the medium and how it differs from live action.
Walt Disney identified a key difference: animated films are drawn (using storyboards) rather than written. Disney used the storyboarding process to develop and explore story concepts visually and found that there were better ways to explore the visual nature of animation than writing stories.
Many animators prefer to draw storyboards instead of first writing scripts. However, production companies still use script writers to produce scripts, an important part of many studio pipelines. An experienced television animation script writer understands how to balance the need for interesting storytelling with budgetary limitations necessary in episodic production.

For example, an experienced script writer knows that it isn't practical to introduce new characters and locations in a television series in every episode, as it would require too much extra time and expense to produce and distribute new designs and manage quality control across artists.
A storyboard is a sequence of pictures that illustrate a story. The storyboard artist’s job is to draw each shot of the story. They are responsible for the look of each shot, and their drawings must describe the camera angle, staging, and action.
The storyboard originates in gag strips drawn by animators when beginning their animation. In the 1930s, Max Fleisher had these gag strips cut out as individual panels and stuck on a wall where they could be viewed in sequence by the animation team. The team could re-arrange the panels and draw additional panels where required. Walt Disney implemented and developed the approach in his studio - it became fixed as a part of the production process.
Developing a storyboard involves several pitch sessions with the production team and the director, where the storyboard artist presents their drawn ideas for feedback and discussion. Or it is a visual adaptation of an existing script, visually describe the script’s action and events, the composition of each scene, plan any camera moves, and provide visuals that reinforce the script's mood, atmosphere and pacing.

A storyboard is drawn with usually three or six panels per page. These panels are numbered to represent the start and end of each scene. In animation, each new shot is a scene. The storyboard artist should use as many panels as required to describe the action in any scene clearly. Each scene is labelled consecutively, and a new scene begins every time the camera cuts to a new angle.
A Production Department manages and records every scene in an animated production. They plan and maintain schedules and deadlines for each department and prepare and distribute all necessary materials required in each department.
An exposure sheet, known as an x-sheet, is prepared for each scene. Each scene has an x-sheet, which indicates the total number of frames the animation director decides.
Everything in an animated film must be designed, including characters, locations, props, vehicles, costumes, and any visual element appearing on screen.
Design packs are produced and distributed to all departments so that different artists can draw consistent designs. A design pack consists of model sheets for characters, locations, props, vehicles, costumes, etc.
Each model sheet shows all relevant information for an object, background or character.
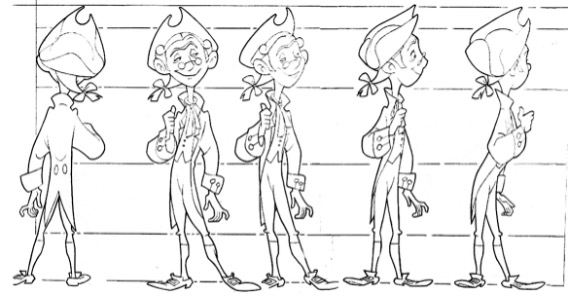
Model packs include a variety of different types of model sheets, including:
- Turnaround models showing various angles of a prop or character.
- Expression models showing a range of character expressions and moods.
- Mouth charts showing specific mouth shapes used to draw shots involving dialogue.
- Size comparison model sheets showing size relationships between characters.
- Key location/Background models showing all necessary environment information to draw a scene from any angle.
- Prop models
- Effect design model sheets showing how to draw effects such as smoke, fire, water, etc.
- Colour designs for artists' painting of backgrounds, characters and effects.
Explore
Character model sheets
In the information above, you’ve read about different model sheets.
If you need to deepen your knowledge on turnaround model and expression sheets (including pose sheets) from a character design perspective, visit the Character Design topic within this Foundations module at any time. Enjoy your study!
What does the Production stage involve?
Select + to view elements of the Production stage.
Layout is the first phase of production, following the completion of the storyboard during pre-production. Layout’s role is to develop and provide a clear, scaled plan for each storyboard scene.
This plan becomes the basis for the final background painting or 3D environment and describes:
- What, where, and how the characters move in any scene
- Camera position relative to the action
- Camera movements.
The layout artist:
- Produces a clear, scaled plan for each storyboard scene
- Draws a background drawing (given to the Background Department to paint)
- Provides character drawings to describe a scene's action
The background and character drawings are given to the Animation Department so that animators can complete their animation scene, matching their character drawings to the background provided and following the basic character positions provided by the layout artist.
Key animators are responsible for bringing the characters (and effects) to life. They use the layout drawings to complete each animation scene, matching their character drawings to the background provided and following the basic character positions provided by the layout artist.

The Animation Team consists of experienced and junior artists or assistants. A lead animator uses their drawing skills and in-depth understanding of movement and acting to:
- Produce all the key drawings for each scene
- Plan the timing of each movement.
The key drawing focuses solely on important movements necessary in the performance. It does not include the ‘in-between’ frames, which are added later to make each action move smoothly.
The lead or key animator works closely with an assistant (called an in-betweener) who completes all of the in-between drawings in a scene. These in-between drawings fill the spaces between the key drawings and smooth out the animation, and are drawn in specific positions according to the key artist's spacing directions.
A checker painstakingly examines each scene looking for errors, generally in the technical areas of animation, such as registration and labelling.
The key clean-up artist must produce a new 'cleaned up’ final line drawing for every rough key drawing indicated on the x-sheet. The cleaned-up drawings will include all necessary correct details, shapes, and proportions consistent with the model sheets.
Throughout the scene, the shapes and masses should flow well, with smooth, consistent line work, while maintaining consistency of model and style. These final drawings will be scanned, painted and seen on the screen.
The in-between clean-up artist must produce a new 'cleaned up’ final line drawing for every rough in-between drawing.
What does the Post-production stage involve?
Select + to view elements of the Post-production stage.
Each drawing is scanned and optically registered, and the x-sheet is digitised.
Each drawing is vectorised and digitally painted according to the colour design specifications. Each drawing is saved to include only the drawn area, i.e., the space around each character drawing is left clear and transparent and is saved in a format to maintain the transparent areas.
Complete frame sequences are painted and saved for each animation level. Each level will later be put together (composited) along with the background, and due to the transparent areas, each character level can be seen together against the background.
All levels are put together to produce each final frame of animation. Each frame contains the final image, including all painted character levels, shadow and light levels, painted effects levels, painted underlays and overlays, and final background paintings.

Hand-drawn animation – the basics
In this section, dive in deeper to discover hand-drawn animation basics and find answers to questions such as:
- What are the main types of hand-drawn animation?
- What are the core elements of a hand-drawn sequence?
- How does your choice of timing and spacing impact movement?
- How does the flipping technique help you create in-between frames?
What are the main types of hand-drawn animation?
There are three main types of hand-drawn animation. These are:
- Straight ahead
- Pose to pose
- A combination of both of these.
In pose to pose animation, the animator draws a key drawing for the key moments in the action and later adds in-between drawings to smooth out the movement.
![[ADD IMAGE'S ALT TEXT]](/sites/default/files/Pose%20To%20Pose_1.jpg)
Why are animation drawings created on hole-punched paper?
All animation drawings are drawn on paper punched with holes to keep each drawing perfectly aligned. The holes are punched with a specific hole size and shape using a special hole-punch.
The specifications used are the same in animation studios worldwide, allowing studios to work together on the same production from different locations.
What are core elements of a hand-drawn sequence?
In-between artist role
The in-between artist completes the in-between drawings according to the animator’s timing charts.
How is movement impacted by the choice of timing and spacing?
The timing chart indicates the spacing of each in-between drawing to be completed between the key drawings. There are several main types of timing charts used in animation.
The more in-betweens drawn between two keys, the smoother the movement will appear. It will also take longer (in time) if they are each held for the same amount of time.
How does the flipping technique help create in-betweens?
Animators use a technique called flipping to draw in-betweens. By repeatedly and quickly flipping between two character key drawings from an animation sequence, you can begin to see the drawings as though they are on the same page.
This effect is called 'persistence of vision', the eye phenomenon by which an afterimage persists for approximately 1/25th of a second on the retina.
In an in-between drawing, the in-between artist must draw every shape and detail in the halfway position between the same details on the two key drawings.
Why is understanding movement arcs critical in hand-drawn animation?
Practice
Task 1: Check your knowledge – Traditional 2D Animation Basics
Get ready to put your knowledge of traditional 2D animation concepts and processes to the test! This short knowledge check will help reinforce your learning, so treat it as a valuable tool to boost your knowledge of what you’ve read in this subtopic.
You'll encounter a variety of question formats, including multiple choice and true or false. So approach each question with a critical eye and draw on your learning to choose the best answers – remember, you can always refer back to the information as you answer.
What steps should you take to complete this knowledge check?
15 minutes

Set aside 15 minutes to complete this knowledge check.
- This quiz has 10 questions. Read each question carefully. Make sure you understand what is being asked before attempting an answer.
- Provide the most accurate and complete answers you can. If a question stumps you, make an educated guess based on your knowledge.
- Don't let difficult questions discourage you. Stay confident and do your best. Remember, it's a learning opportunity, and not a formal assessment!
- Once you've reviewed your answer and are satisfied, click the ‘Check button’ to see if you chose the correct answer. You can also retry questions and show solutions.
Good luck, and enjoy the challenge!
What should you do after completing this knowledge check?
Explore the next subtopic, 2D Digital Animation, where you’ll learn how to use powerful tools such as Adobe Animate and Toon Boom to build digital assets and create captivating animated content.
Welcome to 2D Digital Animation! In this subtopic, dive into the mechanics of creating captivating digital animation using Adobe Animate and Toon Boom. From building basic characters and objects to FX animation and anthropomorphism, you'll learn core digital techniques that bring your creations to life.
Tip
Watch Jade animate
This subtopic includes videos with Jade showing you how to use Adobe Animate and Toon Boom to create 2D animation content. You’ll find these videos helpful when completing learning tasks in this subtopic.
Observe the techniques shown in the videos. Pause the videos to practise or experiment with system steps. If a video presents challenges, pause it to attempt the tasks or find the solution.
So have fun, stay focussed, and ask us if you need help!
Building characters and objects
In this section, discover how to use Adobe Animate to create your animation assets. Follow Jade as he demonstrates how to build assets and then reinforce your growing familiarity with Adobe Animate by building characters and objects, from fish to faces.
Explore
New to Adobe Animate?
Get a head start on your learning tasks and try out Adobe Animate with these two tutorials. You’ll also find these and other tutorials in Software at the start of this course.
- The Animate drawing tools Learn how to use the drawing tools and create a boat. (5:27m)
- Create a symbol Save art and make it easy to update and reuse by creating symbols. (3:34m)
How do you build animation assets?
Watch Jade build assets and symbols for a simple character with Adobe Animate in three videos, located in the playlist below. Use the hamburger icon in the top right of the playlist to access the video menu.
These videos help you complete Task 2: Create a simple character below. You can also use this quick start guide to step you through the videos and the learning task: Quick Start Guide: Building characters and objects.
Practice
Task 2: Create a simple character
Develop your foundational skills in building animation assets with Adobe Animate. You’ll practise using animation techniques to build a simple character that waves its hand, combining symbol and line-based elements. Get ready to say hello!
What tools or resources do you need for this task?
Make sure you have access to:
- Adobe Animate - you can use either a:
- digital drawing pen and tablet, or
- mouse and keyboard
- Quick Start Guide: Building characters and objects.
What steps should you take to complete this task?
2 hours

Set aside two hours to complete steps 2-9 below. Remember to save your work as you go when using Adobe Animate.
- Watch Jade’s three videos, carefully observing his techniques in Adobe Animate to create his character, and refer to Quick Start Guide: Building characters and objects if you need clarity or get stuck.
- In Adobe Animate, build your simple character (using symbols and the Line Tool) and create an ‘open’ hand.
- Select all parts of your character and create separate layers.
- Extend frames for animation by selecting all layers in the timeline.
- Set keyframes for the arm movement on arm and hand layers.
- Create start and end poses for on each keyframe.
- Swap symbols on the hand layer to bring in the waving hand.
- Refine the animation using inbetweening techniques.
- Export your animation as an MP4.
What should you do after completing this task?
- Consider the movement of your character’s hand wave. Which aspects of in-betweening did you find most effective in achieving smoothness, and how might you apply this technique to future animations?
- Share your waving character to the Forum:
- Select your forum thread in Forum: Art and Animation Basics.
- Select Reply to your first Forum post.
- Enter the words ‘Task 2’ in your reply.
- Select the Post your response button, then select Edit in your reply when it shows up.
- Upload your MP4 using the Attachment field.
- Select Save changes to share your coursework to your forum thread.
- Get feedback on this and other learning tasks at the next Live Session – check the Live Session calendar for dates and times.
In the next section, you’ll explore the process of building characters from actual drawings, allowing you to expand your creative possibilities in Adobe Animate.
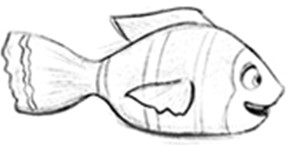
How do you build from drawings?
Watch Jade build and animate a fish character from a drawing with Adobe Animate in four videos , located in the playlist below. Use the hamburger icon in the top right of the playlist to access the video menu.
These videos help you complete Task 3: Draw and build a fish below. You can also use this quick start guide to step you through the videos and the learning task: Quick Start Guide: Building characters and objects.
Explore
Quick start guides that support your learning
If you haven’t noticed already, Jade’s videos in this subtopic are supplemented by quick start guides, designed to be your trusty companion in case you need clarity or support as you take in what you’re watching.
The quick start guides are also handy references for acing the learning tasks below – it’s all about fast insights at your fingertips!
Practice
Task 3: Draw and build a fish
Keep developing your emerging skills in creating animated characters, and practice using Adobe Animate to build animations - this time from one of your drawings.
What tools or resources do you need for this task?
Make sure you have access to:
- Adobe Animate - you can use either a:
- digital drawing pen and tablet, or
- mouse and keyboard
- Quick Start Guide: Building characters and objects.
What steps should you take to complete this task?
2 hours
Set aside two hours to complete steps 2-8 below. Remember to save your work as you go when using Adobe Animate.
- Watch Jade’s four videos, carefully observing his techniques in Adobe Animate to draw and build his fish, and refer to Quick Start Guide: Building characters and objects if you need clarity or get stuck.
- Draw a fish and import your drawing into Adobe Animate.
- Build the fish in parts (i.e., body, pupil of eye, fins) on a new layer and trace each part above the imported drawing.
- Convert each part into a symbol upon completion.
- Select all symbols and turn distribute them onto individual layers.
- Extend frames for all layers to the desired scene length.
- Creating a looping animation to simulate swimming through an environment in an animated scene.
- Export your animation as an MP4.
What should you do after completing this task?
- Consider the fluidity of movements, the synchronisation of body parts, and overall realism. How did the process of drawing and animating your fish character contribute to your understanding of character movement and storytelling?
- Share your swimming fish to the Forum:
- Select your forum thread in Forum: Art and Animation Basics.
- Select Reply to your first Forum post.
- Enter the words ‘Task 3’ in your reply.
- Select the Post your response button, then select Edit in your reply when it shows up.
- Upload your MP4 using the Attachment field.
- Select Save changes to share your coursework to your forum thread.
- Get feedback on this and other learning tasks at the next Live Session – check the Live Session calendar for dates and times.
Building on your animation skills, move to the next section and create a character's face and explore facial expressions and mouth movements to enhance the emotive quality of your characters.
How do you build a character?
Watch Jade create a character’s face using shapes and symbols with Adobe Animate.
This video will help you complete Task 4: Create a character’s face below. You can also use this quick start guide to step you through the video and the learning task: Quick Start Guide: Building characters and objects.
Practice
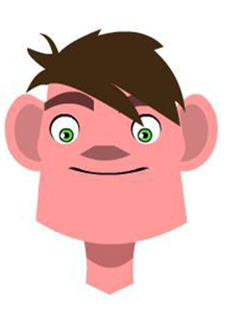
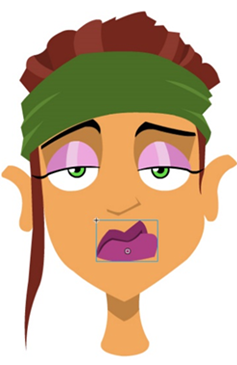
Task 4: Create a character’s face
Reinforce your 2D digital animation skills by creating a character's face and animating a simple eye blink using shapes and symbols with Adobe Animate.
What tools or resources do you need for this task?
Make sure you have access to:
- Adobe Animate - you can use either a:
- digital drawing pen and tablet, or
- mouse and keyboard
- Quick Start Guide: Building characters and objects.
What steps should you take to complete this task?
4 hours
Set aside four hours to complete steps 2-7 below. Remember to save your work as you go when using Adobe Animate.
- Watch Jade’s video, carefully observing his techniques in Adobe Animate to create a character face, and refer to Quick Start Guide: Building characters and objects if you need clarity or get stuck.
- Build the face parts of a character (e.g. mouth, eye, nose, head, etc.), saving each part as a symbol in Adobe Animate.
- Arrange your symbols into different designs to create various character variations.
- Animate a basic blink by converting previously created eye symbols into a new Blink symbol, organising layers, and preparing for animation.
- Create a skin-coloured eyelid shape by copying and breaking apart the eye symbol, setting the stage for the blink animation.
- Extend frames, create keyframes, and adjust each frame to achieve a seamless blinking animation.
- Export your animation as an MP4.
What should you do after completing this task?
- What do you think about the steps you’ve used with Adobe Animate to create a character face? Consider the fluidity of the eye blink, the synchronisation with other facial features, and the overall expression achieved.
- Share your blinking character to the Forum:
- Select your forum thread in Forum: Art and Animation Basics.
- Select Reply to your first Forum post.
- Enter the words ‘Task 4’ in your reply.
- Select the Post your response button, then select Edit in your reply when it shows up.
- Upload your MP4 using the Attachment field.
- Select Save changes to share your coursework to your forum thread.
- Get feedback on this and other learning tasks at the next Live Session – check the Live Session calendar for dates and times.
Develop your character creation skills with the next learning task, where you’ll create a lip sync animation with a character audio file, helping you add further layers of realism and expressiveness to your characters.
Now, watch Jade create a lip sync and animate dialogue with Adobe Animate.
This video will help you complete Task 5: Create a lip sync for character audio and Task 6: Build and animate a mouth below. You can also use this quick start guide to step you through the video and the learning tasks: Quick Start Guide: Building characters and objects.
Practice
Task 5: Create a lip sync for character audio
Practise integrating expressive and synchronised mouth movements with audio in Adobe Animate, enhancing your ability to convey dynamic character dialogue.

What tools or resources do you need for this task?
Make sure you have access to:
- Files: Character and audio
- Adobe Animate - you can use either a:
- digital drawing pen and tablet, or
- mouse and keyboard
- Headphones (if you are studying by other people)
- Quick Start Guide: Building characters and objects.
What steps should you take to complete this task?
2 hours
Set aside two hours to complete steps 2-8 below. Remember to save your work as you go when using Adobe Animate.
- Watch Jade’s video, carefully observing his techniques in Adobe Animate to create a lip sync and animate dialogue, and refer to Quick Start Guide: Building characters and objects if you need clarity or get stuck.
- Access and download the two files in Files: Character and audio.
- Import the audio file into the Adobe Animate library and place the audio on a layer.
- Set the audio sync to Stream and listen to the audio file by scrubbing through the timeline.
- Review the mouth movements and consider which mouth shapes suit the sounds.
- Add keyframes, adjusting the selected mouth in the properties window for synchronisation.
- Adjust ‘homer mouths’ and preview the synchronised mouth movements.
- Export your animation as an MP4.
What should you do after completing this task?
- What worked or didn’t work well for you when working through the lip sync process? Were there alternate steps you considered using in Adobe Animate, and how might have they affected the outcome?
- Share your lip sync to the Forum:
- Select your forum thread in Forum: Art and Animation Basics.
- Select Reply to your first Forum post.
- Enter the words ‘Task 5’ in your reply.
- Select the Post your response button, then select Edit in your reply when it shows up.
- Upload your MP4 using the Attachment field.
- Select Save changes to share your coursework to your forum thread.
- Get feedback on this and other learning tasks at the next Live Session – check the Live Session calendar for dates and times.
When you’re ready, move to the next learning task, where you’ll build and animate mouth shapes, refining your 2D digital animation skills to add realism to character expression through character dialogue.
Practice
Task 6: Build and animate a mouth
Reinforce your familiarity with lip sync and dialogue work using Adobe Animate to build and animate mouth shapes and integrate audio for expressive character dialogue.
What tools or resources do you need for this task?
- Files: Audio
- Adobe Animate - you can use either a:
- digital drawing pen and tablet, or
- mouse and keyboard
- Headphones (if you are studying by other people)
- Quick Start Guide: Building characters and objects.
What steps should you take to complete this task?
4 hours
Set aside four hours to complete steps 2-8 below. Remember to save your work as you go when using Adobe Animate.
- Watch Jade’s video, carefully observing his techniques in Adobe Animate to create a lip sync and animate dialogue, and refer to Quick Start Guide: Building characters and objects if you need clarity or get stuck.
- Access and download the five files in Files: Audio.
- Build or draw a face without a mouth on Layer 1 in Adobe Animate.
- On a new layer, build or draw a closed mouth and convert the mouth to a symbol, naming it ‘A’ mouth.
- Open the symbol and add 5-10 blank keyframes. On the new keyframes, build or draw six other different mouths representing various sounds and shapes.
- Synchronise the keyframes with imported audio and adjust the keyframes.
- Listen to the audio and add keyframes to the mouth symbol.
- Export your animation as an MP4.
What should you do after completing this task?
- What are your main takeaways from navigating through the steps in this 2D digital animation challenge? Can you see yourself enhancing your skills in this area in related animation work?
- Share your animation to the Forum:
- Select your forum thread in Forum: Art and Animation Basics.
- Select Reply to your first Forum post.
- Enter the words ‘Task 6' in your reply.
- Select the Post your response button, then select Edit in your reply when it shows up.
- Upload your MP4 using the Attachment field.
- Select Save changes to share your coursework to your forum thread.
- Get feedback on this and other learning tasks at the next Live Session – check the Live Session calendar for dates and times.
In the next section you’ll learn how to use motion guides to bring characters and objects to life in fun animated sequences, enhancing your skills in creating compelling 2D digital animations.
Moving symbols
Using a motion guide, you can make any symbol travel along a specified path. In this short section, find out how to use Adobe Animate to control and define the path along which a symbol moves during an animation, allowing you to achieve smooth and intricate movements in your animations.
How do you create a motion guide?
Practice
Task 7: Create a motion guide
Prepare to create controlled animations by practising motion guide creation. By specifying and controlling the path of a symbol, you can achieve smoother and more dynamic movements, enhancing your proficiency in 2D digital animation.
What tools or resources do you need for this task?
- Adobe Animate - you can use either a:
- digital drawing pen and tablet, or
- mouse and keyboard
- Quick Start Guide: Creating a motion guide.
What steps should you take to complete this task?
1 hour
Set aside one hour to complete steps 2-8 below. Remember to save your work as you go when using Adobe Animate.
- Refer to Quick Start Guide: Creating a motion guide to help you create a motion guide in Adobe Animate.
- Start by creating an object you wish to animate and convert the object to a symbol.
- Right-click on the symbol layer and select Add Classic Motion Guide to introduce a motion guide layer.
- Turn on the Snap to Objects function at the bottom of your toolbar to assist in precise placement.
- Extend frames on both the symbol and motion guide layers to the desired length and add a keyframe to the last frame of your symbol layer.
- Select the motion guide layer and use the pencil tool to draw the path you want your symbol to move.
- Snap the symbol to your guide’s the start and end points on the first and last frames.
- Finally, right-click between keys on the symbol layer and choose Create Classic Tween.
What should you do after completing this task?
Now that you've practised creating a motion guide, the next step is to dive deep into animating characters and objects. Apply your knowledge to bring your creations to life with nuanced and captivating movements. After completing your animations, take a moment to review and reflect on how the motion guide enhanced your work.
Animating characters and objects
In this section, consolidate and use fundamental animation concepts and processes you’ve learnt. Follow Jade as he demonstrates how to animate characters and objects using Toon Boom, and practise your skills – ranging from timing and spacing, squash and stretch, to keys, breakdowns and in-betweens - by making objects bounce and arc.
Explore
New to Toon Boom?
Jumpstart your journey with these Toon Boom tutorials designed to help you learn the essentials. Explore these and other software tutorials in Software at the start of this course.
- Using the Drawing Tools Learn how to use various drawing tools including the Pencil, Cutter, and Contour Editor tools. (12:52m)
- Using the Timeline Learn how to navigate the Timeline and Camera views to set the timing and movement on your animations. (10:27m)
- Creating a Frame Learn about animating drawings frame-by-frame and how to create a new palette and paint your animation. (10:28m)
- Importing Images Learn to import images and multimedia into your scene. (5:58m)
How do you animate a bouncing ball?
Watch Jade animate a bouncing ball with Toon Boom in three videos, located in the playlist below. Use the hamburger icon in the top right of the playlist to access the video menu.
These videos will help you complete Task 8 and Task 9 below, where you’ll animate balls bouncing on the spot and across your screen. You can also use this quick start guide to step you through the videos and the learning tasks: Quick Start Guide: Animating characters and objects.
Practice
Task 8: Animate a ball: Bouncing on the spot
Reinforce your understanding of fundamental animation principles and processes by creating a looping cycle of a ball bouncing on the spot, practicing the concepts of timing, spacing, slow-in and slow-out, squash and stretch, as well as keys, breakdowns, and in-betweens.
What tools or resources do you need for this task?
Make sure you have access to:
- Toon Boom or Adobe Animate
- digital drawing pen and tablet
- Quick Start Guide: Animating characters and objects.
What steps should you take to complete this task?
3 hours
Set aside three hours to complete steps 2-8 below. Remember to save your work as you go when using Toon Boom or Adobe Animate.
- Watch Jade’s three videos, carefully observing his techniques in Toon Boom to animate a bouncing ball, and refer to Quick Start Guide: Animating characters and objects if you need clarity or get stuck.
- Choose your tool – you can use Adobe Animate or Toon Boom to create your animation.
- Choose between animating a ball object/asset or creating the animation frame by frame. Start the animation from the ground (lowest point) in the first frame.
- Use Onion Skin mode and set the bracket range to meet the current Frame, allowing you to view the current frame and previous frames.
- Use the keyboard arrows to measure and position each frame precisely, especially during the slow-in and slow-out phases. For instance, incrementally adjust the ball's position downward with each successive frame to achieve a perfect slow-out.
- Continue inserting single frames and adjusting the ball's position, doubling the previous number of arrow taps to ensure a gradual and realistic slow-out.
- Play the animation to review the bouncing ball's motion, ensuring it follows a natural and convincing trajectory.
- Export your animation as an MP4.
What should you do after completing this task?
- Were there any specific challenges you encountered, and how did you overcome them in the animation process? What adjustments did you make to improve the realism and fluidity of the bouncing ball's movement?
- Share your bouncing ball to the Forum:
- Select your forum thread in Forum: Art and Animation Basics.
- Select Reply to your first Forum post.
- Enter the words ‘Task 8’ in your reply.
- Select the Post your response button, then select Edit in your reply when it shows up.
- Upload your MP4 using the Attachment field.
- Select Save changes to share your coursework to your forum thread.
- Get feedback on this and other learning tasks at the next Live Session – check the Live Session calendar for dates and times.
Now, take your skills further by extending the challenge. In the next learning task, you’ll animate another bouncing ball, introducing the element of arcs. This additional complexity will deepen your understanding of motion paths and enhance your ability to create nuanced and visually engaging animations.
Practice
Task 9: Animate another ball: Bouncing across your screen
Animate another bouncing ball – this time bouncing left to right across your screen – and extend your use of animation principles by incorporating arcs and squash and stretch ! And just like with your first bouncing ball, you’ll get to use keyframes, breakdowns, in-betweens, and slow-in and slow-out.
What tools or resources do you need for this task?
Make sure you have access to:
- Toon Boom or Adobe Animate
- digital drawing pen and tablet
- Quick Start Guide: Animating characters and objects.
What steps should you take to complete this task?
4 hours
Set aside four hours to complete steps 2-9 below. Remember to save your work as you go when using Toon Boom or Adobe Animate.
- Refer to Quick Start Guide: Animating characters and objects if you need clarity or get stuck. You can also rewatch Jade’s three videos where he uses Toon Boom to animate a bouncing ball.
- Choose your tool – you can use Adobe Animate or Toon Boom to create your animation.
- Set up your digital file and prepare your keyframes. As you progress, remember to review your keyframes and draw breakdowns and in-betweens.
- Draw a circle representing the ball above the ground line. Choose the size and position according to your preference and determine the ball’s starting position.
- Use arcs to plan the trajectory and distance for the ball’s bounces. Develop smaller and tighter arcs as the ball bounces further.
- Draw all keyframes on a new layer, following the arcs as a guide. Squash the ball when hitting the ground and create breakdowns with lighter opacity.
- Apply slow-in and slow-out to the top of the arcs. Add squash to keyframes touching the ground and stretch to the frames after leaving the ground.
- Play the animation to review the bouncing ball's motion, ensuring it follows a natural and convincing trajectory.
- Export your animation as an MP4.
What should you do after completing this task?
- What new insights did you gain from creating the left-to-right bounce using arcs? How did squash and stretch help convey a sense of weight and impact in the bouncing ball?
- Share your bouncing ball to the Forum:
- Select your forum thread in Forum: Art and Animation Basics.
- Select Reply to your first Forum post.
- Enter the words ‘Task 9’ in your reply.
- Select the Post your response button, then select Edit in your reply when it shows up.
- Upload your MP4 using the Attachment field.
- Select Save changes to share your coursework to your forum thread.
- Get feedback on this and other learning tasks at the next Live Session – check the Live Session calendar for dates and times.
Now that you’ve practised using animation techniques and tools such as timing, spacing, slow-in and slow-out, and arcs, prepare to experiment with more nuanced movements in the next learning task where you’ll animate a hand gesture.
How do you create in-betweens for a hand gesture?
Watch Jade animate a hand gesture with Toon Boom in two videos. This video will help you complete Task 10: Animate a hand gesture below, located in the playlist below. Use the hamburger icon in the top right of the playlist to access the video menu.
Practice
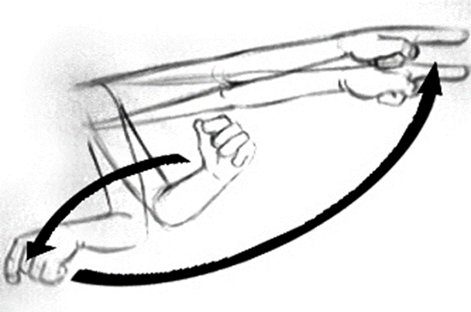
Task 10: Animate a hand gesture
Extend your experience with drawing keyframes, breakdowns, and in-betweens and sharpen your skills using strong poses, anticipation, and cushioning by animating a hand gesture. Focussing on a hand gesture’s nuanced movement will also solidify your understanding of timing, spacing, slow-in and slow-out, and arcs.
What tools or resources do you need for this task?
Make sure you have access to:
- Toon Boom or Adobe Animate
- digital drawing pen and tablet.
What steps should you take to complete this task?
6 hours
Set aside six hours to complete steps 2-9 below. Remember to save your work as you go when using Toon Boom or Adobe Animate.
- Watch Jade’s two videos where he uses Toon Boom to animate a hand gesture.
- Choose your tool – you can use Adobe Animate or Toon Boom to create your animation – and set up your digital file.
- Sketch basic hand poses on paper (similar to the image above). Import these rough sketches as a guide on a separate layer. Lock the layer.
- Create a new layer above. Use the brush tool to sketch the hand poses on this new layer. Plan the pose sequence on the timeline.
- Use the time slider and playback options to view the animation keyframes. Focus on resolving arcs and positions in your keyframes before progressing to breakdowns and in-betweens.
- Add new blank frames and draw breakdowns. Use the time slider and playback options to assess how breakdowns align with your keyframes.
- Pay attention to maintaining the volumes of hand and fingers , creating strong poses, and conveying anticipation and cushioning.
- Repeat the process for in-betweens and continue refining your animation.
- Export your animation as an MP4.
What should you do after completing this task?
- What animation elements worked particularly well in your hand gesture animation? Are there aspects that you could refine or modify to enhance the overall quality, e.g. timing, arcs, or poses?
- Share your hand gesture to the Forum:
- Select your forum thread in Forum: Art and Animation Basics.
- Select Reply to your first Forum post.
- Enter the words ‘Task 10’ in your reply.
- Select the Post your response button, then select Edit in your reply when it shows up.
- Upload your MP4 using the Attachment field.
- Select Save changes to share your coursework to your forum thread.
- Get feedback on this and other learning tasks at the next Live Session – check the Live Session calendar for dates and times.
Broaden your knowledge and get ready to animate rain showers and jumping flour bags, exploring how these diverse elements move and interact. The next section will challenge you to adapt your growing skills to new stories, fostering creativity and versatility in your animations.
Applying the same concepts using different tools
Whether you’re animating using different tools – i.e. traditional tools such as pencil on paper or digital software such as Toon Boom or Adobe Animate – you’re applying the same concepts and process.
Whichever tools you’re using, you’ll need to plan and create key-frames, timing, breakdowns and in-betweens. For example, in a digital process, it may be easier or more effective to create in-betweens using digital interpolation, automating the in-between process and then making adjustments to refine aspects of the timing to favour a slow-in or slow-out.
Important
Empower your creative freedom
As you look at different examples of animation in this course, references to specific software will be kept to a minimum. You can choose which tools you’d like to experiment with to create your animation.
Try to be flexible in your approach, and if you think it would help to switch to a different tool or software when working on a learning task, then switch!
Don’t be afraid to experiment and explore, even if this means repeating learning tasks several times, changing direction mid-way through one, and starting again with a different approach, tool or software.
To wrap up this subtopic, you'll learn how to animate a rain shower and give personality to a simple flour sack. This hands-on practice will also develop your awareness of how to create effects (FX) animation and how to animate non-living objects.
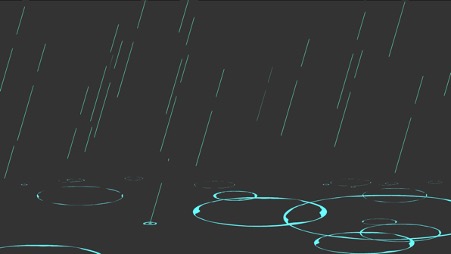
How do you animate a rain shower?
Key animation – effects (FX) animation
The image below shows the basic key-frame process of animating a radial burst for an effect similar to a firework or burst of magic dust. Radial burst animation effects typically begin explosively and quickly expand and dissipate by breaking up as it expands. The timing begins fast, then slows as it dissipates.
![[ADD IMAGE'S ALT TEXT]](/sites/default/files/Key-Frame%20Process.jpg)
You can use the same basic approach for ripple effects on water. It’s often easier to animate effects from a simple angle, as shown above, and then digitally skew the whole animation to fit a given perspective.
![[ADD IMAGE'S ALT TEXT]](/sites/default/files/Ripple%20Effects.png)
Watch Jade create FX animation for a rain shower with Adobe Animate in three videos, located in the playlist below. Use the hamburger icon in the top right of the playlist to access the video menu.
These videos will help you complete Task 11: Animate a rain shower below. You can also use this quick start guide to step you through the videos and the learning task: Quick Start Guide: Animating characters and objects.
Practice
Task 11: Animate a rain shower
Creating FX animation for a rain shower is easier than you might think! Practice animating a few elements to create a single raindrop with ripple and duplicate the same animation in different screen locations with offset timings to give the effect of a rain shower.
What tools or resources do you need for this task?
Make sure you have access to:
- Adobe Animate
- digital drawing pen and tablet
- Quick Start Guide: Animating characters and objects.
What steps should you take to complete this task?
4 hours
Set aside four hours to complete steps 2-8 below. Remember to save your work as you go when using Adobe Animate.
- Watch Jade’s three videos, carefully observing his techniques in Adobe Animate to animate a rain shower, and refer to Quick Start Guide: Animating characters and objects if you need clarity or get stuck.
- In Adobe Animate, create a radial ripple starting as a small circle that quickly spreads and dissipates.
- Animate the ripple as a circle seen from above and skew it to match the perspective of the ground plane.
- Start the animation with a few frames of a falling droplet, represented as a broken straight line.
- Make the droplet disappear as it lands in the centre of the radial ripple at the start of the animation.
- Duplicate the completed droplet and ripple animation, placing them in different locations on the screen.
- Adjust the timing of each duplicated droplet to create the overall effect of a rain shower.
- Export your animation as an MP4.
What should you do after completing this task?
- Congratulations on animating a rain shower! How did features like drawing tools, timing, and duplication contribute to the desired effect? What areas of improvement would you make to enhance the overall impact?
- Share your rain shower to the Forum:
- Select your forum thread in Forum: Art and Animation Basics.
- Select Reply to your first Forum post.
- Enter the words ‘Task 11’ in your reply.
- Select the Post your response button, then select Edit in your reply when it shows up.
- Upload your MP4 using the Attachment field.
- Select Save changes to share your coursework to your forum thread.
- Get feedback on this and other learning tasks at the next Live Session – check the Live Session calendar for dates and times.
Your next and final learning task in this 2D Digital Animation subtopic challenges you to animate a flour sack jumping. Remember the techniques you've practised, such as drawing keyframes, breakdowns, and in-betweens, to bring the flour bag to life with realistic movement. Consider how timing, squash and stretch, and anticipation influence its animation, and be prepared to explore new techniques. Happy animating!
How do you animate a flour sack jumping?
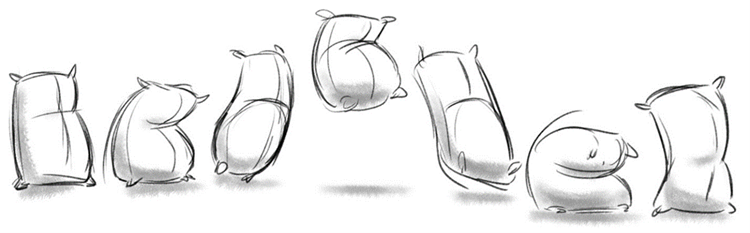
Have you heard of the famous Flour Sack? It’s where you practise creating a short ‘character’ animation of a non-living object. Animating a non-living object (like a flour sack) is called anthropomorphism – giving life to inanimate objects.
Key animation – getting familiar with the model sheet
![[ADD IMAGE'S ALT TEXT]](/sites/default/files/Flour%20Sack.png)
Before you start any animation of this type, it’s helpful to take some time to familiarise yourself with the model sheets so that you understand the basic shapes and can maintain mass and volume when drawing the ‘character’ from different angles.
It’s not easy to add personality to a flour sack in a single drawing, but through your animation, you can express emotion through a combination of poses, timing and movement.
Remember, before starting any ‘character’ animation, take some time to draw the character from the model sheet in different poses and angles.
Watch Jade do this with a flour sack, and make it jump, with Toon Boom in two videos, located in the playlist below. Use the hamburger icon in the top right of the playlist to access the video menu.
These videos will also help you complete Task 12: Animate a flour sack jumping below. You can also use this quick start guide to step you through the videos and the learning task: Quick Start Guide: Animating characters and objects.
Practice
Task 12: Animate a flour sack jumping
This subtopic’s final learning task will stretch your 2D digital animation skills by challenging you to animate a flour sack jumping across a gap. You'll practice key animation principles such as timing, squash and stretch, and anticipation, enhancing your ability to create lively and engaging character movements. Ready to jump in?
What tools or resources do you need for this task?
Make sure you have access to:
- File: Model sheet
- Toon Boom or Adobe Animate
- digital drawing pen and tablet
- Quick Start Guide: Animating characters and objects.
What steps should you take to complete this task?
6 hours
Set aside six hours to complete steps 2-11 below. Remember to save your work as you go when using Toon Boom or Adobe Animate.
- Watch Jade’s two videos, carefully observing his techniques in Toon Boom to animate a flour sack jumping, and refer to Quick Start Guide: Animating characters and objects.
- Thumbnail key pose drawings for your flour sack animation, ensuring consistency with the File: Model sheet.
- Set up a digital file in Toon Boom or Adobe Animate.
- Sketch key poses for the flour sack, covering the start pose, anticipation (with squash), jumping (smooth arc), and landing with follow-through.
- Optional: Create a simple background on a separate layer featuring platforms for the flour sack to jump across.
- Draw the flour sack's keyframes on a new layer, blocking in the first and last frames to maintain model sheet consistency.
- Extend the background layer for the animation duration. Keep the flour sack animation on a single layer.
- Experiment with squash and stretch in key and breakdown drawings.
- Plan timing by adding timing charts, indicating the number and spacing of in-betweens between key poses.
- Use squash during anticipation and stretch as the character leaps into action. Refer to the model sheet for consistency.
- Use the looping playback option to review your animation, checking for smooth arcs, paths, and spacing. Make adjustments as needed.
- Export your animation as an MP4.
What should you do after completing this task?
- How did you adapt animation principles to address specific aspects of the flour sack's movement? Consider how you can use your problem-solving approach with different 2D digital animation projects.
- Share your jumping flour sack to the Forum:
- Select your forum thread in Forum: Art and Animation Basics.
- Select Reply to your first Forum post.
- Enter the words ‘Task 12’ in your reply.
- Select the Post your response button, then select Edit in your reply when it shows up.
- Upload your MP4 using the Attachment field.
- Select Save changes to share your coursework to your forum thread.
- Get feedback on this and other learning tasks at the next Live Session – check the Live Session calendar for dates and times.
By completing this subtopic, you would have practised over ten 2D digital animations! Make sure you have screen-free time, then step into the next subtopic, The Colour Wheel, where you’ll learn colour theory and create colour palettes that reflect character personality and engage audiences.
Step into The Colour Wheel subtopic and learn the theory of colour to help you express emotions and mood in your animation. Find out how to create appealing colour palettes that reflect your character’s personality and engage the audience, and use this approach to represent iconic animated characters.
Exploring colour theory
What is the colour wheel?
The colour wheel is a fundamental tool in colour theory. It’s a circular diagram that organises colours based on their relationship to each other.
You can use the colour wheel to understand colour harmony, contrast, and how different colours interact.

Primary, secondary, and tertiary colours
The traditional colour wheel consists of primary colours, secondary colours, and tertiary colours.
Select the arrows below to move between each of the three colour categories.
What are key concepts in colour theory?
Select + to look at the key concepts you need to know in colour theory.
Colour harmony refers to appealing combinations of colours. Select the arrows below to find out what it involves knowing.
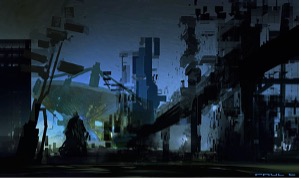
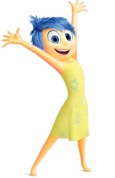
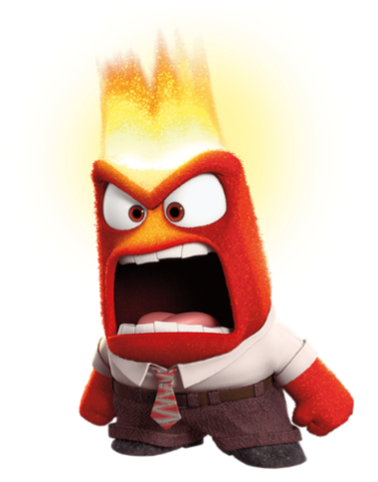
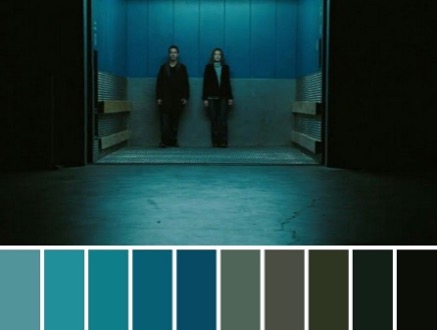
Colour temperature can be categorised as ‘warm’ or ‘cool’ colours:
- Warm colours, such as red, orange, and yellow, evoke feelings of warmth and energy.
- Cool colours, such as blue, green, and violet, create a sense of calmness and serenity.

In these two industrial illustrations, the colours that have been used change the temperature of the image: the first image is a hotter temperature with the reds and oranges, and the second image is cooler with darker blues.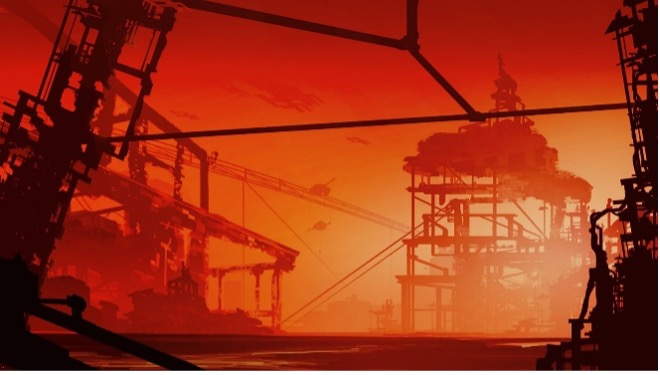
Colour contrast involves using colours that differ significantly from each other to create visual interest and emphasis. You can achieve contrast through differences in:
- hue (colour)
- value (lightness or darkness)
- saturation (intensity or purity).

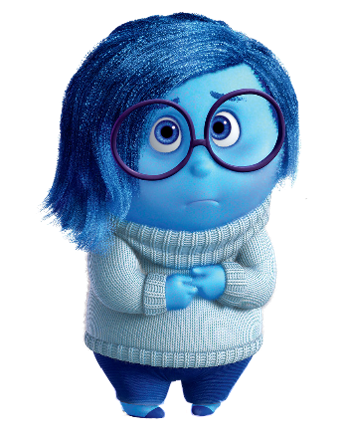
Colour psychology is when you use colour to evoke certain emotions due to colour's psychological effect. For example:
- Red can symbolise passion or danger.
- Blue can evoke a sense of tranquillity or sadness.
Understanding colour psychology can help convey specific messages or moods in visual communication.
|
Depth Stability Trust Confidence Calm |
Passion Energy Power Determination Immediacy |
Growth Calm Nature Balance Safety |
|
Joy Attention Fresh Energy Optimism |
Enthusiasm Success Warmth Creativity Excitement |
Sensitive Caring Emotional Love Sexuality |
|
Royal Power Arrogant Luxury Wisdom |
Pure Innocent Luxury Security Peaceful |
Bold Power Mystery Elegance Stability |
Colour schemes are predefined combinations of colours that work harmoniously together. Examples include:
- Monochromatic (variations of a single colour) schemes.
- Analogous (colours adjacent to each other on the colour wheel) schemes.
- Complementary (colours opposite each other on the colour wheel) schemes.
![[ADD IMAGE'S ALT TEXT]](/sites/default/files/Colour%20Schemes_1.png)
Above: Six examples of colour schemes.
![[ADD IMAGE'S ALT TEXT]](/sites/default/files/Colour%20Schemes%204_1.jpg)
Practice
Task 13: Check your knowledge – Colour theory
Get ready to put your knowledge of colour theory to the test! This short knowledge check will help reinforce your learning, so treat it as a valuable tool to boost your knowledge of what you’ve explored in this subtopic so far.
Approach each question with a critical eye and draw on your learning to choose the best answers – remember, you can always refer back to the information as you answer.
What steps should you take to complete this knowledge check?
10-15 minutes
Set aside 10 minutes to complete this knowledge check.
- This quiz has 6 questions. Read each question carefully. Make sure you understand what is being asked before attempting an answer.
- Provide the most accurate and complete answers you can. If a question stumps you, make an educated guess based on your knowledge.
- Don't let difficult questions discourage you. Stay confident and do your best. Remember, it's a learning opportunity, and not a formal assessment!
- Once you've reviewed your answer and are satisfied, click the ‘Check button’ to see if you chose the correct answer. You can also retry questions and show solutions.
Good luck, and enjoy the challenge!
What should you do after completing this knowledge check?
Continue working through the rest of this subtopic, The Colour Wheel, where you’ll:
- learn the importance of carefully choosing colour palettes for character design, and
- practise creating colour palettes for three iconic characters.
Using colour palettes
Why is a colour palette important for character design?
A well-chosen colour palette is crucial for character design as it:
helps establish visual cohesiveness
conveys personality traits
enhances the storytelling.
Select + to look further into the key reasons why colour palettes are important for character design.
A colour palette ensures that all elements of the character's design work harmoniously. This unity in colour helps tie the various aspects of the character, such as their outfit, accessories, and physical features, into a coherent whole.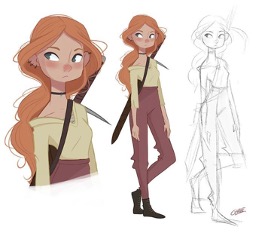
Consistency in colour choices can contribute to the character's recognition and brand identity. When a character consistently appears with the same colour palette across different media or iterations, it becomes easier for audiences to identify and connect with them.
Think of iconic characters like Mickey Mouse or Pikachu, whose distinct colour palettes have become inseparable from their brand.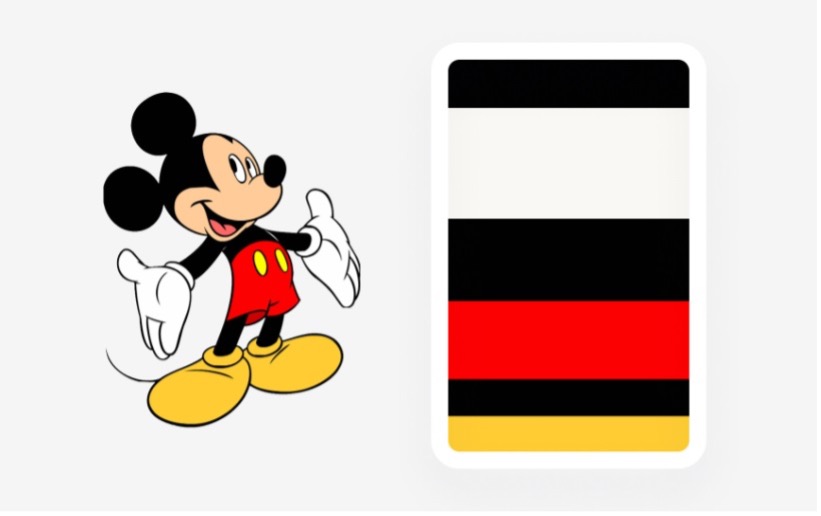
Colours have the power to evoke specific emotions and convey personality traits. Selecting a colour palette that aligns with the character's personality can enhance the audience's understanding and emotional connection to the character.
For example, warm and vibrant colours might be used for an energetic and outgoing character, and cool and muted tones could represent a calm and introverted personality.
A carefully crafted colour palette allows you to guide the viewer's attention to important elements of the character's design. Using contrasting or accent colours strategically lets you draw attention to key features, such as the character's face or unique accessories. This helps create a visual hierarchy and directs the viewer's focus to specific details.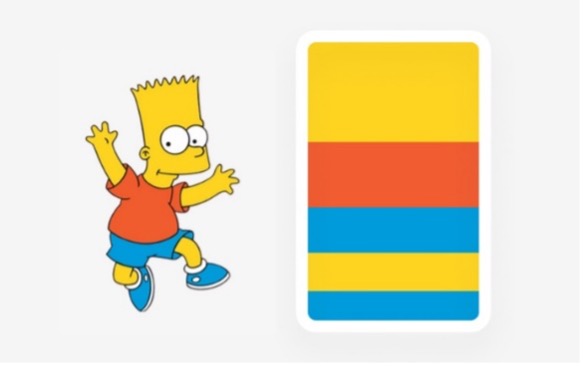
Colours can be used to establish the mood and atmosphere of a character or scene. A well-designed colour palette can evoke a sense of mystery, excitement, or melancholy, setting the tone for the character's narrative. By considering the narrative context and using appropriate colours, you can enhance the storytelling impact of the character design.
Case Study
A brave and adventurous heroine
How can you create a colour palette that reflects a brave heroine’s personality and engage the audience with her adventurous spirit?
Reflect the heroine’s personality and experiences:
- The character has a bold personality and has exciting journeys. Choose warm and energetic colours to reflect these aspects of her character and story.
Represent the heroine’s qualities:
- Courageous and determined – the palette could consist of deep reds or oranges to represent these strengths.
- Energetic and enthusiastic – the palette could also include vibrant yellows to convey these attributes.
- Connection to nature and exploration – the pallet could incorporate earthy tones like browns and greens to signify these passions.
By using this colour palette consistently throughout the heroine’s design, you can create a visual identity that reinforces her character traits and engages the audience with her adventurous spirit
![[ADD IMAGE'S ALT TEXT]](/sites/default/files/Princess%20Merida.jpg)
Practice
Task 14: Create colour palettes
Boost your character design skills in the essential area of colour choices and find out how the vibrant medium of colour palettes helps you reinforce your character’s personality and engage your audience in the story.
What tools or resources do you need for this task?
Make sure you have access to Adobe Photoshop or a comparable graphic design app for creating your colour palettes.
What steps should you take to complete this task?
2 hours
Set aside two hours to complete steps 2-6 below. Remember to save your work as you go when using Adobe Photoshop or another graphic design app.
- Revisit the Using colour palettes section in this subtopic to reinforce what you know if you need to.
- Choose three iconic characters from animated shows, movies, or games.
- Source reference images for each selected character. These images will serve as a guide for capturing the unique colour palette of each character.
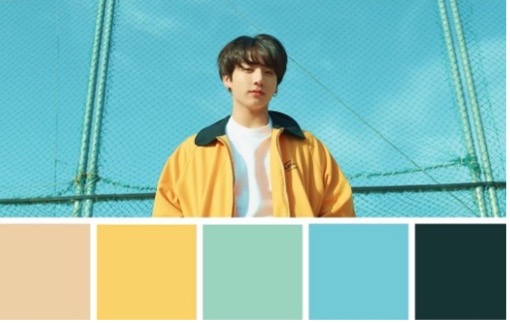
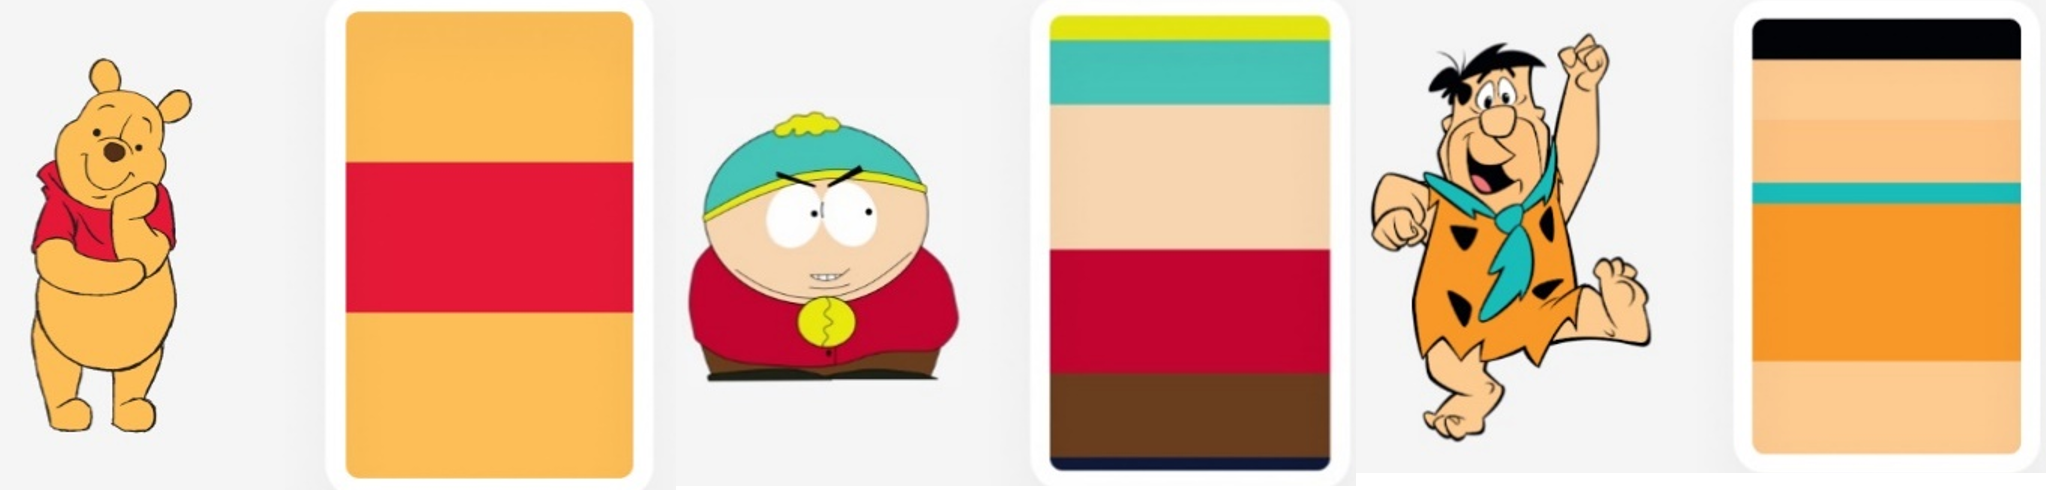
- Create a rectangle (see image above) on a digital A4 canvas representing each character's colour palette. Use the reference images to match and replicate the character's colour choices accurately.
- Position the character reference images next to the respective colour palettes.
- Review your work and save it as an image (e.g. PNG file).
What should you do after completing this task?
- Consider the colour palettes you've created and how each contributes to their character's design. How do the colour choices establish visual cohesion or enhance the mood?
- Share your colour palettes to the Forum:
- Select your forum thread in Forum: Art and Animation Basics.
- Select Reply to your first Forum post.
- Enter the words ‘Task 14’ in your reply.
- Select the Post your response button, then select Edit in your reply when it shows up.
- Upload your image using the Attachment field.
- Select Save changes to share your coursework to your forum thread.
- Get feedback on this and other learning tasks at the next Live Session – check the Live Session calendar for dates and times.
As you move to the next subtopic, Composition, build on what you’ve learnt about colour theory and palettes for more complex compositions and layouts, and explore new concepts and techniques to integrate visual elements effectively into your animation frames.
Delve into this brief Composition subtopic, where you’ll uncover key concepts behind composition and layout to create animations that convey your stories with style, from the rule of thirds to the use of contrast and framing techniques.
Exploring composition
Composition refers to:
- Arranging and organising visual elements within a frame or artwork.
- Determining how the viewer perceives and interprets the image.
A well-composed artwork captures the viewer's attention, leads their eye through the piece, and effectively communicates the intended message or aesthetic.
What about composition for animation?
In animation, composition refers to the positioning, scale, and relationship of elements (characters, objects, landmarks) to create a visually appealing and effective storytelling composition.
A well-composed animation frame enhances the clarity of the action, guides the viewer's eye, and conveys the desired mood or message.
What are key concepts related to composition?
Select + to look at the key concepts you need to know in composition.
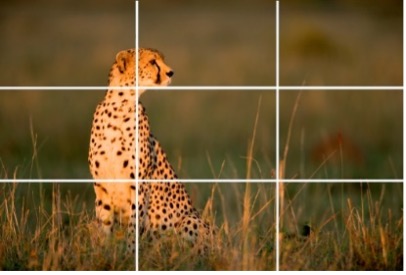
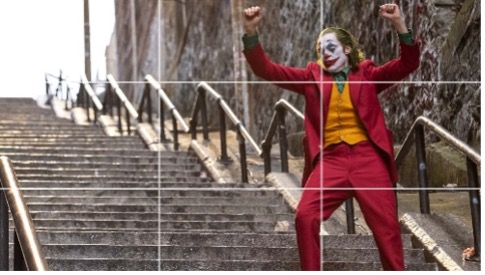
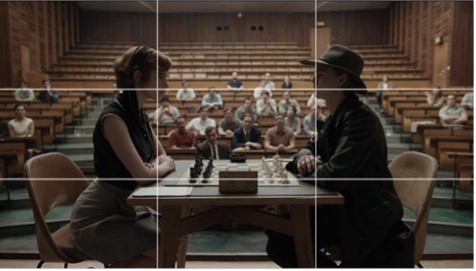
- The rule of thirds is a composition guideline that suggests dividing the frame or canvas into a grid of nine equal sections, by drawing two equally spaced horizontal lines and two equally spaced vertical lines.
- Important elements are placed along these lines or at their intersections, which are considered visually appealing and effective focal points.
- Contrast involves juxtaposing different elements to create visual interest and emphasise important aspects of the composition.
- Contrast can be achieved through differences in colour, size, value (lightness/darkness), or texture. See the contrast in colour, size, and values in the images below.

- Framing refers to the deliberate placement and arrangement of elements within a scene. It helps to guide the viewer's attention, emphasising specific elements within the frame.
- Framing can be achieved by various techniques, such as:
- Using natural or architectural elements like branches, doorways, or windows to create a border around the main subject.
- Placing objects in the foreground to provide a sense of depth and context.
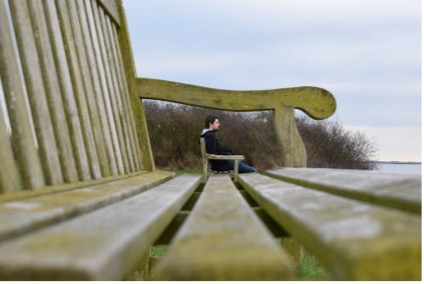
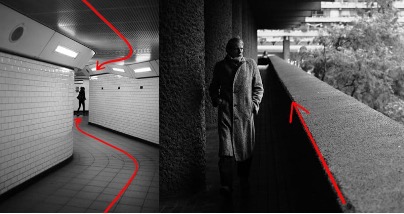
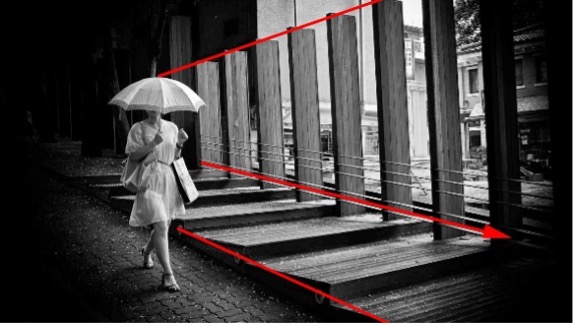
- Leading lines are lines or shapes that guide the viewer's eye through the composition, leading them towards the artwork's main subject or important areas.
- These lines can be actual lines within the composition or implied lines created by the arrangement of elements.
- The focal point is the area of the composition that draws the most attention from the viewer. It is the primary subject or point of interest.
- Effective composition directs the viewer's eye towards the focal point and ensures it stands out from the surrounding elements.
- Balance refers to the distribution of visual elements within the composition and can be achieved through symmetrical (equal distribution on both sides) or asymmetrical (unequal distribution) arrangements.
- Balancing elements helps create a sense of stability and harmony in the composition.

By understanding and applying these composition principles in animation and art, you can create visually compelling and engaging work that effectively:
- communicates your intended message
- captures the viewer's attention
- guides the viewer’s visual experience.
Practice
Task 15: Check your knowledge – Composition
Get ready to put your knowledge of composition to the test! This short knowledge check will help reinforce your learning, so treat it as a valuable tool to boost your knowledge of what you’ve explored in this subtopic.
Approach each question with a critical eye and draw on your learning to choose the best answers – remember, you can always refer back to the information as you answer.
What steps should you take to complete this knowledge check?
10-15 minuteS
Set aside 10 minutes to complete this knowledge check.
- This quiz has 6 questions. Read each question carefully. Make sure you understand what is being asked before attempting an answer.
- Provide the most accurate and complete answers you can. If a question stumps you, make an educated guess based on your knowledge.
- Don't let difficult questions discourage you. Stay confident and do your best. Remember, it's a learning opportunity, and not a formal assessment!
- Once you've reviewed your answer and are satisfied, click the ‘Check button’ to see if you chose the correct answer. You can also retry questions and show solutions.
Good luck, and enjoy the challenge!
What should you do after completing this knowledge check?
Dive into Digital painting where you can apply the skills and knowledge you’ve gained in this Art and Animation Basics topic to practise adding depth, realism, and texture to your creations and improve your digital painting skills.
Complete your exploration of the basics of art and animation with this Digital Painting subtopic, in which you’ll find out how to use Adobe Photoshop tools to blend values, paint textures, texture objects, recreate design imagery, and more, all adding depth and realism to your creative projects.
Tip
Observe Jade’s painting techniques
This subtopic includes videos with Jade showing you how to use Adobe Photoshop to add texture and realism to shapes and drawings.
As with 2D Digital Animation earlier in this topic, observe Jade’s techniques in the videos. Pause the videos to practise or experiment with system steps. If a video presents challenges, pause it to attempt the tasks or find the solution.
So have fun, stay focussed, and ask us if you need help!
Exploring artistic influences
As you’ve discovered, animation is a highly creative field that often requires artists to think outside the box. You may have favourite artists whose work you find compelling or who inspire you to infuse new or different elements into your creations.
What is an influence map?
An influence map is a creative tool artists and animators use to explore the visual elements and styles that inspire and shape their work. Think of it as a visual treasure trove, a curated collection of artwork created by your favourite artists or those who have made a profound impact on your artistic journey.
The artwork you include in an influence map serves as a reference and a reminder of the creative potential in animation. It offers a way to organise, analyse, and understand the art that resonates most with you.
![[ADD IMAGE'S ALT TEXT]](/sites/default/files/Influence%20Map_0.jpg)
Practice
Task 16: Create an influence map
It’s helpful as an animator to reflect on and explore the artworks and visual elements that infuse your artistic perspective. In this learning task, practise using digital tools to curate images of artwork that inspire and influence you, and then arrange these images into an influence map to help you reflect on and summarise those influences to yourself or others.
What tools or resources do you need for this task?
Make sure you have access to:
- Adobe Photoshop or a comparable graphic design app for editing digital images
- a range of images you have sourced using internet searches.
What steps should you take to complete this task?
3 hours
Set aside three hours to complete steps 2-6 below. Remember to save your work as you go when using Adobe Photoshop or another graphic design app.
- Create a digital canvas for your one-page influence map.
- Use online searches or digital libraries to source images from your favourite artists, selecting pieces that inspire you.
- Import, scale, and arrange these images on your influence map, paying attention to its visual layout.
- Label each image with the creator's name and source details to acknowledge and respect the original artists.
- Save your influence map as an image format, e.g. a JPEG file.
- Consider showing your influence map to friends, family, or collaborators to introduce them to your artistic influences.
Note: Remember that the artworks belong to other artists, even though it’s your influence map. Please don't share a digital copy online outside this topic’s forum.
What should you do after completing this task?
- Reflect on the process of curating your influence map. Were there any surprising discoveries or insights about your artistic preferences during this activity?
- Share your influence map to the Forum:
- Select your forum thread in Forum: Art and Animation Basics.
- Select Reply to your first Forum post.
- Enter the words ‘Task 16’ in your reply.
- Select the Post your response button, then select Edit in your reply when it shows up.
- Upload your image using the Attachment field.
- Select Save changes to share your coursework to your forum thread.
- Get feedback on this and other learning tasks at the next Live Session – check the Live Session calendar for dates and times.
Thinking about how your favourite artists demonstrate creative techniques in their art can serve as a practical guide in refining your work. In the next section of this Digital Painting topic, explore skills useful for your art and animation, including blending values, painting textures, and texturing objects.
Blending values
You can create smooth transitions, detailed textures and realistic lighting by knowing how to blend values in Adobe Photoshop. It’s an extremely useful skill to develop for your art and animation, as the process of blending values contributes to the overall quality, consistency, and visual appeal of animated productions.
Explore
New to Adobe Photoshop?
Get a head start on your learning tasks and try out Adobe Photoshop with these three tutorials before you watch Jade. You’ll also find these and other tutorials in Software at the start of this course.
- Get familiar with the work area Take a tour of your workspace in Photoshop (3:58m). Note: This is video 2 on Adobe’s ‘Get to know Photoshop’ web page.
- Understand layers Learn what layers are and why they’re so useful (4:45m). Note: This is video 1 on Adobe’s ‘Work with layers’ web page.
- Learn layer basics Learn how to change layer order, create a new layer, change layer opacity, and delete a layer (4.46m). Note: This is video 2 on Adobe’s ‘Work with layers’ web page.
How do you blend values?
Watch Jade create a blended band of different values with Adobe Photoshop.
This video helps you complete Task 17: Blend two values below. You can also use this quick start guide to step you through the video and the learning task: Quick Start Guide: Digital painting.
Practice
Task 17: Blend two values
Start developing your digital painting skills for animation by creating smooth blends between contrasting values.
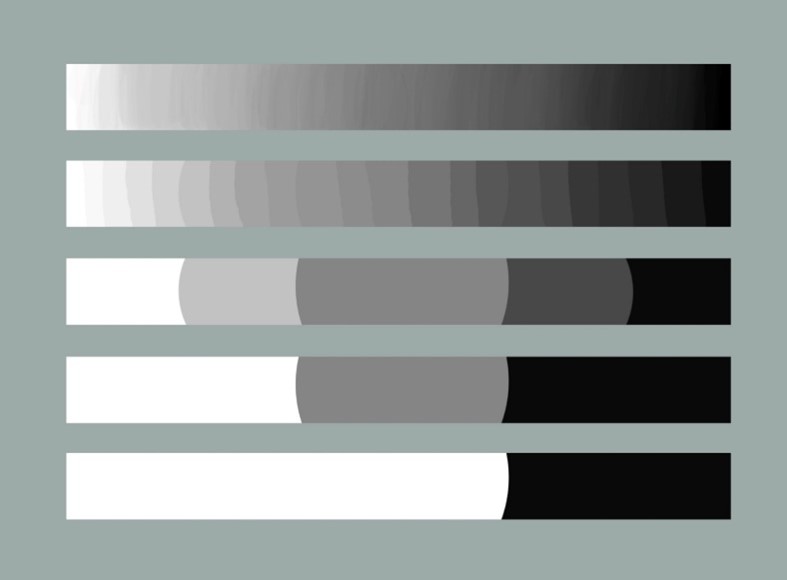
What tools or resources do you need for this task?
Make sure you have access to:
- Adobe Photoshop
- digital drawing pen and tablet
- Quick Start Guide: Digital painting.
What steps should you take to complete this task?
3 hours
Set aside three hours to complete steps 2-8 below. Remember to save your work as you go when using Adobe Photoshop.
- Watch Jade’s video, carefully observing the techniques he uses in Adobe Photoshop to blend the two values. Refer to Quick Start Guide: Digital painting if you need clarity or get stuck.
- Create a new file in Adobe Photoshop.
- Use the Marquee tool to select a rectangular portion of your canvas where you'll apply the blending technique.
- Paint the selected area with a light grey colour using a 100% hard-edged round brush.
- Fill approximately two-thirds of the selected area with black.
- Sample the light grey colour, adjusting your brush's opacity to 50% for smoother blending.
- Continuously sample and paint new bands, blending adjacent value bands to create a smooth result.
- Save your blend as an image file, i.e. JPEG or PNG.
What should you do after completing this task?
- Think about specific areas where you successfully blended between black and white, and consider any adjustments you would make for an even smoother effect.
- Share your blend to the Forum:
- Select your forum thread in Forum: Art and Animation Basics.
- Select Reply to your first Forum post.
- Enter the words ‘Task 17’ in your reply.
- Select the Post your response button, then select Edit in your reply when it shows up.
- Upload your image using the Attachment field.
- Select Save changes to share your coursework to your forum thread.
- Get feedback on this and other learning tasks at the next Live Session – check the Live Session calendar for dates and times.
In the next section, you'll grow your digital painting skills by painting textures. Get ready to experiment with various textures and observe how they interact with blended values for a deeper, more realistic result.
Painting textures
Textures add depth, realism, and character to your creations. The ability to paint textures allows you to infuse life into your characters, objects, and backgrounds – you can create everything from rough wood grain to smooth, polished marble surfaces.
![[ADD IMAGE'S ALT TEXT]](/sites/default/files/Wood%20Grain.jpg)
How do you create a wood texture?
The process of painting textures from scratch will depend on the level of realism or simplicity you need to produce.
Watch Jade use a simple process to create a wood texture with Adobe Photoshop. You can use this process in an environment or when texturing a 3D object.
This video helps you complete Task 18: Create a wood texture below. You can also use this quick start guide to step you through the video and the learning task: Quick Start Guide: Digital painting.
Practice
Task 18: Create a wood texture
Keep developing your digital painting skills and focus on adding depth and realism to objects by creating wood texture from scratch.
![]()
What tools or resources do you need for this task?
Make sure you have access to:
- Adobe Photoshop
- digital drawing pen and tablet
- a range of wood texture images you have sourced using internet searches
- Quick Start Guide: Digital painting.
What steps should you take to complete this task?
3 hours
Set aside three hours to complete steps 2-7 below. Remember to save your work as you go when using Adobe Photoshop.
- Watch Jade’s video, carefully observing the techniques he uses in Adobe Photoshop to create a wood texture. Refer to Quick Start Guide: Digital painting if you need clarity or get stuck.
- Create a new file in Adobe Photoshop.
- Create a rectangle shape and select a base colour such as light brown.
- Pick a brush tool and paint a slightly darker brown value with overlapping strokes.
- Build your texture gradually by adjusting your brush opacity to create varying degrees of darkness (e.g. cracks, grooves) and lightness (e.g. bevel effect) in the wood grain.
- Explore colour adjustments and play with hue, saturation, and brightness to enhance the realism of the wood texture.
- Save your wood texture as an image file, i.e. JPEG or PNG.
What should you do after completing this task?
- Consider the effectiveness of your colour choice, brush strokes, and opacities. How realistic and cohesive does your wood texture appear?
- Share your wood texture to the Forum:
- Select your forum thread in Forum: Art and Animation Basics.
- Select Reply to your first Forum post.
- Enter the words ‘Task 18’ in your reply.
- Select the Post your response button, then select Edit in your reply when it shows up.
- Upload your image using the Attachment field.
- Select Save changes to share your coursework to your forum thread.
- Get feedback on this and other learning tasks at the next Live Session – check the Live Session calendar for dates and times.
Moving forward to the next section, you’re in an excellent place to boost your digital painting skills and use texturing and lighting to transform flat shapes into three-dimensional objects.
Texturing objects
In this section, follow Jade as he textures objects, transforming flat shapes into three-dimensional objects, and practice your texturing skills with Adobe Photoshop by creating sphere and cube diagrams.
How do you add texture to objects?
Watch Jade use texturing, lighting and other techniques to create three-dimensional spheres with Adobe Photoshop in two videos, located in the playlist below. Use the hamburger icon in the top right of the playlist to access the video menu.
These videos help you complete Task 19: Create a sphere diagram below. You can also use this quick start guide to step you through the videos and the learning task: Quick Start Guide: Digital painting.
Practice
Task 19: Create a sphere diagram
Stretch your technical know-how and practise transforming two-dimensional elements into a visually compelling three-dimensional diagram using texturing, lighting, and layer manipulation.
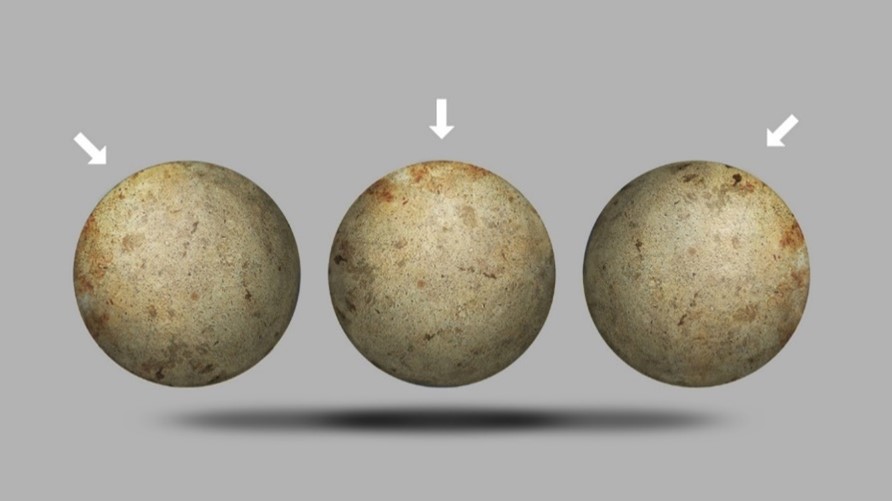
What tools or resources do you need for this task?
Make sure you have access to:
- Adobe Photoshop
- digital drawing pen and tablet
- a free-to-use grunge texture image you have either sourced:
- by using internet searches, or
- from your camera photo library, e.g. a photo you have taken of a texture from a stone bench top or polished stone floor.
- Quick Start Guide: Digital painting.
What steps should you take to complete this task?
2 hours
Set aside two hours to complete steps 2-9 below. Remember to save your work as you go when using Adobe Photoshop.
- Watch Jade’s two videos, carefully observing the techniques he uses in Adobe Photoshop to create a sphere diagram. Refer to Quick Start Guide: Digital painting if you need clarity or get stuck.
- Source a texture image online that is free for you to use. Use ‘grunge texture’ as an internet search term. You can also use your own photo of a grunge-like texture.
- Create a new file in Adobe Photoshop at 1920 x 1080 resolution and import your texture image.
- Create a new layer and draw three circles with a hard round brush.
- Using a soft-edge brush, paint each circle to simulate the look of three spheres lit from different directions.
- Overlay your texture file onto a new layer and trim excess around the spheres to ensure the texture fits.
- Adjust the layer blend mode and opacity to refine the appearance of the texture on the spheres.
- Use a soft-edged brush to add surface shadows to ground the spheres in their surroundings.
- Save your sphere diagram as an image file, i.e. JPEG or PNG.
What should you do after completing this task?
- Reflect on your choice of grunge texture. How did your choice contribute to the overall aesthetic? Were there alternative textures you considered, and why did you make your final choice?
- Share your sphere diagram to the Forum:
- Select your forum thread in Forum: Art and Animation Basics.
- Select Reply to your first Forum post.
- Enter the words ‘Task 19’ in your reply.
- Select the Post your response button, then select Edit in your reply when it shows up.
- Upload your image using the Attachment field.
- Select Save changes to share your coursework to your forum thread.
- Get feedback on this and other learning tasks at the next Live Session – check the Live Session calendar for dates and times.
Expand your understanding of three-dimensional representations in the next learning task, where you’ll create a cube diagram and use transformation tools with a new perspective.
Now, watch Jade use texturing, lighting and other techniques to create three-dimensional cubes with Adobe Photoshop in two videos, located in the playlist below. Use the hamburger icon in the top right of the playlist to access the video menu.
These videos help you complete Task 20: Create a cube diagram below. You can also use this quick start guide to step you through the video and the learning task: Quick Start Guide: Digital painting.
Practice
Task 20: Create a cube diagram
Keep extending your object texturing skills with Adobe Photoshop and practise transforming flat squares into a three-dimensional cube diagram using texturing, skewing, and lighting.
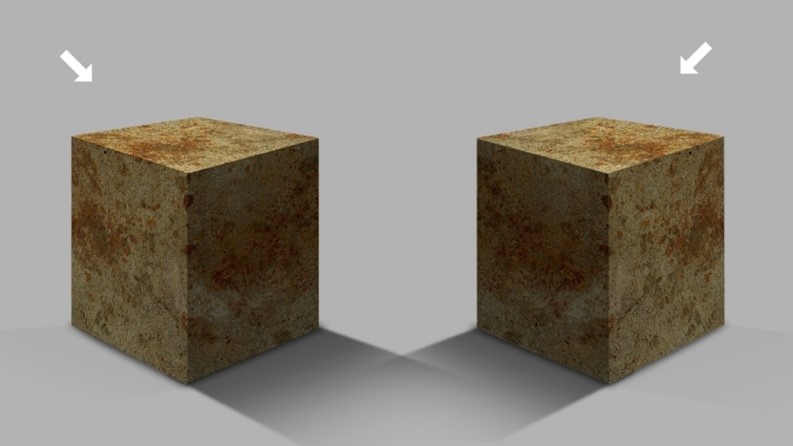
What tools or resources do you need for this task?
Make sure you have access to:
- Adobe Photoshop
- digital drawing pen and tablet
- a free-to-use grunge texture image you have either sourced:
- by using internet searches, or
- from your camera photo library, e.g. a photo you have taken of a texture from a stone bench top or polished stone floor.
- Quick Start Guide: Digital painting.
What steps should you take to complete this task?
2 hours
Set aside two hours to complete steps 2-11 below. Remember to save your work as you go when using Adobe Photoshop.
- Watch Jade’s two videos, carefully observing the techniques he uses in Adobe Photoshop to create a cube diagram. Refer to Quick Start Guide: Digital painting if you need clarity or get stuck.
- Source a texture image online that is free for you to use. Use ‘grunge texture’ as an internet search term. You can also use your own photo of a grunge-like texture.
- Create a new file in Adobe Photoshop at 1920 x 1080 resolution and import your texture image.
- Create a new layer and use selection and fill tools to create three squares, coloured light, medium and dark:
- Use transformation tools to arrange the three squares to form a cube.
- Overlay your texture file onto a new layer and duplicate it.
- Use the transform tools to skew the texture to match the perspective of the three sides of your cubes.
- Use selection tools to trim excess around the cubes’ sides.
- Adjust the layer blend mode and opacity to refine the appearance of the texture on the cubes.
- Use a soft-edged brush to add surface shadows to ground the cubes in its surroundings.
- Save your cube diagram as an image file, i.e. JPEG or PNG.
What should you do after completing this task?
- Consider how you approached perspective and depth in the cube and sphere diagrams, specifically any differences in using transformation tools. How did these differences contribute to the overall visual experience?
- Share your cube diagram to the Forum:
- Select your forum thread in Forum: Art and Animation Basics.
- Select Reply to your first Forum post.
- Enter the words ‘Task 20’ in your reply.
- Select the Post your response button, then select Edit in your reply when it shows up.
- Upload your image using the Attachment field.
- Select Save changes to share your coursework to your forum thread.
- Get feedback on this and other learning tasks at the next Live Session – check the Live Session calendar for dates and times.
Now that you’ve practised texturing objects with the sphere and cube diagrams, move to the next section where you’ll explore painting character art and how to create character colour studies, honing your ability to infuse colour and visual appeal into your 2D and 3D characters.
Painting character art
Character design in animation requires careful consideration of colour, complexity, and style, with a balance between design intricacy and ease of animation. In this section, find out what you should consider when painting character art and practise creating character colour studies.
Why is character colour design simplified in 2D animation?
Character colour design depends on the specifics of the production style, the aesthetic, and the medium (e.g. 2D, 3D mixed). However, designers for animation aim to simplify character elements, as more complex character designs often make animation and other production aspects more complex.
In traditional hand-drawn 2D animation, where each frame of character animation is drawn, cleaned up and coloured by an artist, a simple character is easier (and less time-consuming) to animate than a more detailed, complex character. 2D characters are, therefore, traditionally coloured more simply, with flat colouring and minimal lighting elements.
The image below shows three different levels of colour and lighting detail for the same character – each level would add some measure of complexity to the animation process.
![[ADD IMAGE'S ALT TEXT]](/sites/default/files/Colour%20Levels.jpg)
What about colouring character puppets?
In 2D puppet and 3D animation, where character puppets are created, and it’s not necessary to draw each animation frame, more details can be added to characters as a 'one-time' process during the character development stage in the pre-production stage. Those details do not need to be added repeatedly during animation in the production stage.
However, character development must still consider how design complexity might impact animation complexity and other production areas, such as rendering. A character with many moving appendages - such as a monster - will take more time for an animator to plan and animate the movement for each part of the character.
Similarly, characters with lots of surface detail, such as fur, might take longer to render and impact production timeframes and planning. So, design and 'colouring' are important considerations for a character designer.
How can you explore character colours before you paint?
To explore and analyse the colour schemes you’ll use to represent a character, create a character colour study. It’s a process that helps you make effective choices in colouring characters, ensuring that the colours contribute to visual appeal and storytelling.
Before you practise creating your own character colour study, watch Jade draw and paint a hand with Adobe Photoshop in two videos, located in the playlist below. Use the hamburger icon in the top right of the playlist to access the video menu.
These videos help you complete Task 21: Create a character colour study below.
Practice
Task 21: Create a character colour study
Find out how colour choices contribute to your characters' visual appeal and storytelling elements by creating a vibrant character colour study image, helping you explore and analyse colour schemes for one of your sketches.
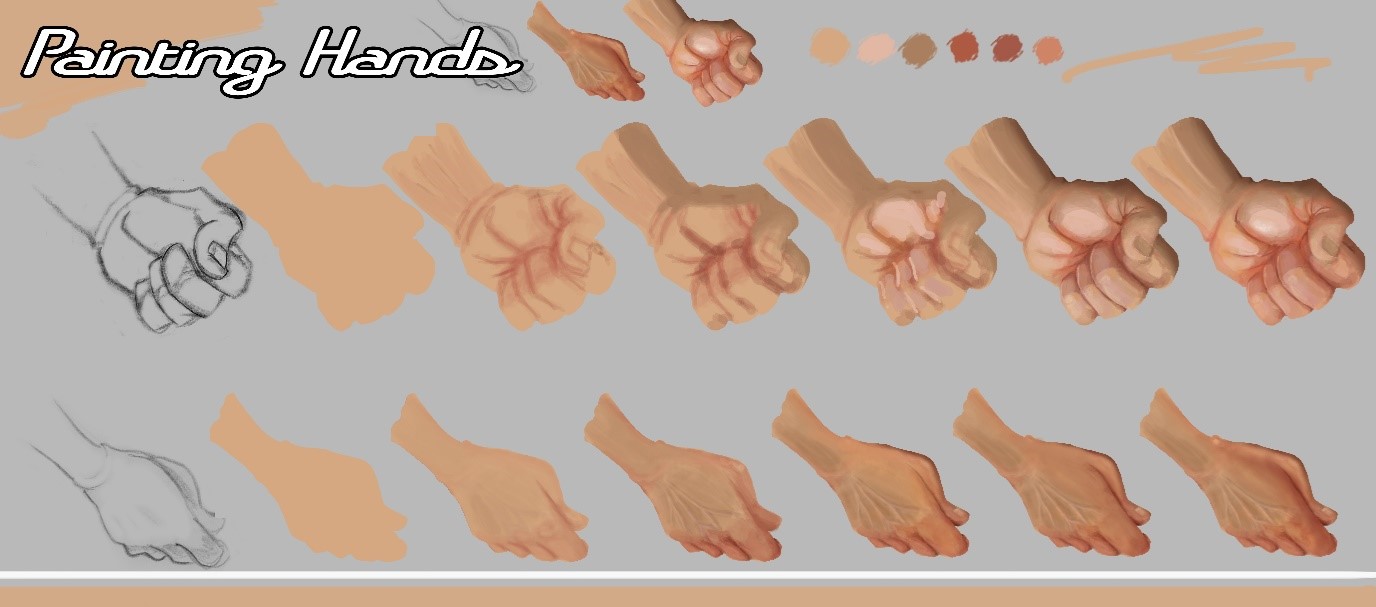
What tools or resources do you need for this task?
Make sure you have access to:
- Adobe Photoshop or a comparable graphic design app for editing digital images
- a rough sketch of a character you’ve drawn - this can be from your sketchbook if you have already worked through the Observation Drawing topic.
What steps should you take to complete this task?
6 hours
Set aside six hours to complete steps 2-11 below. Save each phase of your progress in Adobe Photoshop to present your final painting results as a step-by-step progression, like the one shown above.
- Revisit this Digital Painting topic for painting tips, specifically the Painting textures section where you created a wood texture.
- Watch Jade’s two videos, carefully observing his techniques in Adobe Photoshop to draw and paint a hand.
- Import on a layer your rough sketch of a character you’ve drawn – this can be from your sketchbook if you have already worked through the Observation Drawing topic.
- Set the layer to Multiply (blend mode) and lock the layer.
- On a new layer below, use a hard-edged brush to block in the basic fill colour.
- Adjust the sketch layer opacity to see the paint layers more clearly.
- Add new layers with each phase, or continue painting onto your fill layer.
- Paint into the darker areas in your image (see the image above) using 50% brush opacity.
- Build the necessary values by working over the same areas with more paint.
- Repeat for the light areas and continue developing and refining using a finer brush.
- Save your colour study as an image file, i.e. JPEG or PNG.
What should you do after completing this task?
- How did your colour choices impact the style and complexity of your character in the study? Do specific colours highlight storytelling aspects and contribute to the narrative?
- Share your colour study to the Forum:
- Select your forum thread in Forum: Art and Animation Basics.
- Select Reply to your first Forum post.
- Enter the words ‘Task 21’ in your reply.
- Select the Post your response button, then select Edit in your reply when it shows up.
- Upload your image using the Attachment field.
- Select Save changes to share your coursework to your forum thread.
- Get feedback on this and other learning tasks at the next Live Session – check the Live Session calendar for dates and times.
It’s time for a final digital painting challenge – can you build design imagery entirely from scratch to incorporate into your animation content? Head to the next section to test your technical skills and grasp of visual concepts.
Exploring tools
Using just a few basic tools in Adobe Photoshop, combined with a fundamental understanding of visual concepts, allows you to recreate a wide range of design imagery that you can use to develop:
- animation designs
- background art
- textures
- decorative patterns, e.g. for environments, costumes.
What tools do you use?
An extremely useful way to explore Adobe Photoshop tools – and test your own skills is to find an image you think you can recreate, and make it from scratch!
Watch Jade recreate existing imagery using various Adobe Photoshop tools in two videos, located in the playlist below. Use the hamburger icon in the top right of the playlist to access the video menu.
These videos help you complete Task 23: Recreate an image below.
Practice
Task 22: Recreate an image
It’s time to use the knowledge you’ve gained in this topic and push your creative boundaries to the edge! Can you recreate the image below using a few basic tools in Adobe Photoshop?
What tools or resources do you need for this task?
Make sure you have access to:
- Adobe Photoshop
- digital drawing pen and tablet.
What steps should you take to complete this task?
6 hours
Set aside six hours to complete steps 1-4 below. Remember to save your work as you go when using Adobe Photoshop.
- Watch Jade’s two videos, carefully observing his techniques in Adobe Photoshop to recreate the image.
- Study the image below - it's a break down of the steps Jade uses to build each part of the image:
- Recreate the image using basic selections, transformation editing tools, layer effects (drop shadow) and adjusting layer blend modes.
- Save your final image as an image file, i.e. JPEG or PNG.
What should you do after completing this task?
- Reflect on how this challenge contributed to your technical growth. Did you discover new approaches that you hadn't used before? What aspects of the recreated imagery are you particularly proud of, and are there areas you feel could be improved?
- Share your recreated image to the Forum:
- Select your forum thread in Forum: Art and Animation Basics.
- Select Reply to your first Forum post.
- Enter the words ‘Task 22’ in your reply.
- Select the Post your response button, then select Edit in your reply when it shows up.
- Upload your image using the Attachment field.
- Select Save changes to share your coursework to your forum thread.
- Get feedback on this and other learning tasks at the next Live Session – check the Live Session calendar for dates and times.
Fantastic job on completing this final challenge of the Digital Painting subtopic! Like traditional and digital 2D techniques, colour theory, or composition, digital painting is instrumental in shaping your artistic journey, allowing you to grow as an animator. As you move forward, remember that exploring other artworks can be an invaluable source of inspiration and practice, so keep your eyes open and your tools sharp.
In this topic, you’ve discovered various fundamental tools, processes, and software used for art and animation. You’ve:
- assessed your knowledge of animation workflows and processes used to create hand-drawn animation
- created a range of 2D digital animations using core digital techniques with Adobe Animate and Toon Boom
- used colour theory to create colour palettes for characters, helping to express emotions and moods in animation
- uncovered key concepts behind composition to help you create animations which convey stories with precise and stylish layouts
- used digital painting techniques to add realism and depth to your animation design imagery with Adobe Photoshop.
You've laid the groundwork in creating animation examples that showcase your emerging technical skills and growing familiarity with tools. Keep on finding sources of inspiration that help you appreciate your own personal creativity and professional growth, and enjoy this stage of your artistic journey!
Reflect on what you’ve learnt, practised, and achieved
As you wrap up this topic, take a moment to reflect on what you've learnt, practised, and achieved by completing the various learning tasks in this topic.
Knowing the basics of art and animation – and being able to apply them to animation projects – means you can create engaging visual stories that draw in the viewers. So, great work on all the steps you’ve taken in this topic towards becoming an even more artistic animator!
|
# |
Learning task name |
Duration (hours) |
|
|---|---|---|---|
|
1 |
Check your knowledge - Part 1 |
0.25 |
|
|
2 |
Create a simple character |
2 |
|
|
3 |
Draw and build a fish |
2 |
|
|
4 |
Create a character’s face |
4 |
|
|
5 |
Create a lip sync for character audio |
2 |
|
|
6 |
Build and animate a mouth |
4 |
|
|
7 |
Create a motion guide |
1 |
|
|
8 |
Animate a ball: Bouncing on the spot |
3 |
|
|
9 |
Animate another ball: Bouncing across your screen |
4 |
|
|
10 |
Animate a hand gesture |
6 |
|
|
11 |
Animate a rain shower |
4 |
|
|
12 |
Animate a flour sack jumping |
6 |
|
|
13 |
Check your knowledge - Part 2 |
0.25 |
|
|
14 |
Create colour palettes |
2 |
|
|
15 |
Check your knowledge - Part 3 |
0.25 |
|
|
16 |
Create an influence map |
3 |
|
|
17 |
Blend two values |
3 |
|
|
18 |
Create a wood texture |
3 |
|
|
19 |
Create a sphere diagram |
2 |
|
|
20 |
Create a cube diagram |
2 |
|
|
21 |
Create a character colour study |
6 |
|
|
22 |
Recreate an image |
6 |
|