Compositing is an invaluable skill for animators, allowing you to seamlessly integrate multiple visual elements into a single, cohesive image or shot.
This topic offers practical immersion in using compositing methods and software tools that help you do just that, including tips on how to control every element of your composites.
Prepare yourself to get stuck into all things compositing and learn how to blend visual elements, create compelling landscapes and action sequences, and enhance the aesthetic of your animation.
Subtopics that you can explore
In this Compositing topic, you’ll explore three key subtopics, each offering valuable insights and techniques to elevate your animation game. These subtopics are:
- Fundamentals of Compositing
- Compositing an Image
- Compositing a Shot
Use the Compositing Forum to share your coursework
When you complete a learning task, always read its What should you do after completing this task? section to check if you need to share your coursework (e.g. image or multimedia files) in this topic’s Forum.
You'll get specific guidance on when to do this but it's a good idea to get a headstart and set up your personalised forum thread for Compositing now by working through the task below.
Practice
Set up your forum thread for Compositing
Set up your forum thread for this topic. By doing this, you'll be able to:
- Share your animation coursework you create while completing learning tasks.
- Get constructive feedback from your facilitator and fellow students to help you improve your animation skills and knowledge of animation principles and techniques.
- Learn from different perspectives, techniques and creative solutions shared by fellow students.
What steps should you take to complete this task?
- Find this topic’s Forum by selecting this link: Forum: Compositing or by using the navigation menu on the left.
- Select the New thread link once you land on the Forum.
- In the Subject field, enter your first and last names.
- In the Message field, enter one or two sentences describing what you know about compositing.
- Select Post to forum at the end of the page.
You can also watch this playlist below of two short videos (6:38m) to find out how to set up your forum thread and share your coursework in your forum thread.
Use the hamburger icon in the top right of the playlist to access the video menu if you need to.
What should you do after completing this task?
Keep progressing through this topic. Whenever you get to a learning task, read it carefully to check whether you need to share your animation coursework (e.g. a JPEG or MP4 file) to the Forum.
Remember, reach out to your facilitator if you have questions about how to use the Forums or any other aspect of your study.
Learning tasks that will help you develop and practise animation skills
|
# |
Learning task name |
Duration (hours) |
|
|---|---|---|---|
|
1 |
Check your knowledge |
0.25 |
 |
|
2 |
Composite an image of a Moon landing |
2 |
 |
|
3 |
Composite a shot of a World War II plane |
2 |
|
Feedback and support is woven through the learning tasks as you complete them. Reach out if you have any questions about what to do!
Prepare to blend visual elements and create cohesive images and shots by first getting an overview of compositing processes and methods in this Fundamentals of Compositing subtopic.
Compositing process
Compositing is the process of combining two or more images from several sources into a single image or shot. It creates the illusion that all combined elements are part of a single cohesive image or shot.
How does compositing work in live-action productions?
In live-action productions, visual elements are mostly shot against a green or blue screen, so software tools can ‘pull‘ out the live shot element.
The live shot element is then composited back into a final shot with other elements to create a cohesive whole.
![[ADD IMAGE'S ALT TEXT]](/sites/default/files/Compositing.jpg)
How does compositing work in animation productions?
In animation productions, the blue and green screen parts of an image are replaced with a transparent portion of the frame, which is called the ‘alpha’ channel. But why a channel?
Digital image colour channels
A digital image is made up of information across four colour channels, collectively known as RGBA. The four channels are:
- R – Red
- G – Green
- B – Blue
- A – Alpha (used to store transparency information).
![[ADD IMAGE'S ALT TEXT]](/sites/default/files/RGBA_0.gif)
As you can see in the image above, the values are grey in each of the Red, Green, Blue, and Alpha channels.
Why are the values grey in the four colour channels?
In Adobe Photoshop, the value of grey determines the colour value for each channel:
- 0 is no value, resulting in black
- 255 is the maximum saturated value, resulting in white.
So, every value between 0 and 255 will be a shade of grey ranging from black to white.
When applied to the colour channels, the grey scale converts to an equivalent value of either Red, Green, or Blue:
- 0 is nothing, resulting in black
- 255 is a fully saturated value of Red, Green, or Blue.
![[ADD IMAGE'S ALT TEXT]](/sites/default/files/Grey%20Values.jpg)
How does Alpha differ from the other colour channels?
The fourth channel – Alpha (A) – is again determined by a grey value from 0 to 255.
However, unlike the other colour channels, where 255 represents a fully saturated value, in the Alpha channel, 255 represents full opacity, i.e. solid with no transparency.
Benefits of compositing in the pipeline
The benefits of compositing in the pipeline are that it gives you control and adds efficiency to the production pipeline.
Select + to view more information about these benefits.
- With compositing, you can change channel values to remove, replace, substitute, or adjust an image’s colour and transparency.
- This ability to manipulate an image using its colour channel values means you can create transparent portions of a frame to separate, replace, and manipulate an image. It gives you significant control over the overall look of a production frame.
- A composite stage in the production pipeline is not as intensive on a computer’s processing resource, and it can save time and costs.
- For most applications, the composite stage is faster than rendering a full frame directly from an animation software package like Autodesk Maya. Separating shots into several elements is an efficient way of organising a shot, e.g. separating background, character, effects, or foreground.
![[ADD IMAGE'S ALT TEXT]](/sites/default/files/Character%20Rendered.jpg)
Compositing methods
What did early compositing look like?
Disney used an analogue version of compositing by painting individual frames of character animation on sheets of celluloid and then shooting multiple ‘cells‘ over a separated background element. This process allowed much control over the separated elements and camera effects.
The development of that control allowed for the creation of the multiplane camera, which simulated the parallax effect, where a feeling of depth within a frame is caused by objects further away from the camera moving at different speeds in relation to the camera.
Explore
Disney’s invention that changed animation
Watch Walt Disney explain and demonstrate his trailblazing multiplane camera that created a new way for viewers to perceive depth and parallax in animation (7:20m).
What are contemporary compositing methods?
Today, compositing is done inside compositing software on a computer, with many software packages available for you to composite your final images or shots. All these composite packages will fall under one of two methods of compositing:
- Layer-based
- Node-based
Layer-based compositing
Layer-based compositing is often found in software like Adobe After Effects.
This method uses a timeline, and layers of composites are put one on top of each other. ‘Sub-composites‘ (called ‘pre-comps’ in Adobe After Effects) are created and added in as additional layers. The combined effect of all these layers is the final image output. Sequence editing software can be considered as very basic layer-based compositors.
![[ADD IMAGE'S ALT TEXT]](/sites/default/files/Layer-based%20Compositing.png)
Node-based compositing
Node-based compositing is often found in compositing software like Natron, Nuke, Blender, and Fusion.
Elements are put together like a flowchart, where all passes are mixed down a ‘spiderweb’ of nodes into a final ‘Write’ node which writes the final image output.
![[ADD IMAGE'S ALT TEXT]](/sites/default/files/Node-Based%20Compositing.png)
Practice
Task 1: Check your knowledge – Fundamentals of Compositing
Get ready to test what you know about compositing so far! This short knowledge check will help reinforce your learning, so treat it as a valuable tool to boost your knowledge of what you’ve explored in this subtopic.
Approach each question with a critical eye and draw on your learning to choose the best answers – remember, you can always refer back to the information as you answer.
What steps should you take to complete this knowledge check?
5-15 Minutes

Set aside 5 minutes to complete this knowledge check.
- This quiz has 5 questions. Read each question carefully. Make sure you understand what is being asked before attempting an answer.
- Provide the most accurate and complete answers you can. If a question stumps you, make an educated guess based on your knowledge.
- Don't let difficult questions discourage you. Stay confident and do your best. Remember, it's a learning opportunity, and not a formal assessment!
- Once you've reviewed your answer and are satisfied, click the ‘Check button’ to see if you chose the correct answer. You can also retry questions and show solutions.
Good luck, and enjoy the challenge!
Insert Node-9092_T4_4A here.
What should you do after completing this knowledge check?
Continue to the next subtopic, Compositing an Image, where you’ll use Adobe Photoshop to composite a Moon landing image using multiple image sources.
Step into this Compositing an Image subtopic and learn about what makes a great image composite and how to use Adobe Photoshop to composite an image from multiple image sources.
Tip
Watch Geoff composite two touchdowns!
The remainder of this Compositing topic includes videos with Geoff showing you how to use:
- Adobe Photoshop, to composite images, and
- Adobe After Effects, to composite shots.
You’ll find these videos helpful when you practise compositing an image of a Moon landing and an action shot of a World War II plane.
Observe the techniques shown in the videos. Pause the videos to practise or experiment with system steps. If a video presents challenges, pause it to attempt the tasks or find the solution.
So have fun, stay focused, and ask us if you need help!
Key factors that impact image composites
When compositing images together, you must check for several factors that impact the success of your final composite.
Select + to view these factors.
- Check that the perspectives of source images are closely related.
- Example: If the background is shot from a low angle, compositing in objects or characters shot from a high angle will stand out as false to the eye and ruin the illusion that the image was all shot at the same time.
- Consider light sources (both visible and not visible), and the time of day for exterior locations.
- Examples:
- An image taken at night would not work well in a day shot without considerable manipulation.
- An image with bright light from directly above would look odd composited into an image where the light should be coming from the side.
- Check that the images you are using in a composite are of an appropriate level of detail and resolution.
- Example: Suppose a composited image is to have elements placed in the foreground. In that case, elements need appropriate detail and resolution to stand up to the added scrutiny of being close to the viewer.
- Ensure that the composited elements are colour-matched to appear shot from the same camera.
- Assess on a case-by-case basis the impact a visual element’s dirty or clean appearance has on the believability of your composited images.
- Example: If most or all the details in your shot are clean and new, an old or dirty element will stand out, which may or may not be desirable.
How do you create a composite image?
Explore
Quick start guides that support your learning
Geoff’s videos in this topic are supplemented by quick start guides, designed to be your trusty companion in case you need clarity or support as you take in what you’re watching,
The quick start guides are also handy references for acing the learning tasks below – it’s all about fast insights at your fingertips!
Watch Geoff use multiple image sources with Adobe Photoshop to composite an image of an astronaut landing on the Moon.
These five videos - located in the playlist below - help you complete Task 2: Composite an image of a Moon landing below. You can also use this quick start guide to step you through the videos and the learning task: Quick Start Guide: Composite an image of a Moon landing.
Practice
Task 2: Composite an image of a Moon landing
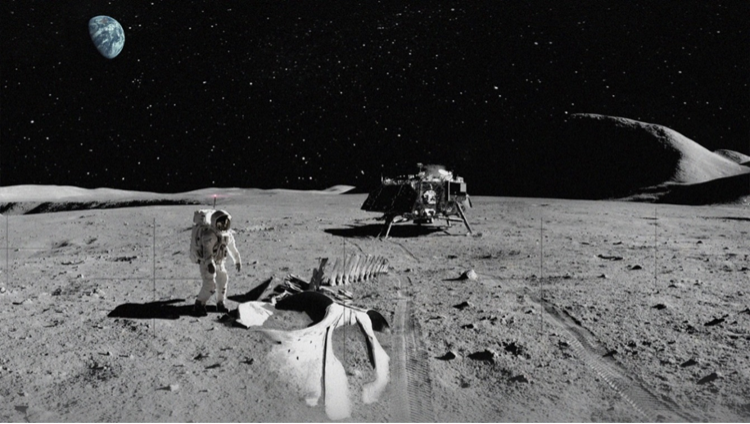
Develop your compositing skills using Adobe Photoshop and multiple visual elements to create a single, cohesive Moon landing image, considering key aspects such as lighting, detail, and colour matching.
What tools or resources do you need for this task?
Make sure you have access to:
What steps should you take to complete this task?
2 hours

Set aside 2-4 hours to complete steps 2-7 below. Remember to save your work as you go when using Adobe Photoshop.
- Revisit the Composite an Image subtopic to reinforce what you know if you need to:
- Watch Geoff’s five videos, carefully observing the techniques he uses in Adobe Photoshop to composite the image.
- Refer to Quick Start Guide: Composite an image of a Moon landing if you need clarity or get stuck.
- Access and download the eight image files in Files: Image materials.
- Launch Adobe Photoshop and create a new project at HDTV resolution (1920 x 1080).
- Add background and create a mask to remove the sky.
- Add stars (adjust contrast levels), Earth (match light direction), and lander (flip horizontally and align with lighting).
- Add astronaut (create shadow) and whale bones, integrating them into the image.
- Enhance the overall image with embellishments like dust and lens flares. Save your composite image.
What should you do after completing this task?
- Once you’ve completed your composite image, reflect on your choices made during the compositing process (e.g. perspective, light sources, level of detail, colour matching, grunge) and how they contribute to the overall illusion.
- Share your composite image to the Forum:
- Select your forum thread in Forum: Compositing.
- Select Reply to your first Forum post.
- Enter the words ‘Task 2’ in your reply.
- Select the Post your response button, then select Edit in your reply when it shows up.
- Upload your image using the Attachment field.
- Select Save changes to share your coursework to your forum thread.
- Get feedback on this and other learning tasks at the next Live Session – check the Live Session calendar for dates and times.
As you advance to the next subtopic, Composite a Shot, build on these foundational skills for more complex composite work. Explore new techniques to refine your ability to integrate elements seamlessly into cohesive scenes.
Use this Compositing a Shot subtopic to discover the essentials of creating a successful shot composite and how to leverage Adobe After Effects to composite an action shot featuring various elements and effects.
Explore
New to Adobe After Effects?
Get prepared for the learning task ahead of time and try out these four tutorials before you watch Geoff use Adobe After Effects. You’ll also find these and other tutorials in Software at the start of this course.
- Tour the interface Get to know the interface (4:56m). Note: This is video 2 on Adobe’s ‘Get to know After Effects’ web page.
- Import media Import assets for use in a project (2.50m). Note: This is video 3 on Adobe’s ‘Get to know After Effects’ web page.
- Build your first composition Create a composition with multiple layers (5:51m). Note: This is video 1 on Adobe’s ‘Work with compositions’ web page.
- Position layers in a composition Explore techniques to position layers in a composition (4:48m). Note: This is video 2 on Adobe’s ‘Work with compositions’ web page.
Integrating materials and elements
When compositing a shot, a compositor works with various source materials, such as image sequences, live footage, still images, etc. A compositor must manage and bring all the various source materials together, combining them as if they were all shot together at the same time.
Each shot a compositor works on will be different and have its own requirements and challenges. Some shots will be straightforward, with only a few elements to integrate, and other shots will be challenging and complex, with many varied elements and interactions between elements.
What are elements you need to manage when compositing a shot?
Select + to view some of the shot elements you might work with.
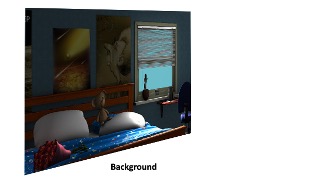
- A shot's background may have been rendered separately from the rest of the shot; most of the time, this is done for render efficiency.
- For example, if the camera does not move, there’s no need to render the same background image for each shot frame. Instead, the background can be rendered once and then held for the length of the shot in post-production.
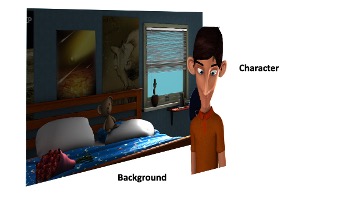
- Characters may be rendered separately from each other and the shot environment; again, this is done for render efficiency.
- Characters sometimes switch from one layer/image sequence to another during a shot, usually when they interact with another character or with some other shot element.
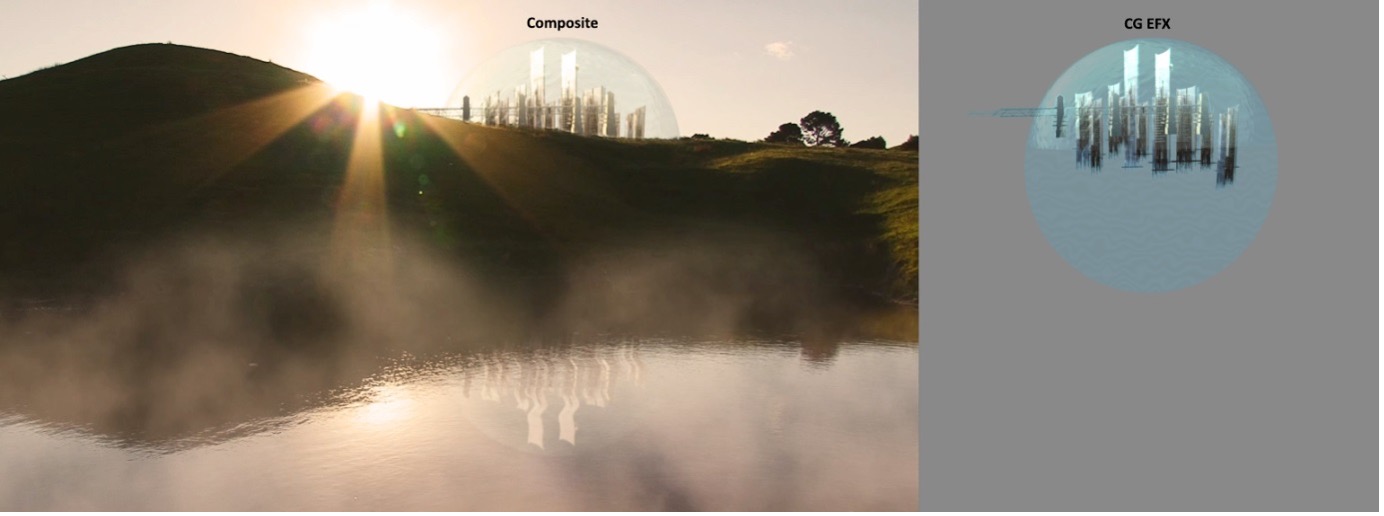
- A shot may need effects. Sometimes, the compositor receives the effects to be composited either as an animated sequence or as live footage.
- It will then be the compositor’s job to generate any mattes needed to integrate the element into the shot. At other times, the compositor will have to create the effects themselves within the compositing software.
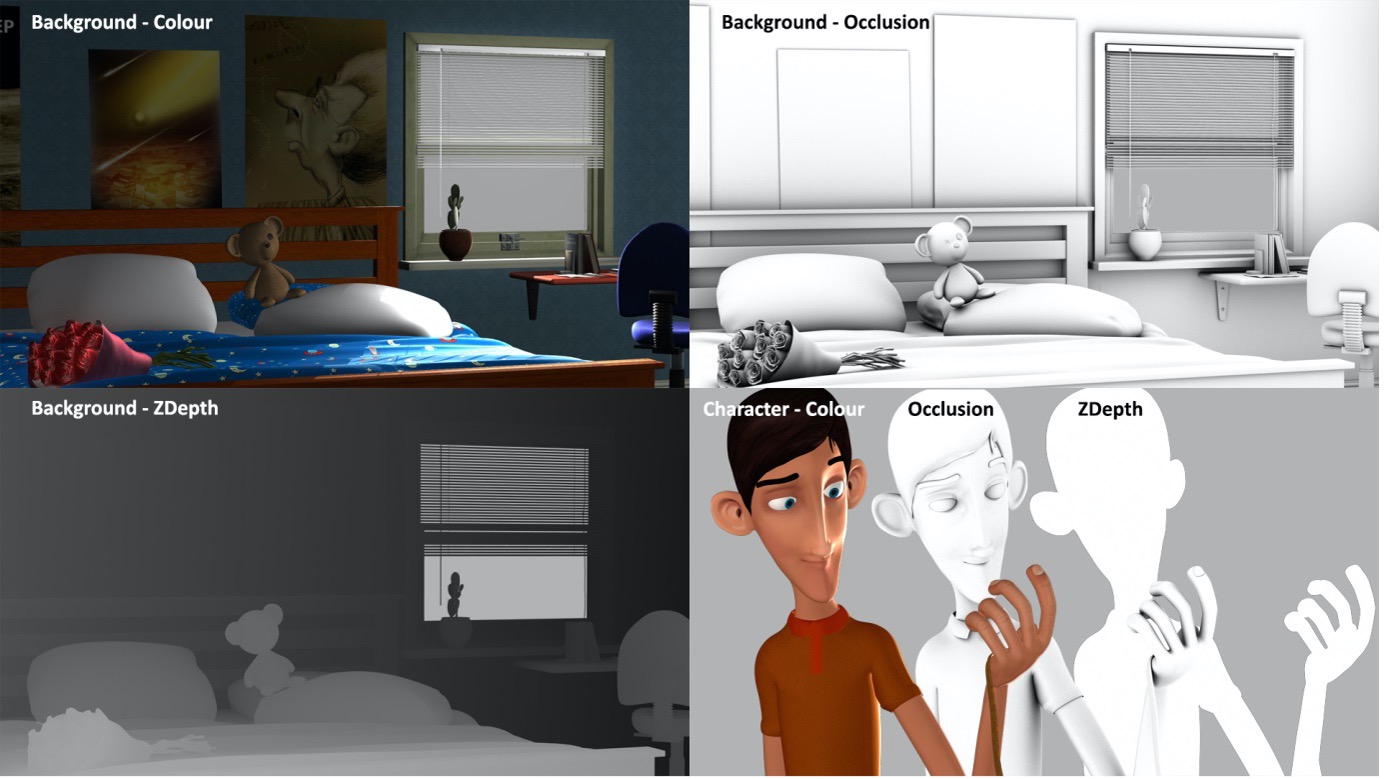
- Sometimes, a shot's environment will be split into different layers, usually when characters or shot elements are required to pass behind elements of the environment.

- Colour or Beauty
- Shadow
- Ambient Occlusion
- Z-Depth
- Reflection
- Object masking or object ID
How do you create a composite shot?
Watch Geoff use Adobe After Effects to integrate multiple animated elements and apply different effects when compositing a shot of a World War II plane landing in a field.
These nine videos - located in the playlist below - help you complete Task 3: Composite a shot of a World War II plane below. You can also use this quick start guide to step you through the videos and the learning task: Quick Start Guide: Composite a shot of a World War II plane.
Practice
Task 3: Composite a shot of a World War II plane

Further develop your compositing skills, this time using Adobe After Effects with multiple shot elements and old film effects to create a dynamic World War II plane action shot, and considering key aspects from layer management to visual cohesion.
What tools or resources do you need for this task?
Make sure you have access to:
- Adobe After Effects
- Files: Composite a shot
- Quick Start Guide: Composite a shot of a World War II plane
What steps should you take to complete this task?
4 hours
Set aside 4 hours to complete steps 2-10 below. Remember to save your work as you go when using Adobe After Effects.
- Revisit the Composite an Image subtopic to reinforce what you know if you need to:
- Watch Geoff’s nine videos, carefully observing the techniques he uses in Adobe After Effects to composite the shot.
- Refer to Quick Start Guide: Composite a shot of a World War II plane if you need clarity or get stuck.
- Access and download the four shot files in Files: Composite a shot.
- Launch Adobe After Effects and create a new composition with a resolution of 1280x720 at 25fps.
- Import each file (Background, Shadow, Airplane, Dust) and arrange the timeline with the Background at the bottom, followed by the Shadow, Airplane, and Effects layers on top.
- Adjust the Dust layer by ignoring the alpha channel. Create masking channel and adjust threshold, tolerance, edge thin, and edge feather values to retain dust effects.
- Add a colour correction to the dust and decrease its opacity for better integration.
- Adjust the blend mode of the Shadow layer and lower its opacity to achieve the desired shadow intensity. Consider the light source for accurate shadow length.
- Add image enhancements:
- Sepia look: Create an Adjustment layer and add a colour correction to adjust for a sepia look, further adjusting saturation, lightness, brightness, and contrast.
- Vignette: Create a new solid layer and draw a circular mask, inverting and adjusting it for a soft vignette and modifying its opacity.
- Add more image enhancements:
- Film dust: Create a new solid layer, ‘Dust’, and add a fractal noise effect, adjusting contrast and brightness. Set keyframes for animation and change the blend mode to Subtract.
- Film lines: Create another solid layer, ‘Lines’, and add a fractal noise effect, adjusting contrast and brightness. Change the blend mode to Add and adjust opacity.
- Review and add the composition to the render queue. Render the final shot in MP4 format.
What should you do after completing this task?
- Once you’ve completed your composite shot, reflect on your choices made during the compositing process using Adobe After Effects. Consider how layer management, visual elements, and overall cohesion contribute to the effectiveness of the action shot.
- Share your composite shot to the Forum:
- Select your forum thread in Forum: Compositing.
- Select Reply to your first Forum post.
- Enter the words ‘Task 3’ in your reply.
- Select the Post your response button, then select Edit in your reply when it shows up.
- Upload your MP4 using the Attachment field.
- Select Save changes to share your coursework to your forum thread.
- Get feedback on this and other learning tasks at the next Live Session – check the Live Session calendar for dates and times.
As you wrap up this advanced compositing task, reflect on you journey in this Compositing topic, practising the art of integrating multiple visual elements to create cohesive illusions with Adobe software. Compositing technologies evolve, and new tools emerge, so stay tuned to the latest updates from compositing software developers.
In this topic, you’ve taken a close look at compositing, delving into the processes and techniques of merging visual elements to create cohesive final images or shots. You’ve:
- assessed your knowledge of compositing methods and processes
- blended multiple visual elements to produce a unified and compelling composite image with Adobe Photoshop
- merged various visual and animated elements to create a cohesive and dynamic composite shot with Adobe After Effects.
Continue sharpening your compositing skills through practice and experimentation, allowing your familiarity with compositing software to grow. And don’t neglect your imagination – allow it to flourish when creating your composite images and shots.
Reflect on what you’ve learnt, practised, and achieved
As you wrap up this topic, take a moment to reflect on what you've learnt, practised, and achieved by completing the various learning tasks in this topic.
Compositing is a versatile skill used for multiple purposes, from crafting amazing digital scenes to seamlessly integrating characters and objects into animated worlds. Enjoy using it to achieve your artistic vision!
|
# |
Learning task name |
Duration (hours) |
|
|---|---|---|---|
|
1 |
Check your knowledge |
0.25 |
|
|
2 |
Composite an image of a Moon landing |
2 |
|
|
3 |
Composite a shot of a World War II plane |
2 |
|