Embark on a creative journey with Autodesk Maya – or Maya – an industry-leading 3D content creation package widely used in animation studios and visual effects (VFX) houses worldwide.
Whether navigating the Maya workspace, shaping basic geometric structures, or delving into the step-by-step process of modelling and texturing, this topic provides you with a comprehensive foundation for using Maya.
Get ready to apply your creativity and increase your technical know-how in the world of 3D animation!
Subtopics that you can explore
In this Create Basic 3D Assets topic, you’ll explore four key subtopics, each offering valuable insights and techniques to elevate your animation game. These subtopics are:
- Overview of Maya
- Maya Polygon Primitives
- Basic Modelling
- Basic Texturing
Use the Create Basic 3D Assets Forum to share your coursework
When you complete a learning task, always read its What should you do after completing this task? section to check if you need to share your coursework (e.g. image or multimedia files) in this topic’s Forum.
You'll get specific guidance on when to do this but it's a good idea to get a headstart and set up your personalised forum thread for Create Basic 3D Assets now by working through the task below.
Practice
Set up your forum thread for Create Basic 3D Assets
Set up your forum thread for this topic. By doing this, you'll be able to:
- Share your animation coursework you create while completing learning tasks.
- Get constructive feedback from your facilitator and fellow students to help you improve your animation skills and knowledge of animation principles and techniques.
- Learn from different perspectives, techniques and creative solutions shared by fellow students.
What steps should you take to complete this task?
- Find this topic’s Forum by selecting this link: Forum: Create Basic 3D Assets or by using the navigation menu on the left.
- Select the New thread link once you land on the Forum.
- In the Subject field, enter your first and last names.
- In the Message field, enter one or two sentences describing what you know about creating basic 3D assets.
- Select Post to forum at the end of the page.
You can also watch this playlist below of two short videos (6:38m) to find out how to set up your forum thread and share your coursework in your forum thread.
Use the hamburger icon in the top right of the playlist to access the video menu if you need to.
What should you do after completing this task?
Keep progressing through this topic. Whenever you get to a learning task, read it carefully to check whether you need to share your animation coursework (e.g. a JPEG or MP4 file) to the Forum.
Remember, reach out to your facilitator if you have questions about how to use the Forums or any other aspect of your study.
Learning tasks that will help you develop and practise animation skills
Practice
Use your skills and build your knowledge
Engage confidently with the learning tasks in this topic: they are the essential building blocks to help you use fundamental animation tools. By completing these learning tasks, you'll strengthen your 3D content creation skills and reinforce your abilities to craft exceptional animations.
Keep an eye out for the PRACTICE box throughout this topic, highlighting learning tasks and resources and providing clear guidance on what actions you should take. The following information outlines the learning tasks in Compositing and the recommended time allocation for each.
|
# |
Learning task name |
Duration (hours) |
|
|---|---|---|---|
|
1 |
Navigating the Maya workspace |
0.25 |
 |
|
2 |
Create, arrange, and adjust polygon primitives |
1 |
 |
|
3 |
Model a space crate |
4 |
|
|
4 |
Texture your space crate |
6 |
|
|
5 |
Model and texture your own custom crate |
8 |
|
Feedback and support is woven through the learning tasks as you complete them. Reach out if you have any questions about what to do!
Get familiar with navigating the Maya workspace and using basic navigation shortcuts in this Overview of Maya subtopic.
Explore
New to Maya?
This Create Basic 3D Assets topic provides you with a range of Yoobee and Maya videos to help you get familiar with Maya’s powerful content creation features and to provide you with hands-on practice in modelling and texturing objects.
If you want a primer into the basics before you take a deep dive into Maya, explore the three Maya tutorials listed below, which you can also find in Software at the start of this course.
- Navigating the interface Discover the menus, options, tools, and controls commonly used in Maya. You’ll get an overview of menu sets, shelves, workspaces, layout views, and basic animation controls. (8:44m)
- Working with scenes Learn to keep all of your files organised and portable by using Maya projects. You’ll learn about different file types Maya can read and how you can save files intelligently using Save Incremental and Autosave. (7:30m)
- Modelling basics Learn about 3D modelling tools and workflows in Maya. You’ll work with the Modelling Toolkit and build a simple primitive model, manipulating its vertices, edges, and polygon faces. (13:05m)
Navigating Maya
If you’re new to Maya, it’s recommended you develop essential Maya navigation skills to start your journey of creating 3D content for animation.
What are the essentials?
These essential Maya navigation skills include:
- navigating within the main viewport
- selecting and viewing objects within a scene
- changing an object's transform attributes.
Watch this Maya Learning Channel video, which quickly covers these skills that you need to know (1:54m).
This video helps you complete Task 1: Navigating the Maya workspace below.
Practice
Task 1: Navigating the Maya workspace
Start your foundational journey of 3D content creation by developing essential skills in navigating the Maya workspace, including camera manipulation and shortcut keys.
What tools or resources do you need for this task?
Make sure you have access to Autodesk Maya.
What steps should you take to complete this task?
15 minutes

Set aside 15 minutes to complete steps 2-7 below.
- Revisit this Overview of Maya subtopic if you need to, including the Maya Learning Channel video above.
- Launch Maya and create a simple object by clicking one of the seven primitives on the Poly Modeling shelf.
- Rotate camera: Use the Alt + Left mouse button to rotate the camera.
- Pan camera: Use Alt + Middle mouse button to pan the camera.
- Zoom camera: Use Alt + Right mouse button for zooming. You can also use the scroll wheel for zoom control.
- Access menus: Hold the spacebar to display all Maya menus.
- Viewport management: Tap the spacebar to toggle between viewports.
What should you do after completing this task?
Consider your developing navigation skills and how fluidly you can explore the Maya workspace. Did any particular shortcut prove more intuitive for you?
Now that you've acquired essential navigation skills in Maya, it's time to dive deeper into content creation. In the next subtopic, Maya Polygon Primitives, you'll learn the fundamentals of constructing basic 3D shapes and arranging them in your virtual space.
Discover quick and efficient ways to create, arrange, and adjust basic geometric shapes – building blocks for more complex 3D models - in this Maya Polygon Primitives subtopic.
Polygon primitive shapes
Polygon primitive shapes are your starting point for modelling in Maya and there are several available.
You can find the primitives in the Polygon Modelling Shelf just above Maya’s viewport window, or select Create at the top of the screen to create them from the Polygon Primitives submenu.
What polygon primitives are available in Maya?
Maya provides you with access to a variety of polygon primitives.
Select the arrows below to view 12 examples. The first six are by far the most widely used when modelling.
How do you transform polygon primitives?
You can transform objects in Maya using the basic Move, Rotate, and Scale tools on the toolbar at the far left of the screen.
Selecting an object will show the corresponding tool handles, which you can manipulate using the left mouse button.
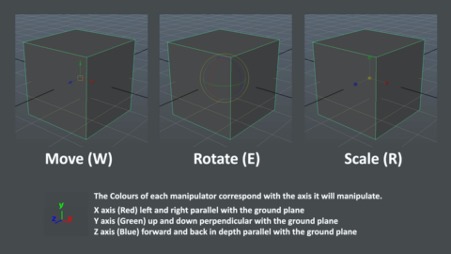
The colours of each manipulator correspond with the axis it will manipulate:
- X axis (Red) - left and right parallel with the ground plane.
- Y axis (Green) - up and down perpendicular with the ground plane.
- Z axis (Blue) - forward and back in depth parallel with the ground plane.
Tip
Master your Maya tools with shortcuts!
Did you notice in the image above how each Move, Rotate, and Scale tool had a shortcut key corresponding to one of the QWERTY keys on your keyboard? These are:
- Q – Select
- W – Move
- E – Rotate
- R – Scale
You should use these Maya shortcuts as much as possible as they allow extremely fast switching between the main manipulation tools in Maya and increase the speed at which you can work.
The yellow manipulator
When you select the Move, Rotate, or Scale tool, you’ll notice a yellow manipulator near the object. The yellow manipulator allows you to apply these transformations along all three axes at the same time.
What components make up a polygon primitive?
Polygons have three different components, which can each be selected and modified to change the original shape of the polygon primitive. These are:
- vertex
- edge
- face.
Using the Move, Rotate, and Scale tools, you can manipulate all vertices, edges, and faces.
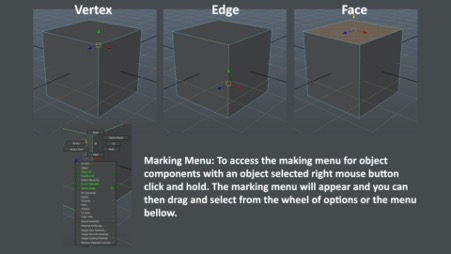
- For speed, and as described in the image above, you can access the components of a polygon object by right mouse clicking and holding, then swiping in the direction of the component or menu you want to select
- You'll discover many different marking menus in Maya when working on selected tasks or using a keyboard shortcut key with the right mouse button.
What does this all look like in Maya
Watch this Maya Learning Channel video, which quickly shows you how to transform shapes in Component mode and move them around in Object mode (2:31m).
This video helps you complete Task 2: Create, arrange, and adjust polygon primitives below.
Practice
Task 2: Create, arrange, and adjust polygon primitives
Further develop your Maya navigation skills and practise manipulating polygon primitives using Maya’s transformation tools.
What tools or resources do you need for this task?
Make sure you have access to Autodesk Maya.
What steps should you take to complete this task?
1 hour

Set aside 1 hour to complete steps 2-7 below.
- Revisit this Maya Polygon Primitives subtopic if you need to, including the Maya Learning Channel video above.
- Keep practising using Maya’s navigation controls, using the primitive you selected in the previous learning task or selecting more primitives from the Poly Modeling shelf.
- Create, arrange, and adjust the polygon primitives using Maya’s transformation tools:
- Select (Q)
- Move (W)
- Scale (E)
- Rotate (R)
- Familiarise yourself with adjusting and transforming individual polygon components:
- Vertices
- Edges
- Faces
What should you do after completing this task?
Reflect on your progress in navigating Maya and manipulating polygon primitives and how you can apply these skills to modelling simple 3D objects. Are there aspects of the transformation tools that you find challenging or less intuitive?
In the next subtopic, Basic Modelling, you can build upon your transformation skills to model a space crate that can be used for animated science fiction stories.
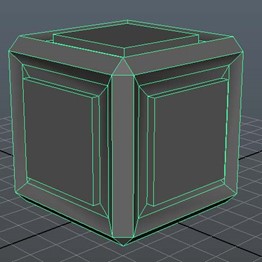
Follow the steps of modelling a simple 3D object – a space crate – with Maya in this Basic Modelling subtopic, from starting with a polygon cube to the point that it’s ready for you to texture. Ready?
Modelling simple 3D objects
As an animator, knowing how to model simple 3D objects is a fundamental skill that allows you to create and manipulate the assets you need for your 3D animation.
To get started, watch Geoff model a space crate with Maya, using the Bevel and Extrude tools to shape and refine it. (1.25m)
This video helps you complete Task 3: Model a space crate below. You can also use this quick start guide to step you through the video and the learning task: Quick Start Guide: Model a space crate.
Explore
Quick start guides that support your learning
Geoff’s videos in this Create Basic 3D Assets topic are supplemented by quick start guides, designed to be your trusty companions in case you need clarity or support as you take in what you’re watching.
The quick start guides are also handy references for acing the remaining learning tasks in this and the next subtopic – it’s all about fast insights at your fingertips!
Practice
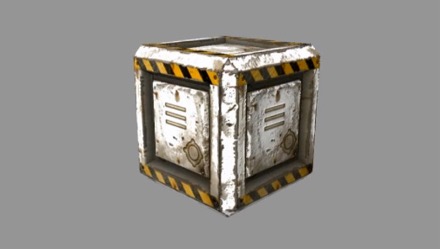
Task 3: Model a space crate
Gain fundamental modelling skills in Maya by creating a simple 3D model - a space crate. Using a polygon cube as a base model, you’ll model the space crate ready for you to texture later.
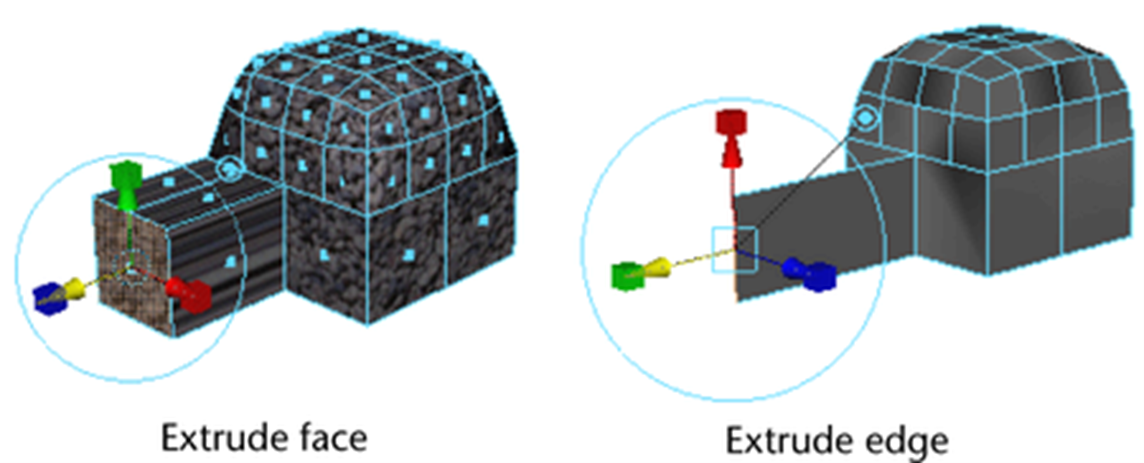
You’ll get familiar with using basic modelling tools in Maya, such as Bevel and Extrude. You’ll use:
- the Bevel tool to expand each selected vertex and edge into a new face, rounding the edges of a polygon mesh.
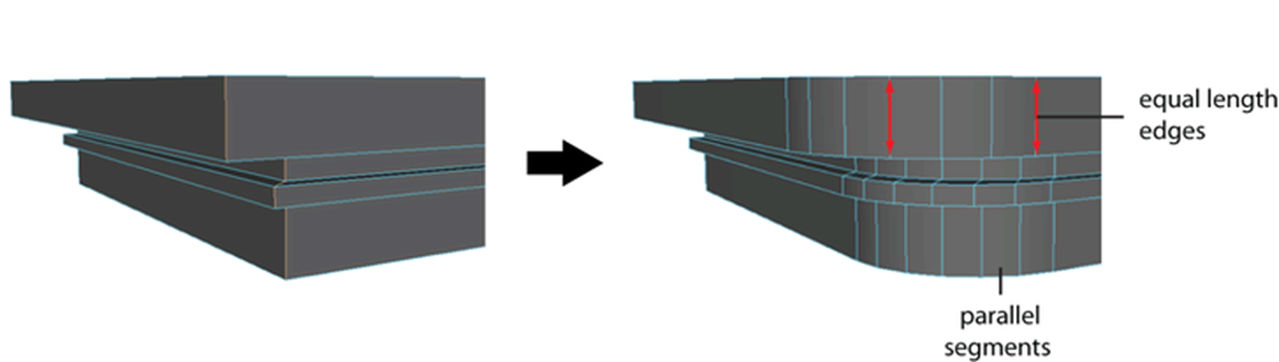
- the Extrude tool to add polygons to an existing mesh by extending polygon faces, edges or vertices – when you extrude a face on a polygon mesh, the existing face telescopes inward or outwards as it creates new connecting faces on the side of the extrusion.
What tools or resources do you need for this task?
Make sure you have access to:
- Autodesk Maya
- Quick Start Guide: Model a space crate
What steps should you take to complete this task?
4 hours
Set aside 2-4 hours to complete steps 2-7 below. Remember to save your work as you go when using Maya.
- Revisit the Basic Modelling subtopic if you need to:
- Watch Geoff’s video, carefully observing the techniques he uses in Maya to model the space crate.
- Refer to Quick Start Guide: Model a space crate if you need clarity or get stuck.
- Initialise base model:
- Open Maya and create a new project following the default file structure.
- Create a polygon cube as the base model for the space crate: Create > Polygon Primitives > Cube.
- Adjust size and position of cube:
- Input dimensions (Width, Height, and Depth) of 6 units in the cube's option box.
- Move the cube up and above the grid using the Move Transform tool (W).
- Save your scene:
- Save your scene in the ‘scenes’ folder of your Maya project (choose a name for it), adhering to the default file structure.
- Bevel for rounded edges:
- Enter component mode by clicking the component mode button or right-clicking and choosing edges.
- Select all edges of the cube.
- Open the Bevel tool: Edit Mesh > Bevel.
- Adjust Bevel options: Width - 1500, Segments - 1.
- Extrude for additional detail:
- Stay in component mode and select faces inside the bevelled edges.
- Use the Extrude tool: Edit Mesh > Extrude.
- Perform three extrusions:
- Scale face globally, then push it back into the cube slightly.
- Repeat using the G key, scale the new face globally.
- Repeat again, then pull out the extruded face to create a small bump.
- Review model and add the scene to the Render View. Save the image of the model, take a screenshot of the model, and save screenshot to JPG format.
What should you do after completing this task?
- Once you’ve completed your model, think about the challenges you encountered during the modelling process. How can your developing skills be applied to more complex 3D modelling work?
- Share your 3D model to the Forum:
- Select your forum thread in Forum: Create Basic 3D Assets.
- Select Reply to your first Forum post.
- Enter the words ‘Task 3’ in your reply.
- Select the Post your response button, then select Edit in your reply when it shows up.
- Upload your image using the Attachment field.
- Select Save changes to share your coursework to your forum thread.
- Get feedback on this and other learning tasks at the next Live Session – check the Live Session calendar for dates and times.
The final step in your space crate journey is to explore the next subtopic, Basic Texturing. Learn how to apply texture to your model with Maya, bringing the space crate to life with surface detail and colour so it’s ready for production.
Take your space crate - which you modelled in the previous subtopic – and give it realistic texture in this Basic Texturing subtopic so it’s ready for use in a production environment. You’ll also have the chance to extend your knowledge of modelling and texturing in Maya to design a personalised crate of your own.
Texturing simple 3D models
Knowing how to texture simple 3D models is a crucial skill that empowers you to enhance the appearance and realism of your 3D animations by applying visual elements to your 3D assets.
To take your space crate to this next creative level, watch Geoff use texturing techniques on his space crate with both Maya and Adobe Photoshop.
These four videos - located in the playlist below - help you complete Task 4: Texture your space crate below. You should also use this quick start guide to step you through the videos and the learning task: Quick Start Guide: Texture your space crate.
Practice
Task 4: Texture your space crate
Dive into an in-depth creative exploration in Autodesk Maya and Adobe Photoshop, where you’ll texture the space crate you modelled earlier. From UV layout creation to adding realistic, grungy details, this texturing challenge sets the stage for personalising your own designs and advancing your proficiency in basic 3D content creation.
What tools or resources do you need for this task?
Make sure you have access to:
- Autodesk Maya
- Adobe Photoshop
- Quick Start Guide: Texture your space crate
What steps should you take to complete this task?
6 hours
Set aside 4-6 hours to complete steps 2-9 below. Remember to save your work as you go when using Maya and Adobe Photoshop.
- Revisit this Basic Texturing subtopic if you need to:
- Watch Geoff’s video, carefully observing his techniques in Maya to texture his space crate model.
- Refer to Quick Start Guide: Texture your space crate as you progress through steps 2-9 below.
- Create a UV layout in Maya using planar projection along the X, Y, and Z axes of your space crate model’s faces.
- Create an occlusion map in Maya for your texture and configure its settings.
- Open the Hypershader in Maya to manage materials and create a Lambert material to assign to your model.
- Export your UV layout from Maya, use Adobe Photoshop to create a texture file, and add your baked occlusion file to your texture file.
- Incorporate sourced textures for realistic details to texture your space crate model in Maya, adding scuffs, scratches, warning stickers, rust effects, and markings. Blend your textures for a cohesive look.
- Create a bump map from the colour map to add surface relief. Adjust bump strength for a subtle effect.
- Switch the material to Phong and configure specular attributes. Apply the bump map as a specular map for varied highlights.
- Review your textured model and add the scene to the Render View. Save the image of the model to JPG format.
What should you do after completing this task?
- Once you’ve finished texturing your space crate, consider the effectiveness of your texturing techniques, evaluate the realism achieved, and assess the interplay of colour, bump, and specular maps. Which textures would you experiment with and how can you refine your approach?
- Share your textured 3D model to the Forum:
- Select your forum thread in Forum: Create Basic 3D Assets.
- Select Reply to your first Forum post.
- Enter the words ‘Task 4’ in your reply.
- Select the Post your response button, then select Edit in your reply when it shows up.
- Upload your image using the Attachment field.
- Select Save changes to share your coursework to your forum thread.
- Get feedback on this and other learning tasks at the next Live Session – check the Live Session calendar for dates and times.
Great work navigating the intricate steps of texturing your space crate, enhancing the realism and authenticity of your model. Extend your Maya skills in a more personalised project and move to the final learning task of this topic, where you can challenge yourself to model and texture another crate, this time with a design of your choice!
Bringing it all together
Now that you've learnt and practised the fundamentals of basic modelling and texturing while creating your space crate, it's time to bring it all together by extending your knowledge to model and texture another crate, this time with a design of your choice.
Reflection
What will you do differently or the same this time?
Pause for a moment to think about the techniques you're absorbing using Maya.
- How can understanding basic geometry and spatial relationships influence the realism and coherence of your crate?
- How can you leverage your grasp of texture mapping and material application to breathe life into your crate and enhance its visual appeal?
- Consider the significance of lighting and shading. How can these elements be manipulated to add depth and nuance to your crate?
Your ability to translate theoretical knowledge into practical content creation will be one key to your success in mastering the craft of creating 3D assets.
Before modelling and texturing your crate, swipe through these five examples to help inspire you. Which type of crate will you create?
Practice
Task 5: Model and texture your own custom crate
Welcome to the final challenge of this Create Basic 3D Assets module, helping you consolidate and extend your knowledge of basic 3D modelling and texturing and express your creativity in designing your custom crate. Have fun exploring different possibilities and pushing the boundaries of your 3D content creation skills!
What tools or resources do you need for this task?
Make sure you have access to:
- Autodesk Maya
- Adobe Photoshop
- Quick Start Guide: Model a space crate
- Quick Start Guide: Texture your space crate
What steps should you take to complete this task?
8 hours
- Set aside 6-8 hours to complete steps 3-8 below. Remember to save your work as you go when using Maya and Adobe Photoshop.
- Before diving in, swipe through the five images of crates above and draw inspiration from their designs.
- Revisit the Basic Modelling and Basic Texturing subtopics – including Geoff’s videos and the two quick start guides – to refresh your knowledge of the steps involved in modelling and texturing basic 3D assets if you need to.
- Outline your crate design concept as a sketch or a list. Consider the purpose, style, and any elements you want to incorporate.
- Use Maya to bring your design concept to life. Apply the fundamental modelling techniques learned earlier, creating a 3D model of your crate.
- Unwrap the UVs of your model to prepare it for texturing in Adobe Photoshop.
- Open Adobe Photoshop and use your design concept to start texturing your crate. Apply colour, surface relief, specular highlights, and additional details to enhance the visual appeal.
- Fine-tune both the 3D model and the texture.
- Export your finalised texture and apply it to your 3D model in Maya. View your crate from different angles to check its overall appearance.
What should you do after completing this task?
- Once you’ve finished your custom crate, give yourself time to digest everything you’ve accomplished in this task. What effort did you go to to make your crate visually interesting? Does your final 3D create design align with your initial concept? What questions do you have about the modelling and texturing process that you want to ask your course facilitator?
- Share your crate to the Forum:
- Select your forum thread in Forum: Create Basic 3D Assets.
- Select Reply to your first Forum post.
- Enter the words ‘Task 5’ in your reply.
- Select the Post your response button, then select Edit in your reply when it shows up.
- Upload your image using the Attachment field.
- Select Save changes to share your coursework to your forum thread.
- Get feedback on this and other learning tasks at the next Live Session – check the Live Session calendar for dates and times.
Congratulations on completing this task! Your journey from foundational exercises to crafting your custom crate showcases your evolving proficiency with 3D modelling and texturing. Embrace the individuality of your creation, and remember, each click and stroke helps grow your skills. Keep exploring, stay curious, and let your creativity flourish in 3D content creation.
In this topic, you’ve gained a useful foundation for using Maya to create basic 3D assets. You’ve:
- become familiar with the Maya workspace, including commonly used menus, options, tools, and controls
- manipulated basic geometric shapes with polygon primitives, learning how to transform these building blocks for more complex 3D models
- practised a step-by-step modelling process and continued that journey as you ventured into texturing, injecting realism into your creations.
When you can craft your 3D assets, you gain greater control over the visual elements in your animations, enabling you to tailor characters, objects, and environments to suit your animation projects. So keep going!
Reflect on what you’ve learnt, practised, and achieved
As you wrap up this topic, take a moment to reflect on what you've learnt, practised, and achieved by completing the various learning tasks in this topic.
Knowing how to customise your 3D assets enhances storytelling and creates a more cohesive and visually appealing animation. Enjoy using – and practising – your content creation skills as you progress through this course.
|
# |
Learning task name |
Duration (hours) |
|
|---|---|---|---|
|
1 |
Navigating the Maya workspace |
0.25 |
|
|
2 |
Create, arrange, and adjust polygon primitives |
1 |
|
|
3 |
Model a space crate |
4 |
|
|
4 |
Texture your space crate |
6 |
|
|
5 |
Model and texture your own custom crate |
8 |
|