Let’s get exercising!
Now that you have some understanding of fitness components and training principles, you are ready to dive into the exercise technique section.
Throughout this topic, you will study images of each exercise and read the information on the major muscles, the equipment options, and the key coaching points and steps. Practice demonstrating every exercise, and explaining every exercise.
Each exercise is accompanied by a video featuring Davy, one of our NZIS sports tutors, and students. Davy will talk you through each exercise, while Iraia, Isabel, Ashley, and Mya demonstrate.
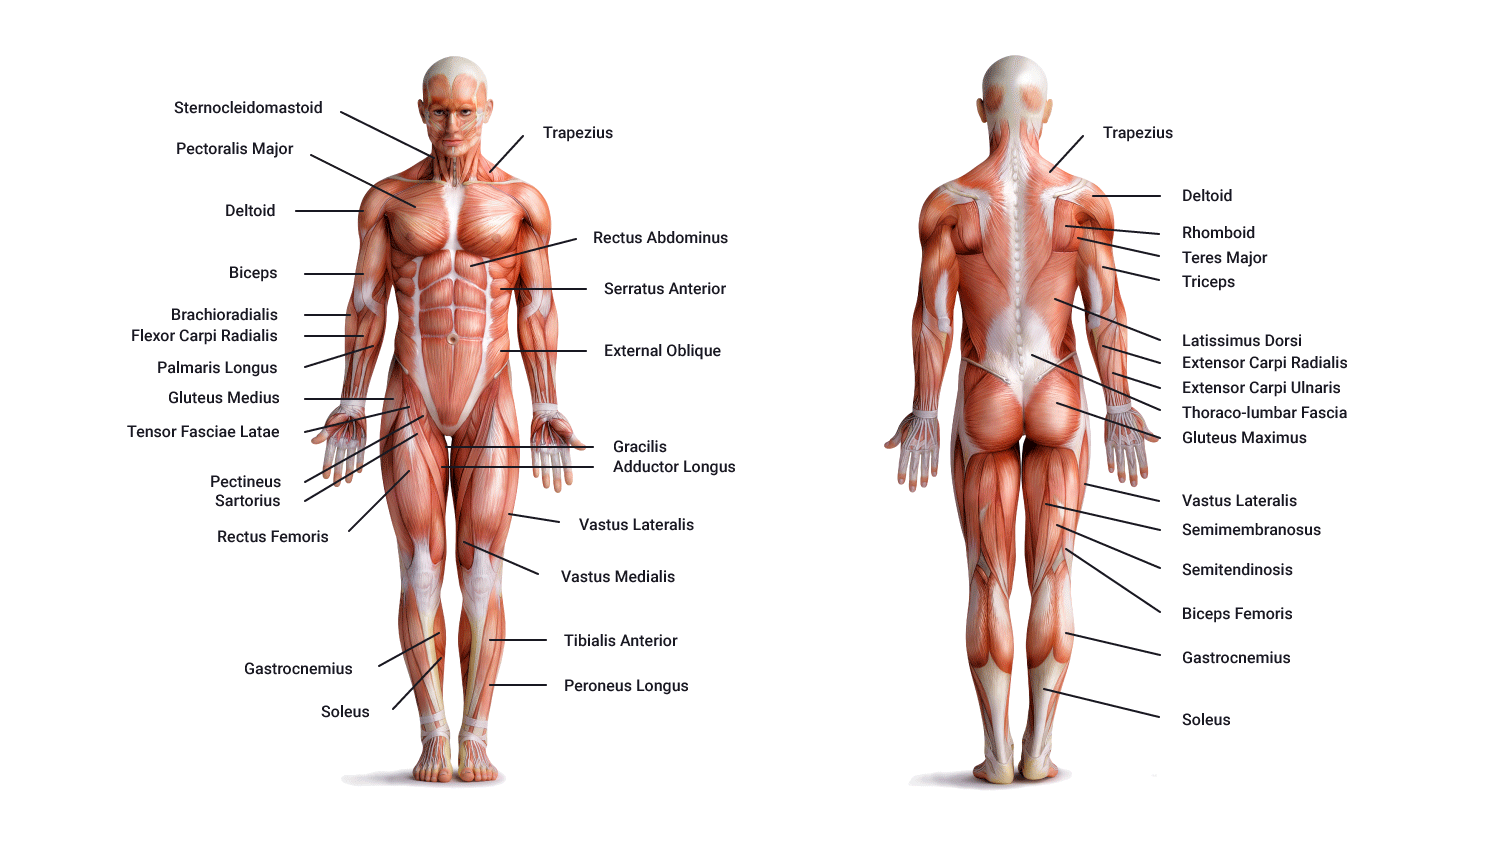
You may wish to refer back to the following anatomical illustrations as you review each exercise. This information is the why, where, when, and how of training. The more comfortable you become, the more comfortable you will be able to make your clients when working with you.
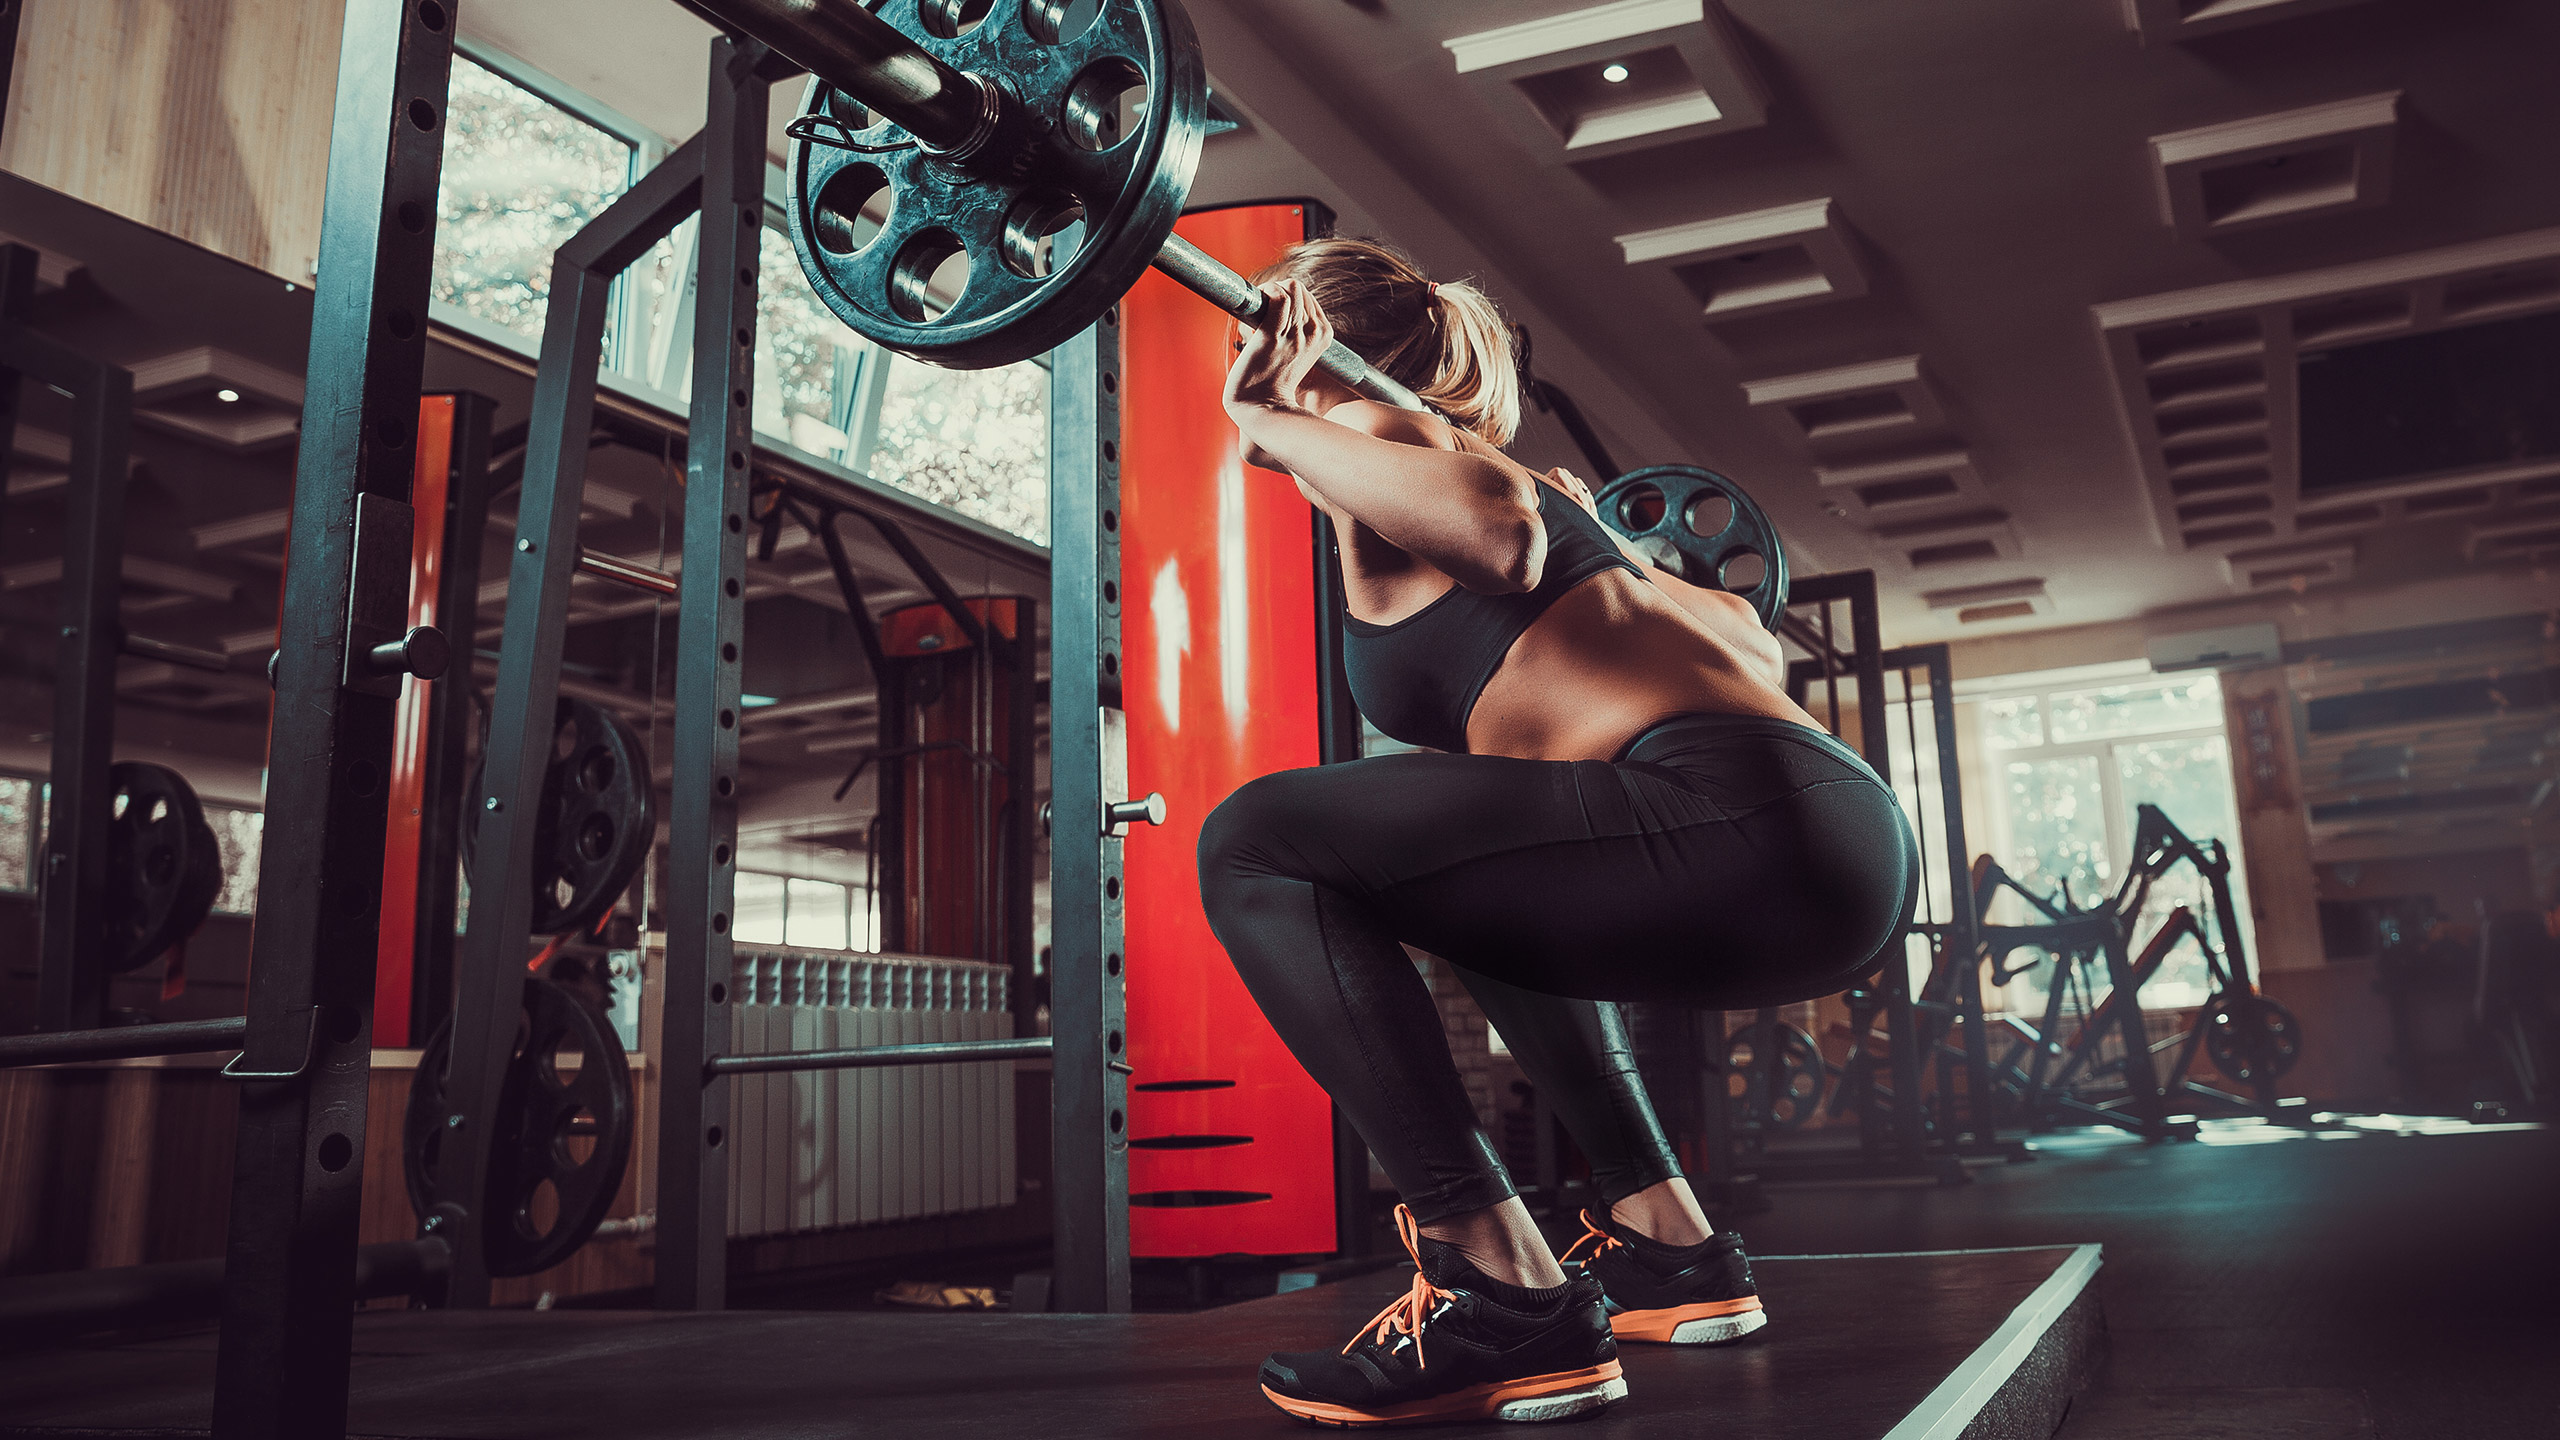
Before we look at each exercise and its specifics, let's first look at training posture. Having an awareness of our posture when we are training will lead to safe and effective exercising. This means, our bones, muscles, and joints should ideally be in their 'happy place' for optimal movement, stability, function, and support.
Training posture can be described as having specific characteristics:
- Chin 'tucked in' being mindful of the cervical portion of the spine-retraction of the head. This will straighten the neck region.
- Eyes are looking straight ahead.
- Shoulders are 'back and down' (removing the rounded/shrugged shoulder posture and pulling out shoulder blades back into 'anatomical position'). This would be retraction and depression of the clavicles and scapula.
- Engage/activate the core. This is important for good/safe posture when exercising as it stabilises the hips and supports the lower back along with giving the tummy muscles a 'wake up'.
- Neutral pelvis. This is important for good/safe posture when exercising as it stabilises the hips and supports the lower back. A neutral pelvis is illustrated in the image that follows.
- Feet hip-width apart (typically ankles are in line with the ball and socket region of the hips). Note: This will be modified in some exercises where the shoulder-width distance of the feet is more appropriate for the exercise being performed.
- Knees in line with hips (ball and socket region) and approximately in line with middle toe.
- Feet pointing forward.
As a trainer, encourage your client to think about these points as they perform the exercises. Some ways to activate the core include drawing in the belly button (sucking it in). This is also a handy way to describe this action to your client because descriptors such as 'Activate your transverse abdominus' or 'Engage your core' will mean something to your colleagues but likely very little to your average client! Translating into everyday words and something we can all relate to helps your clients understand what you are asking of them. It will also ensure that when they train in their own time, they are doing it safely.
Neutral pelvis

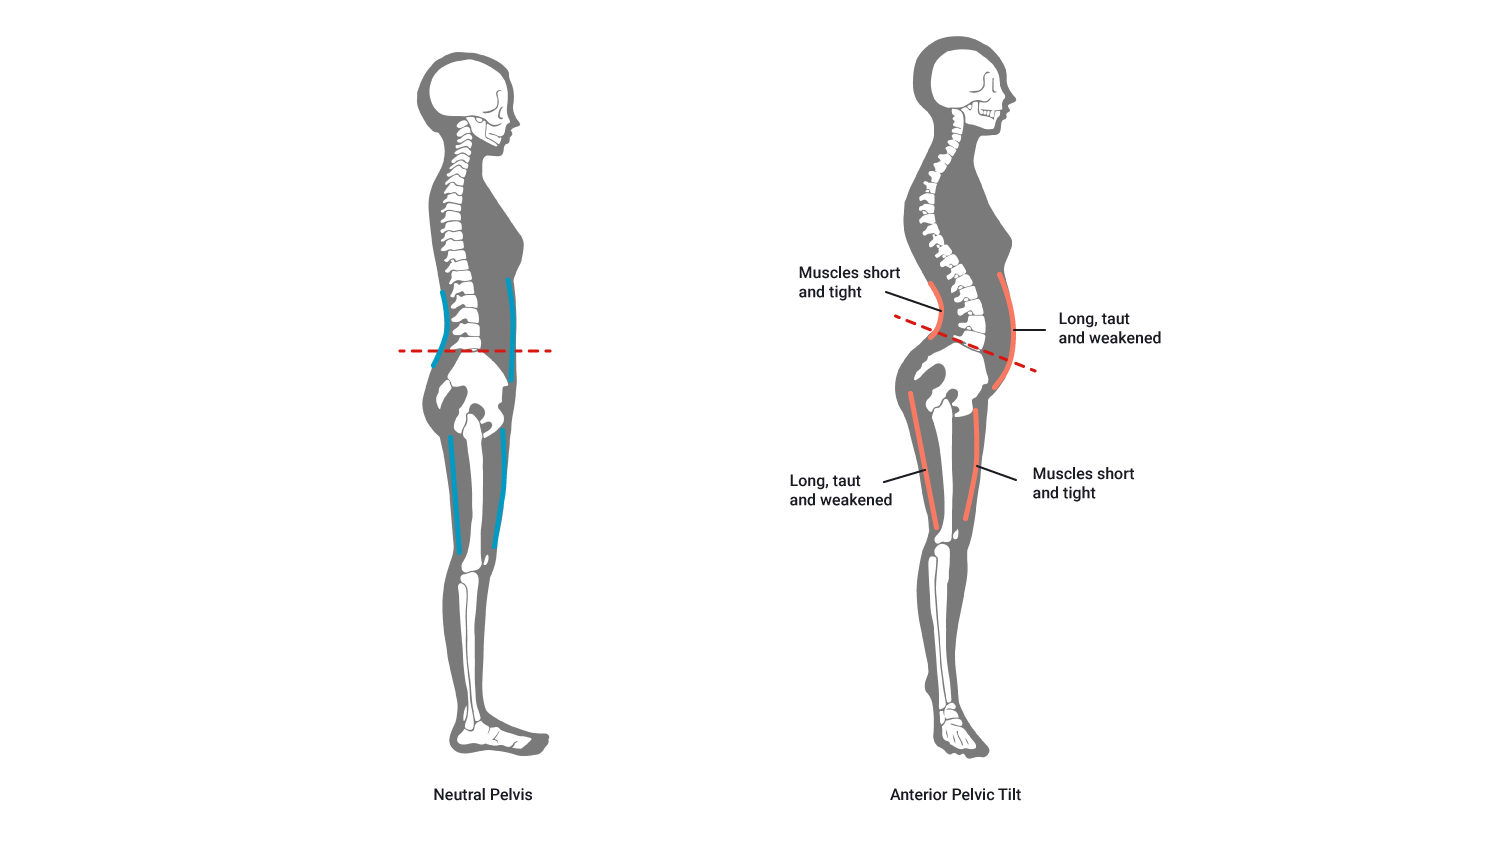
A neutral pelvis ensures the posture of the lower region of the spine (lumbar and sacrum) and their anatomical alignment, removing any 'poor posture' and ensuring the spine is efficient and safely aligned before and during exercise. When training, a neutral pelvis can be tricky to maintain, particularly when tired. With this in mind, it is important to do a mental checklist of all the training posture points during an exercise and particularly between each repetition. This will soon become unconscious behaviour however in the early days, it is important to mentally run through the checklist and review each area of the body to assess if the training posture is intact.
Weight training machines often consist of pin-loaded resistance equipment. This type of equipment has a series of weight plates pre-loaded or hung within the equipment's frame.
The client selects their desired weight by inserting a pin into the weights at pre-determined intervals. This allows only a certain number of plates to be lifted during exercise. This is a safe way of undertaking weight/resistance training.
Helps to build the pectoral muscles and develops the triceps, and shoulders. It can be beneficial for clients prone to shoulder injuries who are unable to use a standard bench press.
These machines can be either seated or supine (lying on back). Focuses on the pectoral muscles.
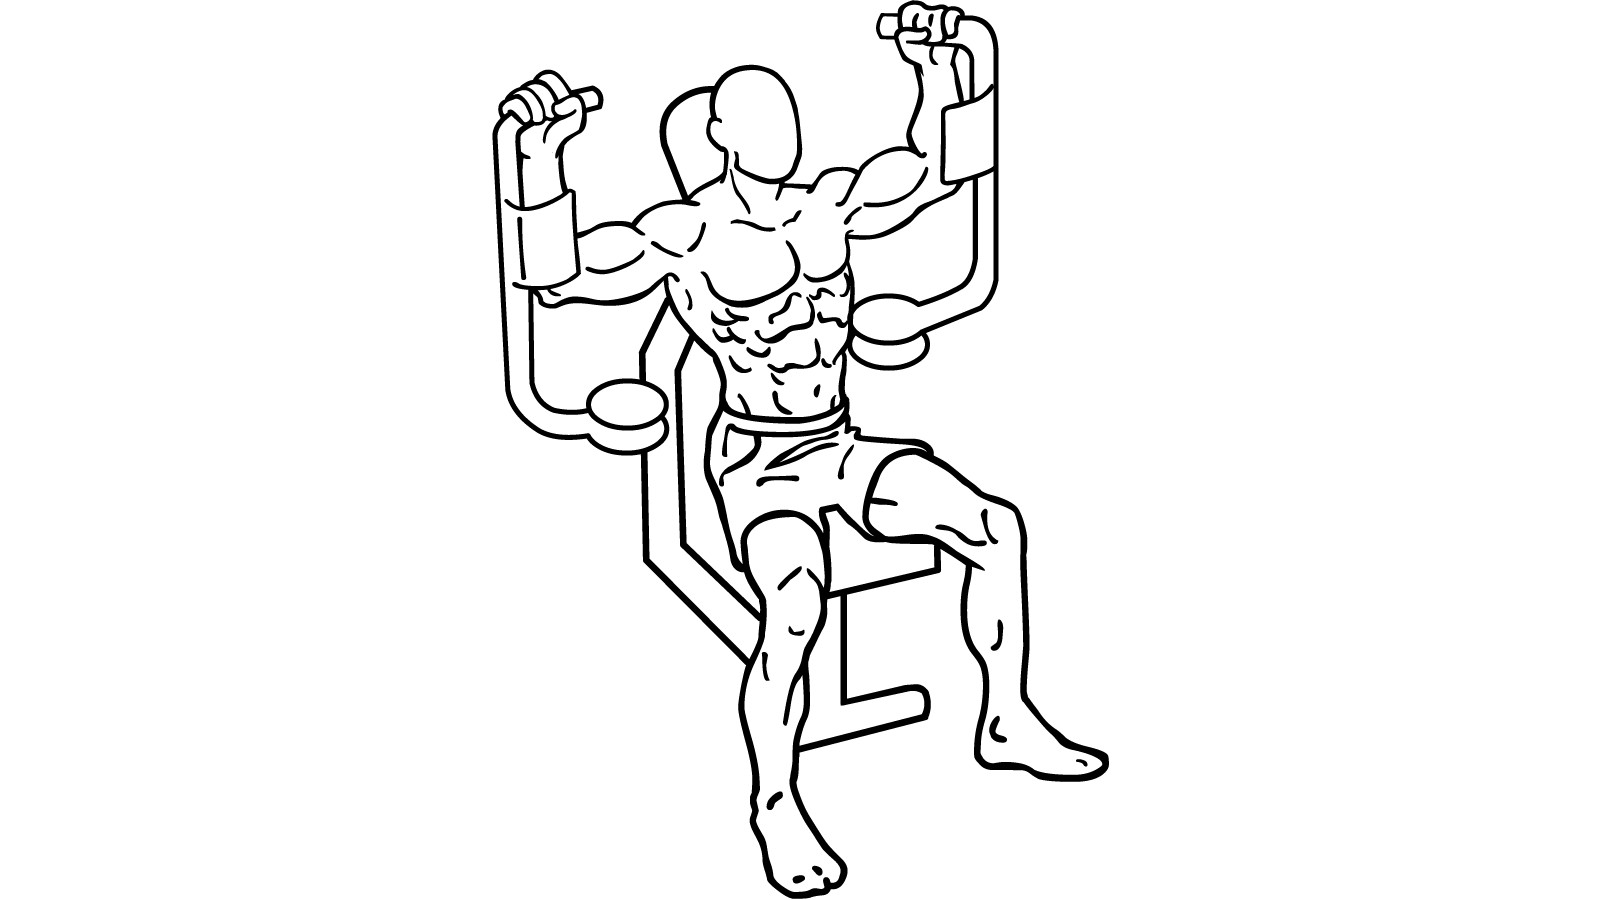
As its name suggests, this machine targets the deltoids (anterior and lateral heads) and secondarily targets the triceps.
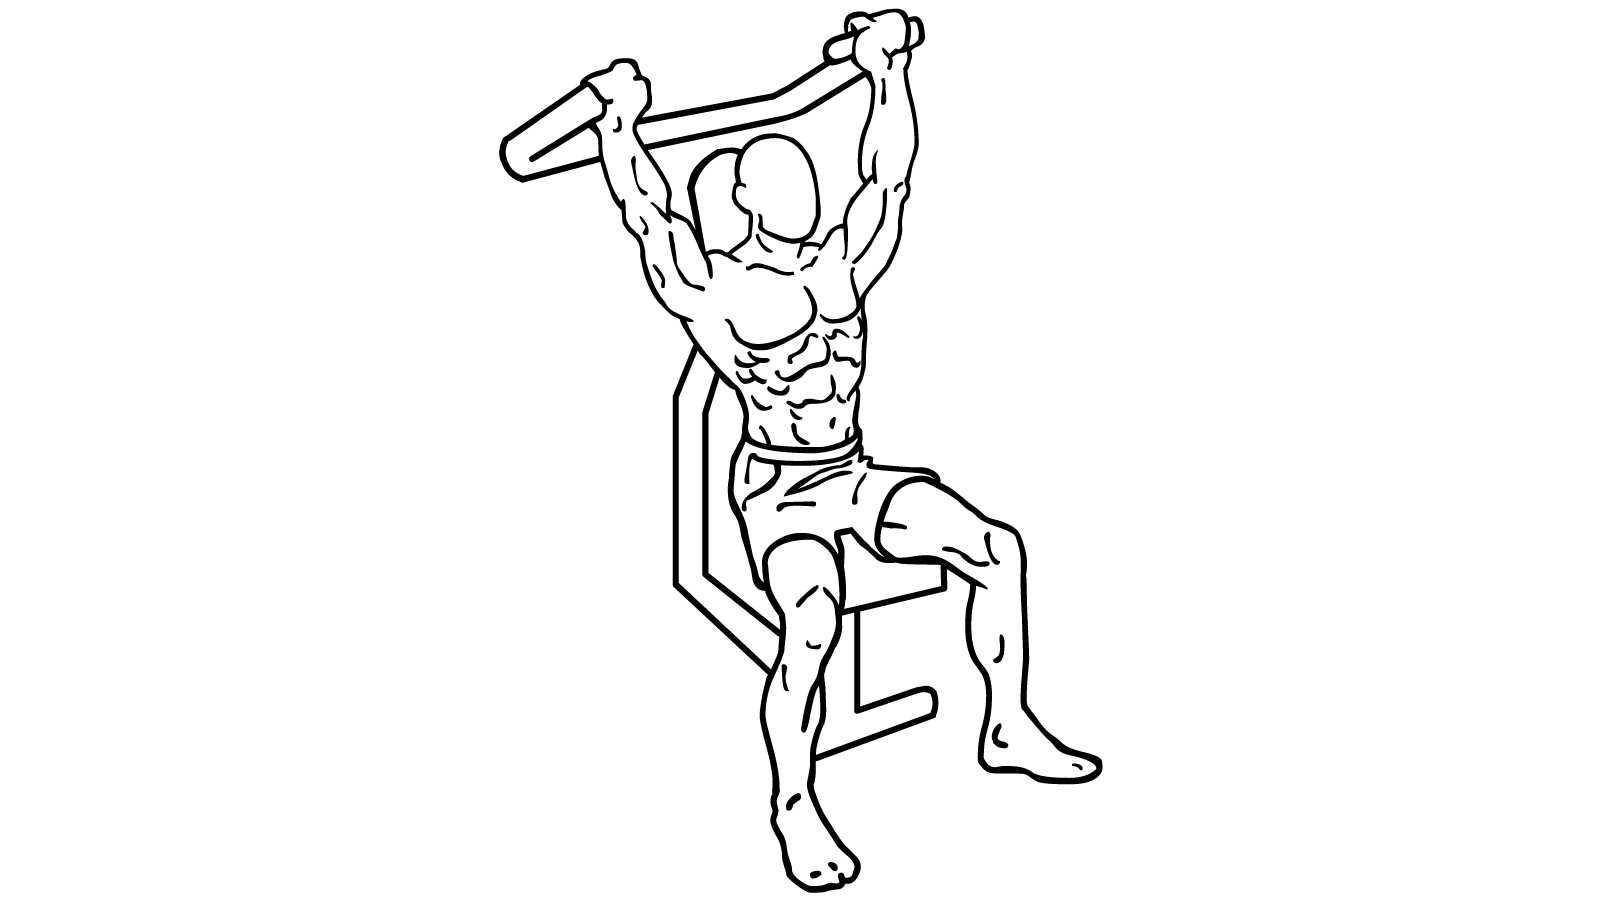
This machine targets the large muscles of the back – latissimus dorsi, rhomboids, and middle/lower trapezius, secondarily it targets the biceps. This machine is often used as a stepping stone towards doing standard pull-ups.
.jpg)
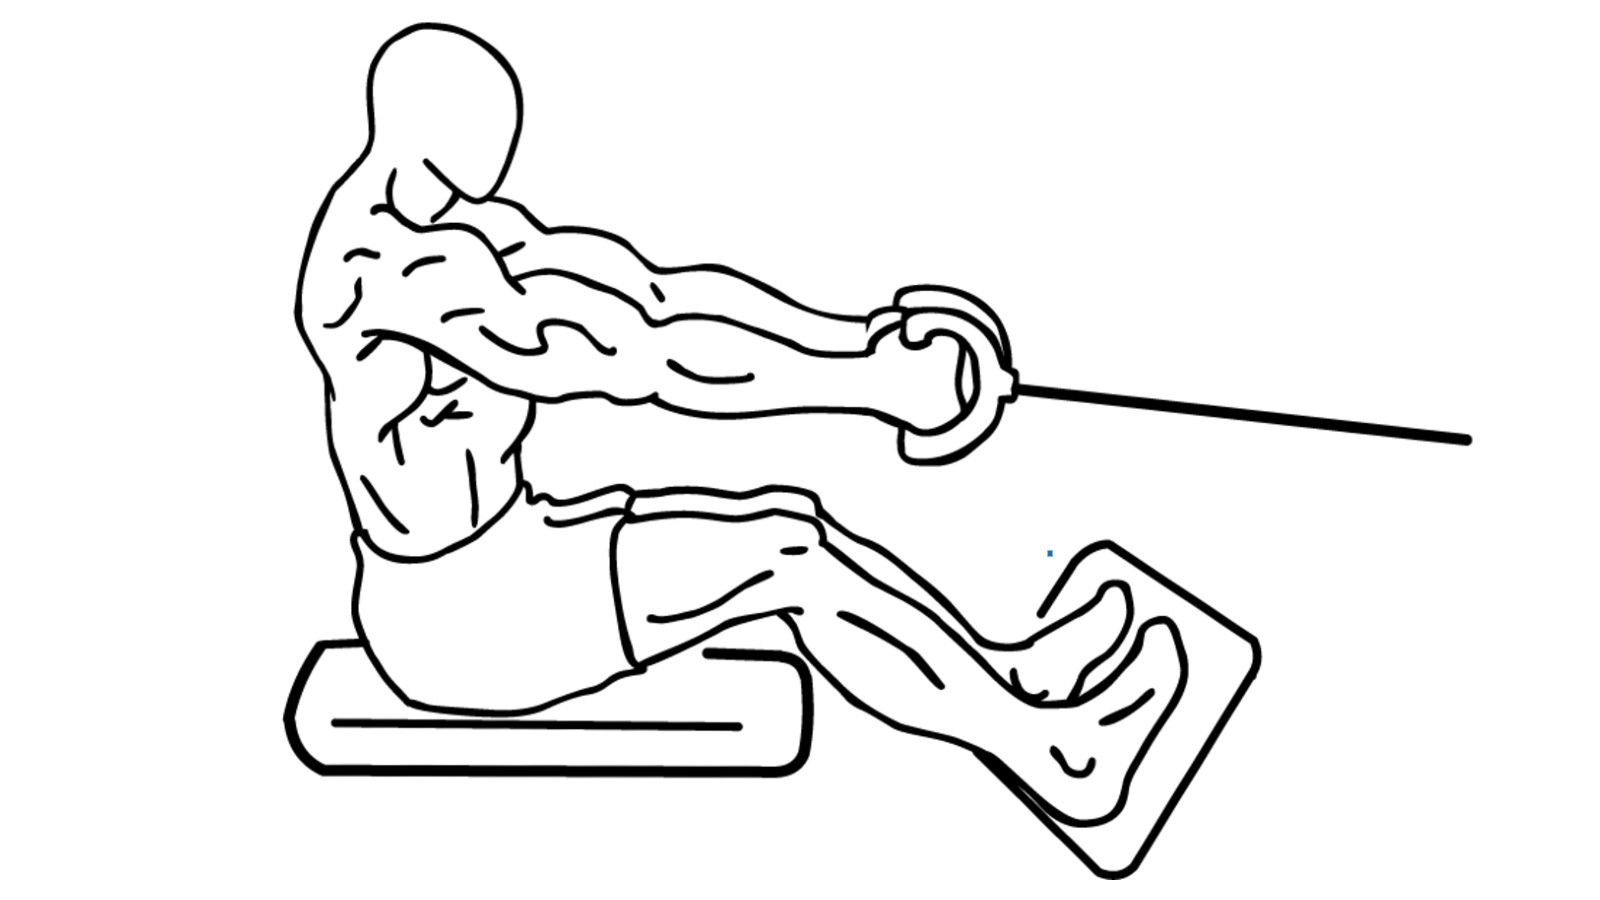
Works the upper and middle back muscles but also works the lats, biceps, and lower back.
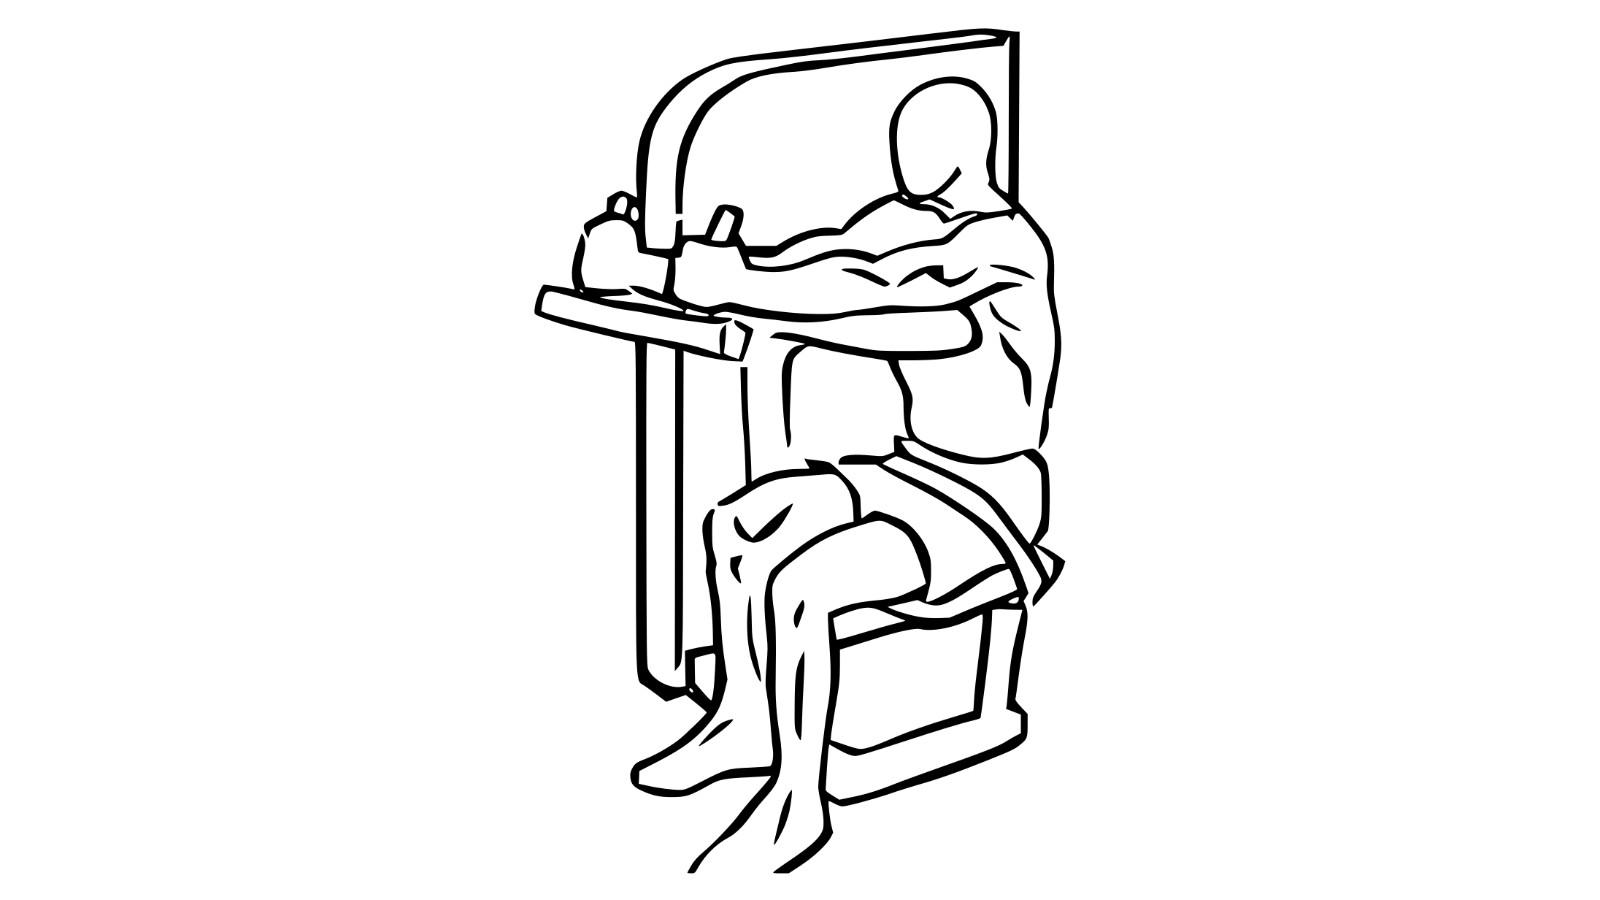
Targets the triceps.
Works the quadriceps, calves, and hamstrings at the same time. This machine is a good alternative to standard squats for clients prone to back injury.
Unlike the leg press, this machine only targets and shapes the quadriceps. Caution must be taken to protect the knees which can be affected if too much weight is added.
The Smith machine is a very versatile piece of equipment that can be used to perform a multitude of compound movements in a more controlled fashion. The bar is held in place on rails and is usually set up completely vertical or on a slight angle. The Smith machine can be used to perform almost any movement that can be performed with a free barbell such as squats, rows, deadlifts, hip thrusts, shoulder press, lunges, and bench press, just to name a few. It allows for a more stable movement pattern and is a great way for clients to build confidence in barbell movements at a reduced risk for injury.
Dumbbells and other free weight equipment such as kettlebells can be used for a multitude of functional, compound, and isolation exercises. They are easy to store and transport and should be first on the list of pieces of equipment to purchase as a new PT if you are wanting to train at home or in a mobile set up. They come in a variety of weights from as low as 1kg to over 50kg. Care should be taken when using free weights with new clients due to the instability – so starting light is very important to ensure technique is proficient before moving onto heavier weights.
Singular metal bar that can be loaded with various weight plates. Barbells can be used for almost any type of strength training modalities and are very versatile pieces of equipment. Using barbells would typically considered an intermediate or advanced piece of equipment compared to using plate-loaded or cable weights machines and having a good understanding of training posture, movement competency, and body awareness should be the focus before introducing clients to using barbells. A spotter is recommended for safety reasons.
Uses a barbell whilst lying on a bench to work the pectorals, arms and shoulders. A spotter is recommended for safety reasons.
Used to perform hyperextensions of the lower back and works the gluteal, hamstring, and abdominal muscles.
.png)
Cardio (Aerobic) Machines
In addition to weight machines, fitness centres also have a range of cardio equipment for the performance of aerobic exercise. Many types of machines are in this category, some more effective than others. Popular examples are:
- Treadmill - Features a moving belt on which the client can walk, jog, or run. Speed and incline can be varied and distance measured.
- Stair mill - A revolving staircase (usually three or four steps) on which the client simulates walking or running up a flight of stairs. Speed can be varied and distance measured.
- Rowing machine - Simulates the action of rowing a watercraft. It can be an electronic machine or a manual apparatus.
- Spin bike - Indoor stationary bike, similar to a standard exercise bike but looks and feels like a normal road bike.
- Elliptical machine or cross trainer - Stationary machine with flat 'pedals' used to simulate walking, running and stair climbing movements.
Miscellaneous Equipment
Various other equipment can be used either individually, as part of a group session, or in a circuit training program. These include:
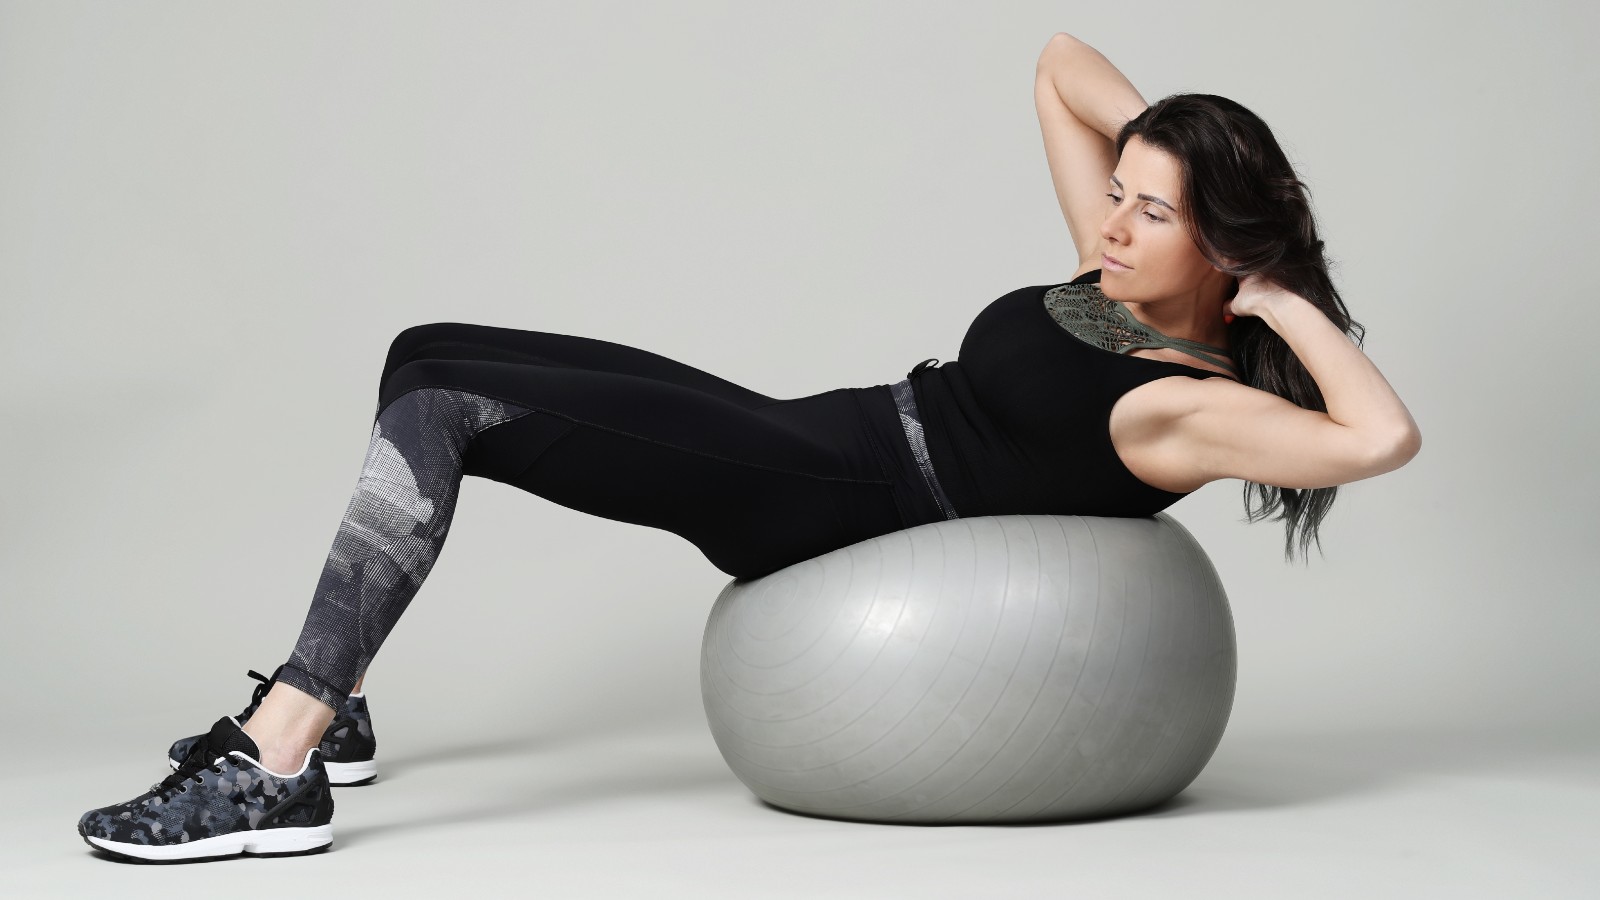
- Fit balls - Large inflated balls that are designed to be sat or reclined upon. They can be used for posture correction, abdominal crunches, and other core strength-building activities.
- Medicine balls - Small (basketball-sized) balls that are weighted in various levels (1kg - 10kg) and may or may not feature handles or straps. They can be used for weight training whilst undertaking squats or lunges.
- Step benches - Stable benches that are assembled at varying heights. They are used in aerobics classes and as part of circuit training. They can be used in combination with other equipment such as dumbbells.
- Benches - In either a flat, incline, or decline position. They are used for abdominal crunches, overhead pulls, and other exercises.
- Resistance bands and handles - Elasticised bands that activate and tone muscles by providing a force that must be counterbalanced. They often feature handles for easy grip or leg/feet straps.
- Skipping ropes - Allow for a full-body workout as the legs are used for jumping, the arms and shoulders are used for rotating the rope, and the abdominals are used for stabilisation. Skipping builds endurance and strength. They also help to develop neuromuscular coordination between the eyes, hands, and feet because the body must coordinate to jump when the rope is in position.
- Mats - Provides an insulating barrier between the body and a hard floor surface, improves balance, and provides protection from injury. They can be rolled up and transported to multiple locations.
Manufacturer Specifications And Safety
Always adhere to manufacturer specifications for exercise equipment. This means communicating and demonstrating the rules and correct techniques with clients before use. Some topics to cover include:
- User weight restrictions: Some equipment items have a maximum user weight limit. Although this weight restriction is usually quite generous and unlikely to be an issue for the majority of clients it is worth noting, especially if a client is morbidly obese.
- Load restrictions: If the exercise equipment has weights incorporated into the design (i.e., weight machines) then there will be various restrictions on how the loads must be managed.
- Set-up and pack-down: What equipment is required, where it is stored and how it is assembled (if applicable), arranged, allocated, and packed away.
- Safe techniques for use: Clients must know how to perform individual exercises, the number of repetitions, and how fast/slow to conduct actions. Diagrams/charts may assist with this process.
- Emergency procedures: Some equipment requires the use of a spotter for safety reasons, clients must be aware of this requirement.
- Trouble-shooting: Referring to the manufacturer's website or operational handbook.
- Maintenance: It is important to create and regularly check maintenance schedules ensuring that maintenance on equipment is completed as required and up to date.
- Documenting faults: Reporting and communicating faults found to appropriate people for maintenance or replacement.
At this point, you should be feeling pretty comfortable with the concept that programmes need to be individualised and specific. To be effective for general human development, a programme should also be designed based on functional movement patterns rather than focusing solely on isolated muscle groups.
Functional movement
Primal movement patterns are a set of fundamental movements that humans have evolved to perform to survive and thrive. These movements are based on our natural instincts and include fundamental human movements we use daily. The concept of primal movement patterns has become popular in recent years to help people achieve functional fitness.
There are 7 primal movement patterns:
- Squatting
- Lunging
- Pushing
- Pulling
- Hinging
- Twisting
- Gait
Incorporating these primal movement patterns into workout routines can help clients achieve functional fitness, improve overall health, and enhance performance in daily activities and sports.
When we look at primal movement patterns, recall that the human body’s movement is divided up into 3 planes: sagittal (front to back), frontal (side to side), and transverse (rotation). A good training programme will work in all 3 planes and a warm-up should do the same.

Squatting

The squat is a fundamental movement pattern that involves bending at the hips and knees to lower the body towards the ground. This movement is important for daily activities such as sitting down and standing up, as well as for athletic movements like jumping and sprinting.
This is the most complex and compound movement which the body can perform. It is referred to as bilateral, which implies the movement is performed in unison, by limbs on both sides of the body. This movement targets muscles of the lower body such as the glutes, hamstrings, quadriceps along with the core.
Lunging

Lunging involves stepping forward with one foot and bending both knees to lower the body towards the ground. This movement pattern is important for activities such as walking and running, as well as for sports that require changes of direction.
It’s an unstable body movement which sees one foot further forward from the other, requiring greater balance, stability, and flexibility. This movement is referred to as unilateral, implying the limbs move independently of each other to produce the desired movement. Exercises can include step-up and side lunges which target muscles of the lower body such as the glutes, quadriceps, hamstrings along with the core.
Fun fact, due to the stance of the lunge, all the glute muscles are stimulated to a greater degree than in a squat.
Pushing

A push movement can be performed in the horizontal and vertical plane, consisting of pushing a weight away from the body or the body away from a weight. This includes push-ups and shoulder presses.
These exercises target the muscles of the upper body such as the chest, triceps, and anterior shoulders.
Pulling

A pull movement can be performed in the horizontal and vertical plane and is the opposite of a push. Instead, it involves pulling a weight closer towards the body or the hands.
Pulling uses the large muscles of the back and upper body, including the biceps, forearms, lats, rhomboids and posterior shoulders. Examples include seated row, pull up, or horizontal pull.
Hinging

Bending or hip hinging is movement in which the glutes move back and the torso learns forward, maintaining a neutral spine. Hinging is essential for activities such as picking up heavy objects from the ground, deadlifting, and Olympic lifting.
It uses the posterior chain muscle groups, including the hamstrings, glutes, and lower back.
Twisting

Unlike the other primal movements, twisting is not performed in the horizontal or vertical plane nor requires movement forward or back. Instead, this action refers to trunk rotation movement performed within a turning or twisting fashion.
This movement can be seen when throwing or kicking a ball, changing direction whilst running, passing an object as well as others. It is an essential movement in sporting success.
Exercises that replicate this include the Russian twist, med ball twist, and the woodchopper.
It is important to incorporate twisting movements into workouts to maintain overall mobility and function in the spine and core muscles. However, it is worth noting that twisting movements can be more complex than other primal movement patterns and may require additional attention to form and technique to avoid injury.
Gait

This term refers to the technique of walking. This fundamental movement pattern includes a combination of movements such as running, jogging, and jumping.
Gait is essential for getting around and for many sports and activities.
These basic exercise movement patterns are simple exercise classifications, which form the foundations of exercise selection in any program. As a personal trainer, it is important to determine basic movement patterns that are essential for a client and then devise a range of exercises forged from those movement patterns (i.e., exercise classifications).
Scenario: Primal movement patterns in a programme
Here's a full-body programme for Bella. Can you identify which primal movement pattern/s are used for each exercise?
Bella's programme
Warm-up: Assault bike 15 calories
Mobilisation/activation: 5 reps of the following:
- Open the gate
- Cat/cow
- Thread the needle
- Walk the dog
- Glute bridges
| Exercise | Rest | Set 1 | Set 2 | Set 3 | Load | Notes |
|---|---|---|---|---|---|---|
| Goblet squat | ss | 15 | 15 | 16kg | Lead with hips | |
| Walking lunge | ss | 12 | 12 | Back knee to floor | ||
| Powerbag hip thrust | 60s | 15 | 15 | 20kg | Squeeze at top | |
| Dumbbell bench press | ss | 8-10 | 8-10 | 7kg | Controlled movement | |
| Ring row | ss | 10 | 10 | Squeeze shoulder blades | ||
| Russian twist | ss | 10 | 10 | Touch toes |
Accountability habits:
- Average 9,000 steps per day
- At least 3 exercise sessions per week
- Aim to keep portion sizes to guidelines
You will see that this is a well-balanced programme with each of the primal patterns featuring at least once.
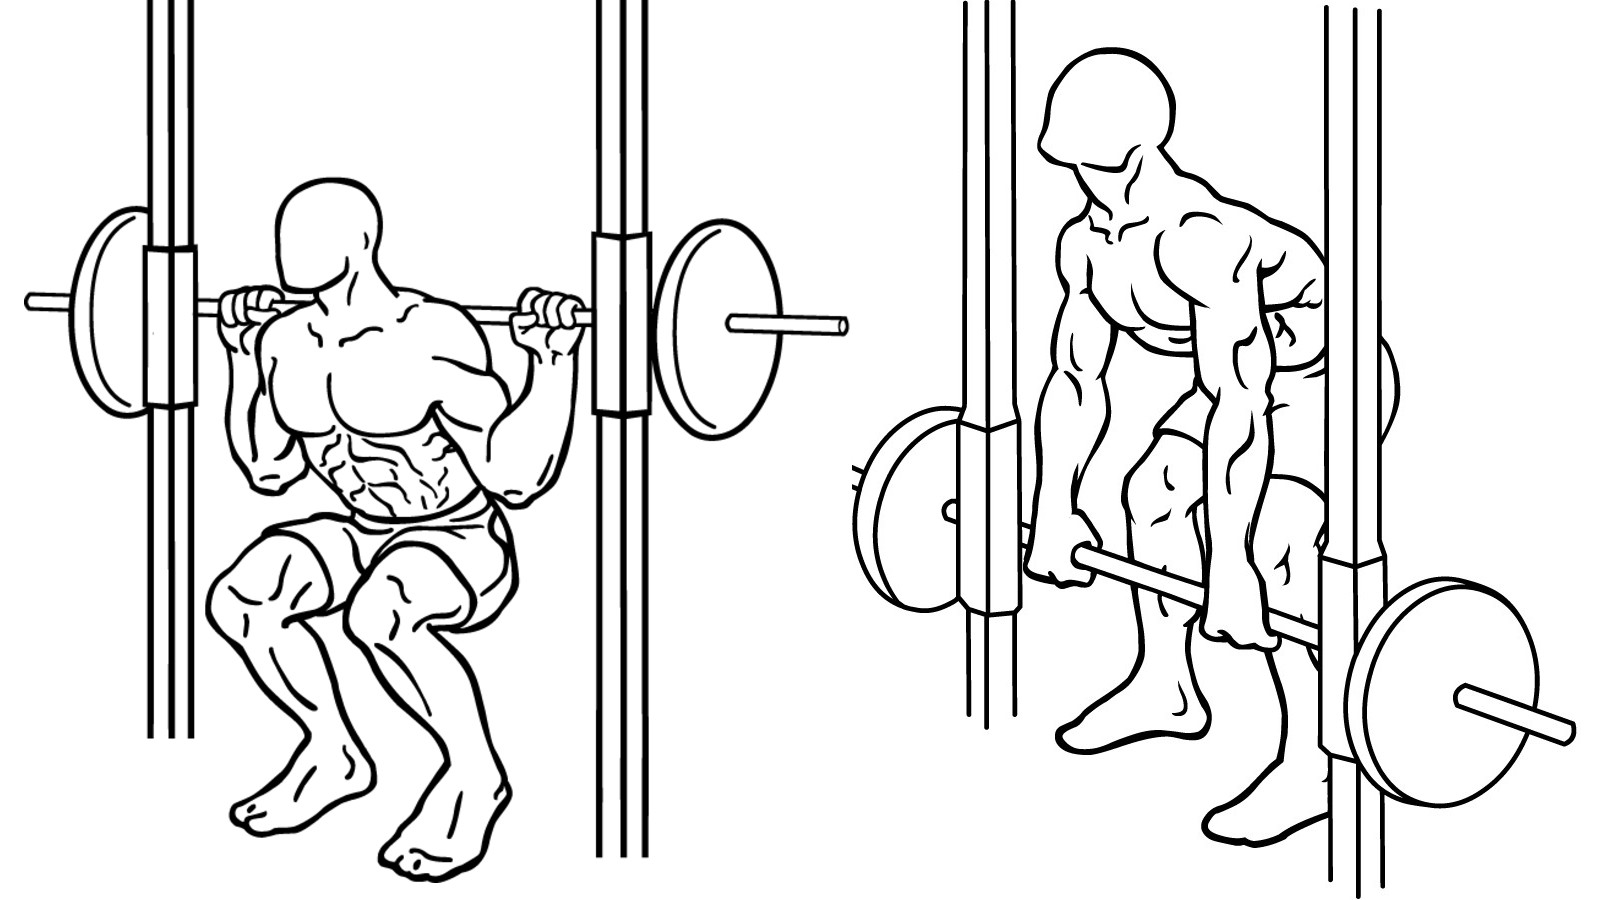
Squat
Let’s start with the squat. A squat is one of the fundamental compound exercises. If you've ever sat down on a chair before, that's effectively a squat. 3 joints are moving - your ankles, your knees, your hips, and it's a great exercise. It's a staple of most lower body-based exercise programmes in the gym.
You can do it with dumbbells. You can do it with barbells on your back or your front. Based on where you put the weight on your body will determine what parts of your legs hurt the next day, and where you are going to get stronger.
Squats are great for weight loss because they burn a lot of calories. As an exercise, it's great for strength because it works the biggest muscles in your body. It's also great for power.
The images below show squats using various equipment options.
Major muscles, variations, and equipment options
| Major muscles | Variations/progressions | Equipment options |
|---|---|---|
|
Quadriceps group Gluteal group Hamstring group Erector spinae |
Both legs One-legged Adductor squat (wide stance) Narrow squat (close stance) Front squat Overhead squat Back against the wall (with or without fitball or yoga ball) |
Freestanding Dumbbell Barbell Swissball/ fitball Machine (Smith machine) BOSU or balance trainer Sandbag |
Key coaching points and steps
- Set up by getting into 'training posture'.
- With the barbell resting on a stand, slide under the bar and place it on the trapezius.
- Pull your shoulders back and down.
- Grasp the bar firmly with the hands at a comfortable width and elbows back in line with the ribs.
- Inhale deeply, engage neutral pelvis, contract the abdominal core, look straight ahead, and remove the barbell from the stand.
- Step back one or two steps and stop with both feet parallel to each other (or toes pointed slightly out) and about shoulder-width apart, knees inline/above your ankles. Push your hips back to initiate movement and avoid rounding the back (squeeze shoulder blades and push the chest out to help).
- Aim to get thighs parallel to the floor (not necessary for all), performing a hip hinge movement whilst maintaining your core with your knees in line with your ankles as you perform the movement. Stop before the lower back begins to arch.
- Push through your heels to straighten the legs and lift the torso to return to the initial position. Ensure the knees remain 'soft' (that is, not locked or stiff).
- Exhale at end of the movement.
3 cues to tell your client
Have your toes slightly pointed out, keep the weight in your heels, and keep your chest proud.
Common mistakes
There's a common misconception that your knee shouldn't travel over your toes when you're squatting, but that's kind of a bit dated and incorrect. Your knees are supposed to move over your toes, especially once you get into the bottom range of a squat. A way to know that is if you go upstairs, you'll see your knee has to go over your toe, and if it doesn't, you can't go up the stairs. So knees are supposed to travel forward.
With sedentary lifestyles, and if someone doesn't have active glutes in their squat, they tend to lean forward too much or they struggle with the hip extension component of a squat. They can put too much weight or load on the knees and other joints.
The other thing to watch for is ankle mobility. In a squat, you need about 20 degrees of dorsiflexion at the ankle. If you can't get that range of motion at the ankle, everything else has to compensate. So it is very common that people with tight calf muscles or lack of ankle mobility struggle with the squat movement.
Squat bar variations

Note the 3 squat bar variations.
- The first illustration of a front squat emphasises quads, develops a strong core, and reduces stress on the lower back.
- The middle illustration of a high bar squat emphasises a good balance of effort through quads and glutes/hamstrings.
- The last illustration of a low bar squat emphasises the posterior chain (glutes/hamstrings). It also places more stress on the lower back.
Lunge
A lunge is similar to a squat, except it's only happening on the sagittal plane (forward and back). Instead of your feet being right next to each other side by side, one is forward and one is back.
Stepping forward into a lunge will be quad-dominant because the weight or the loading goes into the front quadricep of the front leg. But if you step backwards the loading goes into that back leg and the exercise becomes more hamstring or posterior chain glute dominant.
The fun thing with lunges is they allow for many variations. They can be done for various training components or parts of a programme. They can be stability based. You can stay on the spot. For hypertrophy, you can introduce load, with weights in both hands. A great example is the suitcase lunge, where you hold weights in one hand. Your body wants to fall over, so you're using your core to offset that, working both the core and lower body.
Lunges are a great foundational exercise for legs because they require some stability, some strength, and they work a little bit of hypertrophy for the legs as well.
The images below show lunges using various equipment options.
Major muscles, variations, and equipment options
| Major muscles | Variations/progressions | Equipment options |
|---|---|---|
|
Quadriceps group Gluteal group Hamstring group |
Static Alternate Dynamic (walking) Split squat (elevated/declined) Unstable surface (front leg on BOSU/balance board) |
Freestanding Dumbbell Barbell Medicine ball BOSU or balance trainer Sandbag |
Key coaching points and steps
- Aim to achieve 'training posture'.
- Stand with a barbell on the shoulders or dumbbells in the hands. (Note: If using a barbell, review points 1-5 as per the squat instructions).
- Inhale and take a big step forward, with training posture in place. This means core activated, neutral pelvis, shoulders back and down, looking straight ahead, knees in line with toes, and keeping torso as straight as possible.
- Lower the body until the thigh reaches parallel to the ground (client dependent) and return to the initial position. At bottom of the movement don't let the knee travel over the toes, and make sure your knees don’t move too far in or out when viewed from the front.
- The bigger the step the more gluteals will be worked.
- Because the front leg supports all weight, the client needs a good sense of balance before loading. If the client appears to wobble, adjust by performing the movement slower.
- Ensure weight remains on the heel of the front foot when performing this movement, avoid weight being in the toes as this will promote the risk of injury.
If performing this exercise with dumbbells, keep these by the side of the body whilst performing the movement. If performing a barbell lunge, bring the barbell up and over the head, holding the barbell with an even distance between the head and right and left hand, ensuring the elbows do not "flare" behind the body. You or your client should still be able to see their elbow in their peripheral vision easily. Once the barbell is secure and posture is set, begin to perform the lunge movement.
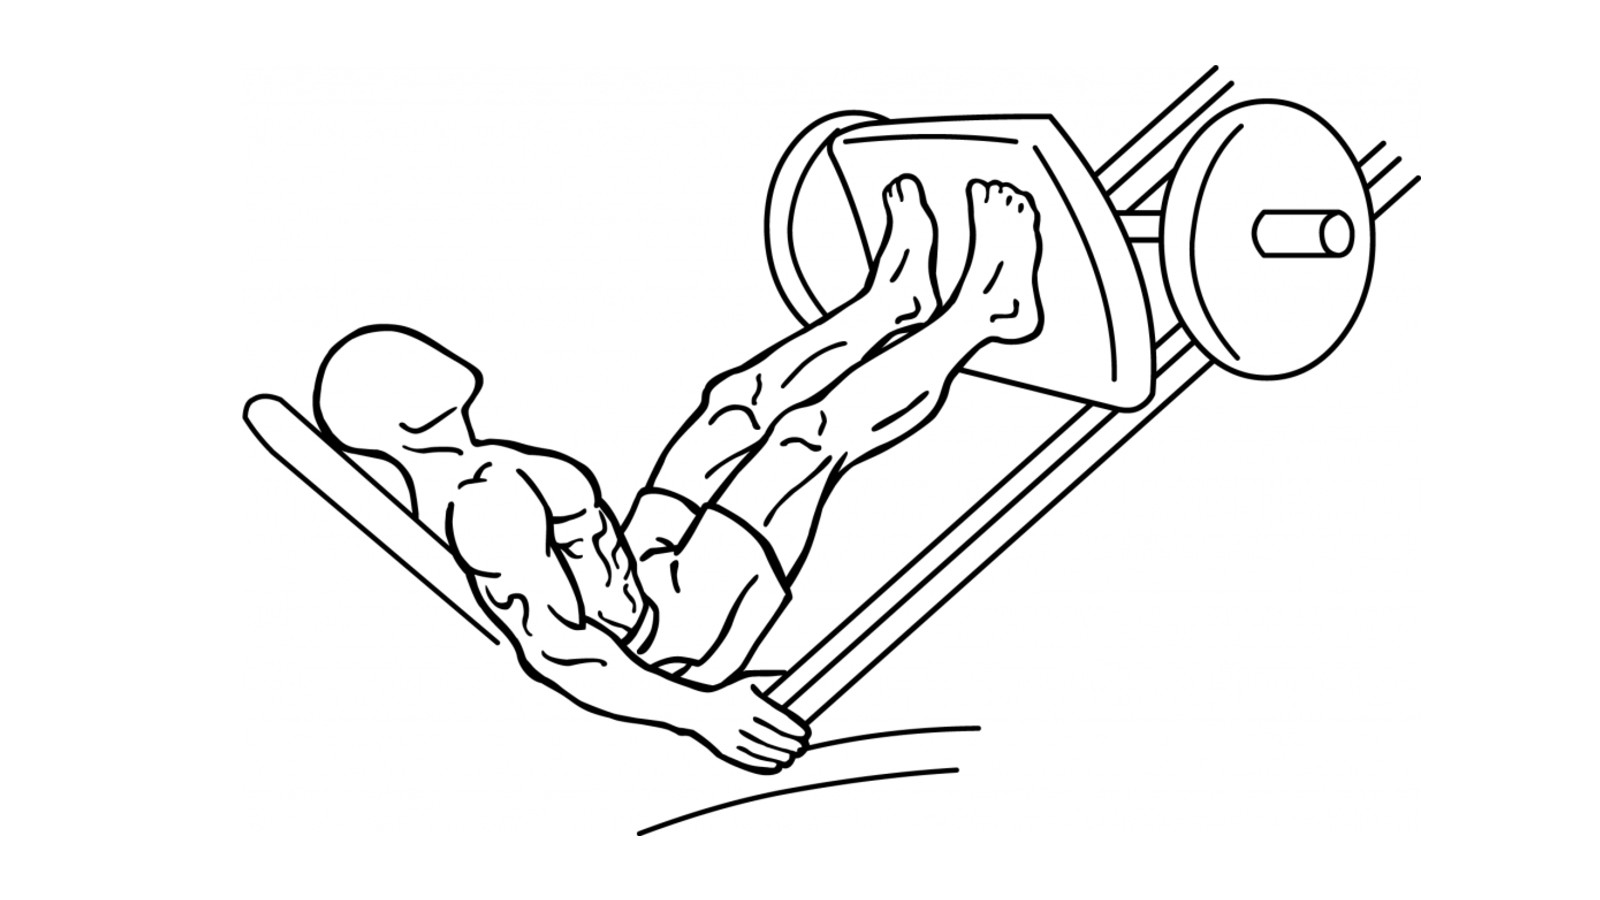
Leg Press
The leg press is a machine-based exercise, like a squat except you're lying on your back and sitting in a machine.
The great thing about the leg press is it targets the agonists, the main movers, in the squat pattern - quads, glutes, calves, and hamstrings. Where you have your feet on the plate will change the exercise. When the feet are higher, you're working the back of your legs, your hamstrings, and your glutes. When the feet are lower and narrower, it targets the quads and the front of the legs.
Leg press is a great exercise for someone who struggles with stability or the squat movement, and in this way can be used as a regression. But it's also a great way to train hypertrophy and strengthen the legs. Because it's a machine-based exercise, it's a great exercise to programme towards the end of a leg workout. The client won't need to focus on stability and what they do with the upper half. Instead, they can put all their focus into the pressing of the weight.
It's a helpful exercise for new people to the gym because you can load the weight up quite a bit compared to other exercises which can be a positive motivator for many clients.
Always keep safety in mind and ensure clients are not locking their knees. They should aim to only straighten their legs 95% of the way and not lock their knees.
The images below show leg presses using various equipment options.
Major muscles, variations, and equipment options
| Major muscles | Variations/progressions | Equipment options |
|---|---|---|
|
Quadriceps group Gluteal group Hamstring group |
Double/single leg Feet high on the footplate (works glutes and hamstrings more) Feet low on the footplate (works quads more) Feet wide apart (strong use of adductors) |
Band Machine (45° plate machine or horizontal cable leg press) Hack Squat |
Key coaching points and steps
- Set up by getting into 'training posture'.
- Position the back firmly against the backrest of the machine, with feet slightly apart (typically hip-width, in line with the ball and socket region of the hips).
- Engage your core and clench your glutes.
- Inhale and release the safety bars, controlling the lowering plate of the leg rest machine as it moves with gravity. Then bend the knees completely so that the thighs touch or nearly touch the torso (or to the point where you would be unable to push the weight back).
- Return to the initial position, position, pushing through the whole foot, exhaling at the end of the movement.
- Before the next repetition, review training posture and adjust before beginning the next repetition.
Important note: People with back pain who are unable to perform squats can perform variations of this exercise which are pain-free. It is important to establish what type of back pain they may have and what exacerbates it. For some clients, the compression offered by the leg press machine can be detrimental due to the compression of the lower spine when the body is in the seated position supporting weight. This would result in the modification of the exercise to a pain-free alternative.
Hamstring Curl and Leg Extensions
Hamstring curl
If you were to stand up straight, bend your knee, and kick yourself in the buttock, that would be a hamstring curl. It is a knee flexion exercise. It also has a synergist or assisting role in hip extension.
The hamstring curl is generally done on a machine, lying prone. You hold on to some handles and bring your heels to your back. Alternatively, you may use a seated machine with a pad out the front, bringing your heels down.
A common mistake you may see, especially in the lying down position, occurs if a client lacks strength at the top end of the curl. To compensate, they may change the shape of their pelvis and go into an anterior pelvic tilt to try and help shorten the distance between their buttock and their heels. They're not doing it on purpose. The body tries to find the path of least resistance. So what we tell people when they're doing a prone hamstring curl is to push their hips forward into the bench and stop their hips from turning and their back raising up.
The image below shows hamstring curls using a machine.

Major muscles, variations, and equipment options
| Major muscles | Variations/progressions | Equipment options |
|---|---|---|
|
Hamstring group |
Feet plantarflexed (deactivates calf muscle contribution) Feet dorsiflexed (to feel effort in Gastrocnemius) Single leg Swissball leg curl |
Machine Bands Ankle weights Swiss ball |
Key coaching points and steps
- Set up by getting into 'training posture'.
- Lie facedown on the machine, holding the handles, legs extended, and ankles positioned under the ankle pads.
- Inhale, activate the core (maintaining an engaged core throughout the movement) and bend both legs at the same time, trying to touch the gluteal muscles with the heels.
- Exhale at the end of the movement.
- Return to the initial position with a controlled movement.
- Before the next repetition, review the training posture and adjust before beginning the next repetition.
Leg extension
A leg extension is the opposite of a hamstring curl. Instead of flexing at the knee, we're extending at the knee and using the quad muscles. Taking the knee from a bent position into an extended position.
Most of the machines for leg extension are seated. There's no need to move the ankle, there's no need to move the hip. We're just extending the knee.
The image below shows leg extension using a machine.

Major muscles, variations, and equipment options
| Major muscles | Variations/progressions | Equipment options |
|---|---|---|
|
Quadriceps |
Double leg Single leg |
Band Machine Ankle weights |
Key coaching points and steps
- Sit at the machine and grasp handles or seat to hold the torso immobile/stabilise the torso.
- Bend the knees and place the ankles under the ankle pads.
- Adopt the 'training posture' (chin tuck, shoulders, core, pelvis).
- Inhale and raise the legs to horizontal, maintaining posture throughout the movement.
- Exhale at the end of the exercise.
- Review training posture and adjust before beginning the next repetition.
Notes
- This is the best exercise for isolating the quads.
- Recommended for beginners to develop enough strength (and to learn/adopt the movement pattern) to move onto more demanding exercises such as free weights.
The following video demonstrates how to perform the hamstring curl and leg extension exercises.
Calf Raise
A calf raise is just what it sounds like - raising your calves. Point your toes down and lift your heels up. The best calf raises are ballet dancers because they're on their toes.
It isn't a common exercise to programme outside of rehabilitation, to support specific sporting goals, or if the client has specific goals around hypertrophy and growing bigger calves. For general populations, it is not commonly programmed because it targets such a small area of the body that it's not burning a lot of calories, therefore it doesn't have a high impact on weight loss goals.
The images below show calf raises using various machines and equipment.
Major muscles, variations, and equipment options
| Major muscles | Variations/progressions | Equipment options |
|---|---|---|
|
Gastrocnemius (emphasised in standing position) Soleus (emphasised in a seated position |
Double/single-legged Barbell/dumbbell balance Toes in (works the lateral head of gastrocnemius) Toes out (works the medial head of gastrocnemius) Seated calf raise (with bent knee soleus is prime mover) |
Machine Free weights Standing Seated with barbell |
Key coaching points and steps
- Stand at the machine with a straight back, shoulders under the pads, and balls of feet on the footplate, with calves relaxed and heels hanging down.
- Adopt 'training posture'.
- Inhale, rise up by extending (plantarflexing) the feet, keeping knees straight/soft, not 'locked' (or slight bend).
- Use a full range of motion and controlled tempo.
- Exhale, lower the heels back towards the ground, and review training posture before the next repetition.
Notes
- The calf muscle group are very powerful, don't be afraid to use heavy weights with this exercise.
- Clients must train both gastrocnemius and soleus to develop a full calf.
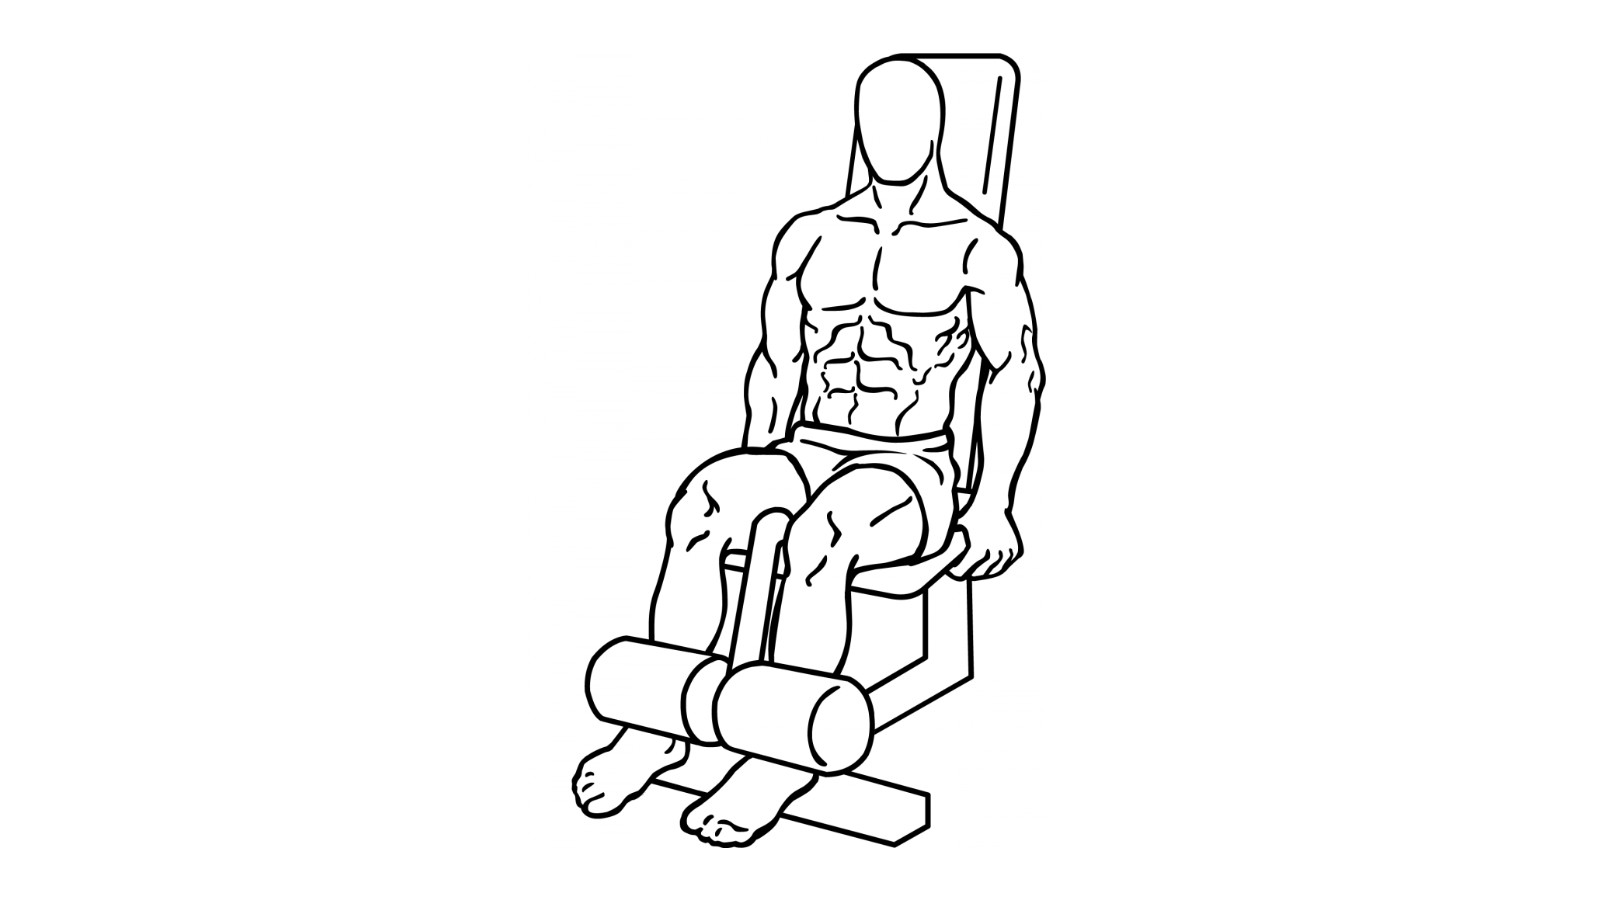
Hip Abduction and Adduction
Abduction
Abduction is predominantly created at the hip by the glute medius, a great synergist and important for hip stabilisation. Hip abduction is a great rehab exercise and stability exercise. If a client wants to grow and change the shape of their glutes, this is a great exercise.
With hip abduction, you want to create abduction at the hip and create more space between the insides of your thighs. Hip abduction can be performed using a seated machine or cable machine. Using a cable machine can be a really effective exercise to combine stability and muscle exercises, as you stand on one leg. This can be particularly helpful for football players as it reflects the motion of a football kick.
The image below shows hip abduction using a machine.

Major muscles, variations, and equipment options
| Major muscles | Variations/progressions | Equipment options |
|---|---|---|
|
Adductor group
|
Leg in neutral Externally rotate hip (toes out/in) Internally rotate hips (toes pointing in/down) |
Machine Cables Band Lying Ankle weights |
Key coaching points and steps
Machine-based exercise:
- Adopt 'training posture'.
- With core engaged, place hands on machine handlebars, and have thighs/knees (machine dependent) against the pads.
- Inhale and press against pads with knees/thighs and push pads away from the body (push thighs apart) in a controlled movement (that is, pushing against resistance).
- Exhale and control the movement of the thighs back together in a controlled movement (that is, controlling the weights against gravity).
- Review training posture, and correct where required before performing the next repetition.
Standing cable abduction:
- Adopt 'training posture'.
- Standing with feet hip-distance apart with a cable around one leg.
- Starting position would have legs fit distance apart with cable approaching from the opposite direction (ready to offer resistance) against the outer leg (one leg when using a stable or standing machine).
- Inhale, keeping hips level (avoid 'hitching hip' up to counterbalance).
- In a smooth and straight line, move the leg away from the body, controlling the movement under resistance.
- End the movement when the hips begin to lift.
- Exhale and bring the leg back to the starting point in a controlled movement.
- Review training posture before the next repetition.
Adduction
Hip adduction is the opposite of abduction. You're working the inner parts of your thighs as opposed to the outside. What was the agonist in abduction is the antagonist in adduction, and vice versa.
Hip adductors are an important stabilisation muscle for squat patterns and heavy loading through the legs and the hips. Again, you can use a seated machine or cable.
It may be appropriate for some clients to cross their leg in front of the body like a football kick. However, you need to be careful because it's quite advanced, and if, for example, the client is twisting their hips to compensate, the movement is no longer adduction and has moved into rotation.
The images below show hip adduction using various equipment options.
Major muscles, variations, and equipment options
| Major muscles | Variations/progressions | Equipment options |
|---|---|---|
|
Adductor group
|
Knee flexed |
Multi-hip machine Cables Band Lying Ankle weights |
Key coaching points and steps
Machine-based exercise (seated adduction):
- Adopt 'training posture'.
- With core engaged place hands on machine handlebars, have thighs/knees (machine dependant) against the pads.
- Inhale and press against pads with knees/thighs and push pads in towards the body (push thighs together) in a controlled movement (that is, pushing against resistance).
- Exhale and control the movement of the thighs back to the starting position (thighs apart) in a controlled movement (that is, controlling the weights against gravity).
- Review training posture, correct where required before performing the next repetition.
Standing cable adduction:
- Adopt 'training posture'.
- Standing with feet hip-distance apart with a cable around one leg.
- Starting position would have one leg already 'abducted' (one leg if using a stable or standing machine).
- Inhale, keeping hips level (avoid 'hitching hip' up to counterbalance).
- In a smooth and straight line, move the leg towards the body, controlling the movement under resistance.
- End the movement when the hips begin to lift.
- Exhale and bring the leg back to the starting point in a controlled movement.
- Review training posture before the next repetition.
The following video demonstrates how to perform both hip abduction and hip adduction exercises.
Hip Extension
Hip extension is going from a bent hip position to standing up straight. For example, if we're sitting in a seat, we're doing the opposite of hip extension. So standing up is hip extension.
If we look at the squat as being hip extension, knee extension, and plantarflexion all at the same time, hip extension is just isolating what the hip does.
It is a good exercise for someone who struggles with glutes and their squat pattern, and it allows for a lot of variation. You can do what's called a barbell hip thrust or use a hip thrust machine. The exercise is seen often in group fitness classes, with clients lying on their backs, bringing the heels slightly closer to the buttocks, so the knees are bent, hips are pushed up to the sky.
Hip extensions are useful to counteract the imbalances caused by excessive sitting.
The image below shows a lying hip extension.

Major muscles, variations, and equipment options
| Major muscles | Variations/progressions | Equipment options |
|---|---|---|
|
Gluteal group Hamstring group |
Externally rotate hip |
Machine Cables Band Swissball Lying |
Key coaching points and steps
- Adopt 'training posture'.
- Ensuring core is engaged, inhale, clench glutes, and pull one leg directly behind in a straight line and in a controlled, even movement.
- Stop when the hips begin to 'hitch up' and return leg to resting position in a controlled and even movement.
- Review training posture before the next repetition.
Note: The same points apply if this exercise is performed in the upright position or lying on equipment in the prone position.
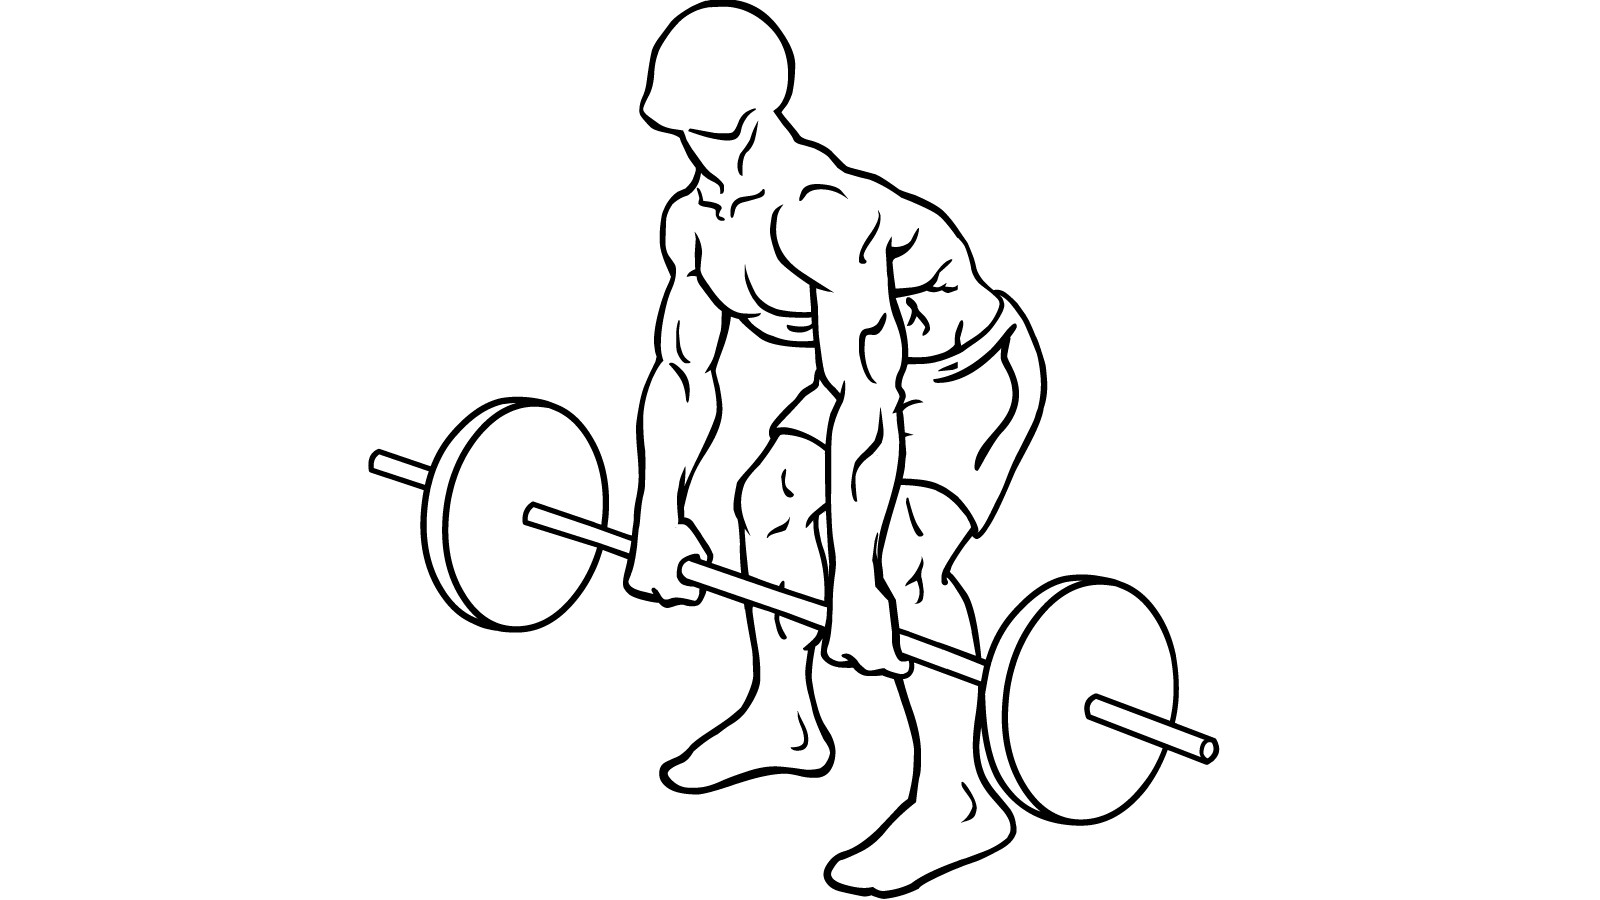
Deadlift
The barbell is raised up by plates, so it starts at around the shin level and it's literally about holding the bar and lifting it to stand straight up. Deadlifts are all about hip extension and then the minor adjustments or differences you see in deadlifts are just to target slightly different muscle groups.
The deadlift is one of the only exercises that start in the concentric phase of the movement. For a squat, you have to control the weight down before you lift it. But deadlifts you start working from the start. If it's too heavy, it will not move off the ground.
If a deadlift is performed correctly, it's probably one of the best exercises for core, hip stability, and functional strength. If there was one exercise to do and all the other exercises didn't exist, it would be a deadlift for most general populations. 3 cues to help your clients nail their technique:
- Vertical shins. Have your shins straight up and down. If the shins are leaning forward, it probably means the client's bending at the ankle too much.
- Shoulders over wrists. Don't lean too far forward. When a client leans too far forward over the bar when they go to lift, they feel like they are going to fall forward or the weight gets shifted into the back, not the hip.
- Cranking the lats.
The image below shows the deadlift using a barbell.

Major muscles, variations, and equipment options
| Major muscles | Variations/progressions | Equipment options |
|---|---|---|
|
Gluteal group Hamstring group |
Sumo deadlift Single leg deadlift Romanian deadlift |
Kettlebells Dumbbells Resistance band Barbell Trap bar |
Key coaching points and steps
- Stand with legs slightly bent
- Feet should be shoulder-width apart with toes pointing forward ( or slightly outward for sumo style)
- Stand behind the bar, with the bar over the balls of your feet
- Squat down and grasp the bar with a pronated grip and the hands wider than shoulder-width
- The back should be rigid and flat, thighs parallel to the ground, eyes looking forward
- Begin raising the barbell from the floor, keeping it close to the body, slightly shifting body weight towards the heels
- Extend knees and hips at the same rate, keeping the back rigid and flat
- The shoulders should remain slightly in front or over the barbell
- The barbell should travel as close to the shins as possible, as soon as it reaches the knees. Shift body weight towards balls of the toes whilst keeping heels planted on the ground
- As the barbell continues to rise above the knees, drive the hips and gluteal muscles forward
- Whilst this is happening, retract the shoulders and keep the spine in a straight and tall position
- Lockout the deadlift and begin lowering the barbell to the ground
- Slowly push your hips back whilst keeping the spine flat (think about a proud chest)
- Slightly bend the knees once the barbell reaches them and continue to control the barbell to the floor.
Try it Out
Perform each lower body exercise, including progressions and regressions where possible. Talk through the cues and what muscles are being targeted. Consider how each exercise supports health and skill-based fitness components, and training principles.
Complete the self-assessment on demonstrating lower body exercises. If you would like feedback, post in the forum.
Complete the self-assessment on explaining lower body exercises. If you would like feedback, post in the forum.
In this topic, we concentrate on the upper body. You will learn how to perform and teach clients 18 specific exercises listed in the following table:
| Bench press | Pec deck | Lat pulldown |
| Machine bench press | Overhead/shoulder press | Seated row |
| Chest press | Front raise | One-arm row |
| Push-ups | Lateral raise | Bent over row |
| Pec flies | Shrugs | Upright row |
| Cable crossover flies | Pullups/chin-ups | Rear deltoid raise |
Healthy arms are critical to our wellbeing and ability to perform routine activities. In this topic, we concentrate on arm strength. You will learn how to perform and teach clients the following exercises:
- Biceps curls
- Triceps push/pull-down
- Triceps kickback
- Triceps extension
- Dips and bench dips
- Wrist/forearm extension
Throughout this topic, you will study images of the exercise and read the information on the major muscles, the equipment options, and the key coaching points and steps. Practice demonstrating and explaining every exercise.
Exercises are demonstrated and explained by Davy, one of our NZIS sports tutors, and students/grads Iraia, Isabel, Ashley, and Mya.
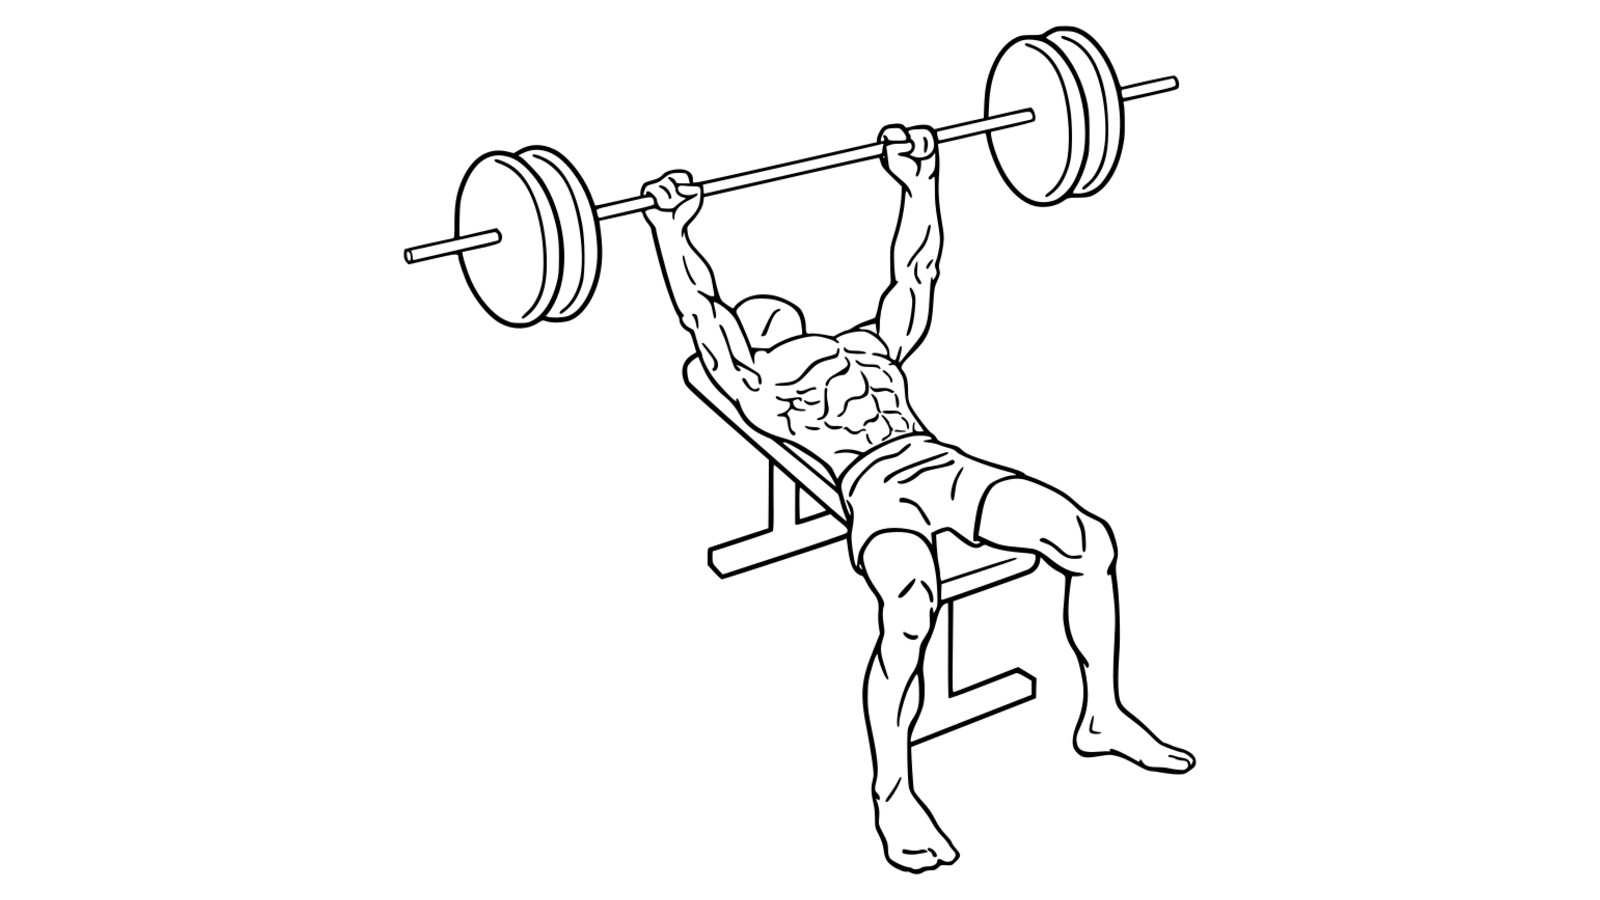
Bench Press
There are 5 contact points for supine (person is lying face upwards) exercises:
- Feet: Have feet firmly placed on the ground of another even surface such as a small step-up bench or platform. Have ankles in line with knees and knees in line with hips for a stable and secure lower body posture.
- Glutes: Keep the glutes in contact with the bench throughout the exercise to ensure the lower back muscles only support the exercise and not performing the exercise.
- Shoulders: to keep the shoulder blades (scapula) safe and secure throughout the exercise, the best position to maintain is to fully retract and depress the scapula to begin and ensure this is maintained throughout the exercise. A handy way to describe this movement is to think of putting the shoulder blades "back in your pocket", squeezing them together and pushing them down.
- Head: The safest placement of the head, to take care of the cervical spine, is to ensure the head remains on the bench throughout the movement.
- Hands: Hands should be placed symmetrically along the bar with the middle of the head as an imaginary midline. Varying the grip will alter the contribution of different muscles and the gains achieved from the exercise, consider variations carefully in relation to your client's goals.

The following table provides information on the major muscles, variations, and equipment options.
| Major muscles | Variations/progressions | Equipment options |
|---|---|---|
|
Pectoralis major Anterior deltoid Triceps Serratus anterior |
Incline (activates upper fibers of pecs) Decline (activates lower fibers of pecs Flat (activates middle fibers of pecs) Vary grip width (closer grip isolates central part of pecs; while a wider grip isolates lateral part of pecs) |
Barbell Machine Swiss ball Bands Dumbbells |
Key coaching points and steps
- Lie faceup on a horizontal bench, with five points of contact.
- Adopt training posture (ensure safe lifting of the bar into starting position).
- Grasp the barbell with an overhand grip slightly wider than shoulder-width and maintain a flat back.
- Review training posture (ensure this is in place before repetitions begin).
- Inhale and lower the bar to the chest with a controlled movement.
- The barbell should follow a slightly arched movement, from chin line to nipple line and back.
- Exhaling, extend the arms moving the barbell from nipple to chin (opposite movement to above). Avoid locking elbows at the end of the eccentric phase, keep elbows 'soft'.
- Review training posture and adjust where required before the next repetition.
Note the safety precautions for this exercise.
Bench presses and pain
Elbow and wrist pain most often develop after bench pressing. This is something you as the personal trainer can help a client avoid by observing the following recommendations.
- This overuse injury is generally related to excessive training with long sets. In bench pressing, locking the elbows at extension can cause rubbing and microtrauma which will lead to inflammation and pain.
- At the first sign of elbow pain, avoid exercises that involve arm extension for several days and ice. If you (or the client) keep working out with this condition you may get intra-articular calcifications which may need surgery to fix!
- Some people will also get wrist pain with narrow grips depending on your (or the client’s) physical structure. Check posture to ensure wrists are straight during all stages of the movement, using a wider grip can often ease the pain. Excessive benching can also form muscular imbalances between the front and back of the shoulder.
- Overdeveloped anterior shoulders will cause the humerus (upper arm bone) to pull back against its shoulder socket joint. You must balance pressing exercises out with overhead presses and rotator cuff work. Observe that elbows are not passing the rib cage when performing the end movement, this would cause excessive straining on the shoulders. Ensure movement ends where elbows stop slightly above the line of the shoulder socket.
Incline bench press
Just like the standard benchpress but the bench is set at an angle. Typically incline benches are fixed however adjustable machines present options of angles, 45 degrees is generally a good rule of thumb although an adjustable machine can range from 30 to 75 degrees and will depend on factors such as height, muscle focus, and body type.
If doing an incline, use angle of 45-60°, and with a decline use angle of 20-40° approx. Note the safety precautions for this exercise.

Machine Bench Press
The following image shows a machine bench press.

The following table provides information on the major muscles, variations, and equipment options.
| Major muscles | Variations/progressions | Equipment options |
|---|---|---|
|
Pectoralis major Anterior deltoid Triceps Serratus anterior |
Incline (activates upper fibers of pecs) Decline (activates lower fibers of pecs Flat (activates middle fibers of pecs) Vary grip width (closer grip isolates central part of pecs; while a wider grip isolates lateral part of pecs) |
Barbell Machine Swiss ball Bands Dumbbells |
Key coaching points and steps
- Sit within the frame of the machine, with five points of contact - feet, glutes, shoulders, head, hands.
- Adopt training posture (ensure safe lifting of the bar into starting position).
- Grasp the handles offered by the machine in an overhand grip style. Ensure the starting position of the machine enables the line of the hands to be in line with the nipples, this may mean adjusting the seat of the machine to achieve this before you begin. this creates the same movement pattern as on a bench whilst performing the exercise on the machine, as is, the movement pattern required to achieve maximal pec major input
- Review training posture (ensure this is in place before repetitions begin).
- Inhale and push the handles away from the chest in a controlled movement.
- The handles should follow a slightly arched movement, from chin line to nipple line and back.
- Exhaling, extend the arms moving the barbell from nipple to chin (opposite movement to above). Avoid locking elbows at the end of the eccentric phase, keep elbows 'soft'.
- Review training posture and adjust where required before the next repetition.
Like with the bench press, and incline bench press, elbow and wrist pain can develop after using a machine bench press. Follow the recommendations discussed for bench presses and pain.
Chest Press
There are 5 contact points to maintain:
- Feet: Have feet firm placed on the ground of another even surface such as a small step-up bench or platform to have ankles in line with knees and knees in line with hips for a stable and secure lower body posture.
- Glutes: Keep the glutes in contact with the bench throughout the exercise to ensure the lower back muscles only support the exercise and not performing the exercise.
- Shoulders: to keep the shoulder blades (scapula) safe and secure throughout the exercise, the best position to maintain is to fully retract and depress the scapula to begin and ensure this is maintained throughout the exercise. A handy way to describe this movement is to think of putting the shoulder blades "back in your pocket", squeezing them together and pushing them down.
- Head: The safest placement of the head, to take care of the cervical spine, is to ensure the head remains on the bench throughout the movement.
- Hands: Hands should be placed symmetrically along the bar with the middle of the head as an imaginary midline. Varying the angle will alter the contribution of different muscles and the gains achieved from the exercise and place different demands upon the ligaments and tendons around the joints (wrist, elbow, and shoulders) keep this in mind when selecting and supervising exercises for your clients, consider variations carefully in relation to your client's goals and abilities.

The following table provides information on the major muscles, variations and equipment options.
| Major muscles | Variations/progressions | Equipment options |
|---|---|---|
|
Pectoralis major Anterior deltoid Triceps Serratus anterior |
Incline (activates upper fibers of pecs) Decline (activates lower fibers of pecs Flat (activates middle fibers of pecs) Vary grip width (closer grip isolates central part of pecs; while a wider grip isolates lateral part of pecs) |
Dumbbell Machine Swiss ball Bands |
Key coaching points and steps
- Lie faceup on a horizontal, incline, or declined bench, with five points of contact.
- Adopt training posture (ensure safe lifting of the bar into starting position).
- Grasp the dumbbells with an overhand grip slightly wider than shoulder-width and maintain a flat back.
- Review training posture (ensure this is in place before repetitions begin).
- Inhale, with dumbbells inline with nipples, push dumbbells away from the body in an arch (from nipples to chin).
- Dumbbells should follow a slightly arched movement, from nipple line to chin line and back.
- Exhaling, extend the arms moving the dumbbell from chin line to nipple line (opposite movement to above). Avoid locking elbows at the end of the eccentric phase, keep elbows 'soft.
- Review training posture and adjust where required before the next repetition.
Like with the bench press, elbow and wrist pain can develop after the chest press. Follow the recommendations discussed for bench presses and pain.
Be mindful of the different demands upon the ligaments and tendons around the joints in relation to movement patterns and angles at the elbows and wrists and shoulders when selecting and supervising exercises for your clients, consider variations carefully in relation to your client's goals and abilities.
Push-Ups
A standard push-up is illustrated in the following image.

The following table provides information on the major muscles, variations and equipment options.
| Major muscles | Variations/progressions | Equipment options |
|---|---|---|
|
Pectoralis major Anterior deltoid Triceps |
Flat Incline (isolates inferior part of pecs) Decline (isolates clavicular head of pecs) Vary grip width (hands wider isolates lateral part of pecs; hands closer isolates the sternal head of pecs) |
Body weight BOSU or stability trainer External weights (i.e. weight vest) |
Key coaching points and steps
- Support yourself facedown on the ground, with arms extended, hands shoulder-width (or more) apart, and feet touching or slightly apart.
- Adopt training posture.
- Consider the body one solid piece (that is, everything moves as one unit).
- Inhale and bend the elbows to bring the chest close to the ground without arching the lower back excessively.
- Push back up to complete arm extension (maintain 'soft' elbows, that avoid locking elbow joints)
- Exhale at end of the movement.
- Review training posture and adjust where required before the next repetition.
Pec Flys
Pec flies are illustrated in the following image.

The following table provides information on the major muscles, variations and equipment options.
| Major muscles | Variations/progressions | Equipment options |
|---|---|---|
|
Pectoralis major Anterior deltoid |
Incline/decline bench Rotating arm with ascent/decent |
Dumbbells Cables Bands |
Key coaching points and steps
- Lie on a narrow bench that won’t interfere with the shoulder movement and hold a dumbbell in each hand with arms extended and slightly bent to relieve stress on the joint.
- Adopt training posture.
- Inhale and open the arms to horizontal ensuring the elbows do not pass the line of the nipples/rib cage.
- Raise the arms to vertical while exhaling.
- Perform a small isometric contraction at the end of the movement to emphasize the work on the sternal head of pecs
- Review training posture and adjust where required before the next repetition.
Note:
- Never perform this lift with heavy weights.
- Be mindful of the different demands upon the ligaments and tendons around the joints (wrist, elbow, and shoulders).
Cable Crossover Flys
Cable crossover flies are illustrated in the following image.

The following table provides information on the major muscles, variations, and equipment options.
| Major muscles | Variations/progressions | Equipment options |
|---|---|---|
|
Pectoralis major Anterior deltoid |
Change angle of pull (adjust height of cable) Change torso angle |
Cable machine Bands |
Key coaching points and steps
- Stand with legs slightly apart and lean the torso forward a bit, with arms spread apart and elbows slightly bent.
- Engage training posture.
- Inhale and squeeze the arms together until the wrists touch, maintaining training posture throughout the movement.
- Exhale at the end of a contraction.
- Squeeze pecs at end of the movement.
- Review training posture and adjust where required before the next repetition.
Note:
- You can work all the fibres of the pecs by varying the angle of the chest and the working angle of the arms.
- This exercise also works the pectoralis minor, which stabilises the scapular and pulls it forward.
- For more advanced clients, the power stance of one foot slightly in front of the other can be adopted, as long as core and stabilisation can be maintained throughout the movement.
Pec Deck
A pec deck is illustrated in the following image.

The following table provides information on the major muscles, variations and equipment options.
| Major muscles | Variations/progressions | Equipment options |
|---|---|---|
|
Pectoralis major Anterior deltoid |
Standing/seated Back against wall Vary grip (neutral/pronated) Lying facedown on an incline bench Cable machine |
Dumbbell Barbell Bands Cable machine |
Key coaching points and steps
This exercise works the pecs by stretching it.
- Sit on the machine, ensure the machine is set so hands begin in line with nipple line and feet are flat on the floor (aiming to have knee joint in line with ball and socket of hip i.e things at right angles to the floor).
- Adopt training posture.
- Sit on the machine with arms slightly behind the body, inhale and squeeze the arms together.
- Exhale at end of the movement.
- As the hands come together, focus the effort onto the sternal head of the pecs.
- Exhale at end of the movement.
- Review training posture and adjust where required before the next repetition.
Note:
- This exercise is good for beginners needing to develop enough strength to move on to more complex exercises.
- Ensure feet are flat on the floor and pointing forward. If a client has difficulty placing feet flat on the floor, adjust the seat. If further adjustment is required, consider using another flat surface, like a step-up bench placed under their feet while seated.
Overhead/Shoulder Press
Various options for overhead/shoulder press are illustrated in the following images.
The following table provides information on the major muscles, variations, and equipment options.
| Major muscles | Variations/progressions | Equipment options |
|---|---|---|
|
Trapezius (upper fibers) Triceps Medial deltoid |
Standing/seated Dumbbell/barbell Alternating Shoulder rotation Front press |
Dumbbell Barbell (military press) Seated on Swiss ball/bench Machine |
Key coaching points and steps
- Sit on a bench, keeping the back straight, and hold dumbbells at shoulder level with an overhand grip.
- Adopt training posture.
- Inhale and extend arms vertically, gently touching weights above the crown of the head.
- Ensure elbows remain 'soft' at the end of the movement (that is, not 'locked').
- Exhale at end of the movement.
- In a controlled movement, return the elbows back to shoulder level.
- Review training posture and adjust where required before the next repetition.
Note: It is important to maintain the core, particularly during free weight-based exercises, to ensure the lower back is protected throughout the movement and decrease the risk of injury.
Front Raise
A front raise is illustrated in the following image.

The following table provides information on the major muscles, variations, and equipment options.
| Major muscles | Variations/progressions | Equipment options |
|---|---|---|
|
Anterior deltoid Pectoralis major (upper fibers) |
Standing/seated Back against wall Vary grip (neutral/pronated) Lying facedown on an incline bench Cable machine |
Dumbbell Barbell Bands Cable machine |
Key coaching points and steps
Cable frontal raise
- Stand with feet shoulder-width apart.
- Begin with hand(s) against the thighs or slightly to the side.
- Adopt training posture.
- Inhale and alternate raising the arms to the front to eye level.
- Exhale as the arm raises, in line with the shoulder (wrist, elbow, and shoulder in line with each other).
- In a controlled movement, bring the arm back to the resting position (in front of/slightly to the side of the thigh).
- Review training posture and adjust where required before the next repetition.
Note: Typically performed one arm at a time, alternating sides.
Dumbbell frontal raise
- Stand with feet slightly apart, holding the dumbbells with an overhand grip as they rest against the front of the thighs or slightly to the side.
- Adopt training posture.
- Inhale and alternate raising the arms in line with the shoulder (wrist, elbow, and shoulder in line with each other).
- In a controlled movement, bring the arm back to the resting position (in front of/slightly to the side of the thigh).
- Review training posture and adjust where required before the next repetition.
Note: All movements that raise the arms contract the muscles that anchor the scapula to the rib cage, such as the serratus anterior and rhomboids. This creates a stable support for the humerus to move from.
Lateral Raise
A lateral raise is illustrated in the following image.

The following table provides information on the major muscles, variations and equipment options.
| Major muscles | Variations/progressions | Equipment options |
|---|---|---|
|
Medial deltoid Trapezius (especially if arms are lifted above parallel) |
Neutral grip Pronated grip Sitting/standing Cables |
Dumbbell Barbell Sitting on Swiss ball Bands Machine |
Key coaching points and steps
- Stand with a straight back, with legs slightly apart, arms hanging next to the body, holding a dumbbell in each hand.
- Adopt training posture.
- Inhale, raising the arms to horizontal with the elbows slightly bent.
- Aim to keep the arms slightly below shoulder height.
- In a controlled movement, return the arms back towards the side of the body by the thighs, exhaling as the arms descend.
- Return to the initial position.
- Review training posture and adjust where required before the next repetition.
Shrugs
Shrugs using dumbbells and barbells are illustrated in the following images.
The following table provides information on the major muscles, variations, and equipment options.
| Major muscles | Variations/progressions | Equipment options |
|---|---|---|
|
Trapezius (upper fibers) Deltoid |
Dumbbell Barbell Standing/seated Shoulder rotation |
Dumbbell Barbell Machine Bands |
Key coaching points and steps
- Stand with legs slightly apart (approximately shoulder width for stability), head upright and looking straight ahead, or slightly flexed forward, griping dumbbell at sides or barbell at front.
- Adopt training posture.
- Shrug the shoulders with an anterior-to-posterior rotation; keep the arms relaxed, back straight, and abdominals contracted.
- Return to the initial position.
- Review training posture and adjust where required before the next repetition.
Note: Heavy weights are not needed for this type of exercise, shoulders are slimmer muscles than others and do not require the same heavyweight when targeting this muscle group.
Shoulder pain when lifting
Note the safety precautions for this exercise. Most weightlifting injuries occur when training the deltoids and rarely result in muscle pulls or tears. They are usually caused by poor technique or overusing the tendons reinforcing the shoulder capsule.
When some people perform exercises where they raise the arms, such as extensions from behind the neck or lateral raises, the supraspinatus tendon is rubbed and compressed between the head of the humerus and the tendons originating from the collar bone (entrapment). Inflammation soon follows.
Some people have smaller distances between the humerus and these tendons, they will develop shoulder pain more regularly. These people should avoid behind-the-head extensions (including behind-head lat pulldowns) and lateral raises that go too high.
Another cause of shoulder pain is an imbalance in muscle tension around the shoulder ball and socket joint. Muscles hold the ball in the socket of this joint from in front, on top, and behind. If one or more gets tight or loose, the ball and socket joint will not line up correctly. This is a common cause of shoulder pain.
Pull-ups and Chin-Ups
Pull-ups and assisted chin-ups are illustrated in the following images.
The following table provides information on the major muscles, variations, and equipment options.
| Major muscles | Variations/progressions | Equipment options |
|---|---|---|
|
Latissimus dorsi Trapezius (Middle fibers) Biceps Teres Major Rhomboids |
Hands neutral Hands pronated Hands supinated Vary grip width |
Pull up bar Assisted machine |
Key coaching points and steps
- Hang from a fixed bar generally with a shoulder-width wide overhand grip.
- Adopt training posture, maintain core, shoulders, and ensure elbows are fully extended, however, never locked.
- Inhale and pull chest up to the level of the bar (avoid a swinging movement for momentum).
- Exhale at the end of the movement.
- Lower the body in a controlled movement towards the ground, returning to starting position (keep elbows soft).
- Review training posture and adjust where required before the next repetition.
Note: To avoid tendinitis of the distal tendon of the biceps, keep elbows slightly bent.
Lat Pull Down
Lat pull down with variations are illustrated in the following images.
The following table provides information on the major muscles, variations and equipment options.
| Major muscles | Variations/progressions | Equipment options |
|---|---|---|
|
Latissimus dorsi Trapezius (middle fibers) Teres major Biceps Rhomboids |
Hands neutral Hands pronated/supinated Vary grip width To front/back of the head |
Machine |
Key coaching points and steps
- Sit facing the machine with the legs under the pads, feet flat on the floor, pointing forward.
- Grip the bar with a wide overhand grip.
- Maintaining a straight back and engaged core, tilt back slightly from the hips with the upper body as one entire unit for complete lat engagement (and posture stabilisation)
- Inhale and pull the bar down to the sternal notch while slightly puffing out the chest and pulling elbows back.
- Exhale at the end of the movement.
- Review training posture and adjust where required before the next repetition.
Note:
- Avoid 'swinging' when lifting heavy weights in a lat pull down, if this occurs, lower the weight to a safe weight. If intensity needs to be increased, consider other techniques, such as slowing the movement.
- Keep shoulders in a retracted position throughout the lift to emphasize the lats.
- Adjust the machine where required to ensure pads support positioning on the machine. If feet cannot be placed evenly on the floor, adjust with a step-up bench or barbell plate or two.
- In both the lat pulldown and chin-ups, the long head of the triceps muscle is used to pull the upper arm towards the body’s centre line. Triceps injuries can occur during these lifts, so ensure sufficient warm-up and triceps stretching.
- Maintaining core stability and ensuring training posture is observed reduces the possibility of lumbar spine strain or injury.
Seated Row
Seated row is illustrated in the following images.
The following table provides information on the major muscles, variations and equipment options.
| Major muscles | Variations/progressions | Equipment options |
|---|---|---|
|
Latissimus dorsi Trapezius Rhomboids Posterior deltoid Biceps Erector spinae (if using back flexion/extension) |
Hands neutral grip Hands supinated/pronated grip Vary grip width With back flexion/extension |
Machine |
Key coaching points and steps
- Sit facing the machine, feet resting on the footpad and the torso bent forward.
- Sit far back enough so that knees remain slightly bent/'soft'.
- Adopt training posture, chin, shoulders, core with eyes and head looking straight ahead.
- From the hip, till the entire upper body back in a straight line (as one solid unit) a few degrees.
- Inhale and bring the handle to the base of the sternum by straightening back and pulling elbows back as far as possible.
- Actively pull shoulder blades together with each pull.
- Never round back with heavy weights.
- Exhale and control the weight moving away from your body (avoid being pulled by the weight).
- Review training posture and adjust where required before the next repetition.
Note:
- A rounded back typically implies too heavy a weight, so reduce the weight, and regain correct and safe training posture. If greater intensity is needed, consider the FITT principles; one adaptation would be slowing the speed of the movement to increase the intensity of the exercise.
- Allowing the weight to pull you back at the end of the movement risks smaller muscles taking the strain of a large weight.
One Arm Row
One arm row using dumbbell is illustrated in the following image.

The following table provides information on the major muscles, variations and equipment options.
| Major muscles | Variations/progressions | Equipment options |
|---|---|---|
|
Latissimus dorsi Trapezius Posterior deltoid Bicep |
Vary pull angle |
Dumbbell |
Key coaching points and steps
- Using a gym bench, position on foot flat on the floor with ankle, knee, and hip joint in one line.
- Place the other leg, bent on the bench with the knee directly under the hip.
- Place hand on the bench with wrist, elbow, and shoulder in line.
- Grasp a dumbbell with the palm facing in (medially); using the opposite hand and knee on the bench to support the back and maintain posture.
- Adopt training posture, chin tuck (neck alignment), core, flat back.
- Inhale and lift the upper arm and elbow in a controlled movement as high as possible next to the body with the elbow bent. Keep back flat and abdominals contracted.
- Avoid swaying or twisting of the torso for a greater 'pull' and aim to keep posture fixed and steady.
- Exhale at end of the movement.
- Review training posture and adjust where required before the next repetition.
Note: Rotating the torso at the end of the movement, can on some occasions, be performed but it is important to highlight that this is an advanced movement and comes with safety risks so not advised for beginner exercisers or those with weaker core muscles. Proficiency in this movement pattern is required before introducing advanced techniques (as with all exercises).
Bent Over Row
Bent over row using a machine is illustrated in the following image.

The following table provides information on the major muscles, variations and equipment options.
| Major muscles | Variations/progressions | Equipment options |
|---|---|---|
|
Latissimus dorsi Trapezius Rhomboids Posterior deltoid Bicep |
Supinated or pronated grip Dumbbells for single arm isolation Vary grip width Angle of torso at different angles |
Dumbbells Barbells Bands T-bar |
Key coaching points and steps
- Stand with legs slightly bent, grasping the bar with an overhand grip and the hands wider than shoulder-width.
- Keep back straight, lean forward at 45° (so the bar is level with the top of the knee). Stick your bum back (sit into the movement similar to a partial squat) to get in the right position. However, ensure this does not knock out your core posture.
- Inhale and pull the barbell to the stomach, following the line of the thighs in a controlled, smooth movement.
- Exhale and return to the initial starting position, controlling the weight in line with gravity.
- Review training posture and adjust where required before the next repetition.
Upright Row
Upright rows using a cable machine and barbells are illustrated in the following images.
The following table provides information on the major muscles, variations and equipment options.
| Major muscles | Variations/progressions | Equipment options |
|---|---|---|
|
Trapezius (upper fibres) Deltoid Bicep |
Wide grip (uses deltoids more) Close grip (uses traps more) |
Dumbbells Barbells Plates Band Cable |
Key coaching points and steps
- Stand with legs slightly apart, keeping the back straight and grasping the bar or barbell with an overhand grip. For standard close grip have tips of thumbs from each hand touching.
- Adopt training posture.
- Inhale and pull the barbell up along the front of the body to chin (lower if needed) in a smooth and controlled movement, raising the elbows as high as possible.
- Always keep elbows higher than wrists and avoid excessive flexing of the wrists to prevent wrist pain.
- Do not rock your upper body excessively.
- Exhale and lower bar, controlling the weight in line with gravity.
- Review training posture and adjust where required before the next repetition.
Rear Deltoid Raise
Rear deltoid raises using dumbbells, cable machine, and seated machine are illustrated in the following images.
The following table provides information on the major muscles, variations, and equipment options.
| Major muscles | Variations/progressions | Equipment options |
|---|---|---|
|
Posterior (rear) deltoid Trapezius (lower fibres) Rhomboids Rotator Cuff muscles |
Seated Standing Machine Cables Bands |
Seated Standing Machine Cables Bands |
Key coaching points and steps
Adopt training posture and review before every repetition.
Seated
- Sit bent over at 45° with dumbbell under legs.
- Keep core activated, shoulders back and down, and a straight torso.
- Inhale and extend arms out to sides parallel with the ground. Ensure elbows are soft and do not come above shoulders.
- Exhale and lower the arms back towards the floor, returning to starting position.
Standing
- On two feet, move glutes back/sit into the position.
- Keep back straight or arched, bent over at the hips at approximately 45°.
- Inhale and extend arms out to sides till parallel. Ensure elbows are soft and do not come above shoulders.
- Exhale and lower the arms back towards the floor, returning to starting position.
Machine
- Sit on seat, feet flat on the floor with arms parallel to the ground out in front of you.
- Inhale and extend arms rearward through full range of motion. Maintain posture and soft elbows.
- Exhale and control the movement of the machine, leave a small gap between plates before the next repetition. Do not let the plates touch (or crash) until the set is over.
Cables
- Grab cable handles in each hand, cross hands (cables crossed) below, and in front of you.
- With an activated core and straight back, tilt the torso at a 45° angle (tilting from the hips).
- Inhale and straighten arms out to the side.
- Exhale and control the return of the weight with gravity.
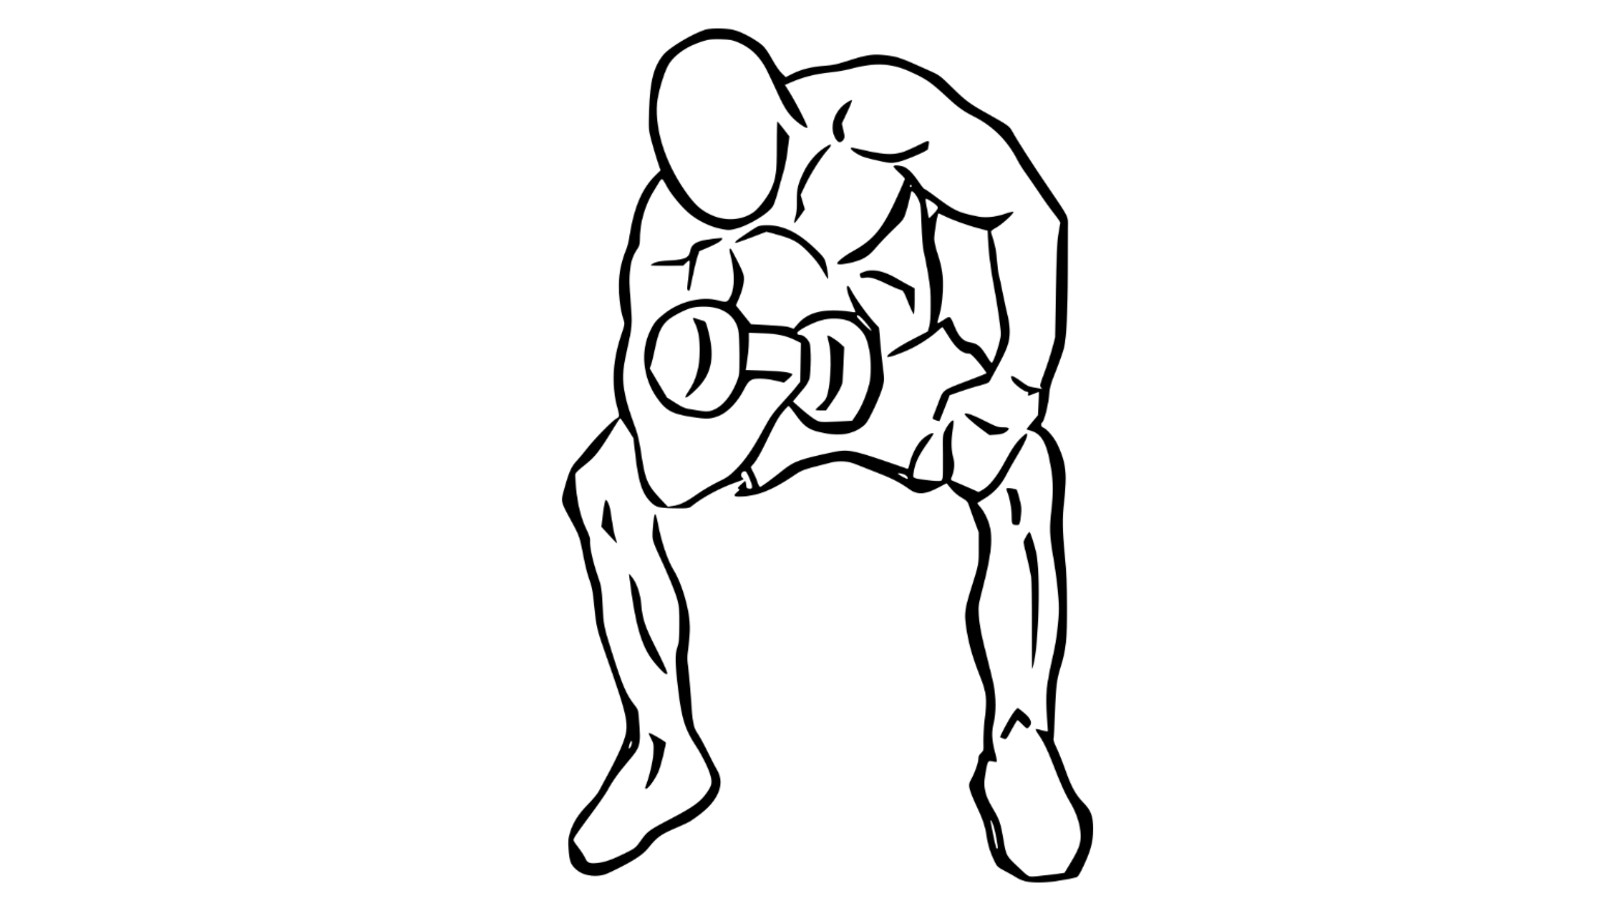
Biceps Curls
Bicep curls using barbell (preacher bench), dumbbells (hammer curl), cable machine, and seated with dumbbell are illustrated in the following images.
The following table provides information on the major muscles, variations, and equipment options.
| Major muscles | Variations/progressions | Equipment options |
|---|---|---|
|
Biceps brachii Brachialis Brachioradialis |
Standing (try with back against the wall) Seated Preacher curls (isolates biceps well) Incline curls Reverse curls (good for strengthening weak wrists) Hammer curls (works brachioradialis muscle more) |
Dumbbell Barbell Band Machine Preacher bench |
Key coaching points and steps
- Whether standing or seated, begin the exercise with weights or barbell down at the side.
- Adopt training posture.
- Inhale and bend the elbow, bringing wrist(s) towards the shoulder until full flexion.
- Aim, with good posture, to avoid upper body movement, which creates momentum (thereby assisting the movement, decreasing work required from the bicep).
- Exhale and return to starting position, keeping elbows 'soft'.
- Review training posture and adjust where required before the next repetition.
Note:
- To avoid tendinitis and other elbow injuries, keep the elbow 'soft' when extended (that is, do not lock the elbow/fully extend the arm).
- To further target the brachioradialis muscle, rotate the forearm(s) at the elbow(s) before the forearm reaches fully horizontal.
The following illustration shows the different stances used to stabilise the body when training. These are appropriate for progressions (depending on the client's exercise ability). Compare the 'feet forward' vs 'feet together' stances.
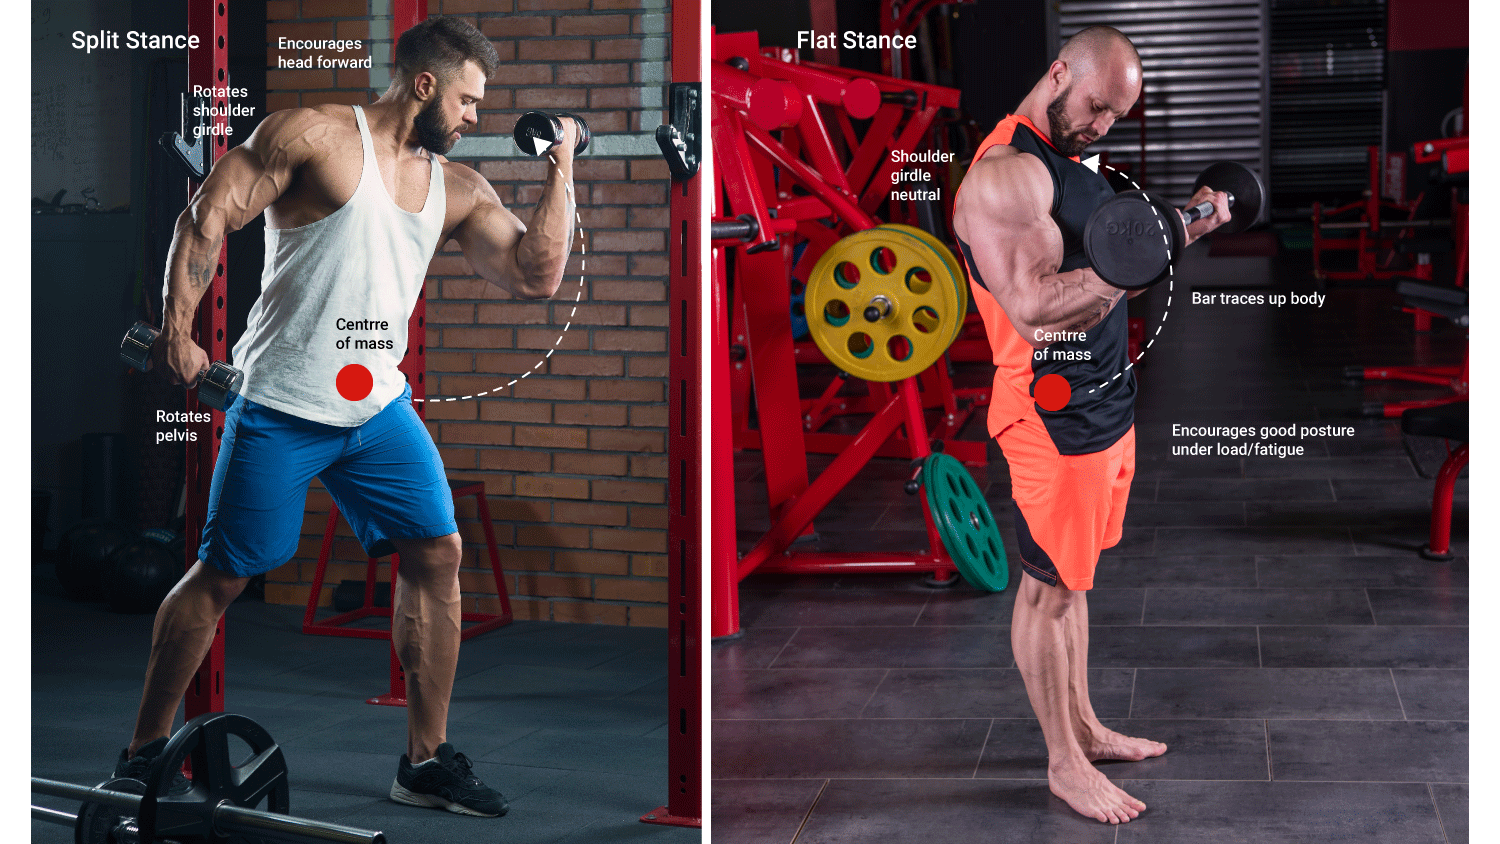
Tricep Pushdown/Pulldown
Tricep pushdown/pulldown using a cable machine is illustrated in the following image.

The following table provides information on the major muscles, variations, and equipment options for this exercise.
| Major muscles | Variations/progressions | Equipment options |
|---|---|---|
|
Triceps brachii (made up of long, medial, and lateral heads) |
One/two arm triceps pushdown with cable Supine (lying face upwards) triceps extension (BB or DB) Cable machine triceps extension Overhead triceps extension (DB or BB) Triceps kickbacks Rope pushdown (engages lateral head of triceps more) |
Ropes Dumbbell Bench Barbells Cable machines |
Key coaching points and steps
- Standing at a machine with feet shoulder-width apart, with feet either parallel to each other or one slightly in front of the other.
- Place your hands on the bar/pulley ropes using an overhand grip.
- Adopt training posture.
- Inhale and pull the bar/pulley ropes down towards your waist in a controlled movement, keeping elbows fixed by the side of the torso (imagine they are bolted there and can not move).
- Exhale, controlling the movement in line with gravity, returning to starting position.
- Keep elbows 'soft' at the end of the movement.
- Review training posture and adjust where required before the next repetition.
Note:
- The upper arm must remain securely by the side and not be allowed to travel excessively in order to isolate triceps.
- Using an underhand grip on cable pushdown exercises activates the medial head of the triceps more.
- Hold an isometric contraction at the end of the movement for 1-2 seconds to add intensity.
Tricep Kickback
Tricep kickback using a dumbbell is illustrated in the following images.

The following table provides information on the major muscles, variations, and equipment options for this exercise.
| Major muscles | Variations/progressions | Equipment options |
|---|---|---|
|
Triceps brachii (made up of long, medial, and lateral heads) |
Triceps kickbacks Rope pushdown (engages lateral head of triceps more) |
Ropes Dumbbell Bench |
Key coaching points and steps
Bench (dumbbells)
- Using a gym bench, position on foot flat on the floor with ankle, knee, and hip joint in one line.
- Place the other leg, bent on the bench with the knee directly under hip.
- Place hand on the bench with wrist, elbow, and shoulder in online.
- Grasp a dumbbell with the palm facing in (medially) and use the opposite hand and knee on the bench to support the back and maintain posture.
- Adopt training posture, chin tuck (neck alignment), core, flat back.
- Inhale and extend the arm at the elbow in a controlled movement keeping the elbow soft at the end of the movement. Keep back flat and abdominals contracted.
- Avoid swaying or twisting of the torso, aim to keep posture fixed and steady.
- Return the dumbbell to starting position ( elbow at an approximate 90-degree angle)
- Exhale at end of the movement.
- Review training posture and adjust where required before the next repetition.
Standing (dumbbell)
- Stand with legs slightly bent, one foot in front of the other, shoulder-width apart with dumbbell in hand, palm facing medially.
- Keep back straight, lean forward at the hips to approximately 45°, maintaining training posture.
- Inhale and extend the arm at the elbow in a controlled movement keeping the elbow soft at the end of the movement. Keep back flat and abdominals contracted.
- Avoid swaying or twisting of the torso, aim to keep posture fixed and steady.
- Exhale at end of the movement.
- Review training posture and adjust where required before the next repetition.
Note:
- The upper arm must remain securely by the side and not be allowed to travel excessively in order to isolate triceps.
- Using an underhand grip on cable pushdown exercises activates the medial head of the triceps more.
- Hold an isometric contraction at the end of the movement for 1-2 seconds to add intensity.
Tricep Extensions
Tricep extensions using cambered bar (bent barbell) and dumbbells (seated and standing) are illustrated in the following images.
The following table provides information on the major muscles, variations, and equipment options for this exercise.
| Major muscles | Variations/progressions | Equipment options |
|---|---|---|
|
Triceps brachii (made up of long, medial, and lateral heads) |
One/two arm triceps pushdown with cable Supine (lying face upwards) triceps extension (BB or DB) Cable machine triceps extension Overhead triceps extension (DB or BB) Triceps kickbacks Rope pushdown (engages lateral head of triceps more) |
Ropes Dumbbell Bench Barbells Cable machines |
Key coaching points and steps
Seated - bench (dumbbells or barbell)
- Using a gym bench, seated comfortably on the edge with feet flat on the floor with ankle, knee, and hip joint in one line.
- Grasp a dumbbell, placed between both hands, with the palms facing up (supine) in an overhead position, mindful of the angle of shoulder joints, and excessive strain.
- Adopt training posture, chin tuck (neck alignment), core, flat back.
- Inhale and flex the arm at the elbow in a controlled movement allowing the barbell to lower behind the head. Keep back flat and abdominals contracted.
- Avoid swaying or twisting of the torso, aim to keep posture fixed and steady.
- Return to dumbbell to starting position via extending the elbows whilst exhaling.
- Review training posture and adjust where required before the next repetition.
Note:
- If using a barbell, ensure the elbows stay in line with each other and avoid them "flaring out"
- If performing in the supine position on a bench, ensure 5 points of contact are maintained. Aim to lower the barbell towards the forehead (without touching the forehead) and then extend the arms back to straight arms with soft elbows.
- The upper arm must remain securely by the side and not be allowed to travel excessively in order to isolate triceps.
- Using an underhand grip on cable pushdown exercises activates the medial head of triceps more.
- Hold an isometric contraction at the end of the movement for 1-2 seconds to add intensity.
Dips and Bench Dips
Bench dips and dips using various machines are illustrated in the following images.
The following table provides information on the major muscles, variations, and equipment options for these exercises.
| Major muscles | Variations/progressions | Equipment options |
|---|---|---|
|
Triceps |
From bench From dip handles From ground Machine assisted |
Bench Machine (weighted and assisted) |
Key coaching points and steps
Bench
This exercise can be performed using one bench (two benches is an advanced progression).
- Sitting on the edge of a bench, place your palms on the edge with fingers wrapping underneath the bench.
- Adopt training posture.
- With elbows soft and firmly by the side of the torso, gently side off the bench.
- Inhale and control the body moving towards the floor in a controlled movement.
- Stay as close to the bench as possible and avoid increasing the angle between body and bench (imagine the back running up and down the edge of the bench during the movement).
- Exhale, pushing through the palms of the hands, elbows remaining firmly by the side of the torso (watch for elbows 'flaring' away from the body wings).
- Raise the body, extending the arms at the elbow keeping elbow 'soft' at the end of the movement.
- Review training posture and adjust where required before the next repetition.
Machine
- With the arms straight, arms and soft elbows grip onto the dip handles.
- Suspend body between two dip handles, feet off the ground (either via knees bent on assisted machine or knees bent with legs behind).
- Inhale and lower the body towards the ground via flexing at the elbows (avoid elbows moving higher than shoulders).
- Exhale and, pushing through the hands, keeping wrists straight, push the body away from the ground (keeping elbows soft at the end of the movement).
- Review training posture and adjust where required before the next repetition.
Note:
- This exercise works the triceps and lower fibres of pectorals as well as the anterior deltoid.
- Resting weights on top of thighs or wearing a weight vest increases the difficulty of the dip.
Wrist/Forearm Extension
Wrist/forearms extension using a barbell is illustrated in the following image.

The following table provides information on the major muscles, variations, and equipment options for wrist flexors.
| Major muscles | Variations/progressions | Equipment options |
|---|---|---|
| Wrist flexors | Sitting Kneeling |
Dumbbells Barbells Bands |
Key coaching points and steps
- Hang wrist over knee or bench end, with the remainder of the forearm firmly on the bench or knee.
- Hold dumbbells or barbells in hand with an overhand grip.
- Inhale and extend wrists in a controlled movement.
- Exhale, return to starting position (neutral/level) wrist.
- Avoid heavy weights with this exercise, wrist flexors are a small muscle group therefor need low weights to avoid strain or injury.
- These exercises strengthen the wrists, which are often vulnerable because of weak wrist extensors or flexors.
The following table provides information on the major muscles, variations, and equipment options for wrist flexors.
| Major muscles | Variations/progressions | Equipment options |
|---|---|---|
|
Wrist extensor |
Sitting Kneeling |
Dumbbells Barbells Bands |
Key coaching points and steps
- Hang wrist over knee or bench end, with the remainder of the forearm firmly on the bench or knee.
- Hold dumbbells or barbells in hand with an underhand grip.
- Inhale and flex wrists in a controlled movement, allowing the bar to slowly and steadily close to the tip of the fingers.
- Exhale, roll the weight, steadily, back into the palm, close your grip and return to starting position (neutral wrist).
- Avoid heavy weights with this exercise, wrist flexors are a small muscle group therefore need low weights to avoid strain or injury.
- These exercises strengthen the wrists, which are often vulnerable because of weak wrist extensors or flexors.
Note:
- Wrist extensors are the extensor carpi radialis longus and brevis, extensor digitorum, extensor digiti minimi, and extensor carpi ulnaris.
- Wrist flexors are the flexor carpi radialis, palmaris lonus, flexor carpi ulnaris and profundus.
Try it Out
Perform each core exercise, including progressions and regressions where possible. Talk through the cues and what muscles are being targeted. Consider how each exercise supports health and skill-based fitness components and training principles.
Complete the self-assessment on demonstrating upper body exercises. If you would like feedback, post in the forum.
Complete the self-assessment on explaining upper body exercises. If you would like feedback, post in the forum.
Introduction
Take a moment to think about what the function of the core is.
It is not to create force "crunching" in and down, like an abdominal curl. You don't need to be able to create a high amount of force to go into trunk flexion. The way we're designed as humans, with gravity pulling us down, if we want to hunch over, we tip our heads forward and gravity does the rest. So our core never needs to be able to powerfully contract. It's not a muscle that needs to powerfully shorten rapidly to produce high amounts of force.
What it does need to be able to do is contract and hold a resting tension to protect and keep things still.

If we look at the stabilising muscles, like the rotator cuffs in the shoulders, they are there to keep the shoulder protected and stabilised when the arms are at different angles so the arms don't pop out. They also allow for rotation. The core is much the same in that it's not there to primarily create force or shorten, but it's often to limit extension.
Now apply that thinking to protect the spine. Most lower back injuries are due to too much compression or excessive extension lordosis through that lower back area. If you think generally, the core is on the opposite side of the lower back. If the core can hold a resting short tension, even when stress is applied to the body, it can inhibit your body from leaning or arching back. A strong core that can hold resting tension will decrease the chances of injuring the lower back.
So the core's primary role is not to promote trunk flexion, but rather to inhibit back extension, torso rotation, or lateral flexion while allowing the spine to flex, extend, laterally flex, and partially rotate. The core is there to minimise unwanted spinal movement when doing dynamic-based exercises.
With this in mind, when we look at training the core and core function, we should regress these kinds of tensions and apply them in a structured format to best mimic the function of the core. For example, planks where gravity is trying to make your back sink and you're stopping that from happening. It's all about creating intentional movement and then using your core to inhibit any additional unwanted movement.
What it comes down to is a strong core supports balance and stability.
In this topic, we concentrate on the core (trunk) body. You will learn how to perform and teach:
- Abdominal curls (crunches)
- Oblique curls
- Reverse curls
- Back extensions
- Plank
- Hollow holds
- Seated medicine ball rotations (Russian twists)
- Seated medicine ball slams (Russian slams)
- Pallof press
Each exercise has images, information on the major muscles, the equipment options, and the key coaching points and steps. Practice demonstrating every exercise, and explaining every exercise.
Davy and Mya demonstrate how to perform the core exercises throughout this topic.
Abdominal Curls (Crunches)
Crunches are about decreasing the space between the front of the hip bones and your lower ribs. You can either come all the way up or partially.
For safety, we don't want clients using their necks, pulling their heads, and going into cervical flexion. This can be a common mistake, and it is not ideal. Instead, we want the hands just resting on the head. A useful cue for this is "light fingers".
Many people, especially overweight people, will struggle with crunches because there's little space to move. To mitigate this, you can regress the range.
You can make crunches harder by lying on a decline bench and having to curl a longer distance.
The images below show a standard abdominal curl without equipment and using a decline bench.
Major muscles, variations, and equipment options
| Major muscles | Variations/progressions | Equipment options |
|---|---|---|
| Rectus Abdominus |
Hands at side Hands crossed on chest One hand up Full sit up vs crunch Feet elevated |
Floor Machine Swiss ball BOS |
Key coaching points and steps
Ensure training posture is in place.
- For the crunch, just the shoulders and upper back leave the ground.
- Do not put your hands behind the head as you will pull with your arms and flex the neck. Instead, place fingers on the temples on the side of the head.
- For a full sit-up, with fingers on the temples, raise the upper body up away from the ground, fingers on temples, and aim to touch the thighs with the elbows.
- Ensure the spine leaves the floor, vertebrae by vertebrae rather than as one solid, straight-backed movement.
- Perform controlled movements up and down.
Notes
- Extending arms forward makes this easier for beginners.
- Having a partner hold feet makes this easier.
- Working on an incline bench makes this exercise harder.
Oblique Curls
Obliques are on the sides of the body, and you have internal and external obliques. It's a bit of a simplification, but let's say you're internal obliques, are more responsible for the stability function. The external obliques assist with stability as well, but arguably these are the ones you feel more when you isolate your obliques in a curl function.
Instead of lying on your front or your back, you're on your side because the obliques wrap around the sides of your torso and you're just shortening the space between the hip and the ribs, but laterally on the sides.
The images below show various formats for oblique curls.
Major muscles, variations, and equipment options
| Major muscles | Variations/progressions | Equipment options |
|---|---|---|
|
Rectus abdominis Internal obliques External obliques |
Hands on side of head Foot up on the opposite knee One arm on the floor Both feet raised |
N/A |
Key coaching points and steps
Oblique Curl (supine)
- In the supine position (laying face up) adopt training posture (shoulders back and down, core engaged, chin tuck, and feet hip-distance apart).
- Place hands on the side of the head (do not place them behind the head/neck at risk of pulling on the neck) with elbows bent.
- Inhale, raining the spine vertebra by vertebra (think of peeling the spine off the floor vertebra by vertebra or bone by bone).
- As you progress towards the seated position, take your right elbow toward the left knee (try and touch if possible).
- Exhale as you come to a seated position (or as close as possible).
- Lower the upper body, vertebra by vertebra, in a controlled movement back towards the floor.
- Review your training posture, and adjust as appropriate before the next repetition.
Variations of this exercise:
- A single elbow-to-knee touch per repetition
- A double elbow-to-knee touch per rep (right elbow to the left knee and left elbow to right knee)
- Holding a weight such as a medicine ball or barbell plate
- Performing the movement with legs raised (advanced)
Reverse Curls
Reverse curls are great at supporting the primary function of the core. With a reverse curl, you're effectively targeting the eccentric component of a curl. The focus on the eccentric component or lengthening of the core has a far more stability-based focus than a concentric curl. If you were only going to do one form of curl or crunch, and you want a functional core, reverse curls would be the one to go for.
Reverse curls may involve toe taps or straight legs. Think of the legs as a lever. Switching between straight legs and bent knees/toe taps, is changing the length of the lever. If the core is weak, and you increase the length of the lever (straight legs), it may be too much leverage for the core to maintain and the lower back may cave or arch to compensate. In a reverse curl, you shorten your legs to make it a regression. This can mean tapping the heels or putting a bench or group fitness step under somebody's heels if they cannot reach the floor, reducing the distance they have to cover.
Legs together or alternating?
One leg is half the weight of two so individually dropping one leg is easier on the core. There is also an argument that it's more functional as it's more in line with common movements like gait cycles. Increasingly, there is demand for exercises targeting improved coordination and core stabilisation. There's neural stimulation and thought and coordination in an exercise where you are alternating sides. This makes it more transferable to dynamic movement outside the gym.
The images below show various reverse curl options.
Major muscles, variations, and equipment options
| Major muscles | Variations/progressions | Equipment options |
|---|---|---|
|
Rectus abdominus Transverse Abdominus |
Up and twist Legs together and alternating Straight legs or knees bent |
N/A |
Key coaching points and steps
- Lie on your back with legs elevated straight up and arms supporting alongside your body.
- Adopt training posture.
- Lift only just the buttocks and lower back off the ground (aim to use hands/arms to balance not to push buttocks up off the floor.)
- Maintain training posture during exercise. Begin with this stage and when appropriate, attempt the more advanced version shown in the image where more of the torso leaves the floor.
- Review training posture and adjust where required before the next repetition.
Back Extension
An extension is the opposite of a crunch. You're lying prone and shortening your lower back muscles to lift your chest off the ground. A back extension targets the lower back muscles and the top of the glutes. The glutes are a synergist to back extension if back extension is what you're trying to isolate.
It is a great exercise for rehab and priming, including a warming exercise for the posterior chain.
Where the hands and arms are will impact the difficulty. Hands down by the side will be easier because there's more weight relative to where the joint is moving. If you take your hands further away and put them on your head and arched up, it will be harder because the lever where the weight is from where the joint is moving is further away.
The images below show various options for back extensions.
Major muscles, variations, and equipment options
| Major muscles | Variations/progressions | Equipment options |
|---|---|---|
|
Erector spinae |
On the floor (hands on head or by sides), alternate arm and leg. |
Bench Swiss ball or BOSU Barbell plate, dumbbell, or medicine ball |
Key coaching points and steps
- Adopt training posture, including hands on the side of the head or across the chest where applicable (typically bench-based extension exercises).
- Inhale and lift your chest away from the surface (bench or floor). Begin with shoulders first, then vertebra by vertebra lift the remainder of your torso.
- Exhale as you gently and steadily raise your torso as far as comfortably possible.
- Gently and steadily lower your torso back towards the floor, vertebra by vertebra, in the opposite order (that is, the lumbar region of the torso to the thoracic).
- Review training posture and adjust where required before the next repetition.
Plank
The plank is about not moving. A static plank involves propping yourself up against gravity. Over time, gravity will want to make you sink and you'll need to brace to stop that from happening.
If a client was very, very weak in a plank and could do it for less than 10 seconds, that indicates that there are a lot of exercises you shouldn't programme or need to programme regressions for. If a client can't hold their spinal torso structure for 10 seconds against gravity it indicates that their functional core strength is weak.
On the flip side is the law of diminishing returns. If someone can do a static plank for longer than 3 to 5 minutes, they probably don't need to do more planks. Think about how much value is coming out of that session. The client might use it as a challenge or fitness target, which can be motivating. But generally, you're better off putting in variety with progressions.
BOSU balls can be used to create a platform of instability and a requirement to try harder to be stable. If we do that enough, stability will improve.
The image below illustrates a basic plank, also known as a front hold, hover, or abdominal bridge.

Hollow Holds
These are also called banana boat planks and it's essentially a plank where you're lying on your back, but you've got your arms and legs out and trying to keep your back flat. Your body ends up making almost a banana boat shape.
Hollow holds are effectively supine planks, lying on your back, but with maximal leverage out each way. You've made your body as tall as possible, and with your arms and legs fully out, there's enough weight against gravity to make the torso want to come up and the lower back extend. You have to hold that down or drive your naval down into the floor whilst gravity acts on the long levers of your arms and legs.
Seated Medicine Ball Rotations
Also called Russian twists, seated medicine ball rotations are about twisting effectively and are a really good function of the core.
With the exception of the obliques and the lateral movements, all the core exercises have been predominantly sagittal or front and back. But the core also works on the transverse plane, which is the twisting plane, and it needs to stabilise the transverse plane.
Sit on your buttocks with your feet slightly out to counterbalance and lean back slightly. You don't want your shoulders directly over your hips. by leaning back slightly, your torso weight is somewhat against gravity, and then you're taking a ball and twisting to one side and then twisting to the other.
The idea is that this movement will throw you off balance. The ball's weight causes your hips to want to raise and twist. A good cue for any twisting base motion is to keep both butt cheeks down because you don't want to raise or lift to one side. If one side of your body is shortening to twist, your obliques are contracting to twist one way, and the other obliques on the other side have to lengthen to allow that to happen, and they need to control that lengthening as well.
Seated Medicine Ball Slams
A slam is just adding in more power to the seated medicine ball twist. Instead of just twisting and placing the ball, you're twisting and then either overhead or from a neutral position slamming the ball down. If it's a bouncy ball and the floor allows it to bounce, you can let it bounce, otherwise, slam it and pick it up again.
This exercise is about creating more intensity by applying force while still trying to control the movement.
Pallof Press
This is one of the most important ones to get good at for any general population who wants to play sports or become more athletic.
A pallof press can be done standing, kneeling, in a lunge pattern, or with a cable machine. The cables come out from the machine, and you hold the rope or handle in front of you. You push out and come back and push out and come back. The cable is coming across from the side, so the length is not getting longer or shorter. It's staying the same.
The weight attached to the cable is trying to pull you towards it and you are trying to resist that motion. The hardest part of the exercise is when the lever is the longest - when you are bringing the cable back from a fully out position.
Performing the pallof press from a lunge position is good because you get one of the glutes fired up as part of the core function. This exercise focuses on and inhibits unwanted movement through the midsection.
Try it Out
Perform each core exercise, including progressions and regressions where possible. Talk through the cues and what muscles are being targeted. Consider how each exercise supports health and skill-based fitness components, and training principles.
Complete the self-assessment on demonstrating core exercises. If you would like feedback, post in the forum.
Complete the self-assessment on explaining core exercises. If you would like feedback, post in the forum.
Introduction
Stretching activities are part of both a warm-up and a cool-down. They can also form the main activity such as in yoga style class. Stretches improve your health, muscle tone, and flexibility. Stretching is an important part of exercise, enhancing overall performance and preventing injuries during activity.
There are 2 main types of stretches: static stretches and dynamic stretches. We've covered stretches previously so before jumping into the specifics of each type of stretch, let's see what you can recall.

Static and dynamic stretches have different functions. Static (or passive) stretches lengthen a muscle and you're holding that stretch for at least 25 to 30 seconds. An easy way to think about this is whatever muscle you're trying to stretch, identify the origin and the insertion of that muscle. You are getting the origin and insertion as far away from each other comfortably without compromising the movement of the joint. That's a stretch.
The reason we say 25 to 30 seconds is because the fun thing with static stretching is it involves what we call the GTO or the Golgi Tendon Organ. It lies between the muscle and its tendon area, and its primary role is to recognise the force being pulled on in that muscle. When it recognises a force, it sends a signal back up to the brain, which then sends signals back to the muscle and tells those myosin and actin fibres to relax and lengthen, creating a feedback loop. The receiver feels the stress, sends something up to the brain, and the brain tells that muscle to relax.

Dynamic stretching is when we create a movement for the muscle we're trying to stretch. For example, an active (or dynamic) hamstring stretch would be like a swooping crane motion.
Think about a starting blocks position for a running race. To dynamically stretch, the runner will push their hips up to the top and then come back down, and repeat. Active stretches are about taking the muscle to the range of its motion. It's a really good preparatory way of stretching because you don't want the first time your muscle hits its end range of motion to be under load or intensity. Dynamic stretching will also stimulate light synovial fluid in the joint, acting as a lubricant. For these reasons, dynamic stretching is predominately used in warm-ups.
In this topic, you will learn:
- The importance of stretching
- Common stretches
Davy and Mya will demonstrate how to perform and instruct the following stretches:
- Biceps and forearms
- Calf
- Child's pose
- Cobra
- Deltoid
- Downward dog
- Forward fall
- Garland
- Glute
- Hamstrings
- Hip flexor
- Lat cat cow
- Middle and upper trap
- Pec
- Quadriceps
- Side bridge
- Triceps
- Upper back
- Wrist fall up and down
The Importance of Stretching

It's not enough to build muscle and achieve aerobic fitness. You need to think about flexibility, too. Stretching can help.
It is not only runners, gymnasts, or elite athletes who need to warm up and stretch! Everyone in the general population needs to stretch and no fitness routine is complete without stretching exercises. Stretching should be integrated before, during, and after training sessions.
Previously, the school of thought was that stretching impaired those who wished to 'bulk up', and that stretching 'un-did' all the good work achieved in the gym. All those hours of lifting weights and shortening the muscles through resistance training, why stretch and undo this? Old school thinking!
Quite simply, there are many components to exercise. And many different components to a healthy, effective, and sustainable training regime and this means more than just lifting weights. Focusing on muscle building is not sufficient as we know; cardio is required for a more overall workout. This also applies to stretching which is just as important a fitness component as muscle building or cardio training.
What is stretching?
When strength training (or really, training in general) the exercise works the muscles by putting them under tension. As a result, the muscles become shorter and tenser, less flexible. This then has a knock-on effect on the tendons which attach the muscles to bone and the ligaments around a joint. With these components becoming tight and more rigid, this decreases the range of movement provided by that joint. It also results in less function capacity and can impair movement patterns leading to injury.
Stretching is a technique that is vital to maintaining homeostasis. This balance relates to the muscular system (and its connective tissue components), and the skeletal system and helps support their optimal function.
So, why is stretching so important?
Stretching techniques, performed when muscles are cold does not increase flexibility and may also lead to or result in injury. Tissue stretches best when smooth, slow force is applied due to its composition. Effective stretching occurs in a gentle and controlled manner, with muscles being of a warmer temperature (that is, not when the muscles are cold). This can be achieved by applying a heat pack or via ultrasound therapy. However, five to 10 minutes of muscular contraction (such as jogging, aerobics, gentle swimming session, or walking) is effective and typically safer. Why is that? Exercise heats the muscles more thoroughly, therefore, decreasing the risk of injury via surface level warmth only.
This is an example of why a warm-up and a cool-down are important parts of any exercise routine. Without an effective warm-up (or any warm-up at all for that matter) your training session is potentially off to a rocky start, which could impact your training regime should you become injured as a result.
We also need to stretch to:
- protect mobility and independence.
- keep the muscles flexible, strong, and healthy.
- maintain motion in the joints.
- increase blood flow and reduce stiffness.
- prevent injuries to the muscles which can lead to joint injuries.
Watch
Watch the benefits of stretching from the Mayo Clinic which will expand on the importance of stretching.
Common Stretches
Depending on your exercise objectives and client requirements, you may use a combination of the following stretches. As you look at each, ask yourself if the stretch is static or dynamic, and when you might suggest it to a client.
Becoming comfortable with stretching is essential and will take a few forms (as exists with exercises) as you will need to become comfortable with:
- your dialogue when explaining to your client verbally how to perform each stretch safely and effectively.
- how to adapt your instructional terms should your client be unable to understand what you mean.
- being able to identify when an adaptation of the stretch is required.
- being able to clearly explain, in terms your client can understand, why they are performing a particular stretch (humans need context).
- adapt your planned stretching routine for your client should they present with either pain or discomfort.
It is just as important to be comfortable with your knowledge of stretches as with the individual exercises, take time to practice this, and lock in your knowledge. Consider practising in front of your mirror, with friends or family and fine-tune your verbal delivery should you identify areas of your instructions that are not clear enough for the stretch to be performed effectively and safely.
The Stretches
In this video series, Mya and Davy demonstrate stretches, including variations. Watch the videos and practice demonstrating and explaining the stretches.
Bicep and forearms
Calf stretch
Child's pose
Cobra
Deltoids
Downward dog
Forward fall
Garland
Glute
Hamstrings
Hip flexor
Lat cat cow
Middle and upper trap
Pec stretch
Quadriceps
Side bridge
Triceps
Upper back
Wrist fall up and down
Try it Out
Perform each stretch, including progressions and regressions where possible. Talk through the cues and what muscles are being targeted. Consider how each stretch supports health and skill-based fitness components and training principles.
Complete the self-assessment on demonstrating stretches. If you would like feedback, post in the forum.
Complete the self-assessment on explaining stretches. If you would like feedback, post in the forum.