In this topic we cover the following, to help equip you with the knowledge and skills you’ll need to work as part of a landscape construction team:
- what workplace and team culture are
- what teamwork is and behaviours that support effective teamwork
- how to give instructions to other team members
- how to help develop the skills and knowledge of other team members
- how to interpret landscape construction documents.
By the end of this topic you’ll be able to:
- reflect on the culture of teams that you have been part of and what contributed to that culture
- give a daily briefing to a landscape construction team
- coach a team member to help develop their skills and knowledge
- interpret landscape construction documents in order to explain the construction requirements to team members.
In a landscaping business there may be a number of people involved in different roles.
If you are working in a landscaping business, make sure you understand what everyone’s job is and what they are responsible for. In particular, know who you report to (your boss) and know who else you can go to if you need to raise an issue and don’t feel comfortable doing this with your boss.
Here are some common job roles found in landscaping businesses, and examples of their role responsibilities:
| Role title(s) | General responsibilities |
|---|---|
| Owner, Director, Managing Director, Principal | Ensure the business:
|
| Health and Safety Manager/Advisor |
|
| Human Resources Manager/Advisor |
|
| Landscape Architect, Landscape Designer |
|
| Operations Manager / Construction Manager |
|
| Foreperson, Landscape Leading Hand |
|
| Landscaper |
Work safely and efficiently as part of a team to:
|
Depending on the size of the business, there may be more or fewer roles. For example a sole trader may take on all of these tasks. Alternatively, a large landscaping company may employ a range of specialists, and other managerial and support staff.
Workplace culture is sometimes described as “the way we do things around here”. How the people in a workplace understand why they do what they do and what they think is important.Mahi Haumaru Aotearoa Worksafe
This definition can also be used for workplace teams. Sometimes the culture of a team within a business is different to the culture of the workplace overall.
Ideally both the workplace and the team will have a positive culture.
A positive culture is one where:
- “We have a clear understanding of our job scope and responsibilities.
- We treat people with dignity and we show respect for employees, employers and fellow co-workers.
- As a values-led organisation we have clear expectations that our personnel will not engage in behaviours such as harassment, bullying, discrimination or bias against gender, sexual orientation, ethnicity, culture or religious background.
- There is two-way communication between our manager(s) and their employees.
- Personnel are comfortable and supported by their managers to express concerns without fear of reprimand.
- We provide support to enable a work-life balance.
- Wellbeing of employees is put at the forefront of workplace decisions.
- The workplace values diversity and inclusion.
- Leaders ‘walk the talk’ and reflect the values our organisation promotes.” (Positive workplace culture, no date)
On the other hand, a negative culture exists where one or more of these features is missing.
How each individual in a team behaves contributes to the culture of that team. Make sure that you demonstrate positive behaviours, as described below.

So what is a team anyway?
A team works towards a common goal. It is not about individual achievement; the whole team succeeds together. To achieve this you need to help each other when you can. A good team member anticipates their teammates’ needs and steps in to help where needed. The flip side of this is accepting help yourself. It is important to know your own limitations and to ask for help before you become overwhelmed.
Contribute your ideas and opinions, as appropriate. A fresh viewpoint is sometimes what a team needs to set themselves on a better path. Teams are stronger when they listen to and support every member.
Show accountability by following through on tasks you have said you will complete. If they are taking longer than expected, let people who are relying on you know that progress has been delayed and when they can expect completion.
Behaviours for effective teamwork
Teamwork is required across all parts of the business, but in this section we are going to focus on the behaviours most appropriate for landscape teams; those made up of a foreperson and one or more landscapers.
Punctuality and time management
Be on time for work. Do your best to achieve deadlines. This shows that you respect others' time and demonstrates reliability and commitment to your job.
Communication skills
Build your skills as an effective communicator. This involves clear, concise, and respectful interaction with teammates, clients, and management.
Remember we talked about active listening during the first module?
Using active listening techniques within your team is as important as using these techniques with your client.
If you want to review the section on active listening, go to the relevant section at 1 > Landscaping - Getting Started > 1.4 Client requirements: What the client needs > 1.4.4 Active listening.
Collaboration
Contribute to team objectives, be willing to share your knowledge, and ‘chip in’ (offer support) where needed.
Integrity
Be honest and ethical in all activities and decisions. This will help build trust with your teammates, clients, and management.
Work ethic and productivity
Show up every day with a strong work ethic and a dedication to delivering quality work.
Positive attitude
Maintain a positive attitude, even in challenging situations. This contributes to a positive work environment and can inspire and motivate others.
Adaptability and problem solving
Learn to become comfortable with change.
Plans and construction documents are never entirely accurate – they can’t reflect the real world fully. So it is up to the landscaping team to make decisions about how to install the landscape features so they meet the design. Inevitably, the result of one decision will lead to other changes.
The ability to adapt to changes, whether they relate to work tasks, work environment, or organisational changes, shows resilience and a willingness to embrace new challenges.
Discuss problems with your team as you come across them, so you can solve them as a team.
Over time you’ve become an excellent problem solver.
Respect and inclusivity
Treat everyone with respect, value diversity, and do what you can to promote an inclusive team environment.
Some easy simple things you can do are:
- Use non-gendered language, like “team” or “folks” rather than “guys”.
- Avoid stereotypes – don’t assume that someone can or can’t do something based on how they look or sound.
- Learn common phrases and how to greet people in their first language. This may be your teammates, clients, or other people you interact with.
These are some simple ways that you can foster positive relationships and develop a supportive workplace culture.
Accountability and responsibility
Take ownership of your tasks, acknowledge your mistakes, and seek solutions rather than assigning blame.
Continuous learning
Seek out opportunities to improve your skills and knowledge. Completing this programme is a great way to develop foundational skills in landscape design and construction. With this as a solid base, grow your skills further by learning from others and putting into practice the knowledge you’ve built up.
Activity: Team culture
Think back to a time where you have had to work as part of a team. This could be in your job, as part of a community group, sports team or social club.
Would you describe this as a positive or negative team culture?
What features or behaviours were present that make you say this?
There are two main times you’ll be required to give instructions if you are leading a landscaping team:
- Giving a task briefing or daily briefing.
- Instructing someone you are supervising in how to do the job.
Task and daily briefings
A task briefing is an explanation you give to a team so everyone knows:
- What the task is.
- How it is going to be carried out.
- Who is responsible for each part of the task.
- What to do if things don’t go to plan.
- What the hazards, risks and control measures are (either a full toolbox talk, or just a summary of it).
- What the emergency procedures are.
Task briefings are sometimes referred to as day briefings or daily briefings as they often happen at the start of the day.
Preparing to give a daily briefing
- Plan out the work:
- What needs to happen first, next, later?
- What tools, equipment and materials are needed?
- Do you have these onsite or does someone need to get them?
- Who has the necessary skills to do the work?
- Does anyone not know how to do this, and could benefit from learning?
- Has a Work Risks and Control Plan been completed for this project?
- Write notes about the main points you are going to make to your team. You might like to use the briefing template below.
- Suggest to your teammates that they might want to have a notebook and pen/pencil handy.
You can download the following documents here:
Giving a daily briefing
Now you’re ready to give the daily briefing. To get the best out of it, follow these points:
- Let your team know that there is a structure to the briefing.
- Ask them to hold onto questions until the end. If they have a notebook and pen or pencil they might like to note these down as you go.
- Have the Work Risks and Control Plan handy so you can refer to it and update it if needed.
- Run through the briefing in sequence. Run through each task in the table from left to right (from the Who? column all the way across to the Risks and Controls column) before talking about the next task.
- When you get to the general risks and controls section:
- Review the Work Risks and Control Plan.
- Highlight key risks and controls not covered in the briefing form.
- Add other general safety information to the right.
- Ask if there are any new risks that need to be assessed.
- When you get to the questions section:
- Use the opportunity to ask if there are any questions but also ask questions of your team to make sure they understand what you’ve told them.
If you are responsible for giving task briefings, regularly, for instance you are the foreperson in a landscaping business, use the same approach each time. Doing so will create a routine so team members know what to expect and what to do.
This will contribute to a team culture of safety and professionalism.
Try this approach a handful of times. If after running briefings like this you find that it’s not working well for your team, get their feedback about what would make it work better, and implement those changes.
Instructing others to do the job
Rather than stand on the sideline and explain each part of a task step-by-step, a more effective approach is to “talk and walk” them through the process.
A common approach to this is:
- Introduce: Begin by introducing the task and outlining the key steps involved. If there are parts of the process that require existing knowledge or skills, particularly things that carry risk, make sure the team member is competent and confident in those before moving on.
- Demonstrate, describe, and explain: Demonstrate how to do the task, step-by-step, taking the time to describe what you are doing and explain why it needs to be done like this. Answer any questions the team member may have. Repeat parts that they want to see you perform again.
- Practise: Give the team member the opportunity to practise the skills under your direct supervision, as slowly as they need to build their skills and confidence.
- Accept that they won’t be able to do it as fast as you can but supporting them to learn these skills will help everyone in the long term.
- Intervene if you need to, for instance to protect their safety, or to prevent damage to tools, equipment or materials.
- Feedback: Give constructive feedback as you go. Constructive feedback helps team members improve their performance by focusing on the skill (or behaviour), the effect it has, and how to do better. Make sure they know they can come back to you for help.
- Reflection: Give the team member time to consider your feedback and their own observations of how well they completed the task. Give them time to mull it over and ask questions.
- Retry: If they haven't quite mastered the skill, make sure you give them other opportunities to practise without the pressure of time.
Giving feedback
A useful (and easy to remember) way to give constructive feedback is the PEER feedback model:
- Permission – get permission to offer your feedback. Doing so will make them more receptive to your feedback.
- Explain – Describe what you’ve seen them do.
- Effect – Explain the impact that it has on other people or the quality of work.
- Result – Describe the behaviour you’d like to see and what the desired performance will be.
An example of constructive feedback is:
Don’t forget to give feedback for things they do well too. This will help reinforce those good behaviours. You can use the PEER model for this too.
As the person responsible for leading the construction work – either as foreperson or as the person leading the redevelopment of your own property – it's critical that you can understand construction documents.
When we talk about landscape construction documents we are referring to plans, specifications, and technical drawings.
You should already have a good idea of how to interpret landscape design plans, because you’ve already drawn up a series, including:
- Base Plan
- Site Analysis Plan
- Concept Plan
- Proposal Plan
- Planting Plan.
You already know about dimensions, common landscape graphics symbols, title blocks, and annotations with varying degrees of specification (more specific in the Proposal Plan).
Here we cover a few more points that will have you reading landscape construction documents like a pro!
Working with scale
As you’ve learned earlier, plans are drawn to a scale, as are other technical drawings. The scale is the ratio of measurements on the plan to the measurements in the real world. A scale of 1:100 means one unit (like 1mm) on the plan represents 100 units (100mm) in the real world.
In theory, it is possible to measure between points on a drawing and multiply it by the scale to get the real world measurement. However, this should only be used as a last resort.
The main reasons that scaling from a printed plan is not always accurate are:
- If the plan is printed on a different size page, it may have been scaled incorrectly.
- For instance, if you resize an A2 drawing to fit on an A3 sheet of paper the drawing will be 71% of its original size. If you didn’t know that it had been resized and measured an object on the plan then set it out on the ground it would be almost 30% shorter than it should be!
- Rulers are not always accurate. Cheap rulers made of plastic may not be as accurate as a good quality steel ruler.
- It’s hard to get accuracy from small-scale drawings, such as 1:200, 1:100 or even 1:50, especially when different line weights are used. Remember that at 1:100 if you mismeasure by 1mm, your real-world object will be out by 100mm, which in some cases will be noticeable.
Timber components
Landscape construction documents may contain a jumble of letters and numbers when referring to the components that make up a deck, boardwalk or fence, for instance: “Joists: 90x45 D4S H3.2” or “Posts: 100x100 R/S H4”.
Let’s look at what this all means.
Timber terms
Decks and boardwalks are usually comprised of the following components, from top down:
- Decking is the top surface that people walk or wheel on.
- Joists are part of the subfloor framing. They take the load (weight) from the decking and anything that’s on it and pass it down to the bearers. Each joist spans across all the bearers at a right angle to them.
- Bearers are the part of the subfloor framing that takes the load from the joists above and transfers it onto the piles. Each bearer spans a row of piles.
- Piles are posts that go into the ground. They are the most common type of foundation.
![[ADD IMAGE'S ALT TEXT]](/sites/default/files/Deck%20components%20-%20marked.jpg)
Timber fences are most commonly made up of:
- Posts are the upright/vertical lengths that go down into the ground. Generally, one-third of the length of the post is underground and two-thirds is above ground level. In that way, fence posts are both the foundation and part of the above-ground structure.
- Rails are horizontal members that connect the posts together and hold the palings.
- Palings are effectively the cladding for the fence. Pickets are a type of paling. Not all timber fences have palings, as we learned earlier.
![[ADD IMAGE'S ALT TEXT]](/sites/default/files/Fence%20components%20-%20marked.jpg)
Timber finishes
“Timber is available in three surface finishes: rough sawn, gauged or dry dressed. For a nominal (call) size, the actual (finished) dimension will vary depending on the way it is finished.” (Pringle, 2012)
The timber you buy from a hardware store will generally be either rough sawn or dry dressed.
- Rough sawn (R/S) means “the dimensions of a piece of timber as it comes off the saw” (Glossary of Timber Terms, 2022). For instance 100x40mm. Rough sawn timber is often used for fencing and garden bed edging.
- Dry dressed, sometimes called dressed four sides (D4S), refers to timber that has been dried and had all faces smoothed. The corners may have been rounded. A 100x40mm rough sawn piece of timber will usually have a dry dressed dimension of 90x35mm.
- Actual dimension or finished dimension means the real-world dimensions.
- Call size or nominal dimension means the stand dimensions as if it was rough sawn. If you ask for 75x40mm dressed framing timber, you’ll get timber that has real world (actual) dimensions of 65x35mm.
The Timber Plus website provides a useful list of standard timber sizes for sale in Aotearoa: Dimensions of Timber for Sale.
Treatment hazard classes
As we learned earlier, most timber used for structural components, such as fence posts and rails and deck and boardwalk foundations and subfloor framing, are milled from radiata pine. Radiata pine is a softwood so it needs to be treated to prevent it from rotting.
The type of treatment it needs depends on what it will be used for. Timber is treated to six different hazard classes: H1 through to H6, some of which have subclasses. The higher the number, the more extreme conditions it can cope with.
For outdoor use, the ones we are interested in are:
| Hazard class | Description* | Used for** |
|---|---|---|
| H3.2 | “Timber used outdoors above ground, exposed to weather or protected from the weather but with a risk of water entrapment.” |
|
| H4 | “Used in high decay areas such as ground contact or fresh water.” |
|
| H5 | “Used for severe decay hazard risks such as ground contact where conditions of severe or continuous wetting may occur.” |
|
* Text from (Hazard Class Description, no date).
** From (Pringle, 2012)
Check your understanding of timber used for landscape construction by completing this quiz.
Construction drawings
A construction drawing, also called a detail drawing, specifies how a landscape feature must be assembled.
They are usually presented as orthographic cross section drawings, such as the drawing below.
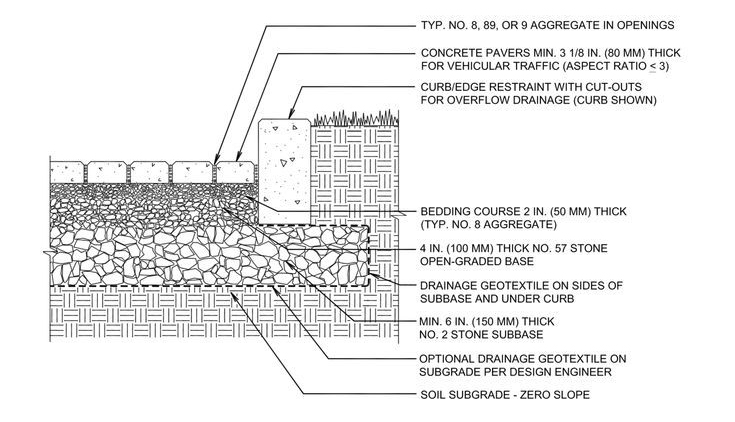
The drawing may show dimensions on the drawing itself or have this information in the annotations. Generally construction drawings are at a larger scale than plan drawings. Where a plan drawing might be 1:100, accompanying construction drawings will likely be at 1:20 or 1:10.
Take plenty of time to read and understand the annotations and dimensions used in construction drawings.
If you can’t work out how the pieces fit together, try:
- asking the designer to provide more information
- sketching it from a different perspective using pencil and paper
- creating a 3D model in CAD to explore it from different angles.
In this is topic we:
- explored what is meant by the terms workplace culture, team culture, and teamwork
- described behaviours that support effective teamwork
- outlined approaches for giving instructions to team members and developing the skills and knowledge of other team members through coaching
- focused on some of the more challenging parts of working with landscape construction documents in order to interpret them.
In the next topic we’ll explain how to draw a set-out plan.