Visual storytelling is a cornerstone of animation, weaving together narrative elements with captivating imagery to convey stories that resonate with audiences. In this comprehensive topic, explore nine key areas, each offering valuable insights and techniques necessary to animate your final sequence.
Trace the origins of storyboards through to creating your own story concept, ultimately crafting a storyboard that vividly communicates your creative vision. Delve into film techniques and influences, equipping yourself with the knowledge necessary to infuse vitality into your storyboard. Get ready to unlock the secrets of visual storytelling and unleash your creative potential in the world of animation.
Subtopics that you can explore
In this Visual Storytelling topic, you’ll explore nine subtopics, each offering valuable insights and techniques to enhance your animation skills. These subtopics are:
- Storyboarding Origins and Types
- Film Techniques
- Film Influences and Film Study
- Academic Writing Essentials
- Story Concept Development
- Storyboard Formatting, Flow, and Engagement
- Geography
- Drawing Storyboards
- Fundamental Narrative and Storytelling Concepts
Learning tasks that will help you develop and practise animation skills
Practice
Use your skills and build your knowledge
Dive into this topic’s learning tasks confidently – they're your stepping stones towards getting to grips with essential visual storytelling techniques. Completing these tasks will hone your skills in crafting compelling narratives and creating impactful storyboards.
Look out for this PRACTICE box throughout this topic to identify learning tasks and resources, letting you know exactly what to do. The following information outlines what learning tasks to expect in Visual Storytelling and how much time you should allocate to each one.
| # | Learning Task Name | Duration (Hours) | |
|---|---|---|---|
| 1 | Identify three types of shots | 0.5 | |
| 2 | Identify camera movements from A Bug’s Life | 0.5 | |
| 3 | Identify composition techniques used in three shots | 0.25 | |
| 4 | Create a list of your ten favourite films | 0.25 | |
| 5 | Create a reference board of key shots from two favourite sequences | 0.5 | |
| 6 | Explain aspects of key shots from your reference boards | 1 |  |
| 7 | List your observations from the opening sequence of Brave | 0.25 | |
| 8 | Write an introduction for your Brave film study | 0.5 | |
| 9 | Write paragraphs on film techniques and visual elements for your Brave film study | 2 | |
| 10 | Source quotes for your Brave film study | 1.5 |  |
| 11 | Fine-tune and complete your Brave film study | 2 | |
| 12 | Generate three simple story ideas | 1 | |
| 13 | Write a short synopsis for one of your ideas | 2 | |
| 14 | Draw a short sequence of storyboard panels for a story idea | 2 | |
| 15 | Draw a storyboard for a script sequence from Room on the Broom | 16 | |
| 16 | Draw another storyboard for a different script sequence from Room on the Broom | 16 | |
| 17 | Create a series of storyboard panels for your story concept | 18 | |
| 18 | Complete story treatment components for Spirited Away | 3 | |
| 19 | Explain the three-act narrative structure of Spirited Away | 2 | |
Feedback and support are woven through the learning tasks as you complete them. Reach out if you have any questions about what to do!
Explore the origins of the storyboard, find out how it functions as a crucial story development tool, and learn about the various storyboard types used across different mediums.
Origins of storyboarding
The storyboard has its origins in gag strips drawn by animators when they began their animation.
In the 1930s, Max Fleisher had these gag strips cut out as individual panels and stuck on a wall where they could be viewed in sequence by the animation team. The team could arrange the panels differently and draw additional panels where required.
Walt Disney implemented and developed that approach in his studio. It became fixed as a part of the production process.
![[ADD IMAGE'S ALT TEXT]](/sites/default/files/Disney%20Storyboard.png)
Many film production companies adopted the storyboard in the 1930s. It was used as a blueprint that allowed all the people working on a production to share a vision of the story. In this way, a storyboard also served as a detailed schematic for animation production.
How does storyboarding function as a story development tool?
Developing a storyboard often involves several pitch sessions with the production team and the director, where the storyboard artist presents their drawn ideas for feedback and discussion.
Storyboards are not all developed by first writing a script.
In our studio, we don’t write our stories, we draw them.Walt Disney (animator, film producer, entrepreneur)
Storyboards can be used in a basic way to put pictures to an existing script – a common approach in television streaming services (TV) feature animation where cost and efficiency, and not necessarily great stories, are the driving factors.
But this doesn't represent the main way a storyboard functions in animation as a story development tool.
In animation, storyboarding has always been and is still used mainly to develop the story.Eric Goldberg (animator, film director and producer)
![[ADD IMAGE'S ALT TEXT]](/sites/default/files/Ballet-Oop.png)
Storyboard types across mediums
Today, storyboards are used for most film, television, commercial, and gaming projects. However, each of these mediums uses storyboards in slightly different ways.
In general terms, a storyboard can be defined as either:
- a sequence of pictures that illustrates a story or
- a visual adaptation of a script.
Tip
Where communication trumps drawing skills
Did you know that a good storyboard artist doesn’t need to be great at drawing?
To be a good storyboard artist, you need to know how to effectively communicate with your storyboard.
It's important to learn storyboarding fundamentals, including visual storytelling concepts, staging and composition, clear labelling, and how to achieve continuity.
A thorough storyboard:
- clearly describes a story’s actions and events and each scene’s composition
- helps plan any camera moves
- provides visuals that reinforce a script's mood, atmosphere, and pacing.
While storyboarding conventions, terms and practices are variable from one medium to the next (e.g. live action versus animation), the basic information is much the same.
What are the features of different types of storyboards?
Select + to view features of storyboards for animation, live-action, and TV.
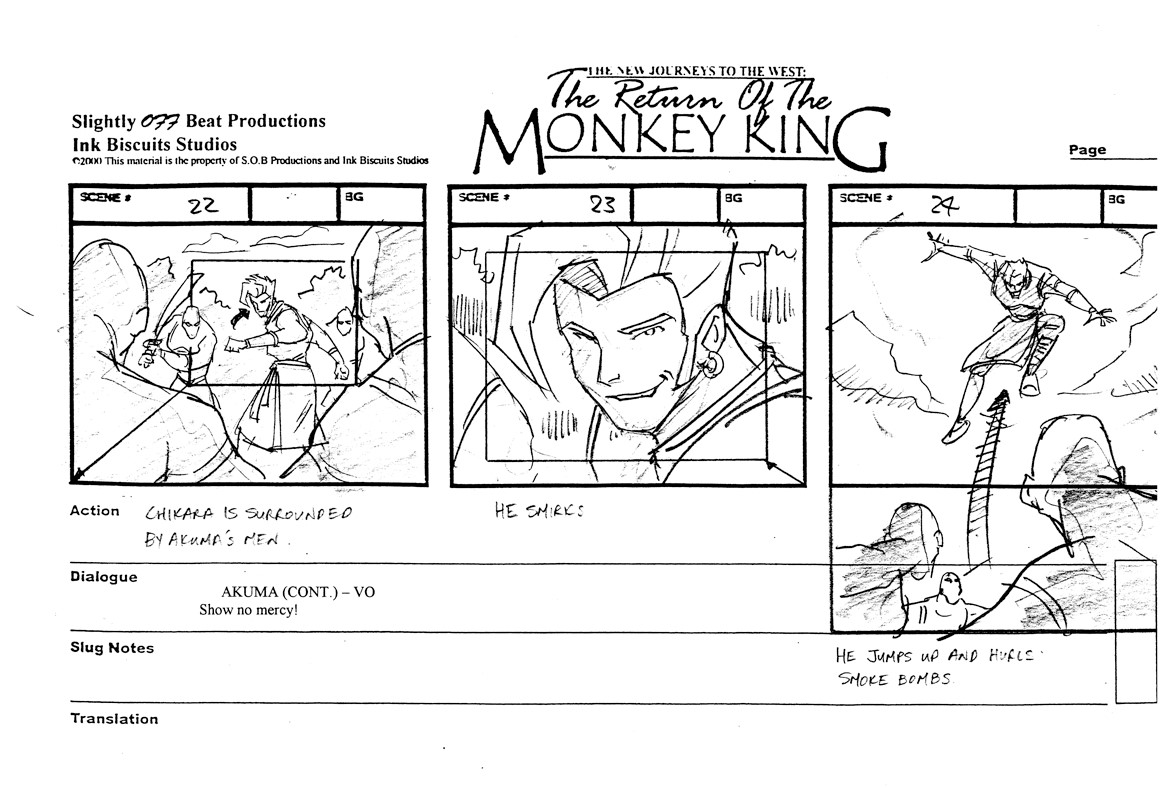
- An animation storyboard needs to be very thorough, describing every new action and expression.
- The storyboard artist determines camera angles. Once the storyboard is complete and approved, shots and camera angles stay largely unchanged.
- In animation, a 'scene' is the term used to describe each time the camera cuts to a new angle. The 'scene' ends when the camera cuts away to a new shot. For example:
- If the camera cuts from a medium shot to a close-up, this is considered and labelled as two different scenes on the storyboard.
- If, however, the camera moves closer in one continuous shot, this is considered and labelled as just one scene.
- A new scene is clearly indicated on the storyboard with the specific scene number in the upper left-hand box above each panel.
- Writing ‘CUT’ between panels can also indicate the end of a scene.
Live-action filmmakers commonly use storyboards to plan their films in great detail.
Swipe these two images to compare the live-action footage with the original storyboard panel:
TV storyboards are typically developed directly from polished written scripts, unlike feature film storyboarding (which is primarily used as a story development tool).
A TV animation scriptwriter considers many factors of producing animation, such as cost, efficiency, and tight TV production schedules. TV storyboard artists are driven as much by these factors as by more creative factors.
While TV storyboards might not be as valuable in your creative development as an artist, they are a fantastic training ground in many practical storyboarding processes, such as efficiently formatting, labelling and planning storyboards.
Get to know film techniques used in visual storytelling! Find out how shots, angles, and camera movements impact viewers and uncover how transitions and composition techniques add interest and appeal to visual storytelling.
Important
Use the Film Techniques worksheet
In this subtopic, you’ll practise three learning tasks:
- Identify three types of shots.
- Identify camera movements in a sequence from A Bug's Life.
- Identify compositional techniques used in three shots.
Note: You only need to post to Forum: Visual Storytelling once by using the same worksheet for all three tasks. Just follow these three steps:
- Download this Film Techniques worksheet.
- As you work through each learning task, record your findings in the corresponding section of the worksheet – don’t forget to save to your device as you go!
- After completing all learning tasks, upload your completed worksheet to Forum: Visual Storytelling for feedback.
You’ll get a reminder to use the worksheet in each learning task within this subtopic.
Types of shots
With storytelling, you can plan different shots for different reasons. Choosing a particular camera position and angle can:
- clarify the action, or
- establish a new setting, or
- enhance the mood or emotion in a scene.
What are some standard shots?
- Look at this image of nine standard shots.
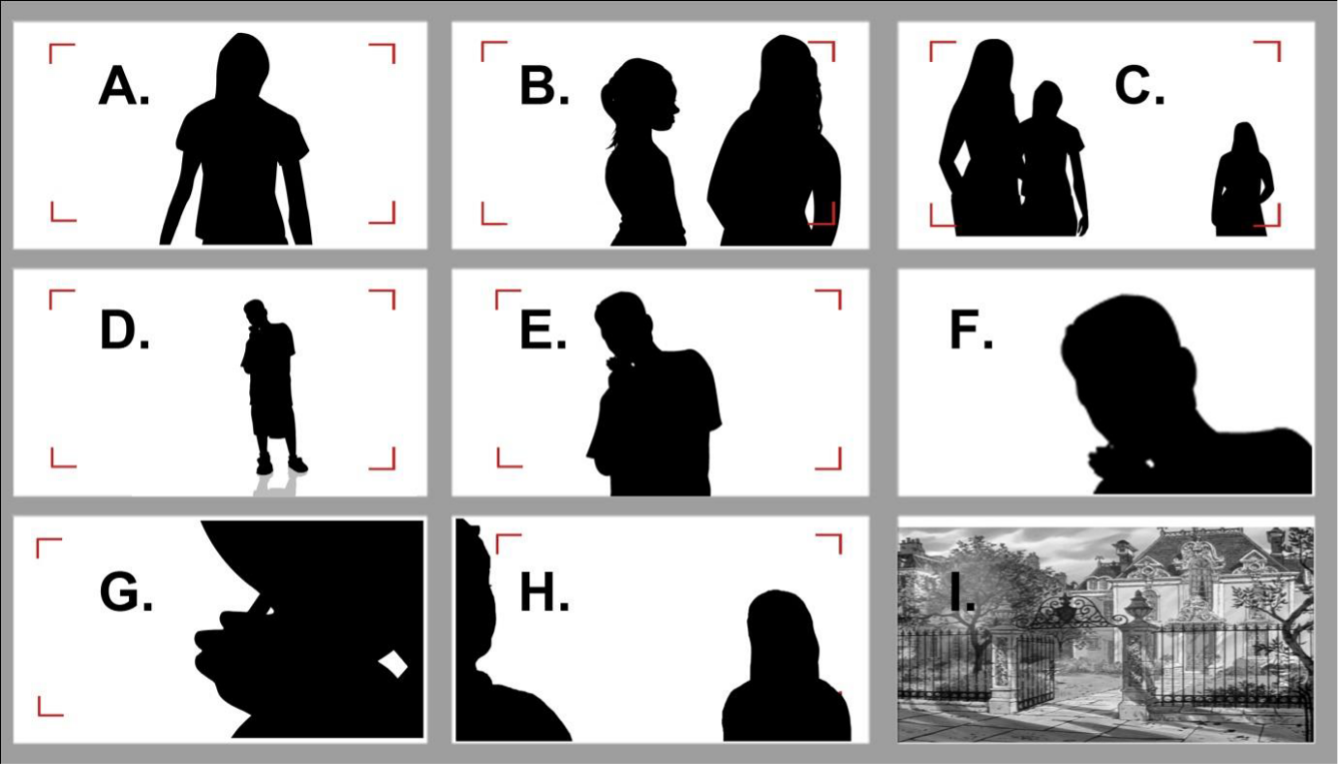
- Complete this nine-question quiz to test your knowledge of these standard types of shots.
Camera techniques
Understanding how to use camera techniques effectively in storytelling becomes intuitive if you see the camera as your viewpoint in the world.
Impact of shots on viewers
For example, take the extreme close-up shot. How does it make you feel to be extremely close to someone’s face?

An extreme close-up of someone’s eyes creates an intimate feeling. It focuses your attention on that person’s emotions and intentions.
Impact of angles on viewers
Camera angles can also affect an audience intuitively.
A low-angle shot (or upshot) creates a feeling in the viewer of being smaller or lower, a feeling we experienced as babies when our view of the world was always from a position of being small.

A high-angle shot has the opposite effect!

How does adding depth to shots impact storytelling?
By using three planes to represent spatial perspective, you can enhance your visual storytelling by creating a sense of depth in the shot. Each of the three planes represents a 3D axis in the space, i.e. the X, Y, or Z axis.
In the following image, the shot has depth due to the characters being placed at different points along planes 1 and 3.

Swipe through these two images to see how increased depth between characters provides an enhanced space.
You should aim to stage shots in simple and natural ways, so reserve more dynamic shots for action sequences.
Practice
Task 1: Identify three types of shots
Knowing how to use different types of shots in your storyboards helps you enhance your storytelling. Can you identify the three shots below and explain their use in their films?
What tools or resources do you need for this task?
- Make sure you have access to the Film Techniques worksheet.
- Swipe through these three images to help you complete this learning task:
What steps should you take to complete this task?
30 minutes

Set aside up to 30 minutes to complete steps 1-4 below. Remember to save your work as you go when using Word.
- Download the Film Techniques worksheet.
- Examine each of the three shots above.
- Record in the corresponding worksheet section the following information:
- Identify the shot types (think about camera angles as well).
- Explain briefly why you think the shot types were used.
- Make any required updates to your Film Techniques worksheet and save to your device.
What should you do after completing this task?
Think about how shot types contribute to a scene's mood and reveal character details. How might using different shot types alter a viewer's perception and a scene's impact?
Now that you’re familiar with basic shot types and angles, it's time to explore how camera movements like pans and trucks enhance visual storytelling and add dynamism and depth to a scene.
Camera movements
The storyboard artist uses camera movements to help tell a story more effectively.
There are three types of camera movements you need to know:
- Pan
- Truck in
- Truck out.
Important
Camera jargon
The terminology used in animation for some camera movements below differs from that used in live-action filmmaking.
Select + for each camera movement’s description.
A pan is a camera movement used to follow action. The following images represent each of the three main types of pans:
i. Horizontal pan: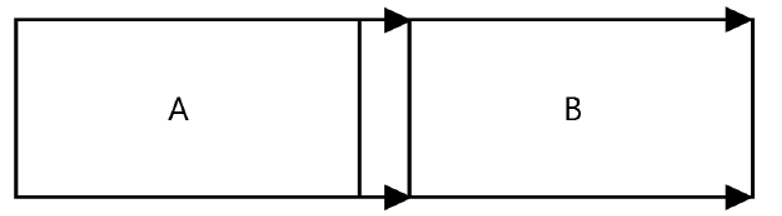
ii. Vertical pan: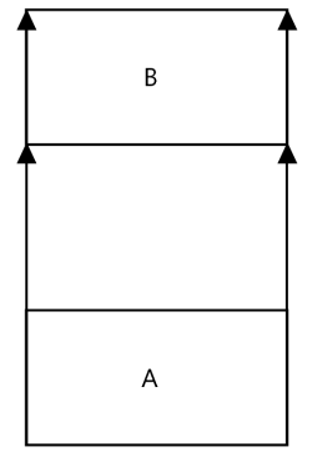
iii. Diagonal pan: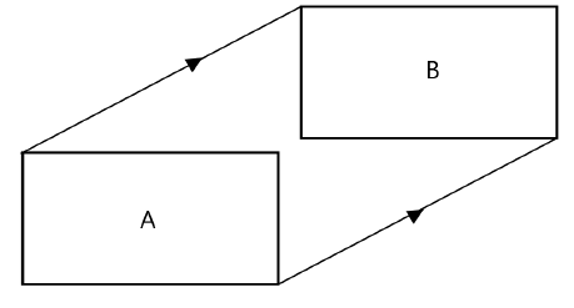
A truck in is a camera movement in which the camera moves into (i.e. closer to) the scene, narrowing the camera view and bringing the audience into a scene or situation: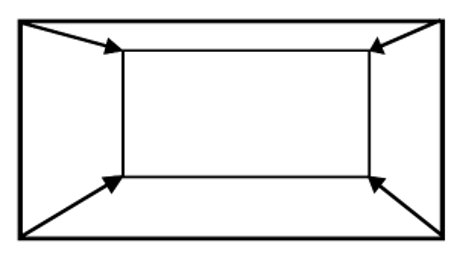
A truck out is a camera movement in which the camera moves away from the scene, widening the camera view and bringing the audience out of a scene or situation:
Practice
Task 2: Identify camera movements from A Bug's Life
Understanding how different camera movements are used in film deepens your comprehension of visual storytelling. Can you identify specific camera movements in the A Bug's Life sequence below?
What tools or resources do you need for this task?
- Your saved Film Techniques worksheet.
- Swipe through these five images to help you complete this learning task:
What steps should you take to complete this task?
30 minutes
Set aside up to 30 minutes to complete steps 1-6 below. Remember to save your work as you go when using Word.
- Open your Films Techniques worksheet.
- Watch the short video (1:20m) above, which shows a sequence from A Bug’s Life.
- Rewatch the video and observe camera movements – such as pans, truck ins, or truck outs – used in the film sequence.
- Identify up to five specific camera movements used in the film sequence, as described in the five shots above.
- Record these five camera movements in the corresponding worksheet section.
- Make any required updates to your Film Techniques worksheet and save to your device.
What should you do after completing this task?
Consider how camera movements contribute to the sequence’s mood and enhance storytelling. How can you use various camera movements in your storyboard to plan and influence a viewer’s experience?
When you’re ready, move on to the next two sections, Transitions and Composition, where you’ll explore creative ways to transition between scenes and how compositional techniques enhance visual storytelling.
Transitions
The storyboard artist uses transitions between shots to help continuity and add interest. There are many creative ways to transition between scenes.
Commonly used types of transitions include:
- Fade in (FI)
- Fade out (FO)
- Cross dissolve (X-diss)
- Wipe
- Ripple dissolve
- Spin away.
Fade in and Fade out
Fade ins (FI) and fade outs (FO) are commonly used at the beginning of new scenes and to show the passing of time.
When one shot finishes with a fade out (to black), and the next begins with a fade in, the viewer feels like time has passed in the story.
Cross dissolve
A cross dissolve (X-diss) occurs between two scenes as one dissolves away, revealing the new scene.
The duration of a cross dissolve can be lengthened or shortened for different effects. A cross dissolve should be at least eight frames, or it can look like a mistake in editing.
The following image shows how to indicate a cross dissolve on a storyboard:
![[ADD IMAGE'S ALT TEXT]](/sites/default/files/Cross%20dissolve.png)
Wipe
A wipe involves one scene being pushed out of the shot, apparently by the next scene as it slides into place.
A wipe may occur horizontally or vertically.
The following image shows a creative wipe transition:
![[ADD IMAGE'S ALT TEXT]](/sites/default/files/Disney%E2%80%99s%20Super%20Goofy.png)
Ripple dissolve
A ripple dissolve is most commonly used to introduce flashbacks and dream or daydream sequences. It combines a ripple effect with the cross dissolve.
Spin away
The spin away is commonly used to introduce a newspaper headline. It has become linked with the iconic television series Batman.
Composition
Swipe through these four images to see examples of four composition techniques that enhance appeal and interest in visual storytelling.
Framing
Framing draws attention inward towards the middle of the screen area, similar to how a picture frame gives focus to a painting hanging on a wall.
High contrast
High contrast also helps to bring focus to important areas by accentuating shapes and movement. Since early human development, people have used contrast to interpret visual information.
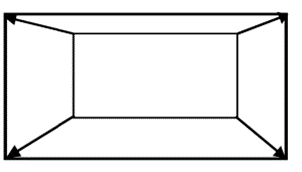
Leading lines
Leading lines direct focus on an area of importance by arranging the camera position and elements on the screen to work as arrows for the viewer.
Rule of thirds
Rules of thirds is another common compositional idea, which simplifies the golden ratio principle by dividing the width and height of the camera frame into thirds with vertical and horizontal lines. Key information is placed within the areas of the screen where those lines intersect.
Practice
Task 3: Identify composition techniques used in three shots
Knowing about the composition techniques used by filmmakers can help your process of creating visually interesting storyboards. Can you identify the key composition techniques used in the three shots below?
What tools or resources do you need for this task?
- Your saved Film Techniques worksheet.
- Swipe through these three images to help you complete this learning task:
What steps should you take to complete this task?
15-20 minutes

Set aside up to 20 minutes to complete steps 1-4 below. Remember to save your work as you go when using Word.
- Examine each of the three shots above.
- Identify the key composition techniques used in each shot.
- Record these key composition techniques in the corresponding worksheet section.
- Make any required updates to your Film Techniques worksheet and save to your device.
What should you do after completing this task?
- Reflect on how different composition techniques guide the viewer's attention and contribute to the storytelling. How might using different composition techniques enhance your storyboarding?
- Share your Film Techniques worksheet to Forum:
- Select your forum thread in Forum: Visual Storytelling - remember to create your thread if you have not already done so.
- Select Reply to your first Forum post.
- Enter the words ‘Task 3: Film Techniques’ in your reply.
- Select the Post your response button, then select Edit in your new reply when it shows up.
- Upload your worksheet using the Attachment field.
- Select Save changes to share your coursework to your forum thread.
- Get feedback on this and the previous two learning tasks at the next Live Session – check the Live Session calendar for dates and times.
Take a breather and then move to the next subtopic, Film Influences and Film Study, where you can identify your film influences and gear up to practice a key assessment task – writing a film study!
Embark on a journey through the world of film - from identifying your film influences and your favourite sequence and shots to learning the steps involved in writing a film study, uncover the depths of the cinematic experience.
Film influences
Important
Use the Film Influences worksheet
In this section, you’ll practise three learning tasks:
- Create a list of your ten favourite films.
- Create a reference board of key shots from two favourite sequences.
- Explain aspects of key shots from your reference boards.
Note: You only need to post to Forum: Visual Storytelling once by using the same worksheet for all three tasks. Just follow these three steps:
- Download this Film Influences worksheet.
- As you work through each learning task, record your findings in the corresponding section of the worksheet – don’t forget to save to your device as you go!
- After completing all learning tasks, upload your completed worksheet to Forum: Visual Storytelling for feedback.
You’ll get a reminder to use the worksheet in each learning task within the Film Influences section.
Watching and discussing films and film sequences – and the ones that influence you as an individual – is a great way to develop your understanding of visual storytelling and filmmaking techniques.
What are your favourite films?
Practice
Task 4: Create a list of your ten favourite films
Do you feel a personal connection to films you’ve watched and enjoyed? Knowing your own preferences and tastes helps you approach visual storytelling with a more personal and critical perspective.
What tools or resources do you need for this task?
- Make sure you have access to the Film Influences worksheet.
What steps should you take to complete this task?
15-20 minutes
Set aside up to 20 minutes to complete steps 1-3 below. Remember to save your work as you go when using Word.
- Download the Film Influences worksheet.
- List in the corresponding worksheet section your ten favourite films (animated or live action).
- Make any required updates to your Film Influences worksheet and save to your device.
What should you do after completing this task?
Great work on identifying your top ten favourite films. Now it’s time to zoom in on specific film sequences from your list.
What are your favourite sequences?
Reflection
From rebels to raiders
Think again about the ten films you listed in the previous learning task.
In those films, are there any specific sequences or shots that you really like or that influence you more than others?
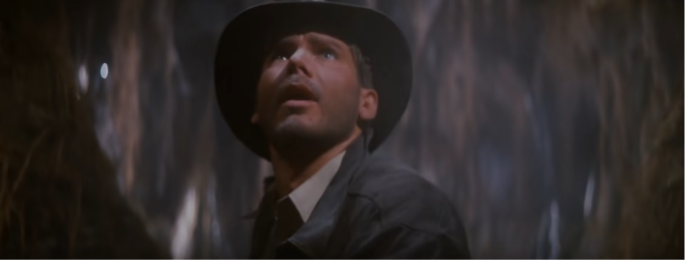
An animation tutor at Yoobee shared two of their favourite sequences, from The Empire Strikes Back and Raiders of the Lost Ark (both films by Lucasfilm Ltd.) and provided reasons why the sequences stood out.
Swipe through both sequences (eight shots each) and read the tutor’s comments.
I like the Hoth battle sequence in The Empire Strikes Back with the AT-AT walkers and the thrilling flight of the snow speeders and the climax where Luke manages to destroy one of the walkers with his lightsabre...
…or Raiders of the Lost Ark in the opening sequence when you are introduced to the character while he is recovering the Idol from inside the temple culminating with the boulder chase.
Practice
Task 5: Create a reference board of key shots from two favourite sequences
Identifying and isolating key shots within film sequences can help you focus on visual storytelling and film techniques that make those shots memorable. Starting with sequences, which stand out to you as a viewer?
What tools or resources do you need for this task?
- Your saved Film Influences worksheet.
What steps should you take to complete this task?
30 minutes
Set aside up to 30 minutes to complete steps 1-4 below. Remember to save your work as you go when using Word.
- Open your Films Influences worksheet.
- Select a favourite sequence from each of the two films in your top ten list.
- Create a reference board of key shots using the corresponding worksheet section:
- Your reference board should have approximately 6-8 shots per sequence (i.e. 12-16 shots across two sequences in total).
- Keep the shots in chronological order.
- Make any required updates to your Film Influences worksheet and save to your device.
What should you do after completing this task?
Now that you've selected your two sequences and created a reference board, it’s time to delve deeper into the individual key shots that impact you as a viewer.
What are your favourite shots?
Choose one of your sequence reference boards and review the shots you have included. Ask yourself three questions:
- What do you really like about each shot?
- What do you think the director was trying to tell you about that moment in the story?
- Is there any detail in each shot that you think stands out as important for the wider story?
Select + to:
- Look at specific shots from the Raiders of the Lost Ark sequence.
- Read the Yoobee animation tutor’s review of why these shots are so appealing.
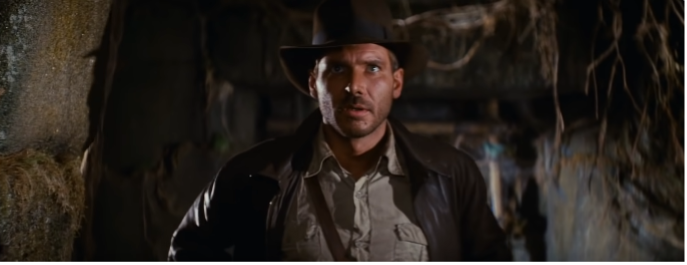
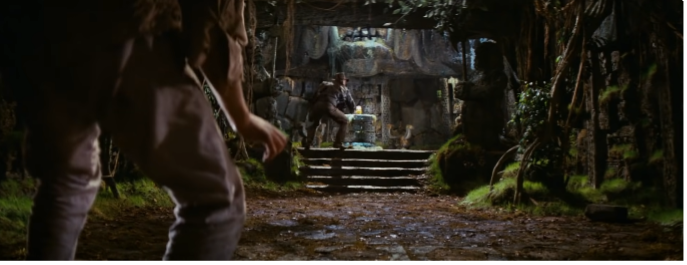
“I particularly like the sense of mystery and suspense which is achieved during the entry to the temple by the pacing and lighting of the shots in the sequence. There’s a feeling of building tension and anticipation, which contrasts well with the frantic pace of the climax at the end of the sequence.”
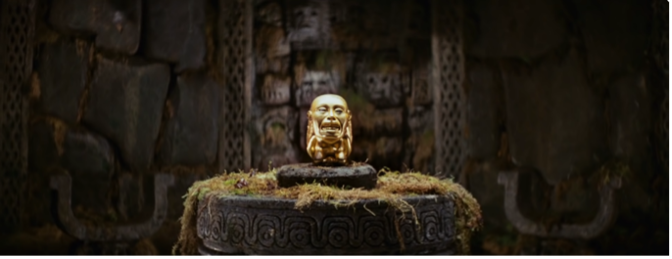
“The reveal of the Idol on the plinth is very effective due to the lighting in the shot. The background is darker, with bright golden light bathing the idol, which draws your attention to the centre of the frame.
“The composition of the shot itself is ritualistic with the placement of the Idol at the centre of the image, which mirrors many examples of religious iconography.”
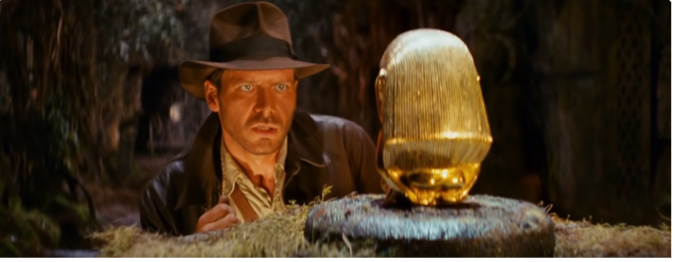
“The pacing of the sequence has some great moments where the main character pauses to consider how best to achieve his goal of getting the Idol.
“My favourite moment/shot is the moment where Indy has reached the Idol and is considering the best method to take it and not set off any traps, which ultimately fails! The lighting in this shot is particularly effective in framing the Idol and the main character from the darker surroundings of the temple.”
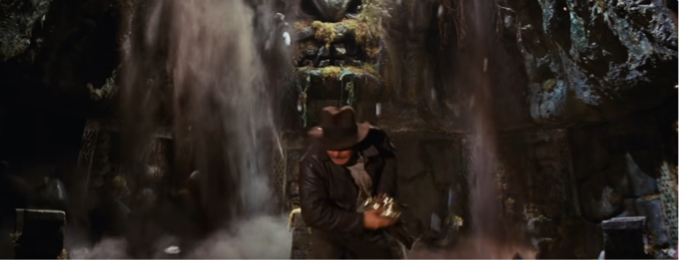
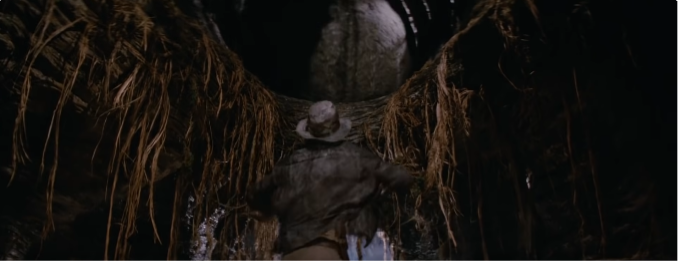
“And finally, the sequence is capped off with the fast-paced and intense rush to get out of the temple alive after setting off the booby traps!”
Practice
Task 6: Explain aspects of key shots from your reference boards
Have you ever tried to explain to someone else why key shots in a film sequence appeal to you as a viewer or why they're so effective? It's a skill that will come in handy when you practice writing a film study, which is the focus of the next section in this Film Influences and Film Study topic.
What tools or resources do you need for this task?
- Your saved Film Influences worksheet.
What steps should you take to complete this task?
1 Hour

Set aside one hour to complete steps 1-5 below. Remember to save your work as you go when using Word.
- Revisit the What are your favourite shots? section above.
- Open your Films Influences worksheet.
- List a key aspect (i.e. a film technique or a visual element) that stands out to you in each shot on your reference board.
- Write 1-2 sentences for each aspect you have listed, explaining why you think it makes the shot effective in telling the story.
- Make any required updates to your Film Influences worksheet and save to your device.
What should you do after completing this task?
- Reflect on how identifying and explaining the aspects of key shots has enhanced your understanding of visual storytelling. How has it improved your ability to break down film sequences and articulate your observations?
- Share your Film Influences worksheet to Forum:
- Select your forum thread in Forum: Visual Storytelling.
- Select Reply to your first Forum post.
- Enter the words ‘Task 6: Film Influences’ in your reply.
- Select the Post your response button, then select Edit in your new reply when it shows up.
- Upload your worksheet using the Attachment field.
- Select Save changes to share your coursework to your forum thread.
- Get feedback on this and the previous two learning tasks at the next Live Session – check the Live Session calendar for dates and times.
In this Film Influences section, you’ve identified your own film preferences and explained how key shots in your favourite film sequences impact you as a viewer. Get ready to dissect film techniques and visual elements even more in the next step of your visual storytelling journey - Film Study.
Film study
Writing a short film study is a great way for you to:
- Learn techniques related to shot types, camera movements, transitions, and composition.
- Build your knowledge of visual storytelling as an animator.
- Help improve your storyboarding and the way you develop your animated sequences.
Important
Gearing up for your assessment tasks
Your first task assessment for this module involves you writing and submitting a film study for a film sequence that has had an influence on you.
In this section, you’ll find seven steps designed to guide you through the process of writing a compelling film study. You'll also encounter five learning tasks to help you practise these steps, using as a case study the animated film Brave.
As you work through each step, remember that writing a film study goes beyond merely dissecting scenes—it's your chance to demonstrate your understanding of visual storytelling techniques. From watching the film to checking your writing, each step plays a vital role in writing an insightful film study.
What is a film study?
In a nutshell, a film study explains:
- the story being told in the film sequence
- how well a film sequence works, and
- why the film sequence works (or doesn’t).
The various elements a film study focuses on include the use of film techniques – such as shot types and camera movements - and the historical and cultural context that the story is set in.
How do you write a film study?
Writing a film study consists of seven steps:
Step 1: Watch a film sequence and list your observations
The first step in writing a film study involves watching a film sequence and listing the:
- visual elements that describe the settings
- film techniques used to tell the story.
The information you list should be specific and include information, details, and examples about the settings and shot types.
It means you need to actively take notice. A good way is to ask yourself the following questions when you watch the film sequence:
- What do you notice about the cultural setting – the world and its characters?
- What about the historical setting – the time period, technologies, and living conditions?
- What do you notice about the film techniques (i.e. types of shots, camera movements, transitions, composition)?
- What film techniques are used?
- Why have these film techniques been used?
Practice
Task 7: List your observations from the opening sequence of Brave
Practice the initial step in writing a film study by carefully observing and documenting the visual elements and film techniques used in the opening sequence of Brave.
This learning task will help you understand how these elements contribute to storytelling and set the stage for your Brave film study.
What tools or resources do you need for this task?
Make sure you have access to:
- the Brave opening sequence (3:18m): Brave Opening Scene (youtube.com)
- an application like Microsoft Word or a similar note-taking app to document your observations.
What steps should you take to complete this task?
15-20 minutes
Set aside 20 minutes to complete steps 1-4 below. Remember to save your work as you go when using your note-taking app.
- Watch the opening sequence of Brave and actively take notice of the visual and cinematic elements presented.
- List its visual elements:
- Observe the cultural setting:
- What do you notice about the cultural setting?
- How do the characters interact with their environment?
- Document specific details such as costumes, architecture, and societal norms.
- Consider the historical setting:
- What do you notice about the historical setting?
- How does the time period influence the story?
- Record examples of technologies, tools, and living conditions shown in the sequence.
- Observe the cultural setting:
- Identify film techniques:
- Pay attention to the types of shots and camera movements:
- What film techniques are used?
- How do these techniques help tell the story?
- Note specific examples of shot types (e.g., close-ups, medium shots, wide shots) and camera movements (e.g., pans, tilts, zooms) and consider their purpose in the narrative.
- Observe the composition and transitions:
- What do you notice about the composition and framing of shots?
- What types of transitions are used?
- List examples of composition techniques (e.g., rule of thirds, leading lines) and transitions (e.g., cuts, fades, dissolves).
- Pay attention to the types of shots and camera movements:
- Organise and save your list of observations into clear categories (e.g., cultural setting, historical setting, shot types, camera movements, composition, transitions).
What should you do after completing this task?
Think about how the visual elements and film techniques in the opening sequence of Brave contribute to your understanding of the sequence’s setting and characters. In what ways do your observed film techniques enhance or detract from the narrative being told?
Use your observations as a foundation for the next steps in drafting your film study of Brave, the next of which is writing the introduction.
Step 2: Prepare an introduction
Using the observation lists you created in Step 1, you’re ready to write an introduction for your film study!
You need to introduce the film the sequence is from and what the sequence is about:
- Start by listing key details about the film sequence, including:
- film title
- production company
- year of release
- director
- a brief story synopsis (e.g. world, setting, characters) in your own words.
- Then, connect these key details and, with a bit of tweaking, write a basic introduction of two or three sentences.
Practice
Task 8: Write an introduction for your Brave film study
Use your observation lists created in the previous learning task to write an engaging introduction for your film study of Brave.
By summarising key details about the film sequence and weaving them together, you’ll introduce the film's context, storyline, and visual elements to hook your reader.
What tools or resources do you need for this task?
Make sure you have access to:
- your list of observations of the opening sequence of Brave.
- an application like Microsoft Word or a similar word-processing app to draft your film study.
What steps should you take to complete this task?
30 minutes
Set aside 30 minutes to complete steps 1-4 below. Remember to save your work as you go when using your word-processing app.
- List key details about the film sequence, including:
- Film title
- Production company
- Year of release
- Director
- Write a concise story synopsis (a brief outline) in your own words using your list of observations, covering the world, setting, and characters depicted in the sequence.
- Use the key details and your short synopsis to write a basic introduction of 2-3 sentences that:
- Introduces the film title, production company, year of release, and director to establish context.
- Provides a concise overview of the sequence’s storyline, offering insight into the world, setting, and characters portrayed in the sequence.
- Save your draft: Choose a clear and descriptive filename for your document, such as ‘Brave_Film_Study’.
What should you do after completing this task?
How successfully does your introduction encapsulate the essence of the Brave film sequence and engage the reader’s curiosity to explore your film study further? What adjustments could enhance the clarity and appeal of your introduction?
When you’re ready, use your introduction as a springboard for the next step of writing paragraphs on film techniques and visual elements for your Brave film study.
Step 3: Prepare several paragraphs about the storytelling
Again, using your notes from Step 1, you’re ready to write some paragraphs describing the storytelling.
It’s about expanding your observations from your original lists and adding examples and details.
- Start by writing sentences that build on items in your observation lists.
- String these new sentences together into short paragraphs describing the film sequence’s:
- film techniques (i.e. types of shots, camera movements, transitions, composition)
- visual elements that describe historical and cultural settings.
Practice
Task 9: Write paragraphs on film techniques and visual elements for your Brave film study
Expand upon your observations from the previous two learning tasks and delve deeper into your breakdown of film techniques and visual elements in the Brave film sequence.
By crafting several descriptive paragraphs, you’ll provide detailed insights into how these techniques and elements contribute to the storytelling and overall impact of the sequence.
What tools or resources do you need for this task?
Make sure you have access to:
- your list of observations of the opening sequence of Brave
- your saved Brave film study draft.
What steps should you take to complete this task?
2 Hours
Set aside two hours to complete steps 1-7 below. Remember to save your work as you go when using your word-processing app.
- Revisit your list of observations of the opening sequence of Brave.
- Identify key points related to film techniques (such as types of shots, camera movements, transitions, composition) and visual elements (depicting historical and cultural settings) that you noted during the film sequence.
- Based on the items in your observation lists, write descriptive sentences that expand upon each point.
- Provide examples and specific details to illustrate how each film technique or visual element enhances the storytelling in the Brave sequence.
- String together the new sentences you've written into short paragraphs.
- Organise these paragraphs into two sections:
- Paragraphs describing the film sequence's film techniques.
- Paragraphs describing the visual elements that depict historical and cultural settings.
- Save your film study draft.
What should you do after completing this task?
How well do your paragraphs convey the significance of the film techniques and visual elements in enhancing the storytelling? What additional details or examples could strengthen your film study?
It's time to expand your understanding further by exploring additional sources such as articles, books, or interviews related to the film sequence. By including insights from these sources in your film study, you'll deepen your comprehension of visual storytelling, sharpening your ability to use visual and film elements within the context of animation.
Step 4: Use other sources of information
You’ve already done the hardest part of your film study in the previous three learning tasks. Now, starting with what you already know, look for other sources for information to expand on your film study.
Using other sources of information helps you unpack a film sequence and gives weight to ideas you've formed. These other sources can also challenge your ideas.
- Watch or read sources such as ‘the making of…’ documentaries, articles about the film, or interviews with its director.
- Take notes of any important quotes that seem relevant to the observations you have already made in your film study. These quotes could be the director's comments about shot choices, composition, camera movement or other storytelling tools.
- You need to cite these quotes later on, so note down where the quotes have come from.
Case Study
Sourcing directorial insights: Mark Andrews and Brave
You’ve already identified that Brave was made by Pixar and directed by Mark Andrews. Now, imagine you'd like to find sources of information about camera techniques that enhance the storytelling in Brave.
Explore direct sources
You could search to find out if Andrews explains his approach to filmmaking in sources such as interviews, 'the making of...' documentaries, featurettes, or media articles.
Watch this brief excerpt (5.20m, starting from 1.24m) of Andrews's lecture to CalArts (California Institute of the Arts) students:
Andrews emphasises how important it is:
to tell the story as economically as possible, letting an image sell itself and give the information that makes sense.
His words, quoted here, reflect observations you may already have made when watching the opening film sequence from Brave. In just the first few shots, the economy of storytelling is very evident, and viewers quickly learn about the world, characters, and historical and cultural settings. All of that is packed into just the two opening shots.
Explore other directions for sources
You could also explore other directions when looking for sources to inform your film study.
Search for ‘Mark Andrews filmography’ online. You'll discover he's worked as a storyboard artist on films like Pixar's The Incredibles, directed by Brad Bird.
Several excerpts are available online in featurettes about making The Incredibles, where Andrews discusses his approach to storyboarding – you can see some of those same ideas in his work on Brave as director.
You could also look to Bird to explore how his directorial choices are similar to (and may have influenced) Andrews’s directorial choices in Brave.
Explore possible connections with sources
Feel free to explore possible connections by seeking examples (i.e. evidence) to support or counter different thoughts and ideas.
The economy that Andrews referred to in the YouTube source above is perhaps most obvious in the handling of characters.
The main character in Brave, Merida, has physical features that reflect her personality, making it almost instant for an audience to understand or identify with the character. She has a:
Brenda Chapman, Co-director and Co-writer of Brave… mass of curly, unbridled, wild hair…. It just had to be red, because she's passionate and fierce and independent, so that as soon as she walks out on screen, you know exactly what her story is, without the filmmakers needing to go into any exposition to see what her character is like.
Economical thinking is equally evident in the environments in Brave. Consider this quote:
Steve Pilcher, Production Designer for BraveMovie making is a visual storytelling medium, and everything that we do supports the story. The design of the backgrounds, the design of the castle, the characters, what we’re trying to say about the land, it’s all in the design.
By exploring the methods of directors such as Mark Andrews, you gain deeper insights into storytelling and film techniques that shape animated experiences like Brave. Exploring various sources for directorial insights will enrich your film study and provide valuable perspectives.
Practice
Task 10: Source quotes for your Brave film study
Deepen your understanding of visual storytelling elements in the Brave film sequence by sourcing quotes from relevant materials such as documentaries, articles about the film, or interviews with its director. By incorporating other sources into your film study, you'll give weight to - and even challenge - your ideas around visual storytelling and provide valuable insights from the creators and themselves.
What tools or resources do you need for this task?
Make sure you have access to:
- the Brave 2012 Behind The Scenes documentary (1:13:46h):
- your saved Brave film study draft.
What steps should you take to complete this task?
2 Hours
Set aside two hours to complete steps 1-6 below. Remember to save your work as you go when using your word-processing app.
- Watch the Brave 2012 Behind The Scenes documentary to gain insights into the filmmaking process and the creative decisions behind the Brave film sequence.
- Note any important comments or other significant insights that align with your previous observations in your film study while watching the documentary.
- Note each quote’s source (i.e., timestamp in the documentary) to ensure proper citation later. This step is essential for citing your sources accurately in your film study and providing proper attribution to the creators.
- Extend your research by watching or reading other relevant sources such as documentaries, articles about the film, or interviews with its director. Repeat Steps 2-3 for each new source.
- Integrate the quotes into your film study by weaving them into your paragraphs to support your interpretations of visual elements and film techniques used in the Brave opening sequence.
- Save your film study draft.
What should you do after completing this task?
How have your sourced quotes enhanced your breakdown of visual storytelling elements in Brave? What new perspectives or insights have you gained from these quotes?
At this point, your film study is really coming together! Take a moment to acknowledge the excellent progress you've made so far. Keep up the great work, and continue refining your words. Next, find out how to:
- Expand your paragraphs and check your progress.
- Use APA Style referencing.
- Do a final check.
- Fine-tune and complete your Brave film study.
Step 5: Expand your paragraphs and check your progress
By now, your film study is taking shape nicely!
Extend your paragraphs
Back in Step 3, you described the film techniques and visual elements that make up the film sequence. You now need to explain:
- which film techniques and visual elements work well, and
- why they work well.
To do this, write two extra sentences for each paragraph explaining what worked well and why.
For example, with your film technique paragraphs (e.g. types of shots):
- Identify which shots are the most effective and would impact an audience most.
- Explain why this is the case.
Check your progress
Once you expand your paragraphs, it’s time to check your film study to make sure you’re on track.
Checklist 1
Use this Checklist 1 to guide you through the criteria to make sure you're on track at this point in your film study.
| # | Criteria | Completed (Yes/No) |
|---|---|---|
| 1 | Introduce key details of the film sequence including: | |
| 1.1 | - Film title | |
| 1.2 | - Production company | |
| 1.3 | - Year of release | |
| 1.4 | - Director | |
| 1.5 | - A very brief story synopsis (e.g. world, setting, characters) | |
| 2 | Indicates the specific part of the film being reviewed and its approximate timecode | |
| 3 | Identifies specific film techniques observed in the film sequence and discusses effectiveness and impact | |
| 4 | Identifies specific visual elements (that describe historical and cultural settings) observed in the film sequence and discusses effectiveness and impact | |
| 5 | Uses specific examples from other sources to support comments, perspectives, and conclusions | |
| 6 | Meets word count – aim for 500-1000 words, equivalent to one to two A4 pages (11-point type) |
Step 6: Use APA Style referencing
Remember back in Step 4 how you used other sources of information to find important quotes?
It’s now time to reference these sources in your film study using a referencing style called APA Style.
Tip
Reference with precision – Academic Writing Essentials
APA Style is widely used in academic writing and research to acknowledge the ownership of sources of information and ideas used in a paper or article – like a film study.
APA Style provides you with guidelines to format:
- citations within your text
- a reference list at the end of your film study
You’ll find more information on using APA Style when referencing your sources in the Academic Writing Essentials subtopic. Just follow these breadcrumbs:
4. Foundations > 4.2 Visual Storytelling > 4.2.4 Academic Writing Essentials > Referencing
Step 7: Do a final check
Now for the final step! Spend time thoroughly checking your work for its:
- writing style
- clarity
- use of paragraphs
- avoidance of first-person writing
- grammar
- spelling.
Tip
Polish your writing!
Looking to improve your writing for your film study assessment task?
Check out the following Academic Writing Tips subtopic for helpful strategies. From crafting clear paragraphs to avoiding first-person writing, you'll find helpful tips to elevate your writing.
4. Foundations > 4.2 Visual Storytelling > 4.2.4 Academic Writing Essentials > Academic Writing Tips
You can also seek feedback on your work (and check you’ve used APA referencing properly) with your facilitator.
Checklist 2
Use this final Checklist 2 to guide you through the final check criteria:
| # | Criteria | Completed (Yes/No) |
|---|---|---|
| 1 | Introduce key details of the film sequence including: | |
| 1.1 | - Film title | |
| 1.2 | - Production company | |
| 1.3 | - Year of release | |
| 1.4 | - Director | |
| 1.5 | - A very brief story synopsis (e.g. world, setting, characters) | |
| 2 | Indicates the specific part of the film being reviewed and its approximate timecode | |
| 3 | Outlines which materials you’ve sourced during your review, e.g. filmscripts, storyboards, ’the making of…’ documentaries, interviews, articles. | |
| 4 | Identifies specific film techniques observed in the film sequence and discusses effectiveness and impact | |
| 5 | Identifies specific visual elements (that describe historical and cultural settings) observed in the film sequence and discusses effectiveness and impact | |
| 6 | Uses specific examples from other sources to support comments, perspectives, and conclusions | |
| 7 | Includes citations and uses APA referencing style. | |
| 8 | Meets word count – aim for 500-1000 words, equivalent to one to two A4 pages (11-point type) |
Practice
Task 11: Fine-tune and complete your Brave film study
It's time to finalise and polish your Brave film study! Expanding your paragraphs, checking your progress, and following APA style guidelines will help you complete a well-structured, comprehensive, and insightful film study.
This learning task also includes an opportunity for you to receive valuable feedback on your film study, helping you refine your work and craft an even better film study as part of this module's first assessment task.
What tools or resources do you need for this task?
- Make sure you have access to your Brave film study draft.
What steps should you take to complete this task?
2 Hours
Set aside two hours to complete steps 1-6 below. Remember to save your work as you go when using your word-processing app.
- Revisit the Film Study section to reinforce what you know if you need to.
- Expand your paragraph by adding depth where needed, ensuring each paragraph supports your breakdown of the film techniques and visual elements in the Brave opening sequence.
- Check your progress to make sure you’re on track.
- Refer to the Check Your Progress checklist above.
- Re-read your film study to ensure it flows logically and coherently.
- Make sure each paragraph transitions smoothly to the next.
- Meet the word count. Aim for a word count of 500-1000 words, equivalent to one to two pages A4 pages in 11-point type. Adjust your content to be concise yet thorough, ensuring you stay within this limit.
- Use APA Style to acknowledge your sources:
- Review all quotes and references you've included in your film study.
- Format each citation according to APA Style guidelines, ensuring proper attribution to sources.
- Tip: Visit the Academic Writing Essentials subtopic to learn how to use APA Style.
- Complete a final check:
- Clarity: Make sure your ideas are clearly expressed and easy to follow.
- Use of paragraphs: Ensure each paragraph has a clear main idea and supporting details.
- Grammar and spelling: Proofread your film study for grammatical or spelling errors.
- Save your final draft using a clear and descriptive filename, such as ‘Brave_Film_Study_Final’.
- Post your completed film study to the forum for feedback (see below).
What should you do after completing this task?
- Reflect on the evolution of your film study from its initial stages to completion. What challenges did you face in breaking down the visual storytelling elements of the Brave opening sequence, and how has your understanding of film techniques used in animated films deepened?
- Share your Brave film study to Forum:
- Select your forum thread in Forum: Visual Storytelling.
- Select Reply to your first Forum post.
- Enter the words ‘Task 11: Film Study’ in your reply.
- Select the Post your response button, then select Edit in your new reply when it shows up.
- Upload your photo(s) or files using the Attachment field.
- Select Save changes to share your coursework to your forum thread.
- Get feedback on this and other learning tasks at the next Live Session – check the Live Session calendar for dates and times.
It’s time for a well-deserved break away from your device! When you come back, look out for the next subtopic, Academic Writing Essentials, if you need help with referencing or citing your sources.
Alternatively, go straight to the next subtopic, Story Concept Development to discover the initial step of animating your final sequence!
Use this Academic Writing Essentials subtopic to discover how to enhance your film study through proper referencing. Learn to accurately cite your sources, ensuring your work is credible and traceable, setting the stage for a well-supported and comprehensive film study.
Important
Connecting Academic Writing Essentials with your Film Study
Knowing the essentials of academic writing is critical when writing a film study, particularly for Step 6: Prepare References and Citations. That step involves providing specific references for your sources in the proper format to enhance the credibility of your work.
How this subtopic helps you:
- Proper referencing: Learn the correct format for listing sources in your reference list, ensuring your film study clearly references the specific part of the film you are reviewing and helping you avoid plagiarism.
- Citation styles: Familiarise yourself with the APA Style commonly used at Yoobee. This knowledge is important for formatting your in-text citations accurately.
- Paraphrasing and quoting: Effectively integrate ideas and statements from your sources into your film study.
By leveraging the skills from this subtopic, you'll be well-prepared to create references and citations, strengthening your film study and acknowledging the wider intellectual and filmmaking communities.
Referencing
Citing (i.e. referring to) the sources that helped you produce your written work (such as your film study) means that you can:
- Acknowledge the ownership of sources you've used to write your film study.
- Provide information to the reader to help them identify and retrieve the sources if they want to find out more.
To help you do this, you need to use referencing.

Various referencing styles are used depending on the needs of a particular discipline or academic area. Yoobee College of Creative Innovation uses American Psychological Association (APA) Style.
APA Style includes two key referencing elements you need to use in your film study:
| Referencing element | Description |
|---|---|
| In-text citation | Very brief information about a source is inserted into the body of your text (hence ‘in-text’), allowing readers to locate the full source information in your reference list. |
| Reference list | A comprehensive list at the end of your film study, detailing full information of all sources you’ve cited in your text. |
How do you create in-text citations?
Use APA Style’s author-date system for in-text citations, which combines up to three basic components:
- last name (e.g. Miyazaki) of the source’s creator
- year of publication (e.g. 1988) of the source
- timestamp (e.g. 12:35) when citing from audio-visual sources (e.g. a filmed interview).
You then insert the citation (Miyazaki, 1988) into your text:
This film (Miyazaki, 1988, 12:35) portrays the director’s masterful animation, blending whimsical character design with lush, evocative backgrounds.
Two different types of in-text citations
You can choose between two different types of in-text citations:
| In-text citation type | Description and example |
|---|---|
| Parenthetical citation |
Used when the focus is on the information or idea rather than the creator. Useful for integrating the source without disrupting the text’s flow: This film (Miyazaki, 1988, 12:35) portrays the director’s masterful animation, blending whimsical character design with lush, evocative backgrounds. |
| Narrative citation |
Used when the creator’s name is integral to the sentence, highlighting their contribution or perspective. Useful for emphasising the authority or significance of the source. Miyazaki (1988: 12:35) portrays his masterful animation style, blending whimsical character design with lush, evocative backgrounds. |
The formatting for these two types of in-text citations applies to a source with either one or more than one author:
| Number of authors | Parenthetical citation | Narrative citation |
|---|---|---|
| One author | (Miyazaki, 1988, 12:35) | Miyazaki (1988, 12:35) |
| Two authors | (Miyazaki & Niwa, 2010, 8:34) | Miyazaki and Niwa (2010, 8:34) |
| Three or more authors | (Miyazaki et al., 2013) | Miyazaki et al. (2013) |
| Organisation | (Kinema Junpo Movie Database, 2020) | Kinema Junpo Movie Database (2020) |
How do you create a reference list?
At the end of your film study, list all the works you've referred to in your writing under a heading called 'References'.
References are always longer than in-text citations but have all the information needed for a reader to locate the source. Its formatting changes depending on whether your source is visual, written or verbal, online or printed.
Follow these steps to ensure your reference list is properly formatted:
- Heading: Start with the heading ‘References’ centred at the top of the page.
- Format for films:
- Begin with the last name and first initial of the author/creator: (Miyazaki, H.)
- In parentheses, specify the creative role in italics: (Director)
- Include the year of release in parentheses: (1988)
- Write the film title in italics, followed by the type of film in square brackets: [Animated feature]
- Conclude with the country of origin and the distributor: Studio Ghibli
Example of reference list item for a film source
For the in-text citation (Miyazaki, 1988), you would write the following in your reference list:

- Last name and first initial of the author/creator
- Creative role (for films)
- Year of release
- Film title and type of film
- Country of origin and distributor
Tip
Stay Organised, Research Efficiently, Cite Correctly
Save your sources’ links as you research - list all the references and in-text citations as you draft your film study to avoid none are missing from your reference list.
It’s best to use an APA referencing resource to get the structure right. You’re not expected to remember the exact format of different types of reference formatting, but you can use a reference ‘generator’ resource to support you.
For more information on APA Style, visit How to Cite in APA Style. You can also use this site’s APA Citation Generator to help you when creating your reference list.
Quoting and paraphrasing
Referencing often involves directly quoting or paraphrasing your sources.
Quoting and paraphrasing are two essential techniques for integrating evidence into and supporting your film study, while ensuring you give credit to the original authors.
Using and citing quotations
Quotations must be identical to the source text. Enclosing the words in quotation marks (" ") signals that the words are quoted directly from another source.
Quotations require in-text citations.
Example of a citation for a quotation
Original source:
Zaboomafoo, a fictional lemur who teaches children about wildlife, starred in his own TV show for multiple seasons on PBS. His huggability endeared him to thousands of children, increasing his ability to spread a love of nature and science to the masses. - Andrew Soria, from Childhood Nostalgia, 2014.
Quotation with in-text citation:
Zaboomafoo “spread a love of nature and science to the masses” (Soria, 2014, p. 4).
Note the use of quotation marks!
Paraphrasing
Use paraphrasing when you convey the meaning of information from the source material, but in your own words i.e. a paraphrase, and not as a direct quote.
A paraphrase also requires an in-text citation, as it is still adapted from another source.
You may find practising paraphrasing in your writing useful, as it allows you to summarise and present information in your own words.
Example of a citation for a paraphrased statement
Original source:
Zaboomafoo, a fictional lemur who teaches children about wildlife, starred in his own TV show for multiple seasons on PBS. His huggability endeared him to thousands of children, increasing his ability to spread a love of nature and science to the masses. - Andrew Soria, from Childhood Nostalgia, 2014.
Paraphrased statement with in-text citation:
Zaboomafoo the lemur is a furry, lovable, and kind PBS character that instilled a love of wildlife and science in young TV audiences (Soria, 2014).
Note the absence of quotation marks – it’s your paraphrase, not a direct quote. Remember, however, to still cite the paraphrase with an in-text citation (in the example above, a parenthetical citation).
Writing tips
A well-referenced paper is crucial, but writing with clarity and coherence is equally important. This section provides essential tips for organising your ideas effectively and ensuring your film study is well-structured and polished.

Write with style and clarity
Many students make the mistake of thinking that the content of their paper is all that matters. Although the content is important, it will mean little if the reader can't understand what you are trying to say.
Create clear paragraphs
Creating clear paragraphs is essential. Paragraphs come in so many sizes and patterns that no formula can cover them all. The two basic principles to follow are:
- A paragraph is a means of developing and framing an idea or impression. You should address only one major idea per paragraph.
- The divisions between paragraphs are not random but indicate a shift in focus. In other words, you must carefully organise the order of your paragraphs so that they are logically positioned throughout your paper. Transitions will help you with this by smoothly guiding the reader from one paragraph to the next, indicating shifts in thought or emphasis.
Tip
Using transitions
Transitions are words and phrases that help guide the reader through the logical flow of ideas and ensure smooth transitions between sentences and paragraphs. They come in various forms and serve different purposes in writing.
Here are some examples:
- Addition: Additionally, Furthermore, Moreover, In addition, Also
- Comparison: Similarly, Likewise, In the same way, Just as
- Contrast: However, Nevertheless, On the other hand, Conversely, In contrast
- Cause and Effect: Consequently, Therefore, Thus, As a result, Accordingly
- Sequence/Order: Firstly, Secondly, Lastly, Next, Finally
- Example/Illustration: For example, For instance, Specifically, To illustrate
- Conclusion: In conclusion, To sum up, Ultimately, In summary, Therefore
- Time: Meanwhile, Afterward, Subsequently
- Emphasis: Indeed, In fact, Certainly, Of course, Undoubtedly
- Result: Consequently, Accordingly, Hence, Therefore, Thus
Avoid first-person writing
The first-person point of view is considered informal and is not encouraged in academic writing. First-person can weaken the writer's credibility in research and argument, as it reads as the writer's personal opinion.
Use APA Style to reference
If you are using someone else’s idea, acknowledge it. Use APA Style to cite information from other sources, i.e. in-text citations and a reference list.
Check grammar and spelling
Make sure your film study is free from grammar and spelling mistakes. Mechanical errors are usually the main reason for lack of clarity in writing, so thoroughly proofread your film study before submitting it.
Developing your story concept sets the stage for animating your final sequence. Explore a structured process in this subtopic, accompanied by a case study of a library mystery scene, to develop a compelling narrative. Through practical insights and learning tasks, hone your skills in story concept development to excel in your assessment task of drawing a storyboard.
Important
Gearing up for your assessment tasks
An assessment task in this module involves drawing a storyboard for a sequence of 4-6 animated shots based on your story concept.
Before diving into the storyboard, developing a strong story concept is essential.
This subtopic will guide you through a structured process comprising three essential steps to develop your story concept. Using a case study of a library mystery scene, you'll gain practical insights into crafting a compelling narrative.
Additionally, you'll be able to apply these steps through two learning tasks designed to reinforce your skills in concept development.
As you work through these tasks, remember that a well-developed concept is crucial for creating a compelling storyboard. Take your time to brainstorm creatively and write a clear, concise synopsis.
Each step you complete will bring you closer to producing a storyboard that effectively conveys your final sequence story.
Developing your story concept
To develop a story concept for your storyboard, follow the three steps outlined in the diagram below:

Step 1: How do you generate ideas?
Generating ideas can be one of the hardest parts of creating an animated short sequence.
- What should you create?
- Where do you start?
Finding inspiration through film
A good place to start can be looking at the films or sequences you admire, like you did in the Film Influences section of this topic. Are there any shots or ideas from these that you could adapt and use to inspire your own short series of shots to tell a narrative?
Finding inspiration from other genres and stories
What interests you in your life outside of animation?
Do you enjoy a particular genre? Is there inspiration you can draw from a series of novels or games?
For example, do you enjoy spy or detective stories? Could you build a sequence around a private detective's office?

Brainstorming ideas with others
Brainstorming is a creative technique involving a group of people freely sharing and discussing ideas in a non-judgmental way to generate creative concepts or solutions.
Bouncing ideas with others can be an efficient way to create and develop ideas, so you could try brainstorming ideas with friends or family.
Case Study
Story concept – Generating an idea
The first part of this story concept case study describes the process of generating ideas, narrowing them down, and ultimately selecting a feasible concept (a library mystery scene) to bring to animated life.
Initial project ideas
Several ideas for possible projects were considered, including:
- Discovering the ruins of an ancient temple in the jungle.
- The messy office of a private detective during a bizarre case.
- A Victorian observatory while making an amazing discovery about the cosmos.
- A quiet underground tube station late at night as a train rattles by.
Narrowing down the ideas
Ultimately, none of these ideas were chosen for this project. The first two ideas were too broad in their scope and would require more time to complete than was available. Creating all the assets necessary to make a convincing jungle would take far too long to complete. Similarly, a messy detective's office would require more modelling and texturing than could be completed in a short timeframe, doing the idea justice.
Focusing on feasible concepts
The Victorian observatory and tube station were good ideas for interesting and achievable environments to build in the timeframe. Still, no clear idea of a narrative could be built around the setting. Too much time would likely be spent trying to build that story element of the project.
Final decision on an idea
In the end, a scenario set in the library of an old manor house was chosen. This idea provided plenty of scope to create a nice-looking environment, and the concept of an old private library sparked an idea for the essential narrative element. This narrative element would keep the audience interested in the project’s visual aspect.
Practice
Task 12: Generate three simple story ideas
Practice generating story ideas, which is the initial step in developing a story concept for your storyboard. By practising this skill, you'll gain valuable confidence in exploring various narrative possibilities and grow your storytelling abilities.
What tools or resources do you need for this task?
Make sure you have access to any app or tool that allows you to generate and record your story ideas. Choose the tools that you feel most comfortable with, or that align best with your creative process.
What steps should you take to complete this task?
1 Hour
Set aside up to one hour to complete steps 1-3 below. Remember to save your work as you go.
- Explore sources of inspiration to stimulate your creativity:
- Watch films or animated sequences that inspire you.
- Explore different genres, themes, and mediums (e.g. books, games).
- Pay attention to elements like settings, shots, and other visual storytelling techniques that resonate with you.
- Generate individual story ideas:
- Set aside dedicated time to brainstorm and generate three simple story ideas on your own.
- Use mind mapping, free writing, or visual brainstorming techniques to stimulate your imagination.
- Write down each idea as it comes to you without worrying about judgment or criticism.
- Allow yourself to explore different story concepts and let your creativity flow freely, keeping your ideas simple.
- Select your three top story ideas for upcoming story concept development.
What should you do after completing this task?
- What type of idea generation most effectively stimulated your creativity during this learning task? Which aspects of your three ideas do you find most compelling or promising?
- Share your three ideas to Forum:
- Select your forum thread in Forum: Visual Storytelling.
- Select Reply to your first Forum post.
- Enter the words ‘Task 12: Ideas’ in your reply.
- Select the Post your response button, then select Edit in your new reply when it shows up.
- Upload your photo(s) or files using the Attachment field.
- Select Save changes to share your coursework to your forum thread.
- Get feedback on this and other learning tasks at the next Live Session – check the Live Session calendar for dates and times.
Now that you've generated three promising story ideas, it's time to develop one of them further by creating a compelling narrative around it. In the next learning task, you'll practise crafting a concise synopsis that captures your concept’s storyline.
Step 2: How do you create a story around your idea?
With the basic idea chosen, the next step is to create a story or narrative element to build around your initial idea.
Sometimes, this narrative idea can spring immediately to mind as part of your inner creative process.
Case Study
Story concept – Creating a story around the chosen idea
The next phase in the story concept case study describes the main story points for the library mystery scene idea.
Main story points
The narrative framework of the project unfolds in a series of distinct story points – or story ‘beats’ – each contributing to the overall storytelling:
- Library entrance: The scene opens as viewers are introduced to the library setting, entering through its grand main doors, setting the stage for the unfolding story.
- Gramophone and newspaper: Moving deeper into the library, attention is drawn to a gramophone and a newspaper with a headline proclaiming "Heiress Inherits Fortune!" placed on a side table.
- Fireplace and chair: Progressing further, the focus shifts towards a large fireplace and a chair, positioned with its back to the camera, creating an air of mystery and anticipation.
- Fallen book: As viewers approach, a fallen book comes into view, lying carelessly on the floor, signalling a disruption in the tranquil library environment.
- Pool of red liquid: The fallen book reveals a pool of red liquid on the floor, juxtaposing the serenity of the library with an ominous presence. Small drips of liquid intensify the sense of unease.
- Source of the drips: Following the trail of drips, attention is drawn to a feminine hand loosely holding a nearly empty wine glass, the source of the mysterious liquid slowly dripping onto the floor.
Next step: the synopsis
These story beats serve as a foundation for writing a synopsis of the story, which in turn will guide the creation of storyboards and (eventually) the project’s animatic.
Step 3: What is a synopsis?
A synopsis is a brief paragraph that outlines and summarises the overall ‘beats’ of the story. It serves as a high-level overview without delving into exhaustive detail.
Case Study
Story concept – Writing the synopsis
The final phase in the story concept case study is writing a synopsis of the library mystery story.
Synopsis example
Think of a synopsis as a teaser or preview that describes the story, offering enough information to grasp the essence of its narrative. Read this synopsis of the library mystery story:
"We enter the library of a grand old home; the furnishings are varied, rich and comfortable, and a large painting is proudly displayed over a fireplace, which takes up most of the wall at the far end of the room. A large imposing leather chair is in front of the fireplace, with its back towards the door. An old gramophone plays softly on a side table near the door. As we approach the chair, a newspaper proudly proclaims, “Heiress inherits fortune!”. Something doesn't seem quite right; a slumped shape is lying in the chair, a book lies crumpled on the floor, and a pool of dark red liquid beside it."
Bridging concept development and storyboards
The synopsis now functions as the narrative backbone, providing a clear roadmap for the visual storytelling journey in the animated project. It serves as a direct translation of the conceptual idea into actionable scenes, guiding and shaping the creation of a storyboard.
Practice
Task 13: Write a short synopsis for one of your ideas
Develop your story concept further by crafting a short synopsis for your story idea. This task focuses on the second and third steps of concept development, where you create a cohesive story around your initial idea and write a synopsis to outline its main story beats.
What tools or resources do you need for this task?
Make sure you have access to any app or tool that allows you to generate and record your story points and synopsis. Choose the tools that you feel most comfortable with or that aligns best with your creative process.
What steps should you take to complete this task?
2 Hours
Set aside up to two hours to complete steps 1-7 below. Remember to save your work as you go.
- Choose one idea from the three you generated and selected in the previous learning task. Consider which idea resonates with you the most and has the potential to be the most engaging.
- Refine or narrow down your idea if you need to adjust it to fit the scope of your final sequence’s requirements.
- Brainstorm story points – ‘story beats’ – that could occur within the story. Consider the beginning, middle, and end.
- Create an outline (e.g. a list) that outlines the major plot beats, including the introduction, rising action, climax, and resolution. This outline provides a roadmap for your narrative. Ensure a sense of progression and development throughout.
- Flesh out your outline with sensory details, vivid descriptions, and emotional resonance to bring your story world to life for the reader or viewer.
- Take time to revise and refine your outline, focusing on pacing, narrative development, and thematic consistency. Make any necessary changes to strengthen the narrative.
- Write a concise synopsis that outlines the main plot points of your story. Keep it focused and capture the essence of your narrative in one brief paragraph.
What should you do after completing this task?
- As you wrote your short synopsis, what challenges did you encounter in keeping it focused? How did you ensure that your synopsis effectively captured the main story beats while maintaining its coherence?
- Share your synopsis to Forum:
- Select your forum thread in Forum: Visual Storytelling.
- Select Reply to your first Forum post.
- Enter the words ‘Task 13: Synopsis’ in your reply.
- Select the Post your response button, then select Edit in your new reply when it shows up.
- Upload your photo(s) or files using the Attachment field.
- Select Save changes to share your coursework to your forum thread.
- Get feedback on this and other learning tasks at the next Live Session – check the Live Session calendar for dates and times.
After writing your short synopsis, the next step is translating your narrative into visual storytelling through storyboards. In the next subtopic, you'll learn how to create dynamic and engaging storyboard sequences that visually bring your story concept to life. Through this process, you'll further develop your storytelling skills and refine your ability to communicate stories effectively through images and sequences.
Learn storyboard formatting essentials – from key elements to terminology – and the techniques for a smooth storyboard flow, plus how to make your storyboards more engaging by adding visual interest.
Storyboard formatting
The storyboard artist’s main role when drawing a storyboard is to tell a clear story. An important component that supports this role is formatting.
What are the key formatting elements of a storyboard?
The following storyboard page is a good example of storyboard formatting, i.e. how to label scenes and indicate basic information, including:
- scene number
- camera position notes
- camera movements (indicated by using arrows)
- clear composition and staging
- action descriptions.
![[ADD IMAGE'S ALT TEXT]](/sites/default/files/Tone.png)
How many storyboard panels should you use?
Panels per page
Three or six panels (pictures) per storyboard page is standard, allowing you to view the pictures as a sequence and to help you see and plan story continuity.
Panels per scene
Use as many panels as required to describe the action in any scene clearly.
You should draw a new panel for every new major action or expression change.
Tip
Capturing a story’s essence
Think of your storyboard reading just as a story would, capturing not only action and staging but mood, emotion, and atmosphere.
A storyboard artist’s choice of visuals must clearly describe the action and events in the story, as well as the story's mood, flow and pacing.
As well as an eye for camera work, it helps to know how acting works to position characters and describe their actions and expressions well in each scene.
Storyboard panels (pictures) may be cut out as individual panels and stuck on a wall, where they are viewed in sequence by the animation team, who can then arrange the panels differently and draw additional panels if needed.
What about storyboard terminology?
Storyboarding terminology may differ between production houses, but you will come across abbreviations and basic terms.
Use this glossary to locate these abbreviations and terms.
What are basic rules to follow when storyboarding?
Select + to view basic rules of thumb to help create a great storyboard. Note: Like many rules, you can bend (or even break) these as you become more experienced as a storyboard artist.
- Camera movements are used to follow action and clearly ‘cover’ all the important information and action in any given sequence. A good storyboard artist uses different camera movements to enhance their storytelling by adding drama, tension, and dynamic appeal.
- Generally, use a truck-in (moving closer) to show more detail, and a truck-out (moving further away) to show more surrounding information and scale.
- Different camera movements also have various emotional or atmospheric effects on the viewer. A truck-in not only focuses attention on a specific area of a shot, but by varying their speed, it also changes pacing. It can create a sense of urgency, alarm or surprise by moving quickly, or it can add a sense of sadness, emotional connection, or introspection by slowly moving in on someone’s eyes.
- The camera movement speed can significantly affect the storytelling. Consider how you observe the world in your everyday life. You move your eyes fast to follow fast actions, and when things move slowly around you, you tend to move your viewpoint slowly.
- Avoid cropping your frame at the joints of any character, i.e. don't crop directly at the ankles, knees, waist, neck, elbows, crotch, or armpits. Cropping characters at any of these positions generally looks bad and distorts the proportions of the character’s body and limbs.
- Avoid creating bad tangents. Bad tangents occur by cropping your frame, so a character’s silhouette rests exactly at the edge of the screen. It is better to move the character or the framing slightly, so the character is away from the edge of the frame or move them more out of shot so less of the character is seen.
- Jump cuts occur when a shot changes, causing a jolting and briefly confusing effect on the viewer, making the scene difficult to watch.
- For example, when much of the information remains similar from one shot to the next, only changing slightly, a jump cut has the effect of the same camera jumping a little closer, further away, or from side to side. As the shot is similar to the previous shot, the viewer perceives it as an ‘instant’ camera repositioning.
- Imagine looking at a stage in a theatre and visualising a line between the stage and the audience. The audience cannot cross the line.
- Now, visualise an imaginary line when staging your shots. This line sits like a frame around your viewpoint. When storyboarding, if you shift the viewpoint from one side of the line to the other, the audience will become momentarily disorientated – everything seems to flip or become mirrored, i.e. what was previously on screen left will now be screen right and vice versa.
Some do’s and don’ts
Storyboarding can be one of the most challenging stages in the animation pipeline – and it can also be the most rewarding.
The difference between mediocre and well-designed stories can be in the effort and imagination put into the design. A good script plus a good storyboard inspires all the artists that work on the project.
To help achieve this, here are some essential do's and don'ts when creating effective storyboards.
| Do’s | Don't |
|---|---|
| Do get the audience as close to the action as possible, depending on the type of scene. Keep the audience involved in the story. | Don’t draw your characters too small – you want the audience as close to the action as possible. An establishing shot, of course, will play up the layout view or background. |
| Do remember that the storyboards are at the beginning of a long process. A well-thought-out story will make it easier for all the following departments, e.g., layout and cleanup. | Don’t have one panel with an explanation of everything about it underneath. |
| Do make enough drawings to explain a scene. Show how you want it to work. | Don’t render your drawings too much – it will sap your time and make the storyboard too busy. |
| Do try to balance how much detail is in the panels. More information will be necessary on key panels, but keep the storyboard to what is essential. | Don’t be so tied to the script that you think you must follow it word for word – you have control over the storytelling visually and are making an expression from the script, so feel free to elaborate and improve ways of telling the story. |
| Do keep expressions correct and strong on all drawings. Try for fresh drawings – as the story flows, so should the spirit of the drawings. | |
| Do maintain an open mind and be willing to listen – the director may not always approve of your ideas. Keep your explanations clear on the storyboards. |
How do you draw a storyboard for a short sequence?
Now that you’re familiar with the basic elements and conventions around standard storyboarding, it’s time to pull it together and build a short series of storyboard panels for a sequence based on a simple story idea.
Case Study
Bath time
Remember that the first step in drawing your storyboard for a short sequence is generating a simple story idea (see the Story Concept Development subtopic if you need to refresh your memory). A story idea could be a toddler climbing a sofa or you kicking a ball around.
Consider this synopsis for a simple story:
A small baby is having a bath, splashing and enjoying the warm water. Suddenly, he stops thrashing about in the water and a look of intense concentration forms on his face. Just as suddenly, a stream of nasty, toxic-looking sludge appears in the water. The baby's face then returns to normal, and he goes back to thrashing around in the now-spoiled water.
So, what do you do next to draw your storyboard? Look at the following process and find out!
1. Brainstorm a simple story idea
See the Bath time story above as an example of an idea – “A small baby is having a bath…”
2. Plan the types of shots needed
Plan an establishing shot and action shots to visualise the story.
3. Draw a panel for the establishing shot
Draw a panel of the establishing shot to set up the setting and time of day.
![[ADD IMAGE'S ALT TEXT]](/sites/default/files/Drawing.png)
3. Draw panels for the action shots
Draw panels of the each shot to visualise the sequence. For example, you can cut to a shot of the baby playing in the water and enjoying bath time.
To get the story's main points across, you don't need any further changes in camera angle. If you stage the shot well, the action can tell the rest of the story without further cuts.
Swipe the following four panels to see drawings of the sequence using a constant camera angle:
4. Insert and label panels in storyboard template
You can now insert the panels into a storyboard template. Ensure you fill out the scene number and information relating to action, camera, and dialogue in the template:
![[ADD IMAGE'S ALT TEXT]](/sites/default/files/Bath%20time.jpg)
Practice
Task 14: Draw a short sequence of storyboard panels for a story idea
Develop your storyboarding skills by creating a short sequence of panels based on a simple story idea. By selecting one scenario from the provided options and brainstorming a story around it, you'll reinforce your knowledge of translating story concepts into visual sequences. Then, draw storyboard panels using the provided template to practice effectively conveying action, emotion, and pacing to engage your audience.
What tools or resources do you need for this task?
Make sure you have access to:
- Storyboard template – you can download and either print a hardcopy or edit it in Adobe Photoshop
- Pencil (2B or similar is recommended) and eraser, or a digital device and tool (i.e. Adobe Photoshop).
What steps should you take to complete this task?
2 Hours
Set aside two hours to complete steps 1-4 below. Remember to save your work as you go if you are using Adobe Photoshop.
- Choose one scenario from the following options:
- It is bathtime for an infant or small child.
- You are playing a sport of your choice.
- A child is climbing a tree or similar structure.
- Brainstorm a basic story idea that revolves around your selected scenario. Consider the setting, characters involved, and the unfolding events. Keep the story simple and focused on the chosen scenario.
- Draw a short sequence of storyboard panels (i.e. 3-6 panels) using the provided storyboard template. Each panel should depict a key moment or action in the narrative, progressing the story from beginning to end.
- Follow the do's and don'ts in the section above to ensure clarity, engagement, and effectiveness in your storyboard panels. Refine your panel composition, character expressions, and the balance between detail and simplicity.
What should you do after completing this task?
- How did translating your story idea into storyboard panels enhance your understanding of visual storytelling techniques, such as shots, composition, and camera techniques? Which do’s and don’ts did you find most challenging to implement in your storyboard?
- Share your storyboard to Forum:
- Select your forum thread in Forum: Visual Storytelling.
- Select Reply to your first Forum post.
- Enter the words ‘Task 14: Short Sequence ’ in your reply.
- Select the Post your response button, then select Edit in your new reply when it shows up.
- Upload your photo(s) or files using the Attachment field.
- Select Save changes to share your coursework to your forum thread.
- Get feedback on this and other learning tasks at the next Live Session – check the Live Session calendar for dates and times.
When you’re ready, move through the remainder of this subtopic and learn how to keep continuity intact in your storyboards and make them visually interesting before moving to the Geography subtopic and its implications for camera placement and character staging.
Storyboard flow
A good storyboard flows smoothly from one situation or scene to the next situation or scene, keeping continuity intact.
Poorly chosen shots easily disrupt flow when there's little consideration of how the shots will:
- be seen in a continuous sequence, and
- enhance the flow of the story or damage it.
What storyboard techniques ensure a smooth flow?
To tell a story more effectively, follow three basic storyboarding techniques.
1. Maintain direction
You can achieve good flow by ensuring that if a character moves in one direction in a shot (for example, from right to left on screen), they continue moving in the same direction if the camera cuts to a new shot.
The following sequence is a good example of two shots which flow well. It shows a character:
- exiting a room in the first shot (with a right to left direction), then
- emerging into a hallway in the next shot (maintaining right to left direction).
![[ADD IMAGE'S ALT TEXT]](/sites/default/files/Maintaining%20direction.png)
Tip
Running into a rain cloud (almost)
Check out how Normand Lemay (well-known storyboard artist) portrays the technique of maintaining direction as a basic storyboarding technique:
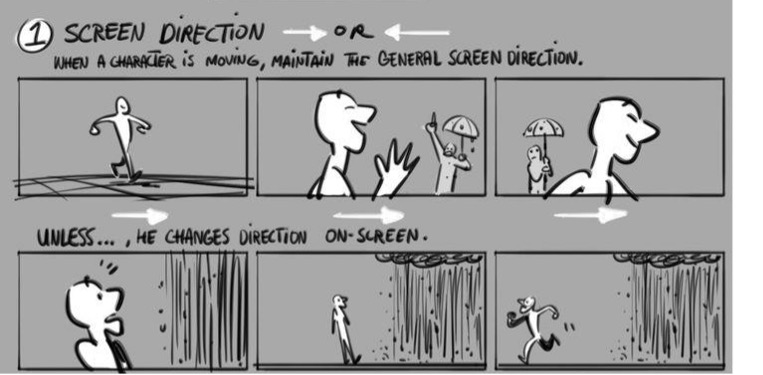
2. Avoid disruption
The following second sequence – which is essentially the same as the one above - does not maintain direction. It’s an example of how sequences can disrupt flow and what to avoid in your storyboards.
It shows the character:
- exiting the room in the first shot (with a right to left direction), then
- emerging into a hallway in the next shot at a different angle (changing to left to right direction).
![[ADD IMAGE'S ALT TEXT]](/sites/default/files/Changing%20direction.png)
This change in direction – from right to left and then left to right – creates disruption and can momentarily disorient the viewer. This disruption is enough to pull them out of the story.
A good storyboard should avoid this – consider the following extended sequence, allowing for a new camera to be introduced without disrupting the flow:
![[ADD IMAGE'S ALT TEXT]](/sites/default/files/Maintain%20The%20Direction.png)
3. Maintain screen position
Maintaining position – or 'screen side' – means keeping characters in the same area on your screen between cuts.
Think of the screen being divided into two, with a vertical line down the middle. Always aim to have each character stay on their side of that invisible line whenever the camera cuts to a different viewpoint.
![[ADD IMAGE'S ALT TEXT]](/sites/default/files/Cut%201.png)
![[ADD IMAGE'S ALT TEXT]](/sites/default/files/Cut%202.png)
Tip
From solitude to sky
Check out how Lemay portrays the storyboarding technique of characters maintaining screen position:
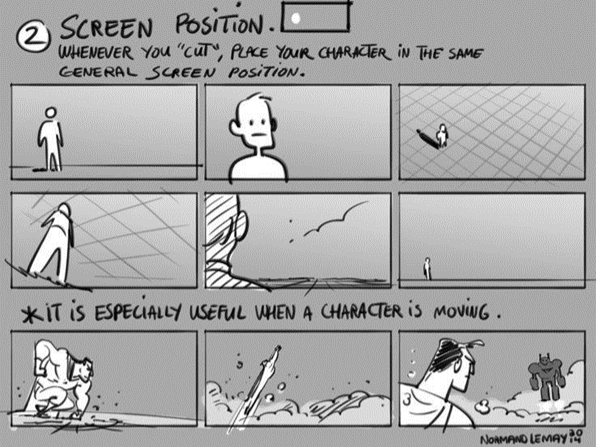
Adding visual interest to a storyboard
A good story engages the viewer. One way to achieve this engagement is to make it visually interesting - another of the roles of the storyboard artist.
To tell a story with added visual interest, the storyboard artist uses film techniques, among other essential techniques.
Which film techniques enhance your storyboard?
Using a variety of different shots
When used in a sequence, too many shots of the same type (e.g., close-ups, full shots, mid-shots) can result in an uninteresting visual journey.
You should choose shots thoughtfully – don’t use a variety of shot types just for the sake of it.

Try to find the appropriate type of shots for each unique storyboard sequence, and keep variety in mind as you plan which shot types to use.
When you have completed your first storyboard sequence draft, look over it and see if you have repeatedly used too many of the same types of shots. If so, try to change some of them to add more variety.
Using a variety of camera moves and transitions
Camera movements
Always read through your storyboards and see if there are places where a camera movement could enhance not only interest but the story, too.
Camera movements can slow or hasten a story sequence. You can also use camera movements as a story-telling tool; for example, a slow truck-in can enhance emotional impact during a tender moment.
Camera transitions
Camera transitions (e.g. cross-dissolves, wipes) can add visual interest to a sequence and are a valuable tool for the storyboard artist. For example, a:
- Fade-in to a new environment can convey a sense of “Meanwhile, across town...”
- Fade-out at the end of a sequence followed by a fade-in to the same location can show the passing of time.
What about other techniques?
Other techniques for adding interest to a storyboard include using:
- composition and design principles
- varying detail levels
- staging.
Composition and design principles
Consider the design of the overall frame. Think about what makes a pleasing combination of large and small shapes, light and dark areas, angles, and curves.
Different lines and angles can evoke different emotional responses from the audience. For example, sharp, jagged lines can create a sense of tension or danger, while smooth, curved lines can evoke feelings of calm and safety.
Which kinds of lines and angles create different kinds of feelings?
Flip the following 16 cards to view how Andrew Loomis, an American illustrator, described the relationship of line to emotional response.
Consider the characters also as compositional design elements. Think about the shapes, sizes, and placement of characters as major design points of a scene, especially in group scenes.

Varying detail levels
Allow for less cluttered areas. The length of screen time affects the amount of detail you can include – longer scenes can have more detail, while shorter scenes should have simpler compositions.
Staging
Position your characters in visually ‘quiet’ areas of the frame for maximum readability. Don’t compose a background without considering character placement and movement; a pleasing background layout may not work well on film if characters don’t fit into it properly.
Not everything important must be centre screen; a major character can often look better when positioned to one side, especially if background elements are designed to lead the viewer’s eye to them.
In animated TV commercials or shows, you need to consider TV cut-offs when staging your characters and background elements. Likewise, think about cinema cut-offs in films.
While less of a problem in modern flat-screen TV’s (see diagram below), older CRT (Cathode Ray Tube) screens have an area around the frame’s edge where the action is sometimes either distorted or cut-off entirely and not visible to the viewer.

So, when composing or staging a scene or shot, consider these cut-off areas of the frame and ensure that any important action always takes place inside the action safe area of the frame, ensuring that the on-screen action is always visible to the viewer.
Find out how to establish logical camera placement and stage your characters to align with a story landscape's geography, crucial to creating coherent and consistent storyboards.
Camera placement
How do you establish camera placement?
Start by planning the environment in which your characters move, considering both top and front views.
Imagine cameras around the environment to capture the shots needed for your sequence. Consider how elaborate your staging should be for your storyboard’s readability and visual appeal – will your camera placement be basic or complex?
Basic camera placement
For basic camera placement, think of the environment as a theatre stage with all the action behind the theatre’s proscenium arch. This simple approach ensures straightforward shots like close-ups and long shots directly in front of the action.
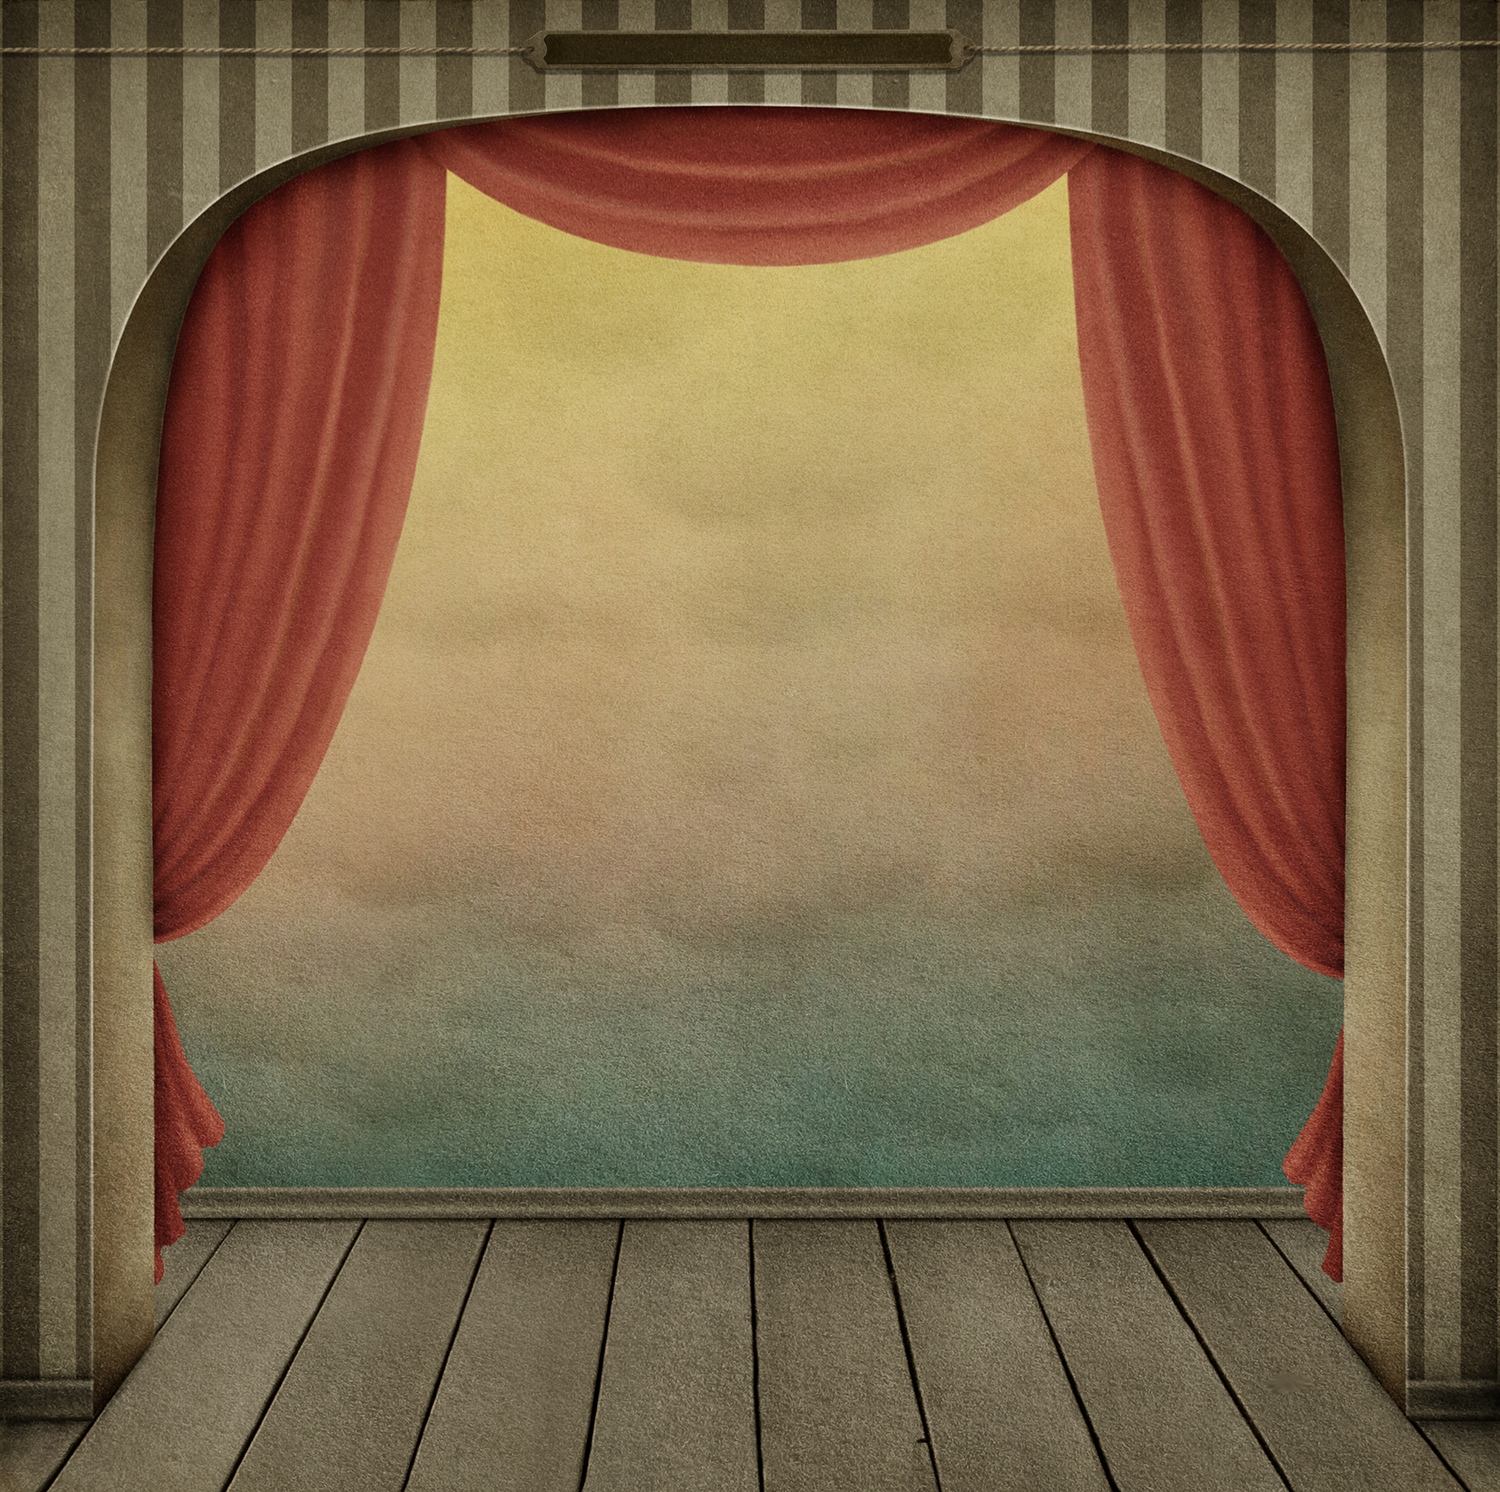
Complex camera placement
For more elaborate staging, consider the following three elements:
- screen direction
- camera placement logic
- camera movement.
Establish screen direction
Even if your camera placement differs radically from scene to scene, screen direction can be the cohesive element.
![[ADD IMAGE'S ALT TEXT]](/sites/default/files/Screen%20Direction.png)
Suppose your character runs across the screen from left to right (as in the sequence above), but you plan shots from right to left.
Imagine the audience’s confusion if the second scene was flipped:
![[ADD IMAGE'S ALT TEXT]](/sites/default/files/Confused%20Audience.png)
In that case, spatial relationships completely reverse - it will look as if the character is swapping places in the geography rather than the camera changing its point of view.
Logic of camera placement
Consider the logic of camera placement based on your characters' size and speed of movement:
- Small characters may require the camera close to the ground with them at all times.
- With fast-paced sequences ( e.g. a typical road-runner chase scene), you may want a succession of scenes with the character centre screen and backgrounds rushing past (rather than interrupting the flow with, for example, a scene that has a stationary camera in the middle of the action and the characters whizzing past the lens).
If you want a fragmented, offbeat look, you may want to use discontinuous scenes with various angles. Or, as with the roadrunner above, you may want to make a series of interestingly composed shots with the character's movement as the logical thread, which holds the sequence together.
Camera movement
Do you want a moving or a stationary shot?
The camera only needs to move if it is integral to telling the story. For example:
- Don’t insert a truck in when getting closer to the character doesn’t illuminate the scene further.
- Don’t cut back and forth, in and out, to move the camera around. The exception is a gentle 'moving camera' - for example, a gentle pan - which takes the edge off hard cuts and lends production value.
Character staging
Like camera placement, effective character staging is important for guiding the audience’s attention and enhancing the storytelling impact of each scene.
How do you stage your characters?
Major character in a scene
Think about:
- Who has the main action in a scene?
- If it is a group scene, is the major character in a clear enough area to do their acting?
- Does the scene require a close-up for them to punch their point home?
- Are their poses well delineated?
Shifts in importance between characters
Think about:
- Does the scene shift in importance from one character to another?
- Is the scene composed to account for this shift in importance?
- Can the secondary characters add importance to this shift with their movements, i.e. head turns, posture changes, or reactions to the dialogue?
Continuity of characters
Think about:
- Has the continuity of characters from scene to scene been accounted for? For example, which characters are included throughout the scenes? What about their postures and movements?
- Is there continuity from scene to scene of the character’s relationship to the background? For example, if a character is standing in front of a door in the medium shot, is a piece of the door and its relationship to the character shown in the close-up?
Leading the viewer’s eye
There are various character staging tactics you can use to guide the viewer’s eyes, including sequences that involve either two characters or a group of characters.
Two-character sequence
Around a frame
Look at this first sequence. It’s an example of the viewer’s eye being guided around a frame:
![[ADD IMAGE'S ALT TEXT]](/sites/default/files/Staging%20Characters.png)
The following table describes each of the five panels:
| Movement | Panel | Description |
|---|---|---|
| 1st |  |
Character walks in. |
| 2nd | 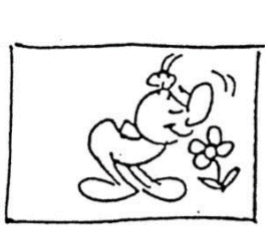 |
Character leans down to sniff. |
| 2nd | 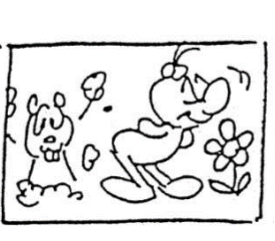 |
Gopher pops up during restricted sniffing movement. |
| 4th |  |
Gopher rears back during continued sniffing. |
| 5th |  |
Gopher kicks character’s backside; both move broadly. |
Scene to scene
Look at this next sequence. It’s an example of the viewer’s eye being guided from scene to scene:
![[ADD IMAGE'S ALT TEXT]](/sites/default/files/Staging%20Characters%202.png)
The following table describes each of the five panels:
| Movement | Panel | Description |
|---|---|---|
| 1st |  |
Character walks in. |
| 2nd |  |
Character leans down to sniff. |
| 3rd |  |
Cut to close-up as Gopher pops up. A piece of the character (their right leg/foot) is retained for continuity. |
| 4th |  |
Gopher kicks and the character shifts in reaction. |
| 5th |  |
Cut back out as Gopher comes out of kick and character is in mid-air. |
Group sequence
Look at this final sequence. It’s an example of the viewer’s eye being guided in a group shot:
![[ADD IMAGE'S ALT TEXT]](/sites/default/files/Staging%20Characters%203.png)
The following table describes each of the four panels:
| Movement | Panel | Description |
|---|---|---|
| 1st |  |
Doc says “It’s nice to have a woman around the house.” Other dwarfs nod appreciatively. |
| 2nd |  |
Grumpy turns round in the opposite direction and snaps “Aw fooey.” Other dwarfs’ heads turn to him in reaction. |
| 3rd | 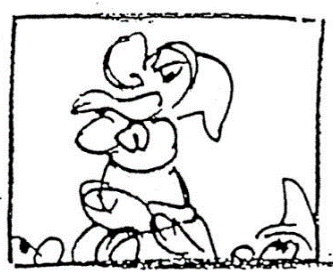 |
Cut to medium close-up. Grumpy waits until he’s sure all eyes are upon him. |
| 4th | 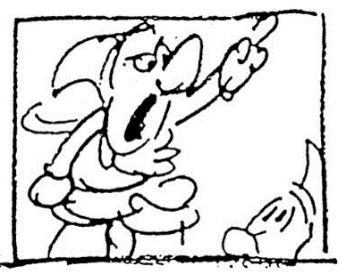 |
Then Grumpy wheels around and says “Wimmin as Pizen!” |
Maintaining the 180-degree line
Remember how you should avoid ‘crossing the line’ from creeping into your storyboards? It’s all about the audience remaining on their side of the stage to avoid get confused.
With staging characters, you use the same rule - avoid crossing over the 180-degree line when planning compositions or cuts.
Other cuts that appear more extreme in the above scene but which are still acceptable as they do not break the 180-degree line rule include the following:
![[ADD IMAGE'S ALT TEXT]](/sites/default/files/Extreme%20Cuts.png)
Off-screen reactions
The occasional off-screen reaction (i.e. someone listening to the speaker) works well, too – just remember to keep them facing in the correct direction to the established relationship.
Practising drawing storyboards is pivotal for bringing your final sequence to animated life. In this subtopic, immerse yourself in practical exercises designed to enhance your storyboarding skills and equip yourself with the tools to convey your story concept effectively through visual storytelling.
Important
Gearing up for your assessment tasks
As you know by now, an assessment task in this module involves drawing a storyboard for a sequence of 4-6 animated shots based on your story concept.
To prepare for this, you'll practise storyboarding in this subtopic through a series of tasks. First, you'll draw storyboards for two script sequences from Room on the Broom, honing your skills in visual storytelling. Then, you'll apply what you've learned by creating a series of storyboard panels for your own story concept.
These learning tasks will guide you in crafting an evocative storyboard that incorporates visual storytelling elements, clearly conveying your story concept in a simple but effective way.
Characters and story
There are many ways to draw storyboards. Whatever style is used, two factors are always the most important:
- the characters need to be expressive
- the story must be clear.
Swipe these four images to compare four storyboard drawings – each by a different storyboard artist – from the same sequence in Iron Giant (Warner Bros., 1999).
Which of the four storyboard drawings do you think visually describes the most expressive, clearest story?
What drawing techniques enhance your storyboards?
Creating better storyboards means learning how to draw better.
Still, simple drawings can also be effective, and you don’t need to wait to become excellent at drawing before beginning to create basic storyboards.
Select + to discover seven drawing techniques to use when blocking (drawing) characters in basic storyboards.
Use silhouettes to provide clear and easily readable character or object outlines.
Swipe these two road signs to see how strong silhouettes can tell a story very effectively, without being detailed:
Add simple details to your drawing to imply specific character information such as clothes and hair styles:
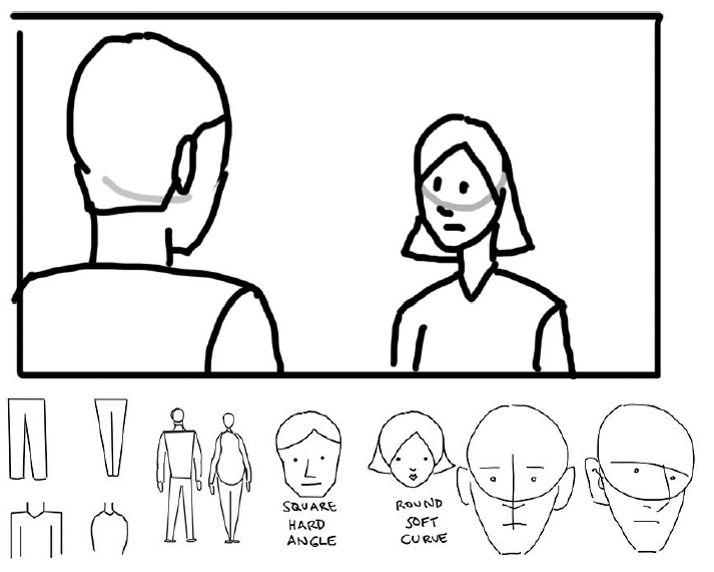
Practise drawing a handful of useful facial expressions and add these to your growing arsenal of drawing techniques.
![[ADD IMAGE'S ALT TEXT]](/sites/default/files/Expressions.png)
Sometimes, adding values to a rough storyboard sketch can make the image read much more clearly:
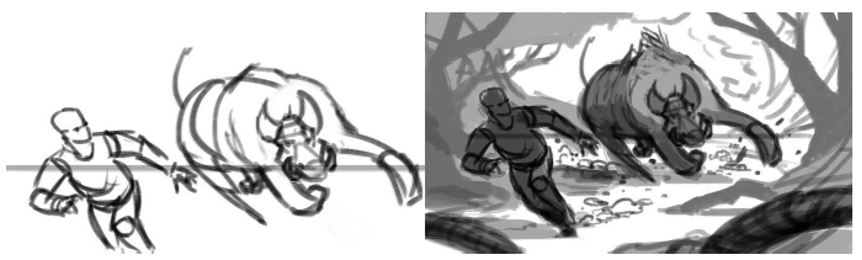
Using colour in your storyboard adds dimension to the storytelling:

Use line work to simplify and clarify drawings:
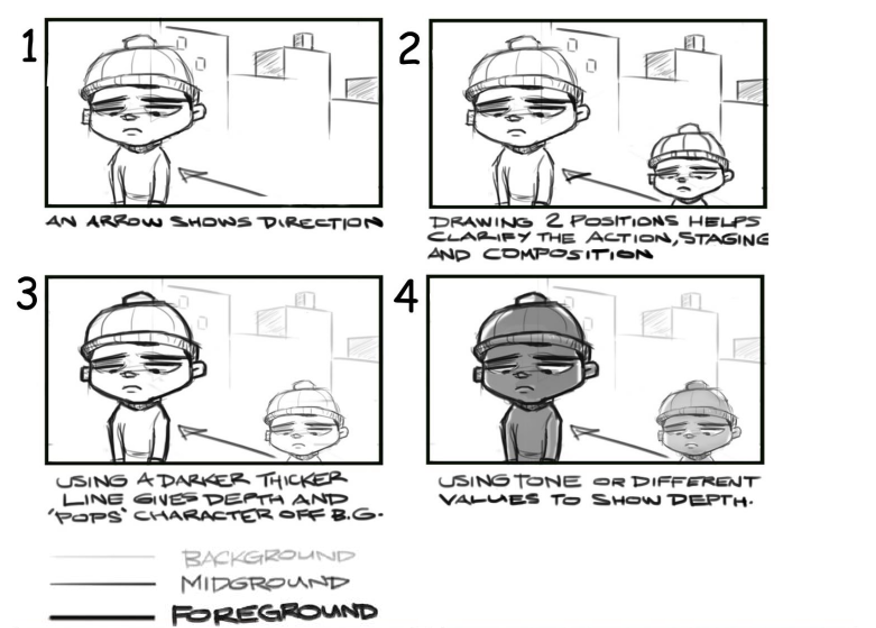
Practice
Task 15: Draw a storyboard for a script sequence from Room on the Broom
Develop your storyboarding skills by creating a storyboard for a sequence from the animated adaptation of Room on the Broom. Practise using storyboarding techniques to convey the sequence’s story through poses and expressions to convey character actions, attitudes, thoughts, and emotions.
What tools or resources do you need for this task?
Make sure you have access to:
- Storyboard template – you can download and either print a hardcopy or edit it in Adobe Photoshop
- Pencil (B2 or similar is recommended) and eraser, or a digital device and tool (i.e.. Adobe Photoshop)
- Room on the Broom Model Sheet
- Room on the Broom Script Sequence 1.
What steps should you take to complete this task?
16 Hours
Set aside up to 16 hours to complete steps 1-5 below. Remember to save your work as you go if you are using Adobe Photoshop.
- Read Script sequence 1 from Room on the Broom. Identify the key moments, actions, and emotions in the sequence.
- Consider how to visually represent each key moment and emotion in your storyboard panels. Think about the settings, character expressions, and actions.
- Use the provided storyboard template to draw enough storyboard panels to visually describe the sequence clearly.
- Apply storyboarding techniques, i.e.:
- Use information lines to convey basic details about characters and backgrounds.
- Ensure silhouettes are clear and easily readable.
- Add simple details like clothes and hairstyles for clarity.
- Practice drawing a range of facial expressions to enhance character emotions.
- Use values to add dimension and clarity to your panels.
- Apply line work to simplify and clarify your drawings.
- Review your storyboard for clarity and expressiveness and make any necessary adjustments to improve the storytelling and visual impact.
What should you do after completing this task?
- How effectively do you think your storyboard conveys the story within the first Room on the Broom script sequence? What storyboarding techniques did you find most useful in enhancing your storyboard?
- Share your storyboard to Forum:
- Select your forum thread in Forum: Visual Storytelling.
- Select Reply to your first Forum post.
- Enter the words ‘Task 15: Sequence 1’ in your reply.
- Select the Post your response button, then select Edit in your new reply when it shows up.
- Upload your photo(s) or files using the Attachment field.
- Select Save changes to share your coursework to your forum thread.
- Get feedback on this and other learning tasks at the next Live Session – check the Live Session calendar for dates and times.
When you’re ready, proceed to the next learning task: Draw another storyboard for a different script sequence from Room on the Broom to continue practising and refining your storyboarding skills.
Practice
Task 16: Draw another storyboard for a different script sequence from Room on the Broom
Keep developing your storyboarding skills by creating a storyboard for another sequence from the animated adaptation of Room on the Broom, and build on your growing abilities to convey a narrative through visual storytelling.
What tools or resources do you need for this task?
Make sure you have access to:
- Storyboard template – you can download and either print a hardcopy or edit it in Adobe Photoshop
- Pencil (B2 or similar is recommended) and eraser, or a digital device and tool (i.e.. Adobe Photoshop)
- Room on the Broom Model Sheet
- Room on the Broom Script Sequence 2.
What steps should you take to complete this task?
16 Hours
Set aside up to 16 hours to complete steps 1-5 below. Remember to save your work as you go if you are using Adobe Photoshop.
- Read Script sequence 2 from Room on the Broom. Identify the key moments, actions, and emotions in the sequence.
- Consider how to visually represent each key moment and emotion in your storyboard panels. Think about the settings, character expressions, and actions.
- Use the provided storyboard template to draw enough storyboard panels to visually describe the sequence clearly.
- Apply storyboarding techniques, i.e.:
- Use information lines to convey basic details about characters and backgrounds.
- Ensure silhouettes are clear and easily readable.
- Add simple details like clothes and hairstyles for clarity.
- Practice drawing a range of facial expressions to enhance character emotions.
- Use values to add dimension and clarity to your panels.
- Apply line work to simplify and clarify your drawings.
- Review your storyboard for clarity and expressiveness and make any necessary adjustments to improve the storytelling and visual impact.
What should you do after completing this task?
- How did your experience with storyboarding the first Room on the Broom sequence influence your approach to this second sequence? What new techniques or improvements did you incorporate in this second storyboard compared to your first storyboard?
- Share your storyboard to Forum:
- Select your forum thread in Forum: Visual Storytelling.
- Select Reply to your first Forum post.
- Enter the words ‘Task 16: Sequence 2’ in your reply.
- Select the Post your response button, then select Edit in your new reply when it shows up.
- Upload your photo(s) or files using the Attachment field.
- Select Save changes to share your coursework to your forum thread.
- Get feedback on this and other learning tasks at the next Live Session – check the Live Session calendar for dates and times.
Congratulations on completing your storyboards for sequences from Room on the Broom! Your focus on learning storyboarding techniques underscores your commitment to sharpening your animation skills. As you move forward, apply your storyboarding skills to develop a storyboard for your story concept you developed earlier, and keep up your confidence and creativity!
Developing your storyboard
It’s time to develop your storyboard based on your own story concept.
Your sequence of storyboard panels will need to visually depict your story and show the audience the main story beats and any action in your narrative.
Important
Gearing up for your assessment tasks
As you know by now, an assessment task in this module involves drawing a storyboard for a sequence of 4-6 animated shots based on your story concept.
Remember to share your coursework in Forum: Visual Storytelling as you practise drawing your storyboard in the upcoming learning task. Seeking feedback from your facilitator is crucial for refining your skills and ensuring your coursework aligns with assessment expectations.
Embrace this learning opportunity to elevate your visual storytelling and excel in your assessments.
What should you do if struggling with visualising your story’s environment?
Suppose you're encountering difficulty in visualising environments from different perspectives and angles.
In that case, a helpful approach is constructing a basic version of the environment in Maya using basic polygon primitives. You can then place a camera in the environment and create your narrative’s:
- compositions
- exact camera positions.
You can then use these positions and angles and draw in the details and composition of your shot.
Swipe through these two images to see how the library scene you came across in Story Concept Development was constructed in Maya using basic polygon primitives and then drawn over with finer details added.
Tip
Fixing problem areas using a draw over

Background
This tip demonstrates how creating a 3D version of a scene using software like Maya and overlaying it with drawings can help identify and adjust problematic areas within a panel’s composition.
Identifying and addressing problems
Example 1: Mezzanine floor
Initially, a mezzanine floor ran around the outer edges of the library room. However, in the drawn storyboard, this feature did not read well and detracted from the overall composition. To enhance the visual impact, the mezzanine was removed entirely. Floor-to-ceiling bookcases were added instead, significantly improving the composition in the storyboard panel.
Example 2: Skylight adjustment
Another issue was a skylight positioned in the middle of the room, which was not visible in the final shot. Several solutions were considered:
- Moving the skylight to a more prominent location.
- Increasing the size of the skylight to make it more visible.
- Replacing the skylight with a chandelier or similar light fixture to enhance the shot's composition.
- Removing the skylight from the shot entirely.
The fourth solution was chosen to ensure that the element did not compromise the visual narrative.
Example 3: Floor detail enhancement
The floor under the table initially appeared barren and lacked detail. To address this, additional elements such as a large rug were proposed to add visual interest and richness to this area of the frame.
Conclusion
Using a 3D version of the environment and overlaying it with drawings provides a practical approach to identifying and fixing composition issues in storyboards. This method helps refine the visual narrative, ensuring each element works harmoniously to tell the story effectively. By addressing problem areas early on, the overall quality and impact of the storyboard are significantly enhanced, leading to a more compelling and visually appealing animation.
What should you do after creating the first panel?
Once you create your first panel, make the necessary adjustments and continue the process through the story, drawing and creating the panels required to convey the narrative visually.
It is important to create as many panels as necessary to illustrate the story sequence clearly.
Case Study
Storyboard panels – Developing the visual strategy
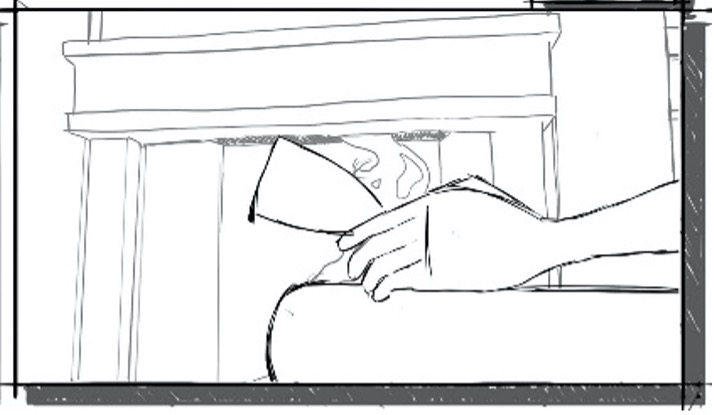
Background
The story revolves around the discovery of the heiress in the library early in the morning. The storyboard panels were designed to build up to this revelation, and needed careful decisions about what to show, how to show it, and when to show it.
Key points considered included:
- Entering the library: Establishing the setting by showing the entrance to the library.
- Newspaper foreshadowing: Displaying a newspaper with a headline that hints at the events leading to the heiress's fate.
- Gramophone playing: Indicating an interrupted nightly routine by showing a gramophone still playing, with curtains open, appliances on, and the fire still burning.
- Hero chair: Focusing on the main chair to reveal its significance and its contents.
- Fallen book and pool of liquid: Highlighting a fallen book and a pool of liquid on the floor to add suspense and detail to the scene.
- Main title reveal: Ensuring the book and pool of liquid lead into the main title.
Visual storytelling considerations
Decisions were made regarding the presentation of these key points to ensure they were visually comprehensible to the audience. This involved choosing between cutting scenes or employing long camera moves, and determining the duration of each shot.
As the storyboards were developed, these choices became clearer. The process of creating storyboards and eventually an animatic—a rough version of the story in real-time—helped in refining the visual narrative. The animatic, built from the completed storyboard panels, will guide the pacing and reveal the most effective ways to animate the story.
Completed storyboard panels
Take a look at the series of completed storyboard panels for the Library story concept, across six pages.
Practice
Task 17: Create a series of storyboard panels for your story concept
Use your storyboarding skills to create a detailed series of storyboard panels that fully describe the story concept you developed in the Story Concept Development subtopic. This learning task will solidify your visual storytelling skills and prepare you for a task in the upcoming assessment, where you need to submit your storyboard for a sequence of 4-6 animated shots based on your story concept.
What tools or resources do you need for this task?
Make sure you have access to:
- Storyboard template – you can download and either print a hardcopy or edit it in Adobe Photoshop
- Pencil (B2 or similar is recommended) and eraser, or a digital device and tool (i.e.. Adobe Photoshop)
- Your story concept synopsis.
What steps should you take to complete this task?
18 Hours
Set aside up to 18 hours to complete steps 1-6 below. Remember to save your work as you go if you are using Adobe Photoshop.
- Revisit the synopsis you wrote for your story concept to recall your narrative's main plot points and overall structure.
- Break down your story into key moments essential for the story, considering how to incorporate storytelling elements that communicate your story concept in a straightforward yet impactful manner.
- Use the provided storyboard template to draw a sequence of storyboard panels depicting your story’s key moments. Ensure you:
- Number each scene, describe actions, indicate camera angles, and note sound effects.
- Apply techniques like using polygon primitives, ensuring clear silhouettes, adding simple details, practising a range of facial expressions, using values and colour for dimension, and applying line work for clarity.
- Follow the do's and don'ts from Storyboard formatting to refine your panels, enhancing clarity and engagement. Consider strategies such as using one basic environment and camera movement to create different shots and incorporating simple animation elements to enhance the atmosphere without adding excessive workload.
- Review your storyboard for clarity and expressiveness, ensuring each panel effectively communicates the intended action and emotion. Make any necessary adjustments to improve storytelling and visual impact.
- Post your storyboard to the forum for feedback from your facilitator, focusing on refining your sequence based on your facilitator’s suggestions to align with the assessment criteria.
What should you do after completing this task?
- How does visualising your story concept through storyboard panels enhance your understanding of pacing, narrative flow, and visual storytelling techniques? What breakthroughs did you experience while translating your story concept into storyboard panels, and how did these breakthroughs influence your storytelling approach?
- Share your storyboard to the Forum:
- Select your forum thread in Forum: Visual Storytelling.
- Select Reply to your first Forum post.
- Enter the words ‘Task 17: Final Sequence Storyboard’ in your reply.
- Select the Post your response button, then select Edit in your new reply when it shows up.
- Upload your photo(s) or files using the Attachment field.
- Select Save changes to share your coursework to your forum thread.
- Get feedback on this and other learning tasks at the next Live Session – check the Live Session calendar for dates and times.
Use the valuable feedback from your facilitator to refine your storyboard, recognising its significance as an assessment task in your journey through Visual Storytelling. Next, dive into the final subtopic - Fundamental Narrative and Storytelling Concepts - leveraging the insights gained from what you've learnt so far in this module to strengthen your storytelling skills.
Dive back into the world of stories and plots as you learn essential narrative and storytelling concepts, structures, and terms. You'll also get to create a story treatment for an animated feature film and break down its plot using the conventional three-act narrative model.
Story structure
A story’s structure centres around one or more central characters who propel a plot, with a cause-and-effect situation (i.e. an action generates a reaction).
How does a plot develop within a story structure?
The plot develops with linear chronologies (i.e. events presented in the order they occur) directed at certain goals. This linear chronological approach also applies to flashbacks.
A plot usually follows three steps in a story structure:
- Present the situation or circumstance.
- Disrupt that situation – often presented as a crisis or confrontation.
- Resolve that disruption.
McKee’s approach
Robert McKee (author and story consultant) set out a more detailed, five-part approach for a story’s structure:
- Inciting incident – the event that sets the story into motion
- Progressive complications
- Crisis
- Climax
- Resolution (also know as Denouement) – the plot’s strands come together, and matters are explained or resolved.
Narrative and storytelling terms
What do you know about terms associated with fundamental narrative and storytelling concepts? Test your knowledge below.
Use this resource to recall narrative and storytelling terms.
Story treatments
A story treatment is a storytelling tool that helps you:
- structure your story
- break down the elements of the narrative
- highlight the important information in your story.
What are the components of a story treatment?
A story treatment is made up of five components:
| Component | Description | |
|---|---|---|
| 1 | Title | The story's main title, encapsulating the narrative's essence. |
| 2 | Logline | One or two short sentences summarising the story. |
| 3 | Plot summary | An extended version of the logline, detailing your story's plot and establishing the narrative's theme and tone. |
| 4 | Major characters | The story's main protagonists and antagonists, detailing their goals in the narrative. |
| 5 | Setting | Where and when the story takes place. The environment and the place in time help create the characters' backgrounds and their placement. |
Practice
Task 18: Complete story treatment components for Spirited Away
Deepen your understanding of story structure by creating a story treatment for Studio Ghibli’s Spirited Away. By breaking down and organising its narrative elements, you'll gain valuable insights into how effective storytelling is crafted, enhancing your ability to structure and develop compelling stories in your own work.
What tools or resources do you need for this task?
Make sure you have access to:
- Studio Ghibli’s animated feature film Spirited Away. You can find it on streaming services (e.g. Netflix) or rent it online.
- the Spirited Away worksheet.
What steps should you take to complete this task?
3 Hours
Set aside up to three hours to complete steps 1-4 below. Remember to save your work as you go when using Word.
- Download the Spirited Away worksheet.
- Watch the Spirited Away film, paying close attention to its narrative elements (including plot), characters, and setting.
- In your Spirited Away worksheet:
- Identify the story’s main title. Describe how the title encapsulates the essence of the story.
- Write a one or two-sentence summary (logline) of the story. Ensure it captures the core of the narrative succinctly.
- Write a plot summary by developing an extended version of the logline. Detail the plot, establishing the narrative’s theme and tone. Focus on how the story unfolds from beginning to end.
- Describe the major protagonists and antagonists. Provide brief descriptions of their goals and roles within the narrative. Consider their development and motivations.
- Describe the setting, where and when the story takes place. Highlight how the environment and time period contribute to the characters’ backgrounds and the overall story.
- Make any required updates to your Spirited Away worksheet and save it to your device.
What should you do after completing this task?
How did creating a story treatment for Spirited Away deepen your understanding of its narrative structure and storytelling techniques? What insights did you gain about the importance of character development and setting in crafting a compelling narrative?
Delve into the following Conventional Three-Act Narrative Structure section to further explain how Spirited Away conforms to or deviates from this specific model, enhancing your appreciation of narrative pacing, character arcs, and plot development in Studio Ghibli's animated masterpiece.
Conventional three-act narrative structure
Popular narrative fiction often uses a model that divides stories into three parts: the three-act narrative structure.
What are the model’s stages?
The three-act narrative structure has three stages which set up the narrative’s beginning, middle, and end. These stages are:

What are the components of each stage?
First Act: Set up
The first act introduces the protagonist and other characters, sometimes including the main antagonist. The setting – the environment/world where the characters live – is established.
The first act also introduces an inciting incident to establish the conflict and get the ball rolling with rising action.
Second Act: Confrontation
The second act is the heart of the story, where increased rising action occurs. It follows the characters trying to resolve the conflict caused by the first act’s inciting incident.
The antagonist(s) are introduced if they weren’t in the first act. These characters often caused the inciting incident, and spend the second act attempting to stop the protagonist from fulfilling the quest.
At the end of the second act, the important climax of the story begins, where the protagonist faces potential failure in their biggest battle.
Third Act: Resolution
The third act starts with the second act's climax as it happens, with further rising action where problems and questions are ultimately resolved and answered. During this stage, the antagonist usually loses or dies.
When the dust clears, falling action takes place. The resolution becomes apparent to the protagonist, who gains a new sense of who they really are and experience some change within themselves.

Practice
Task 19: Explain the three-act narrative structure of Spirited Away
Gain a comprehensive understanding of the three-act narrative structure by applying the model to Spirited Away, and learn how to recognise effective storytelling strategies while gaining practical knowledge to apply to your own visual storytelling.
What tools or resources do you need for this task?
Make sure you have access to:
- Your saved Spirited Away worksheet.
What steps should you take to complete this task?
2 Hours
Set aside two hours to complete steps 1-3 below. Remember to save your work as you go when using Word.
- Revisit the three-act narrative structure model, focusing on the purpose of each act in setting up the beginning, middle, and end of a story.
- Open your Spirited Away worksheet and describe how each act contributes to the film’s overall narrative progression and character development:
- First act (introduction):
- Identify the protagonist, other characters, and the established setting.
- Highlight the inciting incident that initiates the conflict and rising action.
- Second act (conflict and rising action):
- Describe the intensification of conflict and character interactions.
- Explore the antagonist's role in opposing the protagonist's quest and the significance of the act's climax.
- Third act (resolution and conclusion):
- Examine the resolution of conflicts and questions posed throughout the story.
- Reflect on the protagonist's journey and any transformations experienced.
- First act (introduction):
- Make any required updates to your Spirited Away worksheet and save it to your device.
What should you do after completing this task?
- How did applying a three-act narrative structure to Spirited Away enhance your understanding of narrative progression and character development in storytelling? What specific storytelling techniques from the film could you apply to your own visual storytelling projects to create more engaging and coherent narratives?
- Share your Spirited Away worksheet to the Forum:
- Select your forum thread in Forum: Visual Storytelling.
- Select Reply to your first Forum post.
- Enter the words ‘Task 19: Acts’ in your reply.
- Select the Post your response button, then select Edit in your new reply when it shows up.
- Upload your photo(s) or files using the Attachment field.
- Select Save changes to share your coursework to your forum thread.
- Get feedback on this and other learning tasks at the next Live Session – check the Live Session calendar for dates and times.
Congratulations on completing the final learning task of this Visual Storytelling topic! Take a moment to celebrate your achievements and the insights you've gained.
Next, head to Summary to reflect on all you have accomplished and the knowledge you’ve gained at this mid-point in the module journey as you prepare to start the final topic in the Diploma of Animation, Final Sequence.
In this topic, you've immersed yourself into the art of visual storytelling, uncovering its power, combined with cinematic techniques, to convey narratives through compelling imagery. You've:
- developed skills in shot identification, film techniques, and academic writing, enriching your understanding of using cinematic language.
- explored films that serve as inspiration and reference for honing your visual storytelling skills.
- analysed sequences from animated feature films and provided your own insights into the nuanced use of visual elements for narrative storytelling.
- created reference boards and story concepts to help apply your knowledge to real-world visual storytelling scenarios.
- practised drawing storyboard panels for your story concept, refining your ability to visualise narrative sequences effectively.
Reflect on what you’ve learnt, practised, and achieved
| # | Learning Task Name | Duration (Hours) | |
|---|---|---|---|
| 1 | Identify three types of shots | 0.5 | |
| 2 | Identify camera movements from A Bug’s Life | 0.5 | |
| 3 | Identify composition techniques used in three shots | 0.25 | |
| 4 | Create a list of your ten favourite films | 0.25 | |
| 5 | Create a reference board of key shots from two favourite sequences | 0.5 | |
| 6 | Explain aspects of key shots from your reference boards | 1 | |
| 7 | List your observations from the opening sequence of Brave | 0.25 | |
| 8 | Write an introduction for your Brave film study | 0.5 | |
| 9 | Write paragraphs on film techniques and visual elements for your Brave film study | 2 | |
| 10 | Source quotes for your Brave film study | 1.5 | |
| 11 | Fine-tune and complete your Brave film study | 2 | |
| 12 | Generate three simple story ideas | 1 | |
| 13 | Write a short synopsis for one of your ideas | 2 | |
| 14 | Draw a short sequence of storyboard panels for a story idea | 2 | |
| 15 | Draw a storyboard for a script sequence from Room on the Broom | 16 | |
| 16 | Draw another storyboard for a different script sequence from Room on the Broom | 16 | |
| 17 | Create a series of storyboard panels for your story concept | 18 | |
| 18 | Complete story treatment components for Spirited Away | 3 | |
| 19 | Explain the three-act narrative structure of Spirited Away | 2 | |
As you continue your animation journey in the next Final Sequence topic of this course, remember to draw upon the techniques and insights gleaned from this Visual Storytelling topic to craft a compelling final sequence animation that resonates with audiences.
Visual storytelling encompasses a blend of technical precision, creative expression, and narrative prowess. You've advanced your proficiency in this multifaceted art form through your diligent efforts. Keep up the excellent work!