Let’s get exercising! First, we will go over training posture before moving onto exercises for the lower body.
In this topic, you will learn how to perform and teach clients the following exercises:
- Squat
- Lunge
- Leg press
- Hamstring curl
- Leg extension
- Calf raise
- Hip abduction
- Hip adduction
- Hip extension
- Deadlift
Throughout this topic, you will study images of each exercise and read the information on the major muscles, the equipment options, and the key coaching points and steps. Practice demonstrating every exercise, and explaining every exercise.
Each exercise is accompanied by a video featuring Davy, one of our NZIS sports tutors, and students. Davy will talk you through each exercise, while Iraia, Isabel, Ashley, and Mya demonstrate.
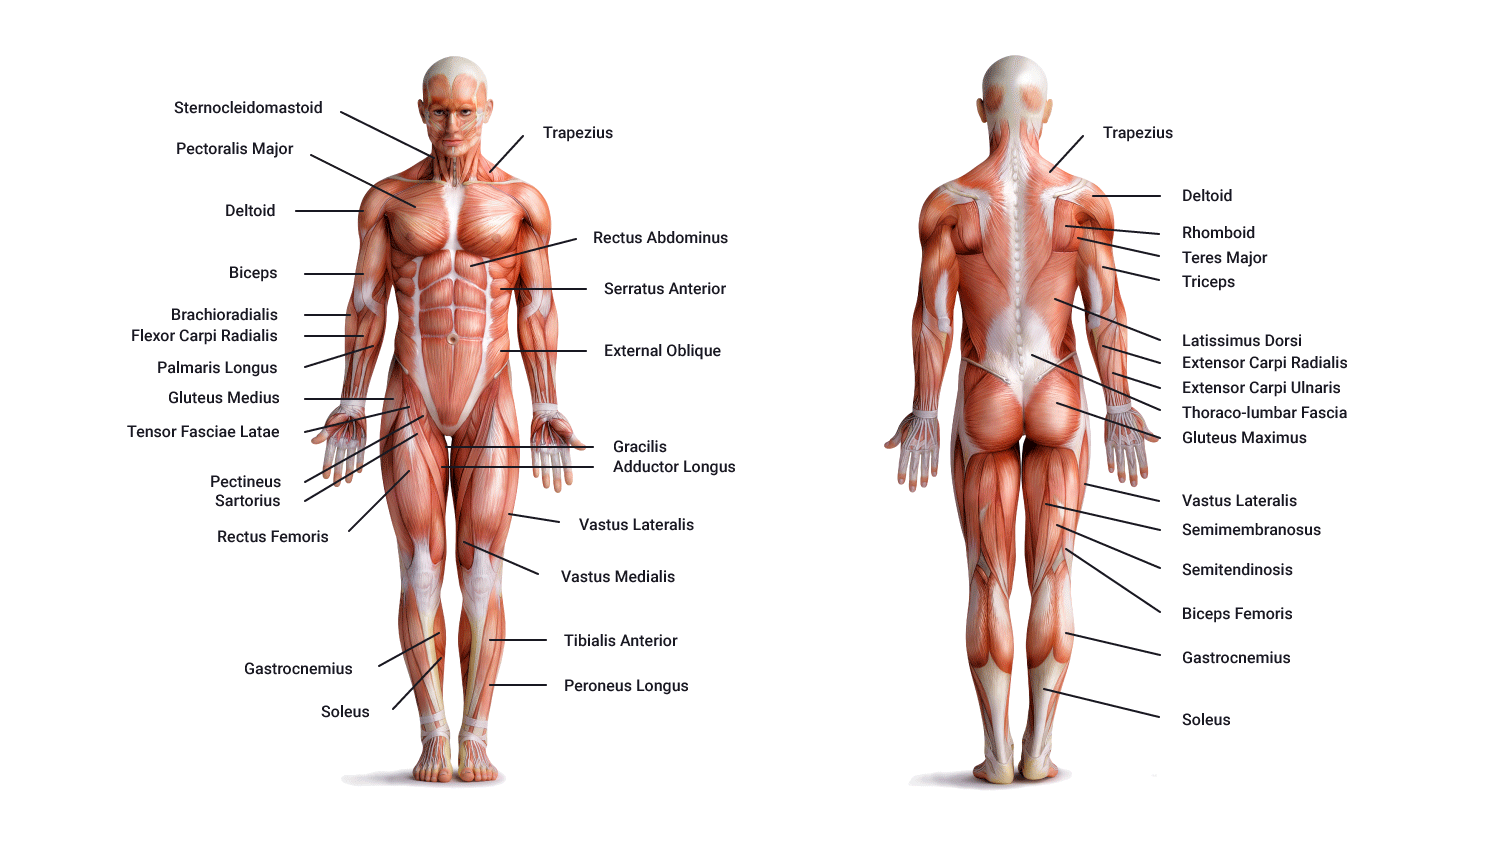
You may wish to refer back to the following anatomical illustrations as you review each exercise. This information is the why, where, when, and how of training. The more comfortable you become, the more comfortable you will be able to make your clients when working with you.
Before we look at each exercise and its specifics, let's first look at training posture. Having an awareness of our posture when we are training will lead to safe and effective exercising. This means, our bones, muscles, and joints should ideally be in their 'happy place' for optimal movement, stability, function, and support.
Training posture can be described as having specific characteristics:
- Chin 'tucked in' being mindful of the cervical portion of the spine-retraction of the head. This will straighten the neck region.
- Eyes are looking straight ahead.
- Shoulders are 'back and down' (removing the rounded/shrugged shoulder posture and pulling out shoulder blades back into 'anatomical position'). This would be retraction and depression of the clavicles and scapula.
- Engage/activate the core. This is important for good/safe posture when exercising as it stabilises the hips and supports the lower back along with giving the tummy muscles a 'wake up'.
- Neutral pelvis. This is important for good/safe posture when exercising as it stabilises the hips and supports the lower back. A neutral pelvis is illustrated in the image that follows.
- Feet hip-width apart (typically ankles are in line with the ball and socket region of the hips). Note: This will be modified in some exercises where the shoulder-width distance of the feet is more appropriate for the exercise being performed.
- Knees in line with hips (ball and socket region) and approximately in line with middle toe.
- Feet pointing forward.
As a trainer, encourage your client to think about these points as they perform the exercises. Some ways to activate the core include drawing in the belly button (sucking it in). This is also a handy way to describe this action to your client because descriptors such as 'Activate your transverse abdominus' or 'Engage your core' will mean something to your colleagues but likely very little to your average client! Translating into everyday words and something we can all relate to helps your clients understand what you are asking of them. It will also ensure that when they train in their own time, they are doing it safely.
Neutral pelvis

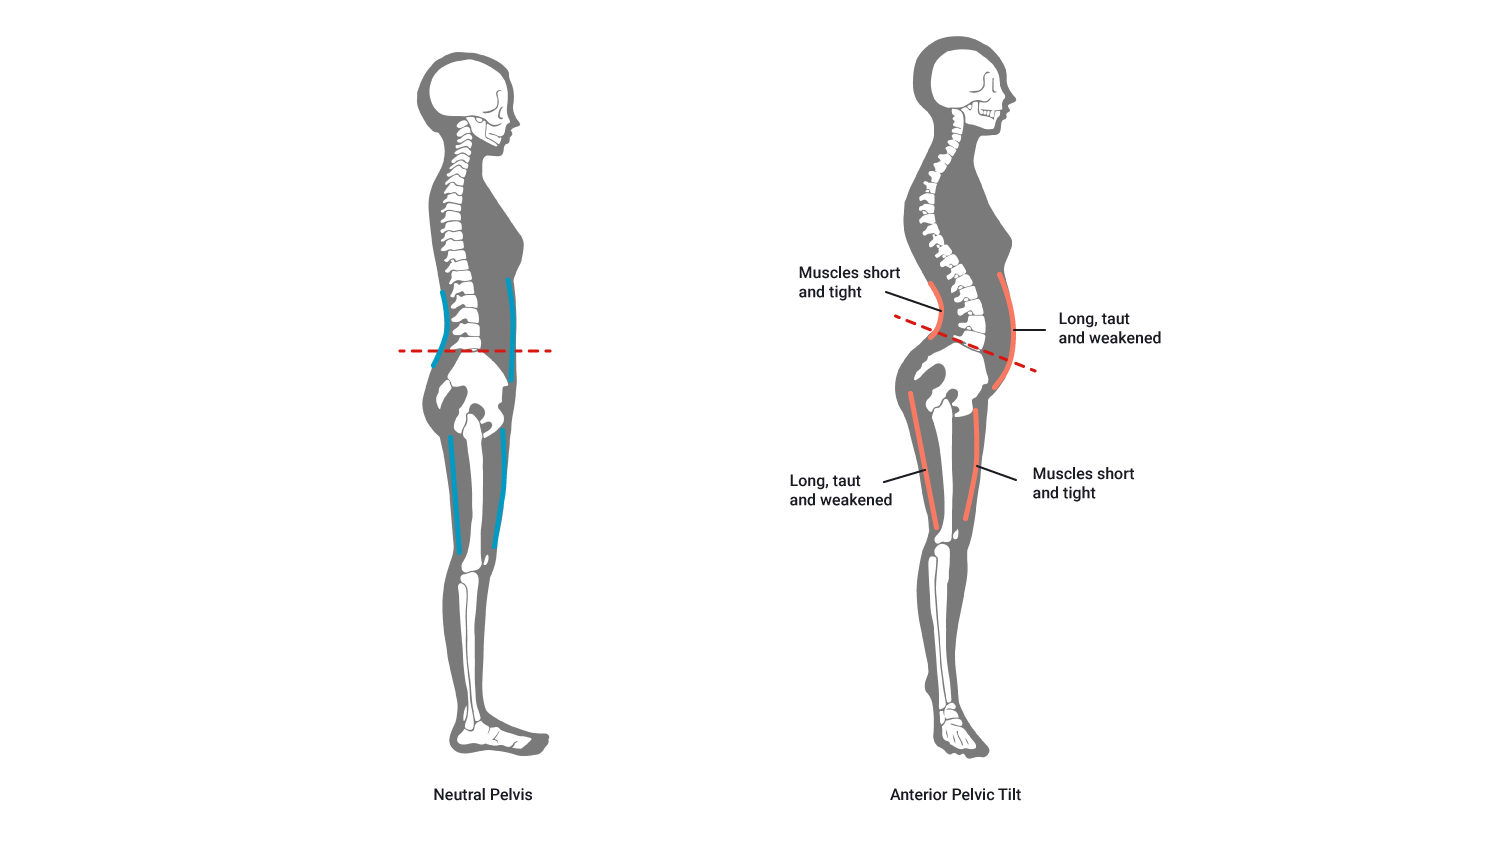
A neutral pelvis ensures the posture of the lower region of the spine (lumbar and sacrum) and their anatomical alignment, removing any 'poor posture' and ensuring the spine is efficient and safely aligned before and during exercise. When training, a neutral pelvis can be tricky to maintain, particularly when tired. With this in mind, it is important to do a mental checklist of all the training posture points during an exercise and particularly between each repetition. This will soon become unconscious behaviour however in the early days, it is important to mentally run through the checklist and review each area of the body to assess if the training posture is intact.
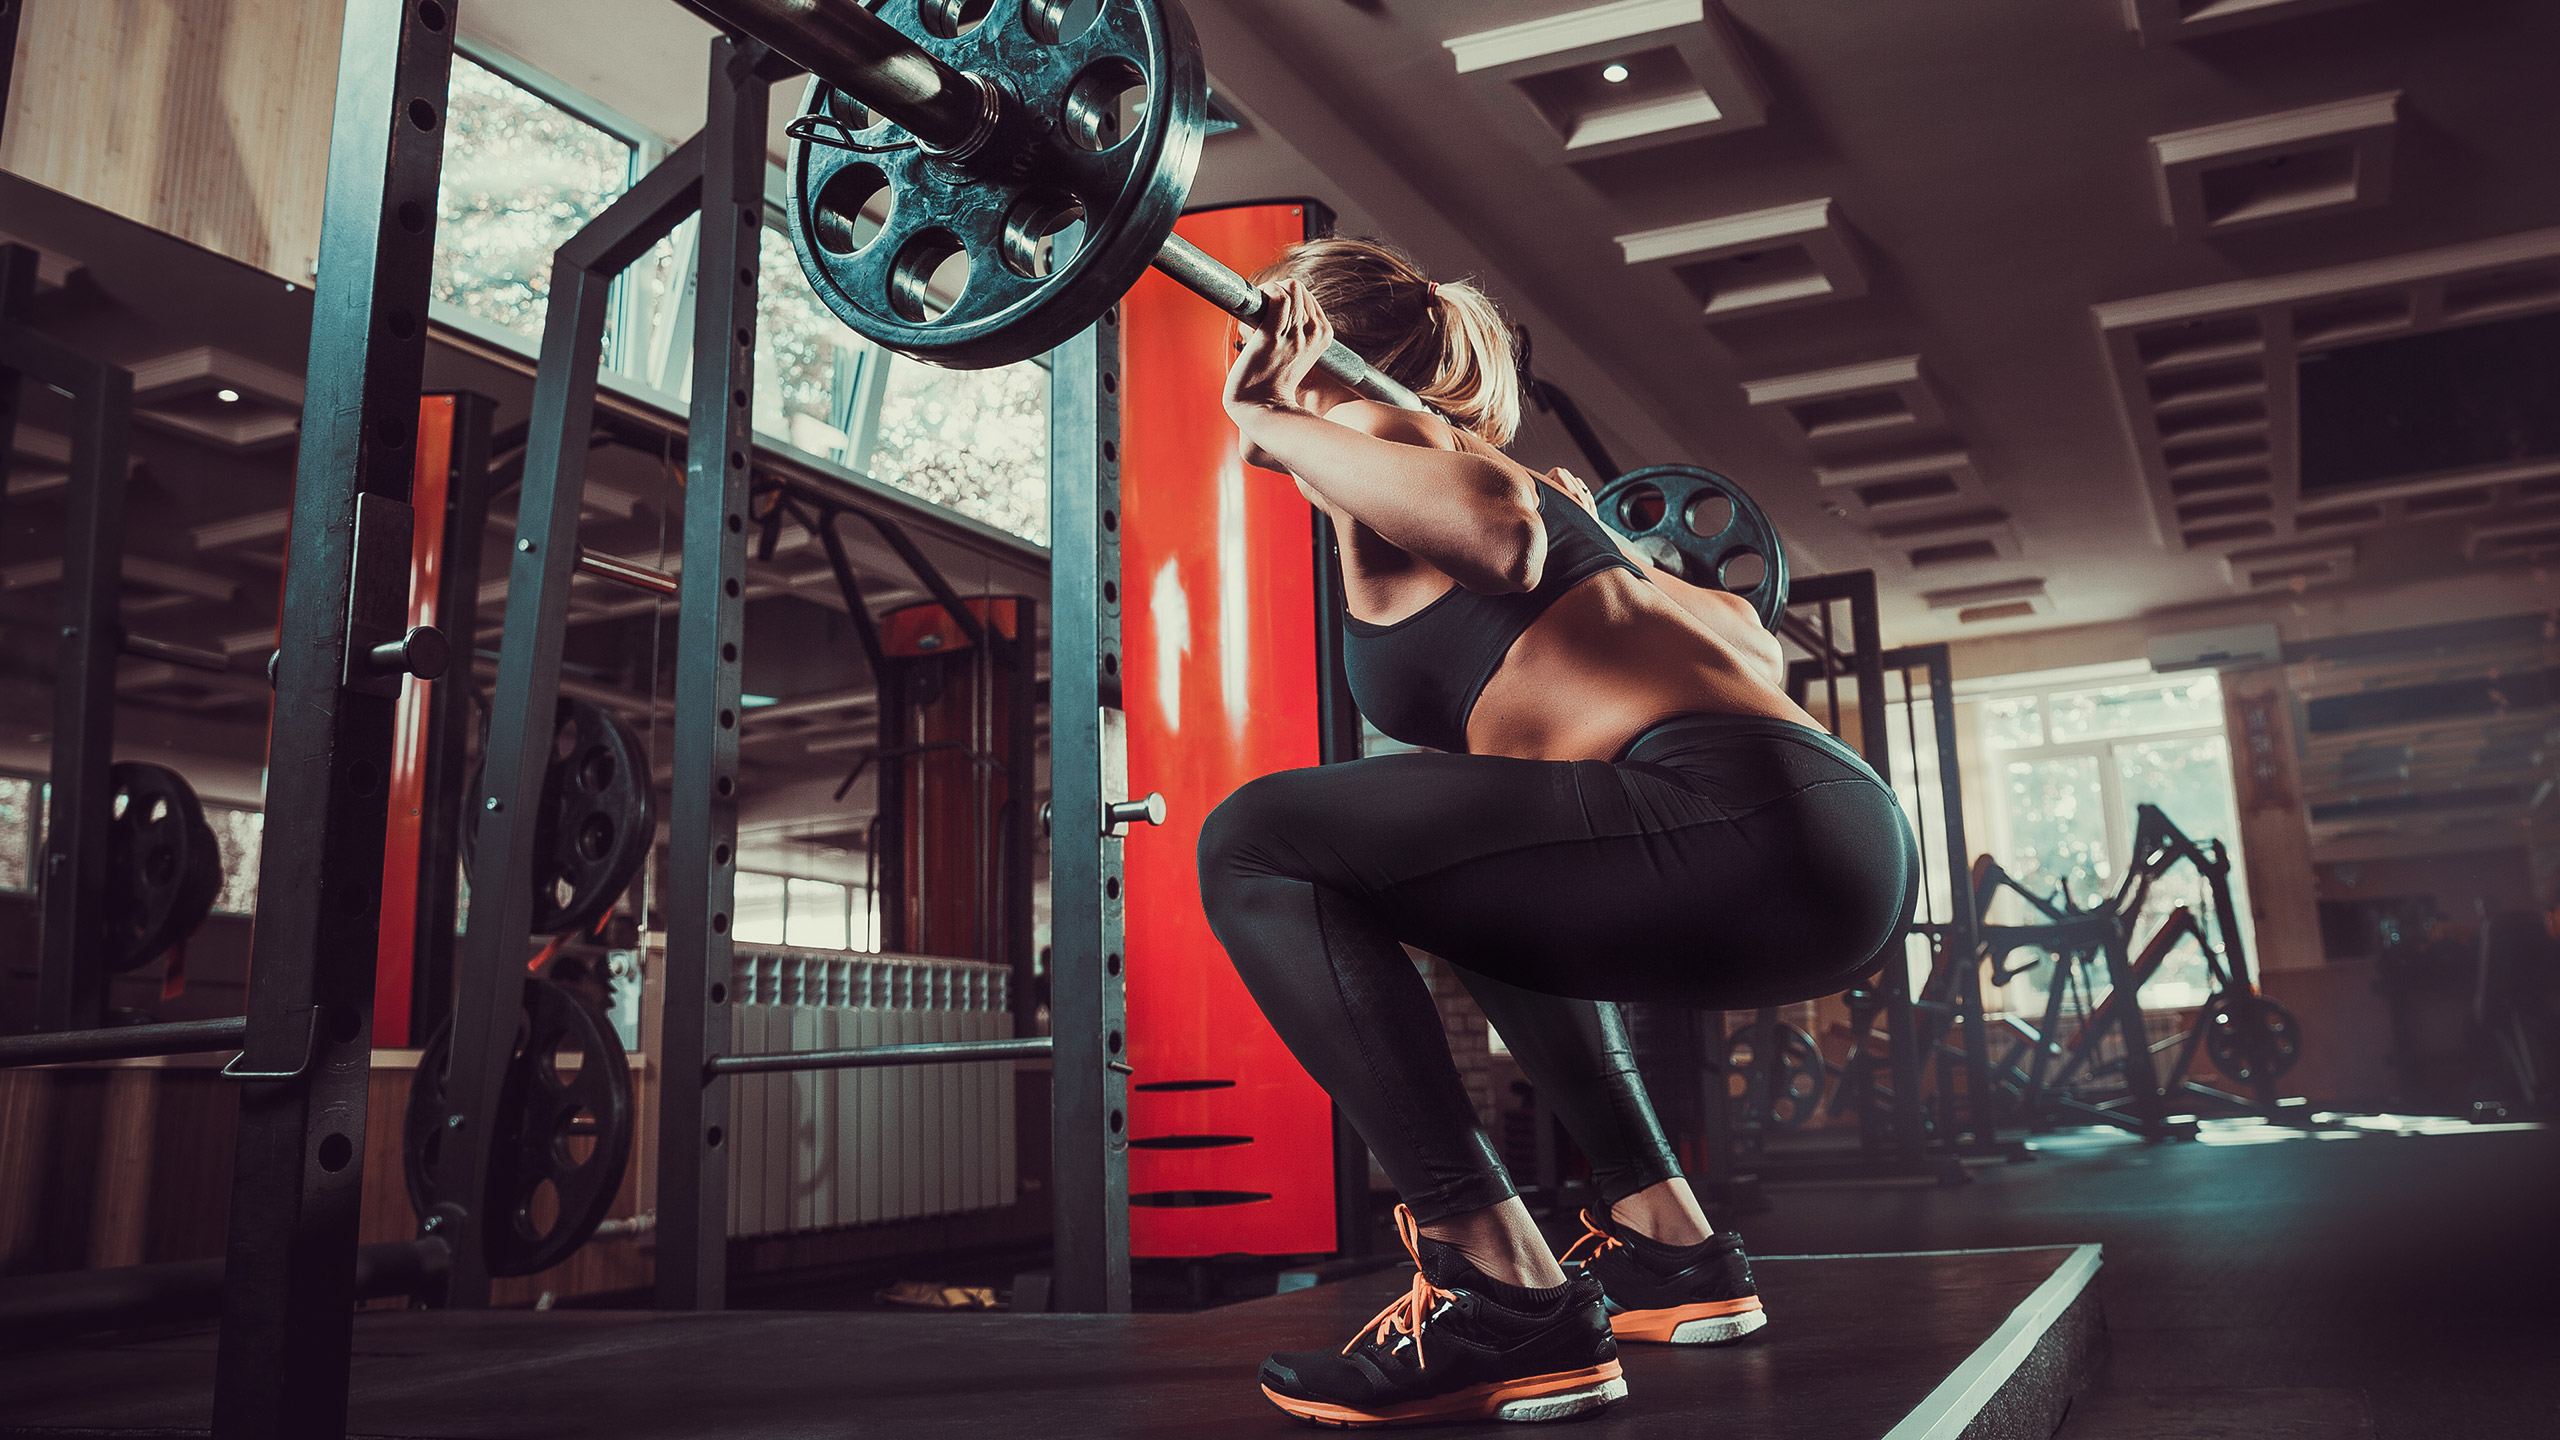
Let’s start with the squat. A squat is one of the fundamental compound exercises. If you've ever sat down on a chair before, that's effectively a squat. 3 joints are moving - your ankles, your knees, your hips, and it's a great exercise. It's a staple of most lower body-based exercise programmes in the gym.
You can do it with dumbbells. You can do it with barbells on your back or your front. Based on where you put the weight on your body will determine what parts of your legs hurt the next day, and where you are going to get stronger.
Squats are great for weight loss because they burn a lot of calories. As an exercise, it's great for strength because it works the biggest muscles in your body. It's also great for power.
The images below show squats using various equipment options.
Major muscles, variations, and equipment options
| Major muscles | Variations/progressions | Equipment options |
|---|---|---|
|
Quadriceps group Gluteal group Hamstring group Erector spinae |
Both legs One-legged Adductor squat (wide stance) Narrow squat (close stance) Front squat Overhead squat Back against the wall (with or without fitball or yoga ball) |
Freestanding Dumbbell Barbell Swissball/ fitball Machine (Smith machine) BOSU or balance trainer Sandbag |
Key coaching points and steps
- Set up by getting into 'training posture'.
- With the barbell resting on a stand, slide under the bar and place it on the trapezius.
- Pull your shoulders back and down.
- Grasp the bar firmly with the hands at a comfortable width and elbows back in line with the ribs.
- Inhale deeply, engage neutral pelvis, contract the abdominal core, look straight ahead, and remove the barbell from the stand.
- Step back one or two steps and stop with both feet parallel to each other (or toes pointed slightly out) and about shoulder-width apart, knees inline/above your ankles. Push your hips back to initiate movement and avoid rounding the back (squeeze shoulder blades and push the chest out to help).
- Aim to get thighs parallel to the floor (not necessary for all), performing a hip hinge movement whilst maintaining your core with your knees in line with your ankles as you perform the movement. Stop before the lower back begins to arch.
- Push through your heels to straighten the legs and lift the torso to return to the initial position. Ensure the knees remain 'soft' (that is, not locked or stiff).
- Exhale at end of the movement.
3 cues to tell your client
Have your toes slightly pointed out, keep the weight in your heels, and keep your chest proud.
Common mistakes
There's a common misconception that your knee shouldn't travel over your toes when you're squatting, but that's kind of a bit dated and incorrect. Your knees are supposed to move over your toes, especially once you get into the bottom range of a squat. A way to know that is if you go upstairs, you'll see your knee has to go over your toe, and if it doesn't, you can't go up the stairs. So knees are supposed to travel forward.
With sedentary lifestyles, and if someone doesn't have active glutes in their squat, they tend to lean forward too much or they struggle with the hip extension component of a squat. They can put too much weight or load on the knees and other joints.
The other thing to watch for is ankle mobility. In a squat, you need about 20 degrees of dorsiflexion at the ankle. If you can't get that range of motion at the ankle, everything else has to compensate. So it is very common that people with tight calf muscles or lack of ankle mobility struggle with the squat movement.
Squat bar variations

Note the 3 squat bar variations.
- The first illustration of a front squat emphasises quads, develops a strong core, and reduces stress on the lower back.
- The middle illustration of a high bar squat emphasises a good balance of effort through quads and glutes/hamstrings.
- The last illustration of a low bar squat emphasises the posterior chain (glutes/hamstrings). It also places more stress on the lower back.
A lunge is similar to a squat, except it's only happening on the sagittal plane (forward and back). Instead of your feet being right next to each other side by side, one is forward and one is back.
Stepping forward into a lunge will be quad-dominant because the weight or the loading goes into the front quadricep of the front leg. But if you step backwards the loading goes into that back leg and the exercise becomes more hamstring or posterior chain glute dominant.
The fun thing with lunges is they allow for many variations. They can be done for various training components or parts of a programme. They can be stability based. You can stay on the spot. For hypertrophy, you can introduce load, with weights in both hands. A great example is the suitcase lunge, where you hold weights in one hand. Your body wants to fall over, so you're using your core to offset that, working both the core and lower body.
Lunges are a great foundational exercise for legs because they require some stability, some strength, and they work a little bit of hypertrophy for the legs as well.
The images below show lunges using various equipment options.
Major muscles, variations, and equipment options
| Major muscles | Variations/progressions | Equipment options |
|---|---|---|
|
Quadriceps group Gluteal group Hamstring group |
Static Alternate Dynamic (walking) Split squat (elevated/declined) Unstable surface (front leg on BOSU/balance board) |
Freestanding Dumbbell Barbell Medicine ball BOSU or balance trainer Sandbag |
Key coaching points and steps
- Aim to achieve 'training posture'.
- Stand with a barbell on the shoulders or dumbbells in the hands. (Note: If using a barbell, review points 1-5 as per the squat instructions).
- Inhale and take a big step forward, with training posture in place. This means core activated, neutral pelvis, shoulders back and down, looking straight ahead, knees in line with toes, and keeping torso as straight as possible.
- Lower the body until the thigh reaches parallel to the ground (client dependent) and return to the initial position. At bottom of the movement don't let the knee travel over the toes, and make sure your knees don’t move too far in or out when viewed from the front.
- The bigger the step the more gluteals will be worked.
- Because the front leg supports all weight, the client needs a good sense of balance before loading. If the client appears to wobble, adjust by performing the movement slower.
- Ensure weight remains on the heel of the front foot when performing this movement, avoid weight being in the toes as this will promote the risk of injury.
If performing this exercise with dumbbells, keep these by the side of the body whilst performing the movement. If performing a barbell lunge, bring the barbell up and over the head, holding the barbell with an even distance between the head and right and left hand, ensuring the elbows do not "flare" behind the body. You or your client should still be able to see their elbow in their peripheral vision easily. Once the barbell is secure and posture is set, begin to perform the lunge movement.
The leg press is a machine-based exercise, like a squat except you're lying on your back and sitting in a machine.
The great thing about the leg press is it targets the agonists, the main movers, in the squat pattern - quads, glutes, calves, and hamstrings. Where you have your feet on the plate will change the exercise. When the feet are higher, you're working the back of your legs, your hamstrings, and your glutes. When the feet are lower and narrower, it targets the quads and the front of the legs.
Leg press is a great exercise for someone who struggles with stability or the squat movement, and in this way can be used as a regression. But it's also a great way to train hypertrophy and strengthen the legs. Because it's a machine-based exercise, it's a great exercise to programme towards the end of a leg workout. The client won't need to focus on stability and what they do with the upper half. Instead, they can put all their focus into the pressing of the weight.
It's a helpful exercise for new people to the gym because you can load the weight up quite a bit compared to other exercises which can be a positive motivator for many clients.
Always keep safety in mind and ensure clients are not locking their knees. They should aim to only straighten their legs 95% of the way and not lock their knees.
The images below show leg presses using various equipment options.
Major muscles, variations, and equipment options
| Major muscles | Variations/progressions | Equipment options |
|---|---|---|
|
Quadriceps group Gluteal group Hamstring group |
Double/single leg Feet high on the footplate (works glutes and hamstrings more) Feet low on the footplate (works quads more) Feet wide apart (strong use of adductors) |
Band Machine (45° plate machine or horizontal cable leg press) Hack Squat |
Key coaching points and steps
- Set up by getting into 'training posture'.
- Position the back firmly against the backrest of the machine, with feet slightly apart (typically hip-width, in line with the ball and socket region of the hips).
- Engage your core and clench your glutes.
- Inhale and release the safety bars, controlling the lowering plate of the leg rest machine as it moves with gravity. Then bend the knees completely so that the thighs touch or nearly touch the torso (or to the point where you would be unable to push the weight back).
- Return to the initial position, position, pushing through the whole foot, exhaling at the end of the movement.
- Before the next repetition, review training posture and adjust before beginning the next repetition.
Important note: People with back pain who are unable to perform squats can perform variations of this exercise which are pain-free. It is important to establish what type of back pain they may have and what exacerbates it. For some clients, the compression offered by the leg press machine can be detrimental due to the compression of the lower spine when the body is in the seated position supporting weight. This would result in the modification of the exercise to a pain-free alternative.
Hamstring curl
If you were to stand up straight, bend your knee, and kick yourself in the buttock, that would be a hamstring curl. It is a knee flexion exercise. It also has a synergist or assisting role in hip extension.
The hamstring curl is generally done on a machine, lying prone. You hold on to some handles and bring your heels to your back. Alternatively, you may use a seated machine with a pad out the front, bringing your heels down.
A common mistake you may see, especially in the lying down position, occurs if a client lacks strength at the top end of the curl. To compensate, they may change the shape of their pelvis and go into an anterior pelvic tilt to try and help shorten the distance between their buttock and their heels. They're not doing it on purpose. The body tries to find the path of least resistance. So what we tell people when they're doing a prone hamstring curl is to push their hips forward into the bench and stop their hips from turning and their back raising up.
The image below shows hamstring curls using a machine.

Major muscles, variations, and equipment options
| Major muscles | Variations/progressions | Equipment options |
|---|---|---|
|
Hamstring group |
Feet plantarflexed (deactivates calf muscle contribution) Feet dorsiflexed (to feel effort in Gastrocnemius) Single leg Swissball leg curl |
Machine Bands Ankle weights Swiss ball |
Key coaching points and steps
- Set up by getting into 'training posture'.
- Lie facedown on the machine, holding the handles, legs extended, and ankles positioned under the ankle pads.
- Inhale, activate the core (maintaining an engaged core throughout the movement) and bend both legs at the same time, trying to touch the gluteal muscles with the heels.
- Exhale at the end of the movement.
- Return to the initial position with a controlled movement.
- Before the next repetition, review the training posture and adjust before beginning the next repetition.
Leg extension
A leg extension is the opposite of a hamstring curl. Instead of flexing at the knee, we're extending at the knee and using the quad muscles. Taking the knee from a bent position into an extended position.
Most of the machines for leg extension are seated. There's no need to move the ankle, there's no need to move the hip. We're just extending the knee.
The image below shows leg extension using a machine.

Major muscles, variations, and equipment options
| Major muscles | Variations/progressions | Equipment options |
|---|---|---|
|
Quadriceps |
Double leg Single leg |
Band Machine Ankle weights |
Key coaching points and steps
- Sit at the machine and grasp handles or seat to hold the torso immobile/stabilise the torso.
- Bend the knees and place the ankles under the ankle pads.
- Adopt the 'training posture' (chin tuck, shoulders, core, pelvis).
- Inhale and raise the legs to horizontal, maintaining posture throughout the movement.
- Exhale at the end of the exercise.
- Review training posture and adjust before beginning the next repetition.
Notes
- This is the best exercise for isolating the quads.
- Recommended for beginners to develop enough strength (and to learn/adopt the movement pattern) to move onto more demanding exercises such as free weights.
The following video demonstrates how to perform the hamstring curl and leg extension exercises.
A calf raise is just what it sounds like - raising your calves. Point your toes down and lift your heels up. The best calf raises are ballet dancers because they're on their toes.
It isn't a common exercise to programme outside of rehabilitation, to support specific sporting goals, or if the client has specific goals around hypertrophy and growing bigger calves. For general populations, it is not commonly programmed because it targets such a small area of the body that it's not burning a lot of calories, therefore it doesn't have a high impact on weight loss goals.
The images below show calf raises using various machines and equipment.
Major muscles, variations, and equipment options
| Major muscles | Variations/progressions | Equipment options |
|---|---|---|
|
Gastrocnemius (emphasised in standing position) Soleus (emphasised in a seated position |
Double/single-legged Barbell/dumbbell balance Toes in (works the lateral head of gastrocnemius) Toes out (works the medial head of gastrocnemius) Seated calf raise (with bent knee soleus is prime mover) |
Machine Free weights Standing Seated with barbell |
Key coaching points and steps
- Stand at the machine with a straight back, shoulders under the pads, and balls of feet on the footplate, with calves relaxed and heels hanging down.
- Adopt 'training posture'.
- Inhale, rise up by extending (plantarflexing) the feet, keeping knees straight/soft, not 'locked' (or slight bend).
- Use a full range of motion and controlled tempo.
- Exhale, lower the heels back towards the ground, and review training posture before the next repetition.
Notes
- The calf muscle group are very powerful, don't be afraid to use heavy weights with this exercise.
- Clients must train both gastrocnemius and soleus to develop a full calf.
Abduction
Abduction is predominantly created at the hip by the glute medius, a great synergist and important for hip stabilisation. Hip abduction is a great rehab exercise and stability exercise. If a client wants to grow and change the shape of their glutes, this is a great exercise.
With hip abduction, you want to create abduction at the hip and create more space between the insides of your thighs. Hip abduction can be performed using a seated machine or cable machine. Using a cable machine can be a really effective exercise to combine stability and muscle exercises, as you stand on one leg. This can be particularly helpful for football players as it reflects the motion of a football kick.
The image below shows hip abduction using a machine.

Major muscles, variations, and equipment options
| Major muscles | Variations/progressions | Equipment options |
|---|---|---|
|
Adductor group
|
Leg in neutral Externally rotate hip (toes out/in) Internally rotate hips (toes pointing in/down) |
Machine Cables Band Lying Ankle weights |
Key coaching points and steps
Machine-based exercise:
- Adopt 'training posture'.
- With core engaged, place hands on machine handlebars, and have thighs/knees (machine dependent) against the pads.
- Inhale and press against pads with knees/thighs and push pads away from the body (push thighs apart) in a controlled movement (that is, pushing against resistance).
- Exhale and control the movement of the thighs back together in a controlled movement (that is, controlling the weights against gravity).
- Review training posture, and correct where required before performing the next repetition.
Standing cable abduction:
- Adopt 'training posture'.
- Standing with feet hip-distance apart with a cable around one leg.
- Starting position would have legs fit distance apart with cable approaching from the opposite direction (ready to offer resistance) against the outer leg (one leg when using a stable or standing machine).
- Inhale, keeping hips level (avoid 'hitching hip' up to counterbalance).
- In a smooth and straight line, move the leg away from the body, controlling the movement under resistance.
- End the movement when the hips begin to lift.
- Exhale and bring the leg back to the starting point in a controlled movement.
- Review training posture before the next repetition.
Adduction
Hip adduction is the opposite of abduction. You're working the inner parts of your thighs as opposed to the outside. What was the agonist in abduction is the antagonist in adduction, and vice versa.
Hip adductors are an important stabilisation muscle for squat patterns and heavy loading through the legs and the hips. Again, you can use a seated machine or cable.
It may be appropriate for some clients to cross their leg in front of the body like a football kick. However, you need to be careful because it's quite advanced, and if, for example, the client is twisting their hips to compensate, the movement is no longer adduction and has moved into rotation.
The images below show hip adduction using various equipment options.
Major muscles, variations, and equipment options
| Major muscles | Variations/progressions | Equipment options |
|---|---|---|
|
Adductor group
|
Knee flexed |
Multi-hip machine Cables Band Lying Ankle weights |
Key coaching points and steps
Machine-based exercise (seated adduction):
- Adopt 'training posture'.
- With core engaged place hands on machine handlebars, have thighs/knees (machine dependant) against the pads.
- Inhale and press against pads with knees/thighs and push pads in towards the body (push thighs together) in a controlled movement (that is, pushing against resistance).
- Exhale and control the movement of the thighs back to the starting position (thighs apart) in a controlled movement (that is, controlling the weights against gravity).
- Review training posture, correct where required before performing the next repetition.
Standing cable adduction:
- Adopt 'training posture'.
- Standing with feet hip-distance apart with a cable around one leg.
- Starting position would have one leg already 'abducted' (one leg if using a stable or standing machine).
- Inhale, keeping hips level (avoid 'hitching hip' up to counterbalance).
- In a smooth and straight line, move the leg towards the body, controlling the movement under resistance.
- End the movement when the hips begin to lift.
- Exhale and bring the leg back to the starting point in a controlled movement.
- Review training posture before the next repetition.
The following video demonstrates how to perform both hip abduction and hip adduction exercises.
Hip extension is going from a bent hip position to standing up straight. For example, if we're sitting in a seat, we're doing the opposite of hip extension. So standing up is hip extension.
If we look at the squat as being hip extension, knee extension, and plantarflexion all at the same time, hip extension is just isolating what the hip does.
It is a good exercise for someone who struggles with glutes and their squat pattern, and it allows for a lot of variation. You can do what's called a barbell hip thrust or use a hip thrust machine. The exercise is seen often in group fitness classes, with clients lying on their backs, bringing the heels slightly closer to the buttocks, so the knees are bent, hips are pushed up to the sky.
Hip extensions are useful to counteract the imbalances caused by excessive sitting.
The image below shows a lying hip extension.

Major muscles, variations, and equipment options
| Major muscles | Variations/progressions | Equipment options |
|---|---|---|
|
Gluteal group Hamstring group |
Externally rotate hip |
Machine Cables Band Swissball Lying |
Key coaching points and steps
- Adopt 'training posture'.
- Ensuring core is engaged, inhale, clench glutes, and pull one leg directly behind in a straight line and in a controlled, even movement.
- Stop when the hips begin to 'hitch up' and return leg to resting position in a controlled and even movement.
- Review training posture before the next repetition.
Note: The same points apply if this exercise is performed in the upright position or lying on equipment in the prone position.
The barbell is raised up by plates, so it starts at around the shin level and it's literally about holding the bar and lifting it to stand straight up. Deadlifts are all about hip extension and then the minor adjustments or differences you see in deadlifts are just to target slightly different muscle groups.
The deadlift is one of the only exercises that start in the concentric phase of the movement. For a squat, you have to control the weight down before you lift it. But deadlifts you start working from the start. If it's too heavy, it will not move off the ground.
If a deadlift is performed correctly, it's probably one of the best exercises for core, hip stability, and functional strength. If there was one exercise to do and all the other exercises didn't exist, it would be a deadlift for most general populations. 3 cues to help your clients nail their technique:
- Vertical shins. Have your shins straight up and down. If the shins are leaning forward, it probably means the client's bending at the ankle too much.
- Shoulders over wrists. Don't lean too far forward. When a client leans too far forward over the bar when they go to lift, they feel like they are going to fall forward or the weight gets shifted into the back, not the hip.
- Cranking the lats.
The image below shows the deadlift using a barbell.

Major muscles, variations, and equipment options
| Major muscles | Variations/progressions | Equipment options |
|---|---|---|
|
Gluteal group Hamstring group |
Sumo deadlift Single leg deadlift Romanian deadlift |
Kettlebells Dumbbells Resistance band Barbell Trap bar |
Key coaching points and steps
- Stand with legs slightly bent
- Feet should be shoulder-width apart with toes pointing forward ( or slightly outward for sumo style)
- Stand behind the bar, with the bar over the balls of your feet
- Squat down and grasp the bar with a pronated grip and the hands wider than shoulder-width
- The back should be rigid and flat, thighs parallel to the ground, eyes looking forward
- Begin raising the barbell from the floor, keeping it close to the body, slightly shifting body weight towards the heels
- Extend knees and hips at the same rate, keeping the back rigid and flat
- The shoulders should remain slightly in front or over the barbell
- The barbell should travel as close to the shins as possible, as soon as it reaches the knees. Shift body weight towards balls of the toes whilst keeping heels planted on the ground
- As the barbell continues to rise above the knees, drive the hips and gluteal muscles forward
- Whilst this is happening, retract the shoulders and keep the spine in a straight and tall position
- Lockout the deadlift and begin lowering the barbell to the ground
- Slowly push your hips back whilst keeping the spine flat (think about a proud chest)
- Slightly bend the knees once the barbell reaches them and continue to control the barbell to the floor.
Perform each lower body exercise, including progressions and regressions where possible. Talk through the cues and what muscles are being targeted. Consider how each exercise supports health and skill-based fitness components, and training principles.
Complete the self-assessment on demonstrating lower body exercises. If you would like feedback, post in the forum.
Complete the self-assessment on explaining lower body exercises. If you would like feedback, post in the forum.