
Mental Health
According to the same report, Māori adults were about 1.5 times as likely as non-Māori adults to report a high or very high probability of having an anxiety or depressive disorder.
Watch: Alice Snedden's Bad News | Episode 3 - Healthcare Inequity
Watch the seven video snippets below as Kiwi comedian Alice Snedden discusses the healthcare inequity in Aotearoa with a range of tāngata, and then answer the post-watch questions that follow each video. It's important to pause after each video to reflect on these questions, as it will help you to understand the real-world impacts of health inequity in Aotearoa.
Tip
You can watch the video in full by clicking here; however, please note that it contains language that may be offensive.
1. Introduction (18 seconds)
Post-watch question:
Why do you think Māori may have a life expectancy seven years shorter than non-Māori?
2. Poor quality care (47 seconds)
Post-watch question:
What is an example of the health inequity that Māori face?
3. INSTITUTIONAL RACISM (1 minute 55 seconds)
Post-watch questions:
How did colonisation impact Māori healthcare?
4. Private Health Insurance (57 seconds)
Post-watch question:
What are the benefits of Ngāti Whātua Ōrakei partnering with NIB to deliver private health insurance?
5. Māori Health (1 minute 26 seconds)
Post-watch question:
What does "Indigenous sovereignty is public health" mean?
6. Investment in Māori Health (58 Seconds)
Post-watch question:
Reflect on your own experiences in the New Zealand healthcare system. Have you experienced inequity? Why, or why not?
7. Conclusion (1 minute 12 seconds)
Post-watch question:
Take a moment to reflect on what you've learned from these videos. Why do you think it's important to be aware of these inequities and what do you think healthcare workers can do to address them?
Trigger Warning
This video contains references to suicide, which some people may find distressing. If you or someone you know is suicidal, help is available.
Where to get help:
Mental Health Foundation: Free call or text 1737 any time for support from a trained counsellor.
Lifeline: 0800 543 354 or 09 522 2999 or free text 4357 (HELP)
Suicide Prevention Helpline: 0508 828 865 (0508 TAUTOKO)
Youthline: 0800 376 633 or free text 234
Samaritans: 0800 726 666.

Haere mai, welcome. We're changing our approach in this week’s Introduction to Patient Care - you'll take on the kaiako (teacher) role this time. Teaching someone else is an effective technique for enhancing your learning. It requires you to thoroughly delve into the subject because to teach, you must first have a solid grasp of the topic yourself.
Create your own microlearning
You are going to create a microlearning for your classmates. Microlearning is a brief and focused learning segment that can be completed in a short amount of time. The ākonga (learner) can review this segment multiple times and download it as a learning aid for future reference.
Your goal in creating this microlearning is to provide an engaging and valuable learning experience for your fellow pharmacy technician ākonga on the topic of health conditions and their pharmacy treatments. This activity will also give you the opportunity to practice your research skills and to consider how to present information clearly to an audience.
Instructions
Read the following instructions carefully to understand what you need to do.
Content
- Choose a health condition you know very little about or have a particular interest in. It must be one that we have not explored in the programme so far.
- Research and prepare a brief presentation for your chosen health condition.
- Include all the following:
- Name of the health condition
- Description of the condition - body systems and organs involved, the signs and symptoms, if it is an acute or chronic condition and anything else you think would be relevant to the ākonga
- The typical pharmaceutical (medicine) treatments
- For any pharmaceutical treatments, investigate the following:
- Medicine name and active ingredients
- Dose form and route of administration
- Onset and duration of action
- Potential side effects
Format
- You must share your microlearning as a presentation. You can use Microsoft PowerPoint, Canva, or any other presentation tool. (There are some great templates that you can use to get started!)
- You should have a minimum of four slides. One should be a slide with links to sources of information you have used. By providing these links, you show that you have received your information from reliable and trustworthy sources, and your ākonga can link to the sources if they wish to read more.
- You can be as creative as you like with the formatting and style of the presentation. Keep in mind that you want your presentation to be readable and engaging for your classmates.
- You can share your finished work as just the presentation file (e.g., a pptx or pdf file) OR
- You may wish to record the presentation as if you were presenting the slides to your classmates and upload the video file.
Share your microlearning
You must post the microlearning before the start of week 23.
Once you’ve completed your presentation, share it to the 'Share Your Microlearning' forum.
As the forum will look slightly different this week, follow the steps in this video or read the step-by-step guidance below to understand how to upload your presentation to the forum.
Step-by-step guidance
- Go to the ‘Share Your Microlearning’ forum
- Click ‘New thread’
- In the ‘Subject’ field, type your health condition, eg. ‘Polycystic Ovary Syndrome’
- In the ‘Message’ field, type a brief explanation about the health condition and why you chose it
- In the ‘Attachment’ box, you can either drag and drop your presentation file or you can search for it
- If you have recorded yourself presenting and have a video file to upload, select this icon and search for the file on your device:

- If you have recorded yourself presenting and have a video file to upload, select this icon and search for the file on your device:
- Click ‘Post to forum’
How to download your peers’ presentations
By completing this activity, you not only create a valuable learning resource for yourself but through the power of collaborative learning - for everyone! Make sure to check back on the forum once all your classmates have shared their presentations. Take advantage of the effort that they have put into their presentations; read, make notes on new information and download their presentations as resources that you can refer to.
- Click on their thread – you should be able to see the health condition that they have researched in their ‘Subject line’
- Click on the file that they have attached.
- Go to your ‘Downloads’ folder on your device and search for the file name eg. ‘Joe Bloggs – Multiple Sclerosis’.
Self-directed learning activity
This week’s SDL is simple!
- Follow the instructions above to create and share your microlearning.
- Read your classmates’ presentations. You may wish to download their presentations to add to your kete (basket) of learning resources.
This week, you invested the time to reflect on your journey as a learner so far. This is an important stage in the learning process as you can celebrate your achievements and plan your actions ahead. Autaia koe, you’re a champ!
Dispensing and the dispensing process
You probably have a good idea of what dispensing means, but let’s recap what the legal definition is and what this means in simple terms.
Legal definition
Here's an excerpt of how dispensing is defined in The Medicines Act 1981, Section 2: Interpretation:
2 Interpretation
(1) In this Act, unless the context otherwise requires, -
dispensing, in relation to a medicine, includes, without limitation, -
(a) the preparation of that medicine for sale to the public (whether in response to the issue of a prescription or a request by an individual to be supplied with the medicine); and
(b) the packaging, labelling, recording and delivery of that medicine.
This excerpt from the Medicines Regulations 1984, Section 42: Dispensing of prescription medicines, details who can disperse medicines and under what conditions they may dispense.
42 Dispensing of prescription medicines
(1) Except as provided in subclause (2), no person other than an authorised prescriber, veterinarian, pharmacist, pharmacy graduate, a pharmacy technician, a student, or dispensary technician may dispense a prescription medicine.
(1A) The following persons may not dispense prescription medicines unless under the direct personal supervision of a pharmacist:
(a) dispensary technicians:
(b) pharmacy graduates:
(c) pharmacy technicians:
(d) students.
in simple terms
For the purposes of this course, we'll use the following definition:
| Dispensing process | All of the actions, procedures, and processes taken from the point of receiving a prescription to the prescription being collected by the customer or the person whom they have nominated to collect it. |
Programme delivery
The programme is delivered to you in the following ways:
- Kanohi-ki-te-kanohi (face-to-face) - scheduled time, learning on campus with your classmates and tutor.
- Online - weekly content delivered to you via this student learning platform. You can choose the location for your online learning. This could be at home, a library, on campus or any other place you choose. This type of learning is individual learning with some peer collaboration and is supported by your tutor.
- Self-directed learning - weekly learning tasks and guides for this type of learning are outlined in the online content. As with your online learning, this type of learning is individual, with some peer collaboration, but it requires you to take more control and responsibility for yourself. Your tutor will also provide some support. You can choose the location for this learning.
- Work placements – scheduled periods of time learning in the pharmacy workplace environment. You will be supported by your tutor, supervising pharmacist and other pharmacy staff.
Engage in online activities
This programme is designed with fully integrated face-to-face and online components. Both components work together to provide you with the knowledge, skills and attitudes needed to become an excellent pharmacy technician. Our goal is to help prepare you for your assessments and to have confidence in your position in the workplace. To achieve this, it is important to participate fully in all online learning activities. The tasks and activities have been designed to simulate the real-world experiences and realities of working in the pharmacy environment.
As a student at Level 4 and Level 5, you are expected to take increasingly more responsibility for your own learning, and this means making the most of all the learning opportunities provided. We invite you to make the most of these value-added learning moments and encourage you to think, reflect, talk to your peers, and communicate with your co-workers to dig deeper, learn more, and achieve the high standards we know you are capable of.
Activities
Throughout the online learning, there will be different activities for you to participate in. These are designed to get you engaging, interacting and applying your skills and knowledge in a safe, supportive and low-risk environment. You will find, as you progress through your studies, that the focus will shift to independent learning. You will take control of your learning and seek out your own answers!
| Activity Type | Purpose | Access |
|---|---|---|
|
Forum |
Interact with your classmates and share your experiences, ideas and resources. | You can access the forums for each module by clicking on 'Forum' in the navigation pane. For more guidance, check out this video. |
|
Journal post |
This is a place to answer questions and save your reflections. Your tutor and peers can view your published work. | You can access your journal for each topic in the 'Journal' tab in the navigation pane. For more guidance, check out this video [include information on Index of journal posts]. |
|
Documentation tool |
Create your own learning resource! Your answers can be downloaded and saved as a Word document. This tool will be used for reflections, scenarios and research. | You will find the documentation tool used more frequently later in the course as you embrace being an independent learner, seeking out your own answers. For more guidance, check out this video. |
|
Quiz |
Throughout this course, we will use quizzes in a variety of ways.
|
These will be used throughout the course. As the answers will disappear when you reload the page or log out, take notes of anything that you get incorrect or that is new to you. |
|
Self-directed learning |
Take the reins for your learning! These activities will consolidate what you've learned for the week and often include further investigation of the topic through independent reading and research, as well as preparation for assessments and projects. | There is a Self-directed learning (SDL) activity at the end of each topic each week. |
Important
These activities won't contribute to your final grade but are designed for you to apply your knowledge in a safe, low-stakes environment. You are not expected to know all of the answers, and it's OK to make mistakes - that's how we learn best! However, you are expected to put effort into each activity as they will allow you to practice and prepare for your final assessments and for the real world!
Learning Check-ins
You must complete the Learning-Check-in self-assessment question at the end of each module. These are not assessments and are not graded - they are an opportunity for you to reflect on your learning for the module and assess your confidence and understanding. You must complete the Learning Check-in to unlock the next module.
This 47-week pharmacy technician programme is divided into the Level 4 section and the Level 5 section. The table below shows you how the programme is organised.
Watch: High Blood Pressure | Hypertension | Nucleus Health (6:49 minutes)
Head to YouTube again to watch a video from Nucleus Medical Media.
This video has 3D animations that are helpful in understanding the factors that affect blood pressure and some of the causes of hypertension. Take careful note of the explanations of ‘resistance’ - what it is and how it causes increased blood pressure. Once you’ve watched the video, complete the following journal activity to reflect on your learning. High Blood Pressure | Hypertension | Nucleus Health.
Journal post
Hypertension
- Complete the following Documentation tool activity.
- Download and save the completed activity.
- Create a new journal post titled ‘Week 26 – Hypertension’.
- Upload the documentation tool to your journal post and publish it to ‘All course users’. This will allow your tutor to review your work and provide you with feedback.
Treatments
The last part of the video focused on lifestyle changes and medication as treatments for hypertension.
| Lifestyle changes | Medication |
|---|---|
|
Lifestyle changes play a role as preventive measures and in contributing to the ongoing treatment of hypertension. Changes include the following:
|
Several therapeutic groups of medicines exist for treating hypertension. These include:
According to bpac NZ (2023), in New Zealand, the first line of medicinal treatments for hypertension are:
Beta-blockers are no longer used as first-line treatment unless indicated for a specific clinical reason. |
As a pharmacy technician, you may be asked to prepare a preparation that involves a percentage. Consider the following:
Scenario:
Ivy has been to her doctor about a skin condition. Her doctor tells her the skin condition is eczema and has prescribed a cream to treat it. Ivy comes to your pharmacy and hands you her prescription. The doctor has prescribed 2% Hydrocortisone powder in Fatty cream (Mitte: 250 grams).
To prepare this cream for Ivy, you will need to calculate how many grams of Hydrocortisone powder you will need and how much of the fatty cream.
Take a moment now to think about what you already know about percentages so you can help Ivy.
Hydrocortisone 2%
Percent means parts per hundred. Therefore, our calculation would be: 2 divided by 100, multiplied by 250g (quantity of the final preparation).
To calculate the amount of fatty cream, we would need to do the following:
Weight of final prepared cream - weight of hydrocortisone powder (Ag) = amount of fatty cream needed.
Kei a koe te rākau ināianei, it's your turn now!
| Product | Drug | Onset, peak, duration | Presentation | Appearance | |
|---|---|---|---|---|---|
| NovoRapid | 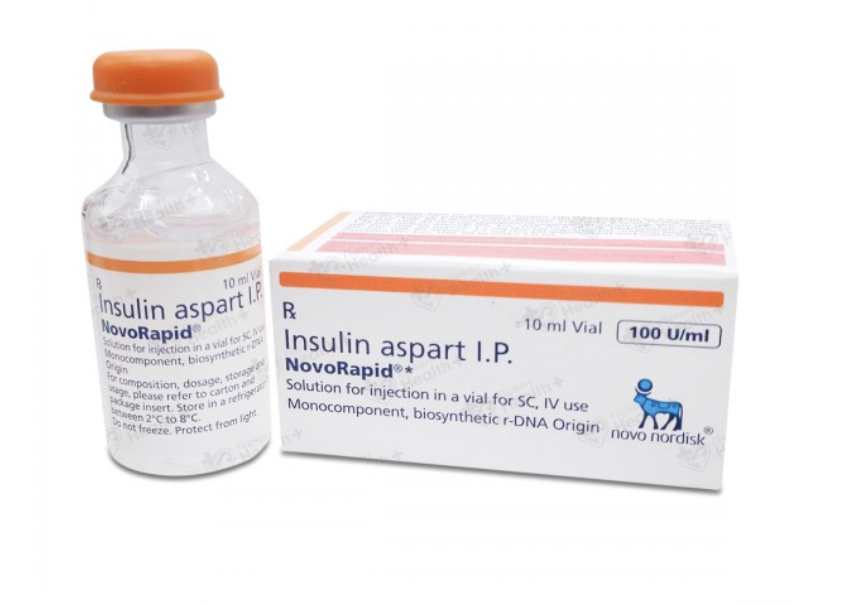 |
Insulin Aspart | Onset: 10 - 20 minutes Peak: 1 - 3 hours Duration: 3 - 5 hours Suitable: IV, SC infusion via pump, or injection. |
|
Clear |
| Apidra |  |
Insulin Glulisine | Onset: 15 minutes Peak: 60 minutes Duration: 2 - 4 hours Not suitable: IV Suitable: SC pump, or injection. |
|
Clear |
| Apidra Solostar |  |
Prefilled disposable pen | Clear | ||
| Humalog | 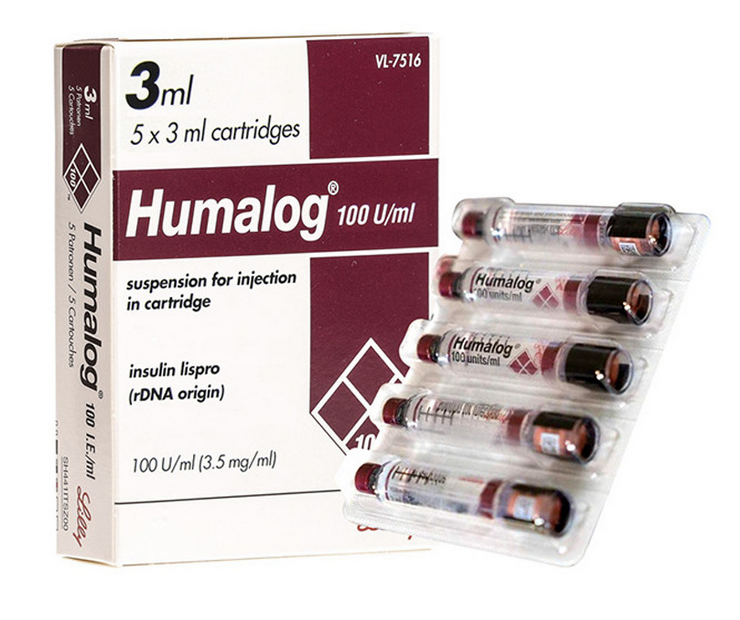 |
Insuline Lispro | Onset: 15 minutes Peak: 30 - 70 minutes Duration: 2 - 5 hours Suitable: IV, infusion pump, or injection. |
|
Clear |
| Product | Drug | Onset, peak, duration | Presentation | Appearance | |
|---|---|---|---|---|---|
| Lantas |  |
Insulin Glargine | Onset: 1.1 hours Peak: None Duration: 24 hours Suitable: SC injection only Not suitable: IV, IM infusion pump |
|
Clear |
| Lantus Solostar | 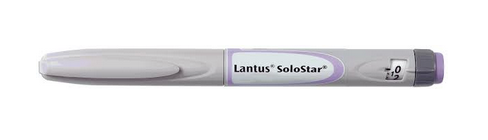 |
SoloStar prefilled disposable pen | Clear | ||
| Levemir | 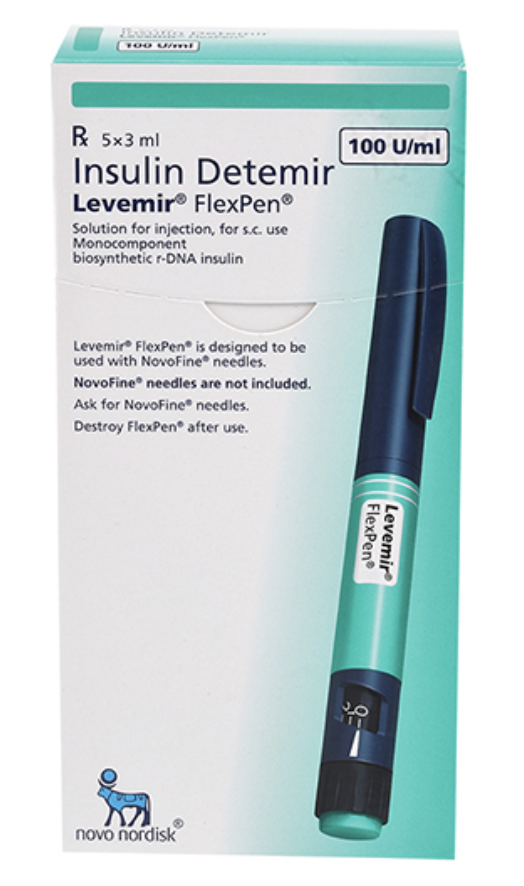 |
Insulin Detemir (rys) | Onset: ≤ 1.5 hours Peak: 4 – 12 hours Duration: ≤ 24 hours Not suitable: IV, IM infusion pump |
prefilled disposable device | Clear |
Activity – Help Mr Weston with his insulin prescription
In the prescription below, Mr Weston has been prescribed Insulin neutral, which is a short-acting insulin, and Insulin isophane, which is an intermediate to long-acting insulin.
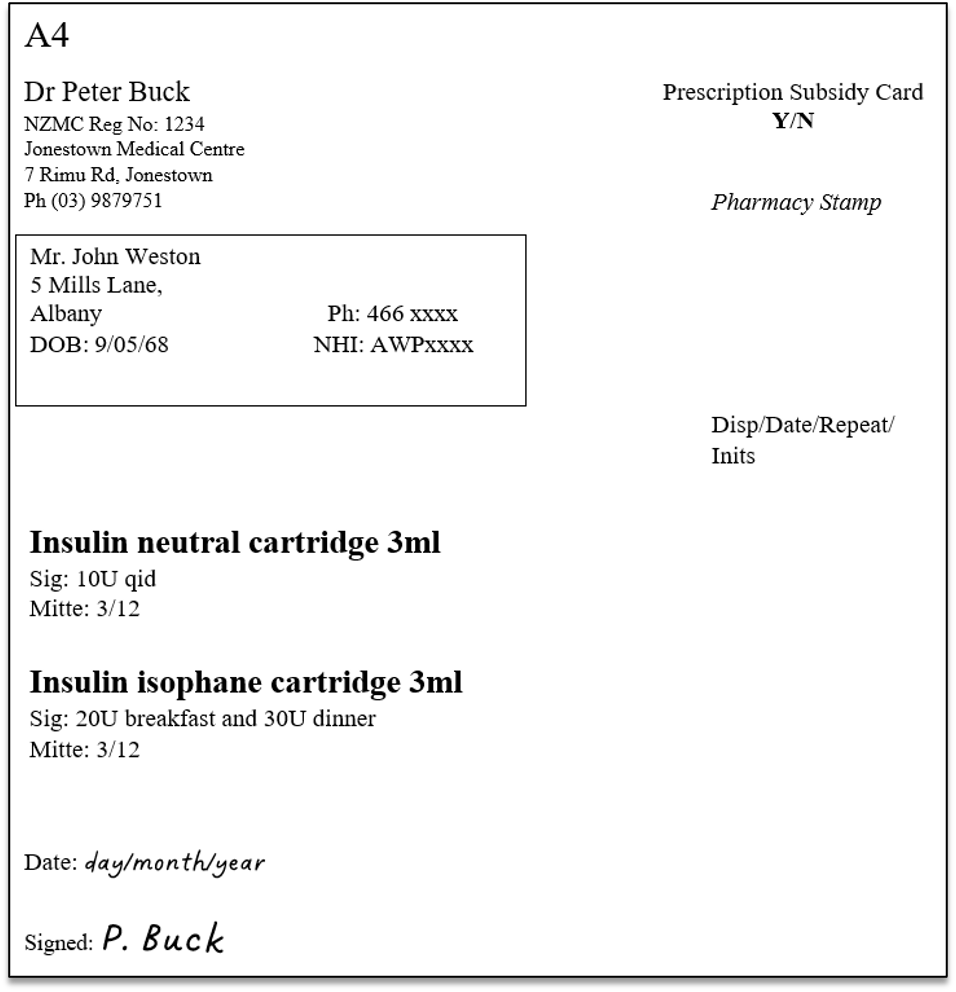
We will calculate how many of each cartridge should be dispensed to ensure that Mr Weston has enough insulin for the prescribed period.
Open each scenario label to help Mr. Weston get his insulin.

We know that insulin is a non-stat medication, which means we can’t give Mr Weston all 12 of the cartridges at once. We should dispense one month’s supply at a time. To calculate the number of cartridges to dispense each month, we can use the following method:
12 cartridges ÷ by 3 months =
- 4 cartridges for the first month
- 4 cartridges for the second month
- 4 cartridges for the third month
Which we can write as 4 + 4 + 4 or 4OPx3
Apply what you have learnt about the calculations for insulin neutral cartridges:

The next thing we want to know is how much Mr Weston needs for a one-month supply.
Looking at Mr. Weston’s prescription once more, calculate the total number of units of insulin required for one month for each type of insulin. Carry out the calculation before expanding the label to check your answer below.
Did you use the same method or a different method to get to the same result?
- Insulin neutral
10U x qid = 40U for one day
40U x 30 days = 1200U for one month
- Insulin isophane
20U + 30U = 50U for one day
50U x 30 days = 1500U for one month
For the three topics this week, Professional Practice Part 1, Introduction to Dispensing and Introduction to Patient Care, the focus is to consolidate your learning of the course content so far and identify the topics or areas you will need to review. You will be given time in the Self-directed learning activities to review these topics.
You can do this using whatever study method or technique works best for you. For example, you may like to create flashcards, brainstorm, summarise each topic in your own words, re-write your notes, draw pictures, create mnemonics, write your own scenarios, role-play with a friend, family member, or peer or conduct your own research. You may have also picked up some great methods from your classmates in the Week 22 forum activity: Week 22 – Introduction to Dispensing: Self-directed Learning Activity.
If you feel confident with your revision techniques, feel free to skip this topic and go straight to Professional Practice Part 1.
Revision techniques
However, if you don’t know where to start or want to try something new, check out the following revision techniques for inspiration.
Watch: The Pomodoro® Technique (2:22 minutes)
If you find it difficult to concentrate or focus, this technique is a brilliant way to keep you on track and rewarded (with breaks) for your hard work.
- You can even use this handy YouTube video as a timer to get you started: Pomodoro Technique 4 x 25 min – Study Timer 2h.
- Need a study buddy to keep you accountable? Here’s how one student uses this method: The only study method that actually works for me in college.
Watch YouTube videos
You’ll be surprised at how effective it is to watch YouTube videos as a way to revise. As you know, YouTube has lots of educational content. You can find tutorials of people doing everything from dispensing medicine to teaching you methods for mathematical calculations. If you’re someone who learns best through video, don’t be shy to give it a go and do your own research and exploration of YouTube.
Create flashcards
This is a classic revision technique that involves writing keywords or questions on cards to test your knowledge and recall. It’s great if you’re a visual learner! Here are some tips from Birmingham City University to get you started: Are Flashcards effective?
Watch: the Blurting method (24 seconds)
You may have seen this revision technique pop up on TikTok. Blurting involves testing yourself repeatedly until you remember the information. Here’s a video to show you how you, too, can become a blurting expert.
Other tips
- Create memes or videos – be creative and make some memes of key concepts. Research shows that using humour and having fun makes information stick!
- Study outside – soak up some vitamin D and nature. Recalling information outside your usual study environment can also help strengthen your grasp of the material. It also gives you a refreshed sense of motivation.
- Listen to calming music – this is a good way to keep focused and get in the right headspace for study. YouTube and Spotify have lots of specific study playlists.
- Sleep – get enough sleep and rest. Our brains make different and new neural connections when we’re out of our ‘focused’ modes. This is why you often have those ‘aha!’ moments in the middle of the night!
Now that you have some techniques up your sleeve, get ready to apply them!

Mālō e leilei, greetings and welcome to the final session of Professional Practice Part 1! Last week, you identified your strengths and weaknesses with dispensing calculations by completing a quiz. In this session, we continue to focus on dispensing calculations with a slightly different type of Challenge Activity.
Challenge Activity
This week, we continue to embrace the Māori principle of ‘Ako’. The word ako means both to teach and to learn; it acknowledges that everyone has their own unique knowledge and experiences that they bring to a learning experience. Everyone has the ability to be both a kaiako (teacher) and ākonga (learner). By interacting, working, and supporting each other, everyone achieves more.
In this Challenge Activity, you and a classmate will create calculation quizzes for each other. The act of creating a quiz for someone else is a different way to practice and consolidate your own knowledge. This activity will help you develop your dispensing calculation skills, enhance your understanding of various pharmaceutical calculations, and promote peer learning. It's an opportunity to apply what you've learned in a practical context while also gaining insights from your peers.
Instructions
- Find a classmate to be your partner. If you are having trouble finding a partner, ask your tutor for assistance.
- You and your partner will both need to create a 15-question dispensing calculation quiz and a separate answer sheet that shows the method used to calculate each answer.
- Swap your quiz with your partner and complete each other's quiz.
- Each partner returns the quiz to the other for marking.
- Organise a time to discuss the results of the quizzes. This can be kanohi-ki-te-kanohi (face-to-face), via Teams chat or Teams video call. In this discussion, you will take turns giving each other feedback on the quiz questions. Make sure to:
- discuss any incorrect answers and why they are incorrect.
- compare calculation methods. For example, you could ask: ‘What do you see as other possible calculations?’ ‘Why did you choose that method?’
- After your discussion, return the quiz and the separate answer sheet to each partner. This is so each partner can use the quiz and answer sheet as a record of their learning and a resource for future use.
Self-directed learning activity
Use your self-directed time to review the topics in Professional Practice Part 1 and prepare for Level 5. You might like to:
- revisit Week 1 and re-read the information and activities in this module.
- organise and add to your personal notes and resources.
- carry out your own extra reading on specific topics that you didn’t have time for previously.
- find the answers to any unanswered questions.
- reflect on what your understanding of Professional Practice was in Week 1 and compare it to your knowledge, understanding and skills now. You should be proud of what you’ve learned!
Whakamihi, congratulations on completing Professional Practice 1! You have worked hard to cover a lot of content. Pai ki a koe! Good on you!
Welcome back to Introduction to Dispensing. In our last session, you completed a revision quiz as a way for you to reinforce and solidify your previous learning. How did you go? Did you check your answers with a fellow ākonga?
In this session, we’ll continue with revising your dispensing knowledge through a revision quiz. Be prepared for some quiz questions that might require more in-depth thinking or searching for information beyond what's available in your online or class notes.
Challenge Activity
Instructions
- Download the quiz document and save it to your device: Week 25 - Introduction to Dispensing: Challenge Activity.
- The quiz has 17 questions and scenarios. Take your time working through these, and don’t give up!
Ka rawe, excellent work. Were you able to answer all the quiz questions? If you want to check your work or are unsure of any answers, you can discuss this with your classmates and tutor.
Self-directed learning activity
Use your self-directed time this week to review the topics in Introduction to Dispensing and prepare for Level 5. You might like to:
- revisit Week 1 and re-read the information and activities in this module.
- organise and add to your personal notes and resources.
- carry out your own extra reading on specific topics that you didn’t have time for previously.
- find the answers to any unanswered questions.
- give yourself a pat on the back for progressing to where you are now.
That brings us to the end of Introduction to Dispensing. You have worked hard and gained a lot of knowledge over the last 25 weeks, ka pai temahi, well done, good work!

Welcome to the last session of Introduction to Patient Care. In keeping with the theme of revision and reflection, in this session, you will complete a quiz that is designed to remind you of some of the topics we have covered in this course. Quizzes are great ways to check how much learning you have retained and help you assess if there are any gaps in your knowledge. There are 27 questions to answer.
Have fun and good luck!
He pai aū mahi i tēnei rā, you have done well today in this session and throughout the course so far. Hopefully, this quiz has helped you reflect on some of the topics we have covered in this course and given you some insight into areas where you may need to spend some time revising.
Self-directed learning activity
This week, you have the chance to take control and responsibility for your learning. During your Self-directed learning time, your task is to assess your progress over the past 25 weeks in Introduction to Patient Care. Identify the topics or areas you need to review and summarise what you've learned.
The goal is to solidify your knowledge and prepare for your next academic level, Level 5.
Autaia koe, you're a champ! You've now completed Week 25 of Introduction to Patient Care. Please take a moment to complete the Learning Check-in for this module.
Next week, you'll officially be starting Level 5. Congratulations, you've completed a huge step in your studies, so we hope that you're proud of your efforts and excited to learn more!
Adobe.comSkeletal animation (bones) and rigging are two terms that generally describe the same thing - and bring the characters you create through computer animation to life. They are a technique for manipulating 2D and 3D models to add movement - whether you’re making a film, advert, game or project for fun. Discover everything you need to know about what rigging is in animation and how to get started, with this guide.
The idea of working in this way is described in the following video 'Robotrig'. Please note that the video author may be using an earlier version of Adobe Animate, and your interface might appear different.
Newbie Activity - Robot Rig
🕔 1 - 2 hours
Now you get to animate your own robot rig character!
- Start by downloading this file — an Illustrator file that you will need to import into Animate.
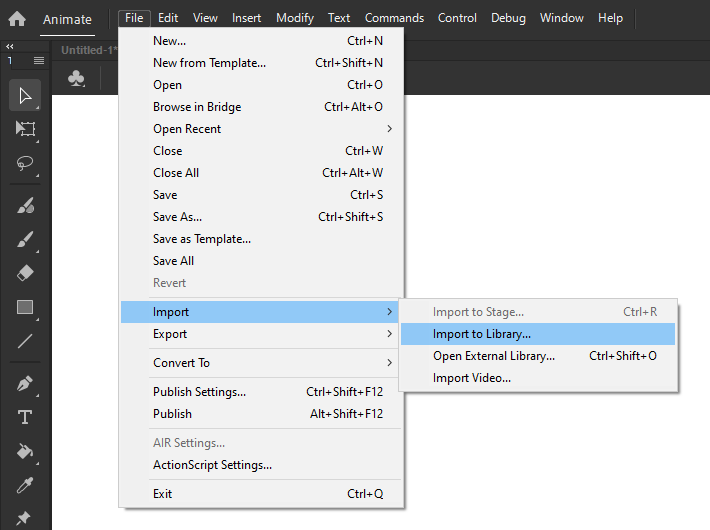
- Open Animate and then go to File > Import > Import to Library...
- The Robot Rig will appear on the stage, and each controller (the red circle symbols) will be a named layer, for example, BackArm, BackLeg, and FrontArm.
- To start, you must place the joint chain. This preferably goes to where the object rotates from.
- Select the main rotation below the hip.
- Using the Bone tool in the Tools pane, hold down Shift and click and drag to draw a line through the hip, torso, bottom of the neck and bottom of the head to the controller at the top of the head.
- To test that you have drawn the line correctly, select the controller at the top of the head and move it to wiggle the entire upper body!
- Repeat this step for each arm. Hold down Shift to draw a line from the collarbone through to the top of the arm, elbow, hand and controller.
- Repeat this step for each leg. Hold down Shift to draw a line from the hip, connecting to the leg, back of the foot and tip of the toe.
- Now it's time to move the legs, arms and head into position.
- Select the Transform tool in the Tools pane and select the object you wish to move.
- Use the arrow keys to move it into place.
- Repeat this step for each body part.
- Finally, you must arrange the arms and legs so they are on the correct side of the robot's body.
- For the front leg and arm, right-click and select Arrange > Bring to Front (Ctrl+Shift+Up) or Bring Forward (Ctrl+Up).
- For the back leg and arm, right-click and select Arrange > Send to Back (Ctrl+Shift+Down) or Send Backward (Ctrl+Down).
- Note: You may need to play with this until they're in the correct place.
- Now, you're ready to animate. Away you go!
Tip
At the moment, all the controllers are red, making it easy to get mixed up. To help you know exactly what you're picking, you can change the colours of the controllers. This will help you visualise what each controller is controlling! For example, you could organise the controllers so that they are green for the back of the body, red for the front of the body, purple for the back arm, blue for the front arm and so on.
