Disposing of sharps carefully will be nothing new to you.
In this lesson, we will look at two other pieces of legislation that pharmacy technicians are expected to apply to their everyday work, as well as the supporting codes, competencies, and standards:
- Te Tiriti o Waitangi
- Health and Safety at Work
The Treaty Of Waitangi Act 1975
| Te Tiriti o Waitangi is not officially part of New Zealand law, but it is thought of as a sort of constitution or set of common laws that are found spread throughout other laws. |
Watch: What's the legal status of the Treaty? (1:43 minutes)
Watch this video from He Tohu on the legal status of the Treaty.
The Treaty of Waitangi Act 1975 establishes the Waitangi Tribunal and its functions.
Let's take a closer look. Go to justice.govt.nz and then complete the following three questions:
Despite not being a law as such, pharmacists and pharmacy technicians are expected to apply the principles of the Treaty to their everyday work practices.
We will discuss Te Tiriti o Waitangi and its principles later in this course in relation to working ethically and professionally.
Health and Safety at Work
The legislation that is in place to ensure the health and safety of workplaces and workers includes the following:
- Health and Safety at Work Act 1975
- Health and Safety at Work (General Risk and Workplace Management) Regulations 2016
- Hazardous Substances and New Organisms Act 1996
- Health and Safety at Work (Hazardous Substances) Regulations 2017
| WorkSafe NZ is the organisation that regulates, educates, enforces, and supports the legislation. |  |
Under the Health and Safety legislation, all PCBUs have a ‘primary duty of care’ for people’s health and safety at work. You may remember from your learning in Level 3 that a PCBU stands for Person Conducting a Business or Undertaking. In other words, your employer.
To learn about an employer’s primary duty of care, read section 2 of the Health and Safety at Work: Quick reference Guide and complete the following activity.
Note: In this context, the word ‘plant’ refers to the machinery, equipment, tools, or devices that are used in a workplace.
To find out who a worker is and what their responsibilities in a workplace are, read Section 3 of the Health and Safety at Work: Quick Reference Guide and complete the following activity.
Codes and Standards
As mentioned, alongside the legislation, there are codes, competencies, and standards that support the legislation.
Let’s now recap the purpose and content of these documents. Expand both of the titles below to learn about them.

Download: Code of Ethics
Written by: Pharmacy Council of New Zealand)
Applies to: Members of the pharmacist profession
Purpose: To guide and support pharmacists in providing patient-centred care while upholding the professional principles fundamental to pharmacy practice.
Using your knowledge to date and the Code of Ethics, complete the following activities.

Download: Competence standards for the pharmacy profession
Written by: Pharmacy Council of New Zealand)
Applies to: Pharmacists
Purpose: To set out the knowledge, skills, attitudes, and values that pharmacists must possess and maintain to ensure they can provide safe, effective, and ethical care to patients. These are divided into six domains, with specific competencies grouped under each domain. Each competency is explained in terms of behaviours.
Use this resource to complete the following activity.
Self-directed learning activities
The following quiz will help consolidate the learning for you.
Congratulations! You have completed this week's learning of Professional Practice Part I.

Checking Prescriptions

Step 2: Checking: Prescription and customer details
Before going any further in the dispensing process, the prescription form must be checked to see if all the legal and funding requirements are present.
You should already have a pretty good idea of what is involved in this step. Confirm your knowledge with the next question.
With your pharmacist technician shoes on, answer this question:
Annotating
Annotating is when a pharmacist or pharmacy staff write on the prescription to clarify the prescriber's intention or make notes for the purposes of:
- clarifying the prescriber's intention
- making notes for the purpose of dispensing accurately
- determining funding eligibility (e.g. endorsements)
- ensuring legal requirements are met (e.g. date stamp, third part label with the quantity of medicine dispensed, etc.)
- traceability (i.e. who has dispensed or checked an item).
Any written annotations should be written in a different coloured pen to the one the prescriber has used and be written next to the relevant item on the prescription. These actions will show what details are pharmacy annotations and which are the prescriber's writing.
Annotating is a continuous practice that occurs throughout the dispensing process.
Legislation and funding requirements for annotation include the following:
- The name and address of the dispensing pharmacy
- The dispensing date for each item on the prescription
- The quantity of medicine dispensed. This may be written as an actual quantity or as a period of time.
- The strength of the medicine (where appropriate)
- Any brand substitutions made. Brand substitutions can only be made by a pharmacist and not pharmacy technicians.
- Annotations from history check, e.g., new patient, new medicines, increased or decreased doses of medicines, etc.
- A unique identifying number for each item on the prescription
- Each item on the prescription medicine is given its own unique number that can then be used to look up the prescription item.
- The number appears on the label for the medicine container, the bag label and the third part label.
- The third part label is stuck onto the prescription form.
- Identity of the person dispensing each item
- Identity of the pharmacist who has checked the dispensed prescription for completeness and accuracy
![[ADD IMAGE'S ALT TEXT]](/sites/default/files/Your%20Pharmacy_0.png)
NHI number
NHI stands for National Health Index. It is a unique combination of letters and numbers. This number is assigned to every person who uses a health or disability service in New Zealand. The number is used by hospitals, family doctors, pharmacies, laboratories, and midwives to identify who a person is for the purposes of coordinated care, treatment and maintaining medical records. The number is linked to the:
- Medical Warnings System (MWS) This is to warn health and disability support services of important information such as allergies, adverse reactions, and medical alerts for health conditions.
- The National Immunisation Register (NIR). This is a record of a person’s immunisation history.
Generally, NHIs are assigned to newborns, but if a person does not have one and is a user of a health and disability service, one will be assigned to them. The NHI holds the following information:
- name (including alternative names such as maiden names)
- NHI number
- address
- date of birth
- gender
- New Zealand resident and citizenship status (this is dependent on what application or service is used to access the NHI)
- place of birth
- ethnicity
- date of death (if appropriate)
Having an NHI number does not make a person eligible for subsidised medical and pharmaceutical benefits.
Self-directed learning activities
- Do you know if you have an NHI number? Do you know what your NHI number is? Check out Te Whatu Ora | Health New Zealand to find out more about NHI numbers and see how you can find yours.
- Review your learning from this course so far. Now would be a good time to:
- Check you have been keeping up to date with your own note-taking
- Organise your learning materials and resources so they are easy to access when you need them
- Find the answers to any questions that have arisen over the last five weeks. You could ask your tutor, discuss with a colleague, or do your own research.
- Review your time management and study planning for upcoming assessments.
Take a moment to pat yourself on the back. You’ve completed the learning for Introduction to Dispensing this week.

Continuing on with our learning on dose forms, we are going to spend some time now looking at liquid dose forms.
Liquid Dose Forms
The liquid dose forms we are going to be looking into are:
- suspensions
- syrups
- gargle
- lotions
- drops-eye, ear, nose, mouth
- nail lacquer.
The accessories used with liquid dose forms are:
- dose measurers
- syringe
- spoon
- conical measure.
Once more, you are going to use your searching skills to find the information you need to complete the following table.
Download the table to get started.
Here are some useful videos to help you:
- Watch: How To Use Eye Drops. AbrahamThePharmacist
- Watch: How to Use Ear Drops Properly. Apotex Inc., YouTube channel
Aerosol dose form
The aerosol dose form is the final dose form we are going to look at. The accessories used with aerosol dose forms are:
| Inhaler aids | 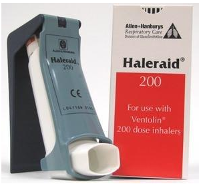 |
| Spacers |
|
Download the table.
Once more, we head back to our tables to help us structure our learning. You may like to check out the following videos from Abraham The Pharmacist, to help with this activity.
- Watch: How To Use Nasal Spray.
- Watch: How To Use A Spacer With Inhaler.
- Watch: How To Use A Turbohaler (Symbicort Pulmicort Bricanyl)
Inhalers
Let’s take a closer look at the two main types of inhalers.
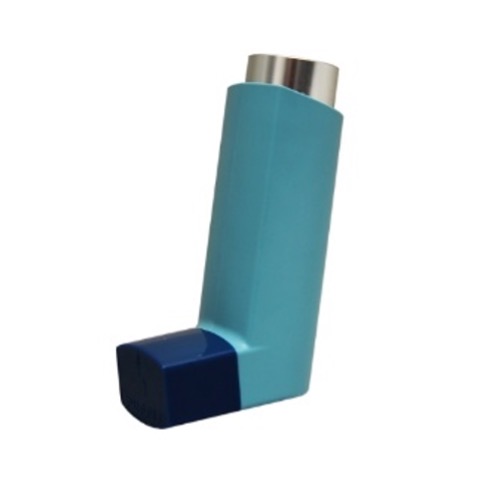
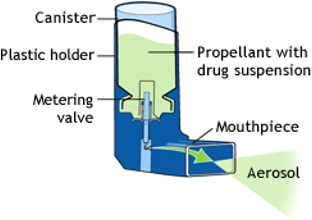
Metered Dose Inhalers
A small canister containing a propellant and the medication in a liquid form is housed inside a plastic device. When the canister is pushed down, a measured dose of the medication is aerosolised and sprays out of the mouthpiece. To deliver the medicine to the patient, they seal their mouth around the mouthpiece and breathe in at the same time as depressing the canister.
 |
 |
The advantages of MDI are that it:
- is quick-acting.
- works directly in the lungs and, therefore, has fewer side effects.
- delivers a precise and consistent dose of medication.
- is portable and easy to carry around.
The disadvantages of MDI are that:
- it requires good technique and coordination.
- it requires a certain level of hand strength that some people may not have.
- the propellant can cause irritation in the throat.
- it is not always easy to tell when empty, although some do have counters now.
Scenario
Instructions:
- Read the following scenario.
- Think your what you would say to the customer.
- Create a new note with the title: 'Inhalers' and save your response.

Consider this scenario:
You are working as a pharmacy technician at a busy community pharmacy when a customer walks in with a prescription for a Ventolin inhaler. The customer tells you it was prescribed for their asthma. They seem confused and ask you what the Ventolin does and how to take it properly. The customer explains that they have been experiencing shortness of breath and wheezing and that they have never used an inhaler before.
As the pharmacy technician, it is your responsibility to provide the customer with accurate information and advice on how to use their medication safely and effectively.
What advice and information will you provide for this customer, including storage and the use of accessories?
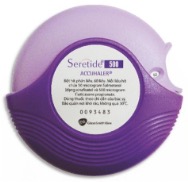
Breath Activated Devices (dry powder inhalers = DPIs)
A DPI is an inhaler that delivers a dose of medicine to the lungs during inhalation rather than via a propellant. DPIs are designed to be used only when the patient inhales, eliminating the need for the coordination required with MDIs that require the user to press a canister while simultaneously inhaling.
Examples of DPI’s are:
Doses of the medicine are preloaded in foil-covered blister packets inside the device. A dose is loaded by sliding a level until a click sound is heard. The device cap is opened to reveal the mouthpiece. Medication is released when the mouth is placed over the mouthpiece and a deep, forceful breath in is taken.
 |
 |
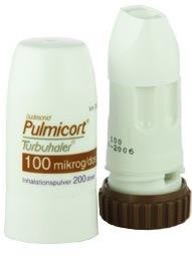
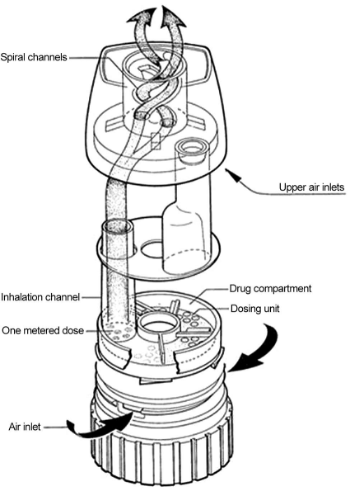
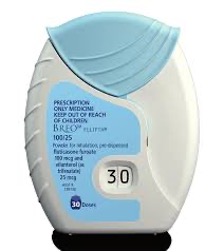
Doses of the medicine are preloaded in the device. The cap is removed, and the dose is loaded by twisting the base one clockwise and back again. A click sound will be heard. Medication is released when the mouth is sealed over the mouthpiece and a deep, forceful breath in is taken.
 |
 |
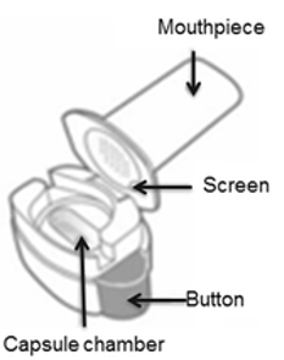
The cap is opened to reveal the mouthpiece, which is removed to open the capsule chamber. A capsule is then placed in the chamber, and the mouthpiece is replaced. The capsule is pierced by pushing a button. Medication is released when the mouth is sealed over the mouthpiece and a deep, forceful breath in is taken.
 |
|

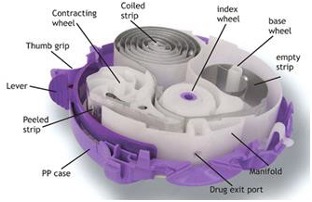
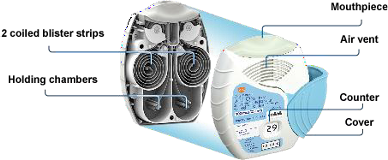
Doses of the medicine are preloaded in foil-covered blister strips inside the device. The cap is opened to reveal the mouthpiece. Lips are pressed around the mouthpiece without covering the air vents on either side. Medication is released when breathing in deeply and rapidly.
 |
 |
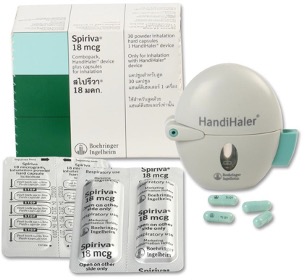
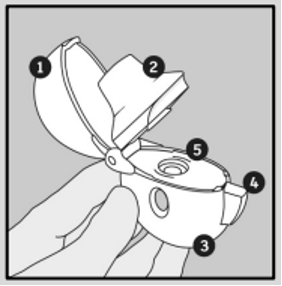
The cap is opened to reveal the mouthpiece. Pull back the mouthpiece to reveal a capsule chamber where a capsule is placed, and the mouthpiece clicks back into position. The capsule is pierced by pushing the two buttons on the sides of the device. The mouth is sealed around the mouthpiece, and medication is released when breathing in deeply and rapidly. While breathing in the capsule, it will make a vibrating sound.
 |
 |
The advantages of DPIs are that it:
- does not contain a propellant that could irritate the throat and is more environmentally friendly.
- does not require coordination of breathing in and pressing down.
- is portable and easy to carry.
- works directly on the lungs; therefore, there are fewer side effects.
- has a dose counter, so we know when it’s empty.
The disadvantages of DPIs are that it:
- is not suitable for young children.
- is not recommended for people who cannot breathe in strongly enough to inhale the powder.
- must be kept away from moisture.
Self-directed learning activities
To consolidate what we have been learning about routes of administration, dose forms, and customer advice, complete the following activity.
Instructions:
Complete the following four worksheets.
Worksheets:
Worksheet 1: Estradiol
Worksheet 2: Aspirin
Worksheet 3: Oestriol pessary
Worksheet 4: Paracatomol
Ka pai! You have completed this week's learning.