This 5-week programme comprises Course 12 – Advanced Menu Design and includes both theory and practical elements. The theory component is the base for your practical sessions and is to be submitted to Turnitin via the LMS as noted on your delivery plan.
This course is the culmination of your two years’ study for the Diploma in Cookery Level 5 with Internship, and your final kitchen service occasions should be positive experiences which demonstrate the knowledge, skill and work attitude you have developed over that time. Your final kitchen experience in this Diploma programme will be to serve a 3-course menu of your group’s devising, to invited guests in the campus restaurant.
You will have 3 opportunities to practice, develop, and improve your dishes before the final occasion. You will receive feedback and recommendations from your tutor, other students and other stakeholders during this development phase which should help you to refine your menus.
Your menus should be developed with your customer in mind. Your tutor will advise the type of customer to cater for, their requirements and the restaurant environment you are designing the menu for. Menus developed should show a high level of technical skill as well as seasonal awareness, a good balance of ingredients, flavours and textures and visually appealing presentation, but must also be designed to be achievable in a busy and stressful service environment.
The assessment is in 2 parts – the first part is a written submission (tasks 1-5) explaining the customer base, menu choices and justifying dishes, standard recipe cards, costings and a menu are also submitted. The second part of the assessment is based on the practical sessions, working as part of a team to prepare, cook and serve a 3-course menu, improving the menu through feedback and recording self-reflection journals.
Your tutor will establish groups of no more than 12 members. Your tutor may also offer assistance in choosing a capable sous-chef to lead each group since this is such a key role.
Exercise 1: Group Responsibilities
In your groups, discuss and complete (online or face to face) the Group Responsibility form outlining how you will work together and the expectations you have for yourselves and your group colleagues. When completed, display the completed forms on the classroom wall or on the discussion forum as a reminder of your agreed commitments.
Group duties include, but are not limited to:
- Sous chef.
- Recipe research (all group members involved).
- Standard recipe writing and food costing (all group members).
- Plate food styling/design.
- Ingredient ordering.
- Mise en place lists/work plans (all group members).
- Menu card design.
- Menu card descriptions.

Access your Group Log 1 document.
A brief is an overall set of criteria setting the scene for a project and outlining the requirements. It defines the parameters for the task in some detail and can be considered an overall plan for what needs to be done.
Having a thorough understanding of the brief is an essential first step in the planning for an event. Knowing who your customers are, what their requirements and preferences are, and how you are going to give them a great experience is vital for a successful event and to ensure you start off in the right direction.
In this case, your final task will be to serve a 3 course meal to a group of customers. Your job in defining the brief will be to:
Explain what kind of restaurant and who you think your customers are going to be (the type of person and culinary expectations they have – are they casual/family style diners, professionals with good food knowledge and desire for high quality etc.)
Explain the kinds of dishes, ingredients and techniques which would appeal to your customers – think about the style of food, key food trends, seasonality etc. when defining the outline for your menu.
Explain any other important factors you will need to think about when planning this menu (e.g. how long will your customers have to sit and eat your menu, how many customers are you expecting to cater for, etc.)
In the first activity, you will discuss the event in your groups, but you will need to write your own version of the brief in your own words for submission.
Exercise 2 - The Brief
In your groups, discuss the brief you have been given and start to define your criteria for the occasion. Write some general notes on what you will need to consider in planning a menu for your customers – do not add too much detail at this stage. Use the prompt questions as a starting point, but add other details you think are relevant too.
- Customers – who are they and what do they expect?
- Ingredient and technique considerations to think about.
- What other factors are important to consider in planning this menu? .
Self-Directed Learning
Write your own version of the key points required for Task 1 based on the group discussions for the framework of the group menu. Your writing must be authentic.
- Find images designed to be inspirational for the type of cuisine for the brief – e.g. upmarket bistro, fine dining etc. Share these images on your group’s page, explaining what you do and don’t like about each
- Research ideas for menus suitable for the brief in preparation for tomorrow’s group discussion.
Before brainstorming ideas for suitable ingredients and dishes appropriate to the given customer type and occasion, it is a good idea to recap some of the key principles of menu planning and the key concepts studied in the entire course – identifying trends, running an efficient and minimal waste kitchen.
Exercise – 3 Menu Planning
In your groups, discuss and make notes on these key menu planning principles you will adopt in designing your menu:
- Cuisine style
- Food trends
- Ingredient choices
- Balance of ingredients
- Balance of colours, textures, flavours
- Balance of cooking methods
- Balance of heavy/rich vs light/refreshing
- Portion size
* consider in season, locally produced, sustainable sources etc.
It is important to keep your ideas realistic and achievable – you will be working a live service in a short time period so you need to keep in mind how the service will work.
Exercise – 4 Hero Ingredients
In your groups, start planning your menu.
In this first draft you should focus on choosing your “hero” ingredient for each course – the key ingredients around which you will design your dishes. Your choice should be consistent with your restaurant type, your customer type and identified food trends. To begin the process, choose at least 3 hero ingredients for each course, then work on choosing the best combination for a balanced menu.
Menus should consist of 3 courses with at least 2 options for each course. A vegetarian option could either be included as one of the options, or added to the starters and main course. An amuse-bouche may also be added, to be served to guests as they arrive and read the menu.
Remember your goal is to create a balanced menu appropriate to your restaurant type and customer type, with a set food cost budget and an acceptable menu price. These constraints should help you choose the hero ingredients to build your menu dishes around.
Access the Menu Planning Sheet (Hero) document.
Exercise 5 - Hero Ingredients II
Once your group has a rough draft of a balanced menu (with a total of at least 6 dishes, plus any vegetarian options), you should split into sections similar to a professional kitchen, i.e. starters, mains and desserts. Remember one of the group is the designated sous chef - involved with all sections.
Each individual should work on building an appealing dish that:
- Champions the hero ingredient(s).
- Conforms to restaurant type, customer type and food trends.
- Uses available and (preferably) mostly seasonal and local ingredients,
- Meets budget objectives for food cost of the dish.
- Provides potential for a visual appealing dish.
Note: Even though you have been allocated a particular recipe to work on you are not contained to only work on that dish. Groups should work together as much as possible to avoid duplication of some tasks and ensure fair allocation of work during prep day.
Self-Directed Learning
Draft Task 2 (individually) – explain the group’s menu choices. Continue with the research and planning for menu options, and research any specific recipes and techniques you want to include.
Access the Menu Planning Sheet (Description) document.
Exercise – 6 Finalise Menu
Finalise your menu options and write down your group’s first version of their menu.
Download the Draft Menu template document.
Exercise 7 - Recipe Card
Working on your own or in pairs, create a set of standard recipe cards for your complete dish. You need to create a separate standard recipe card (sub-recipe or component recipe) for each component part of a dish, as well as for the complete dish itself.
For example, the dish: Horopito Lamb Loin, Caramelised Onion Purée, Kumara Fondant, Madeira Jus and Glazed Baby Vegetables should have these fully costed sub-recipes:
- Caramelised onion purée.
- Kumara fondant.
- Madeira jus.
- Glazed baby vegetables.
- Complete dish: one portion of each of the four sub-recipes, plus the lamb loin making a total of 5 recipes needed for the dish
The reason for doing this is for flexibility in menu planning and simpler costing – some of these sub-recipes could form part of other dishes (e.g. madeira jus could be on multiple meat dishes, the glazed vegetables or kumara fondant could also be part of other dishes, and similarly with the onion purée). This process widens a restaurant’s repertoire of possible dishes whilst maintaining good cost/portion control and quality consistency.
Recipes should all be scaled to 10 portions and use the correct units of measure (recall resource for Delivery 1 on this topic) – use metric measurements where appropriate and avoid using cup measurements for non-liquid ingredients. You may need to weigh any recipe ingredients which are in cups to convert to g or ml.
Use the standard recipe template provided – your tutor will provide more copies as needed.
You will use these recipe cards in your kitchen classes, and amend and update them according to feedback received over the course of the practice and subsequent occasions. You should make notes and ingredient adjustments as you go along when prepping and cooking these dishes. You will also use the accurate ingredient quantities from your recipe cards when completing the costing part of this assessment.
Self-Directed Learning
- Complete final version of Tasks 1 and 2.
- Complete initial standard recipe cards for allocated recipes/components.
Access the Standard Recipe Card document.
Exercise 8 - Peer Feedback
In your groups, look at the draft menu created by the other group in your class and offer feedback based on good menu design principles and the brief given. Use the prompt questions to help offer constructive comments. Be specific and detailed in your comments.
- Do all menu items fit the given overall brief for the occasion and customer type?
- Does the menu show a good balance of ingredients?
- Does the menu show a good balance of colours, flavours and textures?
- Does the menu show an appropriate variety of cooking methods?
- Comment on the choice of key ingredients from a seasonality, sustainability and local-production point of view.
- What advice would you offer to improve this menu? (Be specific) .
Access the Draft Menu Peer Feedback document.
Exercise 9 - Ingredient Order Sheets
Use the required forms to create your initial ingredient order lists for the group (all dishes). Do not duplicate ingredients – if more than one recipe needs the same ingredient, add them all together to add once to the ingredient list. You need to separate ingredient orders into dry goods, meat/fish/dairy/eggs, produce and frozen.
The sous chef for each group should check over the order list and transfer the written list to the Excel spreadsheet to submit to tutor (email or Teams). You should rename the spreadsheet with your group name and occasion number (Occasion 0, Occasion 1, Occasion 2 or Occasion 3).
Note: quantities must be adjusted according to the number of portions to be presented for each occasion. Before re-ordering ingredients, each group is responsible for conducting a stocktake to avoid unnecessary purchasing. Use the stocktake sheet provided for this.
Access the Ingredient Order List documents.
Occasion 0 is a practice for your first recipe drafts and you will have one prep day followed by a cook/presentation day. After this practice you can change or amend recipes as necessary to improve the dish.
Exercise 10 - Workplan
Use the workplan template to list key tasks for your preparation day and for presentation day.
Remember, a workplan is necessary to make sure all prep tasks are completed and in the correct order. Workplans should not be detailed, as all the necessary detail is in the recipe, but rather used as a list of jobs to be done and the order/timing needed for them.
Sous chef – complete an overall mise en place list for the menu covering all dishes to be made. Use this to ensure all mise en place tasks are completed in time for service and allocate tasks to group members.
Self-Directed Learning
Formative - Checkpoint 1 – Tasks 1 and 2 due.
Complete submission of Checkpoint 1 - fully explained task 1 and task 2.
(Note: even though the planning is group work, the assessment must be individual and in your own words.)
Complete and print out recipe cards and workplan if not already done.
Access the Work Plan 1 and Work Plan 2.
With your tutor’s assistance, find wholesale ingredient prices for all ingredients and use these to calculate the cost per portion for each sub-recipe and for each complete dish. Calculate ingredient costs and recipe totals to 2 decimal places.
When all dish sub-recipes have been calculated, create a costing sheet for the entire dish, using the cost-per-portion of each sub-recipe as an ingredient.
If possible, use pricing from the campus suppliers, otherwise, use online resources to find reasonable wholesale ingredient prices e.g. https://orders.kaans.co.nz
As a last resort, use supermarket prices as a base figure and correct for GST and 30% supermarket margin by dividing the supermarket price by 1.5 to give an approximation of wholesale price.
Access the Standard Recipe Costing Sheet.
Your tutor will provide extra copies of recipe sheets if needed.
Example:
Horopito Lamb Loin, Caramelised Onion Purée, Kumara Fondant, Madeira Jus and Glazed Baby Vegetables.
Sub-recipe components (separate recipes). (cost per portion example only)
- Caramelised onion purée, cost per kg calculated $4.56
- Kumara fondant, cost per portion $0.56
- Madeira jus, cost per litre calculated $13.68
- Glazed baby vegetables, cost per portion calculated $0.89
Then create a complete costing recipe, adding the lamb loin:
|
Dish |
Horopito Lamb Loin, Caramelised Onion Purée, Kumara Fondant, Madeira Jus and Glazed Baby Vegetables |
||||||
|---|---|---|---|---|---|---|---|
|
Yield: |
10 |
||||||
| Ingredient | Qty. required | UoM | Purchase Cost | Purchase UoM | UoM Conversion | Ingredient Cost | |
| Lamb Loin | 1.6 | kg | $39.00 | kg | 1 | $62.40 | |
| Caramelised Onion Purée (Separate recipe) | 300 | g | $4.56 | kg | |||
Common food plating guidelines
The Rule of Odds
As noted above, this is more of a guideline than a rule which must be obeyed. It is probably one you have already heard of in your time working in kitchens and in training kitchens and is as applicable to plating food as it is to art and photography. This “rule” states that when you have several of the same item to arrange on a plate, an odd number will be more visually pleasing than an even number. There is a good psychological reason why this is so – our brain is wired to recognise and compare groups of even numbers to understand a scene, and this results in a balanced but static image. The goal of a well-styled plate of food or a good photograph is to engage the diner/viewer and keep them looking at the dish or photo for as long as possible. Groups of odd numbered items keep the eye moving around the plate/image, trying to sort it and decide what the focus is. This technique is most effective with groups of three, five or seven - groups of more than seven become too large and the brain does not try to resolve it. (Allan, 2021)
The Clock Face
A common way of plating a traditional type of dish (main protein, starch, vegetable garnish) is to consider the plate as a clock face. This style has been around for decades – it is simple but effective and still popular today. This guide suggests positioning the hero item (usually the meat/fish or main protein item) somewhere between 3 o’clock and 9 o’clock on the plate, with the starch item positioned between 9 o’clock and 12 o’clock and the vegetables between 12 o’clock and 3 o’clock.
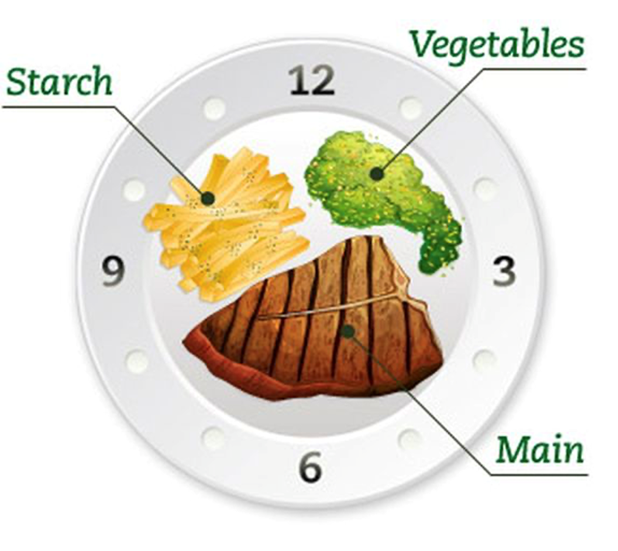
(Clock-Face Plating, n.d.)
Colours
In the next section we will look at some simple colour theory for creating appealing styled food scenes. Use of colour is important and needs to be balanced and harmonious. Avoid using too many different colours but add splashes of appropriate colour where they are effective and work well together. Another interesting technique is to use several tones of one predominant colour (monochromatic), which is a subtle way to emphasise the shapes and textures of the ingredients.
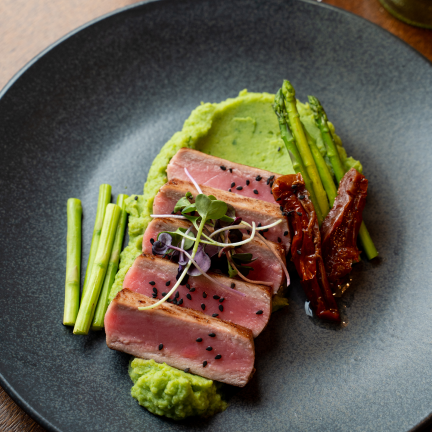
(Colourful Food Plating, n.d.)
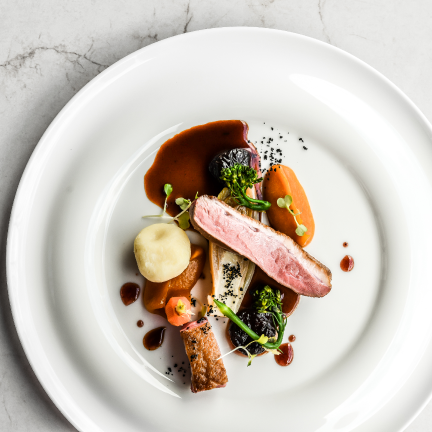
This image shows use of colours: red/green = complementary and red/yellow = analogous and also shows the rule of odds with 3 each of the purées.
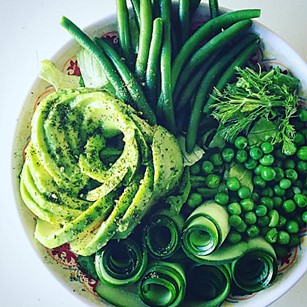
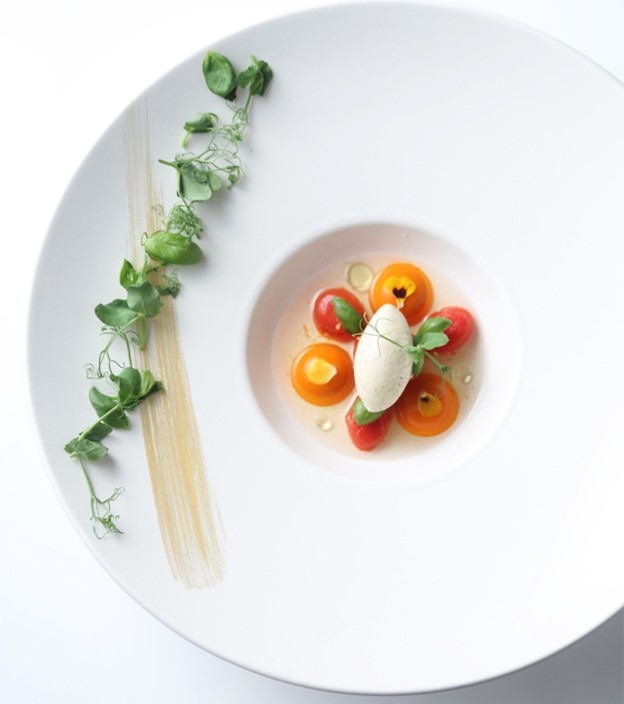
(Monochromatic Food Plating, n.d)
A variety of tones of green emphasises the shapes, patterns and textures without any distraction from other colours.
Lines and Patterns
Purées and sauces can be plated in lines and swipes or in circular patterns or in dots to create visual interest and draw focus to the key ingredient.
The Unilever website has some useful guides and videos for plating styles. You will need to create a free account to view some of the short videos.
Read this guide to plating styles for more information.
Texture
Texture in food describes how we perceive food through touch – with fingers, tongue, palate or teeth. Food textures can be described in many ways, and the texture is often an important part of a dish description on a menu. Some common words used to describe food texture include: crisp, crunchy, tender, creamy, hard, firm, soft, silky, smooth, chewy etc. Use of contrasting textures creates interest in a dish, not only in the eating, but also visually. A dish with no contrasting textures - for example a purée soup - soon becomes boring to eat as there is no variety for the palate to enjoy, or for the eyes to explore.

Height and layers
As with textures, the use of elements with different heights in a dish can also create visual interest and emphasise the main focus of the plate. Some dishes are naturally suited to being built up in layers to create height – burgers, sandwiches, layered cakes etc. are examples of this.
Self-Directed Learning
- Complete plate design sketches using the template on the following page
- Watch YouTube videos on plating techniques.
Watch this video on choosing plateware:
Plate Design Sketches
Use the plate design sketch template to sketch how you see your dish being arranged on the plate. To download the Plate Design Sketch template click here.
Practical Cooking Occasions:
- Occasion 0: Initial practice and initial recipe testing – 4 portions with tutor and peer feedback collected.
- Occasion 1: First trial – minimum 12 portions with feedback required and OneNote self-reflection journal.
- Occasion 2: Second trial – minimum 12 portions with feedback required and OneNote self-reflection journal.
- Occasion 3: Final service (lunch or dinner) – minimum 20 covers, OneNote self-reflection journal required and customer feedback collected.